3.2 添加边框
示例代码
python
import openpyxl
from openpyxl.styles import Border, Side
# 1️⃣ 创建 Excel 工作簿
wb = openpyxl.Workbook()
sheet = wb.active
sheet.title = "球员信息"
# 2️⃣ 定义边框样式(细线边框)
thin_border = Border(
left=Side(style="thin"),
right=Side(style="thin"),
top=Side(style="thin"),
bottom=Side(style="thin"),
)
# 3️⃣ 写入数据
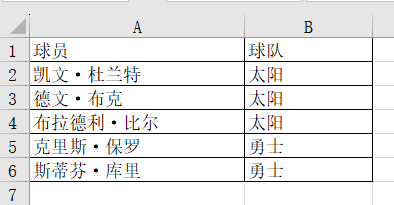
data = [
["球员", "球队"],
["凯文·杜兰特", "太阳"],
["德文·布克", "太阳"],
["布拉德利·比尔", "太阳"],
["克里斯·保罗", "勇士"],
["斯蒂芬·库里", "勇士"]
]
for row_idx, row in enumerate(data, start=1): # 从 Excel 第 1 行开始
for col_idx, value in enumerate(row, start=1): # 从 Excel 第 1 列开始
cell = sheet.cell(row=row_idx, column=col_idx, value=value)
cell.border = thin_border # 应用边框
# 4️⃣ 保存文件
wb.save("suns.xlsx")
wb.close()实现效果
你可以更改 Side(style="thin") 来调整边框:
- 细线 :
Side(style="thin") - 粗线 :
Side(style="thick") - 虚线 :
Side(style="dashed") - 点线 :
Side(style="dotted") - 双线 :
Side(style="double")
3.3 设置背景颜色
示例代码
python
import openpyxl
from openpyxl.styles import PatternFill, Border, Side, Font
# 1️⃣ 创建 Excel 工作簿
wb = openpyxl.Workbook()
sheet = wb.active
sheet.title = "球员信息"
# 2️⃣ 定义边框样式(细线边框)
thin_border = Border(
left=Side(style="thin"),
right=Side(style="thin"),
top=Side(style="thin"),
bottom=Side(style="thin"),
)
# 3️⃣ 定义填充颜色 & 字体样式
header_fill = PatternFill(fill_type="solid", fgColor="ffffff") # 浅灰色(表头)
suns_fill = PatternFill(fill_type="solid", fgColor="FF8C00") # 深橙色(太阳队)
warriors_fill = PatternFill(fill_type="solid", fgColor="00008B") # 深蓝色(勇士队)
default_fill = PatternFill(fill_type="solid", fgColor="333333") # 深灰色(其他球队)
# **字体样式**
header_font = Font(color="000000", bold=True) # **表头字体:黑色 + 加粗**
white_font = Font(color="FFFFFF", bold=True) # **数据字体:白色 + 加粗**
# 4️⃣ 写入数据
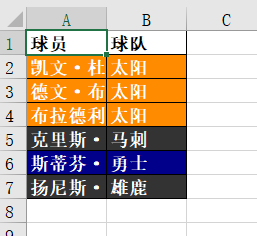
data = [
["球员", "球队"], # 表头
["凯文·杜兰特", "太阳"],
["德文·布克", "太阳"],
["布拉德利·比尔", "太阳"],
["克里斯·保罗", "马刺"],
["斯蒂芬·库里", "勇士"],
["扬尼斯·阿德托昆博", "雄鹿"]
]
for row_idx, row in enumerate(data, start=1): # 从 Excel 第 1 行开始
# 5️⃣ 确定整行颜色
if row_idx == 1:
row_fill = header_fill # **表头 浅灰色**
row_font = header_font # **表头字体 黑色**
elif row[1] == "太阳":
row_fill = suns_fill # **太阳队 深橙色**
row_font = white_font # **白色字体**
elif row[1] == "勇士":
row_fill = warriors_fill # **勇士队 深蓝色**
row_font = white_font # **白色字体**
else:
row_fill = default_fill # **其他队伍 深灰色**
row_font = white_font # **白色字体**
for col_idx, value in enumerate(row, start=1): # 从 Excel 第 1 列开始
cell = sheet.cell(row=row_idx, column=col_idx, value=value)
cell.border = thin_border # 应用边框
cell.fill = row_fill # 应用整行背景色
cell.font = row_font # 应用字体颜色
# 6️⃣ 保存文件
wb.save("nba_teams_header_black.xlsx")
wb.close()实现效果
颜色自定义
- 表头背景色 可调整
header_fill = PatternFill(fill_type="solid", fgColor="XXXXXX") - 表头字体颜色
header_font = Font(color="000000", bold=True)(000000为黑色) - 数据字体颜色
white_font = Font(color="FFFFFF", bold=True)(FFFFFF为白色)