目录
注解:
什么是注解
Java中注解(Annotation),又称Java标注,是一种特殊的注释;
可以添加在包,类,成员变量,方法,参数等内容上面;
注解会随同代码编译到字节码文件中;
在运行中,可以通过反射机制获取到类中注解,然后根据不同的注解进行相应发解析。
内置注解
Java 语言中已经定义好的注解
@Override - 检查该方法是否是重写方法。如果发现其父类,或者是引用的接 口中并没有该方法时,会报编译错误。
@Deprecated - 标记过时方法。如果使用该方法,会报编译警告。
@SuppressWarnings - 指示编译器去忽略注解中声明的警告。
@FunctionalInterface 用于指示被修饰的接口是函数式接口。
元注解
注解的注解
用来定义其他注解的注解
@Target(ElementType.METHOD) 标注此注解可以作用在哪些内容上@Target(ElementType.METHOD,ElementType.TYPE)
@Retention(RetentionPolicy.SOURCE) 在编译期间有用的,可以不编译到字节码中@Retention(RetentionPolicy.RUNTIME) 在运行时有用的,编译到字节码文件开头
自定义注解
如何定义一个注解
java
import java.lang.annotation.ElementType;
import java.lang.annotation.Retention;
import java.lang.annotation.RetentionPolicy;
import java.lang.annotation.Target;

@Target(ElementType.FIELD)
@Retention(RetentionPolicy.RUNTIME)
public @interface NotNull {

	String message() default "";
	int minlength() default 0;
	String lengthmessage() default "";
}
如何使用注解
java
public class User {

	private int num;

	@NotNull(message="姓名不能为空",minlength=3,lengthmessage="长度不能小于3")
	private String name;

	public String getName() {
		return name;
	}

	public void setName(String name) {
		this.name = name;
	}

	public int getNum() {
		return num;
	}

	public void setNum(int num) {
		this.num = num;
	}

}
如何解析注解
java
package com.ffyc.javaPro.javaDemo.javaAnnotation;

import java.lang.reflect.Field;
import java.lang.reflect.Method;

public class Test {

	  public static void main(String[] args) throws NoSuchMethodException, SecurityException, Exception {
		  User user = new User();
		  user.setName("jim");

		  //通过反射解析User类中注解
		  Field[] fields = user.getClass().getDeclaredFields();//拿到类中所有的成员变量 连同私有的也可以获取
		  //循环所有的属性
		  for (Field field : fields) {
	            NotNull notNull = field.getAnnotation(NotNull.class);//获取属性上面 名字为NotNull注解
	            if (notNull != null) {
					//通过属性,生成对应的get方法
	                Method m = user.getClass().getMethod("get" + getMethodName(field.getName()));
					//调用方法  obj就是get方法的返回值
	                Object obj=m.invoke(user);
	                if (obj==null) {
	                    System.err.println(field.getName() +notNull.message());
	                    throw new NullPointerException(notNull.message());
	                }else{
	                	if(String.valueOf(obj).length()<(notNull.minlength())){
	                		 System.err.println(field.getName() +notNull.lengthmessage());
							throw new NullPointerException(notNull.lengthmessage());
	                	}
	                }
	            }
	        }
	   }

		/**
		 * 把一个字符串的第一个字母大写
		 */
	    private static String getMethodName(String fildeName) throws Exception {
	        byte[] items = fildeName.getBytes();
	        items[0] = (byte) ((char) items[0] - 'a' + 'A');
	        return new String(items);
	    }
}


对象克隆
在已有的对象基础上克隆出一个新的对象,并且将已有对象中的属性值复制到新克隆出来的对象中。
为什么要克隆
经常在项目开发中,各层数据传输时,需要将一层中数据,封装到另一对象中去。
Java中实现基本的对象克隆
java
public class Person {

     int num;
     String name;


    public Person() {
    }

    public Person(int num, String name) {
        this.num = num;
        this.name = name;
    }

    public int getNum() {
        return num;
    }

    public void setNum(int num) {
        this.num = num;
    }

    public String getName() {
        return name;
    }

    public void setName(String name) {
        this.name = name;
    }

    @Override
    public String toString() {
        return "Person{" +
                "num=" + num +
                ", name='" + name + '\'' +
                '}';
    }
}
java
public class Test {

    public static void main(String[] args) {

        Person p1 = new Person(100,"jim");
        Person p2 = p1; //这种不是对象克隆,只是把对象地址重新赋值了一次

        System.out.println(p1==p2);//true
    }
}
实现Cloneable接口后并重写Object.clone()
java
package com.ffyc.javaPro.javaDemo.objectClone.demo1;

public class Person implements  Cloneable{

     int num;
     String name;

    public Person() {
    }

    public Person(int num, String name) {
        this.num = num;
        this.name = name;
    }

    public int getNum() {
        return num;
    }

    public void setNum(int num) {
        this.num = num;
    }

    public String getName() {
        return name;
    }

    public void setName(String name) {
        this.name = name;
    }

    @Override
    protected Person clone() throws CloneNotSupportedException {
        Person person = (Person)super.clone();
        return person;
    }

    @Override
    public String toString() {
        return "Person{" +
                "num=" + num +
                ", name='" + name + '\'' +
                '}';
    }
}
java
package com.ffyc.javaPro.javaDemo.objectClone.demo1;

public class Test {

    public static void main(String[] args) throws CloneNotSupportedException {

        Person p1 = new Person(100,"jim");
        Person p2 =  p1.clone(); //克隆一个新的对象

        System.out.println(p1==p2);//false

    }
}
浅克隆和深克隆
1、浅克隆
对于基本类型,在对象克隆时,可以将值直接复制到新对象中。
int a = 10;
int b = a;
b = 20;
java
package com.ffyc.javaPro.javaDemo.objectClone.demo2;

public class Address  {

    String  address;

    public String getAddress() {
        return address;
    }

    public void setAddress(String address) {
        this.address = address;
    }

    @Override
    public String toString() {
        return "Address{" +
                "address='" + address + '\'' +
                '}';
    }
}
java
package com.ffyc.javaPro.javaDemo.objectClone.demo2;

public class Person implements  Cloneable{

    int num;
    String name;
    Address address;

    public Person() {
    }

    public Person(int num, String name) {
        this.num = num;
        this.name = name;
    }

    public int getNum() {
        return num;
    }

    public void setNum(int num) {
        this.num = num;
    }

    public String getName() {
        return name;
    }

    public void setName(String name) {
        this.name = name;
    }

    public Address getAddress() {
        return address;
    }

    public void setAddress(Address address) {
        this.address = address;
    }

    @Override
    protected Person clone() throws CloneNotSupportedException {
        Person person = (Person)super.clone();
        return person;
    }

    @Override
    public String toString() {
        return "Person{" +
                "num=" + num +
                ", name='" + name + '\'' +
                ", address=" + address +
                '}';
    }
}
java
package com.ffyc.javaPro.javaDemo.objectClone.demo2;
public class Test {
public static void main(String[] args) throws CloneNotSupportedException {
Address address = new Address();
address.setAddress("汉中");
Person p1 = new Person(100,"jim");
p1.setAddress(address);
Person p2 =p1.clone();
p2.setName("tom");
address.setAddress("西安");
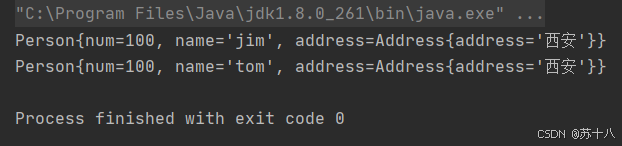
System.out.println(p1);//Person{num=100, name='jim', address=Address{address='西安'}}
System.out.println(p2);//Person{num=100, name='tom', address=Address{address='西安'}} 属于浅克隆,address对象只复制他的地址
}
}
浅克隆主要在于对象中关联的另一个对象是否能被克隆出一个新的对象;
如果克隆时,只是将关联对象的地址进行复制,那么就属于浅克隆;
如果克隆时,将关联的对象,也一同克隆出了一个新的对象,那么就属于深克隆。
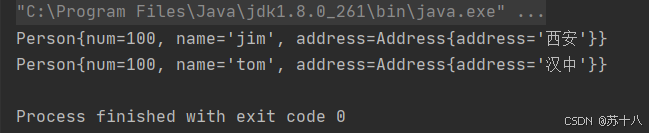
2、深克隆
方式1:在克隆对象时,将我们对象中关联的对象也一同进行克隆;虽然能实现,但是要逐级进行克隆,层级较多时,比较麻烦。
java
package com.ffyc.javaPro.javaDemo.objectClone.demo3;

public class Address  implements Cloneable{

    String  address;

    public String getAddress() {
        return address;
    }

    public void setAddress(String address) {
        this.address = address;
    }

    @Override
    public String toString() {
        return "Address{" +
                "address='" + address + '\'' +
                '}';
    }

    @Override
    protected Address clone() throws CloneNotSupportedException {
        return (Address)super.clone();
    }
}
java
package com.ffyc.javaPro.javaDemo.objectClone.demo3;

public class Person implements  Cloneable{

    int num;
    String name;
    Address address;

    public Person() {
    }

    public Person(int num, String name) {
        this.num = num;
        this.name = name;
    }

    public int getNum() {
        return num;
    }

    public void setNum(int num) {
        this.num = num;
    }

    public String getName() {
        return name;
    }

    public void setName(String name) {
        this.name = name;
    }

    public Address getAddress() {
        return address;
    }

    public void setAddress(Address address) {
        this.address = address;
    }

    @Override
    protected Person clone() throws CloneNotSupportedException {
        Person person = (Person)super.clone();
        person.address = (Address)person.address.clone();   //深度复制  联同person中关联的对象也一同克隆.
        return person;
    }

    @Override
    public String toString() {
        return "Person{" +
                "num=" + num +
                ", name='" + name + '\'' +
                ", address=" + address +
                '}';
    }
}
java
package com.ffyc.javaPro.javaDemo.objectClone.demo3;


public class Test {

    public static void main(String[] args) throws CloneNotSupportedException {

        Address address = new Address();
                address.setAddress("汉中");

        Person p1 = new Person(100,"jim");
               p1.setAddress(address);

        Person p2 =p1.clone();
               p2.setName("tom");
               address.setAddress("西安");

        System.out.println(p1);
        System.out.println(p2);
    }
}
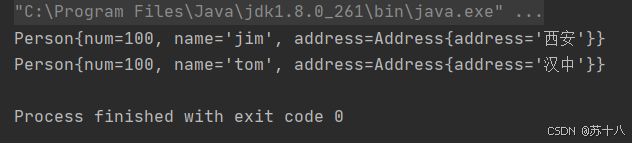
方式2:使用对象序列化,反序列化;需要我们自己定义一个克隆方法,先将对象进行序列化,然后进行反序列化,自动将多级关联的对象也一并重新创建,使用起来比较方便,注意需要序列化的类,必须实现Serializable接口。
java
package com.ffyc.javaPro.javaDemo.objectClone.demo4;

import java.io.Serializable;

public class Address  implements Serializable {

    String  address;

    public String getAddress() {
        return address;
    }

    public void setAddress(String address) {
        this.address = address;
    }

    @Override
    public String toString() {
        return "Address{" +
                "address='" + address + '\'' +
                '}';
    }

}
java
import java.io.*;

public class Person implements Serializable {

    int num;
    String name;
    Address address;

    public Person() {
    }

    public Person(int num, String name) {
        this.num = num;
        this.name = name;
    }

    public int getNum() {
        return num;
    }

    public void setNum(int num) {
        this.num = num;
    }

    public String getName() {
        return name;
    }

    public void setName(String name) {
        this.name = name;
    }

    public Address getAddress() {
        return address;
    }

    public void setAddress(Address address) {
        this.address = address;
    }

    /**
     * 自定义克隆方法
     * @return
     */
    public Person myclone() {
            Person person = null;
              try { // 将该对象序列化成流,因为写在流里的是对象的一个拷贝,而原对象仍然存在于JVM里面。所以利用这个特性可以实现对象的深拷贝
                     ByteArrayOutputStream baos = new ByteArrayOutputStream();
                     ObjectOutputStream oos = new ObjectOutputStream(baos);
                     oos.writeObject(this);
                     // 将流序列化成对象
                     ByteArrayInputStream bais = new ByteArrayInputStream(baos.toByteArray());
                     ObjectInputStream ois = new ObjectInputStream(bais);
                     person = (Person) ois.readObject();
                  } catch (IOException e) {
                     e.printStackTrace();
                  } catch (ClassNotFoundException e) {
                     e.printStackTrace();
                 }
             return person;
          }


    @Override
    public String toString() {
        return "Person{" +
                "num=" + num +
                ", name='" + name + '\'' +
                ", address=" + address +
                '}';
    }
}
java
public class Test {

    public static void main(String[] args) throws CloneNotSupportedException {

        Address address = new Address();
                address.setAddress("汉中");

        Person p1 = new  Person(100,"jim");
        p1.setAddress(address);

        Person p2 =p1.myclone();
               p2.setName("tom");
               address.setAddress("西安");

        System.out.println(p1);
        System.out.println(p2);
    }
}
Java设计模式
设计模式产生背景
设计模式概念首先起源于建筑领域。
1990在软件领域特诞生设计模式概念;
直到1995年,艾瑞克·伽马(ErichGamma)、理査德·海尔姆 (Richard Helm)、拉尔夫·约翰森(Ralph Johnson)、约翰·威利斯迪斯(JohnVlissides)等 4 位作者合作出版了《设计模式:可复用面向对象软件的基础》 一书,在此书中收录了 23 个设计模式。
什么是设计模式
在长期编程的过程中,针对某一类问题经过反复的优化,最终总结出一个固定的解决方案,这些方案经过反复的使用,具有普遍性。
为什么要学习设计模式
学习设计模式就是学习好的编程思想,学习前辈们的经验。
1、可以提高程序员的思维能力、编程能力和设计能力。
2、使程序设计更加标准化、使软件开发效率大大提高。
3、使设计的代码可重用性高、可扩展性提高。
4、能够更好的去理解源码架构
建模语言
统一建模语言(Unified Modeling Language,UML)是一种用于软件系 统分析和设计的语言工具
用图形化的方式来实现类与类,类和接口接口和接口之间的关系,一般把图形化方式也称为UML类图。
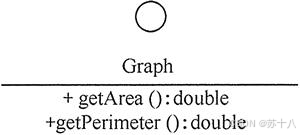
类图中两个基本要素:
1、类

2、接口
类之间的关系
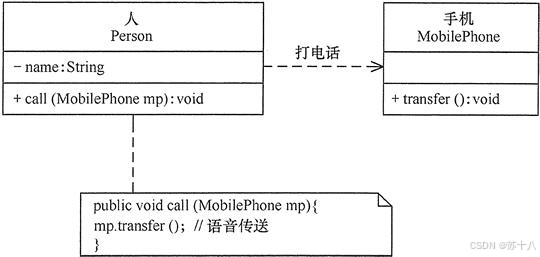
1、依赖关系
在一个类中的方法,把另一个类作为参数进行了使用,具有临时性
方法执行结束后,依赖关系就不存在了
一般把***类用到了***类,这种关系称为依赖关系,也称为user - a关系
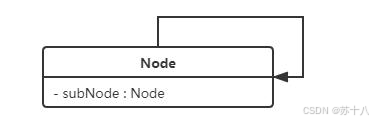
2、关联关系
在一个类中把另一个类当作自己的成员
单向关联

双向关联
自关联
一对多,多对多关联
关联关系根据强弱又分为聚合和组合
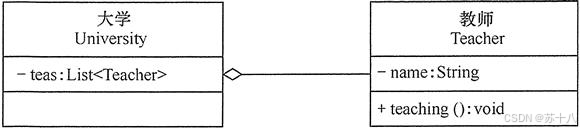
3、聚合关系
也是一种关联关系,是一种整体和部分的关系
学校包含老师,学校即使不存在了,但是教室可以脱离学校独立的存在
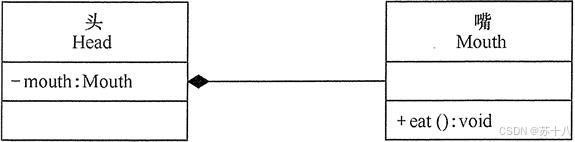
4、组合关系
是一种更强烈的关联关系
头和嘴的关系,头不存在,那么嘴也会销毁
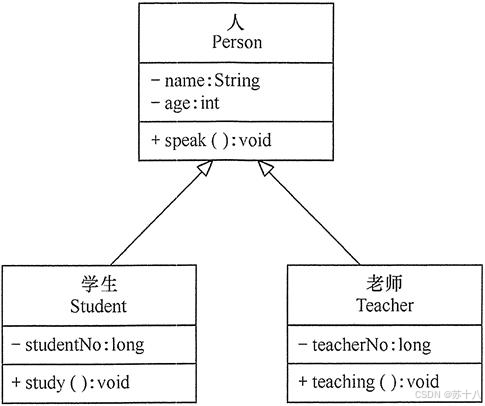
5、继承关系
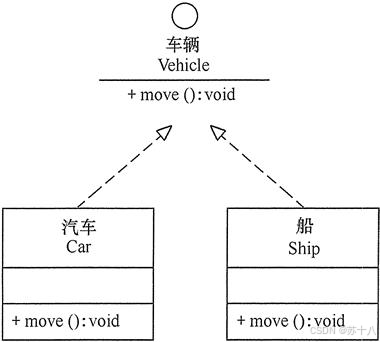
6、实现关系
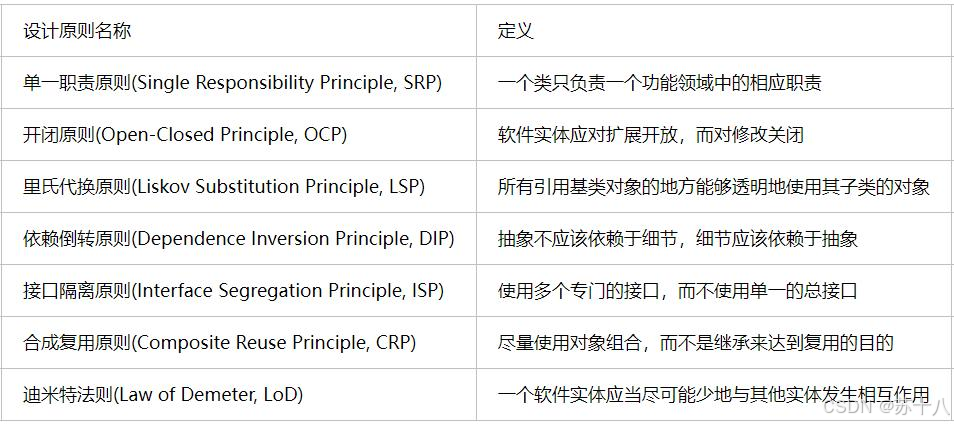
面向对象设计原则
单一职责
一个类只负责某一个具体功能,细化类的粒度。
java
package com.ffyc.javaPro.javaDemo.tenet.tenet1.demo1;

public class UserInfo {

      private int id;
      private String userName;
      private String gender;
      private String phone;
      private String province;//地址相关
      private String city;//地址相关
      private String county;//地址相关
      private String detailAddress;//地址相关
}
java
package com.ffyc.javaPro.javaDemo.tenet.tenet1.demo2;

import java.util.List;

public class UserInfo {

    private int id;
    private String userName;
    private String gender;
    private String phone;
    private List<Address> addressList;
}
java
package com.ffyc.javaPro.javaDemo.tenet.tenet1.demo2;

public class Address {

    private String province;//地址相关
    private String city;//地址相关
    private String county;//地址相关
    private String detailAddress;//地址相关
}
开闭原则
对修改关闭,对扩展开放
尽可能的在扩展功能时,不要修改已有的代码,尽可能的扩展一个新的类来实现新功能。
java
package com.ffyc.javaPro.javaDemo.tenet.tenet2.demo1;
/*
  开闭原则引入案例
 */
public class CarDemo {

    public static void main(String[] args) {
        CarFactory carFactory = new CarFactory();
            carFactory.createCar(1);
            carFactory.createCar(2);
            carFactory.createCar(3);
    }
}

//汽车工厂
class CarFactory{

    public void createCar(int type){
          if(type==1){
              System.out.println("造宝马汽车"+new Car("宝马汽车"));
          }else if(type==2){
              System.out.println("造奥迪汽车"+new Car("奥迪汽车"));
          }else if(type==3){
              System.out.println("造大众汽车"+new Car("大众汽车"));
          }
    }
}

class Car{

    String name;

    public Car(String name) {
        this.name = name;
    }
}
java
package com.ffyc.javaPro.javaDemo.tenet.tenet2.demo2;

/*
开闭原则案例
 */
class CarDemo{

    public static void main(String[] args) {

      Car bmw  =  new BMWCarFactory().createCar();
      Car aodi  = new AodiCarFactory().createCar();

    }
}

//抽象工厂
abstract class CarFactory{
    abstract  Car createCar();
}

class BMWCarFactory extends CarFactory{

    @Override
    Car createCar() {
        return new BMW("宝马汽车");
    }

}
class AodiCarFactory extends CarFactory{

    @Override
    Car createCar() {
        return new Aodi("奥迪汽车");
    }

}

//抽象汽车
abstract  class Car{
    String name;
}

class BMW extends Car{

    public BMW(String name) {
        this.name = name;
    }
}

class Aodi extends Car{
    public Aodi(String name) {
        this.name = name;
    }
}
里氏替换原则
继承的优势:
提高代码复用性,子类继承父类的功能;
提高代码扩展性,子类还可以扩展自己的功能,不影响其他类,重写父类的方法。
继承的劣势:
使得类的体系结果变得复杂。
java
package com.ffyc.javaPro.javaDemo.tenet.tenet3.demo1;

/*
  里氏替换原则演示案例
  计算器父类
*/

class Calculator {
        //加法
        public int add(int a,int b){
            return a+b;
        }
}

/*
超级计算器子类
*/
class SuperCalculator extends Calculator{

   //重写了父类加法
    @Override
    public int add(int a, int b) {
        return a+b-5;
    }
}

public class CalculatorDemo{

    public static void main(String[] args) {

        Calculator p = new Calculator();
        SuperCalculator c = new SuperCalculator();
        int r1 =  p.add(10,5);
        System.out.println("r1="+r1);//15
        int r2 =  c.add(10,5);
        System.out.println("r2="+r2);//10
    }
}
里氏替换:
首先由里斯科夫女士提出的,其次是关于继承使用的。
当子类继承了父类后,在使用时,用子类替换父类后,要确保父类中的功能不受影响。
主要的思想:
就是保证程序的稳定性。
java
package com.ffyc.javaPro.javaDemo.tenet.tenet3.demo2;

/*
  里氏替换原则演示案例
  计算器父类
*/

abstract  class Calculator {

    //加法  将被子类可能重写的方法定义抽象方法
    public abstract int add(int a,int b);
}

/*
超级计算器子类
*/
class SuperCalculator extends Calculator {

    //重写了父类加法
    @Override
    public int add(int a, int b) {
        return a+b-5;
    }
}

public class CalculatorDemo{

    public static void main(String[] args) {

        Calculator p = new SuperCalculator();
        SuperCalculator c = new SuperCalculator();
        int r1 =  p.add(10,5);
        System.out.println("r1="+r1);

    }
}
依赖倒置
面向对象编程,不要面向具体的实现编程。
具体实现应该依赖抽象层(多态 抽象层表示 具体的子实现类)
java
public class ComputerDemo{

    public static void main(String[] args) {
        IntelCPU intelCPU = new IntelCPU();
        IntelMemory intelMemory = new IntelMemory();

        Computer computer = new Computer(intelCPU, intelMemory);
        computer.startRun();
    }
}
/*
 计算机类
 */
 class Computer {

    private IntelCPU intelCPU;
    private IntelMemory intelMemory;

    public Computer(IntelCPU intelCPU, IntelMemory intelMemory) {
        this.intelCPU = intelCPU;
        this.intelMemory = intelMemory;
    }

    public void startRun(){
        intelCPU.calculator();
        intelMemory.storage();
    }
}

//英特尔CPU
class IntelCPU{

    public void calculator(){
        System.out.println("英特尔处理器运算");
    }
}
//英特尔内存
class IntelMemory{

    public void storage(){
        System.out.println("英特尔内存存储");
    }
}
java
public class ComputerDemo{

    public static void main(String[] args) {
        IntelCPU intelCPU = new IntelCPU();
        IntelMemory intelMemory = new IntelMemory();

        Computer computer = new Computer(intelCPU, intelMemory);
        computer.startRun();

        AmdCPU amdCpu = new AmdCPU();
        AmdMemory amdMemory = new AmdMemory();

        Computer computer1 = new Computer(amdCpu, amdMemory);
        computer1.startRun();
    }
}

/*
 计算机类
 */
 class Computer {

    private CPU cpu;
    private Memory memory;


    public Computer(CPU cpu, Memory memory) {
        this.cpu = cpu;
        this.memory = memory;
    }

    public void startRun(){
        cpu.calculator();
        memory.storage();
    }
}

//抽象cpu
interface CPU{
     void calculator();
}

interface Memory{
     void storage();
}

//英特尔CPU
class IntelCPU implements CPU{
    @Override
    public void calculator(){
        System.out.println("英特尔处理器运算");
    }
}

//AMDCPU
class AmdCPU implements CPU{
    @Override
    public void calculator() {
        System.out.println("AMD处理器运算");
    }
}

//英特尔内存
class IntelMemory implements Memory{
     @Override
    public void storage(){
        System.out.println("英特尔内存存储");
    }
}

//AMD内存
class AmdMemory implements  Memory{
    @Override
    public void storage() {
        System.out.println("Amd内存存储");
    }
}
接口隔离
不要把所有的功能定义到一个总的接口,应该把不同的种类发功能,定义在不同的接口中,让实现类,根据自己的需要,进行自行的选择。
迪米特原则
只跟朋友联系,不跟陌生人说话
在程序间相互调用时,如果两个类之间没有直接联系,但是想相互调用时,可以通过第三方软件进行,提高代码独立性。
java
public class DemeterDemo {

    public static void main(String[] args) {
        Star star = new Star("C罗");
        Fans fans = new Fans("李磊");
        Company company = new Company("皇家马德里");

        Agent agent = new Agent("门德斯",star,fans,company);
              agent.meeting();
              agent.business();
    }

}

//经纪人
class Agent{

    String name;
    Star star;
    Fans fans;
    Company company;

    public Agent(String name, Star star, Fans fans, Company company) {
        this.name = name;
        this.star = star;
        this.fans = fans;
        this.company = company;
    }
    //粉丝见面会
    public void meeting(){
         System.out.println("粉丝 "+ fans.name+"与明星 "+ star.name +"见面了");
     }
    //洽谈业务
     public void business(){
         System.out.println(company.name +" 公司 正在与 明星 "+star.name +" 洽谈业务");
     }
}

//明星
class Star{
    String  name;
    public Star(String name) {
        this.name = name;
    }
}

//粉丝
class Fans{
    String  name;
    public Fans(String name) {
        this.name = name;
    }
}

//公司
class Company{
    String  name;
    public Company(String name) {
        this.name = name;
    }
}
组合/聚合(关联关系)复用原则
继承使得类的体系变得复杂,如果我们只是想使用某个类的方法时,我们也可以优先选择关联关系/依赖关系,降低类与类之间的耦合度。
继承
java
/*
   组合/聚合复用原则案例1  使用继承实现复用
 */
public class A {

    public void method01() {    }

    public void method02() {    }
}


class B extends A {

    public void method() {    }

}

class Test {
    public static void main(String[] args) {
        new B().method01();
        new B().method02();
    }
}
关联关系
java
/*
   组合/聚合复用原则案例2  使用组合/聚合实现复用
 */
public class A {

      public void method01(){      }

      public void method02(){      }
}

class B{

     A a;

     public void setA(A a){
         this.a = a;
     }

     public void use(){
         a.method01();
         a.method02();
     }
}

class Test{
    public static void main(String[] args) {
         A a = new A();
         B b = new B();
         b.setA(a);
         b.use();
    }
}
依赖关系
java
/*
   组合/聚合复用原则案例3  使用依赖实现复用
 */
public class A {

      public void method01(){      }

      public void method02(){      }
}

class B{


     public void use(A a){
         a.method01();
         a.method02();
     }
}

class Test{
    public static void main(String[] args) {
         A a = new A();
         B b = new B();
         b.use(a);
    }
}
总结