在HarmonyOS NEXT开发中,组件状态管理是构建动态用户界面的核心。本文将深入探讨@State、@Prop、@Link和@ObjectLink这四种常见的状态管理装饰器,并通过示例代码进行对比分析,以帮助同学们更好地理解和选择合适的状态管理方式。
一、装饰器概述
-
@State:用于定义组件内部的状态变量,其变化会驱动UI的更新。@State装饰的变量与子组件中的@Prop装饰变量之间建立单向数据同步,与@Link、@ObjectLink装饰变量之间建立双向数据同步。
-
@Prop:用于父子组件间的单向数据传递。父组件的数据变化会同步到子组件,但子组件对@Prop修饰的变量进行修改不会影响父组件。
-
@Link:在父子组件间建立双向数据绑定,实现数据的同步更新。当子组件中的@Link装饰变量发生变化时,父组件中的对应数据也会相应更新。
-
@ObjectLink:用于处理嵌套类对象属性的变化。它允许对嵌套对象的属性进行修改,并且这些修改可以被观察到,从而实现数据的同步更新。
二、对比分析
1. 数据流向
-
@State:数据在组件内部流动,用于驱动组件自身的UI更新。
-
@Prop:数据从父组件流向子组件,实现单向数据传递。
-
@Link:数据在父子组件之间双向流动,实现数据的同步更新。
-
@ObjectLink:主要用于处理嵌套类对象的属性变化,数据在对象的嵌套结构中流动。
2. 数据同步方式
-
@State:与@Prop建立单向同步,与@Link、@ObjectLink建立双向同步。
-
@Prop:仅实现父子组件间的单向数据同步,子组件修改不会影响父组件。
-
@Link:实现父子组件间的双向数据绑定,数据变化会相互影响。
-
@ObjectLink:允许对嵌套对象的属性进行修改,并且这些修改可以被观察到,实现数据的同步更新。
3. 适用场景
-
@State:适用于组件内部状态的管理,如计数器、表单输入等。
-
@Prop:适用于父组件向子组件传递数据的场景,如列表项的显示。
-
@Link:适用于需要在父子组件间实现数据双向绑定的场景,如表单数据的同步。
-
@ObjectLink:适用于处理嵌套类对象属性变化的场景,如复杂数据结构的管理。
4. 使用限制
-
@State:变量必须初始化,且访问权限仅限于该组件。
-
@Prop:子组件对@Prop修饰的变量进行修改不会影响父组件。
-
@Link:子组件中的@Link装饰变量发生变化时,父组件中的对应数据也会更新。
-
@ObjectLink:不能在@Entry装饰的自定义组件中使用。
三、示例代码
@State 示例
typescript
@Entry
@Component
struct Counter {
  @State count: number = 0;

  build() {
    Column({ space: 20 }) {
      Text(`Count: ${this.count}`)
        .fontSize(20)
      Row({ space: 20 }) {
        Button("-")
          .onClick(() => {
            this.count--;
          })
        Button("+")
          .onClick(() => {
            this.count++;
          })
      }
    }
    .width("100%")
    .height("100%")
    .justifyContent(FlexAlign.Center)
  }
}
@Prop 示例
typescript
@Entry
@Component
struct ParentComponent {
  @State message: string = "Hello, Prop!";

  build() {
    Column({ space: 20 }) {
      Text(this.message)
        .fontSize(20)
      ChildComponent({ message: this.message })
    }
    .width("100%")
    .height("100%")
    .justifyContent(FlexAlign.Center)
  }
}

@Component
struct ChildComponent {
  @Prop message: string = "";

  build() {
    Text(this.message)
      .fontSize(18)
      .color(Color.Blue)
  }
}
@Link 示例
typescript
@Entry
@Component
struct ParentComponent {
  @State count: number = 0;

  build() {
    Column({ space: 20 }) {
      Text(`Parent Count: ${this.count}`)
        .fontSize(20)
      ChildComponent({ count: this.count })
    }
    .width("100%")
    .height("100%")
    .justifyContent(FlexAlign.Center)
  }
}

@Component
struct ChildComponent {
  @Link count: number;

  build() {
    Column({ space: 20 }) {
      Text(`Child Count: ${this.count}`)
        .fontSize(18)
      Row({ space: 20 }) {
        Button("-")
          .onClick(() => {
            this.count--;
          })
        Button("+")
          .onClick(() => {
            this.count++;
          })
      }
    }
  }
}
@ObjectLink 示例
typescript
class User {
name: string;
age: number;
constructor(name: string, age: number) {
this.name = name;
this.age = age;
}
}
@Observed
class UserManager {
user: User;
constructor(user: User) {
this.user = user;
}
}
@Entry
@Component
struct ParentComponent {
@State userManager: UserManager = new UserManager(new User("Alice", 25));
build() {
Column({ space: 20 }) {
Text(`Name: ${this.userManager.user.name}, Age: ${this.userManager.user.age}`)
.fontSize(20)
ChildComponent({ userManager: this.userManager })
}
.width("100%")
.height("100%")
.justifyContent(FlexAlign.Center)
}
}
@Component
struct ChildComponent {
@ObjectLink userManager: UserManager;
build() {
Column({ space: 20 }) {
Text(`Name: ${this.userManager.user.name}, Age: ${this.userManager.user.age}`)
.fontSize(18)
.color(Color.Blue)
Button("Update User")
.onClick(() => {
this.userManager.user.name = "Bob";
this.userManager.user.age = 30;
})
}
}
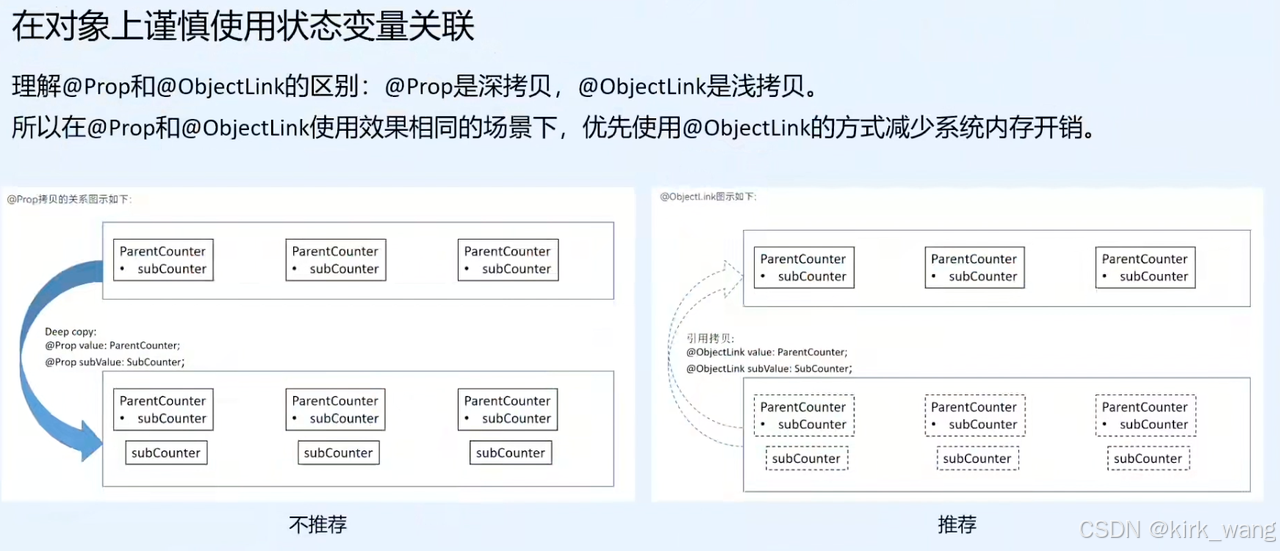
}在HarmonyOS NEXT组件状态管理中,@Prop和@ObjectLink在拷贝方式上有所不同。@Prop采用深拷贝,会增加系统内存开销;而@ObjectLink采用浅拷贝,相对更节省内存。因此,在@Prop和@ObjectLink使用效果相同的场景下,建议优先使用@ObjectLink,以减少系统内存的消耗。遵循这一原则,有助于提高应用的性能和效率
四、总结
在HarmonyOS NEXT开发中,选择合适的状态管理装饰器对于构建高效、灵活的用户界面至关重要。@State适用于组件内部状态管理,@Prop用于父子组件间的单向数据传递,@Link实现父子组件间的双向数据绑定,而@ObjectLink则适用于处理嵌套类对象属性的变化。开发者应根据具体的业务需求和场景,合理选择和使用这些装饰器,以实现最佳的开发效果和用户体验。