今天,我们探讨一下 Vue 中的组件传值问题。这不仅是我们在日常开发中经常遇到的核心问题,也是面试过程中经常被问到的重要知识点。无论你是初学者还是有一定经验的开发者,掌握这些传值方式都将帮助你更高效地构建和维护 Vue 应用

目录
[1. 父子组件通信](#1. 父子组件通信)
[2. 事件总线通信](#2. 事件总线通信)
[3. 路由传参](#3. 路由传参)
[4. Vuex 状态管理](#4. Vuex 状态管理)
1. 父子组件通信
// 父组件
<child-component
    :msg="parentMsg"
    @update="handleUpdate"
/>

// 子组件
props: ['msg'],
methods: {
    updateParent() {
        this.$emit('update', newValue)
    }
}
一、完整实现流程
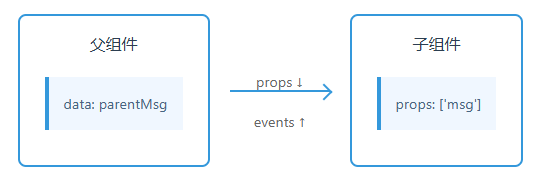
- 父组件传递数据
核心机制 :通过 props 向下传递数据
<template>
  <!-- 绑定 props 与事件监听 -->
  <child-component
    :msg="parentMsg"
    @update="handleUpdate"
  />
</template>

<script>
export default {
  data() {
    return {
      parentMsg: "来自父组件的消息" // 初始数据
    }
  },
  methods: {
    handleUpdate(newValue) {
      this.parentMsg = newValue // 更新父组件数据
    }
  }
}
</script>- 子组件接收与响应
核心机制 :通过 props 接收数据,通过 $emit 触发事件
<script>
export default {
  props: {
    msg: {
      type: String,    // 类型校验
      default: ''      // 默认值
    }
  },
  methods: {
    updateParent() {
      const newValue = "修改后的消息"
      this.$emit('update', newValue) // 触发自定义事件
    }
  }
}
</script>
3、数据流向示意图
父组件                    子组件
[parentMsg]  --props-->  (msg)
       ↑                     |
       |-- event update <----
4、关键特性说明
- 单向数据流
-
数据只能通过 props 从父级流向子级
-
禁止在子组件中直接修改 props(需通过事件触发父级修改)
- 事件触发规范
-
推荐使用 kebab-case 事件名(如
update-data) -
可通过对象形式传递复杂数据
this.$emit('update', {
value: newValue,
timestamp: Date.now()
})
- 生命周期影响
-
父组件的 data 更新会触发子组件的重新渲染
-
可通过
watch监听 props 变化watch: {
msg(newVal) {
// 响应父组件数据更新
}
}
二、进阶实现模式
-
双向绑定简化(v-model)
-
跨层级通信
-
使用 provide/inject(需谨慎设计)
-
使用 Vuex/Pinia 状态管理(复杂场景推荐)
三、常见问题处理
1.Prop 验证失败
props: {
  msg: {
    type: String,
    required: true,
    validator: value => value.length > 5
  }
}2.异步更新处理
this.$nextTick(() => {
  this.$emit('update', asyncData)
})3.事件解绑建议
// 父组件销毁时自动解绑
// 需要手动解绑的特殊场景:
beforeDestroy() {
  this.$off('update')
}
四、最佳实践建议
-
保持 props 的纯净性(仅用于显示/基础逻辑)
-
复杂交互建议使用 Vuex 进行状态管理
-
大型项目推荐使用 TypeScript 定义 props 接口
-
使用自定义事件时添加命名空间(如
user:updated)
2. 事件总线通信

// 组件 A
this.$root.$emit('event-name', data)

// 组件 B
created() {
    this.$root.$on('event-name', this.handler)
}
beforeDestroy() {
    this.$root.$off('event-name', this.handler)
}
一、核心概念
事件总线 :一个中央事件处理中心,用于组件间跨层级通信 (父子/兄弟/任意组件)。
通信原理:
组件A --emit()--> EventBus --on()--> 组件B二、完整实现流程
-
创建事件总线
// event-bus.js
import Vue from 'vue'
export const EventBus = new Vue() -
组件A发送事件
-
组件B监听事件
三、关键代码解析
| 方法 | 作用 | 参数说明 |
|---|---|---|
EventBus.$emit() |
触发自定义事件 | (事件名, 数据载荷) |
EventBus.$on() |
监听指定事件 | (事件名, 回调函数) |
EventBus.$off() |
移除指定事件监听 | (事件名, 回调函数) |
四、高级用法
-
一次性监听
EventBus.$once('one-time-event', this.handleOnce)
-
全局事件总线(使用根实例)
// 组件内发送事件
this.root.emit('global-event', data)// 组件内监听事件
this.root.on('global-event', callback) -
事件命名规范
// 推荐格式:领域/操作
EventBus.$emit('user/profile-updated', userData)
五、生命周期管理
-
必须 在
beforeDestroy中移除监听,避免:-
内存泄漏
-
重复触发僵尸监听器
-
-
自动移除方案:
// 使用 hook API 自动解绑
mounted() {
this.eventBus.on('event', callback)
this.once('hook:beforeDestroy', () => { this.eventBus.$off('event', callback)
})
}
六、注意事项
1.数据不可变性
传递的数据应为副本而非引用:
EventBus.$emit('event', { ...originalObject })2.调试技巧
查看所有事件监听:
console.log(EventBus._events)3.性能优化
高频事件建议添加防抖:
import _ from 'lodash'
EventBus.$on('scroll', _.debounce(this.handleScroll, 200))
七、与Vuex的对比
| EventBus | Vuex | |
|---|---|---|
| 适用场景 | 简单通信/临时交互 | 复杂状态管理 |
| 数据存储 | 无中心化存储 | 集中式状态存储 |
| 调试支持 | 无Devtools集成 | 完整时间旅行调试 |
| 推荐使用 | 小型项目/简单交互 | 中大型项目 |
八、完整代码示例
// 组件A:发送方
methods: {
  notify() {
    this.$root.$emit('notify', {
      type: 'alert',
      content: '重要通知'
    })
  }
}

// 组件B:接收方
created() {
  this.$root.$on('notify', this.showNotification)
},
beforeDestroy() {
  this.$root.$off('notify', this.showNotification)
},
methods: {
  showNotification(payload) {
    if(payload.type === 'alert') {
      alert(payload.content)
    }
  }
}
流程图解
组件A                           EventBus                           组件B
[点击按钮] --> $emit('event') --> 事件队列 --> 匹配监听器 --> $on('event') --> 执行回调
       ↖---------------------------数据载荷---------------------------↙
最佳实践
-
为事件总线创建独立模块
-
使用TypeScript定义事件类型
// event-types.d.ts declare module 'vue/types/vue' { interface Vue { $eventBus: { $on(event: 'user-login', callback: (user: User) => void): void $emit(event: 'user-login', user: User): void } } } -
大型项目建议封装为可追踪的EventService
-
重要事件添加错误边界处理
3. 路由传参
// 路由跳转
this.$router.push({
    name: 'User',
    params: { id: 123 },
    query: { page: 1 }
})

// 组件中获取
created() {
    const userId = this.$route.params.id
    const page = this.$route.query.page
}
一、完整实现流程
-
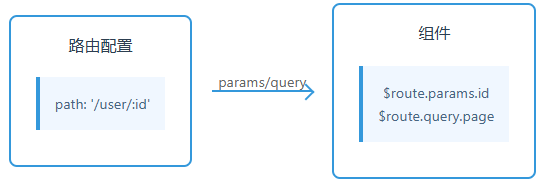
路由配置(核心配置)
// router/index.js
{
path: "/user/:id", // 动态路由参数(注意冒号语法)
name: "UserDetail", // 推荐使用命名路由(非图片中的"I','user"错误写法)
component: UserComponent
} -
路由跳转
// 正确写法(修正图片中的符号错误和拼写错误)
this.$router.push({
name: 'UserDetail', // 使用路由名称更安全(而非图片中的"I','user"错误写法)
params: { id: 123 }, // 路径参数(对应:id)
query: { page: 1 } // 查询参数(URL显示为?page=1)
}) -
组件参数获取
created() {
// 正确获取方式(修正图片中的符号错误)
const userId = this.route.params.id // 获取路径参数(非图片中的"parc�名"错误) const page = this.route.query.page // 获取查询参数(非图片中的".php"错误)console.log(
用户ID: ${userId}, 当前页: ${page})
}
二、核心概念解析
- 参数类型对比
| params | query | |
|---|---|---|
| URL显示 | /user/123 |
/user?page=1 |
| 参数位置 | 路径中 | URL问号后 |
| 路由配置 | 需要预定义:id |
无需预先声明 |
| 参数类型 | 自动转为字符串 | 自动转为字符串 |
| 刷新保留 | 是(需配合命名路由使用) | 是 |
-
生命周期响应
watch: {
// 监听路由参数变化(图片未展示的重要功能)
'$route'(to, from) {
if (to.params.id !== from.params.id) {
this.loadUserData(to.params.id)
}
}
}
三、代码优化建议
-
类型转换处理
// 将字符串参数转为数字(图片未展示)
created() {
this.userId = parseInt(this.route.params.id) this.page = Number(this.route.query.page) || 1
} -
使用Props接收参数(推荐方式
// 路由配置增加(图片未展示)
props: true// 组件接收(更规范的写法)
props: {
id: {
type: [Number, String],
required: true
}
}
四、常见问题处理
-
params失效问题
// 错误写法(图片中写法会导致params丢失)
this.$router.push({
path: '/user/123', // 使用path时params会失效
params: { id: 456 } // 此参数不会被传递
})// 正确写法(必须使用name)
this.$router.push({
name: 'UserDetail',
params: { id: 456 }
}) -
参数继承方案
// 保持现有查询参数(图片未展示)
this.router.push({ params: { id: 789 }, query: { ...this.route.query } // 保留原有查询参数
})
五、完整代码示例
路由配置
// router/index.js
{
  path: '/user/:id',
  name: 'UserDetail',
  component: () => import('./views/UserDetail.vue'),
  props: true  // 启用props接收参数
}
路由跳转
methods: {
  navigate() {
    this.$router.push({
      name: 'UserDetail',
      params: { id: 2023 },
      query: {
        page: 2,
        sort: 'desc'
      }
    })
  }
}
组件实现
<template>
  <div>
    <h2>用户ID: {{ formattedId }}</h2>
    <p>当前页码: {{ page }}</p>
  </div>
</template>

<script>
export default {
  props: {
    id: {
      type: Number,
      required: true
    }
  },
  computed: {
    formattedId() {
      return `UID-${this.id.toString().padStart(6, '0')}`
    },
    page() {
      return Number(this.$route.query.page) || 1
    }
  },
  watch: {
    id(newVal) {
      this.loadUserData(newVal)
    }
  },
  methods: {
    loadUserData(id) {
      // 加载用户数据...
    }
  }
}
</script>
六、最佳实践建议
-
参数验证:
// 路由配置添加正则约束
path: '/user/:id(\d+)' // 只接受数字ID// 组件内验证
beforeRouteEnter(to, from, next) {
if (!/^\d+$/.test(to.params.id)) {
next({ name: 'ErrorPage' })
} else {
next()
}
} -
编码规范:
-
始终使用命名路由(避免路径硬编码)
-
敏感参数使用params传递(不在URL暴露)
-
复杂参数使用JSON序列化:
this.$router.push({
name: 'Search',
query: {
filters: JSON.stringify({
status: ['active', 'pending'],
dateRange: '2023-01/2023-12'
})
}
})
流程图解
[路由跳转]
  │
  ├── params → /user/:id
  │        └──→ 组件通过 $route.params 或 props 接收
  │
  └── query → ?key=value
           └──→ 组件通过 $route.query 接收
常见错误排查表
| 现象 | 原因 | 解决方案 |
|---|---|---|
| params参数未传递 | 使用了path而非name进行跳转 | 改用命名路由 |
| 参数丢失 | 未处理路由守卫中的中断 | 添加路由守卫参数验证 |
| 参数类型错误 | 未进行类型转换 | 使用Number()或parseInt转换 |
| 组件未响应参数变化 | 缺少watch监听 | 添加$route监听 |
4. Vuex 状态管理

// 组件中使用
export default {
    computed: {
        ...mapState(['data']),
        ...mapGetters(['processedData'])
    },
    methods: {
        updateData() {
            this.$store.dispatch('updateAction', payload)
        }
    }
}
一、完整实现流程
-
安装与配置
npm install vuex --save
// store/index.js
import Vue from 'vue'
import Vuex from 'vuex'Vue.use(Vuex)
export default new Vuex.Store({
state: {
offers: [],
data: []
},
mutations: { /* 同步修改方法 / },
actions: { / 异步操作方法 / },
getters: { / 计算属性方法 / },
modules: { / 模块划分 */ }
}) -
核心流程
组件 → dispatch → Actions → commit → Mutations → 修改 State → 触发视图更新
二、核心概念详解
-
State(应用状态)
state: {
offers: [],
data: []
}// 组件访问
this.$store.state.offers -
Mutations(同步修改)
mutations: {
SET_OFFERS(state, payload) {
state.offers = payload
}
}// 组件触发(禁止直接调用)
this.$store.commit('SET_OFFERS', newData) -
Actions(异步操作)
actions: {
async fetchOffers({ commit }) {
const res = await axios.get('/api/offers')
commit('SET_OFFERS', res.data)
}
}// 组件触发
this.$store.dispatch('fetchOffers') -
Getters(计算属性)
getters: {
processedData: state => {
return state.data.filter(item => item.status === 1)
}
}// 组件访问
this.$store.getters.processedData
三、组件集成方案
-
mapState/mapGetters
import { mapState, mapGetters } from 'vuex'
export default {
computed: {
...mapState({
data: state => state.data
}),
...mapGetters(['processedData'])
}
} -
Action分发
methods: {
updateData() {
// 修正原图片中的拼写错误
this.$store.dispatch('updateAction', payload)
}
}
四、模块化实现
// store/modules/user.js
export default {
  namespaced: true,
  state: { profile: null },
  mutations: { SET_PROFILE(state, val) {...} },
  actions: { fetchProfile({ commit }) {...} }
}

// 组件访问
this.$store.dispatch('user/fetchProfile')
五、完整代码示例
// 组件完整实现
export default {
  computed: {
    ...mapState({
      offers: state => state.offers
    }),
    ...mapGetters(['filteredOffers'])
  },
  methods: {
    refreshData() {
      this.$store.dispatch('fetchOffers')
    },
    updateOffer(payload) {
      this.$store.commit('UPDATE_OFFER', payload)
    }
  }
}
六、数据流向示意图
Component → dispatch → Action → commit → Mutation → State → Getter → Component
    ↑                                     ↓
    └─────── API 请求/异步操作 ────────────┘
七、高级特性
-
严格模式
const store = new Vuex.Store({
strict: process.env.NODE_ENV !== 'production'
}) -
插件开发
// 状态快照插件
const snapshotPlugin = store => {
let prevState = JSON.parse(JSON.stringify(store.state))
store.subscribe((mutation, state) => {
console.log('状态变化:', mutation.type)
console.log('旧状态:', prevState)
console.log('新状态:', state)
prevState = JSON.parse(JSON.stringify(state))
})
}
八、常见问题处理
-
异步操作错误处理
actions: {
async fetchData({ commit }) {
try {
const res = await api.getData()
commit('SET_DATA', res.data)
} catch (error) {
commit('SET_ERROR', error.message)
}
}
} -
动态模块注册
store.registerModule('dynamicModule', {
state: {...},
mutations: {...}
})
九、最佳实践建议
-
命名规范:
-
Mutation类型使用全大写(SET_DATA)
-
Action名称使用驼峰命名(fetchUserInfo)
-
-
模块组织:
/store ├── index.js ├── modules │ ├── user.js │ └── product.js └── plugins -
TypeScript集成:
// store/types.ts
interface RootState {
user: UserState
products: ProductState
}// 组件使用
@Action
public async updateProfile(payload: UserProfile) {
this.context.commit('SET_PROFILE', payload)
} -
性能优化:
-
避免在getter中进行重计算
-
使用Vuex的持久化插件(vuex-persistedstate)
-
十、调试技巧
-
DevTools时间旅行:
-
查看状态快照
-
回退/重做mutation
-
-
状态快照输出:
console.log(JSON.stringify(this.$store.state, null, 2))
完整流程图解
[Component]
   │ dispatch(action)
   ↓
[Action] → 发起API请求 → commit(mutation)
   │                      ↓
   └─────────────→ [Mutation] → 修改State
                              ↓
                          [Getter] → 派生状态
                              ↓
                          [Component] 响应式更新
好了这一期就到这里,希望能够帮助到大家,咱们下下期见!