一、说明介绍
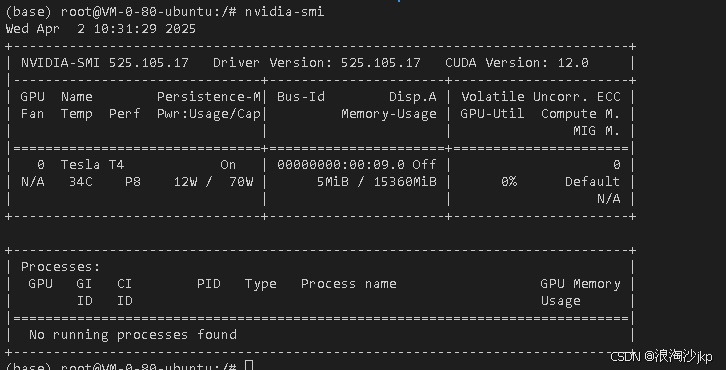
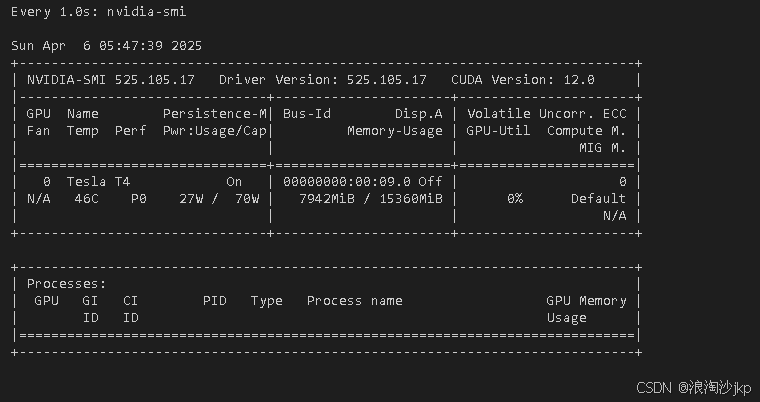
由于前面玩过了,所以啥也别说,就是显存不够玩,要优化,没钱就是这么回事,看下图,显存实际只有15360M,确实是16G+
如何获取算力

二、如何获取算力
1、进入网址 Cloud Studio
2、没有注册的注册
应该是可以和腾讯云共账号,忘了
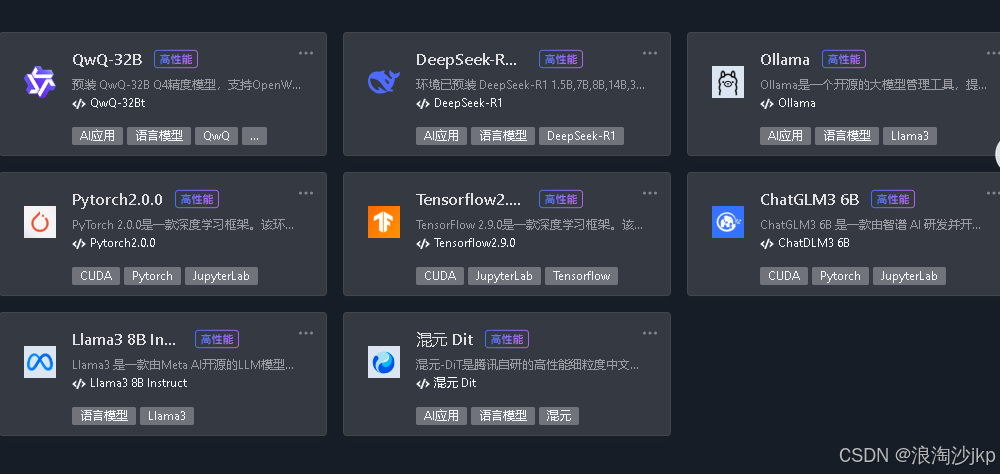
3、选择 Ai模板
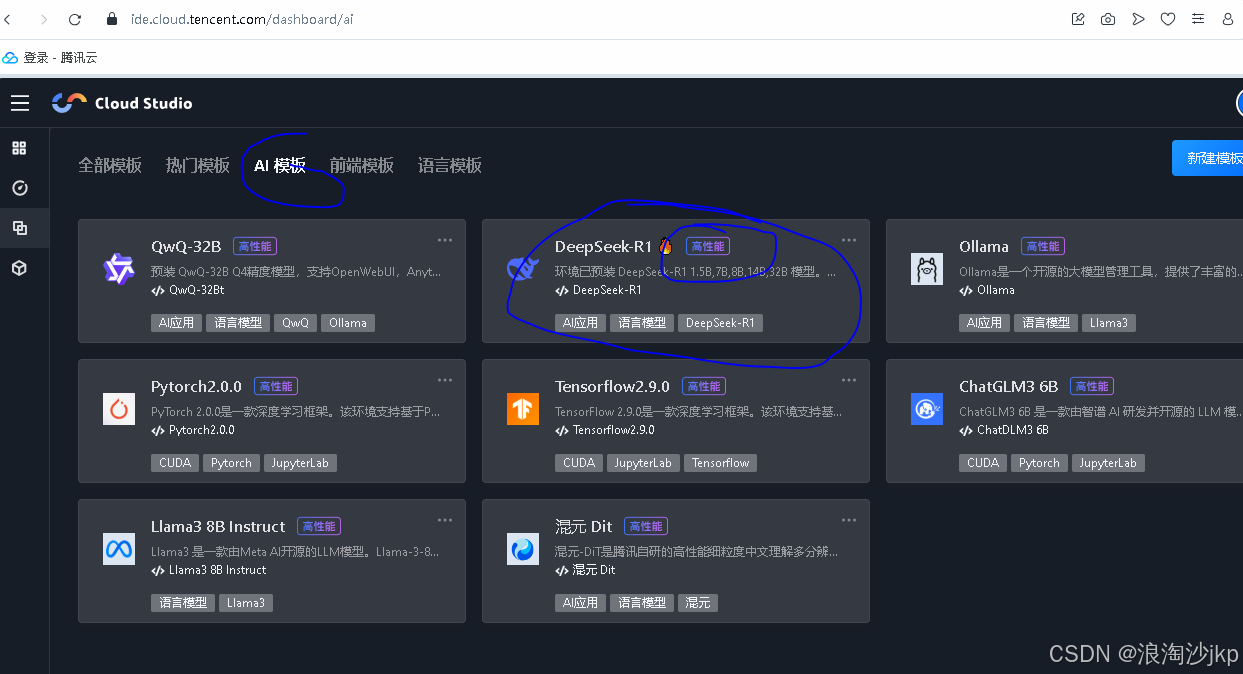
看到高性能没有,这个有GPU
也可以进入高性能工作空间

注意那个立即创建是cpu的,我们要点新建,可以创建很多个,同时工作的可以有两个,总共每月10000分钟,最开始50000分钟,之所以选这个高性能工作空间,这里一般的硬盘比较小,这个比较大,下图中的Pytorch2.0.0 只有30G左右,不够用,其它的有时间可以进去看看,选择deepseek-R1的环境,可以用OLlama直接部署几个蒸馏模型,试了下,14b的可以部署,再往上GPU就不够了
三、部署与测试
前面几篇文章其实已经部署过了,这篇文章其实是优化,
1、创建新的工作空间
我们建立了新的环境,今天还是很快的,一般要几分钟。反正不需要可以删除,放着也行,随时可以创建,最近几天放假,很好创建,前几天进都进不去,直接显示算力没有。这个有点不好的就是好像不能写描述,最开始可以的,不知道从哪里进去建立可以,反正这个方法建立时没有地方修改,大家弄个表格记录下,以后都忘了哪个工作空间是干嘛。

已经完成,有运行中,直接点击这一排,就可以进去,


代码可以放在下图的workspace里,和VScode差不多,

如下图,点击上面的终端,新建终端,就显示终端了

2、下载源码
cd /workspace
git clone https://github.com/deepseek-ai/Janus.git
#难道关税大战,github也要干掉了,有点怀疑啊,慢的要死,我是直接上传,clone不成功
cd Janus
3、安装Python环境
# ubuntu环境
apt-get update
apt-get install build-essential
apt-get install cmake
apt-get install pkg-config

conda create -n janus python=3.10
conda init
source ~/.bashrc
conda activate janus
cd /workspace/Janus
# 注意后面的点
pip install -e .[gradio]
pip install bitsandbytes accelerate flash-attn
4、显存优化的方法
确保模型以4-bit或8-bit加载。
使用半精度(torch.float16)。
启用Flash Attention。
调整batch size为1,避免处理多个样本。
使用内存优化库如vLLM或Hugging Face的优化选项(如device_map="auto",可能结合offload_folder等参数)。
如果使用文本生成,限制生成的最大长度和min_length,减少显存占用。
5、下载模型
这里我们考虑在项目主目录下创建models文件夹,用于保存Janus-Pro-1B和7B模型权重。考虑到国 内网络环境,这里推荐直接在Modelscope上进行模型权重下载。
-
安装modelscope
pip install modelscope
-
创建模型文件夹
我们这次创建在demo文件夹下面
mkdir -p demo/Janus-Pro-7B
# 进入app_januspro.py的目录
cd demo
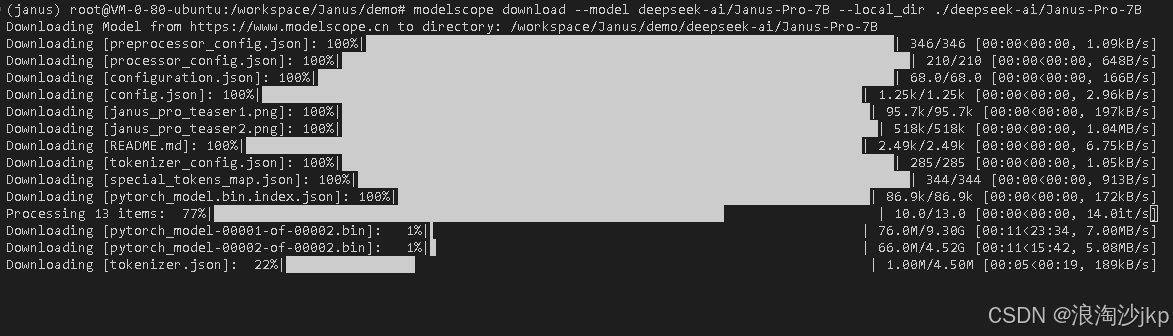
# 下载7B模型
modelscope download --model deepseek-ai/Janus-Pro-7B --local_dir ./Janus-Pro-7B下载需要点时间,看网速,一般还是比较快的。
6、修改app_januspro.py
下载frpc_linux_amd64并放在合适的地方,没有配置时会提示错误,最新版gradio会提示0.3版本
我用的是0.2,也就是requirements.txt表明了gradio==3.48.0
运行之前
下载地址:https://download.csdn.net/download/jiangkp/90568217
mv frpc_linux_amd64_v0.2 /root/miniforge3/envs/janus/lib/python3.10/site-packages/gradio
chmod +x /root/miniforge3/envs/janus/lib/python3.10/site-packages/gradio/frpc_linux_amd64_v0.2
一些优化设置关键点我在代码里注释了
代码如下;
bash
import gradio as gr
import torch
from transformers import AutoConfig, AutoModelForCausalLM, AutoTokenizer, BitsAndBytesConfig
from janus.models import MultiModalityCausalLM, VLChatProcessor
from janus.utils.io import load_pil_images
from PIL import Image

import numpy as np
import os
import time
# import spaces  # Import spaces for ZeroGPU compatibility
#4-bit量化:
#通过BitsAndBytesConfig启用4位量化,显存需求降至原大小的1/4
#双重量化进一步压缩参数
#半精度计算:torch.float16减少计算过程中的内存占用
#Flash Attention:加速注意力计算,降低内存峰值

#设备自动映射:device_map="auto"自动优化跨设备分布(适合多卡环境)

# 配置4-bit量化,添加代码
bnb_config = BitsAndBytesConfig(
    load_in_4bit=True,
    bnb_4bit_use_double_quant=True,
    bnb_4bit_quant_type="nf4",
    bnb_4bit_compute_dtype=torch.float16
)
# Load model and processor
model_path = "/workspace/Janus/demo/Janus-Pro-7B"
config = AutoConfig.from_pretrained(model_path)
language_config = config.language_config
language_config._attn_implementation = 'eager'
vl_gpt = AutoModelForCausalLM.from_pretrained(model_path,
                                             quantization_config=bnb_config,
                                             device_map="auto",
                                             language_config=language_config,
                                             trust_remote_code=True,
                                             torch_dtype=torch.float16
                                             #,attn_implementation="flash_attention_2"  # 启用Flash Attention
                                             )
#if torch.cuda.is_available():
#    vl_gpt = vl_gpt.to(torch.bfloat16).cuda()
#else:
#    vl_gpt = vl_gpt.to(torch.float16)

vl_chat_processor = VLChatProcessor.from_pretrained(model_path)
tokenizer = vl_chat_processor.tokenizer
cuda_device = 'cuda' if torch.cuda.is_available() else 'cpu'

@torch.inference_mode()
# @spaces.GPU(duration=120)
# Multimodal Understanding function
def multimodal_understanding(image, question, seed, top_p, temperature):
    # Clear CUDA cache before generating
    torch.cuda.empty_cache()

    # set seed
    torch.manual_seed(seed)
    np.random.seed(seed)
    torch.cuda.manual_seed(seed)

    conversation = [
        {
            "role": "<|User|>",
            "content": f"<image_placeholder>\n{question}",
            "images": [image],
        },
        {"role": "<|Assistant|>", "content": ""},
    ]

    pil_images = [Image.fromarray(image)]
    prepare_inputs = vl_chat_processor(
        conversations=conversation, images=pil_images, force_batchify=True
    ).to(cuda_device, dtype=torch.float16)


    inputs_embeds = vl_gpt.prepare_inputs_embeds(**prepare_inputs)

    outputs = vl_gpt.language_model.generate(
        inputs_embeds=inputs_embeds,
        attention_mask=prepare_inputs.attention_mask,
        pad_token_id=tokenizer.eos_token_id,
        bos_token_id=tokenizer.bos_token_id,
        eos_token_id=tokenizer.eos_token_id,
        max_new_tokens=512,
        do_sample=False if temperature == 0 else True,
        use_cache=True,
        temperature=temperature,
        top_p=top_p,
    )

    answer = tokenizer.decode(outputs[0].cpu().tolist(), skip_special_tokens=True)
    return answer


def generate(input_ids,
             width,
             height,
             temperature: float = 1,
             parallel_size: int = 5,
             cfg_weight: float = 5,
             image_token_num_per_image: int = 576,
             patch_size: int = 16):
    # Clear CUDA cache before generating
    torch.cuda.empty_cache()

    tokens = torch.zeros((parallel_size * 2, len(input_ids)), dtype=torch.int).to(cuda_device)
    for i in range(parallel_size * 2):
        tokens[i, :] = input_ids
        if i % 2 != 0:
            tokens[i, 1:-1] = vl_chat_processor.pad_id
    inputs_embeds = vl_gpt.language_model.get_input_embeddings()(tokens)
    generated_tokens = torch.zeros((parallel_size, image_token_num_per_image), dtype=torch.int).to(cuda_device)

    pkv = None
    for i in range(image_token_num_per_image):
        with torch.no_grad():
            outputs = vl_gpt.language_model.model(inputs_embeds=inputs_embeds,
                                                use_cache=True,
                                                past_key_values=pkv)
            pkv = outputs.past_key_values
            hidden_states = outputs.last_hidden_state
            logits = vl_gpt.gen_head(hidden_states[:, -1, :])
            logit_cond = logits[0::2, :]
            logit_uncond = logits[1::2, :]
            logits = logit_uncond + cfg_weight * (logit_cond - logit_uncond)
            probs = torch.softmax(logits / temperature, dim=-1)
            next_token = torch.multinomial(probs, num_samples=1)
            generated_tokens[:, i] = next_token.squeeze(dim=-1)
            next_token = torch.cat([next_token.unsqueeze(dim=1), next_token.unsqueeze(dim=1)], dim=1).view(-1)

            img_embeds = vl_gpt.prepare_gen_img_embeds(next_token)
            inputs_embeds = img_embeds.unsqueeze(dim=1)

    #添加下面一行,强制转回为torch.bfloat16
    vl_gpt.gen_vision_model = vl_gpt.gen_vision_model.to(dtype=torch.bfloat16)
    patches = vl_gpt.gen_vision_model.decode_code(generated_tokens.to(dtype=torch.int),
                                                 shape=[parallel_size, 8, width // patch_size, height // patch_size])

    return generated_tokens.to(dtype=torch.int), patches

def unpack(dec, width, height, parallel_size=5):
    dec = dec.to(torch.float32).cpu().numpy().transpose(0, 2, 3, 1)
    dec = np.clip((dec + 1) / 2 * 255, 0, 255)

    visual_img = np.zeros((parallel_size, width, height, 3), dtype=np.uint8)
    visual_img[:, :, :] = dec

    return visual_img


@torch.inference_mode()
# @spaces.GPU(duration=120)  # Specify a duration to avoid timeout
def generate_image(prompt,
                   seed=None,
                   guidance=5,
                   t2i_temperature=1.0):
    # Clear CUDA cache and avoid tracking gradients
    torch.cuda.empty_cache()
    # Set the seed for reproducible results
    if seed is not None:
        torch.manual_seed(seed)
        torch.cuda.manual_seed(seed)
        np.random.seed(seed)
    width = 384
    height = 384
    # 这个改为1 每次生成一张图片
    parallel_size = 1

    with torch.no_grad():
        messages = [{'role': '<|User|>', 'content': prompt},
                    {'role': '<|Assistant|>', 'content': ''}]
        text = vl_chat_processor.apply_sft_template_for_multi_turn_prompts(conversations=messages,
                                                                   sft_format=vl_chat_processor.sft_format,
                                                                   system_prompt='')
        text = text + vl_chat_processor.image_start_tag

        input_ids = torch.LongTensor(tokenizer.encode(text))
        output, patches = generate(input_ids,
                                   width // 16 * 16,
                                   height // 16 * 16,
                                   cfg_weight=guidance,
                                   parallel_size=parallel_size,
                                   temperature=t2i_temperature)
        images = unpack(patches,
                        width // 16 * 16,
                        height // 16 * 16,
                        parallel_size=parallel_size)

        return [Image.fromarray(images[i]).resize((768, 768), Image.LANCZOS) for i in range(parallel_size)]


# Gradio interface
with gr.Blocks() as demo:
    # gr.Markdown(value="# Multimodal Understanding")
    with gr.Tabs():
        # 多模态理解标签页
        with gr.Tab("Multimodal Understanding/多模态理解"):
            with gr.Row():
                image_input = gr.Image()
                with gr.Column():
                    question_input = gr.Textbox(label="Question/你的问题")
                    und_seed_input = gr.Number(label="Seed/随机种子", precision=0, value=42)
                    top_p = gr.Slider(minimum=0, maximum=1, value=0.95, step=0.05, label="top_p/核采样")
                    temperature = gr.Slider(minimum=0, maximum=1, value=0.1, step=0.05, label="temperature/置信度")

            understanding_button = gr.Button("Chat/开始交互")
            understanding_output = gr.Textbox(label="Response/回答")
            understanding_button.click(
                multimodal_understanding,
                inputs=[image_input, question_input, und_seed_input, top_p, temperature],
                outputs=understanding_output
            )


            examples_inpainting = gr.Examples(
                label="Multimodal Understanding examples/多模态理解例子",
                examples=[
                    [
                        "explain this meme/解释这个图片",
                        "images/doge.png",
                    ],
                    [
                        "Convert the formula into latex code./ 公式转换为latex格式.",
                        "images/equation.png",
                    ],
                ],
                inputs=[question_input, image_input],
            )


    # gr.Markdown(value="# Text-to-Image Generation")
        # 文生图标签页
        with gr.Tab("Text-to-Image Generation/文生图"):
            with gr.Row():
                cfg_weight_input = gr.Slider(minimum=1, maximum=10, value=5, step=0.5, label="CFG Weight/CFG的权重")
                t2i_temperature = gr.Slider(minimum=0, maximum=1, value=1.0, step=0.05, label="temperature/置信度")

            prompt_input = gr.Textbox(label="Prompt. (Prompt in more detail can help produce better images!)/提示语")
            seed_input = gr.Number(label="Seed (Optional)/随机种子(可选)", precision=0, value=12345)

            generation_button = gr.Button("Generate Images/生成图片")

            image_output = gr.Gallery(label="Generated Images/生成图片", columns=2, rows=2, height=300)

            generation_button.click(
                fn=generate_image,
                inputs=[prompt_input, seed_input, cfg_weight_input, t2i_temperature],
                outputs=image_output
            )

            examples_t2i = gr.Examples(
                label="Text to image generation examples./文本到图片",
                examples=[
                    "Master shifu racoon wearing drip attire as a street gangster.",
                    "The face of a beautiful girl",
                    "Astronaut in a jungle, cold color palette, muted colors, detailed, 8k",
                    "A glass of red wine on a reflective surface.",
                    "A cute and adorable baby fox with big brown eyes, autumn leaves in the background enchanting,immortal,fluffy, shiny mane,Petals,fairyism,unreal engine 5 and Octane Render,highly detailed, photorealistic, cinematic, natural colors.",
                    "The image features an intricately designed eye set against a circular backdrop adorned with ornate swirl patterns that evoke both realism and surrealism. At the center of attention is a strikingly vivid blue iris surrounded by delicate veins radiating outward from the pupil to create depth and intensity. The eyelashes are long and dark, casting subtle shadows on the skin around them which appears smooth yet slightly textured as if aged or weathered over time.\n\nAbove the eye, there's a stone-like structure resembling part of classical architecture, adding layers of mystery and timeless elegance to the composition. This architectural element contrasts sharply but harmoniously with the organic curves surrounding it. Below the eye lies another decorative motif reminiscent of baroque artistry, further enhancing the overall sense of eternity encapsulated within each meticulously crafted detail. \n\nOverall, the atmosphere exudes a mysterious aura intertwined seamlessly with elements suggesting timelessness, achieved through the juxtaposition of realistic textures and surreal artistic flourishes. Each component\u2014from the intricate designs framing the eye to the ancient-looking stone piece above\u2014contributes uniquely towards creating a visually captivating tableau imbued with enigmatic allure.",
                ],
                inputs=prompt_input,
            )


demo.launch(share=True)
# demo.queue(concurrency_count=1, max_size=10).launch(server_name="0.0.0.0", server_port=37906, root_path="/path")
7、运行
python demo/app_januspro.py8、结果
Running on local URL: http://127.0.0.1:7860
IMPORTANT: You are using gradio version 3.48.0, however version 4.44.1 is available, please upgrade.
Running on public URL: https://edd2f234a885706e90.gradio.live
This share link expires in 72 hours. For free permanent hosting and GPU upgrades, run `gradio deploy` from Terminal to deploy to Spaces (https://huggingface.co/spaces)
http://127.0.0.1:7860:本地可以用这个地址测试
gradio version 3.48.0, however version 4.44.1:如果你升级了,就会有问题,frpc_linux_amd64需要升级到0.3,我用的0.2
https://edd2f234a885706e90.gradio.live:这个是穿透后的公网地址,只能保持72小时,这个地址运行一次就改变一次
运行后初始

9、多模态理解测试
测试一

英文问结果

中文问结果:

对比下,自己看看喔
测试二
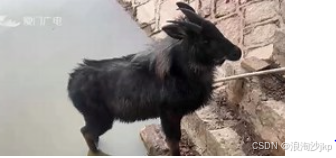
中国人直接中文问

测试三

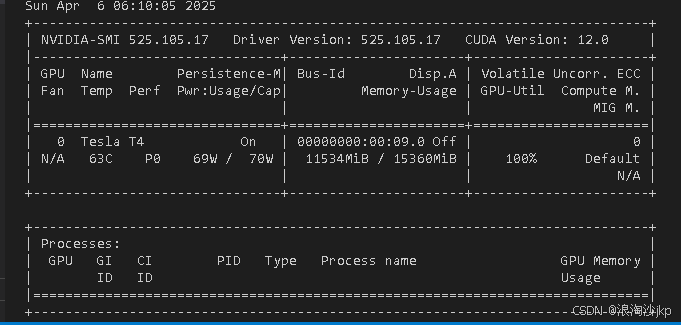
个人感觉不太好,不准啊,不知道不用4bit的会不会好点
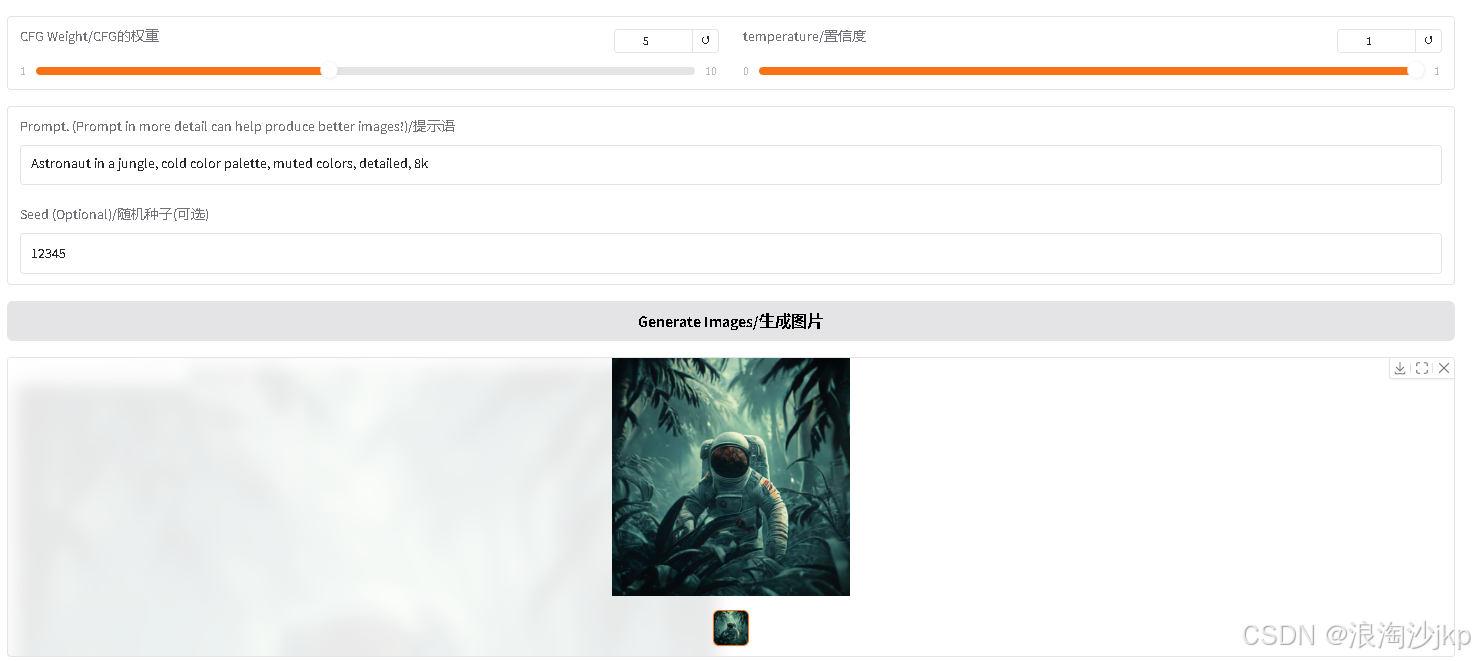
10、 文生图测试
测试一
挂了
This share link expires in 72 hours. For free permanent hosting and GPU upgrades, run `gradio deploy` from Terminal to deploy to Spaces (https://huggingface.co/spaces)
Traceback (most recent call last):
File "/root/miniforge3/envs/janus/lib/python3.10/site-packages/gradio/routes.py", line 534, in predict
output = await route_utils.call_process_api(
File "/root/miniforge3/envs/janus/lib/python3.10/site-packages/gradio/route_utils.py", line 226, in call_process_api
output = await app.get_blocks().process_api(
File "/root/miniforge3/envs/janus/lib/python3.10/site-packages/gradio/blocks.py", line 1550, in process_api
result = await self.call_function(
File "/root/miniforge3/envs/janus/lib/python3.10/site-packages/gradio/blocks.py", line 1185, in call_function
prediction = await anyio.to_thread.run_sync(
File "/root/miniforge3/envs/janus/lib/python3.10/site-packages/anyio/to_thread.py", line 56, in run_sync
return await get_async_backend().run_sync_in_worker_thread(
File "/root/miniforge3/envs/janus/lib/python3.10/site-packages/anyio/_backends/_asyncio.py", line 2470, in run_sync_in_worker_thread
return await future
File "/root/miniforge3/envs/janus/lib/python3.10/site-packages/anyio/_backends/_asyncio.py", line 967, in run
result = context.run(func, *args)
File "/root/miniforge3/envs/janus/lib/python3.10/site-packages/gradio/utils.py", line 661, in wrapper
response = f(*args, **kwargs)
File "/root/miniforge3/envs/janus/lib/python3.10/site-packages/torch/utils/_contextlib.py", line 116, in decorate_context
return func(*args, **kwargs)
File "/workspace/Janus/demo/app_januspro.py", line 179, in generate_image
output, patches = generate(input_ids,
File "/workspace/Janus/demo/app_januspro.py", line 136, in generate
patches = vl_gpt.gen_vision_model.decode_code(generated_tokens.to(dtype=torch.int),
File "/workspace/Janus/janus/models/vq_model.py", line 507, in decode_code
dec = self.decode(quant_b)
File "/workspace/Janus/janus/models/vq_model.py", line 502, in decode
dec = self.decoder(quant)
File "/root/miniforge3/envs/janus/lib/python3.10/site-packages/torch/nn/modules/module.py", line 1739, in _wrapped_call_impl
return self._call_impl(*args, **kwargs)
File "/root/miniforge3/envs/janus/lib/python3.10/site-packages/torch/nn/modules/module.py", line 1750, in _call_impl
return forward_call(*args, **kwargs)
File "/workspace/Janus/janus/models/vq_model.py", line 208, in forward
h = block.upsample(h)
File "/root/miniforge3/envs/janus/lib/python3.10/site-packages/torch/nn/modules/module.py", line 1739, in _wrapped_call_impl
return self._call_impl(*args, **kwargs)
File "/root/miniforge3/envs/janus/lib/python3.10/site-packages/torch/nn/modules/module.py", line 1750, in _call_impl
return forward_call(*args, **kwargs)
File "/workspace/Janus/janus/models/vq_model.py", line 426, in forward
x = self.conv(x)
File "/root/miniforge3/envs/janus/lib/python3.10/site-packages/torch/nn/modules/module.py", line 1739, in _wrapped_call_impl
return self._call_impl(*args, **kwargs)
File "/root/miniforge3/envs/janus/lib/python3.10/site-packages/torch/nn/modules/module.py", line 1750, in _call_impl
return forward_call(*args, **kwargs)
File "/root/miniforge3/envs/janus/lib/python3.10/site-packages/torch/nn/modules/conv.py", line 554, in forward
return self._conv_forward(input, self.weight, self.bias)
File "/root/miniforge3/envs/janus/lib/python3.10/site-packages/torch/nn/modules/conv.py", line 549, in _conv_forward
return F.conv2d(
RuntimeError: Input type (c10::BFloat16) and bias type (c10::Half) should be the same

 #添加下面一行,强制转回为torch.bfloat16
    vl_gpt.gen_vision_model = vl_gpt.gen_vision_model.to(dtype=torch.bfloat16)
    patches = vl_gpt.gen_vision_model.decode_code(generated_tokens.to(dtype=torch.int),
                                                 shape=[parallel_size, 8, width // patch_size, height // patch_size])
一直504 (Gateway Timeout),同志们。后来我就更新了gradio
# 更新
pip install -U gradio

# 上传frpc_linux_amd64_v0.3,前面有下载地址
mv frpc_linux_amd64_v0.3 /root/miniforge3/envs/janus/lib/python3.10/site-packages/gradio
chmod +x /root/miniforge3/envs/janus/lib/python3.10/site-packages/gradio/frpc_linux_amd64_v0.3
执行
bash
# 设置了超时,个人感觉旧版的GRADIO,这个超时设置无效
GRADIO_SERVER_TIMEOUT=300 python demo/app_januspro.py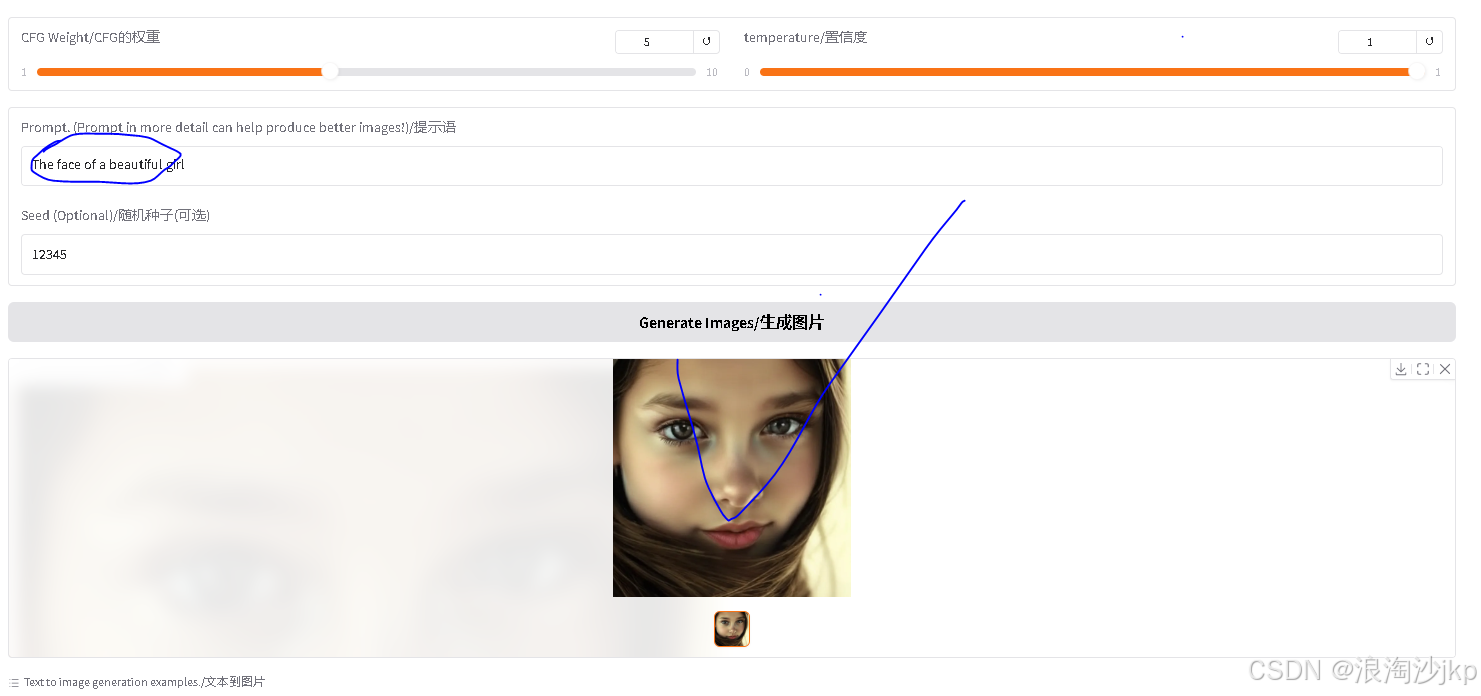
测试二