配置GRE-tunnel隧道思科

配置示例: Route0是公网的路由 在Router1和Router2中使用默认路由指向Route0用来模拟公网透明传输
Router1:
ip route 0.0.0.0 0.0.0.0 <R0的接口/直连ip地址>Router2:
ip route 0.0.0.0 0.0.0.0 <R0的接口/直连ip地址>配置Router1和Router2之间的GRE隧道 隧道的源接口是 FastEthernet0/1,目标是Router2 的 FastEthernet0/1
Router1:
interface Tunnel0给GRE隧道配置ip地址
ip address <R1隧道的ip地址> <子网掩码>指定隧道的接口
tunnel source FastEthernet0/1指定目的接口的ip地址
 tunnel destination <R2的目的接口的ip地址>
 no shutdown
Router2:
interface Tunnel0给GRE隧道配置ip地址
ip address <R2隧道的ip地址> <子网掩码>指定隧道的接口
tunnel source FastEthernet0/1指定目的接口的ip地址
tunnel destination <R1的目的接口的ip地址>
no shutdown
在R1和R2中使用 ospf 路由(端到端路由传递) Router1: 配置进程号(仅本地有效)
router ospf 1指定路由器id号用于区分路由器
router-id 1.1.1.1
network <与R1相连接的内网网段> <子网掩码/反掩码> area 0
network <隧道ip的网段> <子网掩码/反掩码> area 0
Router2: 配置进程号(仅本地有效)
router ospf 1指定路由器id号用于区分路由器
xxrouter-id 2.2.2.2
network <与R2相连接的内网网段> <子网掩码/反掩码> area 0
network <隧道ip的网段> <子网掩码/反掩码> area 0验证隧道接口的状态:
show ip interface brief应显示 up/up 状态 输出应显示静态路由条目,验证静态路由已成功配置:
show ip route查看邻居建立结果:
show ip ospf interfaceGRE隧道技术华为
拓扑图:
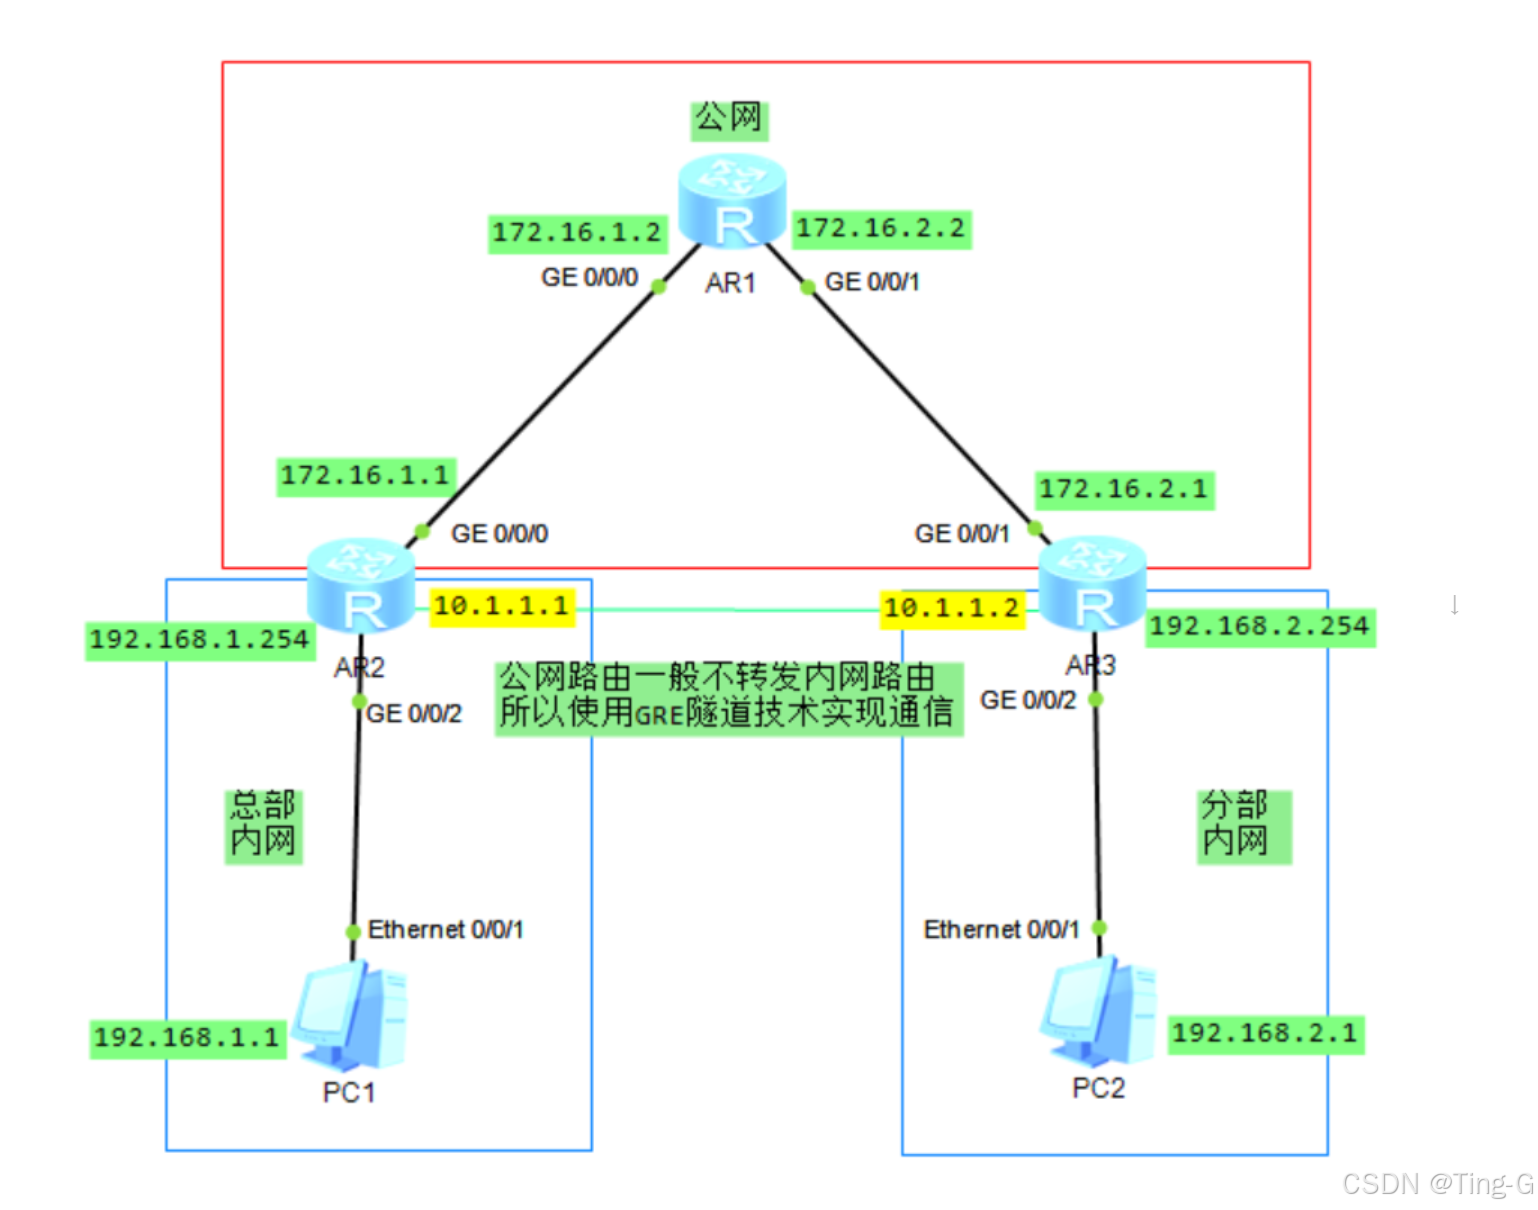
来配置公网路由部分 R1:
sys
sys AR1
int g0/0/0
ip add 172.16.1.2 24
int g0/0/1
ip add 172.16.2.2 24
quit
ospf 1
area 0
network 172.16.1.0 0.0.0.255
network 172.16.2.0 0.0.0.255
quit
quitR2:
sys
sys AR2
int g0/0/0
ip add 172.16.1.1 24
int g0/0/2
ip add 192.168.1.254 24
quit
ospf 1
area 0
network 172.16.1.0 0.0.0.255
quit
quit
用于显示与OSPF(开放最短路径优先)协议相关的IP路由表信息
display ip routing-table protocol ospfR3:
sys
sys AR3
int g0/0/1
ip add 172.16.2.1 24
int g0/0/2
ip add 192.168.2.254 24
quit
ospf 1
area 0
network 172.16.2.0 0.0.0.255
quit
quit
接下来配置内网路由和GRE隧道 R2:
int Tunnel 0/0/1
tunnel-protocol gre
ip add 10.1.1.1 24
source 172.16.1.1
destination 172.16.2.1
keepalive
quit
ospf 2
area 0
network 10.1.1.0 0.0.0.255
network 192.168.1.0 0.0.0.255
quit
quitR3:
int Tunnel 0/0/1
tunnel-protocol gre
ip add 10.1.1.2 24
source 172.16.2.1
destination 172.16.1.1
keepalive
quit
ospf 2
area 0
network 10.1.1.0 0.0.0.255
network 192.168.2.0 0.0.0.255
quit
quit
本次实验通过GRE隧道技术实现了在不通过公网路由的情况下实现两个内网之间的相互通信