文章目录
- 一、前言
- [二、 基于 Netty 实现 Tomcat](#二、 基于 Netty 实现 Tomcat)
-
- [1. 基于传统 IO 重构 Tomcat](#1. 基于传统 IO 重构 Tomcat)
-
- [1.1 创建 MyRequest 和 MyReponse 对象](#1.1 创建 MyRequest 和 MyReponse 对象)
- [1.2 构建一个基础的 Servlet](#1.2 构建一个基础的 Servlet)
- [1.3 创建用户业务代码](#1.3 创建用户业务代码)
- [1.4 完成web.properties 配置](#1.4 完成web.properties 配置)
- [1.5 创建 Tomcat 启动类](#1.5 创建 Tomcat 启动类)
- [2. 基于 Netty 重构 Tomcat](#2. 基于 Netty 重构 Tomcat)
-
- [2.1 创建 NettyRequest和 NettyResponse 对象](#2.1 创建 NettyRequest和 NettyResponse 对象)
- [2.2 构建一个基础的 Servlet](#2.2 构建一个基础的 Servlet)
- [2.3 创建业务底代码](#2.3 创建业务底代码)
- [2.4 完成web.properties 配置](#2.4 完成web.properties 配置)
- [2.5 创建业务逻辑处理类](#2.5 创建业务逻辑处理类)
- [2.6 创建 Tomcat 启动类](#2.6 创建 Tomcat 启动类)
- [三、基于 Netty 重构 RPC 框架](#三、基于 Netty 重构 RPC 框架)
-
- [1. API 模块](#1. API 模块)
-
- [1.1 定义 RPC API 接口](#1.1 定义 RPC API 接口)
- [1.2 自定义传输协议](#1.2 自定义传输协议)
- [2. Provider 模块](#2. Provider 模块)
-
- [2.1 实现 HelloService](#2.1 实现 HelloService)
- [2.2 自定义 Netty 消息处理器](#2.2 自定义 Netty 消息处理器)
- [2.3 服务端启动](#2.3 服务端启动)
- [3. Consumer 模块](#3. Consumer 模块)
-
- [3.1 自定义 Netty 消息处理器](#3.1 自定义 Netty 消息处理器)
- [3.2 实现消费者端的代理调用](#3.2 实现消费者端的代理调用)
- [3.3 消费者调用](#3.3 消费者调用)
- 四、参考内容
一、前言
本系列内容为阅读《Netty4 核心原理》一书内容总结,内容存在个人删改,仅做个人笔记使用。
本篇涉及内容 :第四章 基于 Netty 手写 Tomcat 、第五章 基于 Netty 重构 RPC 框架
本系列内容基于 Netty 4.1.73.Final 版本,如下:
xml
 <dependency>
    <groupId>io.netty</groupId>
     <artifactId>netty-all</artifactId>
     <version>4.1.73.Final</version>
 </dependency>
系列文章目录:
TODO
二、 基于 Netty 实现 Tomcat
Netty 作为底层通信框架,也可以用于实现 Web 容器。
Tomcat 时基于 J2EE规范的 Web 容器,主要入口是 web.xml 文件。web.xml 文件中主要配置 Servlet、Filter、Listener 等,而 Servlet、Filter、Listener 在 J2EE 中只是抽象的实现,具体业务逻辑由开发者实现。
下面用传统 IO 和 Netty 的方式分别简单实现 Tomcat 的功能
至此为止准备工作就已经就绪,下面我们按照传统 IO 和 Netty 的方式分别实现 Tomcat 的功能。
1. 基于传统 IO 重构 Tomcat
1.1 创建 MyRequest 和 MyReponse 对象
java
@Slf4j
@Getter
public class MyRequest {
    private String uri;
    private String method;

    public MyRequest(InputStream inputStream) throws IOException {
        BufferedReader bufferedReader =
                new BufferedReader(new InputStreamReader(inputStream, StandardCharsets.UTF_8));
        String line = bufferedReader.readLine();
        if (StringUtils.isNotBlank(line)) {
            String[] split = line.split("\\s");
            this.method = split[0];
            this.uri = split[1].split("\\?")[0];
        }
    }
}

public class MyResponse {
    private OutputStream outputStream;

    public MyResponse(OutputStream outputStream) {
        this.outputStream = outputStream;
    }

    public void write(String content) throws IOException {
        //按照HTTP响应报文的格式写入
        String httpResponse = "HTTP/1.1 200 OK\n" +
                "Content-Type:text/html\n" +
                "\r\n" +
                content;
        outputStream.write(httpResponse.getBytes());
    }
}
1.2 构建一个基础的 Servlet
java
public abstract class MyServlet {

    public void service(MyRequest request, MyResponse response) throws Exception {
       if(request.getMethod().equals("GET")){
            doGet(request, response);
        }else if(request.getMethod().equals("POST")){
            doPost(request, response);
        }
    }

    public abstract void doGet(MyRequest request, MyResponse response) throws Exception;

    public abstract void doPost(MyRequest request, MyResponse response) throws Exception;
}
1.3 创建用户业务代码
java
public class FirstServlet extends MyServlet {
    @Override
    public void doGet(MyRequest request, MyResponse response) throws Exception {
        this.doPost(request, response);
    }

    @Override
    public void doPost(MyRequest request, MyResponse response) throws Exception {
        response.write("FirstServlet");
    }
}

public class SecondServlet extends MyServlet {

    @Override
    public void doGet(MyRequest request, MyResponse response) throws Exception {
        this.doPost(request, response);
    }

    @Override
    public void doPost(MyRequest request, MyResponse response) throws Exception {
        response.write("SecondServlet");
    }
}
1.4 完成web.properties 配置
这里为了简化操作,使用 web.properties 来替代 web.xml 文件,如下:
shell
servlet.one.url=/firstServlet.do
servlet.one.className=com.kingfish.netty.unit4.tomcat.FirstServlet

servlet.two.url=/secondServlet.do
servlet.two.className=com.kingfish.netty.unit4.tomcat.SecondServlet
1.5 创建 Tomcat 启动类
java
@Slf4j
public class MyTomcat {
private int port = 8080;
private ServerSocket server;
private Map<String, MyServlet> servletMap = Maps.newHashMap();
private Properties webxml = new Properties();
@SneakyThrows
private void init() {
String webInf = Objects.requireNonNull(this.getClass().getResource("/")).getPath();
webxml.load(this.getClass().getResourceAsStream("/web.properties"));
for (Object k : webxml.keySet()) {
final String key = k.toString();
if (key.endsWith(".url")) {
String serverName = key.replaceAll("\\.url", "");
String url = webxml.getProperty(key);
String className = webxml.getProperty(serverName + ".className");
MyServlet servlet = (MyServlet) Class.forName(className).newInstance();
servletMap.put(url, servlet);
}
}
}
@SneakyThrows
public void start() {
// 1. 初始化。加载配置,初始化 servletMap
init();
// 初始化服务
server = new ServerSocket(port);
System.out.println("服务启动成功, 端口 : " + port);
// 等待客户端连接
while (!Thread.interrupted()) {
// TODO : 实际要改为多线程
process(server.accept());
}
}
/**
* 请求处理
*
* @param client
* @throws Exception
*/
private void process(Socket client) throws Exception {
try (InputStream inputStream = client.getInputStream();
OutputStream outputStream = client.getOutputStream();) {
MyRequest request = new MyRequest(inputStream);
MyResponse response = new MyResponse(outputStream);
String uri = request.getUri();
if (servletMap.containsKey(uri)) {
servletMap.get(uri).service(request, response);
} else {
response.write("404 - Not Found");
}
outputStream.flush();
} catch (Exception e) {
log.error("[请求异常]", e);
} finally {
client.close();
}
}
public static void main(String[] args) {
new MyTomcat().start();
}
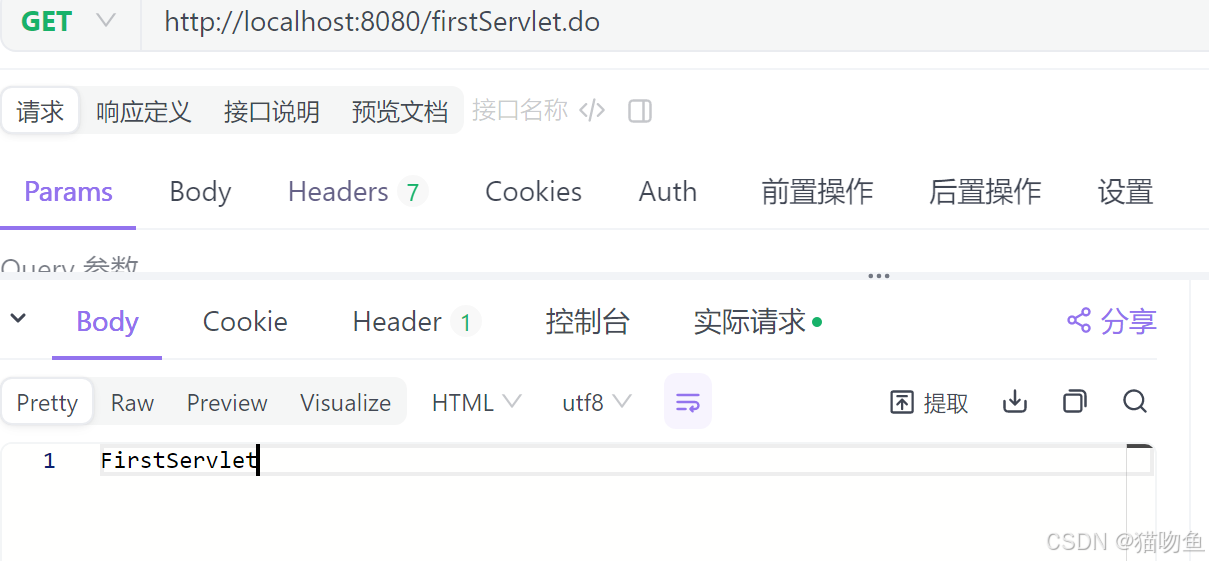
}通过请求 http://localhost:8080/firstServlet.do 和 http://localhost:8080/sencondServlet.do 可以得到相应结果。如下:
2. 基于 Netty 重构 Tomcat
2.1 创建 NettyRequest和 NettyResponse 对象
java
public class NettyRequest {
    private ChannelHandlerContext ctx;

    private HttpRequest request;

    public NettyRequest(ChannelHandlerContext ctx, HttpRequest request) {
        this.ctx = ctx;
        this.request = request;
    }

    public String getUri() {
        return request.uri();
    }

    public String getMethod() {
        return request.method().name();
    }

    public Map<String, List<String>> getParameters() {
        QueryStringDecoder decoder = new QueryStringDecoder(getUri());
        return decoder.parameters();
    }

    public String getParameter(String name) {
        final List<String> params = getParameters().get(name);
        return params == null ? null : params.get(0);
    }
}

public class NettyResponse {
    private ChannelHandlerContext ctx;

    private HttpRequest request;

    public NettyResponse(ChannelHandlerContext ctx, HttpRequest request) {
        this.ctx = ctx;
        this.request = request;
    }

    public void write(String out) {
        try {
            if (out == null || out.length() == 0){
                return;
            }

            // 设置 HTTP 以及请求头信息
            DefaultFullHttpResponse response = new DefaultFullHttpResponse(
                    // 设置版本为 HTTP 1.1
                    HttpVersion.HTTP_1_1,
                    // 设置响应状态码 200
                    HttpResponseStatus.OK,
                    // 设置输出内容编码格式 UTF-8
                    Unpooled.wrappedBuffer(out.getBytes(StandardCharsets.UTF_8)));
            response.headers().set("Content-Type", "text/html;");
            ctx.write(response);
        } finally {
            ctx.flush();
            ctx.close();
        }
    }
}
2.2 构建一个基础的 Servlet
java
public abstract class NettyServlet {

    public void service(NettyRequest request, NettyResponse response) throws Exception {
       if(request.getMethod().equals("GET")){
            doGet(request, response);
        }else if(request.getMethod().equals("POST")){
            doPost(request, response);
        }
    }

    public abstract void doGet(NettyRequest request, NettyResponse response) throws Exception;

    public abstract void doPost(NettyRequest request, NettyResponse response) throws Exception;

}
2.3 创建业务底代码
java
public class FirstServlet extends NettyServlet {

    @Override
    public void doGet(NettyRequest request, NettyResponse response) throws Exception {
        doPost(request, response);
    }

    @Override
    public void doPost(NettyRequest request, NettyResponse response) throws Exception {
        response.write("FirstServlet");
    }
}
2.4 完成web.properties 配置
这里为了简化操作,使用 web.properties 来替代 web.xml 文件,如下:
shell
servlet.one.url=/firstServlet.do
servlet.one.className=com.kingfish.netty.unit4.netty.FirstServlet
2.5 创建业务逻辑处理类
java
public class TomcatHandler extends ChannelInboundHandlerAdapter {

    private Map<String, NettyServlet> servletMap;

    public TomcatHandler(Map<String, NettyServlet> servletMap) {
        this.servletMap = servletMap;
    }

    @Override
    public void channelRead(ChannelHandlerContext ctx, Object msg) throws Exception {
        if (msg instanceof HttpRequest) {
            HttpRequest httpRequest = (HttpRequest) msg;
            NettyRequest request = new NettyRequest(ctx, httpRequest);
            NettyResponse response = new NettyResponse(ctx, httpRequest);

            String uri = request.getUri();
            if (servletMap.containsKey(uri)) {
                servletMap.get(uri).service(request, response);
            } else {
                response.write("404 - Not Found");
            }
        }
    }

    @Override
    public void exceptionCaught(ChannelHandlerContext ctx, Throwable cause) throws Exception {
        cause.printStackTrace();
        ctx.close();
    }
}
2.6 创建 Tomcat 启动类
java
@Slf4j
public class NettyTomcat {
    private int port = 8080;
    private Map<String, NettyServlet> servletMap = Maps.newHashMap();

    private Properties webxml = new Properties();

    @SneakyThrows
    private void init() {
        webxml.load(this.getClass().getResourceAsStream("/web.properties"));
        for (Object k : webxml.keySet()) {
            final String key = k.toString();
            if (key.endsWith(".url")) {
                String serverName = key.replaceAll("\\.url", "");
                String url = webxml.getProperty(key);
                String className = webxml.getProperty(serverName + ".className");
                NettyServlet servlet = (NettyServlet) Class.forName(className).newInstance();
                servletMap.put(url, servlet);
            }
        }
    }

    @SneakyThrows
    public void start() {
        // 1. 初始化。加载配置,初始化 servletMap
        init();
        // 2. 创建 boss 和 worker 线程
        NioEventLoopGroup bossGroup = new NioEventLoopGroup();
        NioEventLoopGroup workerGroup = new NioEventLoopGroup();
        try {

            ServerBootstrap bootstrap = new ServerBootstrap();
            bootstrap.group(bossGroup, workerGroup)
                    // 主线程处理类
                    .channel(NioServerSocketChannel.class)
                    // 子线程处理类
                    .childHandler(new ChannelInitializer<SocketChannel>() {
                        // 客户端初始化
                        @Override
                        protected void initChannel(SocketChannel client) throws Exception {
                            // Netty 对 Http 的封装,对顺序有要求
                            // HttpResponseEncoder 解码器
                            client.pipeline().addLast(new HttpResponseEncoder());
                            // HttpRequestDecoder 编码器
                            client.pipeline().addLast(new HttpRequestDecoder());
                            // 业务逻辑处理
                            client.pipeline().addLast(new TomcatHandler(servletMap));
                        }
                    })
                    // 针对主线程配置 : 分配线程数量最大 128
                    .option(ChannelOption.SO_BACKLOG, 128)
                    // 针对子线程配置 保持长连接
                    .childOption(ChannelOption.SO_KEEPALIVE, true);

            // 启动服务
            ChannelFuture channelFuture = bootstrap.bind(port).sync();
            System.out.println("服务启动成功, 端口 : " + port);
            // 阻塞主线程,防止直接执行 finally 中语句导致服务关闭,当有关闭事件到来时才会放行
            channelFuture.channel().closeFuture().sync();
        } finally {
            // 关闭线程池
            bossGroup.shutdownGracefully();
            workerGroup.shutdownGracefully();
        }

    }

    public static void main(String[] args) {
        new NettyTomcat().start();
    }
通过请求 http://localhost:8080/firstServlet.do 可以得到相应结果。如下:
三、基于 Netty 重构 RPC 框架
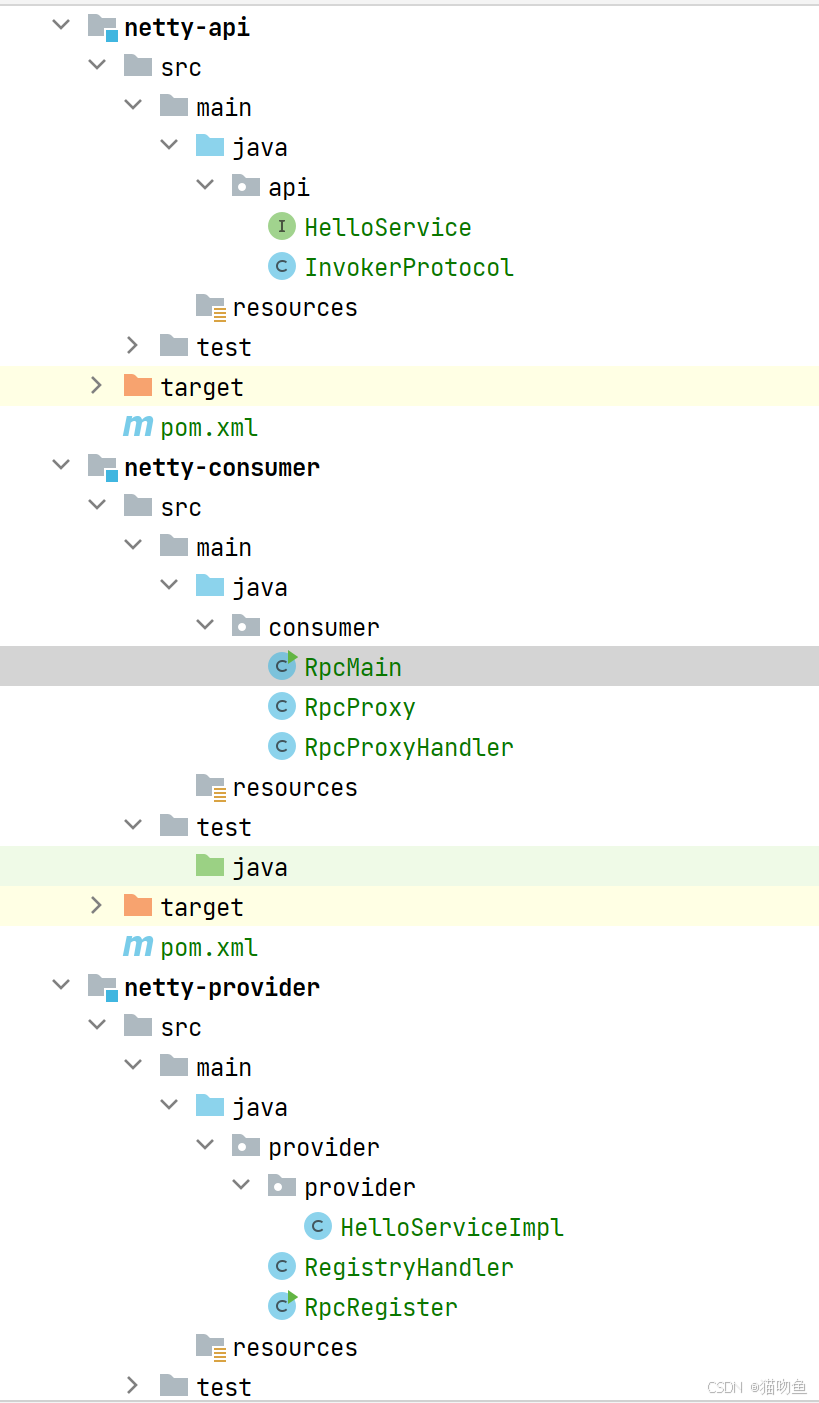
Netty 基本上是作为架构的底层存在,主要是完成高性能的网络通信。下面通过 Netty 简单实现 RPC框架的通信功能,整个项目结构如下图:
1. API 模块
1.1 定义 RPC API 接口
java
public interface HelloService {
    String sayHello(String name);
}
1.2 自定义传输协议
java
@Data
public class InvokerProtocol implements Serializable {

    /**
     * 类名
     */
    private String className;
    /**
     * 方法名
     */
    private String methodName;

    /**
     * 参数列表
     */
    private Class<?>[] params;

    /**
     * 参数列表
     */
    private Object[] values;
}
2. Provider 模块
2.1 实现 HelloService
java
public class HelloServiceImpl implements HelloService {
    @Override
    public String sayHello(String name) {
        return name + ", Hello!";
    }
}
2.2 自定义 Netty 消息处理器
java
public class RegistryHandler extends ChannelInboundHandlerAdapter {

    private static Map<String, Object> registerMap = Maps.newConcurrentMap();

    private List<String> classNames = Lists.newArrayList();

    public RegistryHandler() {
        // 扫描指定目录下的提供者实例
        scannerClass("provider.provider");
        // 将提供者注册
        doRegister();
    }

    @Override
    public void channelRead(ChannelHandlerContext ctx, Object msg) throws Exception {
        InvokerProtocol invokerProtocol = (InvokerProtocol) msg;
        Object result = new Object();
        // 通过协议参数获取到具体提提供者,并通过反射调用
        if (registerMap.containsKey(invokerProtocol.getClassName())) {
            Object clazz = registerMap.get(invokerProtocol.getClassName());
            Method method = clazz.getClass().getMethod(invokerProtocol.getMethodName(), invokerProtocol.getParams());
            result = method.invoke(clazz, invokerProtocol.getValues());
        }

        ctx.write(result);
        ctx.flush();
        ctx.close();
    }

    @Override
    public void exceptionCaught(ChannelHandlerContext ctx, Throwable cause) throws Exception {
        cause.printStackTrace();
        ctx.close();
    }

    /**
     * 递归扫描
     *
     * @param packageName
     */
    private void scannerClass(String packageName) {
        URL url = this.getClass().getClassLoader().getResource(packageName.replaceAll("\\.", "/"));
        List<File> files = FileUtil.loopFiles(url.getFile(), pathname -> pathname.getName().endsWith(".class"));
        for (File file : files) {
            classNames.add(packageName + "." + file.getName().replace(".class", ""));
        }
    }

    @SneakyThrows
    private void doRegister() {
        for (String className : classNames) {
            Class<?> clazz = Class.forName(className);
            Class<?> i = clazz.getInterfaces()[0];
            registerMap.put(i.getName(), clazz.getDeclaredConstructor().newInstance());
        }
    }
}
2.3 服务端启动
java
public class RpcRegister {
    private int port = 8090;

    @SneakyThrows
    public void start() {
        // 2. 创建 boss 和 worker 线程
        NioEventLoopGroup bossGroup = new NioEventLoopGroup();
        NioEventLoopGroup workerGroup = new NioEventLoopGroup();
        try {

            ServerBootstrap bootstrap = new ServerBootstrap();
            bootstrap.group(bossGroup, workerGroup)
                    // 主线程处理类
                    .channel(NioServerSocketChannel.class)
                    // 子线程处理类
                    .childHandler(new ChannelInitializer<SocketChannel>() {
                        // 客户端初始化
                        @Override
                        protected void initChannel(SocketChannel client) throws Exception {
                            // 自定义协议解码器
                            // LengthFieldBasedFrameDecoder 五个入参分别如下:
                            // maxFrameLength : 框架的最大长度。如果帧长度大于此值,将抛出 TooLongFrameException
                            // lengthFieldOffset : 长度属性的偏移量。即对应的长度属性在整个消息数据中的位置
                            // lengthFieldLength : 长度属性的长度。如果长度属性是 int,那么这个值就是 4 (long 类型就是 8)
                            // lengthAdjustment : 要添加到长度属性值的补偿值
                            // initialBytesToStrip : 从解码帧中取出的第一个字节数。
                            client.pipeline().addLast(new LengthFieldBasedFrameDecoder(Integer.MAX_VALUE, 0, 4, 0, 4));
                            // 自定义协议编码器
                            client.pipeline().addLast(new LengthFieldPrepender(4));
                            // 对象参数类型编码器
                            client.pipeline().addLast("encoder", new ObjectEncoder());
                            // 对象参数类型解码器
                            client.pipeline().addLast("decoder", new ObjectDecoder(Integer.MAX_VALUE, ClassResolvers.cacheDisabled(null)));
                            client.pipeline().addLast(new RegistryHandler());
                        }
                    })
                    // 针对主线程配置 : 分配线程数量最大 128
                    .option(ChannelOption.SO_BACKLOG, 128)
                    // 针对子线程配置 保持长连接
                    .childOption(ChannelOption.SO_KEEPALIVE, true);

            // 启动服务
            ChannelFuture channelFuture = bootstrap.bind(port).sync();
            System.out.println("服务启动成功, 端口 : " + port);
            // 阻塞主线程,防止直接执行 finally 中语句导致服务关闭,当有关闭事件到来时才会放行
            channelFuture.channel().closeFuture().sync();
        } finally {
            // 关闭线程池
            bossGroup.shutdownGracefully();
            workerGroup.shutdownGracefully();
        }
    }

    public static void main(String[] args) {
        new RpcRegister().start();
    }
}
3. Consumer 模块
3.1 自定义 Netty 消息处理器
java
public class RpcProxyHandler extends ChannelInboundHandlerAdapter {

    @Getter
    private Object response;

    @Override
    public void channelRead(ChannelHandlerContext ctx, Object msg) throws Exception {
        response = msg;
    }

    @Override
    public void exceptionCaught(ChannelHandlerContext ctx, Throwable cause) throws Exception {
        cause.printStackTrace();
    }
}
3.2 实现消费者端的代理调用
java
public class RpcProxy {
    /**
     * 创建代理对象
     *
     * @param clazz
     * @param <T>
     * @return
     */
    public static <T> T create(Class<?> clazz) {
        Class<?>[] interfaces = clazz.isInterface() ? new Class<?>[]{clazz} : clazz.getInterfaces();
        return (T) Proxy.newProxyInstance(clazz.getClassLoader(), interfaces, new MethodProxy(clazz));
    }


    /**
     * 方法代理
     */
    public static class MethodProxy implements InvocationHandler {
        private Class<?> clazz;

        public MethodProxy(Class<?> clazz) {
            this.clazz = clazz;
        }

        @Override
        public Object invoke(Object proxy, Method method, Object[] args) throws Throwable {
            // 传进来的一个已实现的具体类,本次实现暂不处理该逻辑
            if (Object.class.equals(method.getDeclaringClass())) {
                return method.invoke(this, args);
            } else {
                // 如果传进来的是一个接口,则说明要进行 RPC 调用
                return rpcInvoke(proxy, method, args);
            }
        }

        /**
         * rpc 调用
         *
         * @param proxy
         * @param method
         * @param args
         * @return
         * @throws InterruptedException
         */
        private Object rpcInvoke(Object proxy, Method method, Object[] args) throws InterruptedException {
            NioEventLoopGroup group = new NioEventLoopGroup();
            RpcProxyHandler rpcProxyHandler = new RpcProxyHandler();

            try {
                // 传输协议封装
                InvokerProtocol invokerProtocol = new InvokerProtocol();
                invokerProtocol.setClassName(this.clazz.getName());
                invokerProtocol.setMethodName(method.getName());
                invokerProtocol.setValues(args);
                invokerProtocol.setParams(method.getParameterTypes());

                // 通过 netty 连接 服务提供者
                Bootstrap bootstrap = new Bootstrap();
                bootstrap.group(group)
                        .channel(NioSocketChannel.class)
                        .option(ChannelOption.TCP_NODELAY, true)
                        .handler(new ChannelInitializer<>() {
                            @Override
                            protected void initChannel(Channel channel) throws Exception {
                                // 自定义协议解码器
                                // LengthFieldBasedFrameDecoder 五个入参分别如下:
                                // maxFrameLength : 框架的最大长度。如果帧长度大于此值,将抛出 TooLongFrameException
                                // lengthFieldOffset : 长度属性的偏移量。即对应的长度属性在整个消息数据中的位置
                                // lengthFieldLength : 长度属性的长度。如果长度属性是 int,那么这个值就是 4 (long 类型就是 8)
                                // lengthAdjustment : 要添加到长度属性值的补偿值
                                // initialBytesToStrip : 从解码帧中取出的第一个字节数。
                                channel.pipeline().addLast("frameDecoder", new LengthFieldBasedFrameDecoder(Integer.MAX_VALUE, 0, 4, 0, 4));
                                // 自定义协议编码器
                                channel.pipeline().addLast("frameEncoder", new LengthFieldPrepender(4));
                                // 对象参数类型编码器
                                channel.pipeline().addLast("encoder", new ObjectEncoder());
                                // 对象参数类型解码器
                                channel.pipeline().addLast("decoder", new ObjectDecoder(Integer.MAX_VALUE, ClassResolvers.cacheDisabled(null)));
                                // 业务处理器
                                channel.pipeline().addLast("handler", rpcProxyHandler);
                            }
                        });
                // 连接提供者服务并发送消息
                ChannelFuture future = bootstrap.connect(new InetSocketAddress("127.0.0.1", 8090)).sync();
                future.channel().writeAndFlush(invokerProtocol);
                // 阻塞主线程,防止直接执行 finally 中语句导致服务关闭,当有关闭事件到来时才会放行
                future.channel().closeFuture().sync();
            } finally {
                group.shutdownGracefully();
            }

            return rpcProxyHandler.getResponse();
        }


    }
}
3.3 消费者调用
java
public class RpcMain {
    public static void main(String[] args) {
        HelloService helloService = RpcProxy.create(HelloService.class);
        String hello = helloService.sayHello("张三");
        // 输出 hello = 张三, Hello!
        System.out.println("hello = " + hello);
    }
}