代码下载
地图找房模块
顶部导航栏
封装NavHeader组件实现城市选择,地图找房页面的复用,在 components 目录中创建组件 NavHeader,把之前城市列表写过的样式复制到 NavHeader.scss 下,在该组件中封装 antd-mobile 组件库中的 NavBar组件:
    import { NavBar } from "antd-mobile";
    import { useNavigate } from "react-router-dom";
    import "./NavHeader.scss";

    export default function NavHeader({onBack, children}) {
        const navigate = useNavigate()
        function backAction() {
            navigate(-1)
        }
        return (<NavBar style={{
            '--height': '44px',
            '--border-bottom': '1px #eee solid',
            'color': '#333',
            'backgroundColor': '#f6f5f6'
          }} onBack={onBack || backAction} backIcon={<i className="iconfont icon-back"></i>}>
            {children}
        </NavBar>)
    }
由于头部的左侧按钮不一定是返回上一个页面的功能,所以需要把左侧点击逻辑处理需要通过父组件传递进来,如果说外界传递了,那么就直接使用外界的行为,如果没有传递,那么就用默认的行为。
添加props校验
封装好了的组件可能会提供给别人去使用,然而别人在使用的时候不清楚需要传递怎样的props,所以可以通过添加 props 校验,来提示使用者,应该怎样正确的传递 props:
-
安装
yarn add prop-types或者npm i prop-types -
导入 PropTypes
-
给NavHeader组件的 children 和 onLeftClick添加props校验
  import PropTypes from "prop-types";
  ......
  NavHeader.propTypes = {
      children: PropTypes.string.isRequired,
      onBack: PropTypes.func
  }
在 CityList.js 文件中,引入 NavHeader 组件,把之前 NavBar 组件去掉,使用封装好的NavHeader组件。在 Map.js 文件中使用 NavHeader 组件:
<NavHeader>地图找房</NavHeader>组件之间样式覆盖问题
在配置路由的时候,多个组件都会被导入到路由中,那么只要组件被导入,那么相关的样式也会被导入进来,如果两个组件的样式名称相同,那么就会影响另外一个组件的样式。默认情况下,只要导入了组件,不管组件有没有显示在页面中,组件的样式就会生效。解决方式:
- 写不同的类名
- CSS IN JS
CSS IN JS 是使用JavaScript 编写 CSS 的统称,用来解决CSS样式冲突,覆盖等问题;CSS IN JS 的具体实现有50多种,比如:CSS Modules、styled-components等。推荐使用 CSS Modules(React脚手架已经集成进来了,可以直接使用)。
CSS Modules
-
CSS Modules 通过对CSS类名重命名,保证每一个类名的唯一性,从而避免样式冲突问题
-
实现方式:webpack的css-loader 插件
-
命名采用:BEM(Block块、Element元素、Modifier三部分组成)命名规范。比如: .list_item_active
-
在React脚手架中演化成:文件名、类名、hash(随机)三部分,只需要指定类名即可
  /* 自动生成的类名,我们只需要提供 classname 即可 */
  [filename]_[classname]__[hash]

  // 类名
  .error {}
  // 生成的类名为:
  .Button_error__ax7yz
使用步骤:
- 创建名为 name.module.css 的样式文件(React脚手架中的约定,与普通CSS区分开)
- 组件中导入该样式文件(注意语法)
import styles from './index.module.css' - 通过 styles 对象访问对象中的样式名来设置样式
<div className={styles.test}></div>
使用CSS Modules修改 NavHeader 样式
在 components 目录中创建 NavHeader.module.css 的样式文件,在样式文件中修改当前组件的样式(使用单个类名设置样式,不使用嵌套样式):
    :globle(.adm-nav-bar-title) {
        color: #333;
    }
对于组件库中已经有的全局样式,需要使用:global() 来指定,在修改NavBar里面文字颜色的时候,用到了一个类名叫:adm-nav-bar-title 这个类名是组件库中定义的,所以对于这一类需要这样去设置 :global(.adm-nav-bar-title){}
修改 Map 组件中样式
将 Map.css 修改为 Map.moudle.css,并将样式调整为如下:
    .map {
        height: 100%;
        padding-top: 44px;
    }
    #container {
        height: 100%;
    }

    .map :global(.adm-nav-bar) {
        margin-top: -44px;
    }
导入 Map.moudle.css 样式,调整类名:
    import styles from './Map.module.css'
    ......

        // 页面结构
        <div className={styles.map}>
            <NavHeader>地图找房</NavHeader>
            <div id={styles.container}></div>
        </div>
根据定位展示当前城市
在 utils 文件夹创建 useCurrentCity.js 文件,自定义获取当前定位城市信息的 HOOK:
    import { useEffect, useState } from "react";
    import requestCurrentCity from "./requestCurrentCity.js";

    export default function useCurrentCity() {
        const [city, setCity] = useState(localStorage.getItem('localCity'))
        const [error, setError] = useState(null)
        const [loading, setLoading] = useState(city ? true : false)
        useEffect(() => {
            let ignore = false
            if (city) {

            } else {
                requestCurrentCity().then((data) => {
                    if (!ignore) {
                        setCity(JSON.stringify(data))
                        setLoading(false)
                    }
                }).catch((error) => {
                    if (!ignore) {
                        setError(error)
                        setLoading(false)
                    }
                })
            }

            return () => ignore = true
        }, [city])

        return {currentCity: JSON.parse(city), error, loading}
    }
在 Home、CityList 组件中,使用 useCurrentCity 获取当前城市。
Map 组件处理逻辑:
-
使用 useCurrentCity 获取当前定位城市
-
在 useEffect 中使用 地址解析器 解析当前城市坐标
-
调用 centerAndZoom() 方法在地图中展示当前城市,并设置缩放级别为11
-
在地图中添加比例尺和平移缩放控件
      // 获取当前城市定位
      const { currentCity } = useCurrentCity()
      console.log('currentCity: ', currentCity);

      // 创建地图
      const { label: currentLabel, value: currentValue } = currentCity
      useEffect(() => {
          let ignore = false
          // 定位成功
          if (currentLabel) {
              // 创建地图实例
              var map = new window.BMapGL.Map(styles.container);
              //开启鼠标滚轮缩放
              map.enableScrollWheelZoom(true);

              // 添加比例尺控件
              var scaleCtrl = new window.BMapGL.ScaleControl();
              map.addControl(scaleCtrl);
              // 添加缩放控件
              var zoomCtrl = new window.BMapGL.ZoomControl();
              map.addControl(zoomCtrl);

              //创建地址解析器实例
              var myGeo = new window.BMapGL.Geocoder();
              // 将地址解析结果显示在地图上,并调整地图视野
              myGeo.getPoint(currentLabel, function(point){
                  let p = null
                  if(point){
                      console.log('point: ', point);
                      // map.addOverlay(new window.BMapGL.Marker(point, {title: '北京市海淀区上地10街'}))
                      // 地址解析成功
                      p = point
                  }else{
                      alert('您选择的地址没有解析到结果!');
                      // 地址解析失败,创建默认点坐标 (北京)
                      p = new window.BMapGL.Point(116.404, 39.915);
                  }

                  // 设置中心点坐标和地图级别
                  map.centerAndZoom(p, 11);
              }, currentLabel)
          }

          return () => ignore = true
      }, [currentLabel])
说明:React Effect 使用
Object.is比较依赖项的值,如果依赖项为 对象,则比较的是是否在内存中为同一对象,所以将 currentCity 解构。
地图中展示房源信息
这些房源信息其实就是用文本覆盖物来实现的,所以先查看百度开发文档,先创建文本覆盖物
创建文本覆盖物:
-
创建Label 示例对象
-
掉用setStyle() 方法设置样式
-
在map对象上调用 addOverlay() 方法,讲文本覆盖物添加到地图中
  var point = new BMapGL.Point(116.404, 39.915);
  var content = "label";
  var label = new BMapGL.Label(content, {       // 创建文本标注
      position: point,                          // 设置标注的地理位置
      offset: new BMapGL.Size(10, 20)           // 设置标注的偏移量
  })
  map.addOverlay(label);                        // 将标注添加到地图中
绘制房源覆盖物
1、 引入 axios,获取房源数据
    import axios from "axios";
    ......

                    // 获取房源信息
                    axios.get('area/map?id=' + currentCity.value).then((data) => {

                    })
2、遍历数据,创建覆盖物,给每一个覆盖物添加唯一标识
                    // 获取房源信息
                    axios.get('area/map?id=' + currentCity.value).then((data) => {
                        // 文本覆盖物
                        data && data.body.forEach((item) => {
                            // 覆盖物内容结构
                            var content = `<div class=${styles.bubble}>
                                <p class="${styles.name}">${item.label}</p>
                                <p>${item.count}套</p>
                            </div>`;
                            // 创建文本标注
                            var label = new BMapGL.Label(content, {
                                // 设置标注的地理位置
                                position: new BMapGL.Point(item.coord.longitude, item.coord.latitude),
                                // 设置标注的偏移量
                                offset: new BMapGL.Size(10, 20)
                            })
                            // 给label添加唯一标识
                            label.id = item.value
                            map.addOverlay(label);
                            // 设置label的样式
                            label.setStyle({
                                cursor: 'pointer',
                                fontSize: '12px',
                                textAlign: 'center'
                                border: '0',
                                padding: '0'
                            })
                        })
                    })
由于默认提供的本文覆盖物与需要的效果不符合,所以要进行重新的绘制,调用 Label 的 setContent 方法或创建创建覆盖物时,传入html结构,修改HTML的内容样式;(注意:调用了setContent 那么里面文本的内容就失效了)
3、在 Map.module.css 文件中,设置覆盖物内容的样式:
    /* 覆盖物样式 */
    .bubble {
      width: 70px;
      height: 70px;
      line-height: 1;
      display: inline-block;
      position: absolute;
      border-radius: 100%;
      background: rgba(12, 181, 106, 0.9);
      color: #fff;
      border: 2px solid rgba(255, 255, 255, 0.8);
      text-align: center;
      cursor: pointer;
    }

    .name {
      padding: 5px 0 0 0;
    }
房源覆盖物点击逻辑
点击覆盖物------放大地图 -> 获取数据,渲染下一级覆盖物:
- 点击区、镇覆盖物,清除现有的覆盖物,获取下一级数据,创建新的覆盖物
- 点击小区覆盖物,不清楚覆盖物,移动地图,展示该小区下的房源信息
给覆盖物添加点击事件,并在事件中清除覆盖物:
                        // 添加点击
                        label.addEventListener('click', () => {
                            // 清除覆盖物
                            map.clearOverlays()
                        })
封装流程
到目前为止才完成地图找房的一环,也就是获取了区的房源信息,然后可以点击对应区的房源,清除地图上的覆盖物,而再实现镇的时候也是相同的逻辑,实现小区的时候,逻辑流程也是相似的,所以可以对此进行一层封装,提高代码复用性:
-
renderOverlays() 作为入口:接收区域id参数,获取该区域下的房源数据;接收当前地图级别 zoom 参数,调用对应方法,创建覆盖物,到底是创建区镇的覆盖物还是小区覆盖物
-
createCircle() 方法:根据传入的数据创建覆盖物,绑定事件(放大地图,清除覆盖物,渲染下一级房源数据)
-
createReact() 方法:根据传入的数据创建覆盖物,绑定事件(移动地图,渲染房源列表)
  // 解决脚手架中全局变量访问的问题
  const BMapGL = window.BMapGL

  function renderOverlays(id, zoom, map, setHouseList) {
      // 获取房源信息
      axios.get('area/map?id=' + id).then((data) => {
          console.log('house data: ', data);

          // 文本覆盖物
          data && data.body.forEach((item) => {
              if (zoom === 11 ) {
                  createCircle(item, 13, map, setHouseList)
              } else if (zoom === 13) {
                  createCircle(item, 15, map, setHouseList)
              } else if (zoom === 15) {
                  console.log('setHouseList: ', setHouseList);
                  createRect(item, map, setHouseList)
              }
          })
      })
  }

  // 覆盖物样式
  const labelStyle = {
      cursor: 'pointer',
      fontSize: '12px',
      textAlign: 'center',
      border: '0',
      padding: '0'
  }

  function createCircle(item, zoom, map, setHouseList) {
      // 覆盖物内容结构
      var content = `<div class=${styles.bubble}>
          <p class="${styles.name}">${item.label}</p>
          <p>${item.count}套</p>
      </div>`;
      const point = new BMapGL.Point(item.coord.longitude, item.coord.latitude)
      // 创建文本标注
      var label = new BMapGL.Label(content, {
          // 设置标注的地理位置
          position: point,
          // 设置标注的偏移量
          offset: new BMapGL.Size(-35, -35)
      })
      // 给label添加唯一标识
      label.id = item.value
      // 添加点击
      label.addEventListener('click', () => {
          // 清除覆盖物
          map.clearOverlays()

          // 设置中心点坐标和地图级别
          map.centerAndZoom(point, zoom)

          // 渲染下一级覆盖物
          renderOverlays(item.value, zoom, map, setHouseList)
      })
      map.addOverlay(label);
      // 设置label的样式
      label.setStyle(labelStyle)
  }

  function createRect(item, map, setHouseList) {
      // 覆盖物内容结构
      var content = `<div class=${styles.rect}>
          <span class="${styles.housename}">${item.label}</span>
          <span class="${styles.housenum}">${item.count}套</span>
          <i class="${styles.arrow}"></i>
      </div>`;
      const point = new BMapGL.Point(item.coord.longitude, item.coord.latitude)
      // 创建文本标注
      var label = new BMapGL.Label(content, {
          // 设置标注的地理位置
          position: point,
          // 设置标注的偏移量
          offset: new BMapGL.Size(-50, -28)
      })
      // 给label添加唯一标识
      label.id = item.value
      // 添加点击
      label.addEventListener('click', (e) => {
          // 获取小区房源信息
          axios.get('houses?cityId=' + item.value).then((data) => {
              console.log('house data: ', data);
              // 保存数据,刷新组件
              setHouseList(data.body.list)

              // 调整地图位置(让点击的房源在中心位置)
              const x = window.innerWidth/2 - label.domElement.offsetLeft - 50
              const y = (window.innerHeight - 350)/2 - label.domElement.offsetTop - 28
              map.panBy(x, y)
          })
      })
      map.addOverlay(label);
      // 设置label的样式
      label.setStyle(labelStyle)
  }
使用地图的 panBy() 方法,移动地图到中间位置。
样式:
    /* 覆盖物样式 */
    /* 区、镇的覆盖物样式: */
    .bubble {
      width: 70px;
      height: 70px;
      line-height: 1;
      display: inline-block;
      position: absolute;
      border-radius: 100%;
      background: rgba(12, 181, 106, 0.9);
      color: #fff;
      border: 2px solid rgba(255, 255, 255, 0.8);
      text-align: center;
      cursor: pointer;
    }
    .name {
      padding: 5px 0 0 0;
    }

    /* 小区覆盖物样式 */
    .rect {
        height: 20px;
        line-height: 19px;
        width: 100px;
        padding: 0 3px;
        border-radius: 3px;
        position: absolute;
        background: rgba(12, 181, 106, 0.9);
        cursor: pointer;
        white-space: nowrap;
    }

    .arrow {
        display: block;
        width: 0;
        height: 0;
        margin: 0 auto;
        border: 4px solid transparent;
        border-top-width: 4px;
        border-top-color: #00a75b;
    }

    .housename {
        display: inline-block;
        width: 70px;
        vertical-align: middle;
        overflow: hidden;
        text-overflow: ellipsis;
        white-space: nowrap;
    }

    .housenum {
        display: inline-block;
        width: 20px;
    }

    /* 房源列表样式 */
    .houseList {
        /* 覆盖在地图上 */
        position: fixed;
        z-index: 999;
        left: 0;
        bottom: 0;
        width: 100%;
        height: 350px;
        background-color: #fff;
        transition: transform 0.35s;
        transform: translate(0, 350px);
    }
    .show {
        transform: translate(0, 0);
    }

    .listWrap {
        padding: 0 15px;
        background-color: #c0c0c2;
        border-top: 1px solid #c8c8c8;
        width: 100%;
        height: 44px;
        position: relative;
        display: flex;
        justify-content: space-between;
        align-items: center;
    }
    .listTitle {
        font-size: 16px;
        text-align: center;
        flex-grow: 1;
        text-align: left;
    }
    .listMore {
        font-size: 14px;
        color: #1e1e1e;
        text-decoration: none;
    }

      /* 房源列表项样式 */
    .houseItems {
        width: 100%;
        height: 100%;
        padding-bottom: 44px;
        overflow-y: auto;
    }
    .houseItem {
        width: 100%;
        height: 110px;
        padding: 15px;
        display: flex;
        align-items: center;
    }
    .itemLeft {
        width: 106px;
        height: 80px;
    }
    .itemRight {
        margin-left: 15px;
        height: 100%;
        overflow: hidden;
        flex-grow: 1;
    }
    .itemTitle {
        overflow: hidden;
        text-overflow: ellipsis;
        white-space: nowrap;
        font-size: 15px;
        color: #394043;
    }
    .itemDesc {
        overflow: hidden;
        text-overflow: ellipsis;
        white-space: nowrap;
        vertical-align: middle;
        font-size: 12px;
        color: #afb2b3;
    }
    .price {
        font-size: 12px;
        color: #fa5741;
    }
    .priceNum {
        font-size: 16px;
        font-weight: bolder;
    }
    .tags {
        display: inline-block;
        font-size: 12px;
        border-radius: 3px;
        padding: 4px 5px;
        margin-right: 5px;
        line-height: 12px;
    }
    .tag1 {
        color: #39becd;
        background: #e1f5f8;
    }
    .tag2 {
        color: #3fc28c;
        background: #e1f5ed;
    }
    .tag3 {
        color: #5aabfd;
        background: #e6f2ff;
    }
axios优化&环境变量
每一次请求接口的时候,每一次都需要写相同的 baseUrl。例如 http://localhost:8080,这样太繁琐,所以可以对网络请求进行优化,接口域名、图片域名、分为开发环境和生产环境,直接写在代码中,项目发布时,很难替换。
// 通过脚手架的环境变量来解决 开发环境
在开发环境变量文件 .env.development 中,配置 REACT_APP_URL= http://localhost:8080

// 通过脚手架的环境变量解决, 生产环境
在生产环境变量文件 .env.production 中,配置 REACT_APP_URL=线上接口地址
配置生产环境和开发环境
在react中,默认支持.env文件,可以根据不同的环境使用不同的配置文件,如下所示:
.env:默认配置文件(类似全局可以使用).env.development:开发环境配置文件(特定环境使用).env.production:生产环境配置文件(特定环境使用).env.test:测试环境配置文件(特定环境使用).env.local:本地加载这个文件覆盖默认配置文件使用.env.development.local、.env.production.local、.env.test.local:本地覆盖特定环境使用
1、在项目根目录中创建文件 .env.development
2、在该文件中添加环境变量 REACT_APP_URL(注意:环境变量约定 REACT_APP 开头),设置 REACT_APP_URL = http://localhost:8080
3、重新启动脚手架,脚手架在运行的时候就会解析这个文件
4、在 utils/constValue.js 中,创建 baseUrl 变量,设置值为 process.env.REACT_APP_URL,导出 baseUrl
export const baseUrl = process.env.REACT_APP_URL5、在需要时引入就能使用了 import { baseUrl } from "../utils/constValue";
axios 优化
-
在
.env.development文件中,新增网络超时的时间变量REACT_APP_TIME_OUT = 10000,并在在utils/constValue.js中,创建 timeOut 变量,设置值为process.env.REACT_APP_TIME_OUT,导出 timeOut -
在 utils 中新建
api.js文件,导入 axios 、baseUrl 和 timeOut -
调用 axios.create() 方法创建一个axios实例。给 create 方法,添加配置 baseURL 值为 baseUrl、配置 timeout 值为 timeOut。导出API对象
  import axios from "axios";
  import { baseUrl, timeOut } from "./constValue";

  // 创建配置对象
  const config = {
      baseURL: baseUrl,
      timeout: timeOut
  }

  // 根据create 方法来构建axios对象
  export const instance = axios.create(config)
导入API,代替之前直接利用 axois 请求的代码:
import {instance} from '../../utils/api.js'添加Loading效果
利用 Toast 来实现,请求开始的时候开启 loading,请求结束后关闭 loading。最好的时机就是在请求拦截器中开启 loading,在响应拦截器中关闭 loading:
    import { Toast } from "antd-mobile";

    // 请求拦截器
    instance.interceptors.request.use((config) => {
        Toast.show({icon: 'loading', duration: 0, content: '加载中...', maskClickable: false})
        return config
    })
    // 响应拦截器
    instance.interceptors.response.use((res) => {
        console.log('data: ', res);
        Toast.clear()
        return res.data
    }, (error) => {
        console.log('error: ', error);
        Toast.clear()
    })
列表找房功能
顶部搜索导航栏
封装搜索导航栏组件
在components 目录中创建组件 SearchHeader,把之前写过的结构拷贝到这个文件中,然后把跟首页相关的数据去掉,标题,城市名称,通过props来进行传递:
    import PropTypes from "prop-types";
    import "../pages/Home.scss";
    import { useNavigate } from "react-router-dom";

    export default function SearchHeader({cityName, className, onClickLoction, onClickSearch, onClickMap}) {
        const navigate = useNavigate()
        function locationAction() {
            navigate('/cityList')
        }
        function searchAction() {
            navigate('/search')
        }
        function mapAction() {
            navigate('/map')
        }
        return <div className={'headerSearch' + (className ? ' ' + className : '')}>
            <div className='search'>
                <div className='location' onClick={onClickLoction || locationAction}>
                    <span className="name">{cityName}</span>
                    <i className="iconfont icon-arrow" />
                </div>
                <div className='form' onClick={onClickSearch || searchAction}>
                    <i className="iconfont icon-seach" />
                    <span className="text">请输入小区或地址</span>
                </div>
            </div>
            <div className="iconfont icon-map" onClick={onClickMap || mapAction}></div>
        </div>
    }

    SearchHeader.propTypes = {
        cityName: PropTypes.string.isRequired,
        onClickLoction: PropTypes.func,
        onClickSearch: PropTypes.func,
        onClickMap: PropTypes.func
    }
需要在外部调整组件样式,所以还需要传递 className 的属性进去。
把搜索导航栏引入到 House 中,调整相应样式
给 SearchHeader 组件传递 className 属性,来调整组件样式,让其适应找房页面效果,下面是 House 的头布局:
    import SearchHeader from "../components/SearchHeader";
    import useCurrentCity from "../utils/useCurrentCity";
    import "./House.module.css";

    export default function House() {
        // 获取当前城市定位
        const { currentCity } = useCurrentCity()

        return (<div ref={scollRef} className={styles.root}>
            <SearchHeader className={styles.header} cityName={currentCity.label ? currentCity.label : '--'}></SearchHeader>
        </div>)
    }
创建 house.module.css,设置相应的样式,修改了一些组件中的全局样式,所以需要通过 :global 来设置:
    .root {
        width: 100%;
        height: 100%;
        position: relative;
        padding-top: 20px;
    }

    /* 搜索导航栏样式 */
    .header {
        background-color: #f5f6f5;
        position: static;
    }
    /* 控制右侧的图标 */
    .header :global(.icon-map) {
        color: #00ae66;
    }
    /* 控制search输入框 */
    .header :global(.search) {
        height: 34px;
    }
条件筛选
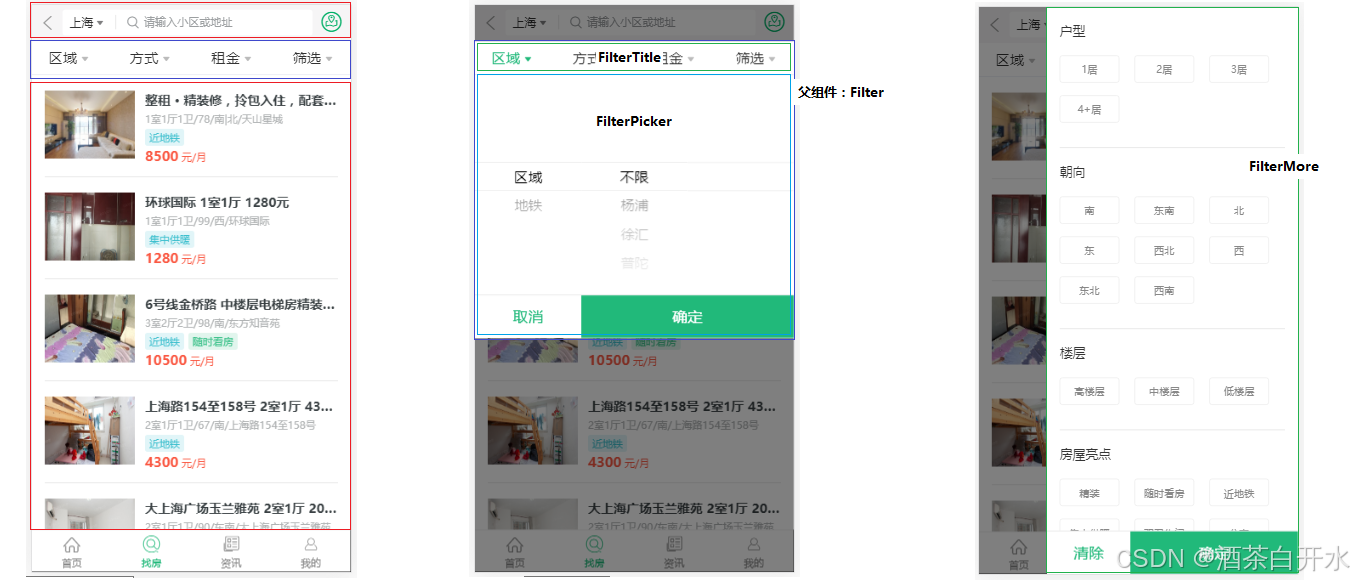
结构分析:
- 父组件:Filter
- 子组件:FilterTitle 标题菜单组件
- 子组件:FilterPicker 前三个菜单对应的内容组件
- 子组件:FilterMore 最后一个菜单对应的内容组件
功能分析:
- 点击 FilterTitle 组件菜单,展开该条件筛选对话框,被点击的标题高亮
- 点击取消按钮或空白区域,隐藏对话框,取消标题高亮
- 选择筛选条件后,点击确定按钮,隐藏对话框,当前标题高亮
- 打开对话框时,如果有选择的条件,那么默认显示已选择的条件
- 打开对话框以及隐藏对话框有动画效果
- 吸顶功能
FilterTitle 组件实现
根据标题菜单数据,渲染标题列表;标题可以被点击,点击时标题高亮:
- 标题高亮状态:提升至父组件Filter中,由父组件提供高亮状态,子组件通过props接受状态来实现高亮
- 原则:单一数据源,也就是说,状态只应该有一个组件提供并且提供操作状态的方法,其他组件直接使用组件中状态和操作状态的方法即可
实现步骤:
-
通过props接受,高亮状态对象 selectedStatus
-
遍历titleList数组,渲染标题列表
-
判断高亮对象中当前标题是否高亮,如果是,添加高亮类
-
给标题项绑定单击事件,在事件中调用父组件传过来的方法 selectAction,将当前标题 item,通过 selectAction 的参数,传递给父组件
  import styles from "./FilterTitle.module.css";

  // 条件筛选栏标题数组:
  const titleList = [
      { title: "区域", type: "area" },
      { title: "方式", type: "mode" },
      { title: "租金", type: "price" },
      { title: "筛选", type: "more" }
  ];

  export default function FilterTitle({ selectedStatus, selectAction }) {
      return (<div className={styles.root}>
          {titleList.map((item) => {
              // 父组件传递过来的状态
              const selected = selectedStatus[item.type]
              return <div
                  key={item.type}
                  className={styles.dropdown + (selected ? ' ' + styles.selected : '')}
                  onClick={() => {
                      selectAction(item)
                  }}>
                  <span>{item.title}</span>
                  <i className="iconfont icon-arrow"></i>
              </div>
          })}
      </div>)
  }
父组件中接受到当前 status,修改标题的选中状态为 true:
    import FilterTitle from "./FilterTitle";
    import { useState } from "react";
    import styles from "./Filter.module.css";

    // 标题高亮状态
    // true 表示高亮; false 表示不高亮
    const initStatus = {
        area: false,
        mode: false,
        price: false,
        more: false
    }

    export default function Filter() {
        const [status, setStatus] = useState(initStatus)

        return (<div className={styles.root}>
            <div className={styles.content}>
                <FilterTitle
                selectedStatus={status}
                selectAction={(item) => {
                    const s = {...status}
                    s[item.type] = true
                    setStatus(s)
                }}></FilterTitle>
            </div>
        </div>)
    }
FilterPicker 组件
思路分析
- 点击前三个标题展示该组件,点击取消的时候隐藏
- 使用PickerView组件来实现页面效果
- 获取到PickerView组件中,选中的筛选条件值
- 点击确定按钮,隐藏该组件,将获取到的筛选条件值传递给父组件
- 展示或隐藏对话框的状态:由父组件提供,通过props传递给子组件
- 筛选条件数据:由父组件提供(因为所有筛选条件是通过一个接口来获取的),通过props传递给子组件
实现步骤
在Filter组件中,提供组件展示或隐藏的状态:openType
const [openType, setOpenType] = useState('')判断 openType的值为 area/mode/price 时,就显示 FilterPicker组件,以及遮罩层
        const showMask = openType === 'area' || openType === 'mode' || openType === 'price'
        return (<div className={styles.root}>
            {/* 遮罩 */}
            { showMask && <div className={styles.mask}></div> }

            <div className={styles.content}>
                ......
                {/* 内容选择器 */}
                { showMask && <FilterPicker></FilterPicker> }
            </div>
        </div>)
在传递给 FilterTitle 组件的 selectAction 方法中,修改状态 openType为当前 type,展示对话框
                selectAction={(item) => {
                    const s = {...status}
                    s[item.type] = true
                    setStatus(s)
                    setOpenType(item.type)
                }
在Filter组件中,提供 cancelAction、confirmAction 方法(作为取消按钮和遮罩层的事件、确定按钮的事件);在 cancelAction、confirmAction 方法中,修改状态 openType为空,隐藏对话框
        function cancelAction() {
            // 清除标题选择状态
            const s = {...initStatus}
            setStatus(s)

            // 取消时隐藏对话框
            setOpenType('')
        }
        function confirmAction() {
            // 清除标题选择状态
            const s = {...initStatus}
            setStatus(s)

            // 确认时隐藏对话框
            setOpenType('')
        }
将 cancelAction、confirmAction 通过props传递给FilterPicker组件,分别在取消、确定按钮的单击事件中调用该方法
{ showMask && <FilterPicker cancelAction={cancelAction} confirmAction={confirmAction}></FilterPicker> }FilterPicker 组件实现:
    import styles from "./FilterPicker.module.css";
    import { PickerView } from "antd-mobile";

    export default function FilterPicker({cancelAction, confirmAction}) {
        const columns = [['1'], ['2'], ['3']]
        return (<div className={styles.root}>
            {/* 选择器 */}
            <PickerView columns={columns}></PickerView>

            {/* 底部按钮 */}
            <div className={styles.bottom}>
                <button className={styles.button + ' ' + styles.cancel} onClick={cancelAction}>取消</button>
                <button className={styles.button + ' ' + styles.confirm} onClick={confirmAction}>确认</button>
            </div>
        </div>)
    }
获取筛选条件数据
在Filter组件中,发送请求,获取所有筛选条件数据;将数据保存为状态 filtersData:
        // 当前城市
        const {currentCity} = useCurrentCity()
        // 筛选数据
        const {data: filtersData} = currentCity && useData.get(`/houses/condition?id=${currentCity.value}`)
        console.log('filtersData: ', filtersData);
封装方法 renderFilterPicker 来渲染FilterPicker组件;在方法中,根据openType的类型,从 filtersData 中获取需要的数据;将 数据 和 openType 通过 props 传递给 FilterPicker 组件:
        // 渲染选择器
        function renderFilterPicker() {
            if (showMask && filtersData) {
                // 数据
                let data = []
                switch (openType) {
                    case 'area':
                        data = [filtersData.body['area'], filtersData.body['subway']]
                        break;
                    case 'mode':
                        data = filtersData.body['rentType']
                        break;
                    case 'price':
                        data = filtersData.body['price']
                        break;

                    default:
                        break;
                }
                console.log('data: ', data);

                return <FilterPicker cancelAction={cancelAction} confirmAction={confirmAction} data={data} type={openType}></FilterPicker>
            }
            return null
        }
FilterPicker 组件接收到 数据 和 type 后,将数据处理之后后作为 PickerView 组件的data:
    import styles from "./FilterPicker.module.css";
    import { PickerView } from "antd-mobile";

    export default function FilterPicker({cancelAction, confirmAction, data, type}) {
        // 计算选择器数据
        function calculateColumns(vs) {
            const result = [data]
            if (type !== 'area') {
                return result
            }
            if (vs.length > 0) {
                const v1 = vs[0]
                if (v1) {
                    const item1 = data.find((value) => value.value === v1)
                    if (item1 && item1.children) {
                        result.push(item1.children)
                        if (vs.length > 1) {
                            const v2 = vs[1]
                            if (v2) {
                                const item2 = item1.children.find((value) => value.value === v2)
                                if (item2 && item2.children) {
                                    result.push(item2.children)
                                }
                            }
                        }
                    }
                }
            }
            if (result.length === 1) {
                result.push([], [])
            } else if (result.length === 2) {
                result.push([])
            }
            console.log('result: ', result);

            return result
        }
        return (<div className={styles.root}>
            {/* 选择器 */}
            <PickerView
            columns={(v) => {
                console.log('cv: ', v);
                return calculateColumns(v)
            }}></PickerView>

            {/* 底部按钮 */}
            <div className={styles.bottom}>
                <button className={styles.button + ' ' + styles.cancel} onClick={cancelAction}>取消</button>
                <button className={styles.button + ' ' + styles.confirm} onClick={confirmAction}>确认</button>
            </div>
        </div>)
    }
获取选中值
在FilterPicker组件中,添加状态selectedValue(用于获取PickerView组件的选中值)
        // 选中值
        const [selectedValue, setSelectedValue] = useState(null)
给PickerView组件添加配置项 onChange,通过参数获取到选中值,并更新状态 value
            {/* 选择器 */}
            <PickerView
            columns={(v) => {
                console.log('cv: ', v);
                return calculateColumns(v)
            }}
            onChange={(v) => {
                setSelectedValue(v)
            }}></PickerView>
在确定按钮的事件处理程序中,将 selectedValue 作为参数传递给父组件
<button className={styles.button + ' ' + styles.confirm} onClick={() => confirmAction(selectedValue)}>确认</button>设置默认选中值
如果是之前选中了的,当再次显示 FilterPicker 的时候,应该展示默认选中项
在Filter组件中,提供选中值状态 selectedValues
// 默认选择器选中值
const initValues = {
    area: ['area', null],
    mode: [null],
    price: [null],
    more: []
}
......

    // 选择器选中值
    const [selectedValues, setSelectedValues] = useState(initValues)
通过 openType 获取到当前类型的选中值,通过 props 传递给 FilterPicker 组件
<FilterPicker cancelAction={cancelAction} confirmAction={confirmAction} data={data} type={openType} defaultValue={selectedValues[openType]}></FilterPicker>在 FilterPicker 组件中,将当前 defaultValue 设置为 PickerView 组件的默认值 defaultValue
    export default function FilterPicker({cancelAction, confirmAction, data, type, defaultValue}) {
    ......
            {/* 选择器 */}
            <PickerView
            columns={(v) => {
                console.log('cv: ', v);
                return calculateColumns(v)
            }}
            onChange={(v) => {
                setSelectedValue(v)
            }}
            defaultValue={defaultValue}
            ></PickerView>
    }
在点击确定按钮后,在父组件中更新当前type对应的selectedValues状态值
        function confirmAction(selectedValue) {
            // 保存选中值
            console.log('selectedValue: ', selectedValue);
            const vs = {...selectedValues, [openType]: selectedValue}
            setSelectedValues(vs)

            // 清除标题选择状态
            const s = {...initStatus}
            setStatus(s)

            // 确认时隐藏对话框
            setOpenType('')
        }
问题
-
在前面三个标签之间来回切换时候,默认选中值不会生效,当点击确定,重新打开FilterPicker组件时候,才会生效
-
分析:两种操作方式的区别在于有没有重新创建FilterPicker组件,重新创建的时候,会生效,不重新创建,不会生效
-
原因:React 会在一个组件保持在同一位置时保留它的 state,不重新创建FilterPicker组件时,不会再次执行state初始化,也就拿不到最新的props
-
解决方式:给FilterPicker组件添加 key 值为openType,这样,在不同标题之间切换时候,key值都不相同,React内部会在key不同时候,重新创建该组件
              FilterPicker
              key={openType}
              cancelAction={cancelAction}
              confirmAction={confirmAction}
              data={data}
              type={openType}
              defaultValue={selectedValues[openType]}
              ></FilterPicker>
FilterMore 组件
渲染组件数据
在 Filter 组件的 renderFilterPicker 方法中渲染 FilterMore 组件,从filtersData中,获取数据(roomType,oriented,floor,characteristic),通过props传递给FilterMore组件
            if (openType === 'more' && filtersData) {
                return <FilterMore
                data={{
                    roomType: filtersData.body['roomType'],
                    oriented: filtersData.body['oriented'],
                    floor: filtersData.body['floor'],
                    characteristic: filtersData.body['characteristic']
                }}
                ></FilterMore>
            }
将 FilterPicker 组件中下方的取消、确认按钮抽取为一个独立的 FilterFooter 组件
    import styles from "./FilterFooter.module.css";

    export default function FilterFooter({
        cancelText = '取消',
        confirmText = '确定',
        cancelAction,
        confirmAction,
        className
      }) {
        return (<div className={styles.bottom + (className ? ' ' + className : '')}>
            <button className={styles.button + ' ' + styles.cancel} onClick={cancelAction}>{cancelText}</button>
            <button className={styles.button + ' ' + styles.confirm} onClick={confirmAction}>{confirmText}</button>
        </div>)
    }
FilterMore组件中,通过props获取到数据,分别将数据传递给renderFilters方法;正在renderFilters方法中,通过参数接收数据,遍历数据,渲染标签
    import styles from "./FilterMore.module.css";
    import FilterFooter from "./FilterFooter";

    export default function FilterMore({data: {roomType, oriented, floor, characteristic}}) {
        function renderFilters(data) {
            return data && data.map((item) => <span key={item.value} className={styles.tag}>{item.label}</span>)
        }
        return (<div className={styles.root}>
            <div className={styles.mask}></div>
            <div className={styles.tags}>
                <dl className={styles.dl}>
                    <dt className={styles.dt}>户型</dt>
                    <dd className={styles.dd}>
                        {renderFilters(roomType)}
                    </dd>
                    <dt className={styles.dt}>朝向</dt>
                    <dd className={styles.dd}>
                        {renderFilters(oriented)}
                    </dd>
                    <dt className={styles.dt}>楼层</dt>
                    <dd className={styles.dd}>
                        {renderFilters(floor)}
                    </dd>
                    <dt className={styles.dt}>房屋亮点</dt>
                    <dd className={styles.dd}>
                        {renderFilters(characteristic)}
                    </dd>
                </dl>
            </div>
            <FilterFooter></FilterFooter>
        </div>)
    }
获取选中值并且高亮显示
-
在state中添加状态 selectedValues;给标签绑定单击事件,通过参数获取到当前项的value
-
判断selectedValues中是否包含当前value值;如果不包含,就将当前项的value添加到selectedValues数组中;如果包含,就从selectedValues数组中移除(使用数组的splice方法,根据索引号删除)
-
在渲染标签时,判断selectedValues数组中,是否包含当前项的value,包含,就添加高亮类
  export default function FilterMore({data: {roomType, oriented, floor, characteristic}}) {
      const [selectedValues, setSelectedValues] = useState([])
      function renderFilters(data) {
          return data && data.map((item) => {
              const selected = selectedValues.indexOf(item.value) >= 0
              return <span
              key={item.value}
              className={styles.tag + (selected ? ' ' + styles.tagActive : '')}
              onClick={() => {
                  const result = [...selectedValues]
                  const index = result.indexOf(item.value)
                  if (index >= 0) {
                      // 已选中, 移除
                      result.splice(index, 1)
                  } else {
                      // 未选中,加入
                      result.push(item.value)
                  }
                  setSelectedValues(result)
              }}
              >{item.label}</span>
          })
      }
      ......
  }
清除和确定按钮的逻辑处理
设置FilterFooter组件的取消按钮文字为 清除,点击取消按钮时,清空所有选中的项的值(selectedValues:\[\])
    export default function FilterMore({data: {roomType, oriented, floor, characteristic}, cancelAction, confirmAction}) {
    ......
            <FilterFooter
            className={styles.footer}
            cancelText="清除"
            cancelAction={() => setSelectedValues([])}
            confirmAction={() => confirmAction(selectedValues)}
            ></FilterFooter>
    ......
给遮罩层绑定事件,在事件中,调用父组件的 cancelAction 关闭 FilterMore 组件
<div className={styles.mask} onClick={cancelAction}></div>点击确定按钮时,将当前选中项的值,传递给Filter父组件;在Filter组件中的 confirmAction 方法中,接收传递过来的选中值,更新状态selectedValues
                return <FilterMore
                data={{
                    roomType: filtersData.body['roomType'],
                    oriented: filtersData.body['oriented'],
                    floor: filtersData.body['floor'],
                    characteristic: filtersData.body['characteristic']
                }}
                cancelAction={cancelAction}
                confirmAction={confirmAction}
                ></FilterMore>
设置默认选中值
在 Filter 组件渲染 FilterMore 组件时,从selectedValues中,获取到当前选中值 more,通过props讲选中值传递给 FilterMore 组件
                <FilterMore
                data={{
                    roomType: filtersData.body['roomType'],
                    oriented: filtersData.body['oriented'],
                    floor: filtersData.body['floor'],
                    characteristic: filtersData.body['characteristic']
                }}
                defaultValues={selectedValues['more']}
                cancelAction={cancelAction}
                confirmAction={confirmAction}
                ></FilterMore>
在FilterMore组件中,将获取到的选中值,设置为组件状态selectedValues的默认值
    export default function FilterMore({data: {roomType, oriented, floor, characteristic}, defaultValues, cancelAction, confirmAction}) {
        const [selectedValues, setSelectedValues] = useState(defaultValues)
        ......
    }
完善 FilterTitle 高亮功能
在 Filter 组件的 confirmAction 方法中,判断当前标题对应的筛选条件有没有选中值(判断当前选中值跟与之默认值是否相同,相同表示没有选中值,不同,表示选中了值),设置选中状态高亮
-
selectedValue 表示当前 type 的选中值
-
如果 openType 为 area,此时,
newStatus[openType] = selectedValue[0] !== openType || selectedValue[1] !== null,就表示已经有选中值 -
如果 openType 为 more,此时选中值数组长度不为0的时候,表示FilterMore组件中有选中项,
selectedValue.length > 0,就表示已经有选中值 -
如果 openType 为 mode 或 price,此时,
selectedVal[0] !== 'null',就表示已经有选中值// 选中了值则修改当前标题为高亮 const newStatus = {...status} if (openType === 'area') { newStatus[openType] = selectedValue[0] !== openType || selectedValue[1] !== null } else if (openType === 'more') { newStatus[openType] = selectedValue.length > 0 } else { newStatus[openType] = selectedValue[0] !== 'null' } console.log('newStatus: ', newStatus); setStatus(newStatus)
在关闭对话框时(cancelAction),根据 openType 的选中值,判断当前菜单是否高亮,逻辑同 confirmAction,所以抽象出来为一个方法
        // 根据选中值更新标题高亮状态
        function updateTitleStatus(selectedValue) {
            console.log('status: ', status);
            console.log('selectedValue: ', selectedValue);

            const newStatus = {...status}
            if (openType === 'area') {
                newStatus[openType] = selectedValue[0] !== openType || selectedValue[1] !== 'null'
            } else if (openType === 'more') {
                newStatus[openType] = selectedValue.length > 0
            } else {
                newStatus[openType] = selectedValue[0] !== 'null'
            }
            console.log('newStatus: ', newStatus);
            setStatus(newStatus)
        }
        function cancelAction() {
            // 根据原本选中的值则修改当前标题高亮状态
            const selectedValue = selectedValues[openType]
            updateTitleStatus(selectedValue)

            // 取消时隐藏对话框
            setOpenType('')
        }
在标题点击事件 onTitleClick事件里面的开始位置,判断 openType 的选中值是否与默认值相同;如果不同则设置该标题的选中状态为true,如果相同则设置该标题的选中状态为false
                <FilterTitle
                selectedStatus={status}
                selectAction={(item) => {
                    const s = {...status}
                    const selectedValue = selectedValues[openType]
                    if (openType === 'area') {
                        s[openType] = selectedValue[0] !== openType || selectedValue[1] !== 'null'
                    } else if (openType === 'more') {
                        s[openType] = selectedValue.length > 0
                    } else if (openType !== '') {
                        s[openType] = selectedValue[0] !== 'null'
                    }
                    s[item.type] = true
                    console.log('s: ', s);

                    setStatus(s)
                    setOpenType(item.type)
                }}></FilterTitle>
获取房屋列表数据
组装筛选条件
1、在 Filter 组件的 confirmAction 方法中,根据最新 selectedValues 组装筛选的条件数据 filters,以下是数据格式
- 获取区域数据的参数名:area 或 subway(选中值,数组的第一个元素),数据值(以最后一个value为准)
- 获取方式和租金的值(选中值得第一个元素)
- 获取筛选(more)的值(将选中值数组转换为以逗号分隔的字符串)
2、在 Filter 组件中增加一个 onFilter 的 props, 通过 onFilter 将筛选条件数据 filters 传递给父组件 House
    export default function Filter({onFilter}) {
        function confirmAction(selectedValue) {
            const vs = {...selectedValues, [openType]: selectedValue}
            ......

            // 筛选条件数据
            const filters = {};
            const { area, mode, price, more } = vs;
            // 区域
            filters[area[0]] = area[area.length - 1]
            // 方式和租金
            filters['rentType'] = mode[0]
            filters['price'] = price[0]
            // 更多
            filters['more'] = more.join(',')
            onFilter(filters)
        }
    }
获取房屋数据
House 组件中,创建方法 onFilter 传递给子组件 Filter,通过参数接收 filters 数据,并存储useState中
    export default function House() {
        // 获取当前城市定位
        const { currentCity } = useCurrentCity()
        console.log('currentCity: ', currentCity);

        const [ filters, setFilters ] = useState({})

        return (<>
            <SearchHeader className={styles.header} cityName={currentCity.label ? currentCity.label : '--'}></SearchHeader>

            <Filter onFilter={(filters) => {
                setFilters(filters)
            }}></Filter>
        </>)
    }
在 House 组件顶部,通过之前定义的 useData HOOK 获取房屋列表数据:
        // 获取房屋列表数据
        const { data: listData } = useData.get('/houses', {params: {
            cityId: currentCity.value,
            ...filters,
            start: 1,
            end: 20
        }})
        console.log('listData: ', listData);
使用 List 组件渲染数据
封装HouseItem组件,实现 Map 和 House 中,房屋列表项的复用
    import styles from "./HouseItem.module.css";
    import { baseUrl } from "../utils/constValue";

    export default function HouseItem({item, onClick}) {
        console.log('item: ', item);

        return (
            <div key={item.value} className={styles.houseItem} onClick={onClick}>
                <img className={styles.itemLeft} src={baseUrl + item.houseImg} alt=""></img>
                <div className={styles.itemRight}>
                    <div className={styles.itemTitle}>{item.title}</div>
                    <div className={styles.itemDesc}>{item.desc}</div>
                    <div>
                        { item.tags && item.tags.map((tag, i) => {
                            const tagClass = 'tag' + (1 + i%3)
                            return <span className={styles.tags + ' ' + styles[tagClass]} key={tag}>{tag}</span>
                        }) }
                    </div>
                    <div className={styles.price}>
                        <span className={styles.priceNum}>{item.price}</span>
                        元/月
                    </div>
                </div>
            </div>
        )
    }
使用 react-virtualized 的 AutoSizer、List 组件渲染房屋列表(参考 CityList 组件的使用)
            {/* 房屋列表 */}
            { listData && <div className={styles.houseItems}>
                <AutoSizer>
                    { ({width, height}) => {
                        console.log('width: ', width);
                        console.log('height: ', height);

                        return <List
                            width={width}
                            height={height}
                            rowCount={listData.body.list.length}
                            rowHeight={110}
                            rowRenderer={({index, key, style}) => {
                                console.log('style: ', style);
                                return <div key={key} style={style}>
                                    <HouseItem item={listData.body.list[index]}></HouseItem>
                                </div>
                            }}
                            scrollToAlignment='start'
                        />
                    } }
                </AutoSizer>
            </div>}
css 样式:
    /* 房源列表项样式 */
    .houseItems {
      width: 100%;
      position: absolute;
      top: 108px;
      bottom: 44px;
    }
    .houseBody {
        width: 100%;
        height: 110px;
    }
使用 WindowScroller 跟随页面滚动
List组件只让组件自身出现滚动条,无法让整个页面滚动,也就无法实现标题吸顶功能。使用 WindowScroller 高阶组件,让List组件跟随页面滚动(为 List 组件提供状态,同时还需要设置 List 组件的 autoHeight 属性)
注意:WindowScroller 高阶组件只能提供height,无法提供width;在 WindowScroller 组件中使用AutoSizer高阶组件来为List组件提供width
            {/* 房屋列表 */}
            { listData && <div className={styles.houseItems}>
                <WindowScroller>
                    {({height, isScrolling, scrollTop, registerChild, onChildScroll}) => {
                        return <AutoSizer>
                            { ({width}) => {
                                return <List
                                    ref={registerChild}
                                    width={width}
                                    height={110*listData.body.list.length}
                                    autoHeight
                                    rowCount={listData.body.list.length}
                                    rowHeight={110}
                                    rowRenderer={({index, key, style}) => {
                                        return (<div key={key} style={style} className={styles.houseBody}><HouseItem item={listData.body.list[index]}></HouseItem></div>)
                                    }}
                                    scrollToAlignment='start'
                                    isScrolling={isScrolling}
                                    scrollTop={scrollTop}
                                    onScroll={onChildScroll}
                                />
                            } }
                        </AutoSizer>
                    }}
                </WindowScroller>
            </div> }
注意:WindowScroller 组件在使用过程中出现问题,只会渲染前面几条数据,后面的数据就不会渲染了,如果后期解决在做说明。
InfiniteLoader 组件
滚动房屋列表时候,动态加载更多房屋数据,使用InfiniteLoader 组件,来实现滚动列表从而加载更多房屋数据,根据 InfiniteLoader 文档示例,在项目中使用组件:
-
isRowLoaded 表示这行数据是否加载完成
-
loadMoreRows 加载更多数据的方法,在需要加载更多数据时,会调用该方法
-
rowCount 列表数据总条数
-
minimumBatchSize 一次要加载的最小行数,此属性可用于批处理请求以减少HTTP请求;默认为10。
-
threshold 表示当用户在X行内滚动时数据将开始加载。默认为15。
      const [list, setList] = useState([])
      const listString = JSON.stringify(listData)
      const filtersString = JSON.stringify(filters)
      useEffect(() => {
          if (listString) {
              const data = JSON.parse(listString)
              const initList = data ? data.body.list : []
              console.log('initList: ', initList);
              setList(() => initList)
          }
          return () => setList([])
      }, [listString, filtersString])

      const count = listData ? listData.body.count : 0
      console.log('count: ', count);

      ......

          {/* 房屋列表 */}
          <div className={styles.houseItems}>
          <InfiniteLoader
          isRowLoaded={({index}) => {
              console.log('isRowLoaded index: ', index);
              const isRowLoaded = !!list[index]
              console.log('isRowLoaded: ', isRowLoaded);
              return isRowLoaded
          }}
          loadMoreRows={({startIndex, stopIndex}) => {
              console.log('startIndex: ', startIndex);
              console.log('stopIndex: ', stopIndex);

              return new Promise((resolve, reject) => {
                  instance.get('/houses', {params: {
                      ...filters,
                      cityId: currentCity.value,
                      start: startIndex + 1,
                      end: stopIndex + 1
                  }}).then((moreData) => {
                      if (moreData) {
                          const more = moreData.body.list
                          const total = list.concat(more)
                          setList(total)
                          console.log('total: ', total);
                      }
                      resolve(moreData)
                  }).catch((error) => reject(error))
              })
          }}
          rowCount={count}
          minimumBatchSize={20}
          threshold={1}
          >
              {({onRowsRendered, registerChild}) => {
                  return <AutoSizer>
                      { ({width, height}) => {
                          console.log('width: ', width);
                          console.log('height: ', height);

                          return <div ref={registerChild}>
                              <List
                              onRowsRendered={onRowsRendered}
                              width={width}
                              height={height}
                              rowCount={list.length}
                              rowHeight={110}
                              rowRenderer={({index, key, style}) => {
                                  console.log('index: ', index);
                                  const item = list[index]
                                  if (item) {
                                      return (<div key={key} style={style} className={styles.houseBody}>
                                          <HouseItem item={item}></HouseItem>
                                      </div>)
                                  }
                                  return null
                              }}
                              />
                          </div>
                      } }
                  </AutoSizer>
              }}
          </InfiniteLoader>
          </div>
说明:
- 在loadMoreRows方法中,根据起始索引和结束索引,发送请求,获取更多房屋数据;获取到最新的数据后,与当前 list 中的数据合并,再更新state,并调用Promise的resolve
- 在 rowRenderer 组件的 rowRenderer 方法中,判断house是否存在;不存在的时候就返回null,存在的时候再渲染HouseItem组件
吸顶功能
实现思路:
- 在页面滚动的时候,判断筛选栏上边是否还在可视区域内;如果在,不需要吸顶;如果不在,就吸顶样式(fixed)
- 吸顶之后,元素脱标,房屋列表会突然往上调动筛选栏的高度,解决这个问题,需要用一个跟筛选栏相同的占位元素,在筛选栏脱标后,代替它撑起高度
1、封装Sticky组件,创建两个ref对象(placeholder,content),分别指向占位元素和内容元素
2、在组件中,使用监听浏览器的scroll事件,通过getBoundingClientRect()方法得到筛选栏占位元素当前位置
        useEffect(() => {
            window.addEventListener('scroll', (e) => {
                const { top } = placeholderEl.getBoundingClientRect()
            })
            return () => window.removeEventListener('scroll')
        }, [])
由于 WindowScroller 在使用中出现问题,此功能不实现具体略...
列表找房模块优化
1、实现加载房源数据时加载完成的提示,需要解决:
-
没有房源数据时,不弹提示框(判断一下count是否为 0,如果为 0,就不加载提示信息)
-
在首次加载数据是弹提示框,加载更多数据时不弹(在保存列表首次加载数据的 useEffect 中处理)
      useEffect(() => {
          if (listString) {
              const data = JSON.parse(listString)
              const initList = data ? data.body.list : []
              console.log('initList: ', initList);
              setList(() => initList)

              if (data && data.body.count !== 0) {
                  Toast.show(`共找到 ${data.body.count} 套房源`)
              }
          }
          return () => setList([])
      }, [listString, filtersString])
2、找不到房源数据时候的提示,将列表的渲染抽象到 renderList 方法中,通过判断 count 是否为 0来决定渲染内容:
        function renderList() {
            if (count === 0) {
                return <div className={styles.noData}>
                    <img className={styles.img} src={baseUrl + '/img/not-found.png'} alt="暂无数据"/>
                    <p className={styles.msg}>没有找到房源,请您换个搜索条件吧~</p>
                </div>
            }

            return <InfiniteLoader
            ......
            </InfiniteLoader>
        }
3、使用条件筛选查询数据时,页面没有回到列表顶部:
- 首先定义一个 listRef
const listRef = useRef(null)并赋值给 List 组件的 ref 属性 - 在点击条件查询确定按钮的时候,利用
listRef.current.scrollToRow(0)来回到列表顶部
react-spring动画库
展示筛选对话框的时候,实现动画效果,增强用户体验;react-spring是基于spring-physics(弹簧物理)的react动画库,动画效果更加流畅、自然。
优势:
- 几乎可以实现任意UI动画效果
- 组件式使用方式(render-props模式),简单易用,符合react的声明式特性,性能高
资料:
基本使用
-
安装
yarn add react-spring或npm i react-spring -
导入组件
import { animated, useSpring } from '@react-spring/web' -
打开Spring组件文档,使用
animated.div组件包裹要实现动画效果的遮罩层div -
使用
useSpringHOOK 钩子函数构建动画参数props,from指定组件第一次渲染时的动画状态,to指定组件要更新的新动画状态;opacity 就是透明度有 0~1 中变化的值const styles = useSpring({ from: { opacity: 0 }, to: { opacity: 1 } }) -
通过
render-props模式,将参数 props 设置为遮罩层 div 的 style<animated.div style={styles}>{ <div> 这是实现动画的 div </div> }</animated.div>
实现遮罩层动画
-
修改to属性的值,在遮罩层隐藏时为0,在遮罩层展示为1
const props = useSpring({ from: { opacity: 0 }, to: { opacity: showMask ? 1 : 0 } }) -
修改渲染遮罩层的逻辑,保证
animated.div组件一直都被渲染(animated.div组件被销毁了,就无法实现动画效果) -
判showMask是否为true,如果为true渲染遮罩层div;如果不为true,就返回null,解决遮罩层遮挡页面导致顶部点击事件失效
          {/* 遮罩 */}
          <animated.div style={props}>
              { showMask ? <div className={styles.mask} onClick={cancelAction}></div> : null }
          </animated.div>
房屋详情模块
改造 NavHeader 组件
修改NavHeader组件(添加了className和rightContent两个props)
    import { NavBar } from "antd-mobile";
    import { useNavigate } from "react-router-dom";
    import PropTypes from "prop-types";
    import styles from "./NavHeader.module.css";

    export default function NavHeader({onBack, children, className, rightContent}) {
        const navigate = useNavigate()
        function backAction() {
            navigate(-1)
        }
        return (<NavBar className={styles.navBar + (className ? ' ' + className : '')} style={{
            '--height': '44px',
            '--border-bottom': '1px #eee solid',
            'color': '#333',
            'backgroundColor': '#f6f5f6'
          }} onBack={onBack || backAction} backIcon={<i className="iconfont icon-back"></i>} right={rightContent}>
            {children}
        </NavBar>)
    }

    NavHeader.propTypes = {
        children: PropTypes.string.isRequired,
        onBack: PropTypes.func,
        rightContent: PropTypes.array
    }
路由参数
-
新建房屋详情组件
HouseDetail,并在根文件中导入import HouseDetail from "./pages/HouseDetail.js"; -
房源有多个,那么URL路径也就有多个,那么需要多少个路由规则来匹配呢?一个还是多个?
-
使用一个路由规则匹配不同的 URL 路径,同时获取到 URL 中不同的内容,利用路由参数来解决
-
让一个路由规则,同时匹配多个符合该规则的URL路径,语法:
/detail/:id,其中:id就是路由参数<Route path='/detail/:id' element={<HouseDetail></HouseDetail>}></Route> -
获取路由动态路径传参通过 HOOK 钩子函数
useParams
展示房屋详情
-
在找房页面中,给每一个房源列表添加点击事件,在点击时跳转到房屋详情页面
-
在单击事件中,获取到当前房屋id;根据房屋详情的路由地址,通过
useNavigateHOOK 钩子函数实现路由跳转const navigate = useNavigate() ...... <HouseItem item={item} onClick={() => {navigate('/detail/' + item.houseCode)}}></HouseItem> -
导入自定义 HOOK 钩子函数
useData,通过路由参数获取到当前房屋id,发送请求,获取房屋数据,请求数据:// 获取路由参数 const routerParams = useParams() console.log('routerParams: ', routerParams); // 请求数据 const { data } = useData.get('/houses/' + routerParams.id) console.log('data: ', data); -
解构出需要的数据:
// 结构数据数据 const { community, title, price, roomType, size, floor, oriented, supporting, description, houseImg, tags, coord } = data ? data.body : {} -
渲染小区名称------导航栏:
{/* 导航栏 */} { community && <NavHeader className={styles.navHeader} rightContent={[<i className="iconfont icon-share" key='share'/>]}>{community}</NavHeader> } -
渲染轮播图:
{/* 轮播图 */} { houseImg && <div> <Swiper loop autoplay style={{ '--height': '240px', }} > {houseImg.map((item) => ( <Swiper.Item key={item}> <a href="https://www.baidu.com/"> <img src={baseUrl + item} style={{width: '100%'}} alt=''></img> </a> </Swiper.Item> ))} </Swiper> </div> } -
渲染标题、标签:
{/* 标题、标签 */} { title && <p className={styles.title}>{title}</p>} { tags && <div className={styles.tagsBox}> { tags.map((tag, i) => { const tagClass = 'tag' + (1 + i%3) return <span className={styles.tags + ' ' + styles[tagClass]} key={tag}>{tag}</span> }) } </div> } -
渲染价格、房型、面积等:
{/* 价格、房型、面积 */} <div className={styles.infoPrice}> { price && <div className={styles.infoPriceItem}> <div>{price} <span className={styles.month}>/月</span> </div> <div className={styles.infoPriceKey}>租金</div> </div> } { roomType && <div className={styles.infoPriceItem}> <div>{roomType}</div> <div className={styles.infoPriceKey}>房型</div> </div> } { size && <div className={styles.infoPriceItem}> <div>{size}平米</div> <div className={styles.infoPriceKey}>面积</div> </div> } </div> -
渲染装修、楼层、朝向等:
{/* 染装修、楼层、朝向等 */} <div className={styles.infoBasic}> <div className={styles.infoBasicItem}> <div className={styles.infoBasicKey}>装修:</div> <div className={styles.infoBasicValue}>精装</div> </div> { floor && <div className={styles.infoBasicItem}> <div className={styles.infoBasicKey}>楼层:</div> <div className={styles.infoBasicValue}>{floor}</div> </div> } { oriented && <div className={styles.infoBasicItem}> <div className={styles.infoBasicKey}>朝向:</div> <div className={styles.infoBasicValue}>{oriented.join('、')}</div> </div> } <div className={styles.infoBasicItem}> <div className={styles.infoBasicKey}>类型:</div> <div className={styles.infoBasicValue}>普通住宅</div> </div> </div> -
渲染地图:
const {latitude, longitude} = coord ? coord : {} useEffect(() => { let ignore = false if (!ignore && latitude && longitude) { console.log('------------'); // 创建地图实例 var map = new BMapGL.Map(styles.mapContainer); //开启鼠标滚轮缩放 map.enableScrollWheelZoom(true); // 设置中心点坐标和地图级别 const point = new BMapGL.Point(longitude, latitude) map.centerAndZoom(point, 17); // 创建文本标注 var label = new BMapGL.Label('', { position: point, // 设置标注的地理位置 offset: new BMapGL.Size(0, -36) // 设置标注的偏移量 }) map.addOverlay(label); // 将标注添加到地图中 // 设置label的样式 label.setStyle({ position: 'absolute', zIndex: -7982820, backgroundColor: 'rgb(238, 93, 91)', color: 'rgb(255, 255, 255)', height: 25, padding: '5px 10px', lineHeight: '14px', borderRadius: 3, boxShadow: 'rgb(204, 204, 204) 2px 2px 2px', whiteSpace: 'nowrap', fontSize: 12, userSelect: 'none' }) label.setContent(` <span>${community}</span> <div class=${styles.mapArrow}></div> `) } return () => ignore = true }, [latitude, longitude]) ...... {/* 地图 */} <div className={styles.map}> { community && <div className={styles.mapTitle}>小区:<span>{community}</span></div> } <div id={styles.mapContainer}></div> </div> -
渲染房屋配套:
// 所有房屋配置项 const HOUSE_PACKAGE = [ { id: 1, name: '衣柜', icon: 'icon-wardrobe' }, { id: 2, name: '洗衣机', icon: 'icon-wash' }, { id: 3, name: '空调', icon: 'icon-air' }, { id: 4, name: '天然气', icon: 'icon-gas' }, { id: 5, name: '冰箱', icon: 'icon-ref' }, { id: 6, name: '暖气', icon: 'icon-Heat' }, { id: 7, name: '电视', icon: 'icon-vid' }, { id: 8, name: '热水器', icon: 'icon-heater' }, { id: 9, name: '宽带', icon: 'icon-broadband' }, { id: 10, name: '沙发', icon: 'icon-sofa' } ] ...... const [selectedNames, setSelectedNames] = useState([]) ...... {/* 渲染房屋配套 */} <div className={styles.about}> <div>房屋配套</div> <div className={styles.aboutList}> {HOUSE_PACKAGE.map((item, i) => { const si = selectedNames.indexOf(item.name) return <div className={styles.aboutItem + (si > -1 ? ' ' + styles.aboutActive : '')} key={item.id} onClick={() => { console.log('si: ', si); const newNames = [...selectedNames] if (si > -1) { newNames.splice(si, 1) } else { newNames.push(item.name) } setSelectedNames(newNames) }}> <p className={styles.aboutValue}> <i className={`iconfont ${item.icon} ${styles.icon}`} /> </p> <div>{item.name}</div> </div> })} </div> </div> -
渲染房屋概况:
{/* 房源概况 */} <div className={styles.set}> <div className={styles.houseTitle}>房源概况</div> <div className={styles.user}> <div className={styles.avatar}> <img src={baseUrl + '/img/avatar.png'} alt="头像"></img> </div> <div className={styles.userInfo}> <div>王女士</div> <div className={styles.userAuth}> <i className="iconfont icon-auth" /> 已认证房主 </div> </div> <div className={styles.userMsg}>发消息</div> </div> <div className={styles.descText}> {description || '暂无房屋描述'} </div> </div> -
渲染推荐,可以复用 HouseItem组件:
    // 猜你喜欢
    const recommendHouses = [
      {
        id: 1,
        houseImg: '/img/message/1.png',
        desc: '72.32㎡/南 北/低楼层',
        title: '安贞西里 3室1厅',
        price: 4500,
        tags: ['随时看房']
      },
      {
        id: 2,
        houseImg: '/img/message/2.png',
        desc: '83㎡/南/高楼层',
        title: '天居园 2室1厅',
        price: 7200,
        tags: ['近地铁']
      },
      {
        id: 3,
        houseImg: '/img/message/3.png',
        desc: '52㎡/西南/低楼层',
        title: '角门甲4号院 1室1厅',
        price: 4300,
        tags: ['集中供暖']
      }
    ]
    ......


          {/* 推荐 */}
          <div className={styles.recommend}>
              <div className={styles.houseTitle}>猜你喜欢</div>
              {
                  recommendHouses.map((item) => {
                      return <HouseItem item={item}></HouseItem>
                  })
              }
          </div>