从2024年2025年,不断的有各种AI工具会在自媒体中火起来,号称各种效率王炸,而在AI是否会替代打工人的话题中,程序员又首当其冲。
作为一个后端开发,这篇文章基于Trae工具,来创建和运行一个简单的Vue前端应用。(下一篇试试Cursor)
Trae官网上这样简介:
是国内首个AI-IDE,深度理解中文开发场景。AI高度集成于IDE环境之中,为你带来比AI插件更加流畅、准确、优质的开发体验。
刷到的各种短视频中,都说AI编程工具可以让小白快速上手,只需要简单的输入几句中文指令即可,实际上可能作者本身就是程序员。
AI具备跨行业跨岗位的能力,不代表使用AI的人也能横跳。
身为后端研发,在Trae中跑完Vue3的入门应用,前后也花了大半天的时间,这还是建立在编程工具和环境搭建都轻车熟路的基础之上。
首先搭建Vue3的运行环境,通过相关文档可知,Vue3依赖Node.js的18.3版本或者更高,这里选择20的稳定版。
在Mac电脑中,使用brew工具安装NodeJS的基本流程。
bash
# 1、查看brew版本
brew -v
Homebrew 4.1.0

# 2、查询支持的node版本
brew search node
==> Formulae
node@18          node@22        node@20

# 3、选择安装node@20
brew install node@20
==> node@20
node@20 is keg-only, which means it was not symlinked into /usr/local,
because this is an alternate version of another formula.

# 注意这里的环境配置
If you need to have node@20 first in your PATH, run:
  echo 'export PATH="/usr/local/opt/node@20/bin:$PATH"' >> /Users/yourmac/.bash_profile

For compilers to find node@20 you may need to set:
  export LDFLAGS="-L/usr/local/opt/node@20/lib"
  export CPPFLAGS="-I/usr/local/opt/node@20/include"

# 4、添加配置,不同的电脑路径有差异,需要注意
echo 'export PATH="/usr/local/opt/node@20/bin:$PATH"' >> /Users/yourmac/.bash_profile

# 5、刷新配置
source ~/.bash_profile

# 6、查看Node版本,安装成功
node -v
v20.19.0
然后就是Trae开发工具,直接从官网下载默认的最新版本,安装到电脑本地。
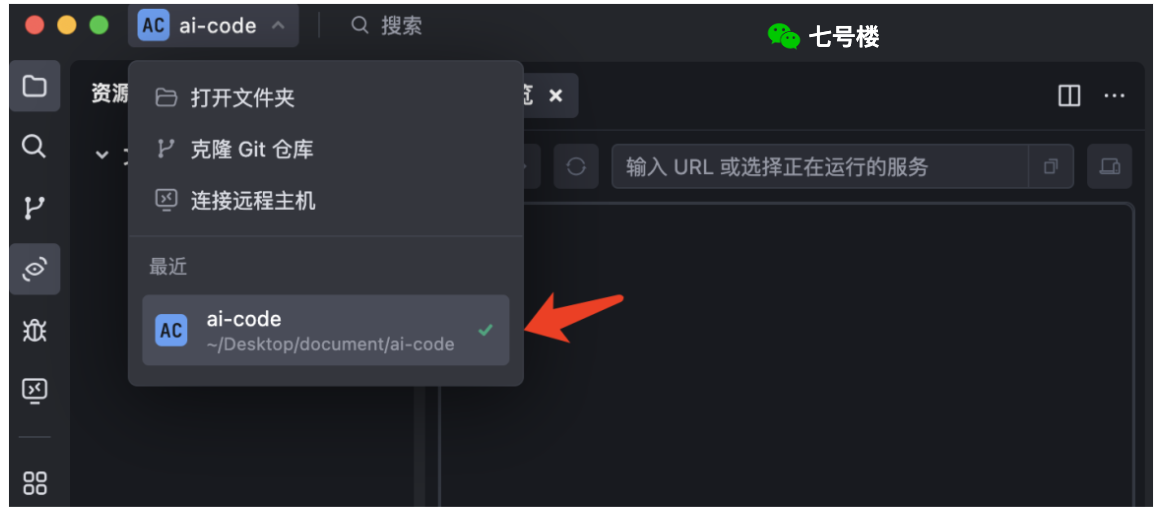
启动Trae工具后,新建一个Demo工程,就是一个ai-code空文件夹,然后在Trae中打开。
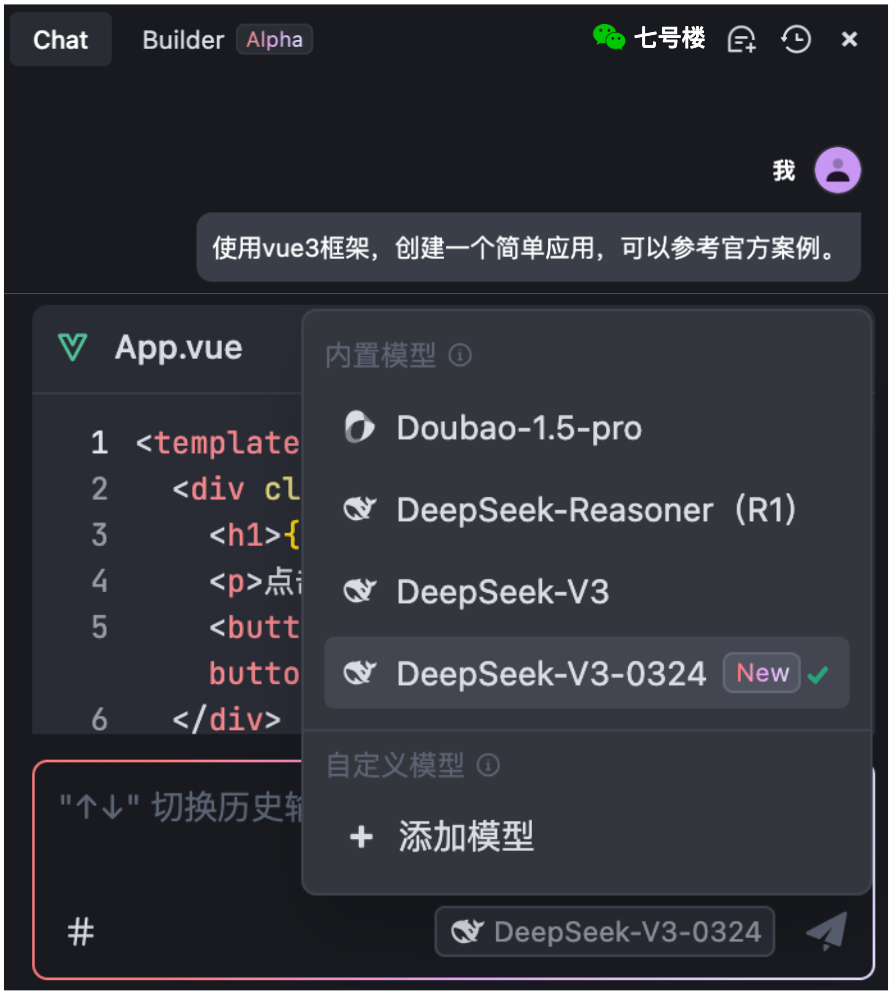
在对话框中输入开发需求,注意这里支持DeepSeek和豆包两款大模型,个人倾向选择最新的版本。
提示词:使用vue3框架,创建一个简单应用,可以参考官方案例。
TraeAI大概把需求拆分了三步,没接触过前端,选择直接照做。
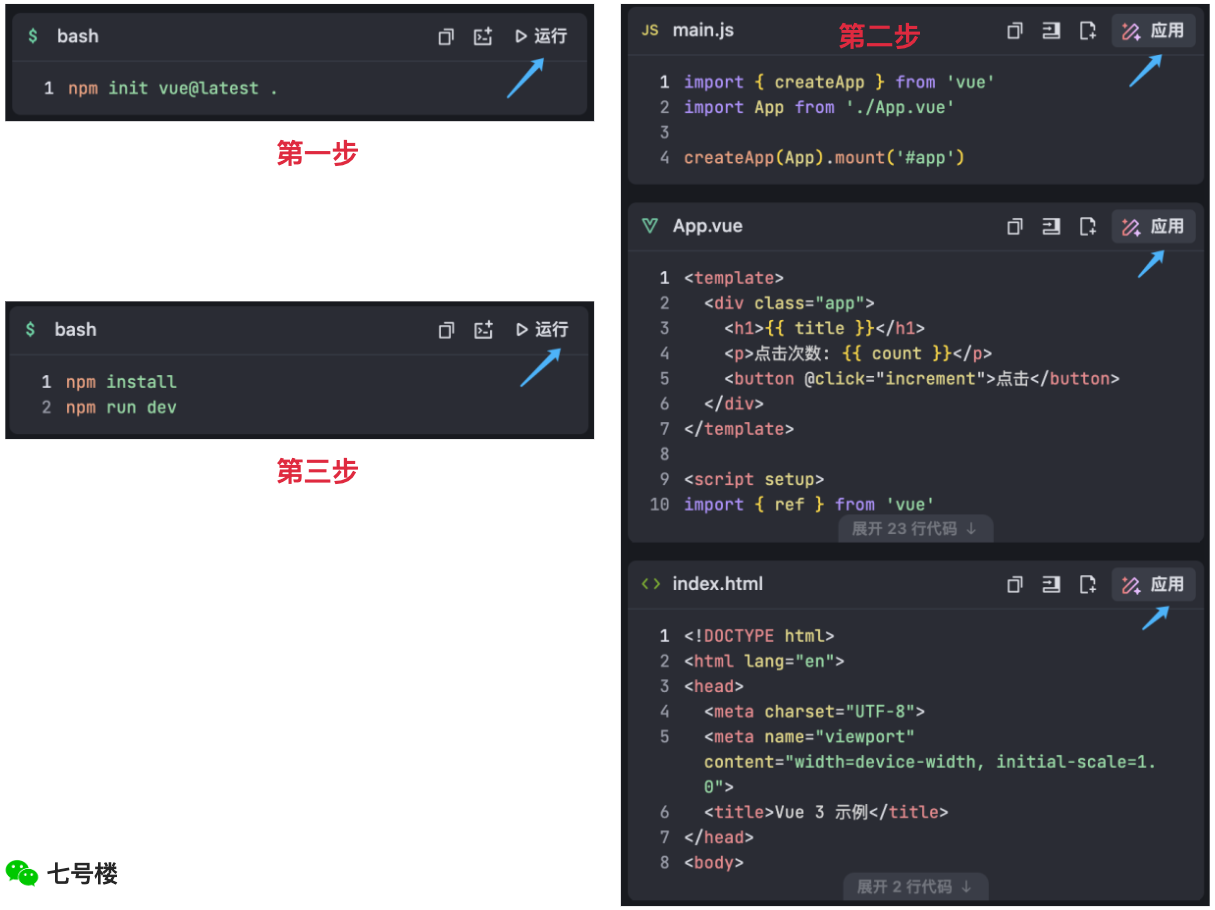
第一步:创建项目,在路径/ai-code目录下面,然后执行初始化命令,直接点击图中的运行即可。
bash
npm init vue@latest .注意下面的初始化日志,有两个地方需要自行输入。
bash
ai-code % npm init vue@latest .

> npx
> create-vue .

┌  Vue.js - The Progressive JavaScript Framework
│
◇  当前目录 非空,是否覆盖?
│  Yes  ←【自行输入】
│
◇  请输入包名称:
│  src  ←【自行输入】
│
◇  请选择要包含的功能: (↑/↓ 切换,空格选择,a
全选,回车确认)
│  none

正在初始化项目 ./Desktop/document/ai-code...
│
└  项目初始化完成,可执行以下命令:

   npm install
   npm run dev

| 可选:使用以下命令在项目目录中初始化 Git:

   git init && git add -A && git commit -m "initial commit"
初始化完成后,也可以直接执行第三步打包运行,服务是正常的。
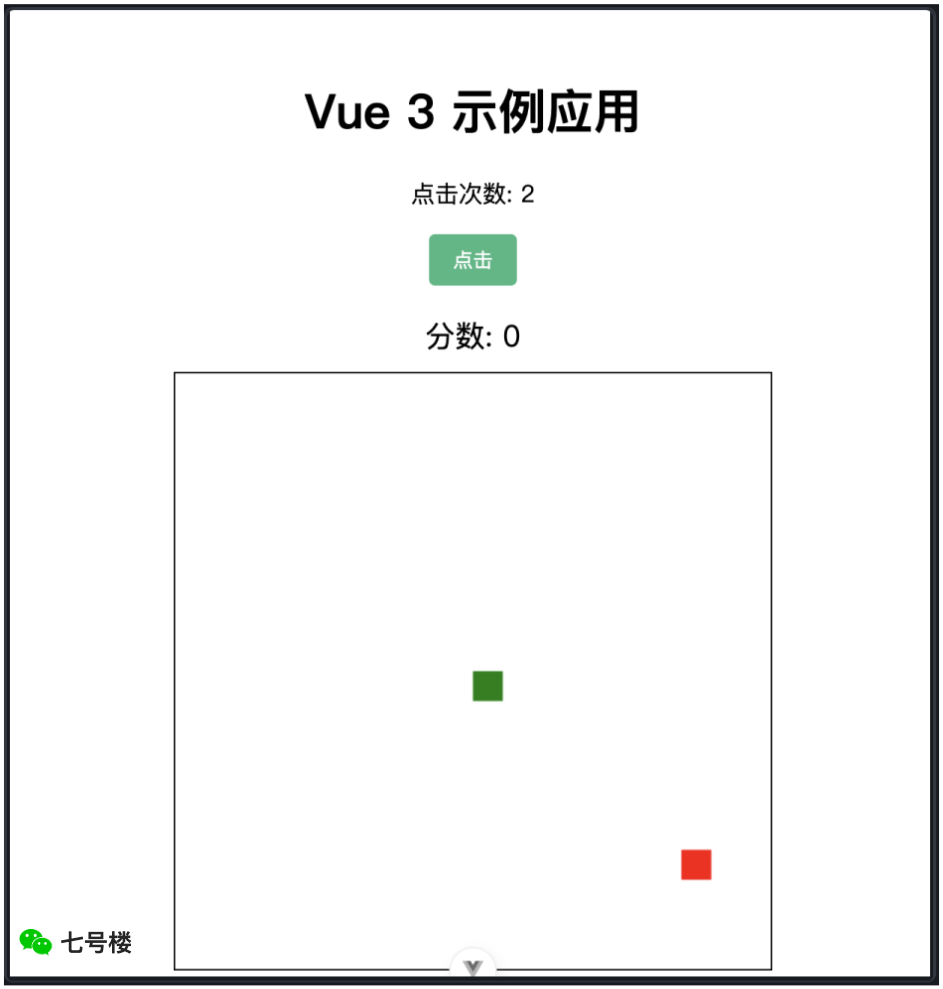
第二步:Vue应用源码,包括一个简单的index.html主页,一个main.js脚本,还有就是App.vue源码,点击应用即可把AI生成的代码,添加到初始化的工程中。
html
<!-- main.js -->

import { createApp } from 'vue'
import App from './App.vue'

createApp(App).mount('#app')

<!-- App.vue -->
<template>
  <div class="app">
    <h1>{{ title }}</h1>
    <p>点击次数: {{ count }}</p>
    <button @click="increment">点击</button>
  </div>
</template>

<script setup>
import { ref } from 'vue'

const title = ref('Vue 3 示例应用')
const count = ref(0)

const increment = () => {
  count.value++
}
</script>

<style>
.app {
  text-align: center;
  margin-top: 60px;
}
button {
  padding: 8px 16px;
  background-color: #42b983;
  color: white;
  border: none;
  border-radius: 4px;
  cursor: pointer;
}
</style>

<!-- index.html -->
<!DOCTYPE html>
<html lang="en">
<head>
  <meta charset="UTF-8">
  <meta name="viewport" content="width=device-width, initial-scale=1.0">
  <title>Vue 3 示例</title>
</head>
<body>
  <div id="app"></div>
  <script type="module" src="/src/main.js"></script>
</body>
</html>
第三步:安装依赖并运行项目的命令。
bash
npm install
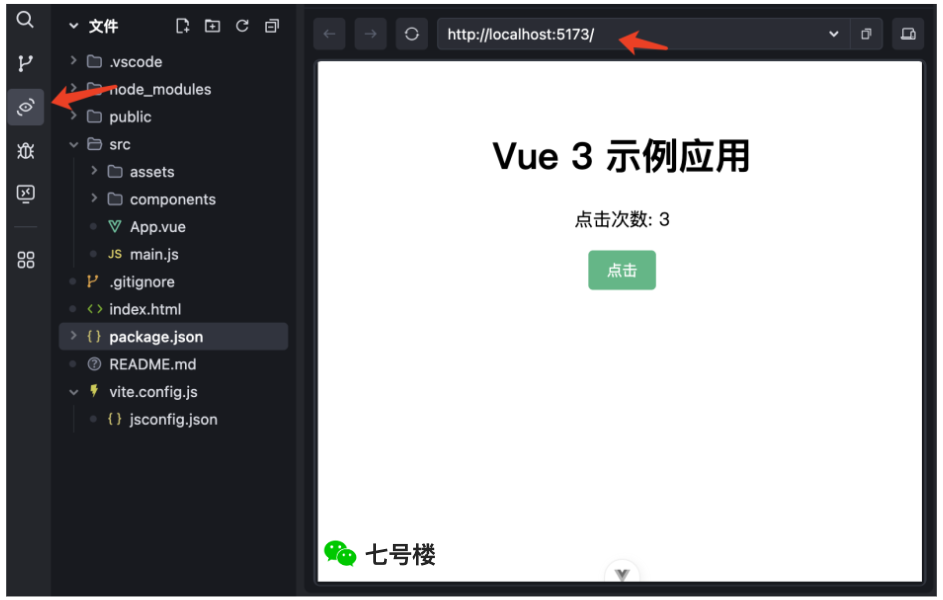
npm run dev这里可以看下启动日志,有服务的端口号,实际上与后端服务启动的原理相似。
bash
ai-code % npm install
npm run dev

added 143 packages, and audited 144 packages in 24s

42 packages are looking for funding
  run `npm fund` for details

found 0 vulnerabilities

ai-code % npm run dev

> src@0.0.0 dev
> vite


  VITE v6.2.5  ready in 842 ms

  ➜  Local:   http://localhost:5173/
  ➜  Network: use --host to expose
  ➜  Vue DevTools: Open http://localhost:5173/__devtools__/ as a separate window
  ➜  Vue DevTools: Press Option(⌥)+Shift(⇧)+D in App to toggle the Vue DevTools
  ➜  press h + enter to show help
可以在Trae工具中预览,也可以在浏览器里直接访问,在命令行中按 Ctrl + C即可退出服务。
这样一个初步的入门案例就完成了,下面再尝试指定源码位置修改。
选中index.html代码添加到对话中,然后需求提示词:添加一个贪吃蛇的小游戏。
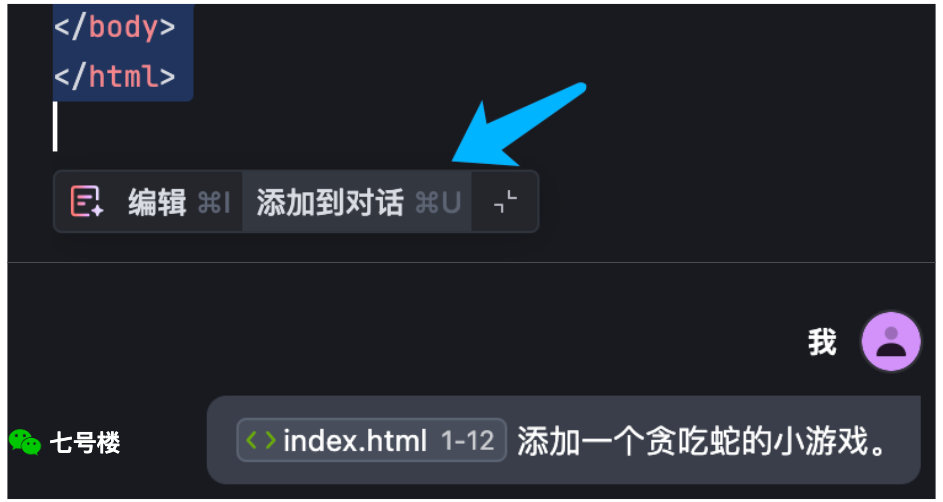
贪吃蛇游戏源码,还是点击应用到工程中,经测试可以运行。
html
<!DOCTYPE html>
<html lang="en">
<head>
<meta charset="UTF-8">
<meta name="viewport" content="width=device-width, initial-scale=1.0">
<title>Vue 3 示例</title>
<style>
#game-container {
display: flex;
flex-direction: column;
align-items: center;
margin-top: 20px;
}
canvas {
border: 1px solid #000;
}
.score {
margin-bottom: 10px;
font-size: 20px;
}
</style>
</head>
<body>
<div id="app"></div>
<div id="game-container">
<div class="score">分数: <span id="score">0</span></div>
<canvas id="game" width="400" height="400"></canvas>
</div>
<script type="module" src="/src/main.js"></script>
<script>
// 贪吃蛇游戏逻辑
const canvas = document.getElementById('game');
const ctx = canvas.getContext('2d');
const scoreElement = document.getElementById('score');
const gridSize = 20;
const tileCount = canvas.width / gridSize;
let snake = [{x: 10, y: 10}];
let food = {x: 5, y: 5};
let direction = {x: 0, y: 0};
let score = 0;
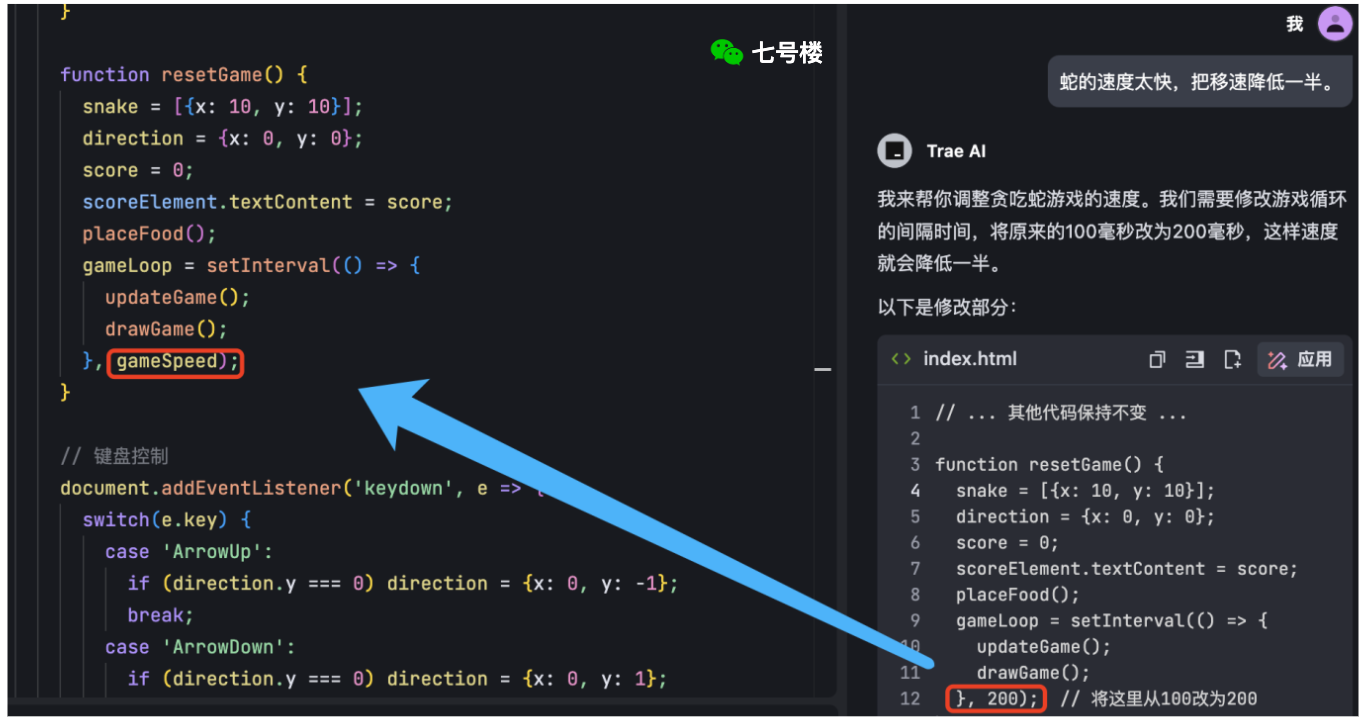
let gameSpeed = 100;
let gameLoop;
function drawGame() {
// 清空画布
ctx.fillStyle = 'white';
ctx.fillRect(0, 0, canvas.width, canvas.height);
// 绘制蛇
ctx.fillStyle = 'green';
snake.forEach(segment => {
ctx.fillRect(segment.x * gridSize, segment.y * gridSize, gridSize, gridSize);
});
// 绘制食物
ctx.fillStyle = 'red';
ctx.fillRect(food.x * gridSize, food.y * gridSize, gridSize, gridSize);
}
function updateGame() {
// 移动蛇
const head = {x: snake[0].x + direction.x, y: snake[0].y + direction.y};
snake.unshift(head);
// 检查是否吃到食物
if (head.x === food.x && head.y === food.y) {
score++;
scoreElement.textContent = score;
placeFood();
} else {
snake.pop();
}
// 检查碰撞
if (
head.x < 0 || head.x >= tileCount ||
head.y < 0 || head.y >= tileCount ||
snake.slice(1).some(segment => segment.x === head.x && segment.y === head.y)
) {
clearInterval(gameLoop);
alert('游戏结束! 分数: ' + score);
resetGame();
}
}
function placeFood() {
food = {
x: Math.floor(Math.random() * tileCount),
y: Math.floor(Math.random() * tileCount)
};
// 确保食物不会出现在蛇身上
while (snake.some(segment => segment.x === food.x && segment.y === food.y)) {
food = {
x: Math.floor(Math.random() * tileCount),
y: Math.floor(Math.random() * tileCount)
};
}
}
function resetGame() {
snake = [{x: 10, y: 10}];
direction = {x: 0, y: 0};
score = 0;
scoreElement.textContent = score;
placeFood();
gameLoop = setInterval(() => {
updateGame();
drawGame();
}, gameSpeed);
}
// 键盘控制
document.addEventListener('keydown', e => {
switch(e.key) {
case 'ArrowUp':
if (direction.y === 0) direction = {x: 0, y: -1};
break;
case 'ArrowDown':
if (direction.y === 0) direction = {x: 0, y: 1};
break;
case 'ArrowLeft':
if (direction.x === 0) direction = {x: -1, y: 0};
break;
case 'ArrowRight':
if (direction.x === 0) direction = {x: 1, y: 0};
break;
}
});
// 开始游戏
resetGame();
</script>
</body>
</html>虽然游戏可以正常运行,但是移动速度太快不好操控,继续使用提示词修改:蛇的速度太快,把移速降低一半。
源码定位和修改都是正确的,但是把gameSpeed变量丢了,打工人这么写没问题,但是AI这么写必须吐槽一句:不够智能。
最后客观的总结一句:在AI的加持下,可以高效的实现很多简单需求的编程,但是要说小白也可以轻松上手,显然也不现实。
所谓AI原生的IDE开发工具,其核心能力还是看底层的大模型,如果不够智能,输出的编码漏洞百出,根本起不到提升效率的作用。
从五花八门的AI应用体验来看,模型即产品。