大家好,这里是架构资源栈 !点击上方关注,添加"星标",一起学习大厂前沿架构!
微服务因其灵活性、可扩展性和易于维护性而成为现代软件架构的重要组成部分。在本博客中,我们将探讨如何使用 Spring Boot 构建微服务。我们将介绍基本工具的集成,例如用于服务发现的Eureka 、用于路由的API 网关 、用于集中配置的Config Server 和用于分布式跟踪的Zipkin 。
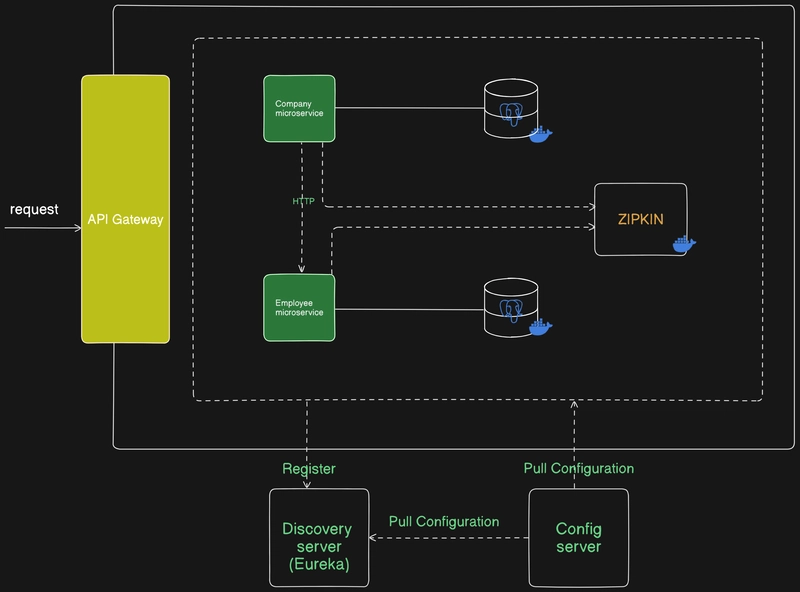
在本指南结束时,您将拥有一个可运行的 Spring Boot 项目,其中包含两个微服务:Company 和Employee,以及 API 网关、Eureka 发现服务器、配置服务器和 Zipkin 一起运行。
先决条件
在开始之前,请确保您已准备好以下物品:
- 对Spring Boot 和Java有基本的了解。
- 熟悉Spring Cloud概念(Eureka、Config Server 等)。
- Maven用于依赖管理。
- Docker(Zipkin 可选)。
组件概述
1. 使用 Spring Boot 的微服务
在这个架构中,我们有两个微服务:
- 公司服务:管理与公司相关的数据。
- 员工服务:处理员工数据。
每个微服务都是一个 Spring Boot 应用程序,它独立运行,但通过 HTTP 请求与其他服务交互。
2. Eureka 发现服务器
Eureka提供服务发现。它允许微服务注册自己并动态地发现彼此。通过使用 Eureka,您无需对服务 URL 进行硬编码,从而实现更灵活的系统。
3. API 网关
API网关 负责将客户端的请求路由到适当的微服务。它还提供负载平衡和安全性等附加功能。在此演示中,我们将使用Spring Cloud Gateway进行路由。
4. 配置服务器
配置服务器集中所有微服务的配置,使得管理和更新配置变得更加容易,而无需重新部署单个服务。
5. 使用 Zipkin 进行分布式跟踪
分布式跟踪有助于跟踪请求在各个微服务中的移动情况。我们将使用Zipkin 来可视化和跟踪跨服务的请求。Spring Cloud Sleuth会自动与 Zipkin 集成,提供跟踪和跨度信息。
逐步实施
步骤1:设置Eureka发现服务器
首先为Eureka Server创建一个 Spring Boot 应用程序。
1)在您的中添加所需的依赖项pom.xml:
<dependency>
    <groupId>org.springframework.cloud</groupId>
    <artifactId>spring-cloud-starter-netflix-eureka-server</artifactId>
</dependency>
Enter fullscreen mode Exit fullscreen mode
2)在主应用程序类中启用 Eureka 服务器:
@SpringBootApplication
@EnableEurekaServer
public class DiscoveryServer{
    public static void main(String[] args) {
        SpringApplication.run(EurekaServerApplication.class, args);
    }
}
Enter fullscreen mode Exit fullscreen mode
3)在application.yml中添加Eureka配置:
server:
  port: 8761

eureka:
  client:
    register-with-eureka: false
    fetch-registry: false
Enter fullscreen mode Exit fullscreen mode
在端口 8761 上运行 Eureka 服务器。可以通过http://localhost:8761访问 Eureka 仪表板。
第 2 步:创建微服务
公司服务和员工服务都将在 Eureka 中注册。创建方法如下:
1)为每个微服务的pom.xml添加以下依赖项:
<dependency>
    <groupId>org.springframework.cloud</groupId>
    <artifactId>spring-cloud-starter-netflix-eureka-client</artifactId>
</dependency>
Enter fullscreen mode Exit fullscreen mode
2)在两个微服务中启用 Eureka 客户端(对于较新版本的 Spring 来说不需要):
@SpringBootApplication
@EnableEurekaClient
public class CompanyServiceApplication {
    public static void main(String[] args) {
        SpringApplication.run(CompanyServiceApplication.class, args);
    }
}
Enter fullscreen mode Exit fullscreen mode
3)配置应用程序属性(application.yml):
spring:
  application:
    name: company-service
  cloud:
    discovery:
      eureka:
        client:
          service-url:
            defaultZone: http://localhost:8761/eureka
Enter fullscreen mode Exit fullscreen mode
步骤 3:设置 API 网关
我们将使用 Spring Cloud Gateway 来处理请求并将其路由到适当的微服务。
1)添加Spring Cloud Gateway所需的依赖项:
<dependency>
    <groupId>org.springframework.cloud</groupId>
    <artifactId>spring-cloud-starter-gateway</artifactId>
</dependency>
Enter fullscreen mode Exit fullscreen mode
2)在application.yml中定义路由:
server:
  port: 8222
spring:
  cloud:
    gateway:
      discovery:
        locator:
          enabled: true
      routes:
        - id: employees
          uri: http://localhost:8090
          predicates:
            - Path=/api/v1/employee/**
        - id: company
          uri: http://localhost:8070
          predicates:
            - Path=/api/v1/company/**
management:
  tracing:
    sampling:
      probability: 1.0
Enter fullscreen mode Exit fullscreen mode
此配置可确保 API 网关根据请求路径将请求路由到 company-service 和 employee-service。
步骤 4:配置服务器设置
为配置服务器创建一个新的 Spring Boot 应用程序。
1)添加以下依赖项:
<dependency>
    <groupId>org.springframework.cloud</groupId>
    <artifactId>spring-cloud-config-server</artifactId>
</dependency>
<dependency>
    <groupId>org.springframework.cloud</groupId>
    <artifactId>spring-cloud-starter-eureka</artifactId>
</dependency>
Enter fullscreen mode Exit fullscreen mode
2)在主类中启用配置服务器:
@SpringBootApplication
@EnableConfigServer
public class ConfigServerApplication {
    public static void main(String[] args) {
        SpringApplication.run(ConfigServerApplication.class, args);
    }
}
Enter fullscreen mode Exit fullscreen mode
- 将配置服务器指向保存微服务配置文件的 Git 存储库(或文件系统)。
步骤5:集成 Zipkin 进行分布式跟踪
向员工、公司、网关微服务添加 Zipkin 依赖项:
<dependency>
            <groupId>io.micrometer</groupId>
            <artifactId>micrometer-tracing-bridge-brave</artifactId>
        </dependency>
        <dependency>
            <groupId>io.zipkin.reporter2</groupId>
            <artifactId>zipkin-reporter-brave</artifactId>
        </dependency>
Enter fullscreen mode Exit fullscreen mode
在application.yml中配置Zipkin:
management:
  tracing:
    sampling:
      probability: 1.0
Enter fullscreen mode Exit fullscreen mode
在端口 9411 上运行 Zipkin(通过 Docker 或独立运行)。您现在可以跟踪跨微服务的请求。
运行应用程序
一切设置完成后,运行以下服务:
Eureka 服务器:本地主机:8761
公司服务:localhost:8070
员工服务:localhost:8090
API 网关:本地主机:8222
配置服务器:localhost:8888(如果使用配置服务器则可选)
访问http://localhost:8222处的 API 网关并向 /company 和 /employee 发出请求。所有请求都将路由到相应的微服务。
您还可以通过http://localhost:9411在 Zipkin 的 Web UI 中监控跟踪。
结论
在本指南中,我们已成功使用 Spring Boot 创建了 2 个微服务,集成了用于服务发现的 Eureka、用于路由的 API Gateway、用于 2 个微服务之间通信的 Open Feign、用于集中配置的 Config Server 以及用于分布式跟踪的 Zipkin。这些工具协同工作,帮助有效地管理和监控微服务,提供可扩展且可维护的架构。
通过此设置,您的微服务可以独立扩展、动态发现彼此,并通过分布式跟踪监控性能和问题。