涉及硬件的音视频能力,比如采集、渲染、硬件编码、硬件解码,通常是与客户端操作系统强相关的,就算是跨平台的多媒体框架也必须使用平台原生语言的模块来支持这些功能
本系列文章将详细讲述移动端音视频的采集、渲染、硬件编码、硬件解码这些涉及硬件的能力该如何实现,其中的示例代码,在我们的 Github 仓库 MediaPlayground 中都能找到,与文章结合着一起理解,效果更好
本文为该系列文章的第 6 篇,将详细讲述在 iOS 平台下如何使用 Metal 实现视频画面的渲染,对应了我们 MediaPlayground 项目中 SceneVCVideoRenderMetal.m 文件涉及到的内容
往期精彩内容,可参考
音视频基础能力之 iOS 视频篇(四):使用OpenGL进行视频渲染(上)
音视频基础能力之 iOS 视频篇(五):使用OpenGL进行视频渲染(下)
前言
之前 2 期文章讲了如何使用 OpenGL 做视频渲染,这次总算轮到 Metal 了。从开发的经验来看,兜兜转转这么多年,Metal 还是凭借自身过硬的实力证明了自己的,它的普及率在不断的提高,随着老旧 Apple 设备的逐渐淘汰,新设备对于 Metal 的支持也做的越来越好,可以说 Apple 生态下的渲染引擎,Metal 是当之无愧的老大
简单介绍Metal
Metal 渲染引擎是 Apple 为旗下操作系统专门打造的一套底层图形和计算编程接口,它能让开发者充分利用设备 GPU的强大性能,实现高性能的图形渲染和并行计算,目标就是代替原本的 OpenGL,为 Apple 生态提供更强大、更高效的图形能力。Metal 的高性能,来源于与 Apple 生态的强绑定,不像 OpenGL 标准要兼顾跨平台的通用性,因此更能发挥出 Apple 硬件设备的实力
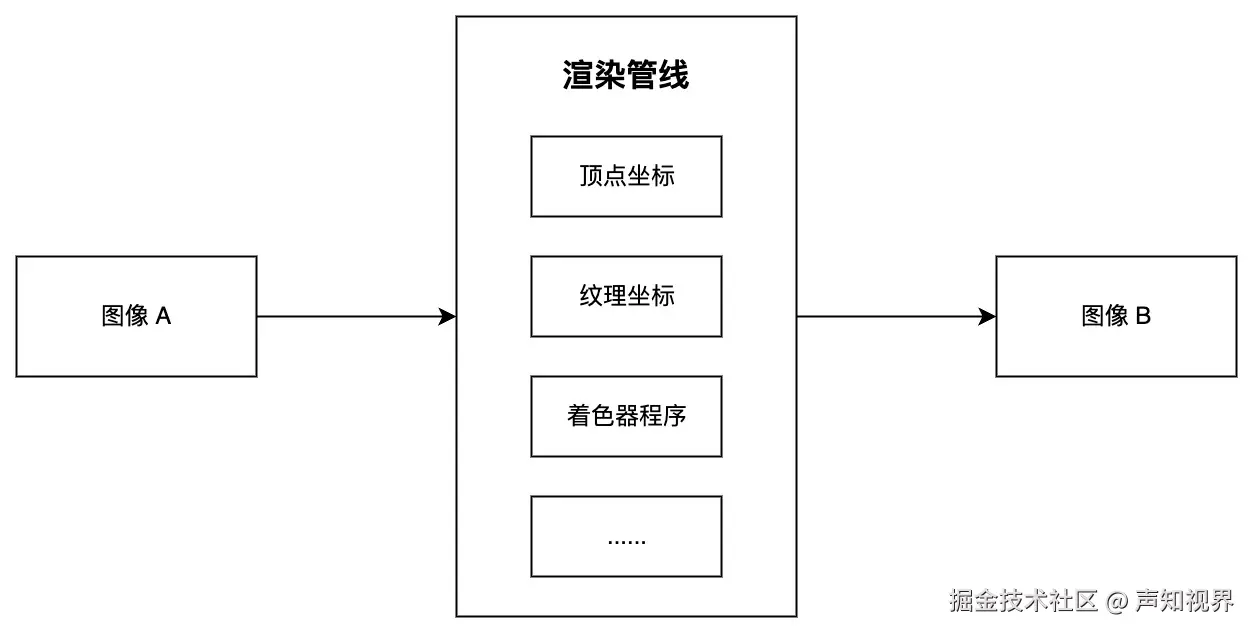
宏观流程
在 OpenGL 的文章中,我们详细介绍了图形渲染的思路和流程,其实渲染引擎换成 Metal 之后,整体思路和流程是不变的,关键的渲染要素也都是不变的,只不过在 Metal 中换了一种写法。因此我们来快速回顾下图形渲染的流程
微观细节
下面用一个例子展开讲 Metal 渲染的细节
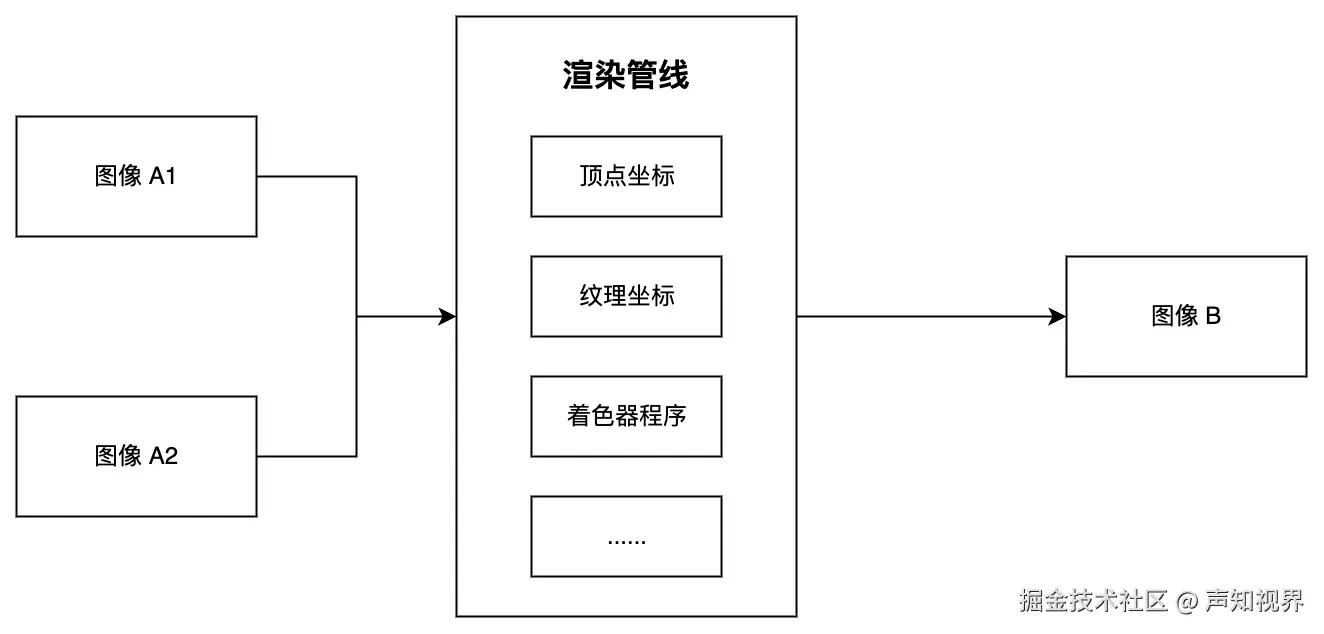
场景:将视频采集之后得到的 NV12 图像数据渲染在屏幕上
注意:因为原始图像数据的格式是 NV12,根据 NV12 格式的特点,数据会分为 Y 和 UV 两个平面,因此要有 2 个输入图像才能正常进行渲染,宏观流程会变成这个样子
系统框架
要在 iOS 上调用 Metal 的接口,需要引入头文件
arduino
#import <Metal/Metal.h>必要资源
MTLDevice
MTLDevice 顾名思义,就是渲染设备,可以理解为 GPU 的抽象体现,与 Metal 渲染引擎相关的资源都由它来分配
ini
id<MTLDevice> device = MTLCreateSystemDefaultDevice();MTLLibrary
MTLLibrary 用于访问着色器程序,通过 MTLDevice 来创建
ini
id<MTLLibrary> default_library = [device newDefaultLibrary];MTLCommandQueue
MTLCommandQueue 用于操作渲染管线,通过 MTLDevice 来创建
ini
id<MTLCommandQueue> command_queue = [device newCommandQueue];采样纹理
与 OpenGL 一样,纹理的数据来源分为 2 种
- 如果原始图像数据被包装在 CVPixelBuffer 中,也就是我们例子中的场景,那么这块纹理是由系统创建并管理生命周期的,我们只需要拿到它就好。为了能拿到它,我们需要创建 CVMetalTextureCacheRef。注意:这个 cache 的生命周期需要我们自行管理
arduino
CVMetalTextureCacheCreate(kCFAllocatorDefault, NULL, device, NULL, &texture_cache_);- 如果原始图像数据本身已经在内存中(有可能是读取本地图片得到的,也有可能是通过软件解码得到的),就需要自行创建纹理并维护其生命周期 (本文中的例子用不到,建议放在一起对比着看,加深理解)
ini
MTLTextureDescriptor* descriptor = [[MTLTextureDescriptor alloc] init];
descriptor.width = pixel_width;
descriptor.height = pixel_height;
descriptor.pixelFormat = MTLPixelFormatR8Unorm;// 对于 YUV 的 Y 分量
texture_ = [metal_device_ newTextureWithDescriptor:descriptor];
MTLRegion region = MTLRegionMake2D(0, 0, pixel_width, pixel_height);
[texture_ replaceRegion:region mipmapLevel:0 withBytes:pixel_data bytesPerRow:pixel_width];
渲染目标
Metal 中没有 OpenGL 那样 frame buffer 的概念,或者就算是有,存在感也不是那么强。涉及渲染目标的内容就是 MTLRenderPassDescriptor,但它其实就像是个携带了一堆参数的 config 而已,因此我们把渲染目标约等于 MTLTexture 也是问题不大的。
根据渲染目标的不同用途,有 2 种创建方式
- 想要渲染的结果能在屏幕上展示,也就是我们例子中的场景,就需要从 CAMetalLayer 中去拿到 MTLTexture。在 iOS 中需要自定义 UIView,修改 layerClass 为 CAMetalLayer
kotlin
+ (Class)layerClass {
    return [CAMetalLayer class];
}- 如果渲染目标并不需要在屏幕上展示,只做离屏渲染,只需要创建 MTLRenderPassDescriptor 和 MTLTexture (本文中的例子用不到,建议放在一起对比着看,加深理解)
ini
MTLTextureDescriptor* texture_descriptor = [[MTLTextureDescriptor alloc] init];
texture_descriptor.width = width;
texture_descriptor.height = height;
texture_descriptor.pixelFormat = MTLPixelFormatBGRA8Unorm;
texture_descriptor.usage = MTLTextureUsageShaderRead | MTLTextureUsageRenderTarget;

id<MTLTexture> texture = [metal_device_ newTextureWithDescriptor:texture_descriptor];

render_pass_descriptor_ = [MTLRenderPassDescriptor renderPassDescriptor];
render_pass_descriptor_.colorAttachments[0].clearColor = MTLClearColorMake(0.0f, 0.0f, 0.0f, 1.0f);
render_pass_descriptor_.colorAttachments[0].texture = texture;
render_pass_descriptor_.colorAttachments[0].loadAction = MTLLoadActionClear;
render_pass_descriptor_.colorAttachments[0].storeAction = MTLStoreActionStore;
着色器程序
着色器的作用在 OpenGL 的篇章里已经讲过,这里直接上代码。Metal 的着色器代码会单独放在 .metal 文件中,写好着色器程序,通过名称获取到 MTLFunction,再关联到 MTLRenderPipelineState。MTLRenderPipelineState 顾名思义就是跟渲染管线有关的资源
ini
id<MTLFunction> vertex_function = [default_library newFunctionWithName:@"BasicVertexShader"];// from MetalBaseShader.metal
id<MTLFunction> fragment_function = [default_library newFunctionWithName:@"NV12FragmentShader"];// from MetalBaseShader.metal
MTLRenderPipelineDescriptor* pipeline_descriptor = [[MTLRenderPipelineDescriptor alloc] init];
pipeline_descriptor.vertexFunction = vertex_function;
pipeline_descriptor.fragmentFunction = fragment_function;
pipeline_descriptor.colorAttachments[0].pixelFormat = MTLPixelFormatBGRA8Unorm;
NSError* error = nil;
self.render_pipeline_state = [device newRenderPipelineStateWithDescriptor:pipeline_descriptor error:&error];
if (error) {
  NSAssert(!error, @"init shader failed, error:%@", error);
}
单次渲染流程
前期准备工作都做完后,就可以让渲染管线真正跑起来了,分为以下几个步骤
第 1 步:将输入的图像 A1 和 A2 的数据,关联到用于采样的纹理
本例中,由于原始图像数据的格式是 NV12,因此需要准备 2 个用于采样的纹理,宏观流程图中的 A1 和 A2 分别对应 Y 平面和 UV 平面。根据图像来源的不同,分为 2 种方式,跟之前准备采样纹理时一样
- 如果原始图像数据被包装在 CVPixelBuffer 中,也就是我们例子中的场景,那么从 CVPixelBuffer 中就能拿到纹理
ini
// NV12 的 Y 分量
CVMetalTextureRef cv_texture = nullptr;
CVMetalTextureCacheCreateTextureFromImage(kCFAllocatorDefault, texture_cache_, pixel_buffer, NULL, MTLPixelFormatR8Unorm, pixel_width, pixel_height, 0, &cv_texture);
id<MTLTexture> texture = CVMetalTextureGetTexture(cv_texture);
CFRelease(cv_texture);

// NV12 的 UV 分量
CVMetalTextureRef cv_texture = nullptr;
CVMetalTextureCacheCreateTextureFromImage(kCFAllocatorDefault, texture_cache_, pixel_buffer, NULL, MTLPixelFormatRG8Unorm, pixel_width/2, pixel_height/2, 1, &cv_texture);
id<MTLTexture> texture = CVMetalTextureGetTexture(cv_texture);
CFRelease(cv_texture);- 如果原始图像数据本身已经在内存中,就需要将内存中的数据传递到之前创建好的纹理中 (本文中的例子用不到,建议放在一起对比着看,加深理解)
ini
MTLTextureDescriptor* descriptor = [[MTLTextureDescriptor alloc] init];
descriptor.width = pixel_width;
descriptor.height = pixel_height;
descriptor.pixelFormat = MTLPixelFormatR8Unorm;// 双平面 YUV 的 Y 分量

id<MTLTexture> texture = [device newTextureWithDescriptor:descriptor];
MTLRegion region = MTLRegionMake2D(0, 0, pixel_width, pixel_height);
[texture replaceRegion:region mipmapLevel:0 withBytes:pixel_data bytesPerRow:pixel_width];
ini
MTLTextureDescriptor* descriptor = [[MTLTextureDescriptor alloc] init];
descriptor.width = pixel_width/2;
descriptor.height = pixel_height/2;
descriptor.pixelFormat = MTLPixelFormatRG8Unorm;// 双平面 YUV 的 UV 分量

id<MTLTexture> texture = [device newTextureWithDescriptor:descriptor];
MTLRegion region = MTLRegionMake2D(0, 0, pixel_width/2, pixel_height/2);
[texture replaceRegion:region mipmapLevel:0 withBytes:pixel_data bytesPerRow:pixel_width];
第 2 步:准备渲染目标。本案例做屏上渲染,需要从 CAMetalLayer 拿到目标纹理
ini
// 屏上渲染
id<CAMetalDrawable> layer_drawable = [[self.display_view getMetalLayer] nextDrawable];
id<MTLTexture> target_texture = layer_drawable.texture;

//
MTLRenderPassDescriptor* render_pass_descriptor = [MTLRenderPassDescriptor renderPassDescriptor];
render_pass_descriptor.colorAttachments[0].clearColor = MTLClearColorMake(0.0f, 0.0f, 0.0f, 1.0f);
render_pass_descriptor.colorAttachments[0].texture = target_texture;
render_pass_descriptor.colorAttachments[0].loadAction = MTLLoadActionClear;
render_pass_descriptor.colorAttachments[0].storeAction = MTLStoreActionStore;
第 3 步:创建 MTLRenderCommandEncoder,这个对象很重要,用于配置渲染管线中的各个要素
ini
// 创建 render command encoder
id<MTLRenderCommandEncoder> render_command_encoder = [command_buffer renderCommandEncoderWithDescriptor:render_pass_descriptor];
// 设置渲染区域
[render_command_encoder setViewport:(MTLViewport){0.0f, 0.0f, [self.display_view getMetalLayer].drawableSize.width, [self.display_view getMetalLayer].drawableSize.height, 0.0f, 1.0f}];
第 4 步:关联着色器与当前的渲染操作
ini
[render_command_encoder setRenderPipelineState:self.render_pipeline_state];第 5 步:关联采样纹理和片段着色器
scss
[render_command_encoder setFragmentTexture:texture_list_[0]->GetTexture() atIndex:MetalShaderTextureIndex0];
[render_command_encoder setFragmentTexture:texture_list_[1]->GetTexture() atIndex:MetalShaderTextureIndex1];
第 6 步:将顶点坐标传递给顶点着色器
ini
id<MTLBuffer> vertex_coordinates_buffer = [device newBufferWithBytes:MetalDefaultVertexCoordinates length:sizeof(MetalDefaultVertexCoordinates) options:MTLResourceStorageModeShared];
[render_command_encoder setVertexBuffer:vertex_coordinates_buffer offset:0 atIndex:MetalShaderIndexVertexCoordinates];
第 7 步:将纹理坐标传递给顶点着色器,然后会由顶点着色器透传给片段着色器
ini
id<MTLBuffer> texture_coordinates_buffer = [device newBufferWithBytes:MetalDefaultTextureCoordinates length:sizeof(MetalDefaultTextureCoordinates) options:MTLResourceStorageModeShared];
[render_command_encoder setVertexBuffer:texture_coordinates_buffer offset:0 atIndex:MetalShaderIndexTextureCoordinates];
第 8 步:调用绘制方法;渲染结果需要上屏显示的话,需要在 command buffer 执行 commit 之前,调用 command buffer 的 presentDrawable 方法,离屏渲染则不需要
可以看到 Metal 所体现的思想就是把渲染操作的指令批量进行打包,放在 command buffer 中,然后批量进行处理,其实 OpenGL 也是类似的,调用 OpenGL 接口只是把指令发给了 GPU,GPU 什么时候执行其实并不那么明确,Metal 在流程控制上也更方便,代码中使用了 waitUntilCompleted 来等待当前渲染操作完成,这在链式渲染操作中是很常见的手段
ini
// render
[render_command_encoder drawPrimitives:MTLPrimitiveTypeTriangleStrip vertexStart:0 vertexCount:4];
[render_command_encoder endEncoding];

// show render result on screen
[command_buffer presentDrawable:layer_drawable];

// commit render commands
[command_buffer commit];
[command_buffer waitUntilCompleted];
到此为止,单次的渲染流程就走完了,在本例中,对应着视频采集单次回调的图像数据从开始渲染直到在屏幕上展示的过程
释放资源
相比 OpenGL,Metal 的资源回收就方便很多了,唯一要注意的是采样纹理,如果纹理的数据来自 CVPixelBuffer,需要手动释放 CVMetalTextureCacheRef,其他的资源都可以由 ARC 机制进行内存管理,释放资源无需进行额外操作,解除强引用即可
scss
CFRelease(texture_cache_);写在最后
以上就是本文的所有内容了,详细介绍了在 iOS 平台下如何使用 Metal 实现视频画面的渲染
本文为音视频基础能力系列文章的第 6 篇
往期精彩内容,可参考
音视频基础能力之 iOS 视频篇(四):使用OpenGL进行视频渲染(上)
音视频基础能力之 iOS 视频篇(五):使用OpenGL进行视频渲染(下)
后续精彩内容,敬请期待
音视频基础能力系列文章的示例代码,在我们的 Github 仓库 MediaPlayground 中都能找到,与文章结合着一起理解,效果更好
如果您觉得以上内容对您有所帮助的话,欢迎关注我们运营的公众号声知视界,会定期的推送音视频技术、移动端技术为主轴的科普类、基础知识类、行业资讯类等文章