目录
[qwen 视频理解能力](#qwen 视频理解能力)
[messages 构建 demo](#messages 构建 demo)
[qwen 抽帧代码分析](#qwen 抽帧代码分析)
[验证两个实际 case](#验证两个实际 case)
[性能对比:ffmpeg 抽帧、decord 库抽帧](#性能对比:ffmpeg 抽帧、decord 库抽帧)
[100 qps 测试(CPU)](#100 qps 测试(CPU))
[100 qps 测试(CPU)](#100 qps 测试(CPU))
[100 qps 测试(GPU)](#100 qps 测试(GPU))
本文也录制了详细的视频讲解:
IT超016 大模型:源码分析Qwen2.5VL视频抽帧模块(附加FFmpeg性能对比测试)_哔哩哔哩_bilibili
IT超016 大模型:源码分析Qwen2.5VL视频抽帧模块(附加FFmpeg性能对比测试)
qwen 视频理解能力
Qwen2.5-VL 是由阿里云 Qwen 团队开发的多模态大型语言模型系列,仓库地址:https://github.com/QwenLM/Qwen2.5-VL

messages 构建 demo
# 方式一:输入视频文件(这种才会走抽帧逻辑)
messages = [
    {
        "role": "user",
        "content": [
            {
                "type": "video",
                "video": "file:///path/to/video1.mp4",
                "max_pixels": 360 * 420,
                "fps": 1.0,
            },
            {"type": "text", "text": "Describe this video."},
        ],
    }
]

# 方式二:直接输入多图
messages = [
    {
        "role": "user",
        "content": [
            {
                "type": "video",
                "video": [
                    "file:///path/to/frame1.jpg",
                    "file:///path/to/frame2.jpg",
                    "file:///path/to/frame3.jpg",
                    "file:///path/to/frame4.jpg",
                ],
            },
            {"type": "text", "text": "Describe this video."},
        ],
    }
]
qwen 抽帧代码分析
视频 message 处理的核心代码:https://github.com/QwenLM/Qwen2.5-VL/blob/main/qwen-vl-utils/src/qwen_vl_utils/vision_process.py
视频解析抽帧能力依赖------decord 库:https://github.com/dmlc/decord?tab=readme-ov-file#install-from-source
Decord 是一个专门为视频数据处理和深度学习设计的轻量级、高性能的视频解码库,擅长处理帧的随机访问模式,避免了像 FFmpeg 那样从头开始逐帧解码------Qwen 抽帧模块用的这个库
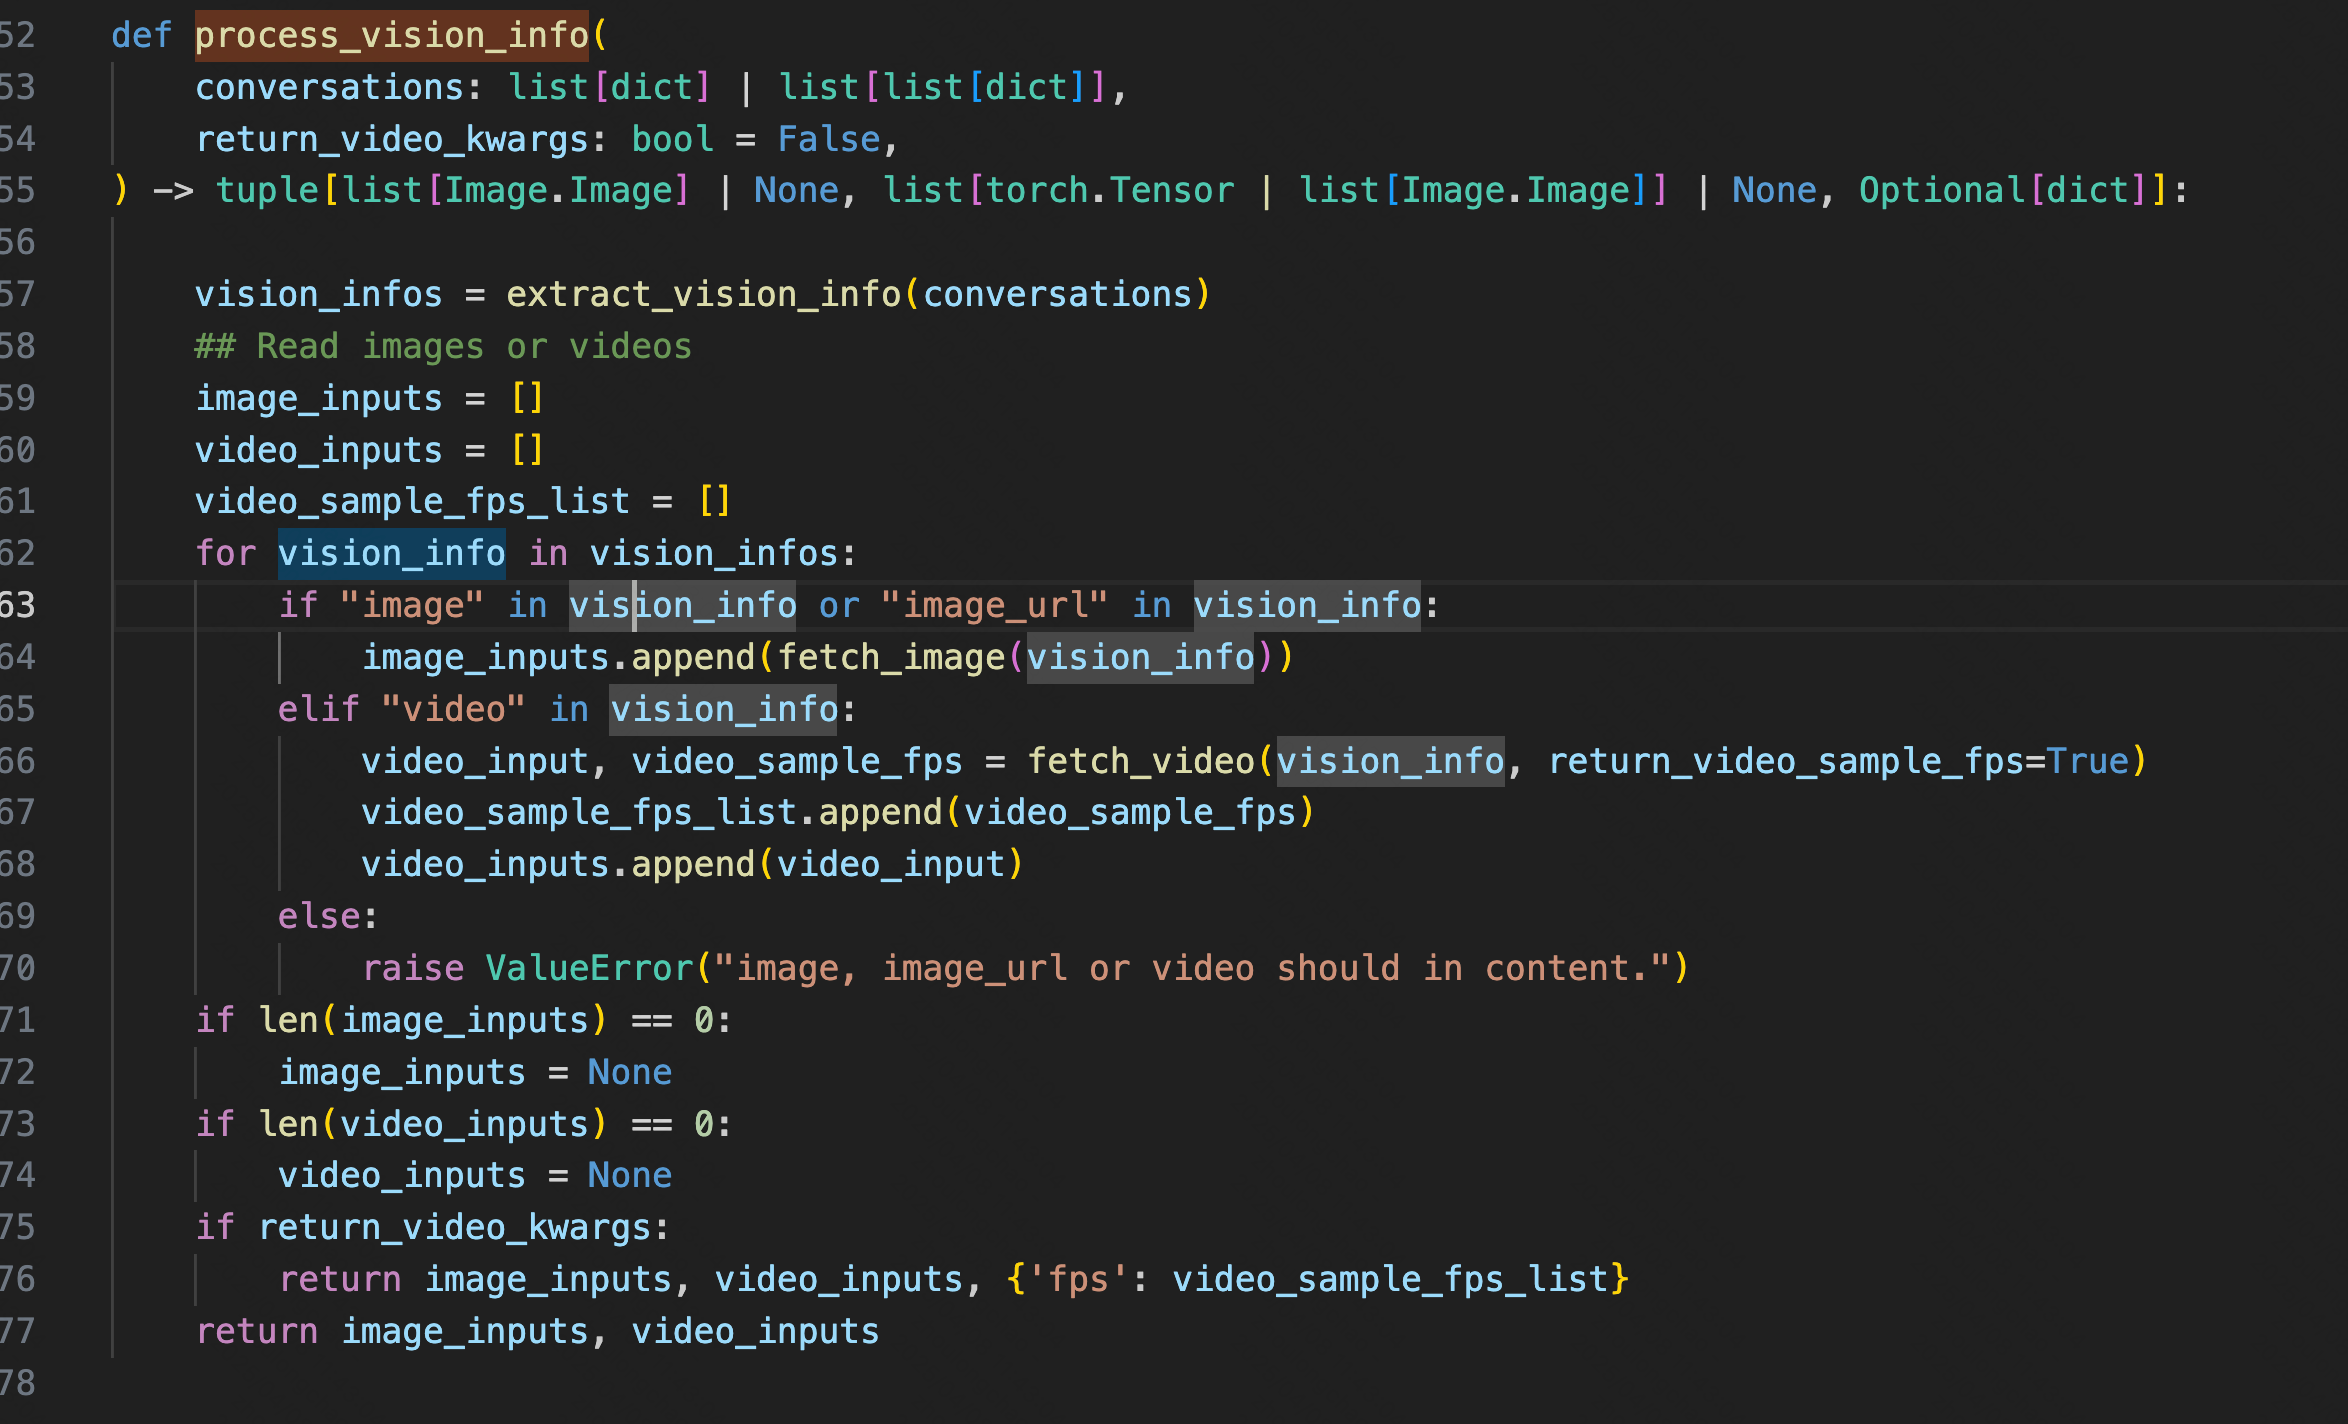
1、vision_process.py # process_vision_info:处理 messages 中的 图像 / 视频 输入
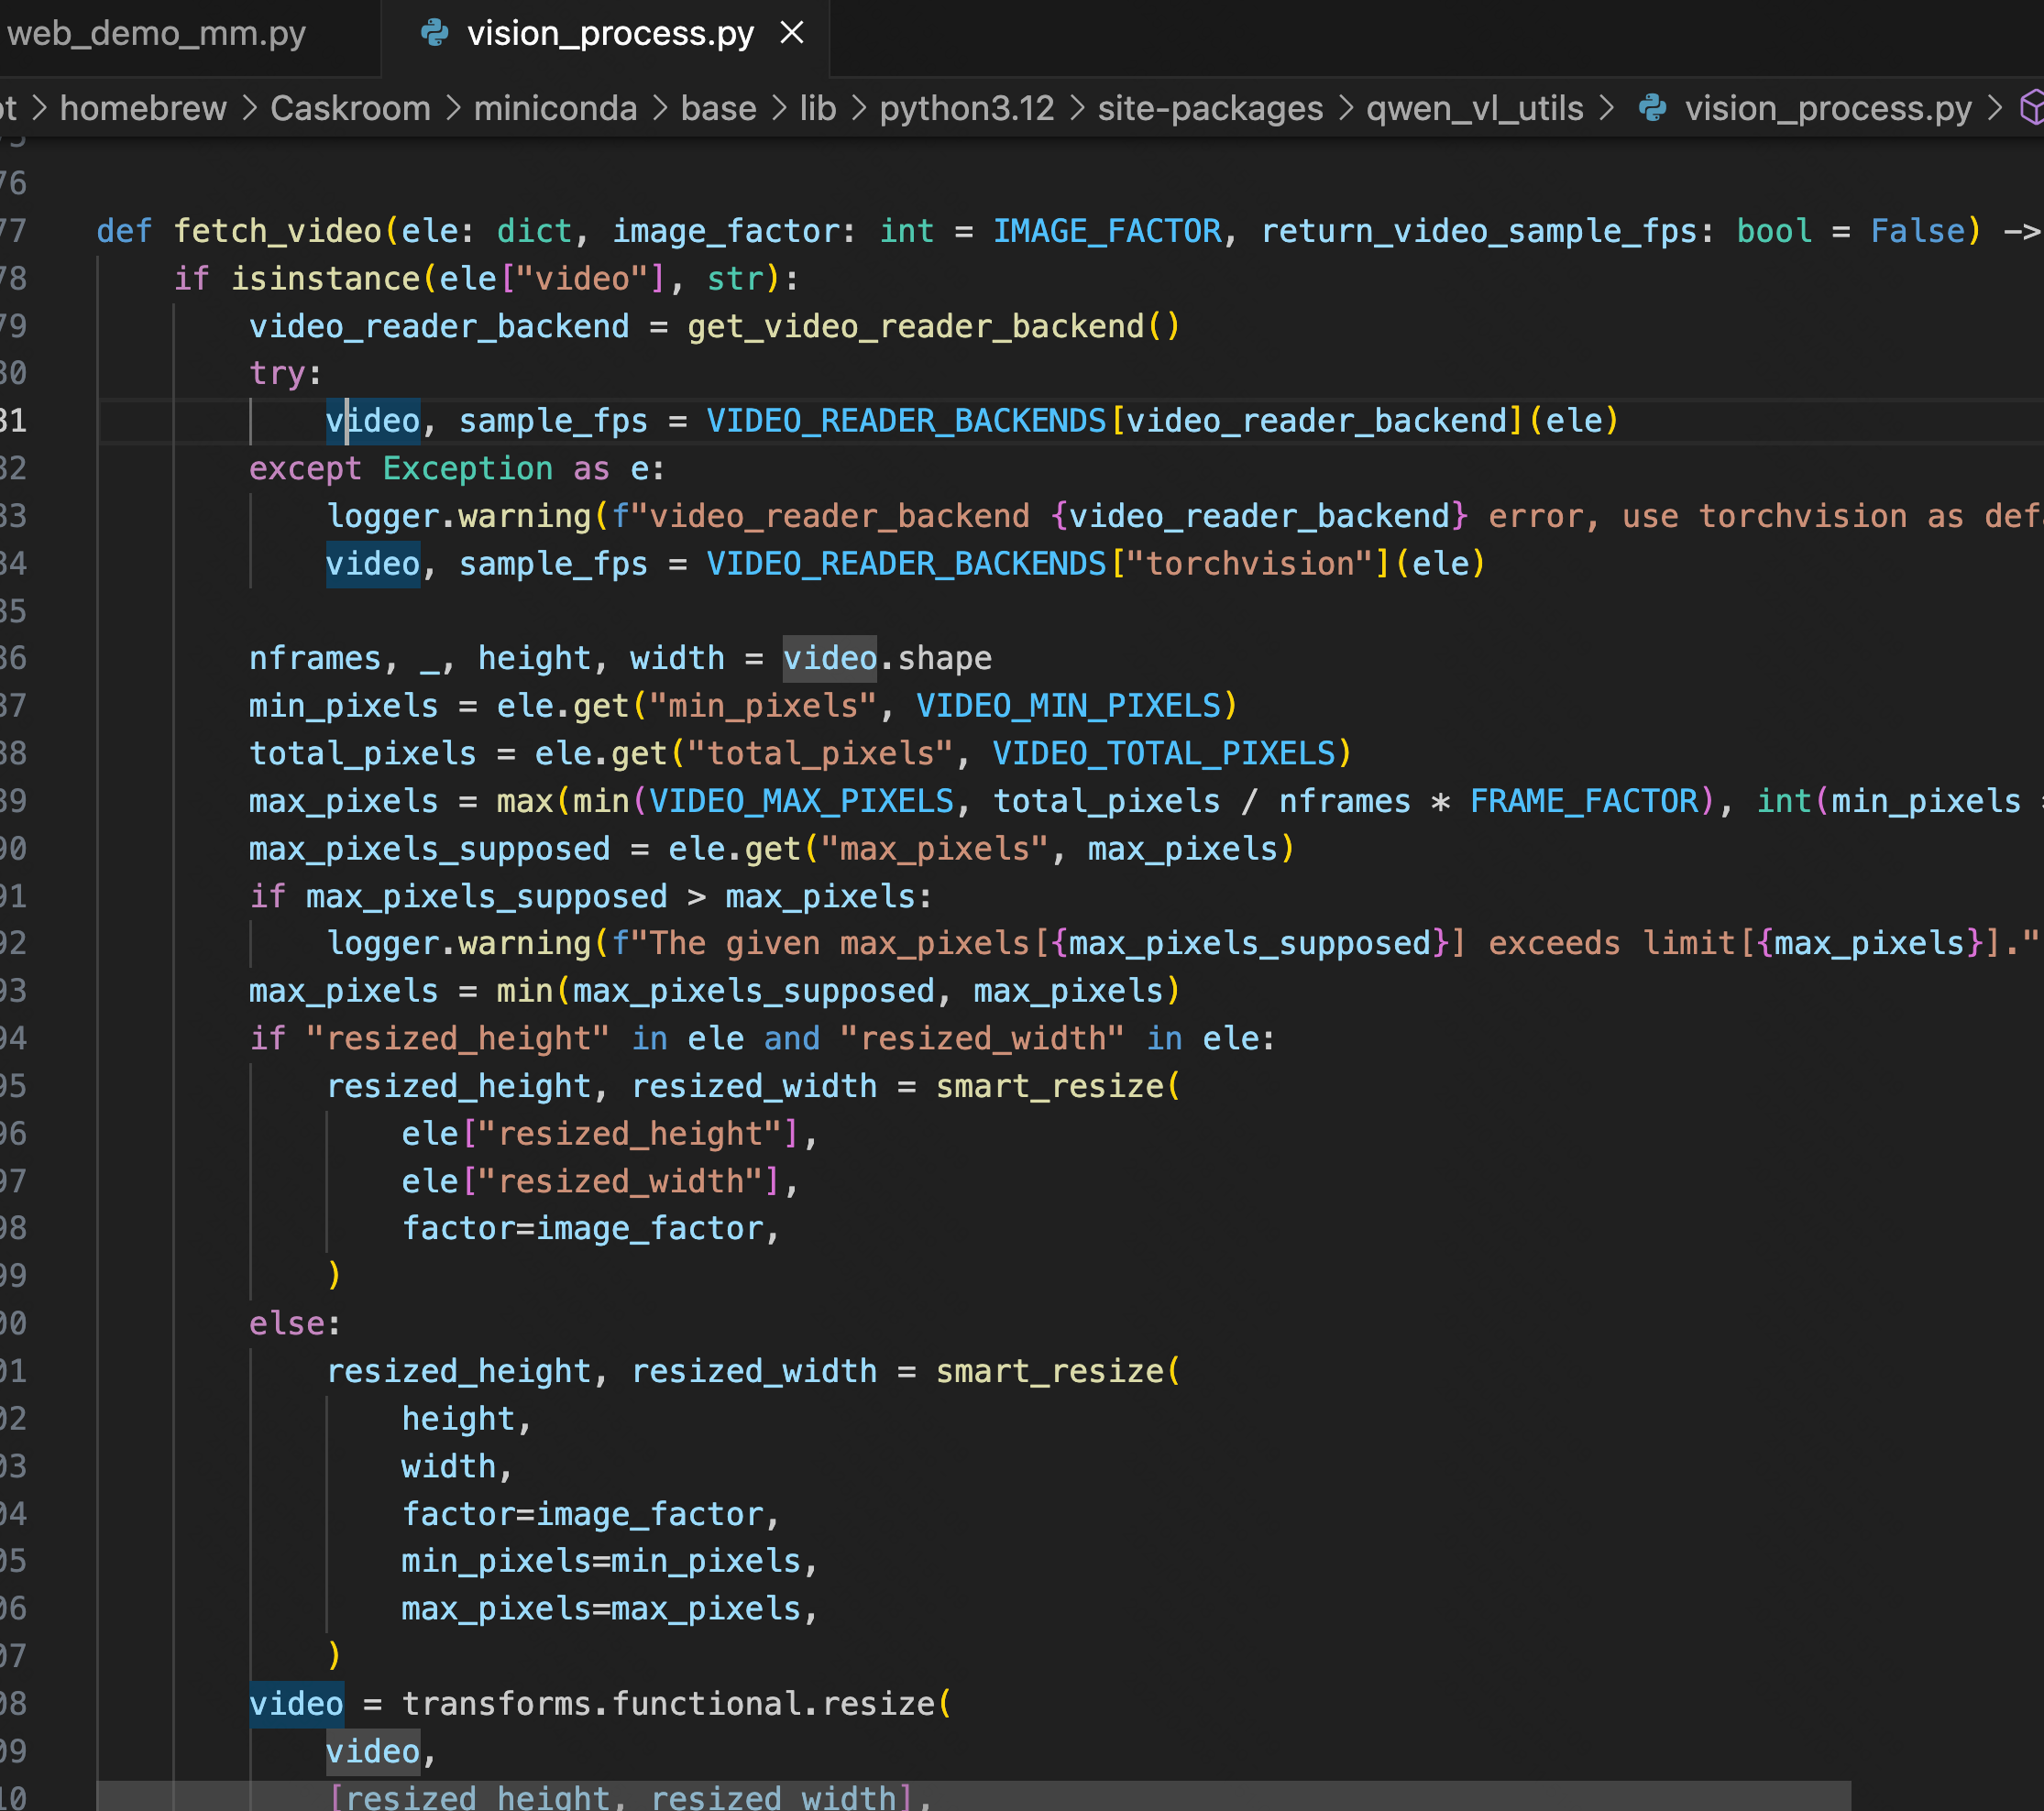
2、vision_process.py # fetch_video:处理 messages 中的 视频 输入
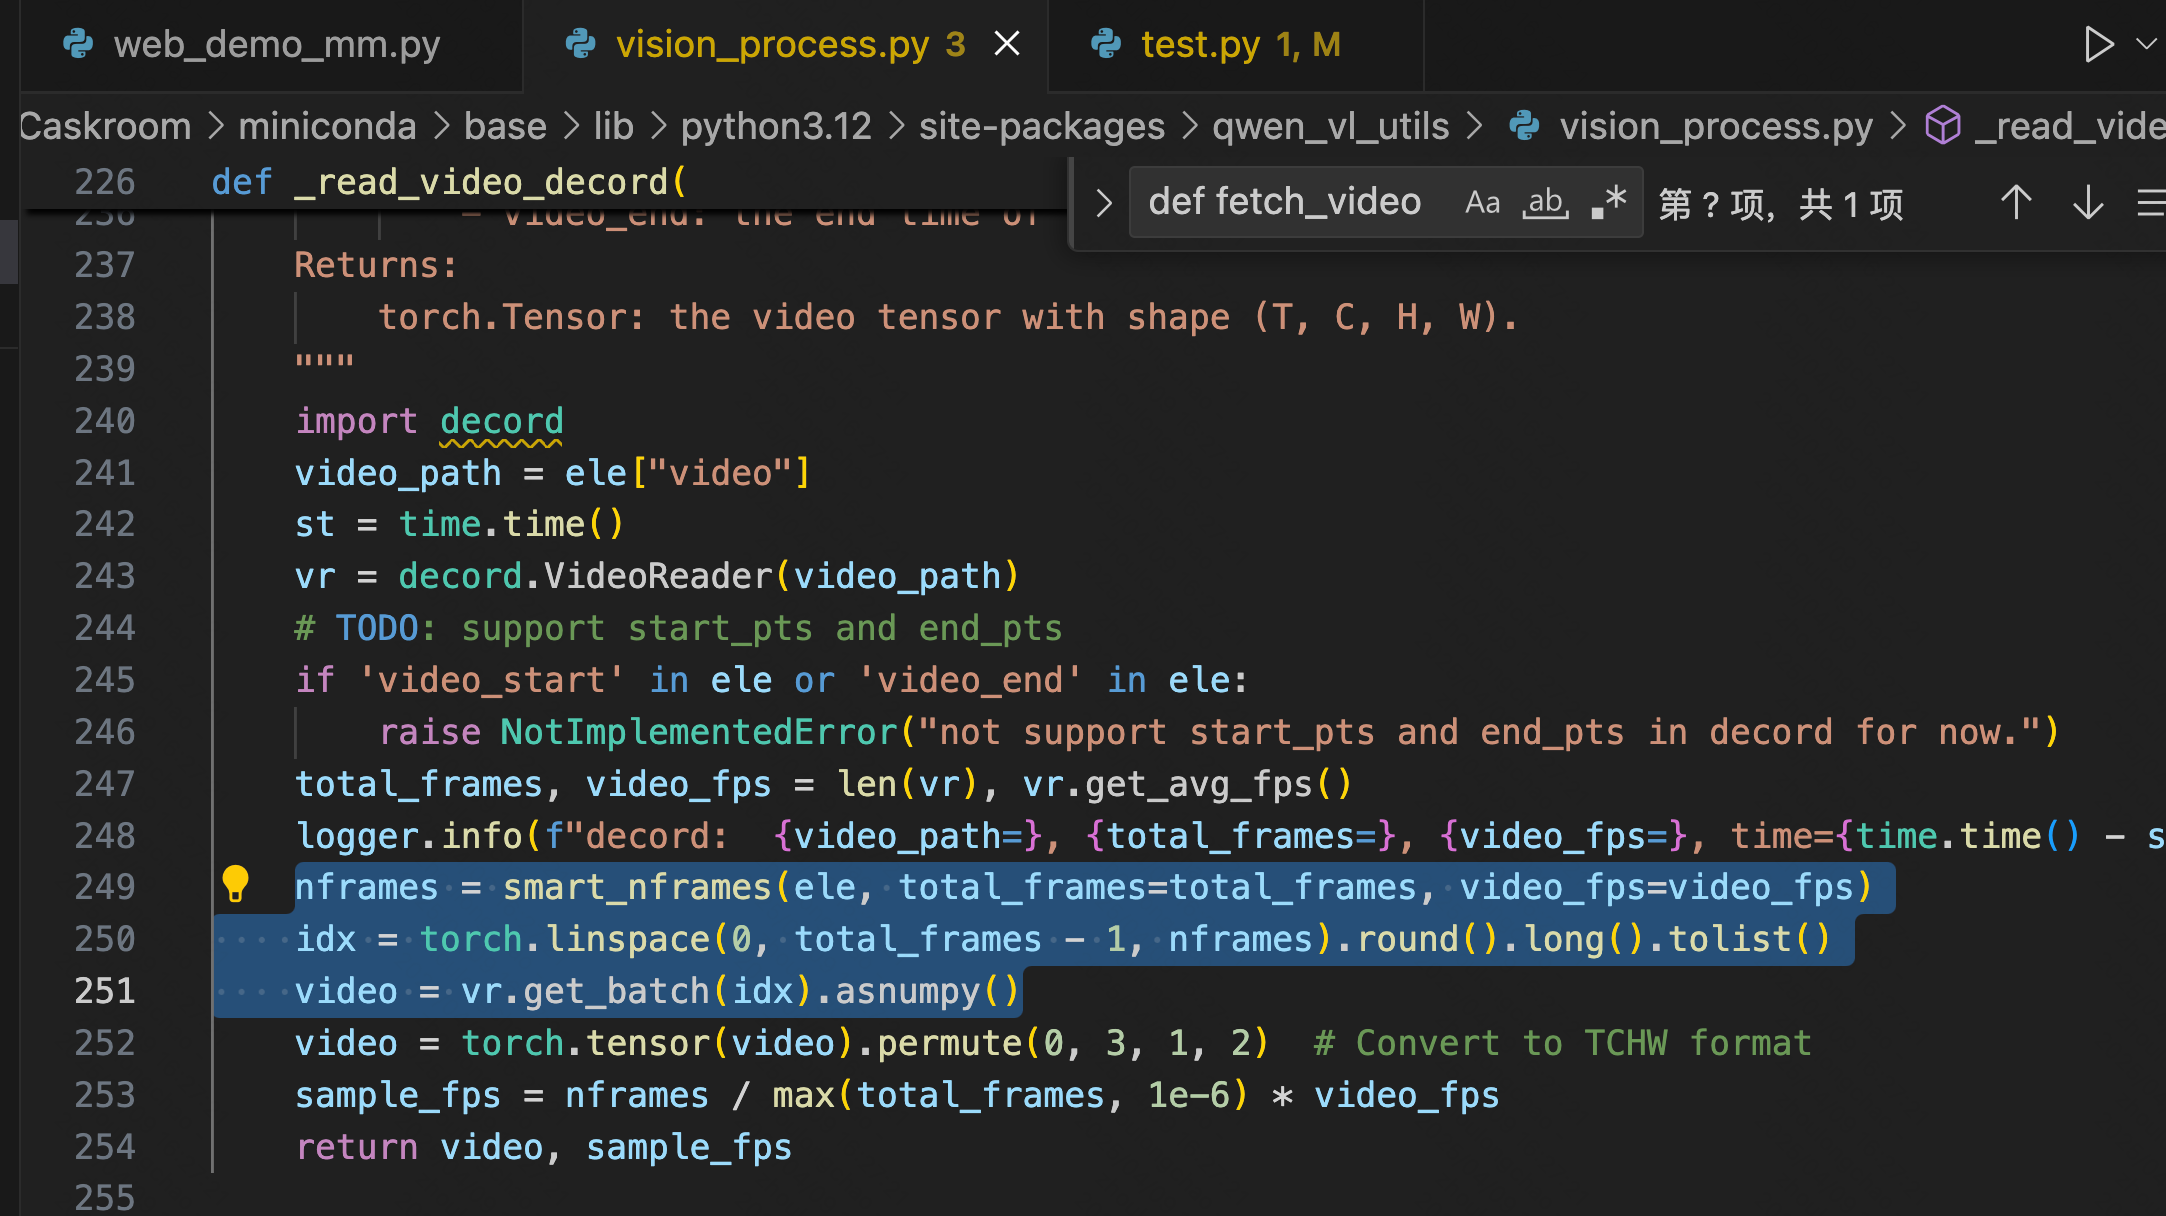
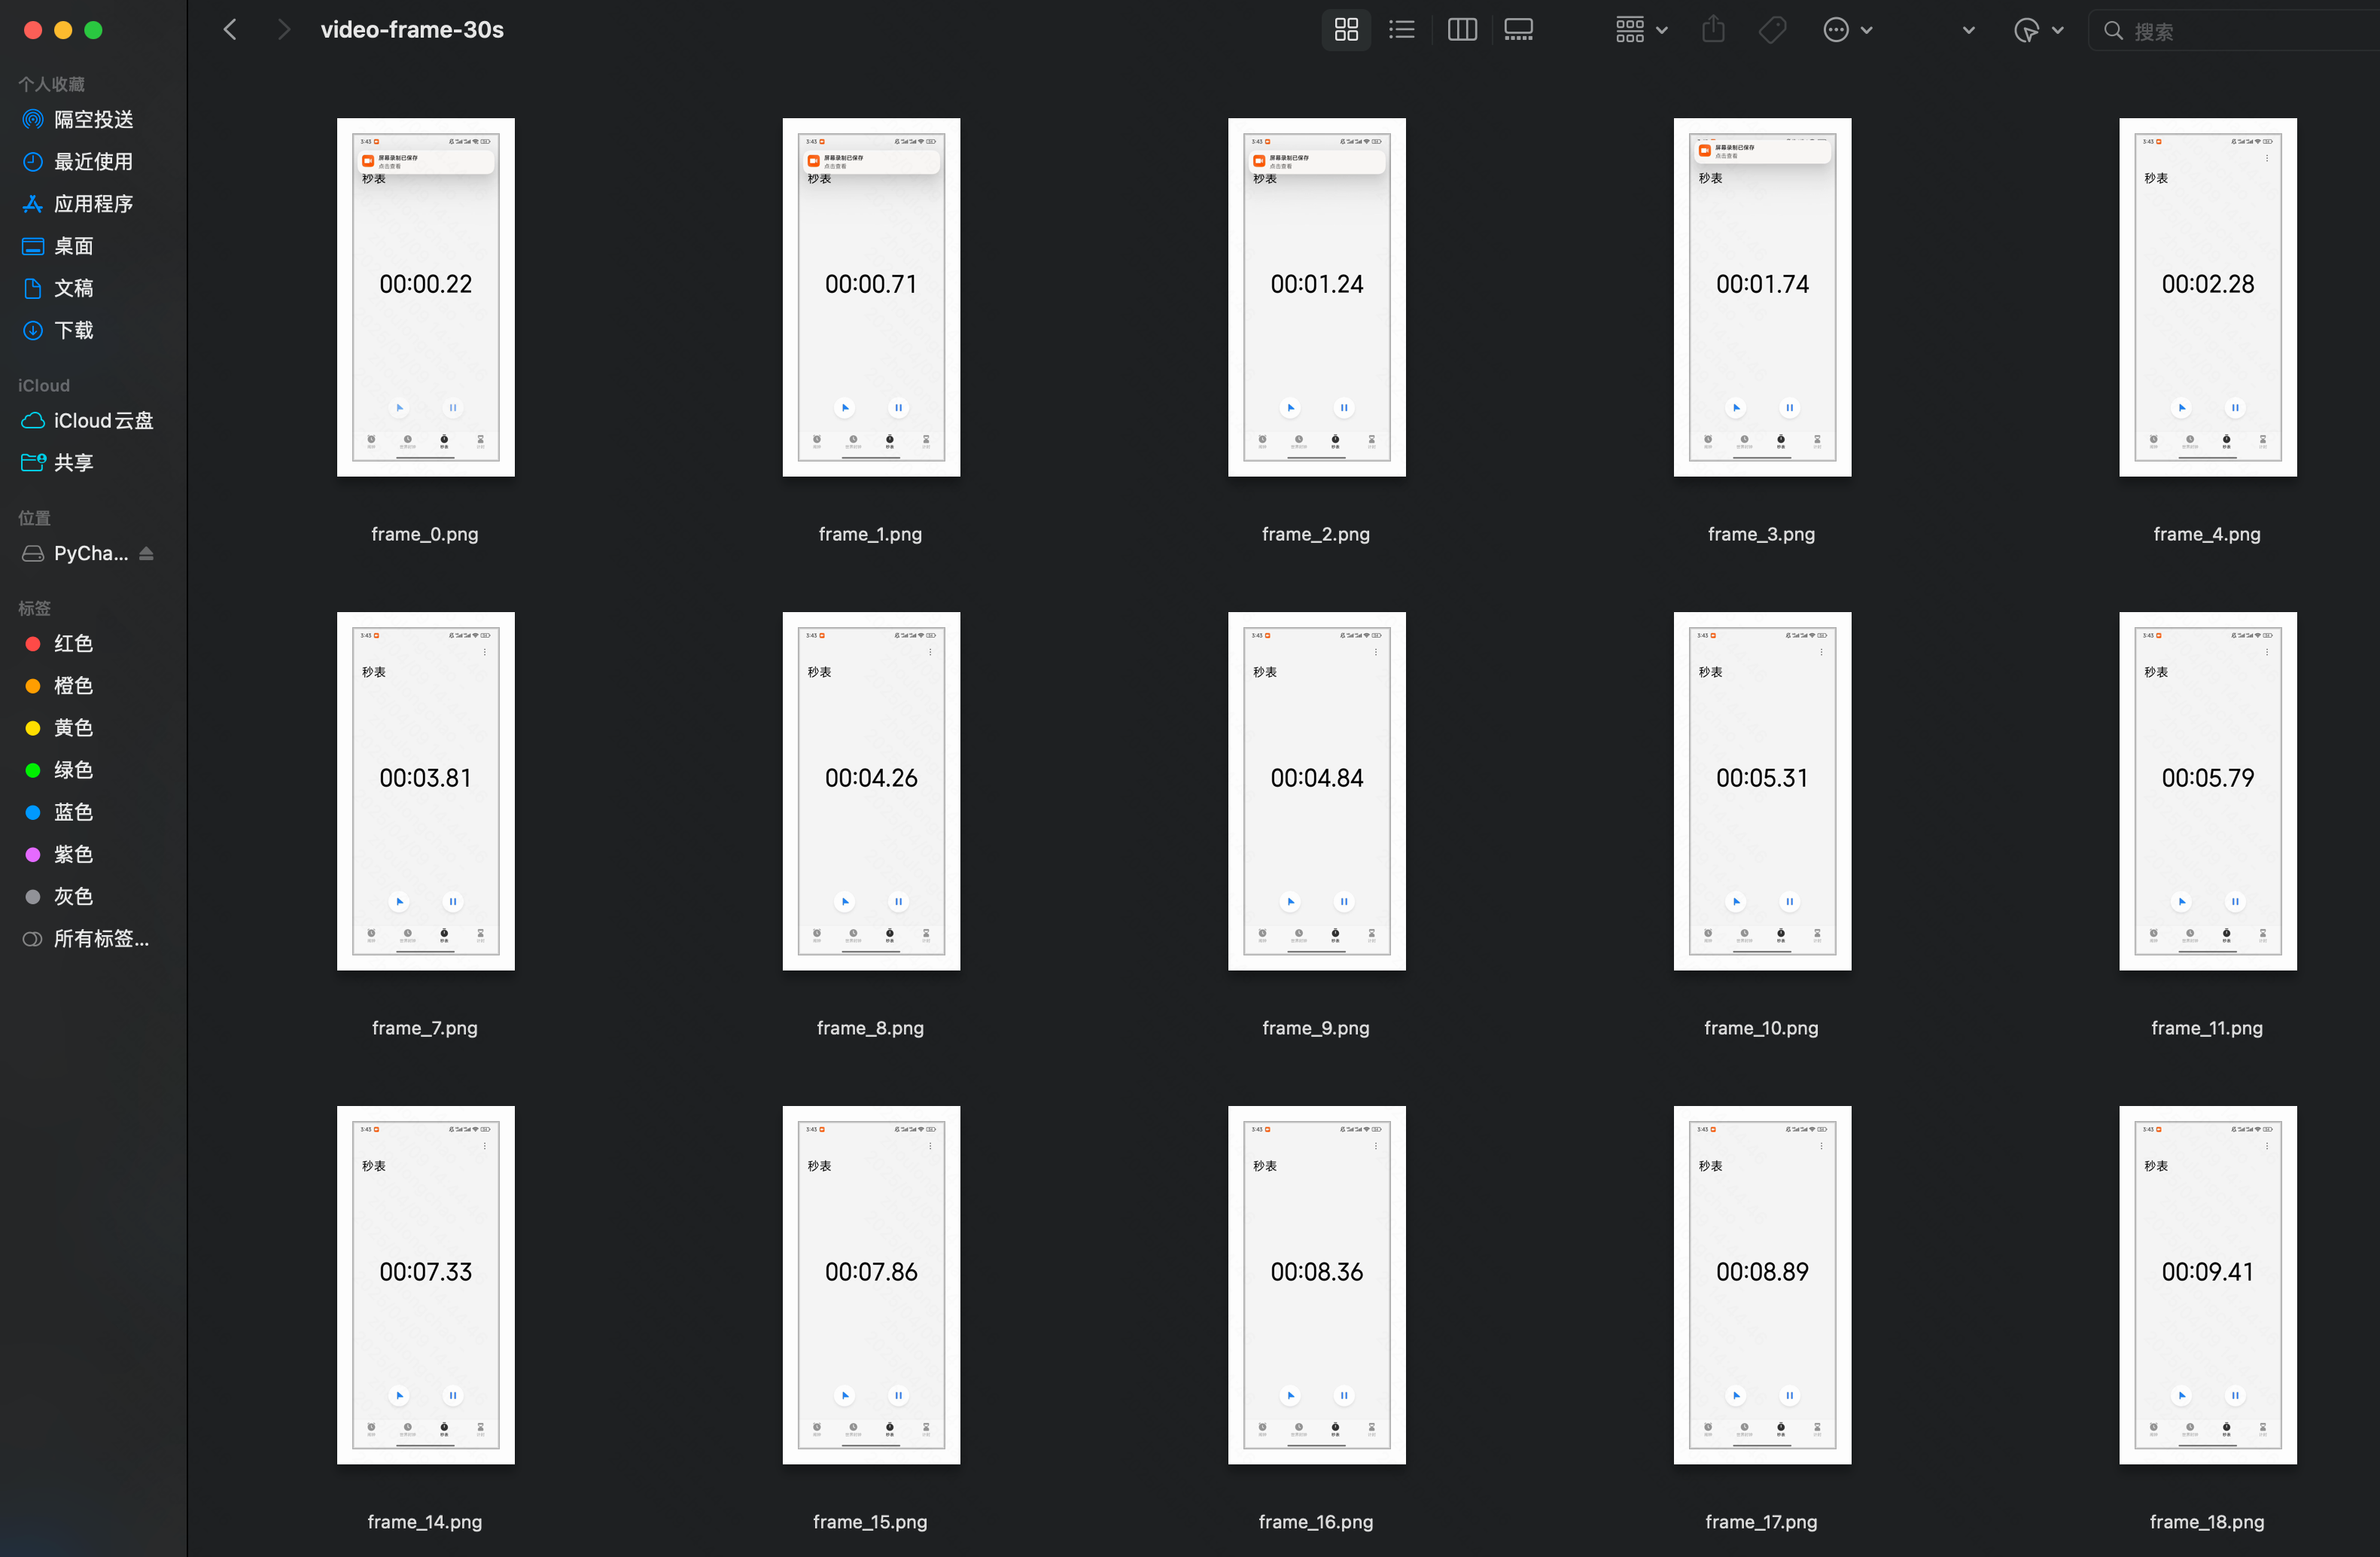
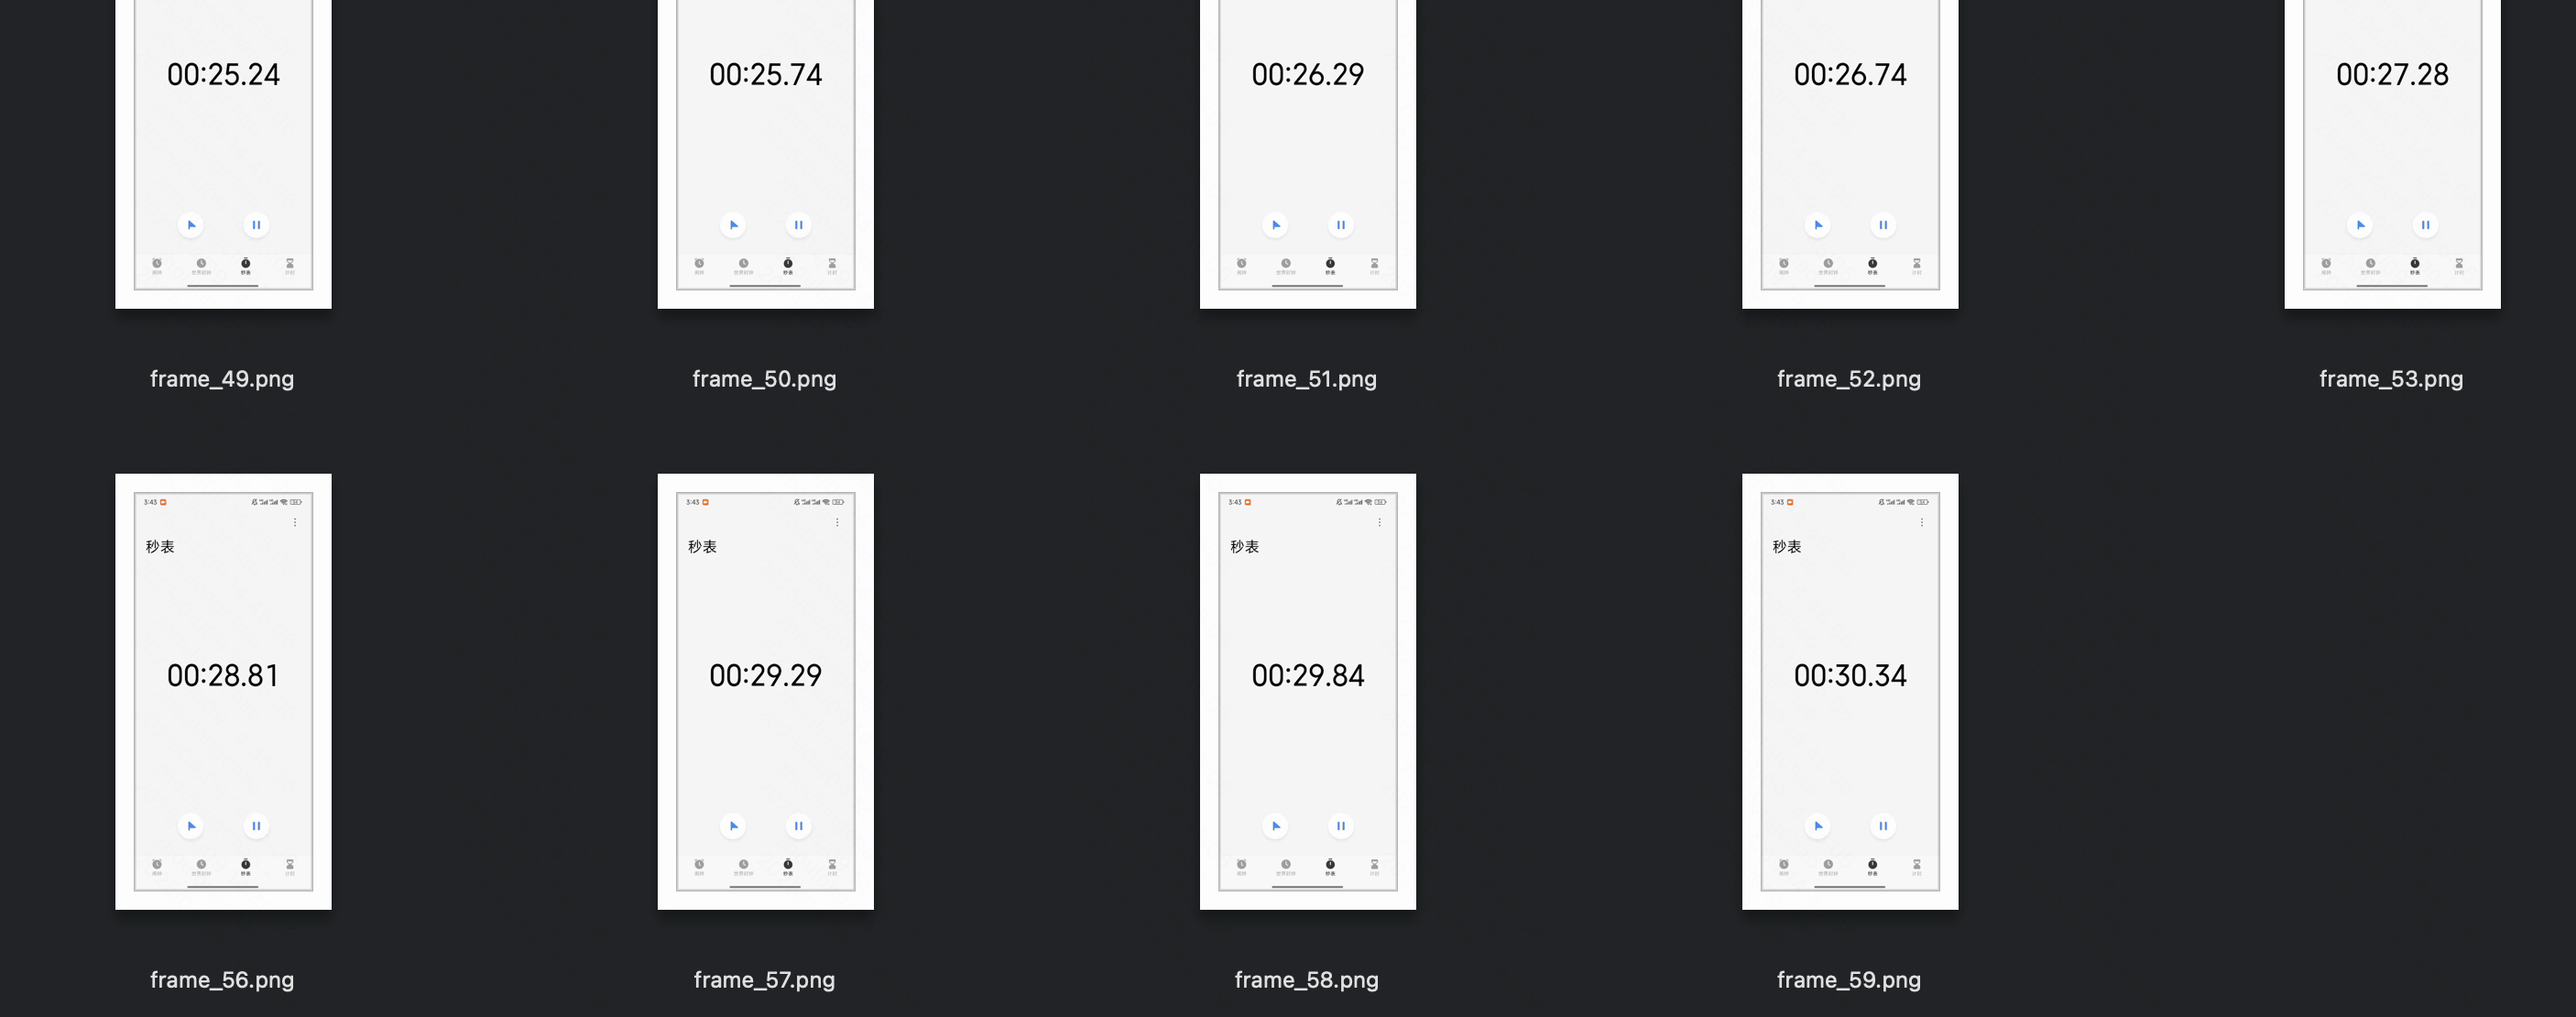
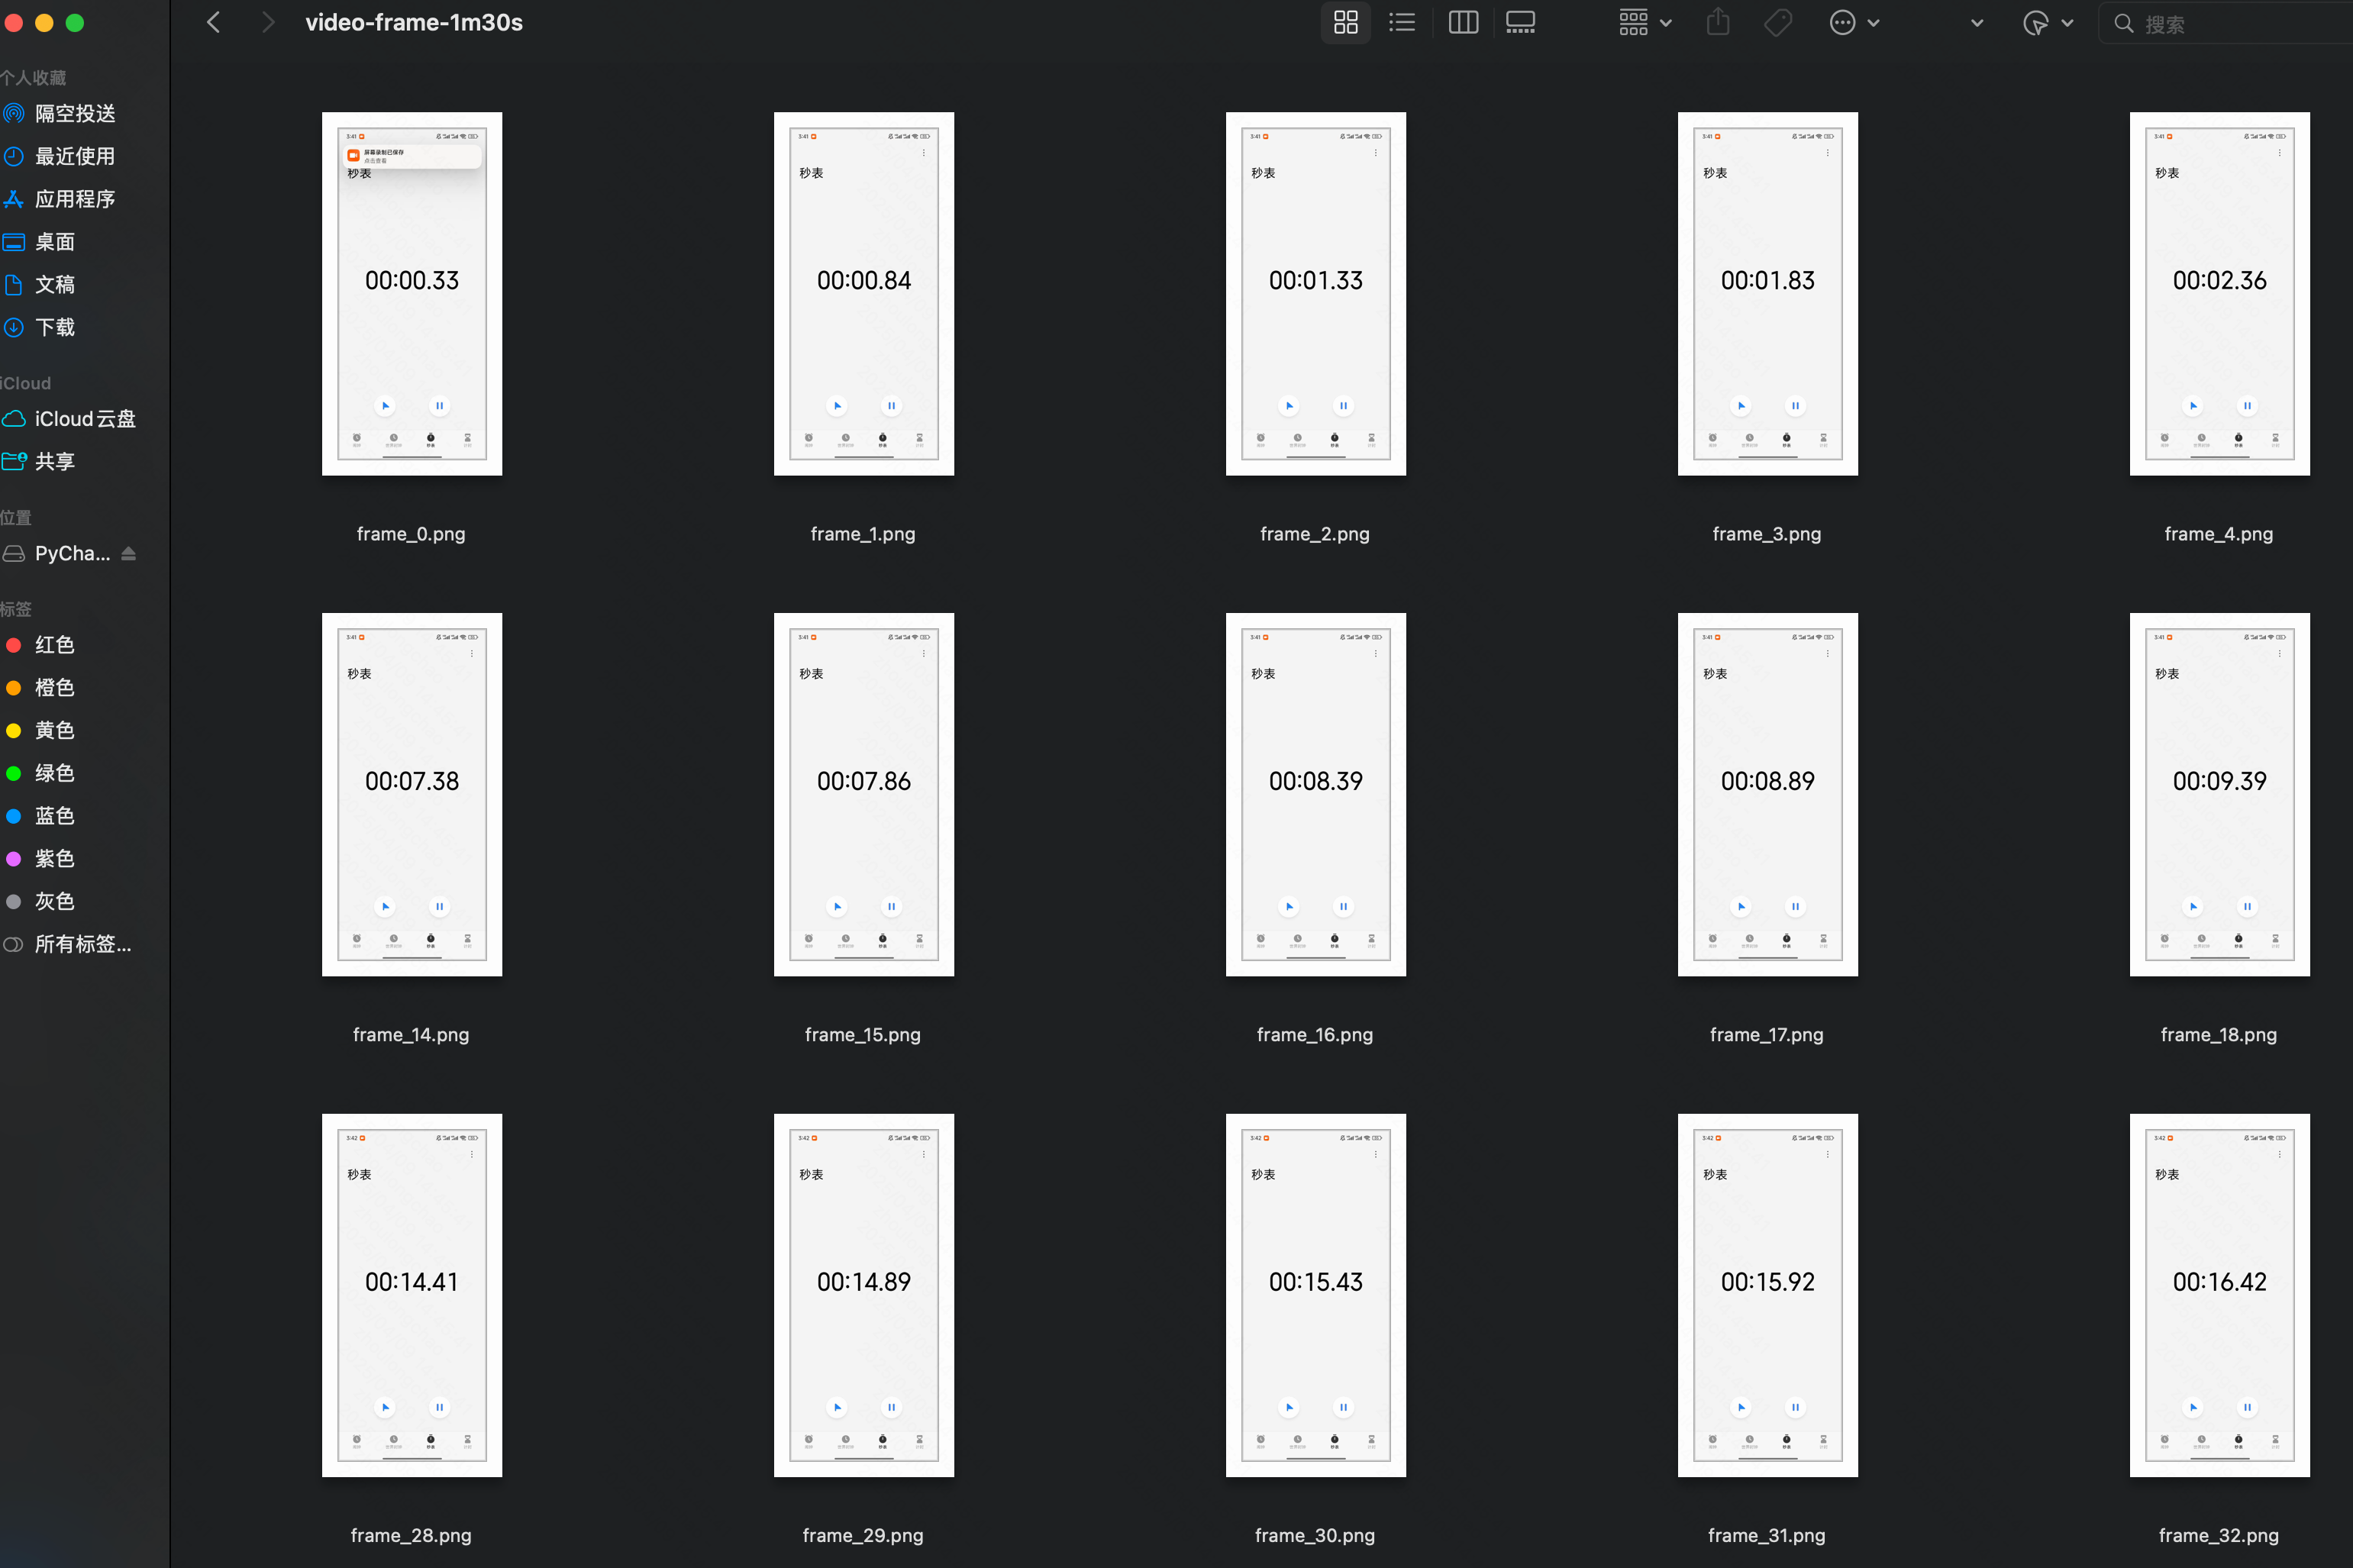
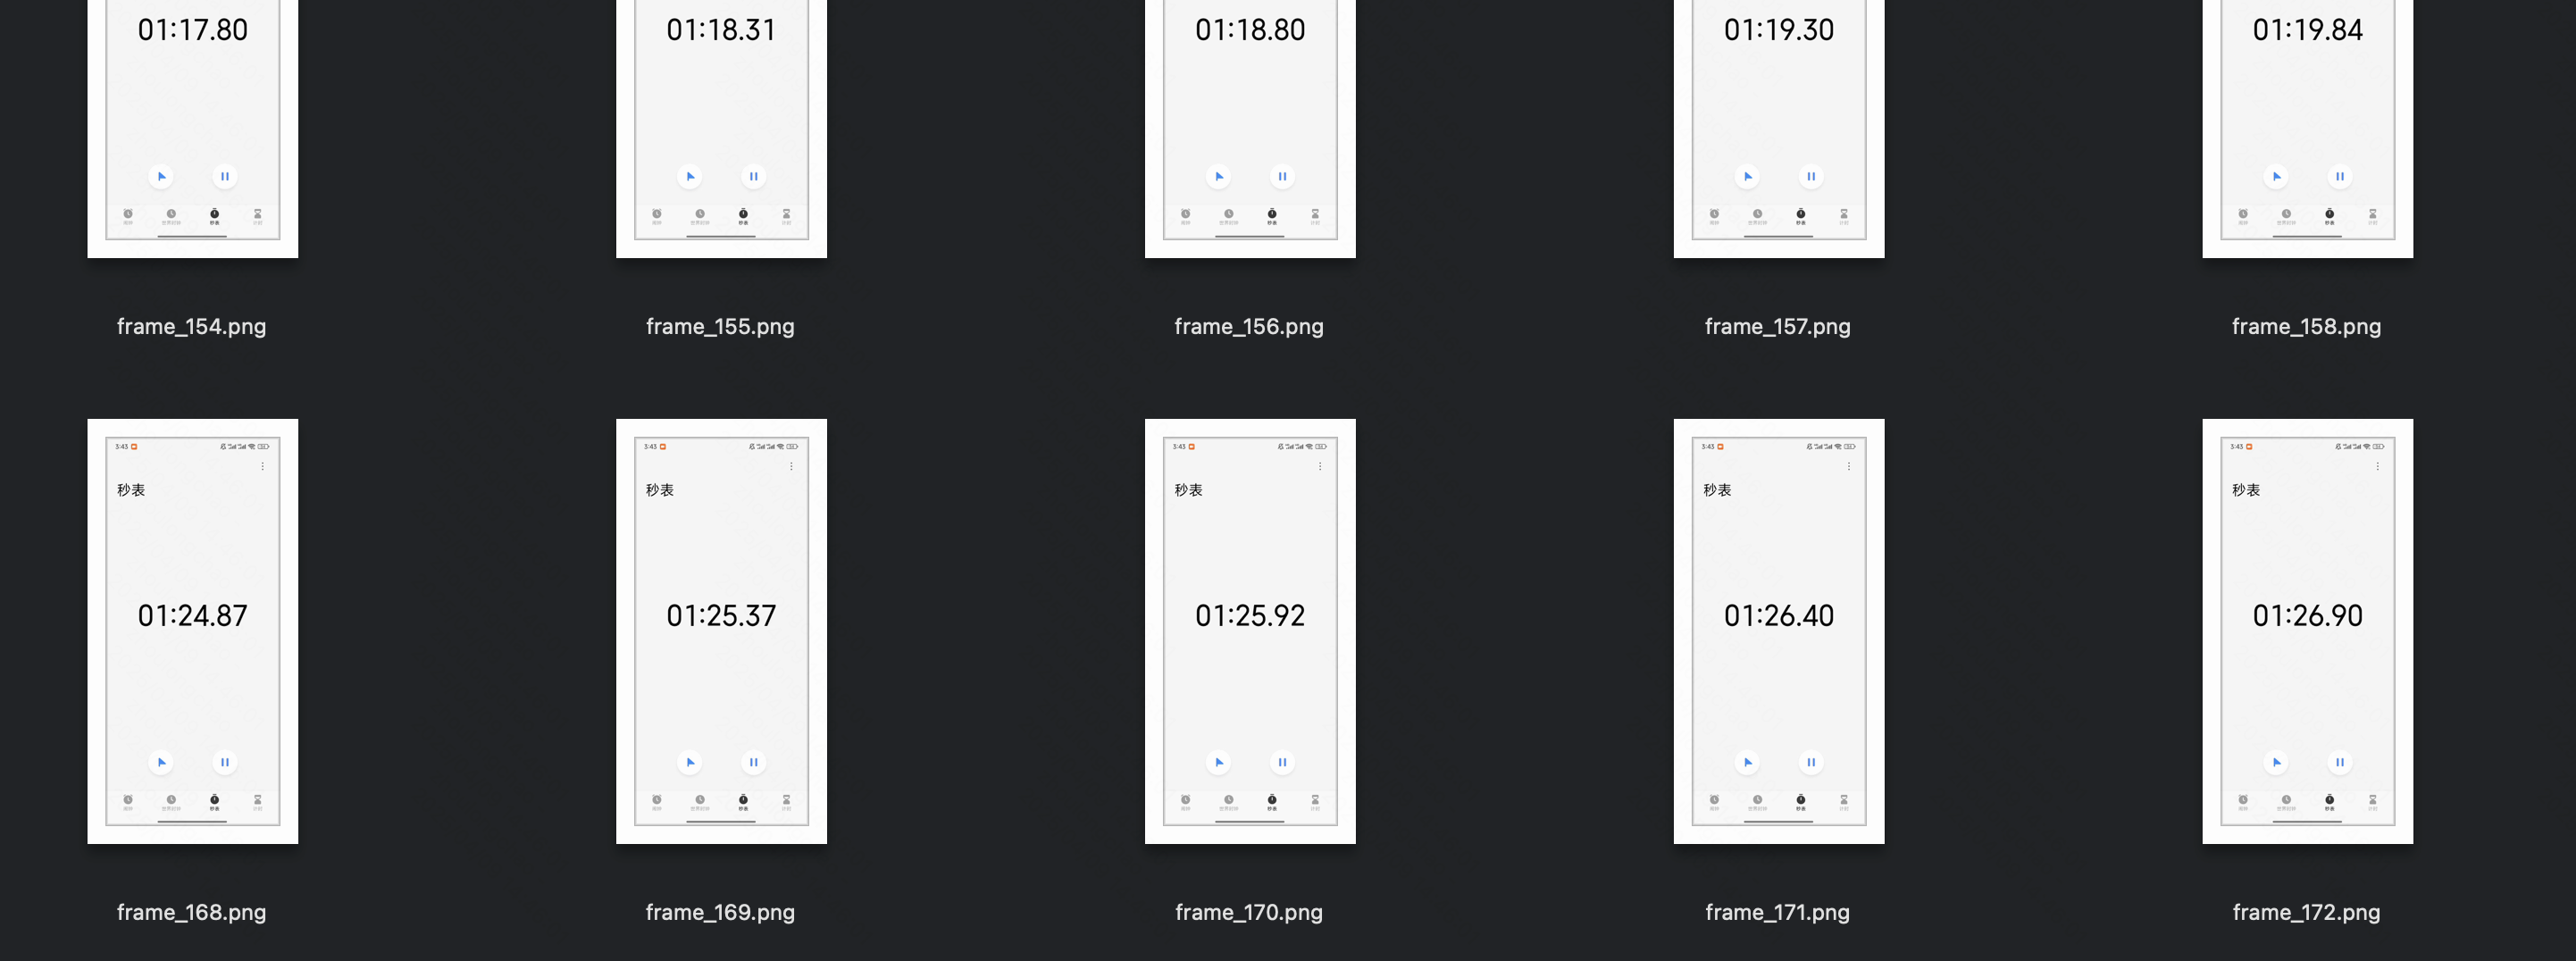
🚩 核心抽帧逻辑(简单来说:0.5 秒抽一张)(30 秒视频,最终抽帧是 60 张)
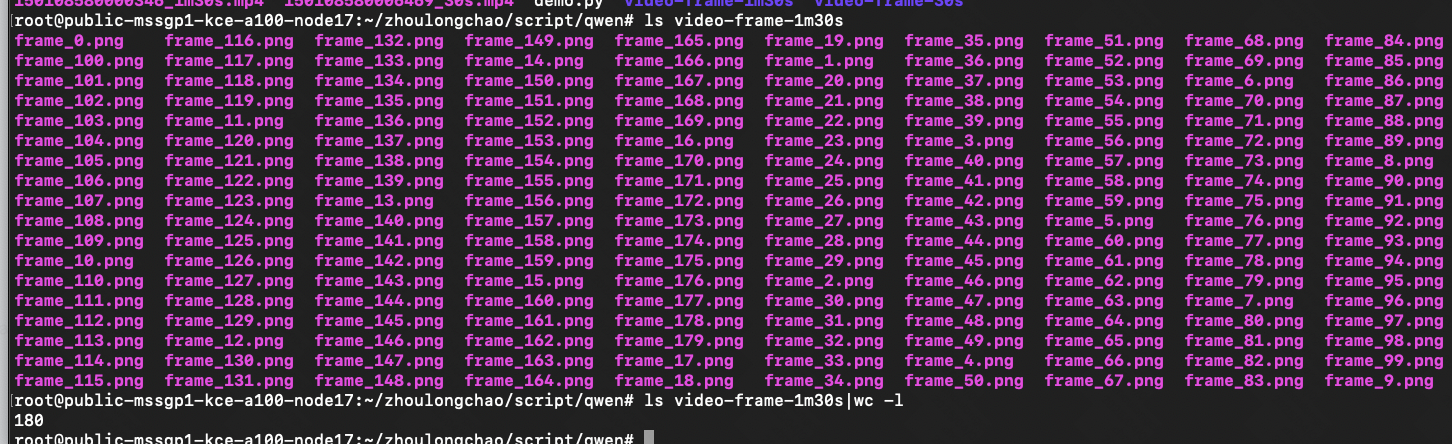
根据 FPS 常数(默认 2)、视频总帧数(秒时长 * 原始 fps)计算抽帧数量 nframes,之后等距离/步长抽取 nframes 张帧图
- 可解析总帧数 = 秒时长 * 原始 fps ------------ 例如 30s 视频,24 fps,值为 720
- 抽帧数 = FPS 常数(默认 2)* 秒时长 ------------例如 30s 视频,值为 60张
- 抽帧步长 :默认 0.5 秒------------(等距步长平均分割,和 FPS 常数有关)
验证两个实际 case
录屏设置:24 fps

|-------------|------------------------------------------------------------------------------------------------------------------------------------------------------------------------------------------------------------------------------------------------------------------------------------------------------------------------------------------|------------------------------------------------------------------------------------------------------------------------------------------------------------------------------------------------------------------------------------------------------------------------------------------------------------------------------------------|
| 方案 | 30秒 的视频 | 1分30秒 的视频 |
| qwen 抽帧 | 加入日志 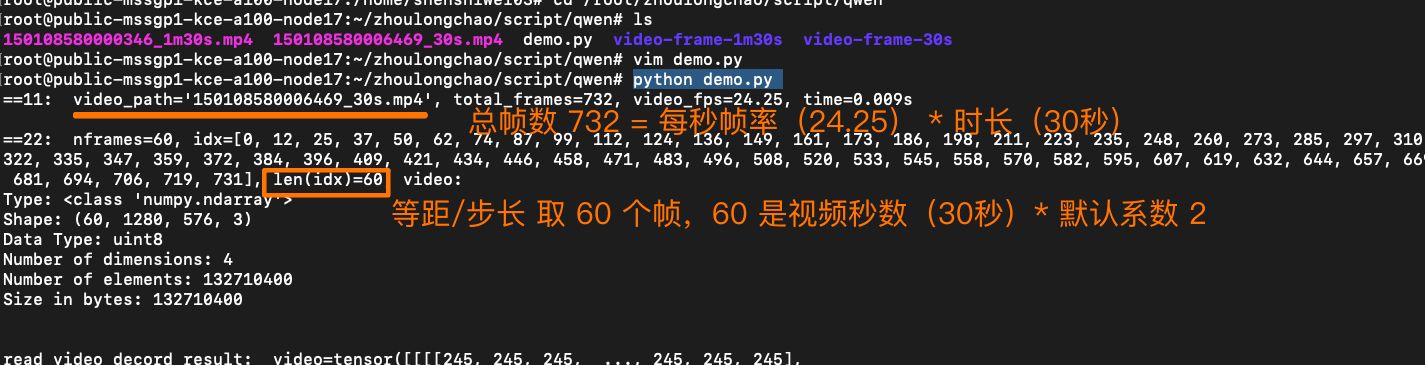

 ...
...  | 加入日志
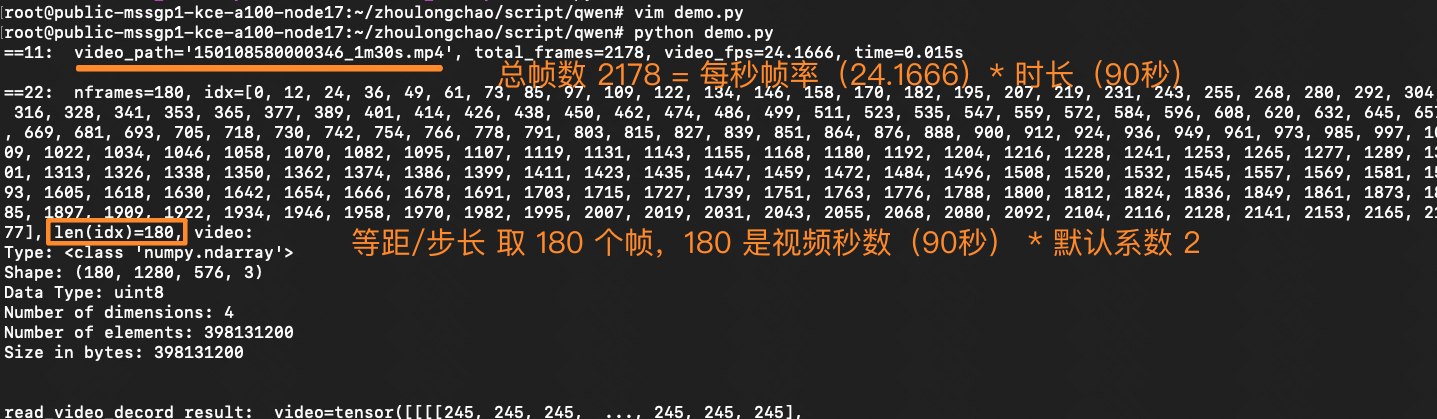
 ...
...  |
|
摘出 qwen 2.5-vl 抽帧模块代码(增加自定义日志)
import torch
import time
import math
from typing import Tuple
from torchvision.utils import save_image
IMAGE_FACTOR = 28
MIN_PIXELS = 4 * 28 * 28
MAX_PIXELS = 16384 * 28 * 28
MAX_RATIO = 200
VIDEO_MIN_PIXELS = 128 * 28 * 28
VIDEO_MAX_PIXELS = 768 * 28 * 28
FRAME_FACTOR = 2
FPS = 2.0
FPS_MIN_FRAMES = 4
FPS_MAX_FRAMES = 768
def _read_video_decord(
ele: dict,
) -> Tuple[torch.Tensor, float]:
"""read video using decord.VideoReader
Args:
ele (dict): a dict contains the configuration of video.
support keys:
- video: the path of video. support "file://", "http://", "https://" and local path.
- video_start: the start time of video.
- video_end: the end time of video.
Returns:
torch.Tensor: the video tensor with shape (T, C, H, W).
"""
import decord
video_path = ele["video"]
st = time.time()
vr = decord.VideoReader(video_path)
# TODO: support start_pts and end_pts
if 'video_start' in ele or 'video_end' in ele:
raise NotImplementedError("not support start_pts and end_pts in decord for now.")
total_frames, video_fps = len(vr), vr.get_avg_fps()
print(f"==11: {video_path=}, {total_frames=}, {video_fps=}, time={time.time() - st:.3f}s\n")
nframes = smart_nframes(ele, total_frames=total_frames, video_fps=video_fps)
idx = torch.linspace(0, total_frames - 1, nframes).round().long().tolist()
video = vr.get_batch(idx).asnumpy()
print(f"==22: {nframes=}, {idx=}, {len(idx)=}, video: ")
print("Type:", type(video))
print("Shape:", video.shape)
print("Data Type:", video.dtype)
print("Number of dimensions:", video.ndim)
print("Number of elements:", video.size)
print("Size in bytes:", video.nbytes)
print('\n')
video = torch.tensor(video).permute(0, 3, 1, 2) # Convert to TCHW format
sample_fps = nframes / max(total_frames, 1e-6) * video_fps
return video, sample_fps
def smart_nframes(
ele: dict,
total_frames: int,
video_fps: float,
) -> int:
"""calculate the number of frames for video used for model inputs.
Args:
ele (dict): a dict contains the configuration of video.
support either `fps` or `nframes`:
- nframes: the number of frames to extract for model inputs.
- fps: the fps to extract frames for model inputs.
- min_frames: the minimum number of frames of the video, only used when fps is provided.
- max_frames: the maximum number of frames of the video, only used when fps is provided.
total_frames (int): the original total number of frames of the video.
video_fps (int | float): the original fps of the video.
Raises:
ValueError: nframes should in interval [FRAME_FACTOR, total_frames].
Returns:
int: the number of frames for video used for model inputs.
"""
assert not ("fps" in ele and "nframes" in ele), "Only accept either `fps` or `nframes`"
if "nframes" in ele:
nframes = round_by_factor(ele["nframes"], FRAME_FACTOR)
else:
fps = ele.get("fps", FPS)
min_frames = ceil_by_factor(ele.get("min_frames", FPS_MIN_FRAMES), FRAME_FACTOR)
max_frames = floor_by_factor(ele.get("max_frames", min(FPS_MAX_FRAMES, total_frames)), FRAME_FACTOR)
nframes = total_frames / video_fps * fps
if nframes > total_frames:
print(f"smart_nframes: nframes[{nframes}] > total_frames[{total_frames}]")
nframes = min(min(max(nframes, min_frames), max_frames), total_frames)
nframes = floor_by_factor(nframes, FRAME_FACTOR)
if not (FRAME_FACTOR <= nframes and nframes <= total_frames):
raise ValueError(f"nframes should in interval [{FRAME_FACTOR}, {total_frames}], but got {nframes}.")
return nframes
def round_by_factor(number: int, factor: int) -> int:
"""Returns the closest integer to 'number' that is divisible by 'factor'."""
return round(number / factor) * factor
def ceil_by_factor(number: int, factor: int) -> int:
"""Returns the smallest integer greater than or equal to 'number' that is divisible by 'factor'."""
return math.ceil(number / factor) * factor
def floor_by_factor(number: int, factor: int) -> int:
"""Returns the largest integer less than or equal to 'number' that is divisible by 'factor'."""
return math.floor(number / factor) * factor
video, sample_fps = _read_video_decord(ele={"video": "150108580006469_30s.mp4"})
print(f"read_video_decord result: {video=}, {sample_fps=}\n")
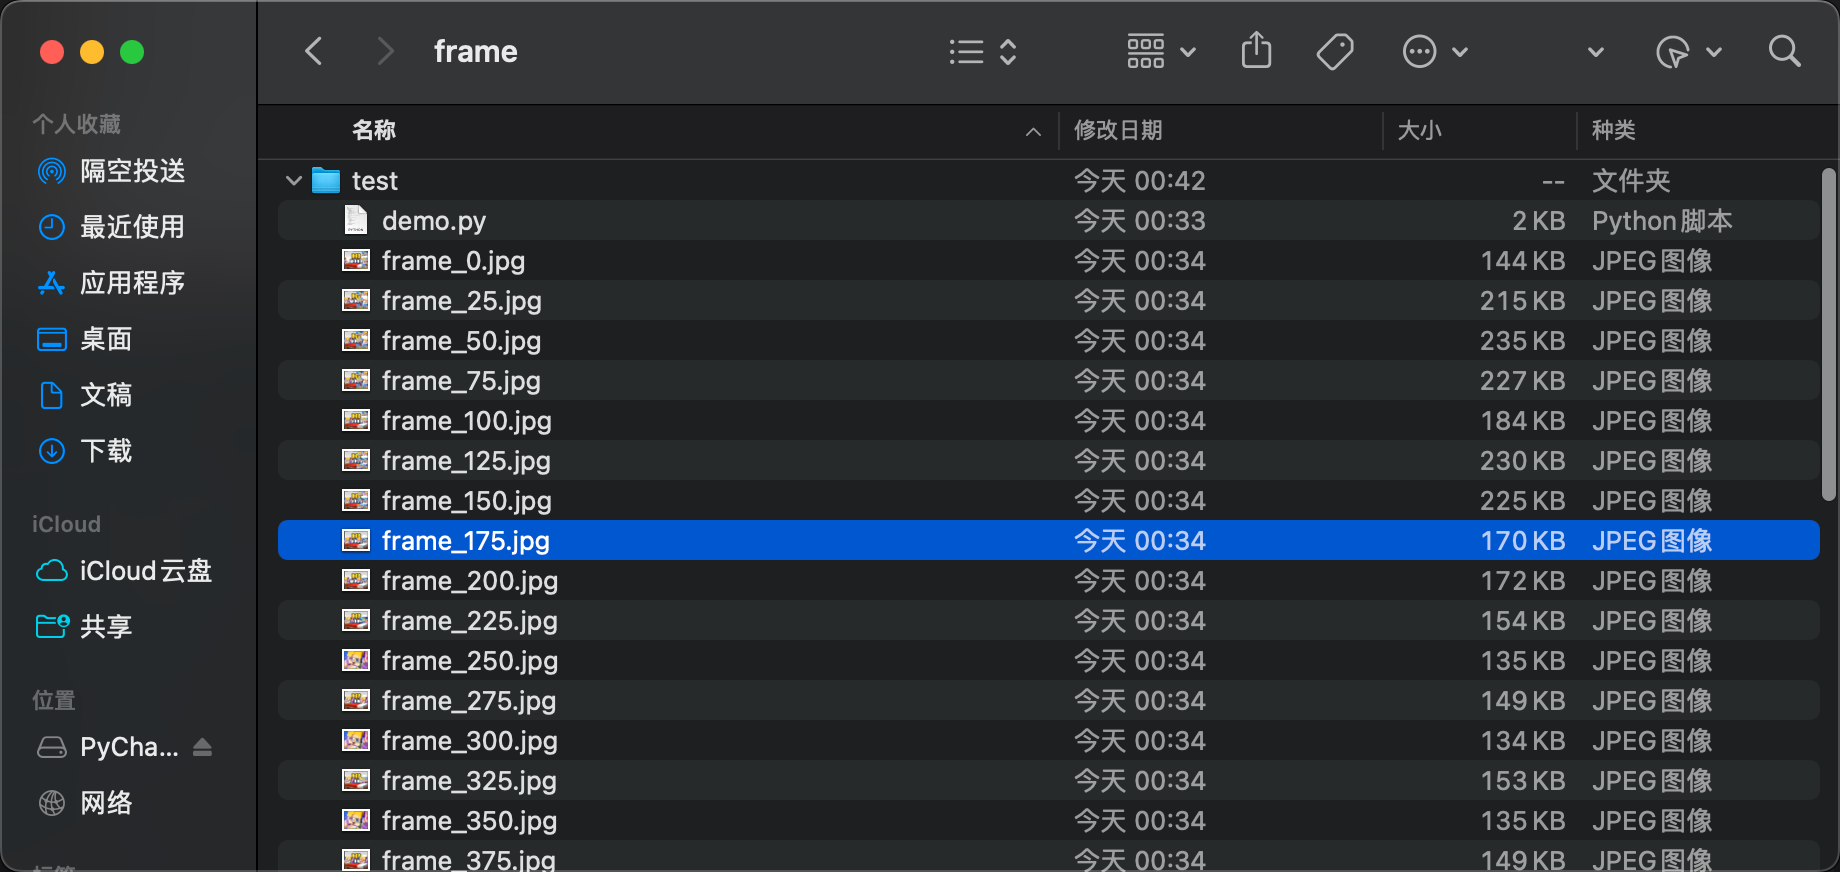
# 将视频帧保存为本地图片
for i, frame in enumerate(video):
# 将像素值缩放到 [0, 1] 范围
frame = frame.float() / 255.0
save_image(frame, f'./video-frame-30s/frame_{i}.png')
# save_image(frame, f'./video-frame-1m30s/frame_{i}.png')
print(f"Frame {i} saved as frame_{i}.png")官网介绍图

性能对比:ffmpeg 抽帧、decord 库抽帧
介绍
ffmpeg 是一个强大且广泛使用的开源多媒体框架,它由多个库和工具组成,例如libavformat(处理音视频封装格式)、libavcodec(进行音视频编解码)、libavutil(提供通用的工具函数)等。在抽帧时,FFmpeg 会利用这些库协同工作。
Decord 是一个专门为视频数据处理和深度学习设计的轻量级、高性能的视频解码库,擅长处理帧的随机访问模式,避免了像 FFmpeg 那样从头开始逐帧解码
联系
decord 依赖 ffmpeg 的核心库
对比
- 速度:ffmpeg 更优,比 decord 快 16%
- 资源消耗:ffmpeg 更优,比 decord 节省资源 25%(只测了下 cpu 抽帧)
- 官方维护:
-
- ffmpeg 一直在更新,社区也更活跃,48.9k star
- decord 库已经 3 年未更新,2.1k star
测试结果
测试指标:
- 100 batch 视频文件测试
- 开发机:train-A100-6 配置为 94核 - 860GiB - 4卡A100
|-----|--------------|--------------------------------------------------------------------------------------------------------------------------------------------------------------------------------------------------------------------------------------------------------------------------------------------------------------------------------------------------|----------------------------------------------------------------------------------------------------------------------------------------------------------------------------------------------------------------------------------------------------------------------|
| | 抽帧方案 | 测试样本(37秒视频) video_150108527915923_37s.mp4 | 测试样本(1分21秒视频)video_150108525914511_1m21s.mp4 |
| 现状 | ffmpeg - cpu | 总耗时: 4.18 秒 平均耗时: 2829.07 毫秒 成功数: 100 失败数: 0 抽出 37 张 + 写入磁盘 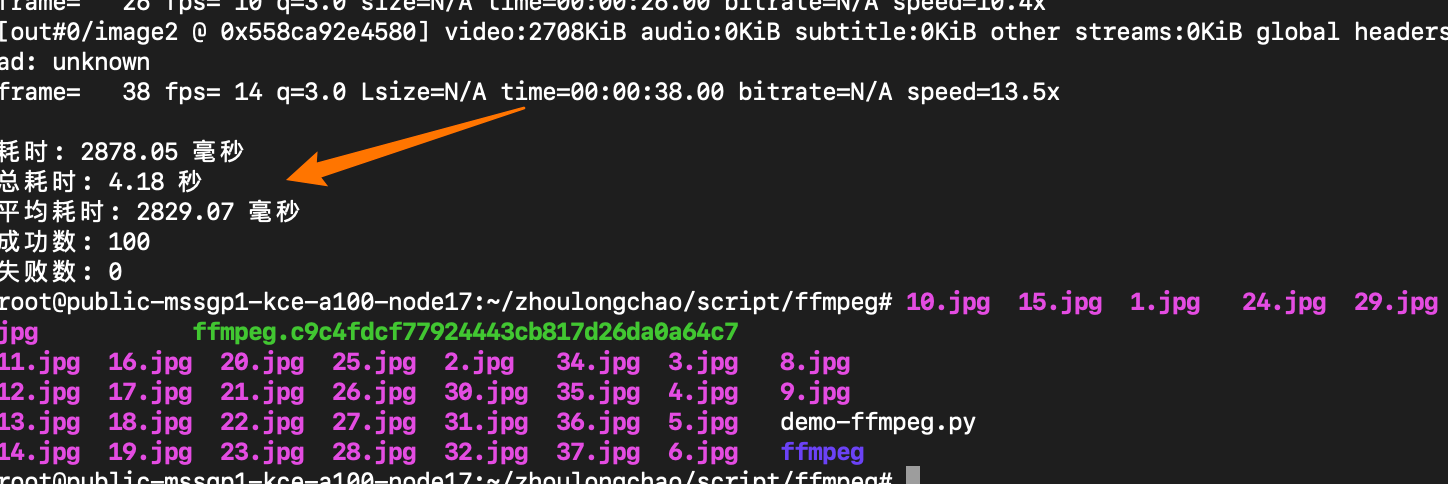 CPU核数换算------需 7 核(94*6%*120%)
  | 总耗时: 12.09 秒 平均耗时: 9383.33 毫秒 成功数: 100 失败数: 0 抽出 81 张 + 写入磁盘
 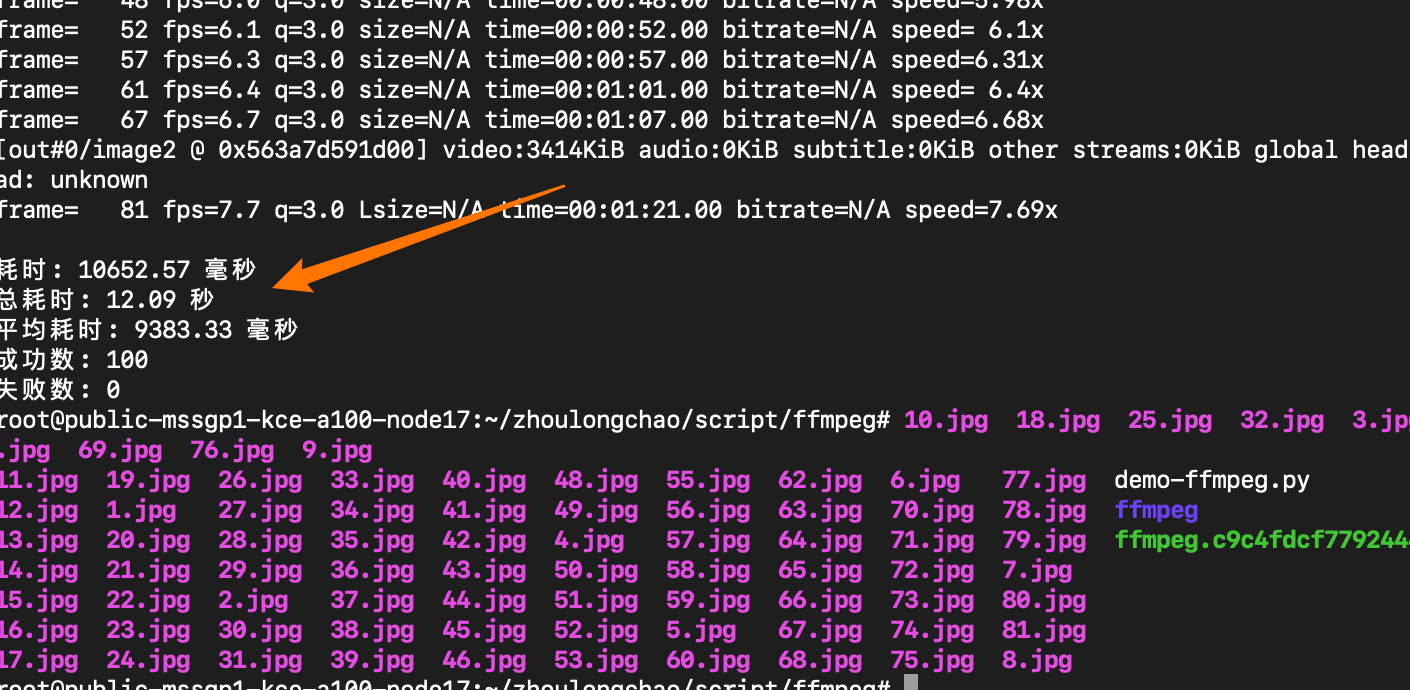 CPU核数换算------需 23 核(94*22%*120%)
 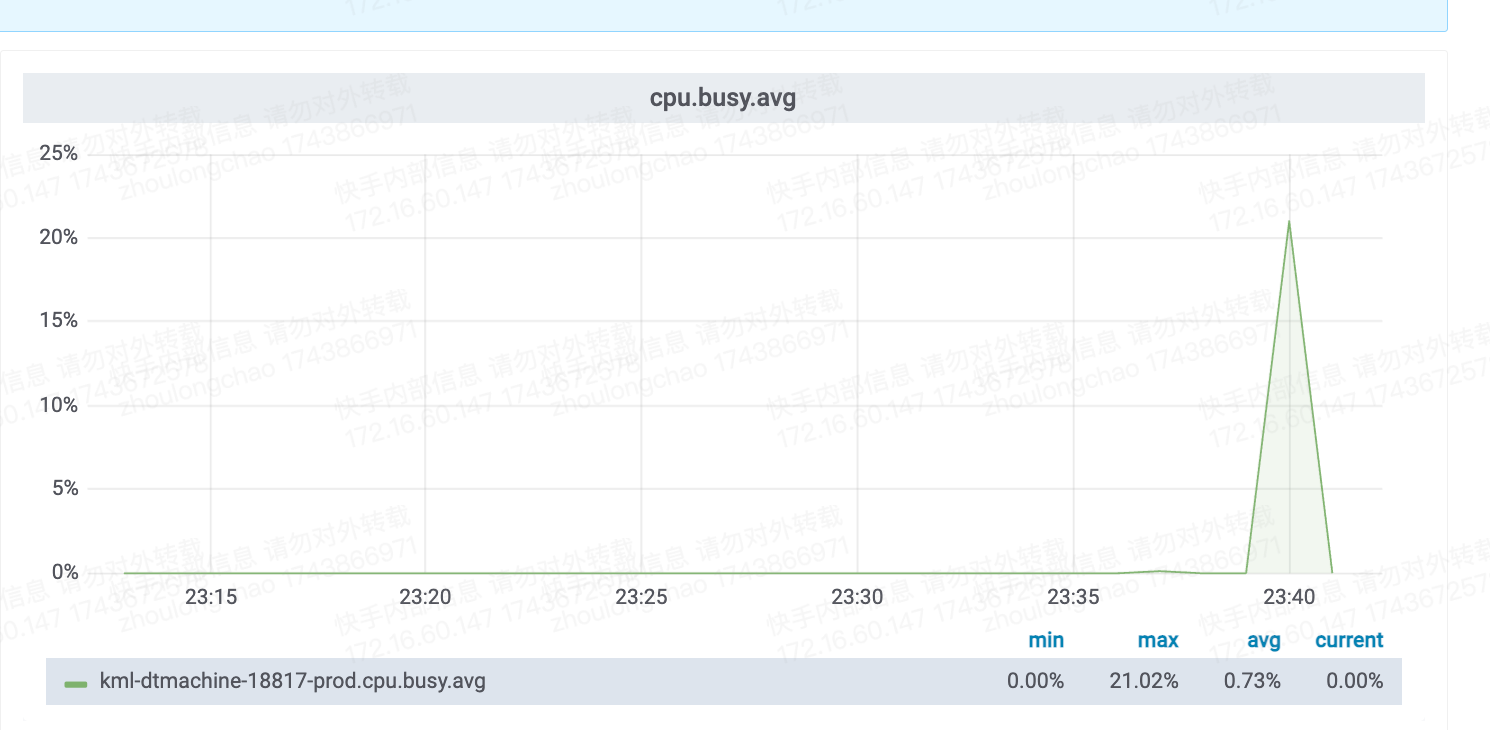 |
|
| 新方案 | decord - cpu | 总耗时: 5.33 秒 平均耗时: 3352.33 毫秒 成功数: 100 失败数: 0 抽出 38 张 + 写入磁盘 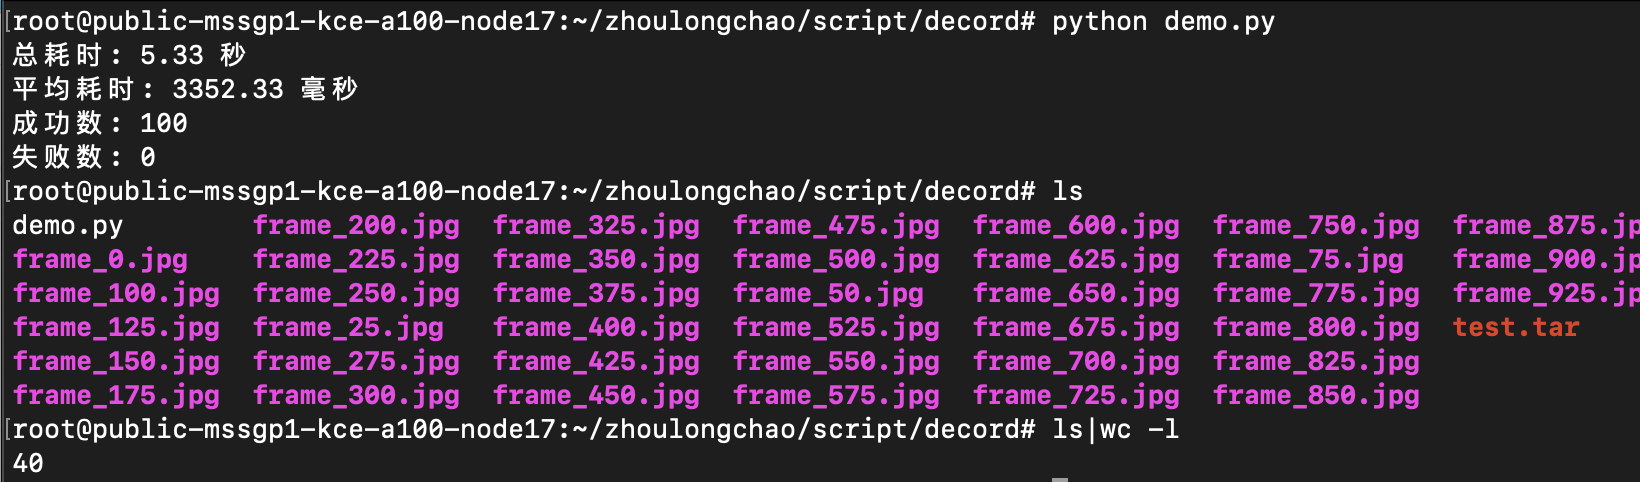
 CPU核数换算------需 7 核(94*7%*120%)
 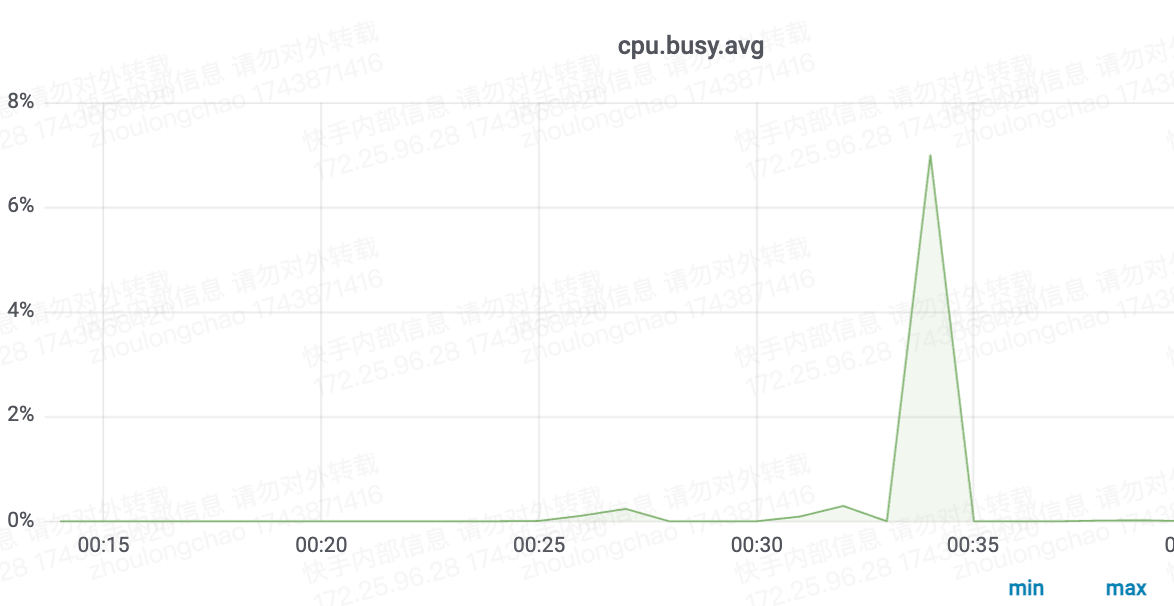 | 总耗时: 15.89 秒 平均耗时: 12617.40 毫秒 成功数: 100 失败数: 0 抽出 85 张 + 写入磁盘
 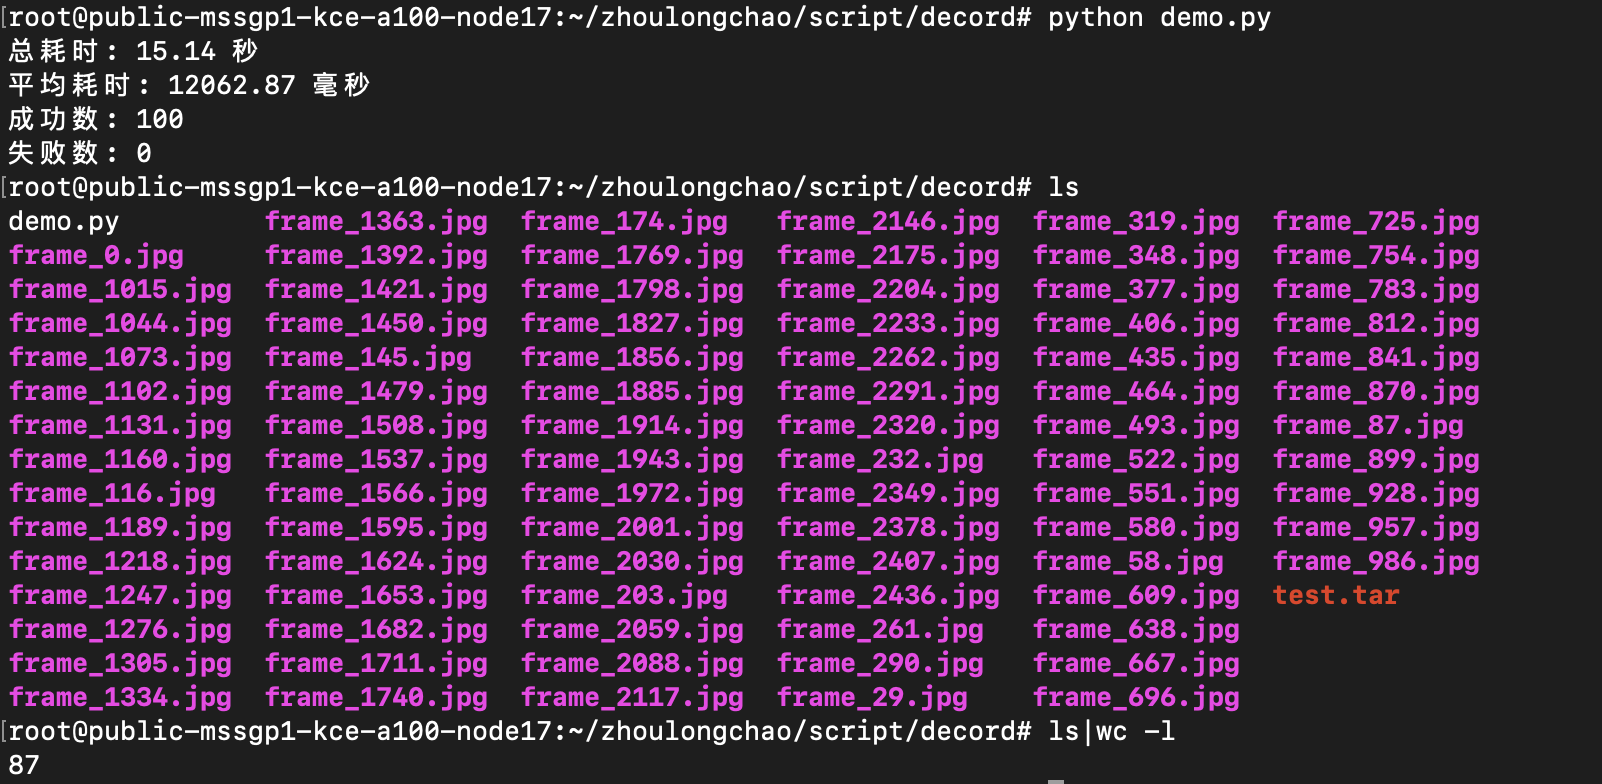 CPU核数换算------需 24 核(94*25%*120%)
 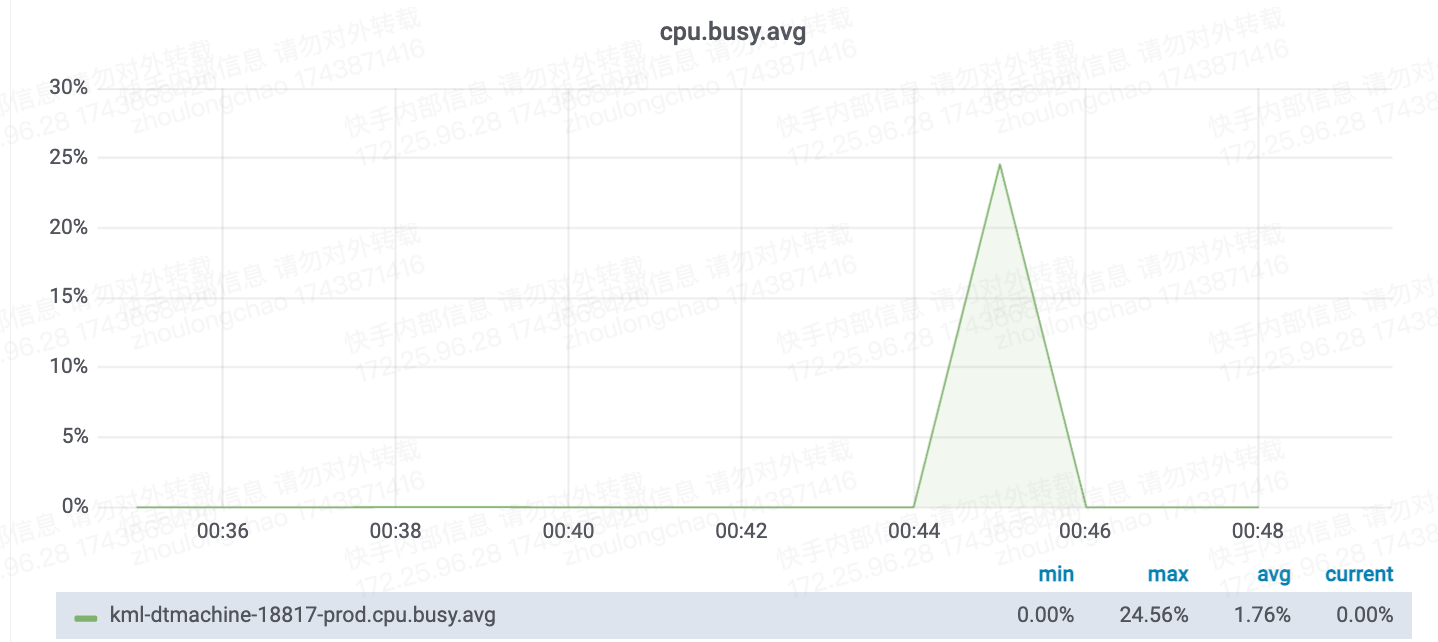 |
|
| | decord - gpu | 环境不兼容 | 环境不兼容 |
测试明细

ffmpeg
登陆开发机
ffmpeg -i /root/zhoulongchao/script/resource/video_150108527915923_37s.mp4 -map 0:v -q:v 3 -vsync 0 -f image2 -vf fps=1 -y ./%d.jpg
100 qps 测试(CPU)
cd /root/zhoulongchao/script/ffmpeg
vim demo-ffmpeg.py
python demo-ffmpeg.py
import subprocess
import time
from concurrent.futures import ThreadPoolExecutor

def run_ffmpeg_command():
    # FFmpeg 命令
    command = [
    'ffmpeg', '-i', '/root/zhoulongchao/script/resource/video_150108525914511_1m21s.mp4',
        '-map', '0:v', '-q:v', '3', '-vsync', '0', '-f', 'image2', '-vf', 'fps=1', '-y', './%d.jpg'
		]

    start_time = time.time()

    # 运行 FFmpeg 命令
    result = subprocess.run(command, capture_output=True, text=True)

    end_time = time.time()

    # 计算耗时(毫秒)
    elapsed_time_ms = (end_time - start_time) * 1000

    print("FFmpeg 输出:")
    print(result.stdout)
    print("错误信息:")
    print(result.stderr)

    print(f"耗时: {elapsed_time_ms:.2f} 毫秒")

    # 根据返回码判断是否成功
    success = result.returncode == 0
    return elapsed_time_ms, success


if __name__ == "__main__":
    # 目标 QPS
    target_qps = 100
    # 每个请求的间隔时间(秒)
    interval = 1 / target_qps

    total_elapsed_time = 0
    all_elapsed_times = []
    success_count = 0
    failure_count = 0

    with ThreadPoolExecutor(max_workers=target_qps) as executor:
        start_time = time.time()
        futures = []
        for _ in range(target_qps):
            future = executor.submit(run_ffmpeg_command)
            futures.append(future)
            time.sleep(interval)
        for future in futures:
            elapsed_time, success = future.result()
            all_elapsed_times.append(elapsed_time)
            total_elapsed_time += elapsed_time
            if success:
                success_count += 1
            else:
                failure_count += 1
        end_time = time.time()

    average_elapsed_time = total_elapsed_time / target_qps if target_qps > 0 else 0
    print(f"总耗时: {end_time - start_time:.2f} 秒")
    print(f"平均耗时: {average_elapsed_time:.2f} 毫秒")
    print(f"成功数: {success_count}")
    print(f"失败数: {failure_count}")
decord
cd /root/zhoulongchao/script/decord
vim main.py
python main.py
100 qps 测试(CPU)

import cv2
import time
from decord import VideoReader
from decord import cpu
from concurrent.futures import ProcessPoolExecutor
import multiprocessing


def process_video(video_path):
    start_time = time.time()
    try:
        vr = VideoReader(video_path, ctx=cpu(0))
        fps = vr.get_avg_fps()
        interval = int(fps)
        for i in range(0, len(vr), interval):
            frame = vr[i].asnumpy()
            frame_bgr = cv2.cvtColor(frame, cv2.COLOR_RGB2BGR)
            cv2.imwrite(f'frame_{i}.jpg', frame_bgr)
        end_time = time.time()
        elapsed_time = (end_time - start_time) * 1000
        return elapsed_time, True
    except Exception:
        end_time = time.time()
        elapsed_time = (end_time - start_time) * 1000
        return elapsed_time, False


if __name__ == "__main__":
    video_path = '/root/zhoulongchao/script/resource/video_150108527915923_37s.mp4'
    target_qps = 100
    interval = 1 / target_qps

    total_elapsed_time = 0
    success_count = 0
    failure_count = 0

    # 获取系统的 CPU 核心数量
    cpu_count = multiprocessing.cpu_count()
    with ProcessPoolExecutor(max_workers=cpu_count) as executor:
        start_time = time.time()
        futures = []
        for _ in range(target_qps):
            future = executor.submit(process_video, video_path)
            futures.append(future)
            time.sleep(interval)

        for future in futures:
            elapsed_time, success = future.result()
            total_elapsed_time += elapsed_time
            if success:
                success_count += 1
            else:
                failure_count += 1

    end_time = time.time()
    average_elapsed_time = total_elapsed_time / target_qps if target_qps > 0 else 0

    print(f"总耗时: {end_time - start_time:.2f} 秒")
    print(f"平均耗时: {average_elapsed_time:.2f} 毫秒")
    print(f"成功数: {success_count}")
    print(f"失败数: {failure_count}")
100 qps 测试(GPU)
》这种方式环境配置失败了,暂时只写了一半
1、安装用于构建共享库的系统包 Ubuntu 运行:
# official PPA comes with ffmpeg 2.8, which lacks tons of features, we use ffmpeg 4.0 here
add-apt-repository ppa:jonathonf/ffmpeg-4 # for ubuntu20.04 official PPA is already version 4.2, you may skip this step
apt-get update
apt-get install -y build-essential python3-dev python3-setuptools make cmake
apt-get install -y ffmpeg libavcodec-dev libavfilter-dev libavformat-dev libavutil-dev
# note: make sure you have cmake 3.8 or later, you can install from cmake official website if it's too old
2、递归克隆 repo(重要)
git clone --recursivehttps://github.com/dmlc/decord
3、在源根目录中构建共享库(指定-DUSE_CUDA=ON或-DUSE_CUDA=/path/to/cuda或-DUSE_CUDA=ON-DCMAKE_CUDA_COMPILER=/path/to/cuda/nvcc启用 NVDEC 硬件加速解码)(要指定自定义的 FFMPEG 库路径,请使用"-DFFMPEG_DIR=/path/to/ffmpeg"):
cd /root/zhoulongchao/script/decord
cd decord
mkdir build && cd build
cmake .. -DUSE_CUDA=ON -DCMAKE_BUILD_TYPE=Release
make请注意,如果您遇到了问题libnvcuvid.so,可能是由于缺少链接 libnvcuvid.so,可以手动找到它(ldconfig -p | grep libnvcuvid)并将库链接到,CUDA_TOOLKIT_ROOT_DIR\lib64以便decord顺利检测并链接正确的库。或者------
Video Codec SDK - Get Started | NVIDIA Developer
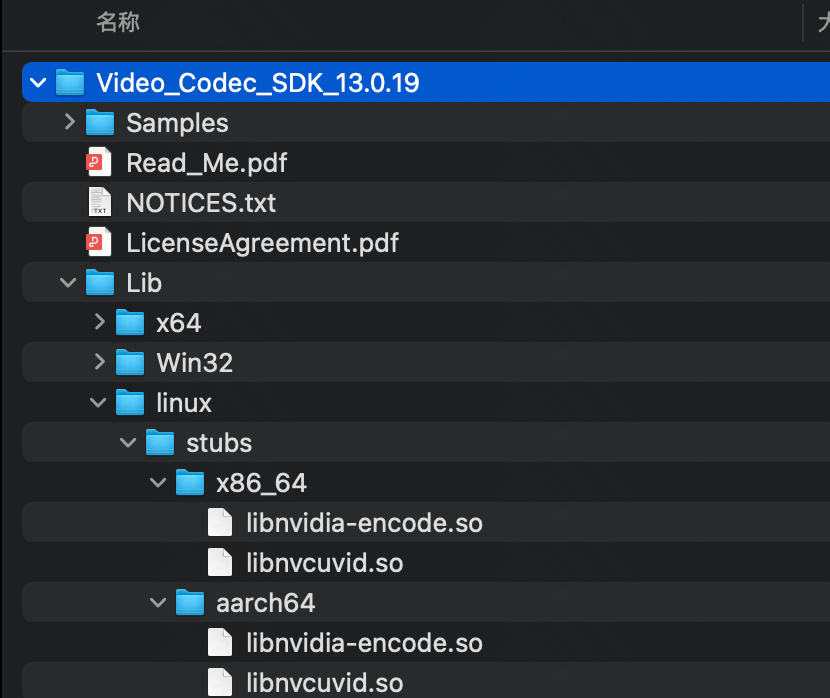
mv libnvcuvid.so /usr/local/cuda/lib64/
4、安装python绑定:
cd ../python
# option 1: add python path to $PYTHONPATH, you will need to install numpy separately
pwd=$PWD
echo "PYTHONPATH=$PYTHONPATH:$pwd" >> ~/.bashrc
source ~/.bashrc
# option 2: install with setuptools
python3 setup.py install --user
make

import cv2
import time
from decord import VideoReader
from decord import gpu
from concurrent.futures import ProcessPoolExecutor
import multiprocessing


def process_video(video_path):
    start_time = time.time()
    try:
        # 修改为使用 GPU 进行解码
        vr = VideoReader(video_path, ctx=gpu(0))
        fps = vr.get_avg_fps()
        interval = int(fps)
        for i in range(0, len(vr), interval):
            frame = vr[i].asnumpy()
            frame_bgr = cv2.cvtColor(frame, cv2.COLOR_RGB2BGR)
            cv2.imwrite(f'frame_{i}.jpg', frame_bgr)
        end_time = time.time()
        elapsed_time = (end_time - start_time) * 1000
        return elapsed_time, True
    except Exception:
        end_time = time.time()
        elapsed_time = (end_time - start_time) * 1000
        return elapsed_time, False


if __name__ == "__main__":
    video_path = '/root/zhoulongchao/script/resource/video_150108527915923_37s.mp4'
    target_qps = 100
    interval = 1 / target_qps

    total_elapsed_time = 0
    success_count = 0
    failure_count = 0

    # 获取系统的 CPU 核心数量
    cpu_count = multiprocessing.cpu_count()
    with ProcessPoolExecutor(max_workers=cpu_count) as executor:
        start_time = time.time()
        futures = []
        for _ in range(target_qps):
            future = executor.submit(process_video, video_path)
            futures.append(future)
            time.sleep(interval)

        for future in futures:
            elapsed_time, success = future.result()
            total_elapsed_time += elapsed_time
            if success:
                success_count += 1
            else:
                failure_count += 1

    end_time = time.time()
    average_elapsed_time = total_elapsed_time / target_qps if target_qps > 0 else 0

    print(f"总耗时: {end_time - start_time:.2f} 秒")
    print(f"平均耗时: {average_elapsed_time:.2f} 毫秒")
    print(f"成功数: {success_count}")
    print(f"失败数: {failure_count}")