理解tomcat中的BIO、NIO、AIO、ARP
tomcat作为springboot中默认的web容器,了解tomcat的运转可以帮助我们更好的去调整tomcat的参数达到更好的性能
1. 前置知识
- I/O就是Input/Output,收别人的数据到本机叫Input,本级发数据出去叫Output
- 网络I/O请求会先到网卡然后到内核态再到用户态
- CPU比内存快、内存比硬盘、网卡等外设快
- 所有I/O操作需要被加载到用户态内存,用户态程序才能直接操作
- 想要效果高,必须让所有的资源都不闲置
- tomcat不处理请求,会接受请求,转发到具体的容器中
- 一个socket连接代表一个客户端,一个socket可以发送多份请求不断开
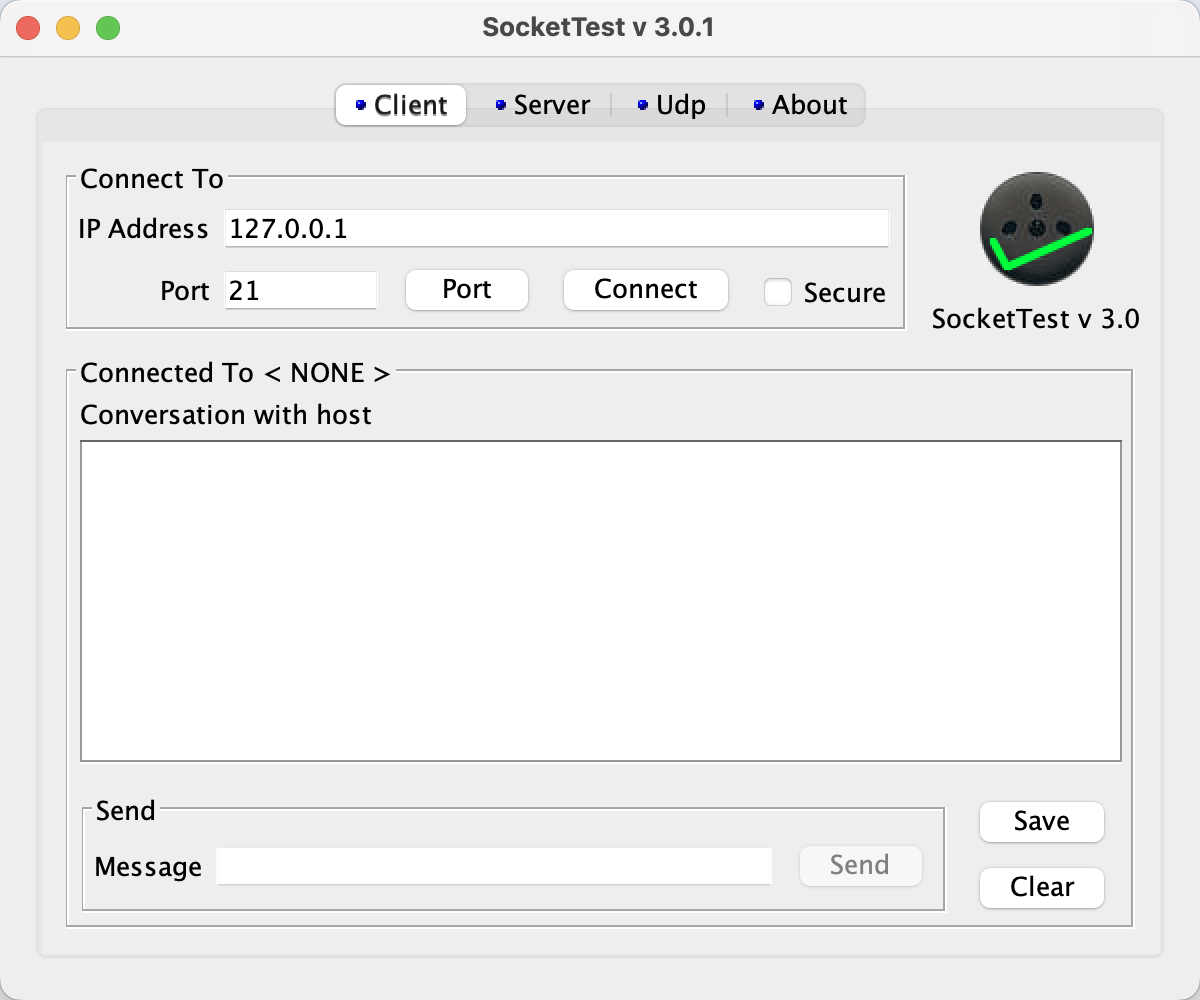
2. scoket测试工具
启动程序是jar包,必须要有jre环境
链接:https://sockettest.sourceforge.net
3. BIO 同步阻塞IO
每一个socket连接后,tomcat都会有一个线程去全程去陪伴,把请求转发到具体的容器中后,这个线程还在阻塞,等待容器返回数据,只有socket连接断开了,才会回收这个线程。tomcat7或以下默认,比较简单、稳定,适合连接数比较少的
模拟代码如下:
java
public class BioServer {

    static ExecutorService executorService = Executors.newCachedThreadPool();

    public static void main(String[] args) {
        try {
            // 启动服务,绑定8080端口
            ServerSocket serverSocket = new ServerSocket();
            serverSocket.bind(new InetSocketAddress(8080));
            System.out.println("开启服务");

            while (true){
                System.out.println("等待客户端建立连接");
                // 监听8080端口,获取客户端连接
                Socket socket = serverSocket.accept(); //阻塞
                System.out.println("建立连接:"+socket);
                executorService.submit(()->{
                    //业务处理
                    try {
                        handler(socket);
                    } catch (IOException e) {
                        e.printStackTrace();
                    }
                });

            }
        } catch (IOException e) {
            e.printStackTrace();
        } finally {
            //TODO 资源回收
        }
    }

    private static void handler(Socket socket) throws IOException {
        byte[] bytes = new byte[1024];
        System.out.println("等待读取数据");
        int read = socket.getInputStream().read(bytes); // 阻塞
        if(read !=-1) {
            System.out.println("读取客户端发送的数据:" +
                    new String(bytes, 0, read));
        }
    }

}
4. NIO 同步非阻塞
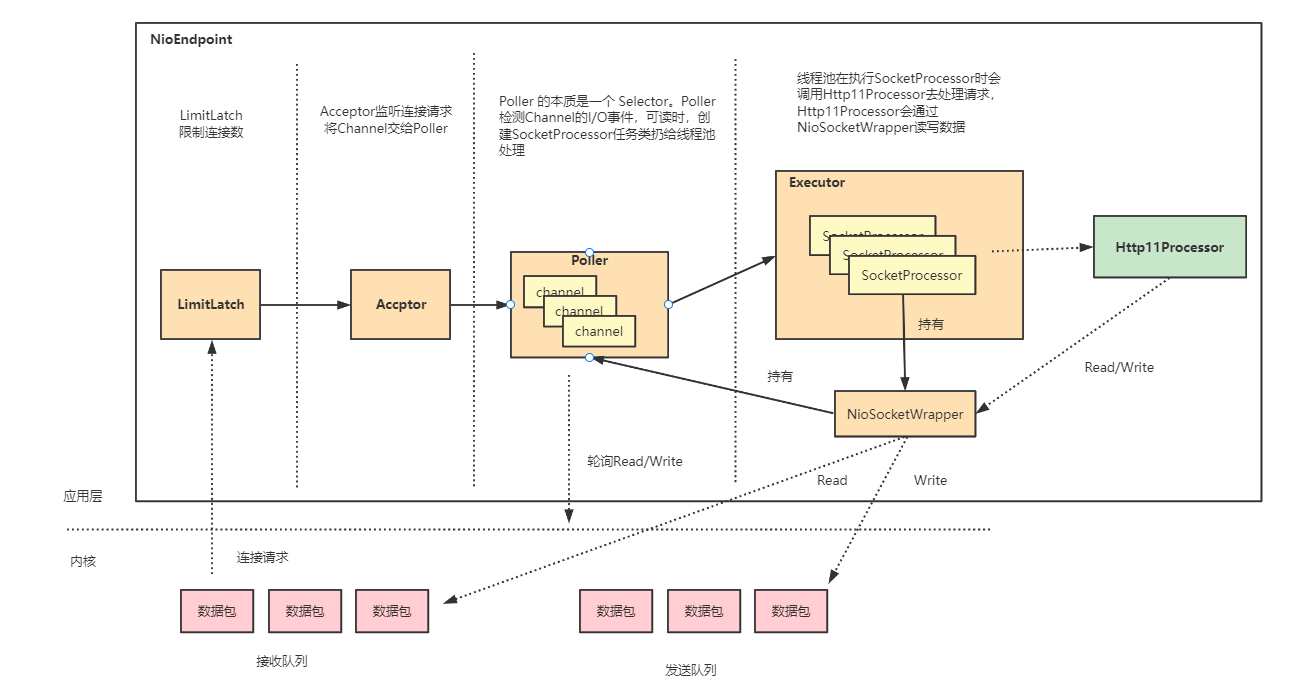
一个socket连接过来,会经历以下步骤
- LimitLatch:连接控制器,负责维护连接数计算,连接数默认是 8192,达到这个阀值后,就会拒绝连接请求。如果要调整修改配置文件server.tomcat.max-connections属性
- Acceptor:Acceptor 跑在一个单独的线程里,它在一个死循环里调用 accept 方法来接收新连接,一旦有新的连接请求到来,accept 方法返回一个 Channel 对象,接着把 Channel 对象交给 Poller 去处理
- Poller:Poller 的本质是一个 Selector,也跑在单独线程里。Poller 在内部维护一个 Channel 数组,它在一个死循环里不断检测 Channel 的数据就绪状态,一旦有 Channel 可读,就生成一个 SocketProcessor 任务对象扔给Executor 去处理
- Executor: Executor 就是线程池,负责运行 SocketProcessor 任务类,SocketProcessor 的 run 方法会调用Http11Processor 来读取和解析请求数据。Http11Processor 是应用层协议的封装,它会调用容器获得响应,再把响应通过 Channel 写出
tomcat8及以上默认, springboot2.3.12.RELEASE内嵌tomcat是9.0.46版本默认也是这个
模拟代码:
public class NioServer {
    public static void main(String[] args)  {
        List<SocketChannel> list = new ArrayList<>();  // 缓存所有的socket
        ByteBuffer byteBuffer = ByteBuffer.allocate(1024); // 缓存区的大小
        try {
            ServerSocketChannel serverSocketChannel = ServerSocketChannel.open();
            // 监听8080
            serverSocketChannel.bind(new InetSocketAddress(8080));
            // channel非阻塞
            serverSocketChannel.configureBlocking(false);
            System.out.println("NioServer 启动....");
            while (true){
                // 非阻塞
                SocketChannel socketChannel = serverSocketChannel.accept();
                Thread.sleep(1000);
                if(socketChannel == null){
                    System.out.println("没有新的客户端建立连接");
                }else {
                    System.out.println("新的客户端建立连接");
                    // channel非阻塞
                    socketChannel.configureBlocking(false);
                    // 将新的socket添加到 list
                    list.add(socketChannel);
                }
                //遍历所有的socket
                for(SocketChannel channel:list){
                    //非阻塞
                    int read = channel.read(byteBuffer);
                    if(read >0) {
                        //读模式
                        byteBuffer.flip();
                        System.out.println("读取客户端发送的数据:" +new String(byteBuffer.array(),0,read));
                        byteBuffer.clear();
                    }
                }
            }
        } catch (Exception e) {
            e.printStackTrace();
        }
    }
}
5. AIO异步非阻塞
NIO 和 AIO(NIO2) 最大的区别是,一个是同步一个是异步。异步最大的特点是,应用程序不需要自己去触发数据从内核空间到用户空间的拷贝。

没有 Poller 组件,也就是没有 Selector。在异步 I/O 模式下,Selector 的工作交给
内核来做了。
Linux 内核没有很完善地支持异步 I/O 模型,因此 JVM 并没有采用原生的 Linux 异步 I/O,而是在应用层面通过 epoll 模拟了异步 I/O 模型。因此在 Linux 平台上,Java NIO 和 Java NIO2 底层都是通过 epoll 来实现的,但是 Java NIO 更加简单高效。如果你的 Tomcat 跑在 Linux 平台上,建议不使用NIO2
模拟代码:
public class AioServer {

    public AsynchronousServerSocketChannel serverSocketChannel;

    public static void main(String[] args) throws Exception {
        new AioServer().listen();
        Thread.sleep(Integer.MAX_VALUE);
    }

    private void listen() throws IOException {
        //1. 创建一个线程池
        ExecutorService es = Executors.newCachedThreadPool();
        //2. 创建异步通道群组
        AsynchronousChannelGroup acg = AsynchronousChannelGroup.withCachedThreadPool(es, 1);

        //3. 创建服务端异步通道
        serverSocketChannel = AsynchronousServerSocketChannel.open(acg);
        //4. 绑定监听端口
        serverSocketChannel.bind(new InetSocketAddress(8080));
        System.out.println("AioServer 启动....");

        //5. 监听连接,传入回调类处理连接请求
        serverSocketChannel.accept(this, new CompletionHandler<AsynchronousSocketChannel, AioServer>() {
            //
            //            //具体处理连接请求的就是completed方法,它有两个参数:第一个是异步通道,第二个就是上面传入的AioServer对象
            @Override
            public void completed(AsynchronousSocketChannel socketChannel, AioServer attachment) {
                try {
                    if (socketChannel.isOpen()) {
                        System.out.println("接收到新的客户端的连接,地址:"
                                + socketChannel.getRemoteAddress());
                        final ByteBuffer byteBuffer = ByteBuffer.allocate(1024);
                        //调用 read 函数读取客户端发送的数据
                        socketChannel.read(byteBuffer, socketChannel,
                                        new CompletionHandler<Integer, AsynchronousSocketChannel>() {
                                            @Override
                            public void completed(Integer result, AsynchronousSocketChannel attachment) {

                                try {
                                    //读取请求,处理客户端发送的数据
                                    byteBuffer.flip();
                                    String content = Charset.defaultCharset()
                                            .newDecoder().decode(byteBuffer).toString();
                                    System.out.println("服务端接受到客户端发来的数据:" + content);

                                } catch (CharacterCodingException e) {
                                    e.printStackTrace();
                                }
                            }

                            @Override
                            public void failed(Throwable exc, AsynchronousSocketChannel attachment) {
                                exc.printStackTrace();
                                try {
                                    attachment.close();
                                } catch (IOException e) {
                                    e.printStackTrace();
                                }
                            }
                        });
                    }
                } catch (IOException e) {
                    e.printStackTrace();
                }finally {
                    //当有新的客户端接入的时候,直接调用accept的方法
                    attachment.serverSocketChannel.accept(attachment, this);
                }
            }
            @Override
            public void failed(Throwable exc, AioServer attachment) {
                exc.printStackTrace();
            }
        });
    }
}
6. APR异步非阻塞
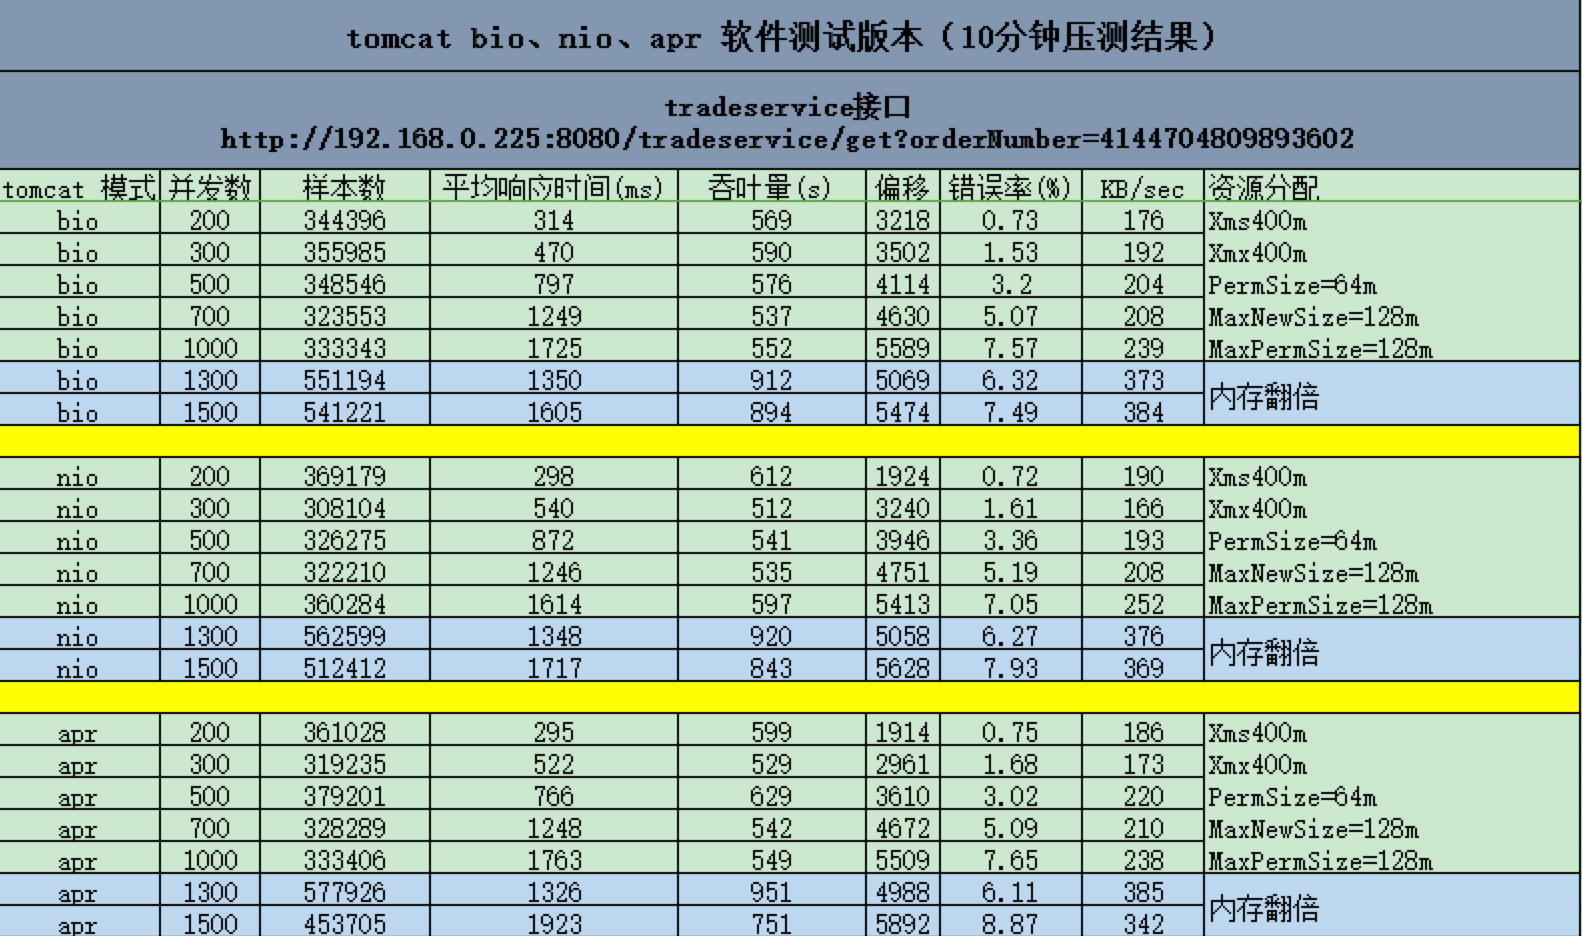
APR方式全名叫Apache Portable Runtime,需要额外去下载安装配置,NIO2是调用java库去实现异步的,而ARP是直接通过JNI (Java Native Interface)去操作系统是实现异步,APR 能够使用高级 IO 功能 (如sendfile, epoll, OpenSSL),sendfile主要是对静态文件提升很大,换APR也主要是这个原因其他的提升也不是特别大
附上对比图
springboot配置apr教程:https://www.jianshu.com/p/f716726ba340