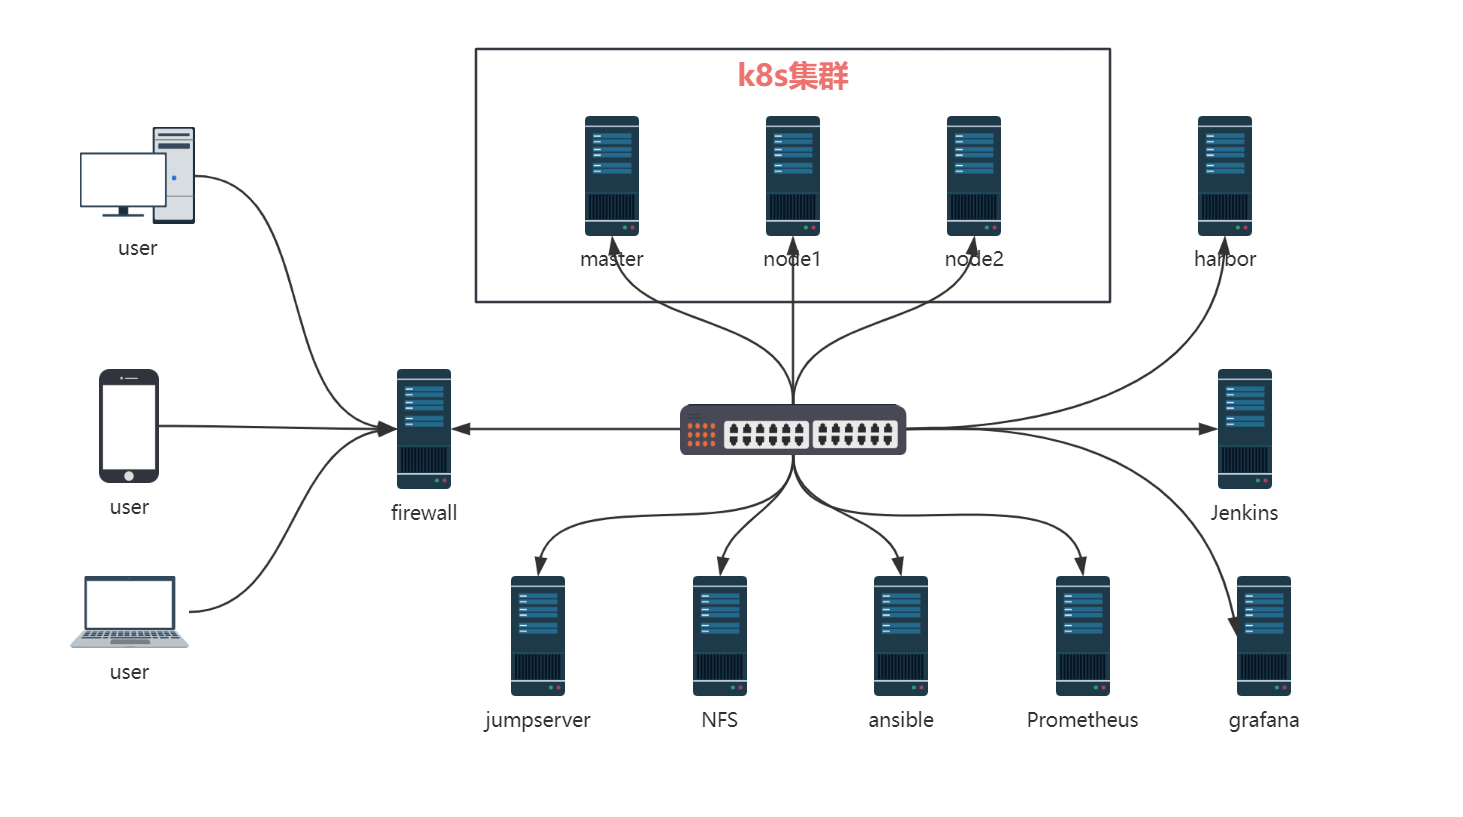
项目架构图
|--------------|-----------------|
| server | ip |
| master | 192.168.140.130 |
| node1 | 192.168.140.131 |
| node2 | 192.168.140.132 |
| ansible | 192.168.140.166 |
| jumpserver | 192.168.100.133 |
| firewall | 192.168.1.86 |
| nfs | 192.168.140.157 |
| harbor | 192.168.140.159 |
| Promethethus | 192.168.140.130 |
| Jenkins | 192.168.140.130 |
| Grafana | 192.168.140.130 |
| Dashboard | 192.168.140.130 |
项目描述
本项目旨在模拟公司生产环境,构建一个高性能、高可用的 Kubernetes(K8s)集群,用于部署和管理 Web 应用、MySQL 数据库、NFS 存储服务、Harbor 私有镜像仓库、Prometheus 监控系统以及 Jenkins 持续集成工具。通过整合这些关键组件,实现应用的高效部署、自动化运维、性能监控和数据持久化,为企业的数字化转型提供坚实的技术支撑。
项目的核心目标是打造一个稳定、可靠的云原生平台,支持 Web 应用的快速迭代和弹性扩展,同时确保数据的安全性和一致性。通过 Kubernetes 的容器编排能力,结合 Prometheus 和 Grafana 的监控可视化功能,以及 Jenkins 的 CI/CD 流水线,实现从代码开发到生产部署的全流程自动化。此外,Harbor 镜像仓库的引入,进一步优化了镜像管理流程,提高了镜像分发的效率和安全性。
通过本项目的实施,不仅能够提升开发和运维团队的工作效率,还能够显著降低运维成本,增强系统的整体可靠性,为企业的业务发展提供有力保障。
项目环境
CentOS7.9,kubelet-1.23.17,docker-ce-20.10.6,jumpserver,nfs,Jenkins,harbor2.8.3,prometheus-2.43.0,dashboard,Grafana9.1.2-1,mysql等
修改主机名
hostnamectl set-hostname master
hostnamectl set-hostname node1
hostnamectl set-hostname node2

#切换用户,重新加载环境
su - root
[root@master ~]#
[root@node1 ~]#
[root@node2 ~]#
关闭selinux和firewall
# 防火墙并且设置防火墙开启不启动
service firewalld stop && systemctl disable firewalld

# 临时关闭seLinux
setenforce 0

# 永久关闭seLinux
sed -i 's/SELINUX=enforcing/SELINUX=disabled/g' /etc/selinux/config


[root@master ~]# service firewalld stop
Redirecting to /bin/systemctl stop firewalld.service
[root@master ~]# systemctl disable firewalld
[root@master ~]# sed -i 's/SELINUX=enforcing/SELINUX=disabled/g' /etc/selinux/config
[root@master ~]# reboot
[root@master ~]# getenforce
Disabled
配置静态ip地址
#master节点
[root@master ~]# cd /etc/sysconfig/network-scripts/
[root@master network-scripts]# vim  ifcfg-ens33

BOOTPROTO="none"
NAME="ens33"
DEVICE="ens33"
ONBOOT="yes"
IPADDR=192.168.140.130
#NETMASK=255.255.255.0
PREFIX=24
GATEWAY=192.168.140.2
DNS1=114.114.114.114

#node1节点
[root@node1 ~]# cd /etc/sysconfig/network-scripts/
[root@node1 network-scripts]# vim  ifcfg-ens33

BOOTPROTO="none"
NAME="ens33"
DEVICE="ens33"
ONBOOT="yes"
IPADDR=192.168.140.131
#NETMASK=255.255.255.0
PREFIX=24
GATEWAY=192.168.140.2
DNS1=114.114.114.114

#node2节点
[root@node2 ~]# cd /etc/sysconfig/network-scripts/
[root@node2 network-scripts]# vim  ifcfg-ens33

BOOTPROTO="none"
NAME="ens33"
DEVICE="ens33"
ONBOOT="yes"
IPADDR=192.168.140.132
#NETMASK=255.255.255.0
PREFIX=24
GATEWAY=192.168.140.2
DNS1=114.114.114.114
添加hosts域名解析
[root@master ~]# vim /etc/hosts
[root@master ~]# cat /etc/hosts
127.0.0.1   localhost localhost.localdomain localhost4 localhost4.localdomain4
::1         localhost localhost.localdomain localhost6 localhost6.localdomain6
192.168.140.130 master
192.168.140.131 node1
192.168.140.132 node2
项目步骤
一、安装部署k8s单master的集群环境(1个master+2个node节点)
# 1.互相之间建立免密通道
ssh-keygen      # 一路回车

ssh-copy-id master
ssh-copy-id node1
ssh-copy-id node2

# 2.关闭交换分区(Kubeadm初始化的时候会检测)
# 临时关闭:swapoff -a
# 永久关闭:注释swap挂载,给swap这行开头加一下注释
[root@master ~]# cat /etc/fstab

#
# /etc/fstab
# Created by anaconda on Thu Mar 23 15:22:20 2023
#
# Accessible filesystems, by reference, are maintained under '/dev/disk'
# See man pages fstab(5), findfs(8), mount(8) and/or blkid(8) for more info
#
/dev/mapper/centos-root /                       xfs     defaults        0 0
UUID=00236222-82bd-4c15-9c97-e55643144ff3 /boot                   xfs     defaults        0 0
/dev/mapper/centos-home /home                   xfs     defaults        0 0
#/dev/mapper/centos-swap swap                    swap    defaults        0 0

# 3.加载相关内核模块
modprobe br_netfilter

echo "modprobe br_netfilter" >> /etc/profile

cat > /etc/sysctl.d/k8s.conf <<EOF
net.bridge.bridge-nf-call-ip6tables = 1
net.bridge.bridge-nf-call-iptables = 1
net.ipv4.ip_forward = 1
EOF

#重新加载,使配置生效
sysctl -p /etc/sysctl.d/k8s.conf


# 为什么要执行modprobe br_netfilter?
#    "modprobe br_netfilter"命令用于在Linux系统中加载br_netfilter内核模块。这个模块是Linux内# 核中的一个网络桥接模块,它允许管理员使用iptables等工具对桥接到同一网卡的流量进行过滤和管理。
# 因为要使用Linux系统作为路由器或防火墙,并且需要对来自不同网卡的数据包进行过滤、转发或NAT操作。

# 为什么要开启net.ipv4.ip_forward = 1参数?
#   要让Linux系统具有路由转发功能,需要配置一个Linux的内核参数net.ipv4.ip_forward。这个参数指# 定了Linux系统当前对路由转发功能的支持情况;其值为0时表示禁止进行IP转发;如果是1,则说明IP转发# 功能已经打开。

# 4.配置阿里云的repo源
yum install -y yum-utils
yum-config-manager --add-repo http://mirrors.aliyun.com/docker-ce/linux/centos/docker-ce.repo

yum install -y yum-utils device-mapper-persistent-data lvm2 wget net-tools nfs-utils lrzsz gcc gcc-c++ make cmake libxml2-devel openssl-devel curl curl-devel unzip sudo ntp libaio-devel wget vim ncurses-devel autoconf automake zlib-devel  python-devel epel-release openssh-server socat  ipvsadm conntrack ntpdate telnet ipvsadm

# 5.配置安装k8s组件需要的阿里云的repo源
[root@master ~]# vim  /etc/yum.repos.d/kubernetes.repo
[kubernetes]
name=Kubernetes
baseurl=https://mirrors.aliyun.com/kubernetes/yum/repos/kubernetes-el7-x86_64/
enabled=1
gpgcheck=0

# 6.配置时间同步
[root@master ~]# crontab -e
* */1 * * * /usr/sbin/ntpdate   cn.pool.ntp.org

#重启crond服务
[root@master ~]# service crond restart

# 7.安装docker服务
yum install docker-ce-20.10.6 -y


# 启动docker,设置开机自启
systemctl start docker && systemctl enable docker.service

# 8.配置docker镜像加速器和驱动
vim  /etc/docker/daemon.json

{
 "registry-mirrors":["https://rsbud4vc.mirror.aliyuncs.com","https://registry.docker-cn.com","https://docker.mirrors.ustc.edu.cn","https://dockerhub.azk8s.cn","http://hub-mirror.c.163.com"],
  "exec-opts": ["native.cgroupdriver=systemd"]
}

# 重新加载配置,重启docker服务
systemctl daemon-reload  && systemctl restart docker

# 9.安装初始化k8s需要的软件包
yum install -y kubelet-1.23.17 kubeadm-1.23.17 kubectl-1.23.17

# 设置kubelet开机启动
systemctl enable kubelet

#注:每个软件包的作用
#Kubeadm:  kubeadm是一个工具,用来初始化k8s集群的
#kubelet:   安装在集群所有节点上,用于启动Pod的
#kubectl:   通过kubectl可以部署和管理应用,查看各种资源,创建、删除和更新各种组件

# 10.kubeadm初始化k8s集群
# 把初始化k8s集群需要的离线镜像包上传到k8smaster、k8snode1、k8snode2机器上,然后解压
docker load -i k8simage-1-20-6.tar.gz

# 把文件远程拷贝到node节点
root@k8smaster ~]# scp k8simage-1-20-6.tar.gz root@node1:/root
root@k8smaster ~]# scp k8simage-1-20-6.tar.gz root@node2:/root

# 查看镜像
[root@node1 ~]# docker images
REPOSITORY                                                        TAG        IMAGE ID       CREATED       SIZE
registry.aliyuncs.com/google_containers/kube-proxy                v1.20.6    9a1ebfd8124d   2 years ago   118MB
registry.aliyuncs.com/google_containers/kube-scheduler            v1.20.6    b93ab2ec4475   2 years ago   47.3MB
registry.aliyuncs.com/google_containers/kube-controller-manager   v1.20.6    560dd11d4550   2 years ago   116MB
registry.aliyuncs.com/google_containers/kube-apiserver            v1.20.6    b05d611c1af9   2 years ago   122MB
calico/pod2daemon-flexvol                                         v3.18.0    2a22066e9588   2 years ago   21.7MB
calico/node                                                       v3.18.0    5a7c4970fbc2   2 years ago   172MB
calico/cni                                                        v3.18.0    727de170e4ce   2 years ago   131MB
calico/kube-controllers                                           v3.18.0    9a154323fbf7   2 years ago   53.4MB
registry.aliyuncs.com/google_containers/etcd                      3.4.13-0   0369cf4303ff   2 years ago   253MB
registry.aliyuncs.com/google_containers/coredns                   1.7.0      bfe3a36ebd25   3 years ago   45.2MB
registry.aliyuncs.com/google_containers/pause                     3.2        80d28bedfe5d   3 years ago   683kB

# 11.使用kubeadm初始化k8s集群
kubeadm config print init-defaults > kubeadm.yaml

[root@master ~]# vim kubeadm.yaml
apiVersion: kubeadm.k8s.io/v1beta2
bootstrapTokens:
- groups:
  - system:bootstrappers:kubeadm:default-node-token
  token: abcdef.0123456789abcdef
  ttl: 24h0m0s
  usages:
  - signing
  - authentication
kind: InitConfiguration
localAPIEndpoint:
  advertiseAddress: 192.168.2.104         #控制节点的ip
  bindPort: 6443
nodeRegistration:
  criSocket: /var/run/dockershim.sock
  name: k8smaster                        #控制节点主机名
  taints:
  - effect: NoSchedule
    key: node-role.kubernetes.io/master
---
apiServer:
  timeoutForControlPlane: 4m0s
apiVersion: kubeadm.k8s.io/v1beta2
certificatesDir: /etc/kubernetes/pki
clusterName: kubernetes
controllerManager: {}
dns:
  type: CoreDNS
etcd:
  local:
    dataDir: /var/lib/etcd
imageRepository: registry.aliyuncs.com/google_containers  # 需要修改为阿里云的仓库
kind: ClusterConfiguration
kubernetesVersion: v1.20.6
networking:
  dnsDomain: cluster.local
  serviceSubnet: 10.96.0.0/12
  podSubnet: 10.244.0.0/16         #指定pod网段,需要新增加这个
scheduler: {}
#追加如下几行
---
apiVersion: kubeproxy.config.k8s.io/v1alpha1
kind: KubeProxyConfiguration
mode: ipvs
---
apiVersion: kubelet.config.k8s.io/v1beta1
kind: KubeletConfiguration
cgroupDriver: systemd

# 12.基于kubeadm.yaml文件初始化k8s
[root@k8smaster ~]# kubeadm init --config=kubeadm.yaml --ignore-preflight-errors=SystemVerification

mkdir -p $HOME/.kube
sudo cp -i /etc/kubernetes/admin.conf $HOME/.kube/config
sudo chown $(id -u):$(id -g) $HOME/.kube/config

kubeadm join 192.168.2.104:6443 --token abcdef.0123456789abcdef \
    --discovery-token-ca-cert-hash sha256:83421a7d1baa62269508259b33e6563e45fbeb9139a9c214cbe9fc107f07cb4c

# 13.扩容k8s集群-添加工作节点
[root@k8snode1 ~]# kubeadm join 192.168.2.104:6443 --token abcdef.0123456789abcdef \
    --discovery-token-ca-cert-hash sha256:83421a7d1baa62269508259b33e6563e45fbeb9139a9c214cbe9fc107f07cb4c

[root@k8snode2 ~]# kubeadm join 192.168.2.104:6443 --token abcdef.0123456789abcdef \
    --discovery-token-ca-cert-hash sha256:83421a7d1baa62269508259b33e6563e45fbeb9139a9c214cbe9fc107f07cb4c

# 14.在master上查看集群节点状况
[root@master ~]# kubectl get nodes
NAME        STATUS     ROLES                  AGE     VERSION
master      NotReady   control-plane,master   2m49s   v1.20.6
node1       NotReady   <none>                 19s     v1.20.6
node2       NotReady   <none>                 14s     v1.20.6

# 15.node1,node2的ROLES角色为空,<none>就表示这个节点是工作节点。
可以把node1,node2的ROLES变成work
[root@master ~]# kubectl label node node1 node-role.kubernetes.io/worker=worker
node/node1 labeled

[root@master ~]# kubectl label node node2 node-role.kubernetes.io/worker=worker
node/node2 labeled
[root@master ~]# kubectl get nodes
NAME        STATUS     ROLES                  AGE     VERSION
master      NotReady   control-plane,master   2m43s   v1.20.6
node1       NotReady   worker                 2m15s   v1.20.6
node2       NotReady   worker                 2m11s   v1.20.6
# 注意:上面状态都是NotReady状态,说明没有安装网络插件

# 16.安装kubernetes网络组件-Calico
# 上传calico.yaml到master上,使用yaml文件安装calico网络插件 。
wget https://docs.projectcalico.org/v3.23/manifests/calico.yaml --no-check-certificate

[root@master ~]# kubectl apply -f  calico.yaml
configmap/calico-config created
customresourcedefinition.apiextensions.k8s.io/bgpconfigurations.crd.projectcalico.org created
customresourcedefinition.apiextensions.k8s.io/bgppeers.crd.projectcalico.org created
customresourcedefinition.apiextensions.k8s.io/blockaffinities.crd.projectcalico.org created
customresourcedefinition.apiextensions.k8s.io/clusterinformations.crd.projectcalico.org created
customresourcedefinition.apiextensions.k8s.io/felixconfigurations.crd.projectcalico.org created
customresourcedefinition.apiextensions.k8s.io/globalnetworkpolicies.crd.projectcalico.org created
customresourcedefinition.apiextensions.k8s.io/globalnetworksets.crd.projectcalico.org created
customresourcedefinition.apiextensions.k8s.io/hostendpoints.crd.projectcalico.org created
customresourcedefinition.apiextensions.k8s.io/ipamblocks.crd.projectcalico.org created
customresourcedefinition.apiextensions.k8s.io/ipamconfigs.crd.projectcalico.org created
customresourcedefinition.apiextensions.k8s.io/ipamhandles.crd.projectcalico.org created
customresourcedefinition.apiextensions.k8s.io/ippools.crd.projectcalico.org created
customresourcedefinition.apiextensions.k8s.io/kubecontrollersconfigurations.crd.projectcalico.org created
customresourcedefinition.apiextensions.k8s.io/networkpolicies.crd.projectcalico.org created
customresourcedefinition.apiextensions.k8s.io/networksets.crd.projectcalico.org created
clusterrole.rbac.authorization.k8s.io/calico-kube-controllers created
clusterrolebinding.rbac.authorization.k8s.io/calico-kube-controllers created
clusterrole.rbac.authorization.k8s.io/calico-node created
clusterrolebinding.rbac.authorization.k8s.io/calico-node created
daemonset.apps/calico-node created
serviceaccount/calico-node created
deployment.apps/calico-kube-controllers created
serviceaccount/calico-kube-controllers created
poddisruptionbudget.policy/calico-kube-controllers created

# 再次查看集群状态
[root@master ~]# kubectl get nodes
NAME        STATUS   ROLES                  AGE     VERSION
master      Ready    control-plane,master   5m57s   v1.20.6
node1       Ready    worker                 3m27s   v1.20.6
node2       Ready    worker                 3m22s   v1.20.6
# STATUS状态是Ready,说明k8s集群正常运行了
二、部署ansible完成相关软件的自动化运维工作
hostnamectl set-hostname ansible

# 1.建立免密通道 在ansible主机上生成密钥对
[root@ansible ~]# ssh-keygen -t rsa
Generating public/private rsa key pair.
Enter file in which to save the key (/root/.ssh/id_rsa):
/root/.ssh/id_rsa already exists.
Overwrite (y/n)? y
Enter passphrase (empty for no passphrase):
Enter same passphrase again:
Your identification has been saved in /root/.ssh/id_rsa.
Your public key has been saved in /root/.ssh/id_rsa.pub.
The key fingerprint is:
SHA256:q4c8TiMvoFo1VhzRhdc82SkPICfQcoTMM8Xuv78X6hE root@ansible
The key's randomart image is:
+---[RSA 2048]----+
|     o+X=o++ o . |
|     .B.*+. B o  |
|      o* .   =   |
|     .  .     .  |
|    +  .S   E    |
|  .o .  ..   ..  |
| .....o...  .. . |
|..  .++o. . ...  |
|o    o+o  .++o   |
+----[SHA256]-----+
[root@ansible ~]# cd /root/.ssh
[root@ansible .ssh]# ls
authorized_keys  id_rsa  id_rsa.pub  known_hosts

# 2.上传公钥到所有服务器的root用户家目录下
#     所有服务器上开启ssh服务 ,开放22号端口,允许root用户登录
#将公钥上传到master
[root@ansible .ssh]# ssh-copy-id root@192.168.140.130
/usr/bin/ssh-copy-id: INFO: Source of key(s) to be installed: "/root/.ssh/id_rsa.pub"
The authenticity of host '192.168.140.130 (192.168.140.130)' can't be established.
ECDSA key fingerprint is SHA256:vW3D/UV79EsmgiZamRj5gAv1pA2svjKN4cZSL7PFX+M.
ECDSA key fingerprint is MD5:ed:34:bc:0e:61:b3:f0:1d:5e:f1:ec:92:e4:c7:ca:eb.
Are you sure you want to continue connecting (yes/no)? yes
/usr/bin/ssh-copy-id: INFO: attempting to log in with the new key(s), to filter out any that are already installed
/usr/bin/ssh-copy-id: INFO: 1 key(s) remain to be installed -- if you are prompted now it is to install the new keys
root@192.168.140.130's password:

Number of key(s) added: 1

Now try logging into the machine, with:   "ssh 'root@192.168.140.130'"
and check to make sure that only the key(s) you wanted were added.

#将公钥上传到node1
[root@ansible .ssh]# ssh-copy-id root@192.168.140.131
/usr/bin/ssh-copy-id: INFO: Source of key(s) to be installed: "/root/.ssh/id_rsa.pub"
The authenticity of host '192.168.140.131 (192.168.140.131)' can't be established.
ECDSA key fingerprint is SHA256:vW3D/UV79EsmgiZamRj5gAv1pA2svjKN4cZSL7PFX+M.
ECDSA key fingerprint is MD5:ed:34:bc:0e:61:b3:f0:1d:5e:f1:ec:92:e4:c7:ca:eb.
Are you sure you want to continue connecting (yes/no)? yes
/usr/bin/ssh-copy-id: INFO: attempting to log in with the new key(s), to filter out any that are already installed
/usr/bin/ssh-copy-id: INFO: 1 key(s) remain to be installed -- if you are prompted now it is to install the new keys
root@192.168.140.131's password:

Number of key(s) added: 1

Now try logging into the machine, with:   "ssh 'root@192.168.140.131'"
and check to make sure that only the key(s) you wanted were added.

#将公钥上传到node2
[root@ansible .ssh]# ssh-copy-id root@192.168.140.132
/usr/bin/ssh-copy-id: INFO: Source of key(s) to be installed: "/root/.ssh/id_rsa.pub"
The authenticity of host '192.168.140.132 (192.168.140.132)' can't be established.
ECDSA key fingerprint is SHA256:vW3D/UV79EsmgiZamRj5gAv1pA2svjKN4cZSL7PFX+M.
ECDSA key fingerprint is MD5:ed:34:bc:0e:61:b3:f0:1d:5e:f1:ec:92:e4:c7:ca:eb.
Are you sure you want to continue connecting (yes/no)? yes
/usr/bin/ssh-copy-id: INFO: attempting to log in with the new key(s), to filter out any that are already installed
/usr/bin/ssh-copy-id: INFO: 1 key(s) remain to be installed -- if you are prompted now it is to install the new keys
root@192.168.140.132's password:

Number of key(s) added: 1

Now try logging into the machine, with:   "ssh 'root@192.168.140.132'"
and check to make sure that only the key(s) you wanted were added.

# 验证是否实现免密码密钥认证
[root@ansible .ssh]# ssh root@192.168.140.130
Last login: Thu Apr 17 01:36:30 2025 from 192.168.140.1
[root@master ~]# exit
登出
Connection to 192.168.140.130 closed.
[root@ansible .ssh]# ssh root@192.168.140.131
Last login: Thu Apr 17 01:30:12 2025 from 192.168.140.1
[root@node1 ~]# exit
登出
Connection to 192.168.140.131 closed.
[root@ansible .ssh]# ssh root@192.168.140.132
Last login: Thu Apr 17 01:30:15 2025 from 192.168.140.1
[root@node2 ~]# exit
登出
Connection to 192.168.140.132 closed.

# 3.安装ansible,在管理节点上
[root@ansible .ssh]# yum install epel-release -y
[root@ansible .ssh]# yum  install ansible -y

# 4.编写主机清单
[root@ansible ~]# cd /etc/ansible
[root@ansible ansible]# ls
ansible.cfg  hosts  roles
[root@ansible ansible]# vim hosts

[master]
192.168.140.130

[node1]
192.168.140.131

[node2]
192.168.140.132

[harbor]
192.168.140.159

[nfs]
192.168.140.157

[firewall]
192.168.140.178


#测试是否成功
[root@ansible ansible]# ansible all -m shell -a "ip add"

#关闭防火墙
[root@ansible ~]# service firewalld stop && systemctl disable firewalld
Redirecting to /bin/systemctl stop firewalld.service
[root@ansible ~]# sed -i 's/SELINUX=enforcing/SELINUX=disabled/g' /etc/selinux/config
[root@ansible ~]# getenforce
Disabled
三、部署堡垒机
# 1.执行命令,一键安装Jumpserver
[root@jumpserver ~]# curl -sSL https://resource.fit2cloud.com/jumpserver/jumpserver/releases/latest/download/quick_start.sh | bash

>>> 安装完成了
1. 可以使用如下命令启动, 然后访问
cd /opt/jumpserver-installer-v4.8.1
./jmsctl.sh start

2. 其它一些管理命令
./jmsctl.sh stop
./jmsctl.sh restart
./jmsctl.sh backup
./jmsctl.sh upgrade
更多还有一些命令, 你可以 ./jmsctl.sh --help 来了解

3. Web 访问
http://192.168.140.133:80
默认用户: admin  默认密码: ChangeMe

 更多信息
官方网站: https://www.jumpserver.org/
官方文档: https://docs.jumpserver.org/

# 2.禁止root用户直接登入,禁用22号端口
[root@jumpserver /]# vim /etc/ssh/sshd_config
Port 6677
PermitRootLogin no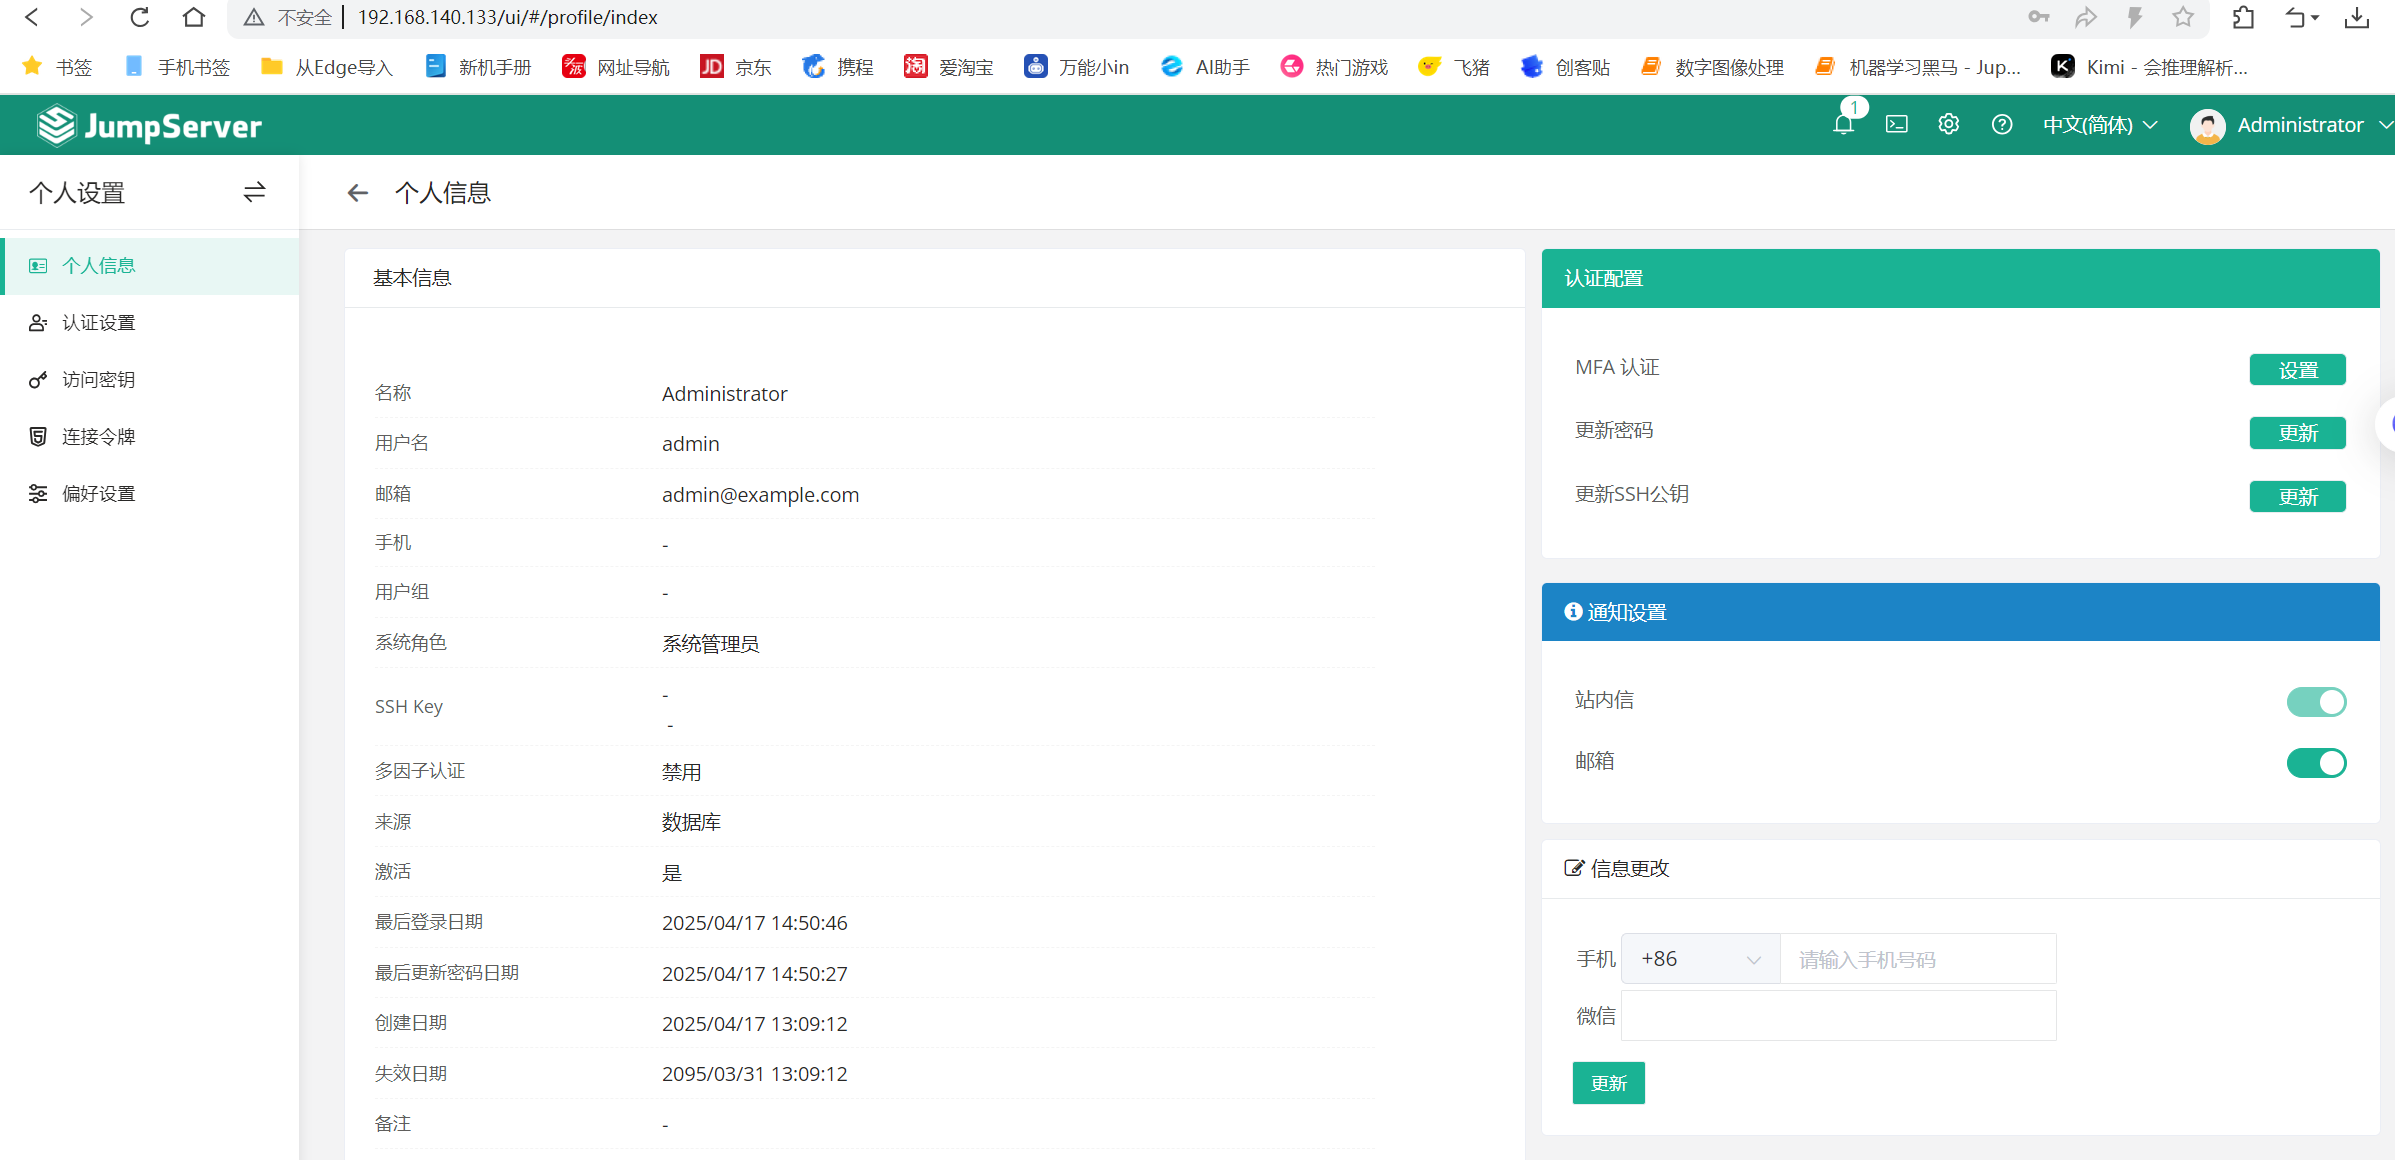
四、部署firewall服务器
# 在firewall服务器上编写脚本实现SNAT_DNAT功能
[root@firewall ~]# vim snat_dnat.sh

#!/bin/bash


#清除规则
iptables  -F
iptables  -t  nat -F

#开启路由功能
echo  1  >/proc/sys/net/ipv4/ip_forward

#开启snat功能

iptables -t nat -A POSTROUTING -s 192.168.140.0/24  -o ens36 -j SNAT --to-source 192.168.1.86

#开启DNAT功能
iptables -t nat -A PREROUTING -i ens36 -d 192.168.1.86 -p tcp --dport 80 -j DNAT --to-destination 192.168.140.130:80

#发布堡垒机
iptables -t nat -A PREROUTING -d 192.168.1.86 -p tcp --dport 2288 -i ens36 -j DNAT --to-destination 192.168.140.133:6677

#在k8s集群中的master节点上开启相应的端口
[root@master ~]# vim open_app.sh
#!/bin/bash

# open ssh
iptables -t filter  -A INPUT  -p tcp  --dport  22 -j ACCEPT

# open dns
iptables -t filter  -A INPUT  -p udp  --dport 53 -s 192.168.140.0/24 -j ACCEPT

# open dhcp
iptables -t filter  -A INPUT  -p udp   --dport 67 -j ACCEPT

# open http/https
iptables -t filter  -A INPUT -p tcp   --dport 80 -j ACCEPT
iptables -t filter  -A INPUT -p tcp   --dport 443 -j ACCEPT

# open mysql
iptables  -t filter  -A INPUT -p tcp  --dport 3306  -j ACCEPT

# open Kubernetes API
iptables -A INPUT -p tcp --dport 6443 -j ACCEPT

# drop icmp request
iptables -t filter  -A INPUT -p icmp  --icmp-type 8 -j DROP

# default policy DROP
#iptables  -t filter  -P INPUT DROP
五、搭建nfs服务器,保障nginx集群的数据一致性,并且设置提供服务的后端real-server开机自动挂载
1.下载nfs-utils软件
[root@nfs ~]# yum install nfs-utils -y

2.新建共享目录和index.html
[root@nfs ~]# mkdir /nginx
[root@nfs ~]# cd /nginx
[root@nfs nginx]# echo "hello world" >index.html
[root@nfs nginx]# ls
index.html

3.设置共享目录
[root@nfs ~]# vim /etc/exports
[root@nfs ~]# cat /etc/exports
/nginx   192.168.140.0/24(ro,no_root_squash,sync)

4.刷新nfs或者重新输出共享目录
[root@nfs ~]# exportfs -r   #输出所有共享目录
[root@nfs ~]# exportfs -v   #显示输出的共享目录
/nginx            192.168.140.0/24(sync,wdelay,hide,no_subtree_check,sec=sys,ro,secure,no_root_squash,no_all_squash)

5.重启nfs服务并且设置nfs开机自启
[root@nfs web]# systemctl restart nfs && systemctl enable nfs
Created symlink from /etc/systemd/system/multi-user.target.wants/nfs-server.service to /usr/lib/systemd/system/nfs-server.service.
创建pv使用nfs服务器上的共享目录
# 在master上操作
[root@master ~]# mkdir /pv
[root@master ~]# cd /pv
[root@master pv]# vim nfs-pv.yaml
apiVersion: v1
kind: PersistentVolume
metadata:
  name: pv-web
  labels:
    type: pv-web
spec:
  capacity:
    storage: 10Gi
  accessModes:
    - ReadWriteMany
  storageClassName: nfs
  nfs:
    path: "/nginx"
    server: 192.168.140.157
    readOnly: false

[root@master pv]# kubectl apply -f nfs-pv.yaml
persistentvolume/pv-web created

[root@master pv]# kubectl get pv
NAME          CAPACITY   ACCESS MODES   RECLAIM POLICY   STATUS      CLAIM                  STORAGECLASS   REASON   AGE
pv-web        10Gi       RWX            Retain           Available                          nfs                     2m22s

# 创建pvc
[root@master pv]# vim nfs-pvc.yaml
apiVersion: v1
kind: PersistentVolumeClaim
metadata:
  name: pvc-web
spec:
  accessModes:
  - ReadWriteMany
  resources:
     requests:
       storage: 1Gi
  storageClassName: nfs

[root@master pv]# kubectl apply -f nfs-pvc.yaml
persistentvolumeclaim/pvc-web created

[root@master pv]# kubectl get pvc
NAME      STATUS   VOLUME   CAPACITY   ACCESS MODES   STORAGECLASS   AGE
pvc-web   Bound    pv-web   10Gi       RWX            nfs            11s

# 创建pod
[root@master pv]# vim nginx-deployment.yaml
apiVersion: apps/v1
kind: Deployment
metadata:
  name: nginx-deployment
  labels:
    app: nginx
spec:
  replicas: 4
  selector:
    matchLabels:
      app: nginx
  template:
    metadata:
      labels:
        app: nginx
    spec:
      volumes:
        - name: pv-storage-nfs
          persistentVolumeClaim:
            claimName: pvc-web
      containers:
        - name: pv-container-nfs
          image: nginx
          imagePullPolicy: IfNotPresent
          ports:
            - containerPort: 80
              name: "http-server"
          volumeMounts:
            - mountPath: "/usr/share/nginx/html"
              name: pv-storage-nfs

[root@master pv]# kubectl apply -f nginx-deployment.yaml
deployment.apps/nginx-deployment created

[root@master pv]# kubectl get pod -o wide
NAME                               READY   STATUS    RESTARTS   AGE   IP               NODE    NOMINATED NODE   READINESS GATES
nginx-deployment-5ffbcf544-hdn2v   1/1     Running   0          13s   10.224.166.180   node1   <none>           <none>
nginx-deployment-5ffbcf544-p6tpx   1/1     Running   0          13s   10.224.166.181   node1   <none>           <none>
nginx-deployment-5ffbcf544-wr9m7   1/1     Running   0          13s   10.224.104.53    node2   <none>           <none>
nginx-deployment-5ffbcf544-ztkbx   1/1     Running   0          13s   10.224.104.54    node2   <none>           <none>

# 测试
[root@master pv]# curl 10.224.104.53
hello world

# 对nfs服务器上index.html的内容进行修改
[root@nfs nginx]# vim index.html
hello world!
welcome to my'web!


[root@master pv]# curl 10.224.104.53
hello world!
welcome to my'web!
六、采用HPA技术来启动nginx和MySQL的pod,cpu使用率超过80%时进行水平扩缩
部署MySQLpod
# 编写yaml文件
[root@master ~]# mkdir /mysql
[root@master ~]# cd /mysql/
[root@master mysql]# vim mysql.yaml
apiVersion: apps/v1
kind: Deployment
metadata:
    labels:
        app: mysql
    name: mysql
spec:
    replicas: 1
    selector:
        matchLabels:
            app: mysql
    template:
        metadata:
            labels:
                app: mysql
        spec:
            containers:
            - image: mysql:latest
              name: mysql
              imagePullPolicy: IfNotPresent
              env:
              - name: MYSQL_ROOT_PASSWORD
                value: "123456"
              ports:
              - containerPort: 3306
---
apiVersion: v1
kind: Service
metadata:
  labels:
    app: svc-mysql
  name: svc-mysql
spec:
  selector:
    app: mysql
  type: NodePort
  ports:
  - port: 3306
    protocol: TCP
    targetPort: 3306
    nodePort: 30007

#部署pod
[root@master mysql]# kubectl apply -f mysql.yaml
deployment.apps/mysql created
service/svc-mysql created

[root@master mysql]# kubectl get service
NAME                 TYPE        CLUSTER-IP       EXTERNAL-IP   PORT(S)          AGE
kubernetes           ClusterIP   10.96.0.1        <none>        443/TCP          14d
svc-mysql            NodePort    10.100.245.213   <none>        3306:30006/TCP   20s


[root@master mysql]# kubectl get pods
NAME                               READY   STATUS        RESTARTS   AGE
mysql-597ff9595d-s8kqh             1/1     Running       0          2m11s
nginx-deployment-5ffbcf544-hdn2v   1/1     Running       0          14m
nginx-deployment-5ffbcf544-p6tpx   1/1     Running       0          14m
nginx-deployment-5ffbcf544-wr9m7   1/1     Running       0          14m
nginx-deployment-5ffbcf544-ztkbx   1/1     Running       0          14m


# 进入MySQL
[root@master mysql]# kubectl exec -it mysql-597ff9595d-s8kqh -- bash
bash-5.1# mysql -uroot -p123456
mysql: [Warning] Using a password on the command line interface can be insecure.
Welcome to the MySQL monitor.  Commands end with ; or \g.
Your MySQL connection id is 9
Server version: 9.3.0 MySQL Community Server - GPL

Copyright (c) 2000, 2025, Oracle and/or its affiliates.

Oracle is a registered trademark of Oracle Corporation and/or its
affiliates. Other names may be trademarks of their respective
owners.

Type 'help;' or '\h' for help. Type '\c' to clear the current input statement.

mysql>
部署带有HPA功能的nginx
# 编写yaml文件
[root@master ~]# mkdir /hpa
[root@master ~]# cd /hpa
[root@master hpa]# vim nginx-hpa.yaml
apiVersion: apps/v1
kind: Deployment
metadata:
  name: myweb
spec:
  selector:
    matchLabels:
      run: myweb
  template:
    metadata:
      labels:
        run: myweb
    spec:
      containers:
      - name: myweb
        image: nginx
        imagePullPolicy: IfNotPresent
        ports:
        - containerPort: 80
        resources:
          limits:
            cpu: 200m
          requests:
            cpu: 50m
---
apiVersion: v1
kind: Service
metadata:
  name: myweb-svc
  labels:
    run: myweb-svc
spec:
  type: NodePort
  ports:
  - port: 80
    targetPort: 80
    nodePort: 31000
  selector:
    run: myweb

[root@master hpa]# kubectl apply -f nginx-hpa.yaml
deployment.apps/myweb created
service/myweb-svc created

[root@master hpa]# kubectl get pod -o wide
NAME                               READY   STATUS              RESTARTS        AGE   IP               NODE    NOMINATED NODE   READINESS GATES
myweb-55d568cd6c-mc6sp             1/1     Running             0               24s   10.224.104.57    node2   <none>           <none>

# 启用HPA水平扩缩
[root@master hpa]# kubectl autoscale deployment myweb --cpu-percent=80 --min=1 --max=10
horizontalpodautoscaler.autoscaling/myweb autoscaled
安装metrics-server
# 在master上操作
# 下载components.yaml配置文件
wget https://github.com/kubernetes-sigs/metrics-server/releases/latest/download/components.yaml

# 修改components.yaml配置文件
image: registry.aliyuncs.com/google_containers/metrics-server:v0.6.0
imagePullPolicy: IfNotPresent
args:
// 新增下面两行参数
- --kubelet-insecure-tls
- --kubelet-preferred-address-types=InternalDNS,InternalIP,ExternalDNS,ExternalIP,Hostname

[root@master ~]# cat components.yaml
部分代码如下
spec:
      containers:
      - args:
        - --kubelet-insecure-tls
        - --cert-dir=/tmp
        - --secure-port=10250
        - --kubelet-preferred-address-types=InternalDNS,InternalIP,ExternalDNS,ExternalIP,Hostname
        - --kubelet-use-node-status-port
        - --metric-resolution=15s
        image: registry.aliyuncs.com/google_containers/metrics-server:v0.6.0
        imagePullPolicy: IfNotPresent


# 部署
[root@master ~]# kubectl apply -f components.yaml

# 检查是否安装成功
[root@master ~]# kubectl get pods -o wide -n kube-system |grep metrics-server
metrics-server-5bd756b4b8-788qj            1/1     Running   0              51s   10.224.104.10     node2    <none>           <none>

[root@master ~]# kubectl top node
NAME     CPU(cores)   CPU%   MEMORY(bytes)   MEMORY%
master   163m         8%     1183Mi          32%
node1    88m          4%     1186Mi          32%
node2    76m          3%     656Mi           17%
在nfs服务器上进行ab压力测试
# 安装httpd-tools工具
[root@nfs ~]# yum install httpd-tools -y

# 模拟用户访问业务场景
# ab -n <请求数量> -c <并发数> <URL>
[root@nfs ~]# ab  -n 1000  -c 50  http://192.168.121.101:31000/index.html

# 在master机器上监控HPA状态
[root@master ~]# kubectl get hpa --watch

# 增加请求数量和并发数量
[root@nfs ~]# ab  -n 5000  -c100  http://192.168.121.101:31000/index.html
[root@nfs ~]# ab  -n 10000  -c200  http://192.168.121.101:31000/index.html
[root@nfs ~]# ab  -n 20000  -c400  http://192.168.121.101:31000/index.html
七、构建CI/CD环境,安装部署Jenkins、harbor实现相关的代码发布
部署并安装Jenkins
# 安装git软件
[root@master ~]# mkdir /jenkins
[root@master ~]# cd /jenkins
[root@master jenkins]# yum install git -y

# 下载yaml文件
[root@master jenkins]# git clone https://github.com/scriptcamp/kubernetes-jenkins

# 创建一个命名空间
[root@master jenkins]# cd kubernetes-jenkins/
[root@master kubernetes-jenkins]# cat namespace.yaml
apiVersion: v1
kind: Namespace
metadata:
  name: devops-tools

[root@master kubernetes-jenkins]# kubectl apply -f namespace.yaml
namespace/devops-tools created

# 查看命名空间
[root@master kubernetes-jenkins]# kubectl get ns
NAME              STATUS   AGE
default           Active   39h
devops-tools      Active   89s
kube-node-lease   Active   39h
kube-public       Active   39h
kube-system       Active   39h

# 创建服务账号,集群角色绑定
[root@master kubernetes-jenkins]# vim serviceAccount.yaml
---
apiVersion: rbac.authorization.k8s.io/v1
kind: ClusterRole
metadata:
  name: jenkins-admin
rules:
  - apiGroups: [""]
    resources: ["*"]
    verbs: ["*"]

---
apiVersion: v1
kind: ServiceAccount
metadata:
  name: jenkins-admin
  namespace: devops-tools

---
apiVersion: rbac.authorization.k8s.io/v1
kind: ClusterRoleBinding
metadata:
  name: jenkins-admin
roleRef:
  apiGroup: rbac.authorization.k8s.io
  kind: ClusterRole
  name: jenkins-admin
subjects:
- kind: ServiceAccount
  name: jenkins-admin
  namespace: devops-tools

[root@master kubernetes-jenkins]# kubectl apply -f serviceAccount.yaml
clusterrole.rbac.authorization.k8s.io/jenkins-admin unchanged
serviceaccount/jenkins-admin unchanged
clusterrolebinding.rbac.authorization.k8s.io/jenkins-admin created

# 创建卷
[root@master kubernetes-jenkins]# vim  volume.yaml

kind: StorageClass
apiVersion: storage.k8s.io/v1
metadata:
  name: local-storage
provisioner: kubernetes.io/no-provisioner
volumeBindingMode: WaitForFirstConsumer

---
apiVersion: v1
kind: PersistentVolume
metadata:
  name: jenkins-pv-volume
  labels:
    type: local
spec:
  storageClassName: local-storage
  claimRef:
    name: jenkins-pv-claim
    namespace: devops-tools
  capacity:
    storage: 10Gi
  accessModes:
    - ReadWriteOnce
  local:
    path: /mnt
  nodeAffinity:
    required:
      nodeSelectorTerms:
      - matchExpressions:
        - key: kubernetes.io/hostname
          operator: In
          values:
          - node1  # 改为自己k8s集群里的node节点名字

---
apiVersion: v1
kind: PersistentVolumeClaim
metadata:
  name: jenkins-pv-claim
  namespace: devops-tools
spec:
  storageClassName: local-storage
  accessModes:
    - ReadWriteOnce
  resources:
    requests:
      storage: 3Gi

[root@master kubernetes-jenkins]# kubectl apply -f volume.yaml
storageclass.storage.k8s.io/local-storage created
persistentvolume/jenkins-pv-volume created
persistentvolumeclaim/jenkins-pv-claim created

[root@master kubernetes-jenkins]# kubectl get pv
NAME                CAPACITY   ACCESS MODES   RECLAIM POLICY   STATUS   CLAIM                           STORAGECLASS    REASON   AGE
jenkins-pv-volume   10Gi       RWO            Retain           Bound    devops-tools/jenkins-pv-claim   local-storage            22s
pv-web              10Gi       RWX            Retain           Bound    default/pvc-web                 nfs                      17h

[root@master kubernetes-jenkins]# kubectl describe pv jenkins-pv-volume
Name:              jenkins-pv-volume
Labels:            type=local
Annotations:       <none>
Finalizers:        [kubernetes.io/pv-protection]
StorageClass:      local-storage
Status:            Bound
Claim:             devops-tools/jenkins-pv-claim
Reclaim Policy:    Retain
Access Modes:      RWO
VolumeMode:        Filesystem
Capacity:          10Gi
Node Affinity:
  Required Terms:
    Term 0:        kubernetes.io/hostname in [node1]
Message:
Source:
    Type:  LocalVolume (a persistent volume backed by local storage on a node)
    Path:  /mnt
Events:    <none>

# 部署Jenkins
[root@master kubernetes-jenkins]# cat deployment.yaml
apiVersion: apps/v1
kind: Deployment
metadata:
  name: jenkins
  namespace: devops-tools
spec:
  replicas: 1
  selector:
    matchLabels:
      app: jenkins-server
  template:
    metadata:
      labels:
        app: jenkins-server
    spec:
      securityContext:
            fsGroup: 1000
            runAsUser: 1000
      serviceAccountName: jenkins-admin
      containers:
        - name: jenkins
          image: jenkins/jenkins:lts
          imagePullPolicy: IfNotPresent
          resources:
            limits:
              memory: "2Gi"
              cpu: "1000m"
            requests:
              memory: "500Mi"
              cpu: "500m"
          ports:
            - name: httpport
              containerPort: 8080
            - name: jnlpport
              containerPort: 50000
          livenessProbe:
            httpGet:
              path: "/login"
              port: 8080
            initialDelaySeconds: 90
            periodSeconds: 10
            timeoutSeconds: 5
            failureThreshold: 5
          readinessProbe:
            httpGet:
              path: "/login"
              port: 8080
            initialDelaySeconds: 60
            periodSeconds: 10
            timeoutSeconds: 5
            failureThreshold: 3
          volumeMounts:
            - name: jenkins-data
              mountPath: /var/jenkins_home
      volumes:
        - name: jenkins-data
          persistentVolumeClaim:
              claimName: jenkins-pv-claim

[root@master kubernetes-jenkins]# kubectl apply -f deployment.yaml
deployment.apps/jenkins created

[root@master kubernetes-jenkins]# kubectl get deploy -n devops-tools
NAME      READY   UP-TO-DATE   AVAILABLE   AGE
jenkins   1/1     1            1           7m

[root@master kubernetes-jenkins]# kubectl get pod -n devops-tools
NAME                      READY   STATUS    RESTARTS   AGE
jenkins-b96f7764f-hf24r   1/1     Running   0          6m7s

# 发布Jenkins pod
[root@master kubernetes-jenkins]# cat service.yaml
apiVersion: v1
kind: Service
metadata:
  name: jenkins-service
  namespace: devops-tools
  annotations:
      prometheus.io/scrape: 'true'
      prometheus.io/path:   /
      prometheus.io/port:   '8080'
spec:
  selector:
    app: jenkins-server
  type: NodePort
  ports:
    - port: 8080
      targetPort: 8080
      nodePort: 32000

[root@master kubernetes-jenkins]# kubectl apply -f service.yaml
service/jenkins-service created

[root@master kubernetes-jenkins]# kubectl get svc -n devops-tools
NAME              TYPE       CLUSTER-IP      EXTERNAL-IP   PORT(S)          AGE
jenkins-service   NodePort   10.98.133.177   <none>        8080:32000/TCP   8s

# 使用浏览器访问宿主机的IP+端口号
http://192.168.140.130:32000

# 进入pod里获取密码
[root@master kubernetes-jenkins]# kubectl exec -it jenkins-b96f7764f-hf24r -n devops-tools -- bash
jenkins@jenkins-b96f7764f-hf24r:/$ cat /var/jenkins_home/secrets/initialAdminPassword
ad4fbdcf630a4f43ab955d6c91a58890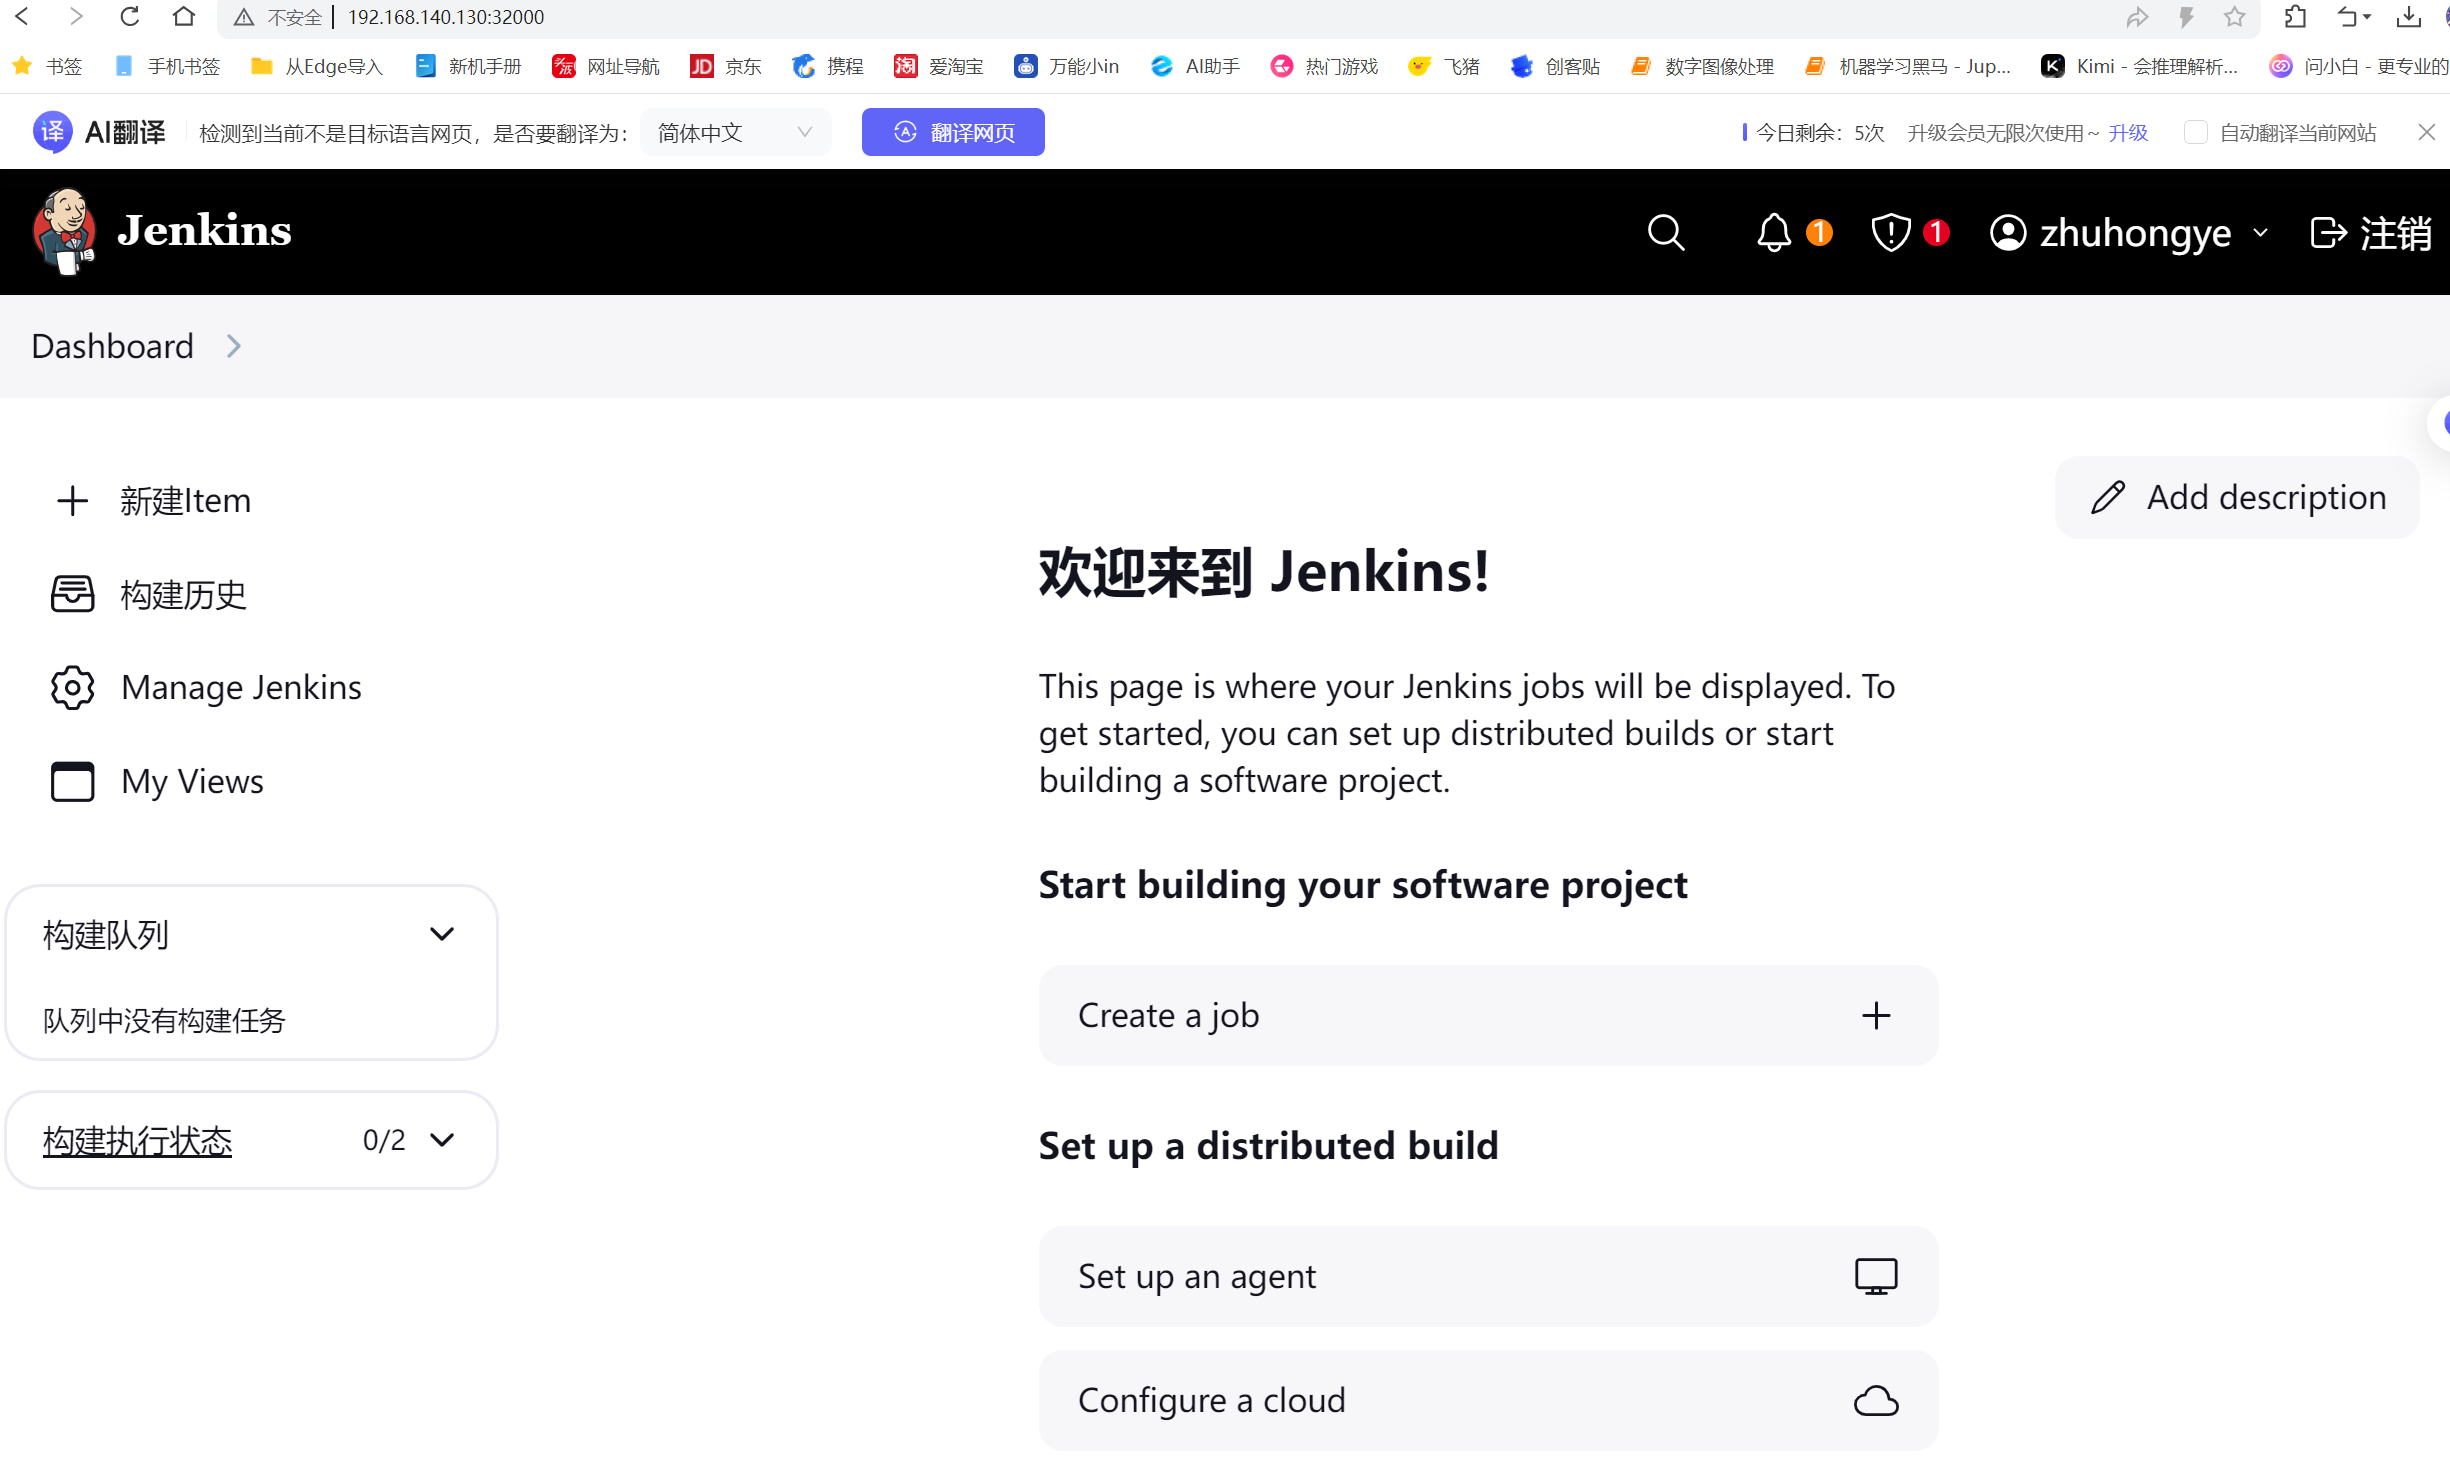
部署安装Gitlab
# 部署gitlab
https://gitlab.cn/install/

[root@localhost ~]# hostnamectl set-hostname gitlab
[root@localhost ~]# su - root
su - root
上一次登录:日 6月 18 18:28:08 CST 2023从 192.168.2.240pts/0 上
[root@gitlab ~]# cd /etc/sysconfig/network-scripts/
[root@gitlab network-scripts]# vim ifcfg-ens33
[root@gitlab network-scripts]# service network restart
Restarting network (via systemctl):                        [  确定  ]
[root@gitlab network-scripts]# sed -i 's/SELINUX=enforcing/SELINUX=disabled/g' /etc/selinux/config
[root@gitlab network-scripts]# service firewalld stop && systemctl disable firewalld
Redirecting to /bin/systemctl stop firewalld.service
Removed symlink /etc/systemd/system/multi-user.target.wants/firewalld.service.
Removed symlink /etc/systemd/system/dbus-org.fedoraproject.FirewallD1.service.
[root@gitlab network-scripts]# reboot
[root@gitlab ~]# getenforce
Disabled

# 1.安装和配置必须的依赖项
yum install -y curl policycoreutils-python openssh-server perl

# 2.配置极狐GitLab 软件源镜像
[root@gitlab ~]# curl -fsSL https://packages.gitlab.cn/repository/raw/scripts/setup.sh | /bin/bash
==> Detected OS centos

==> Add yum repo file to /etc/yum.repos.d/gitlab-jh.repo

[gitlab-jh]
name=JiHu GitLab
baseurl=https://packages.gitlab.cn/repository/el/$releasever/
gpgcheck=0
gpgkey=https://packages.gitlab.cn/repository/raw/gpg/public.gpg.key
priority=1
enabled=1

==> Generate yum cache for gitlab-jh

==> Successfully added gitlab-jh repo. To install JiHu GitLab, run "sudo yum/dnf install gitlab-jh".

[root@gitlab ~]# yum install gitlab-jh -y
Thank you for installing JiHu GitLab!
GitLab was unable to detect a valid hostname for your instance.
Please configure a URL for your JiHu GitLab instance by setting `external_url`
configuration in /etc/gitlab/gitlab.rb file.
Then, you can start your JiHu GitLab instance by running the following command:
  sudo gitlab-ctl reconfigure

For a comprehensive list of configuration options please see the Omnibus GitLab readme
https://jihulab.com/gitlab-cn/omnibus-gitlab/-/blob/main-jh/README.md

Help us improve the installation experience, let us know how we did with a 1 minute survey:
https://wj.qq.com/s2/10068464/dc66

[root@gitlab ~]# vim /etc/gitlab/gitlab.rb
external_url 'http://gitlab.example.com'

[root@gitlab ~]# gitlab-ctl reconfigure
Notes:
Default admin account has been configured with following details:
Username: root
Password: You didn't opt-in to print initial root password to STDOUT.
Password stored to /etc/gitlab/initial_root_password. This file will be cleaned up in first reconfigure run after 24 hours.
NOTE: Because these credentials might be present in your log files in plain text, it is highly recommended to reset the password following https://docs.gitlab.com/ee/security/reset_user_password.html#reset-your-root-password.
gitlab Reconfigured!
# 查看密码
[root@gitlab ~]# cat /etc/gitlab/initial_root_password
# WARNING: This value is valid only in the following conditions
#          1. If provided manually (either via `GITLAB_ROOT_PASSWORD` environment variable or via `gitlab_rails['initial_root_password']` setting in `gitlab.rb`, it was provided before database was seeded for the first time (usually, the first reconfigure run).
#          2. Password hasn't been changed manually, either via UI or via command line.
#
#          If the password shown here doesn't work, you must reset the admin password following https://docs.gitlab.com/ee/security/reset_user_password.html#reset-your-root-password.

Password: LfkwPEmMt6KTa94Q2S4LvArCEGoQcPYmSFzYSKOiHdg=


# NOTE: This file will be automatically deleted in the first reconfigure run after 24 hours.

# 可以登录后修改语言为中文
# 用户的profile/preferences

# 修改密码

[root@gitlab ~]# gitlab-rake gitlab:env:info

System information
System:
Proxy:      no
Current User:   git
Using RVM:  no
Ruby Version:   3.0.6p216
Gem Version:    3.4.13
Bundler Version:2.4.13
Rake Version:   13.0.6
Redis Version:  6.2.11
Sidekiq Version:6.5.7
Go Version: unknown

GitLab information
Version:    16.0.4-jh
Revision:   c2ed99db36f
Directory:  /opt/gitlab/embedded/service/gitlab-rails
DB Adapter: PostgreSQL
DB Version: 13.11
URL:        http://myweb.first.com
HTTP Clone URL: http://myweb.first.com/some-group/some-project.git
SSH Clone URL:  git@myweb.first.com:some-group/some-project.git
Elasticsearch:  no
Geo:        no
Using LDAP: no
Using Omniauth: yes
Omniauth Providers:

GitLab Shell
Version:    14.20.0
Repository storages:
- default:  unix:/var/opt/gitlab/gitaly/gitaly.socket
GitLab Shell path:      /opt/gitlab/embedded/service/gitlab-shell
部署安装harbor
# 准备一台2核4G内存的虚拟机
# 配置好阿里云的repo源
[root@harbor ~]# yum install yum-utils -y
[root@harbor ~]# yum-config-manager --add-repo http://mirrors.aliyun.com/docker-ce/linux/centos/docker-ce.repo

# 安装docker
[root@harbor ~]# yum install docker-ce -y

# 启动docker,设置开机启动
[root@harbor ~]# systemctl start docker
[root@harbor ~]# systemctl enable docker.service

# 查看docker和docker compose的版本
[root@harbor ~]# docker version
[root@harbor ~]# docker compose version

# 安装harbor
[root@harbor ~]# wget https://github.com/goharbor/harbor/releases/download/v2.8.3/harbor-offline-installer-v2.8.3.tgz

# 解压
[root@harbor ~]# ls
anaconda-ks.cfg  harbor-offline-installer-v2.8.3.tgz
[root@harbor ~]# tar xf harbor-offline-installer-v2.8.3.tgz

# 修改配置文件
[root@harbor ~]# ls
anaconda-ks.cfg  harbor  harbor-offline-installer-v2.8.3.tgz

[root@harbor ~]# cd harbor
[root@harbor harbor]# ls
common.sh             harbor.yml.tmpl  LICENSE
harbor.v2.8.3.tar.gz  install.sh       prepare

[root@harbor harbor]# vim harbor.yml.tmpl
# The IP address or hostname to access admin UI and registry service.
# DO NOT use localhost or 127.0.0.1, because Harbor needs to be accessed by external clients.
hostname: 192.168.140.159  #修改为主机ip地址

# http related config
http:
  # port for http, default is 80. If https enabled, this port will redirect to https port
  port: 5001  #端口可以修改

#如果开启https功能的话,需要在对应位置添加证书路径(要有证书)
https:
  # https port for harbor, default is 443
  port: 443
  # The path of cert and key files for nginx
  certificate: /root/harbor/nginx.crt
  private_key: /root/harbor/ca.key
# 其余地方不做修改

# 安装harbor
[root@harbor harbor]# mv harbor.yml.tmpl  harbor.yml
[root@harbor harbor]# ./install.sh
[+] Running 9/10
 ⠇ Network harbor_harbor        Created                                                                     2.8s
 ✔ Container harbor-log         Started                                                                     0.5s
 ✔ Container registry           Started                                                                     1.5s
 ✔ Container harbor-db          Started                                                                     1.2s
 ✔ Container harbor-portal      Started                                                                     1.6s
 ✔ Container redis              Started                                                                     1.5s
 ✔ Container registryctl        Started                                                                     1.2s
 ✔ Container harbor-core        Started                                                                     1.9s
 ✔ Container harbor-jobservice  Started                                                                     2.4s
 ✔ Container nginx              Started                                                                     2.5s
✔ ----Harbor has been installed and started successfully.----

[root@harbor harbor]# docker compose ps|grep harbor
WARN[0000] /root/harbor/docker-compose.yml: `version` is obsolete
harbor-core         goharbor/harbor-core:v2.8.3          "/harbor/entrypoint...."   core          2 minutes ago   Up 2 minutes (healthy)
harbor-db           goharbor/harbor-db:v2.8.3            "/docker-entrypoint...."   postgresql    2 minutes ago   Up 2 minutes (healthy)
harbor-jobservice   goharbor/harbor-jobservice:v2.8.3    "/harbor/entrypoint...."   jobservice    2 minutes ago   Up 2 minutes (healthy)
harbor-log          goharbor/harbor-log:v2.8.3           "/bin/sh -c /usr/loc..."   log           2 minutes ago   Up 2 minutes (healthy)   127.0.0.1:1514->10514/tcp
harbor-portal       goharbor/harbor-portal:v2.8.3        "nginx -g 'daemon of..."   portal        2 minutes ago   Up 2 minutes (healthy)
nginx               goharbor/nginx-photon:v2.8.3         "nginx -g 'daemon of..."   proxy         2 minutes ago   Up 2 minutes (healthy)   0.0.0.0:5001->8080/tcp, :::5001->8080/tcp
redis               goharbor/redis-photon:v2.8.3         "redis-server /etc/r..."   redis         2 minutes ago   Up 2 minutes (healthy)
registry            goharbor/registry-photon:v2.8.3      "/home/harbor/entryp..."   registry      2 minutes ago   Up 2 minutes (healthy)
registryctl         goharbor/harbor-registryctl:v2.8.3   "/home/harbor/start...."   registryctl   2 minutes ago   Up 2 minutes (healthy)

# 用浏览器访问,测试效果
http://192.168.140.159:5001/
账号:admin
密码:Harbor12345
新建一个项目:k8s-harbor
新建一个用户:user
密码:Aa12345678
授权k8s-harbor项目允许用户user去访问,授予项目管理员权限

# 实现k8s集群使用harbor仓库
[root@master ~]# vim /etc/docker/daemon.json
{
  "exec-opts": ["native.cgroupdriver=systemd"],
  "registry-mirrors": [
    "https://docker.xuanyuan.me",
    "https://registry.docker-cn.com",
    "http://hub-mirror.c.163.com",
    "https://reg-mirror.qiniu.com",
    "https://docker.mirrors.ustc.edu.cn"
  ],
  "insecure-registries": ["192.168.140.159:5001"],
  "data-root": "/opt/lib/docker"
}
#保存文件后,重启Docker服务
systemctl daemon-reload
systemctl restart docker
测试harbor的镜像上传和拉取
# 在原来安装harbor的宿主机上,重新启动harbor相关的容器
[root@docker harbor]# cd /harbor
[root@docker harbor]# docker compose up -d

# master上登陆harbor仓库
[root@master ~]# docker login 192.168.140.159:5001
Username: user
Password:
WARNING! Your password will be stored unencrypted in /root/.docker/config.json.
Configure a credential helper to remove this warning. See
https://docs.docker.com/engine/reference/commandline/login/#credentials-store

Login Succeeded

# 将master上的nginx镜像上传到仓库里
[root@master ~]# docker tag nginx:latest  192.168.140.159:5001/k8s-harbor/nginx:latest
[root@master ~]# docker images
REPOSITORY                                                        TAG        IMAGE ID       CREATED         SIZE
192.168.121.105:5001/k8s-harbor/nginx                             latest     92b11f67642b   7 weeks ago     187MB

[root@master ~]# docker push 192.168.140.159:5001/k8s-harbor/nginx:latest

# 在nfs服务器上拉取harbor仓库里的nginx镜像
[root@nfs ~]# vim /etc/docker/daemon.json
{
  "exec-opts": ["native.cgroupdriver=systemd"],
  "registry-mirrors": [
    "https://docker.xuanyuan.me",
    "https://registry.docker-cn.com",
    "http://hub-mirror.c.163.com",
    "https://reg-mirror.qiniu.com",
    "https://docker.mirrors.ustc.edu.cn"
  ],
  "insecure-registries": ["192.168.140.159:5001"],
  "data-root": "/opt/lib/docker"
}

# 重启docker
[root@nfs ~]# systemctl daemon-reload
[root@nfs ~]# systemctl restart docker

# 登陆harbor仓库
[root@nfs ~]# docker login 192.168.140.159:5001

#在nfs服务器上从harbor拉取镜像
[root@nfs ~]# docker pull  192.168.140.159:5001/k8s-harbor/nginx:latest

#查看是否拉取成功
[root@nfs ~]# docker images|grep nginx
192.168.140.159:5001/k8s-harbor/nginx   latest    4e1b6bae1e48   2 days ago   192MB
八、使用ingress,给web业务做基于域名的负载均衡
安装ingress controller
[root@master ~]# mkdir /ingress
[root@master ~]# cd /ingress/
[root@master ingress]# ls
ingress-controller-deploy.yaml         kube-webhook-certgen-v1.1.0.tar.gz
ingress-nginx-controllerv1.1.0.tar.gz  nginx-svc-1.yaml
ingress.yaml                           nginx-svc-2.yaml

# 将镜像传到所有的node节点服务器上
[root@master ingress]# scp kube-webhook-certgen-v1.1.0.tar.gz node2:/root
[root@master ingress]# scp kube-webhook-certgen-v1.1.0.tar.gz node1:/root
[root@master ingress]# scp ingress-nginx-controllerv1.1.0.tar.gz node1:/root
[root@master ingress]# scp ingress-nginx-controllerv1.1.0.tar.gz node2:/root

# 在node1和node2上导入镜像
[root@node1 ~]# docker load -i ingress-nginx-controllerv1.1.0.tar.gz
[root@node1 ~]# docker load -i kube-webhook-certgen-v1.1.0.tar.gz
[root@node1 ~]# docker images
REPOSITORY                                                                     TAG        IMAGE ID       CREATED         SIZE
registry.cn-hangzhou.aliyuncs.com/google_containers/nginx-ingress-controller   v1.1.0     ae1a7201ec95   2 years ago     285MB
registry.cn-hangzhou.aliyuncs.com/google_containers/kube-webhook-certgen       v1.1.1     c41e9fcadf5a   2 years ago     47.7MB

# 使用ingress-controller-deploy.yaml文件启动ingress controller
[root@master ingress]# kubectl apply -f ingress-controller-deploy.yaml
namespace/ingress-nginx created
serviceaccount/ingress-nginx created
configmap/ingress-nginx-controller created
clusterrole.rbac.authorization.k8s.io/ingress-nginx created
clusterrolebinding.rbac.authorization.k8s.io/ingress-nginx created
role.rbac.authorization.k8s.io/ingress-nginx created
rolebinding.rbac.authorization.k8s.io/ingress-nginx created
service/ingress-nginx-controller-admission created
service/ingress-nginx-controller created
deployment.apps/ingress-nginx-controller created
ingressclass.networking.k8s.io/nginx created
validatingwebhookconfiguration.admissionregistration.k8s.io/ingress-nginx-admission created
serviceaccount/ingress-nginx-admission created
clusterrole.rbac.authorization.k8s.io/ingress-nginx-admission created
clusterrolebinding.rbac.authorization.k8s.io/ingress-nginx-admission created
role.rbac.authorization.k8s.io/ingress-nginx-admission created
rolebinding.rbac.authorization.k8s.io/ingress-nginx-admission created
job.batch/ingress-nginx-admission-create created
job.batch/ingress-nginx-admission-patch created

# 查看命名空间
[root@master ingress]# kubectl get namespace
NAME              STATUS   AGE
default           Active   44h
devops-tools      Active   5h30m
ingress-nginx     Active   14s
kube-node-lease   Active   44h
kube-public       Active   44h
kube-system       Active   44h

# 查看相关service
[root@master ingress]# kubectl get svc -n ingress-nginx
NAME                                 TYPE        CLUSTER-IP       EXTERNAL-IP   PORT(S)                      AGE
ingress-nginx-controller             NodePort    10.101.156.215   <none>        80:32023/TCP,443:30325/TCP   2m47s
ingress-nginx-controller-admission   ClusterIP   10.105.220.120   <none>        443/TCP                      2m47s


# 查看相关pod
[root@master ingress]# kubectl get pod -n ingress-nginx
NAME                                        READY   STATUS      RESTARTS   AGE
ingress-nginx-admission-create-cpd95        0/1     Completed   0          3m28s
ingress-nginx-admission-patch-jdk4w         0/1     Completed   1          3m28s
ingress-nginx-controller-7cd558c647-2d878   1/1     Running     0          3m28s
ingress-nginx-controller-7cd558c647-ct69k   1/1     Running     0          3m28s
创建pod和暴露pod服务
[root@master ingress]# vim nginx-svc-1.yaml
apiVersion: apps/v1
kind: Deployment
metadata:
  name: nginx-deploy-1
  labels:
    app: nginx-1
spec:
  replicas: 3
  selector:
    matchLabels:
      app: nginx-1
  template:
    metadata:
      labels:
        app: nginx-1
    spec:
      containers:
      - name: nginx-1
        image: nginx
        imagePullPolicy: IfNotPresent
        ports:
        - containerPort: 80
---
apiVersion: v1
kind: Service
metadata:
  name:  nginx-svc-1
  labels:
    app: nginx-svc-1
spec:
  selector:
    app: nginx-1
  ports:
  - name: name-of-service-port
    protocol: TCP
    port: 80
    targetPort: 80

[root@master ingress]# vim nginx-svc-2.yaml
apiVersion: apps/v1
kind: Deployment
metadata:
  name: nginx-deploy-2
  labels:
    app: nginx-2
spec:
  replicas: 3
  selector:
    matchLabels:
      app: nginx-2
  template:
    metadata:
      labels:
        app: nginx-2
    spec:
      containers:
      - name: nginx-2
        image: nginx
        imagePullPolicy: IfNotPresent
        ports:
        - containerPort: 80
---
apiVersion: v1
kind: Service
metadata:
  name:  nginx-svc-2
  labels:
    app: nginx-svc-2
spec:
  selector:
    app: nginx-2
  ports:
  - name: name-of-service-port
    protocol: TCP
    port: 80
    targetPort: 80

[root@master ingress]# kubectl apply -f nginx-svc-1.yaml
deployment.apps/nginx-deploy-1 created
service/nginx-svc-1 created
[root@master ingress]# kubectl apply -f nginx-svc-2.yaml
deployment.apps/nginx-deploy-2 created
service/nginx-svc-2 created
启用ingress关联ingress controller和service
[root@master ingress]# vim ingress-url.yaml
apiVersion: networking.k8s.io/v1
kind: Ingress
metadata:
  name: simple-fanout-example
  annotations:
    kubernets.io/ingress.class: nginx
spec:
  ingressClassName: nginx
  rules:
  - host: www.qqx.com
    http:
      paths:
      - path: /foo
        pathType: Prefix
        backend:
          service:
            name: nginx-svc-1
            port:
              number: 80
      - path: /bar
        pathType: Prefix
        backend:
          service:
            name: nginx-svc-2
            port:
              number: 80

[root@master ingress]# kubectl apply -f ingress-url.yaml
ingress.networking.k8s.io/simple-fanout-example created

[root@master ingress]# kubectl get ingress
NAME                    CLASS   HOSTS         ADDRESS                           PORTS   AGE
simple-fanout-example   nginx   www.qqx.com   192.168.140.131,192.168.140.132   80      44m
在nfs服务器上进行测试,需要在/etc/hosts文件里添加域名解析记录
[root@nfs ~]# vim /etc/hosts
127.0.0.1   localhost localhost.localdomain localhost4 localhost4.localdomain4
::1         localhost localhost.localdomain localhost6 localhost6.localdomain6
192.168.140.131 www.qqx.com
192.168.140.132 www.qqx.com

[root@master ingress]# kubectl get pod
NAME                              READY   STATUS    RESTARTS      AGE
nginx-deploy-1-75d4755db9-chbvh   1/1     Running   0             29m
nginx-deploy-1-75d4755db9-dd5z8   1/1     Running   0             29m
nginx-deploy-1-75d4755db9-k59dg   1/1     Running   0             29m
nginx-deploy-2-5c47798b5f-4n5ct   1/1     Running   0             29m
nginx-deploy-2-5c47798b5f-4pnh6   1/1     Running   0             29m
nginx-deploy-2-5c47798b5f-wzrf6   1/1     Running   0             29m


# 进入service1对应的一个pod里
[root@master ingress]# kubectl exec -it nginx-deploy-1-75d4755db9-dd5z8  -- bash

# 新建/for文件夹以及index.html网页文件
root@nginx-deploy-1-75d4755db9-dd5z8:/# cd /usr/share/nginx/html/
root@nginx-deploy-1-75d4755db9-dd5z8:/usr/share/nginx/html# mkdir /foo
root@nginx-deploy-1-75d4755db9-dd5z8:/usr/share/nginx/html# cd /foo/
root@nginx-deploy-1-75d4755db9-dd5z8:/foo# echo "this is www.qqx.com/foo/" >index.html
root@nginx-deploy-1-75d4755db9-dd5z8:/foo# exit

# 同理,进入service2上的pod并新建/bar文件夹以及index.html网页文件
[root@master ingress]# kubectl exec -it nginx-deploy-2-5c47798b5f-4pnh6   -- bash
root@nginx-deploy-2-5c47798b5f-4pnh6:/# cd /usr/share/nginx/html/
root@nginx-deploy-2-5c47798b5f-4pnh6:/usr/share/nginx/html# mkdir bar
root@nginx-deploy-2-5c47798b5f-4pnh6:/usr/share/nginx/html# cd bar/
root@nginx-deploy-2-5c47798b5f-4pnh6:/usr/share/nginx/html/bar# echo "this is www.qqx.com/bar/" >index.html
root@nginx-deploy-2-5c47798b5f-4pnh6:/usr/share/nginx/html/bar# exit

# 在nfs服务器上
[root@nfs ~]# curl www.qqx.com/foo/index.html
this is www.qqx.com/foo/
[root@nfs ~]# curl www.qqx.com/bar/index.html
this is www.qqx.com/bar/
九、使用探针监控web业务的pod,出现问题马上重启,增强业务可靠性
[root@master /]# mkdir /probe
[root@master /]# cd /probe/

# 为了和第五步的myweb.yaml区分,下面的myweb都加上后缀
[root@master probe]# vim myweb2.yaml
apiVersion: apps/v1
kind: Deployment
metadata:
  labels:
    app: myweb2
  name: myweb2
spec:
  replicas: 3
  selector:
    matchLabels:
      app: myweb2
  template:
    metadata:
      labels:
        app: myweb2
    spec:
      containers:
      - name: myweb2
        image: nginx
        imagePullPolicy: IfNotPresent
        ports:
        - containerPort: 8000
        resources:
          limits:
            cpu: 300m
          requests:
            cpu: 100m
        livenessProbe:
          exec:
            command:
            - ls
            - /tmp
          initialDelaySeconds: 5
          periodSeconds: 5
        readinessProbe:
          exec:
            command:
            - ls
            - /tmp
          initialDelaySeconds: 5
          periodSeconds: 5
        startupProbe:
          httpGet:
            path: /
            port: 8000
          failureThreshold: 30
          periodSeconds: 10
---
apiVersion: v1
kind: Service
metadata:
  labels:
    app: myweb2-svc
  name: myweb2-svc
spec:
  selector:
    app: myweb2
  type: NodePort
  ports:
  - port: 8000
    protocol: TCP
    targetPort: 8000
    nodePort: 30001

[root@master probe]# kubectl apply -f myweb2.yaml
deployment.apps/myweb2 unchanged
service/myweb2-svc created

[root@master probe]# kubectl get pod |grep -i  myweb2
myweb2-7c4dcb8459-7vn8d            1/1     Running     2 (84s ago)   11m
myweb2-7c4dcb8459-jxdpf            1/1     Running     2 (84s ago)   11m
myweb2-7c4dcb8459-zc9n7            1/1     Running     2 (84s ago)   11m

[root@master probe]# kubectl describe pod myweb2-7c4dcb8459-zc9n7
Liveness:     exec [ls /tmp] delay=5s timeout=1s period=5s #success=1 #failure=3
Readiness:    exec [ls /tmp] delay=5s timeout=1s period=5s #success=1 #failure=3
Startup:      http-get http://:8000/ delay=0s timeout=1s period=10s #success=1 #failure=30
十、使用dashboard掌控整个web集群的资源
[root@master ~]# mkdir /dashboard
[root@master ~]# cd /dashboard
[root@master dashboard]# vim recommended.yaml
[root@master dashboard]# cat recommended.yaml
# Copyright 2017 The Kubernetes Authors.
#
# Licensed under the Apache License, Version 2.0 (the "License");
# you may not use this file except in compliance with the License.
# You may obtain a copy of the License at
#
#     http://www.apache.org/licenses/LICENSE-2.0
#
# Unless required by applicable law or agreed to in writing, software
# distributed under the License is distributed on an "AS IS" BASIS,
# WITHOUT WARRANTIES OR CONDITIONS OF ANY KIND, either express or implied.
# See the License for the specific language governing permissions and
# limitations under the License.

apiVersion: v1
kind: Namespace
metadata:
  name: kubernetes-dashboard

---

apiVersion: v1
kind: ServiceAccount
metadata:
  labels:
    k8s-app: kubernetes-dashboard
  name: kubernetes-dashboard
  namespace: kubernetes-dashboard

---

kind: Service
apiVersion: v1
metadata:
  labels:
    k8s-app: kubernetes-dashboard
  name: kubernetes-dashboard
  namespace: kubernetes-dashboard
spec:
  type: NodePort  # 关键修改:将 ClusterIP 改为 NodePort
  ports:
    - port: 443
      targetPort: 8443
      nodePort: 30088  # 手动指定 NodePort 端口(范围 30000-32767)
  selector:
    k8s-app: kubernetes-dashboard

---

apiVersion: v1
kind: Secret
metadata:
  labels:
    k8s-app: kubernetes-dashboard
  name: kubernetes-dashboard-certs
  namespace: kubernetes-dashboard
type: Opaque

---

apiVersion: v1
kind: Secret
metadata:
  labels:
    k8s-app: kubernetes-dashboard
  name: kubernetes-dashboard-csrf
  namespace: kubernetes-dashboard
type: Opaque
data:
  csrf: ""

---

apiVersion: v1
kind: Secret
metadata:
  labels:
    k8s-app: kubernetes-dashboard
  name: kubernetes-dashboard-key-holder
  namespace: kubernetes-dashboard
type: Opaque

---

kind: ConfigMap
apiVersion: v1
metadata:
  labels:
    k8s-app: kubernetes-dashboard
  name: kubernetes-dashboard-settings
  namespace: kubernetes-dashboard

---

kind: Role
apiVersion: rbac.authorization.k8s.io/v1
metadata:
  labels:
    k8s-app: kubernetes-dashboard
  name: kubernetes-dashboard
  namespace: kubernetes-dashboard
rules:
  # Allow Dashboard to get, update and delete Dashboard exclusive secrets.
  - apiGroups: [""]
    resources: ["secrets"]
    resourceNames: ["kubernetes-dashboard-key-holder", "kubernetes-dashboard-certs", "kubernetes-dashboard-csrf"]
    verbs: ["get", "update", "delete"]
    # Allow Dashboard to get and update 'kubernetes-dashboard-settings' config map.
  - apiGroups: [""]
    resources: ["configmaps"]
    resourceNames: ["kubernetes-dashboard-settings"]
    verbs: ["get", "update"]
    # Allow Dashboard to get metrics.
  - apiGroups: [""]
    resources: ["services"]
    resourceNames: ["heapster", "dashboard-metrics-scraper"]
    verbs: ["proxy"]
  - apiGroups: [""]
    resources: ["services/proxy"]
    resourceNames: ["heapster", "http:heapster:", "https:heapster:", "dashboard-metrics-scraper", "http:dashboard-metrics-scraper"]
    verbs: ["get"]

---

kind: ClusterRole
apiVersion: rbac.authorization.k8s.io/v1
metadata:
  labels:
    k8s-app: kubernetes-dashboard
  name: kubernetes-dashboard
rules:
  # Allow Metrics Scraper to get metrics from the Metrics server
  - apiGroups: ["metrics.k8s.io"]
    resources: ["pods", "nodes"]
    verbs: ["get", "list", "watch"]

---

apiVersion: rbac.authorization.k8s.io/v1
kind: RoleBinding
metadata:
  labels:
    k8s-app: kubernetes-dashboard
  name: kubernetes-dashboard
  namespace: kubernetes-dashboard
roleRef:
  apiGroup: rbac.authorization.k8s.io
  kind: Role
  name: kubernetes-dashboard
subjects:
  - kind: ServiceAccount
    name: kubernetes-dashboard
    namespace: kubernetes-dashboard

---

apiVersion: rbac.authorization.k8s.io/v1
kind: ClusterRoleBinding
metadata:
  name: kubernetes-dashboard
roleRef:
  apiGroup: rbac.authorization.k8s.io
  kind: ClusterRole
  name: kubernetes-dashboard
subjects:
  - kind: ServiceAccount
    name: kubernetes-dashboard
    namespace: kubernetes-dashboard

---

kind: Deployment
apiVersion: apps/v1
metadata:
  labels:
    k8s-app: kubernetes-dashboard
  name: kubernetes-dashboard
  namespace: kubernetes-dashboard
spec:
  replicas: 1
  revisionHistoryLimit: 10
  selector:
    matchLabels:
      k8s-app: kubernetes-dashboard
  template:
    metadata:
      labels:
        k8s-app: kubernetes-dashboard
    spec:
      securityContext:
        seccompProfile:
          type: RuntimeDefault
      containers:
        - name: kubernetes-dashboard
          image: kubernetesui/dashboard:v2.7.0
          imagePullPolicy: Always
          ports:
            - containerPort: 8443
              protocol: TCP
          args:
            - --auto-generate-certificates
            - --namespace=kubernetes-dashboard
            # Uncomment the following line to manually specify Kubernetes API server Host
            # If not specified, Dashboard will attempt to auto discover the API server and connect
            # to it. Uncomment only if the default does not work.
            # - --apiserver-host=http://my-address:port
          volumeMounts:
            - name: kubernetes-dashboard-certs
              mountPath: /certs
              # Create on-disk volume to store exec logs
            - mountPath: /tmp
              name: tmp-volume
          livenessProbe:
            httpGet:
              scheme: HTTPS
              path: /
              port: 8443
            initialDelaySeconds: 30
            timeoutSeconds: 30
          securityContext:
            allowPrivilegeEscalation: false
            readOnlyRootFilesystem: true
            runAsUser: 1001
            runAsGroup: 2001
      volumes:
        - name: kubernetes-dashboard-certs
          secret:
            secretName: kubernetes-dashboard-certs
        - name: tmp-volume
          emptyDir: {}
      serviceAccountName: kubernetes-dashboard
      nodeSelector:
        "kubernetes.io/os": linux
      # Comment the following tolerations if Dashboard must not be deployed on master
      tolerations:
        - key: node-role.kubernetes.io/master
          effect: NoSchedule

---

kind: Service
apiVersion: v1
metadata:
  labels:
    k8s-app: dashboard-metrics-scraper
  name: dashboard-metrics-scraper
  namespace: kubernetes-dashboard
spec:
  ports:
    - port: 8000
      targetPort: 8000
  selector:
    k8s-app: dashboard-metrics-scraper

---

kind: Deployment
apiVersion: apps/v1
metadata:
  labels:
    k8s-app: dashboard-metrics-scraper
  name: dashboard-metrics-scraper
  namespace: kubernetes-dashboard
spec:
  replicas: 1
  revisionHistoryLimit: 10
  selector:
    matchLabels:
      k8s-app: dashboard-metrics-scraper
  template:
    metadata:
      labels:
        k8s-app: dashboard-metrics-scraper
    spec:
      securityContext:
        seccompProfile:
          type: RuntimeDefault
      containers:
        - name: dashboard-metrics-scraper
          image: kubernetesui/metrics-scraper:v1.0.8
          ports:
            - containerPort: 8000
              protocol: TCP
          livenessProbe:
            httpGet:
              scheme: HTTP
              path: /
              port: 8000
            initialDelaySeconds: 30
            timeoutSeconds: 30
          volumeMounts:
          - mountPath: /tmp
            name: tmp-volume
          securityContext:
            allowPrivilegeEscalation: false
            readOnlyRootFilesystem: true
            runAsUser: 1001
            runAsGroup: 2001
      volumes:
        - name: tmp-volume
          emptyDir: {}
      serviceAccountName: kubernetes-dashboard
      nodeSelector:
        "kubernetes.io/os": linux
      # Comment the following tolerations if Dashboard must not be deployed on master
      tolerations:
        - key: node-role.kubernetes.io/master


[root@master dashboard]# kubectl apply -f recommended.yaml
namespace/kubernetes-dashboard created
serviceaccount/kubernetes-dashboard created
service/kubernetes-dashboard created
secret/kubernetes-dashboard-certs created
secret/kubernetes-dashboard-csrf created
secret/kubernetes-dashboard-key-holder created
configmap/kubernetes-dashboard-settings created
role.rbac.authorization.k8s.io/kubernetes-dashboard created
clusterrole.rbac.authorization.k8s.io/kubernetes-dashboard unchanged
rolebinding.rbac.authorization.k8s.io/kubernetes-dashboard created
clusterrolebinding.rbac.authorization.k8s.io/kubernetes-dashboard unchanged
deployment.apps/kubernetes-dashboard created
service/dashboard-metrics-scraper created
deployment.apps/dashboard-metrics-scraper created

# 查看命名空间
[root@master dashboard]# kubectl get ns
NAME                   STATUS   AGE
cpu-example            Active   14d
default                Active   16d
devops-tools           Active   10h
ingress-nginx          Active   100m
kube-node-lease        Active   16d
kube-public            Active   16d
kube-system            Active   16d
kubernetes-dashboard   Active   24s
mem-example            Active   14d

# 查看pod是否启动
[root@master dashboard]# kubectl get pods -n kubernetes-dashboard
NAME                                         READY   STATUS    RESTARTS   AGE
dashboard-metrics-scraper-768cb4b7c4-6cglm   1/1     Running   0          69s
kubernetes-dashboard-758765f476-6nkh8        1/1     Running   0          69s

# 查看服务是否启动
[root@master dashboard]# kubectl get svc -n kubernetes-dashboard
NAME                        TYPE        CLUSTER-IP      EXTERNAL-IP   PORT(S)    AGE
dashboard-metrics-scraper   ClusterIP   10.110.66.224   <none>        8000/TCP   85s
kubernetes-dashboard        ClusterIP   10.96.203.199   <none>        443/TCP    86s

在浏览器里访问 https://192.168.140.130:30088/

# 获取token
[root@master dashboard]# kubectl get secret -n kubernetes-dashboard|grep dashboard-token
kubernetes-dashboard-token-7hkhr   kubernetes.io/service-account-token   3      2m50s
[root@master dashboard]# kubectl describe secret -n kubernetes-dashboard kubernetes-dashboard-token-7hkhr
Name:         kubernetes-dashboard-token-7hkhr
Namespace:    kubernetes-dashboard
Labels:       <none>
Annotations:  kubernetes.io/service-account.name: kubernetes-dashboard
              kubernetes.io/service-account.uid: e16ebfee-3fdc-4413-86da-e8977521a6b5

Type:  kubernetes.io/service-account-token

Data
====
ca.crt:     1099 bytes
namespace:  20 bytes
token:      eyJhbGciOiJSUzI1NiIsImtpZCI6Im0wMzRMeEU1RU9UY1F1ZW9EOTJTRVRlaVZ6UUNTV0FwbmRNM0NBRVJVQVUifQ.eyJpc3MiOiJrdWJlcm5ldGVzL3NlcnZpY2VhY2NvdW50Iiwia3ViZXJuZXRlcy5pby9zZXJ2aWNlYWNjb3VudC9uYW1lc3BhY2UiOiJrdWJlcm5ldGVzLWRhc2hib2FyZCIsImt1YmVybmV0ZXMuaW8vc2VydmljZWFjY291bnQvc2VjcmV0Lm5hbWUiOiJrdWJlcm5ldGVzLWRhc2hib2FyZC10b2tlbi03aGtociIsImt1YmVybmV0ZXMuaW8vc2VydmljZWFjY291bnQvc2VydmljZS1hY2NvdW50Lm5hbWUiOiJrdWJlcm5ldGVzLWRhc2hib2FyZCIsImt1YmVybmV0ZXMuaW8vc2VydmljZWFjY291bnQvc2VydmljZS1hY2NvdW50LnVpZCI6ImUxNmViZmVlLTNmZGMtNDQxMy04NmRhLWU4OTc3NTIxYTZiNSIsInN1YiI6InN5c3RlbTpzZXJ2aWNlYWNjb3VudDprdWJlcm5ldGVzLWRhc2hib2FyZDprdWJlcm5ldGVzLWRhc2hib2FyZCJ9.ALySk8mxSW6AaThZMWjs3QdEhYKhjzo1XjKVTVVRqWf2T4RhgWdDz1E70bZbmMf2d9c_O8fqxWHO8aw4M6ynw5qIypdjVDAnAOeqlEeE_8hyMxXSLwN4Pj_QhjNbi_QO7jwMGGraaUPnoihkKiW6yOBDAYS0a7WILIh7I8viKfReaQmDUNmgdiqP6QBlR4H2j-K4Z6oAyW-FqjnpFzCMRBBzmZ117tqGcJZLd0An2hRNGpb7YDEC9Oo1TQvxrT8TE3njJSrOjMgXX4rLzVsu2JB0XZ-qMlG5aUjMadm-A4_7xiS_BpFZb8IKXX7RC6G39iQifE8IuRXF1GMT4C_c7A
[root@master dashboard]# 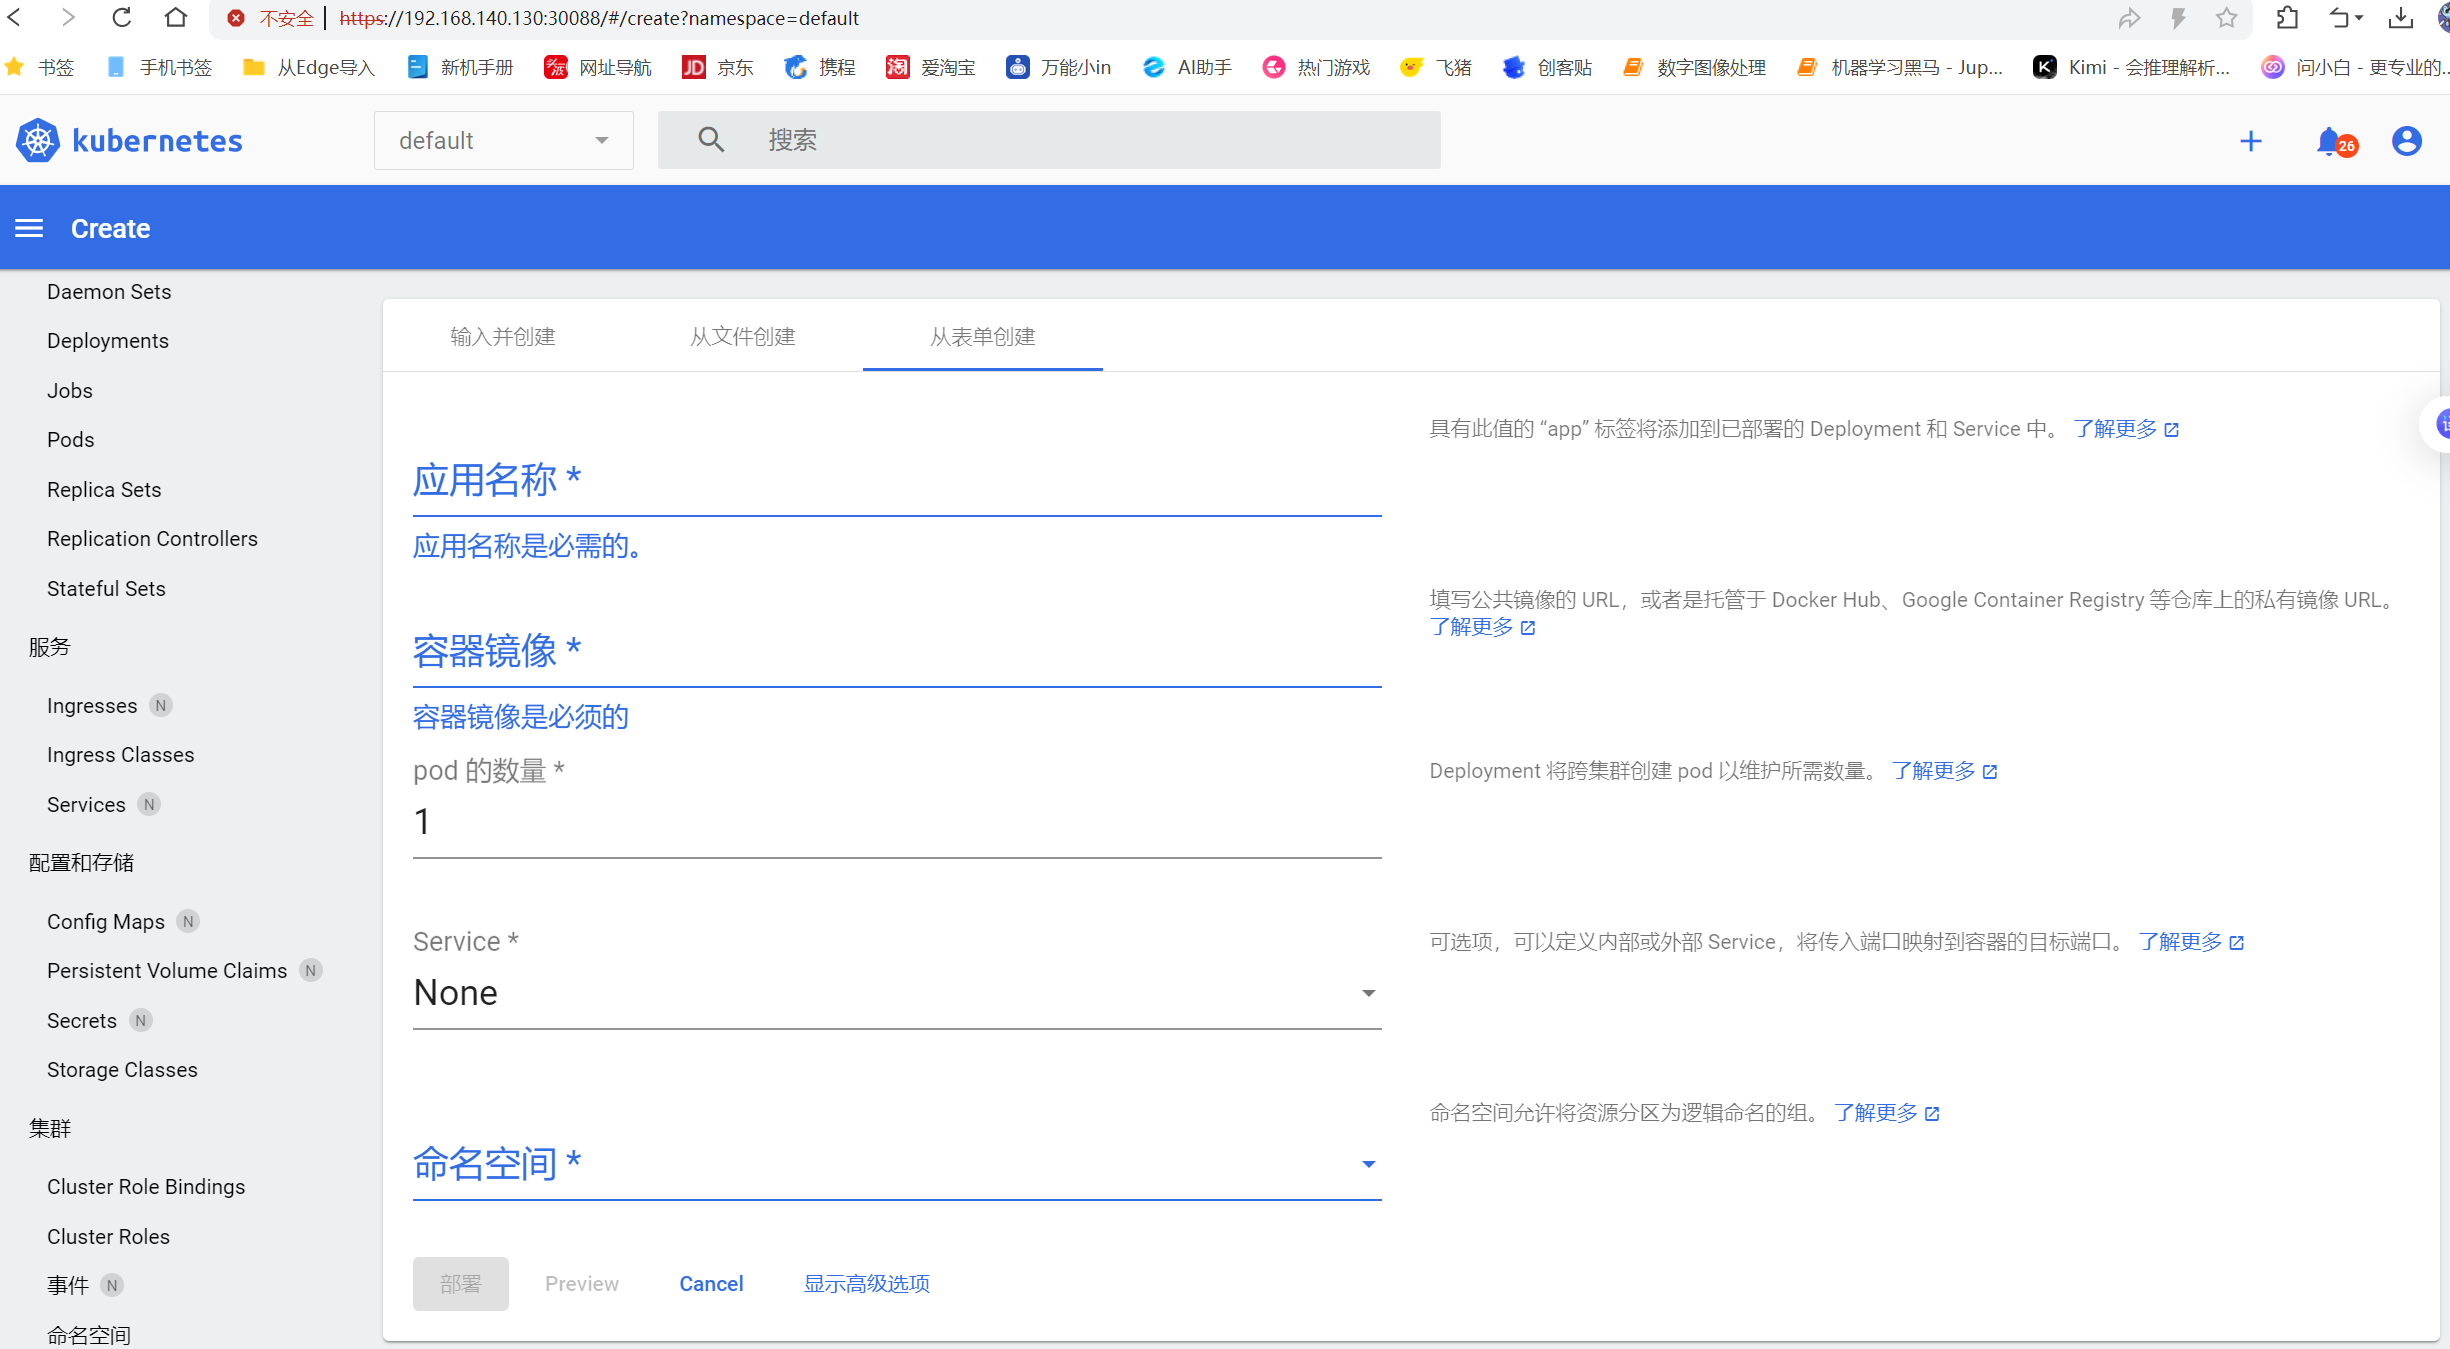
十一、安装部署Prometheus+grafana
安装Prometheus
[root@prometheus ~]# mkdir /prom
[root@prometheus ~]# cd /prom

# 获取Prometheus安装包
[root@master prom]# wget https://github.com/prometheus/prometheus/releases/download/v2.43.0/prometheus-2.43.0.linux-amd64.tar.gz
[root@prometheus /prom]# ls
prometheus-2.43.0.linux-amd64.tar.gz

# 解压文件
[root@prometheus prom]# tar xf prometheus-2.43.0.linux-amd64.tar.gz
[root@prometheus prom]# ls
prometheus-2.43.0.linux-amd64  prometheus-2.43.0.linux-amd64.tar.gz

[root@prometheus prom]# mv prometheus-2.43.0.linux-amd64 prometheus
[root@prometheus prom]# cd prometheus
[root@master prometheus]# ls
console_libraries  consoles  LICENSE  NOTICE  prometheus  prometheus.yml  promtool
# 修改PATH变量
[root@prometheus prometheus]# PATH=/prom/prometheus:$PATH
[root@prometheus prometheus]# vim /etc/profile
PATH=/prom/prometheus:$PATH # 加在最后
# 在后台运行
[root@prometheus prometheus]# nohup prometheus --config.file=/prom/prometheus/prometheus.yml  &

# 查看Prometheus进程
[root@prometheus prometheus]# ps aux|grep prom
root       8197  1.4  2.1 798956 40900 pts/0    Sl   14:56   0:00 prometheus --config.file=/prom/prometheus/prometheus.yml
root       8204  0.0  0.0 112824   972 pts/0    S+   14:56   0:00 grep --color=auto prom

# 查看Prometheus端口
[root@prometheus prometheus]# netstat -anplut | grep prom
tcp6       0      0 :::9090                 :::*                    LISTEN      8197/prometheus
tcp6       0      0 ::1:9090                ::1:41618               ESTABLISHED 8197/prometheus
tcp6       0      0 ::1:41618               ::1:9090                ESTABLISHED 8197/prometheus

# 关闭防火墙
[root@prometheus prometheus]# service firewalld stop
Redirecting to /bin/systemctl stop firewalld.service
[root@prometheus prometheus]# systemctl disable firewalld
Removed symlink /etc/systemd/system/multi-user.target.wants/firewalld.service.
Removed symlink /etc/systemd/system/dbus-org.fedoraproject.FirewallD1.service.

# 配置关于Prometheus服务的参数
[root@prometheus prometheus]# vim /usr/lib/systemd/system/prometheus.service
[Unit]
Description=Prometheus Monitoring System
Documentation=https://prometheus.io/docs/introduction/overview/

[Service]
User=prometheus
Group=prometheus
ExecStart=/prom/prometheus/prometheus \
    --config.file=/prom/prometheus/prometheus.yml \
    --storage.tsdb.path=/prom/prometheus/data \
    --web.listen-address=0.0.0.0:9090
ExecReload=/bin/kill -HUP $MAINPID
KillMode=process
Restart=on-failure
RestartSec=30s

[Install]
WantedBy=multi-user.target

# 关闭selinux
[root@prometheus prometheus]# setenforce 0
[root@prometheus prometheus]# sed -i '/^SELINUX=/ s/enforcing/disabled/'  /etc/selinux/config

#创建专用用户并设置权限
# 创建用户(若不存在)
id prometheus || sudo useradd --no-create-home --shell /bin/false prometheus
# 重置权限
sudo mkdir -p /prom/prometheus/data
sudo chown -R prometheus:prometheus /prom/prometheus
sudo chmod -R 775 /prom/prometheus

# 重新加载systemd的配置文件
[root@prometheus prometheus]# systemctl daemon-reload

#彻底清理旧进程
[root@prometheus prometheus]# ps aux|grep prom
root       8734  0.0  2.6 930284 48580 pts/0    Sl   17:55   0:00 prometheus --config.file=/prom/prometheus/prometheus.yml
[root@prometheus prometheus]# kill -9 8734
[root@prometheus prometheus]# service prometheus restart
# 用浏览器访问 IP:9090
在要被监听的机器上安装exporter
# 在被监听的机器上操作,这里我们选择master
[root@master ~]# tar xf node_exporter-1.4.0-rc.0.linux-amd64.tar.gz
[root@master ~]# mv node_exporter-1.4.0-rc.0.linux-amd64 /node_exporter
[root@master ~]# cd /node_exporter/
[root@master node_exporter]# ls
LICENSE node_exporter NOTICE
# 修改环境变量
[root@master node_exporter]# PATH=/node_exporter/:$PATH
[root@master node_exporter]# vim /root/.bashrc
PATH=/node_exporter/:$PATH
# 在后台执行
[root@master node_exporter]# nohup node_exporter --web.listen-address 0.0.0.0:8090 &
[1] 4844
[root@master node_exporter]# nohup: 忽略输入并把输出追加到"nohup.out"
# 检查进程
[root@master node_exporter]# ps aux |grep node_exporter
root 84412 0.0 0.3 716544 13104 pts/0 Sl 15:51 0:00 node_exporter --web.listen-address 0.0.0.0:8090
root 84846 0.0 0.0 112824 980 pts/0 S+ 15:52 0:00 grep --color=auto node_exporter
# 关闭防火墙
[root@prometheus /]# service firewalld stop
Redirecting to /bin/systemctl stop firewalld.service
[root@prometheus /]# systemctl disable firewalld
#关闭selinux:
setenforce 0
sed -i '/^SELINUX=/ s/enforcing/disabled/' /etc/selinux/config
浏览器访问:ip+8090
# 设置node_exporter开机启动
[root@prometheus /]# vim /etc/rc.local
nohup /node_exporter/node_exporter --web.listen-address 0.0.0.0:8090 &
[root@prometheus node_exporter]# chmod +x /etc/rc.d/rc.local
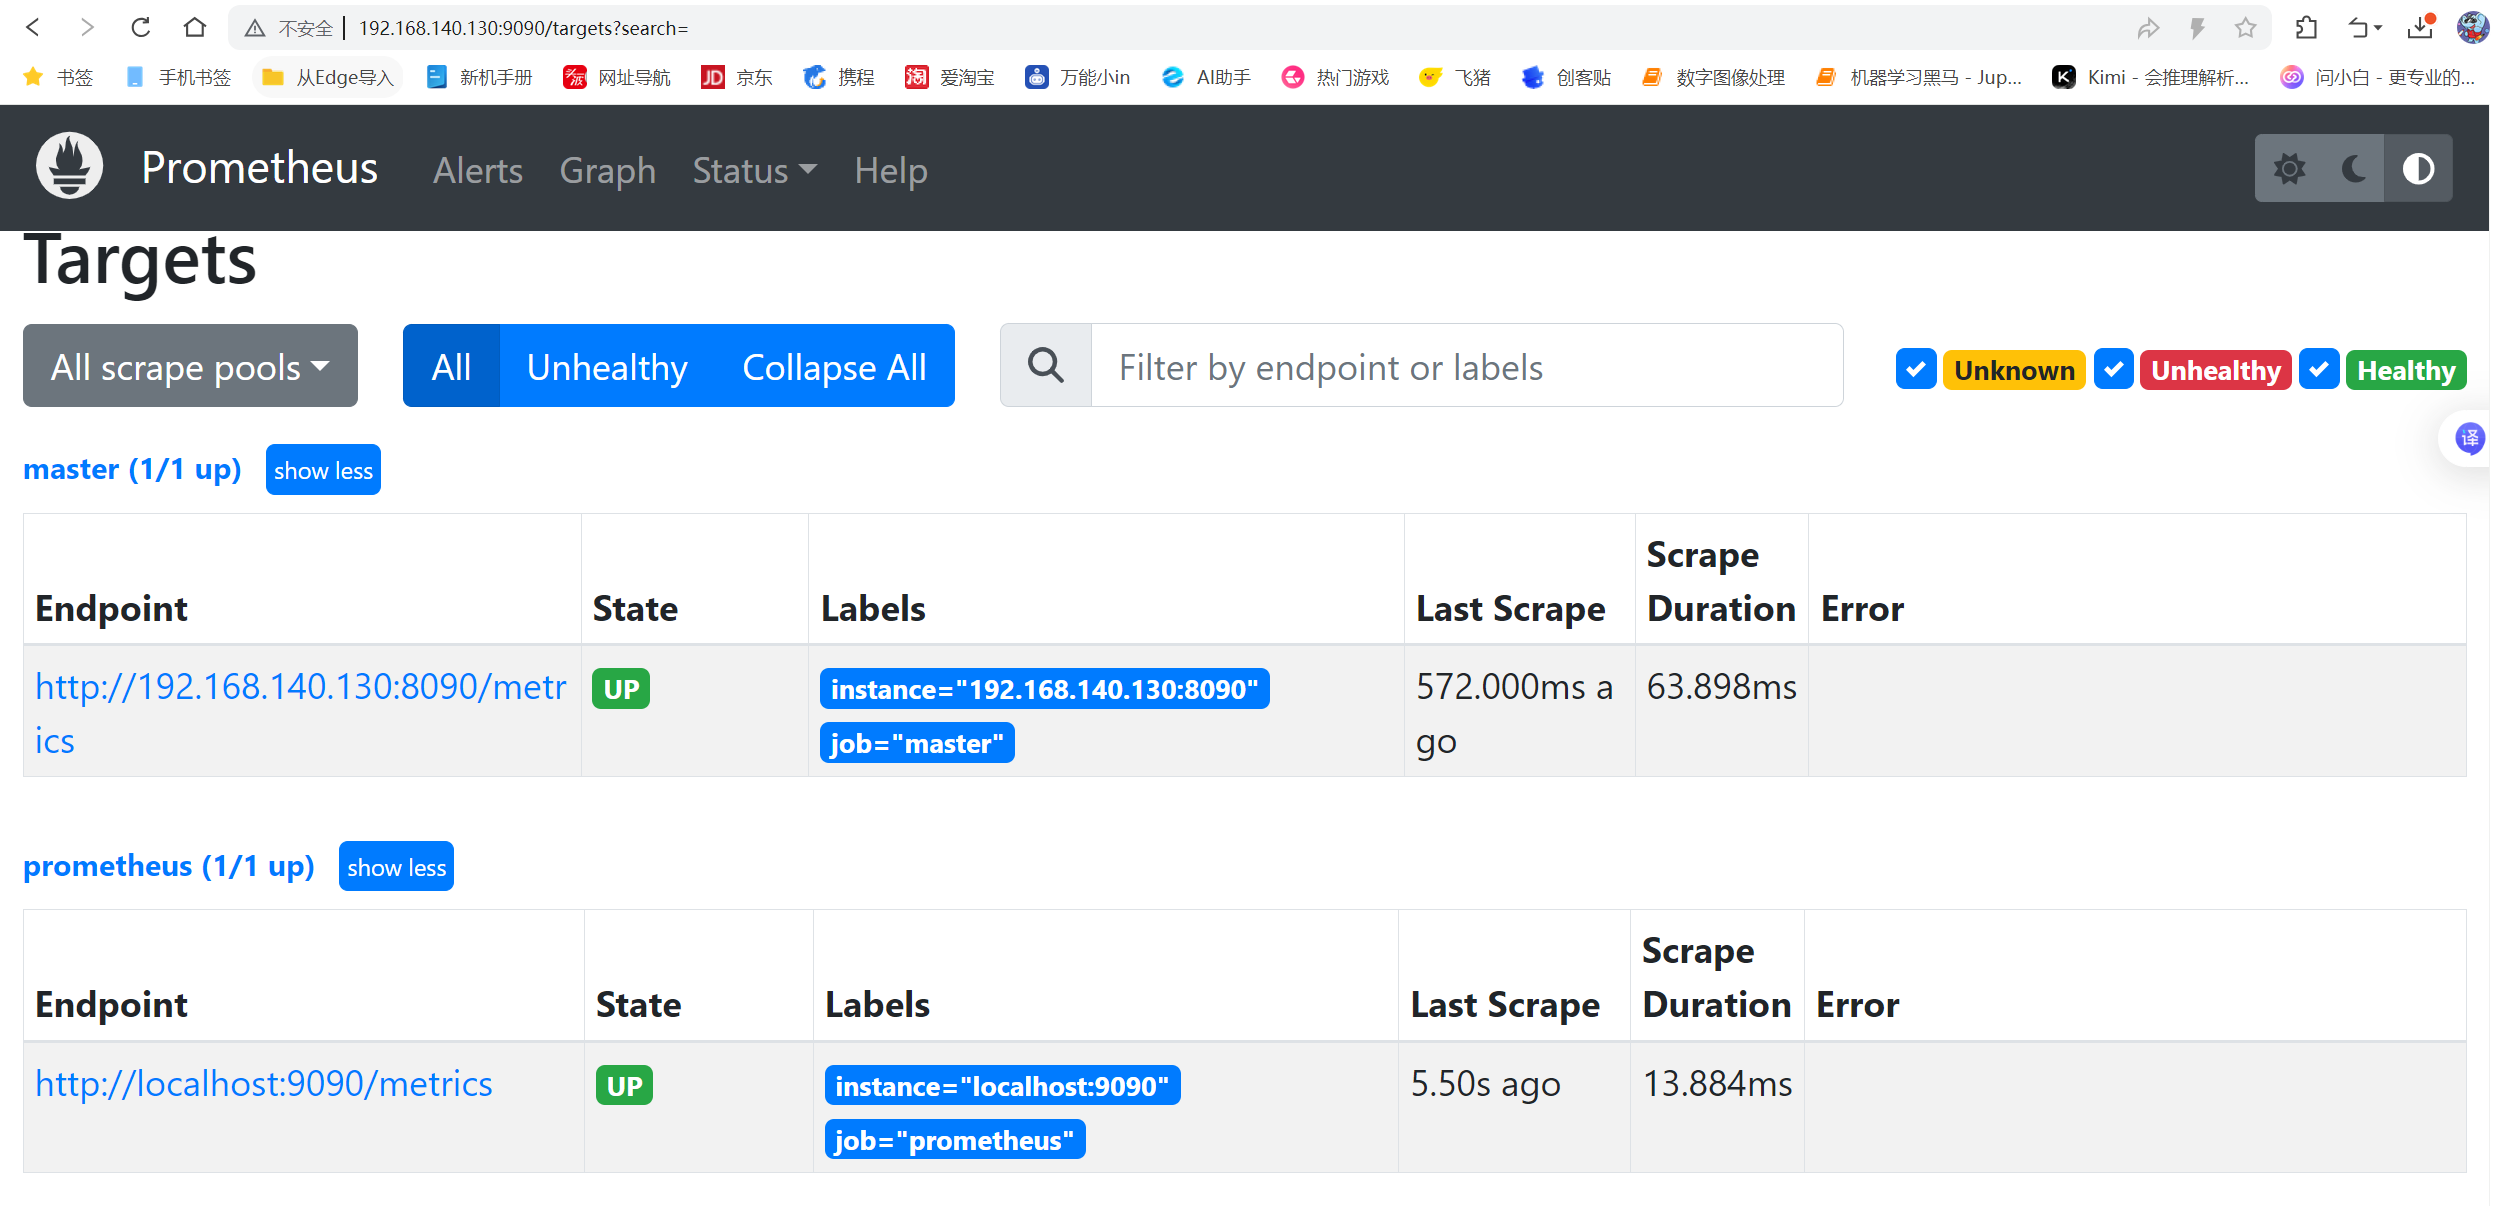
在Prometheus机器的/prom/prometheus/prometheus.yml 里添加机器
- job_name: "prometheus"
static_configs:
- targets: ["localhost:9090"]
- job_name: "master"
static_configs:
- targets: ["192.168.140.130:8090"]
# 刷新Prometheus服务
[root@prometheus prometheus]# service prometheus restart
Redirecting to /bin/systemctl restart prometheus.service
#访问 Prometheus --》IP:9090 然后在"Status" -> "Targets"中查看 Node Exporter 是否被列为"UP"状态
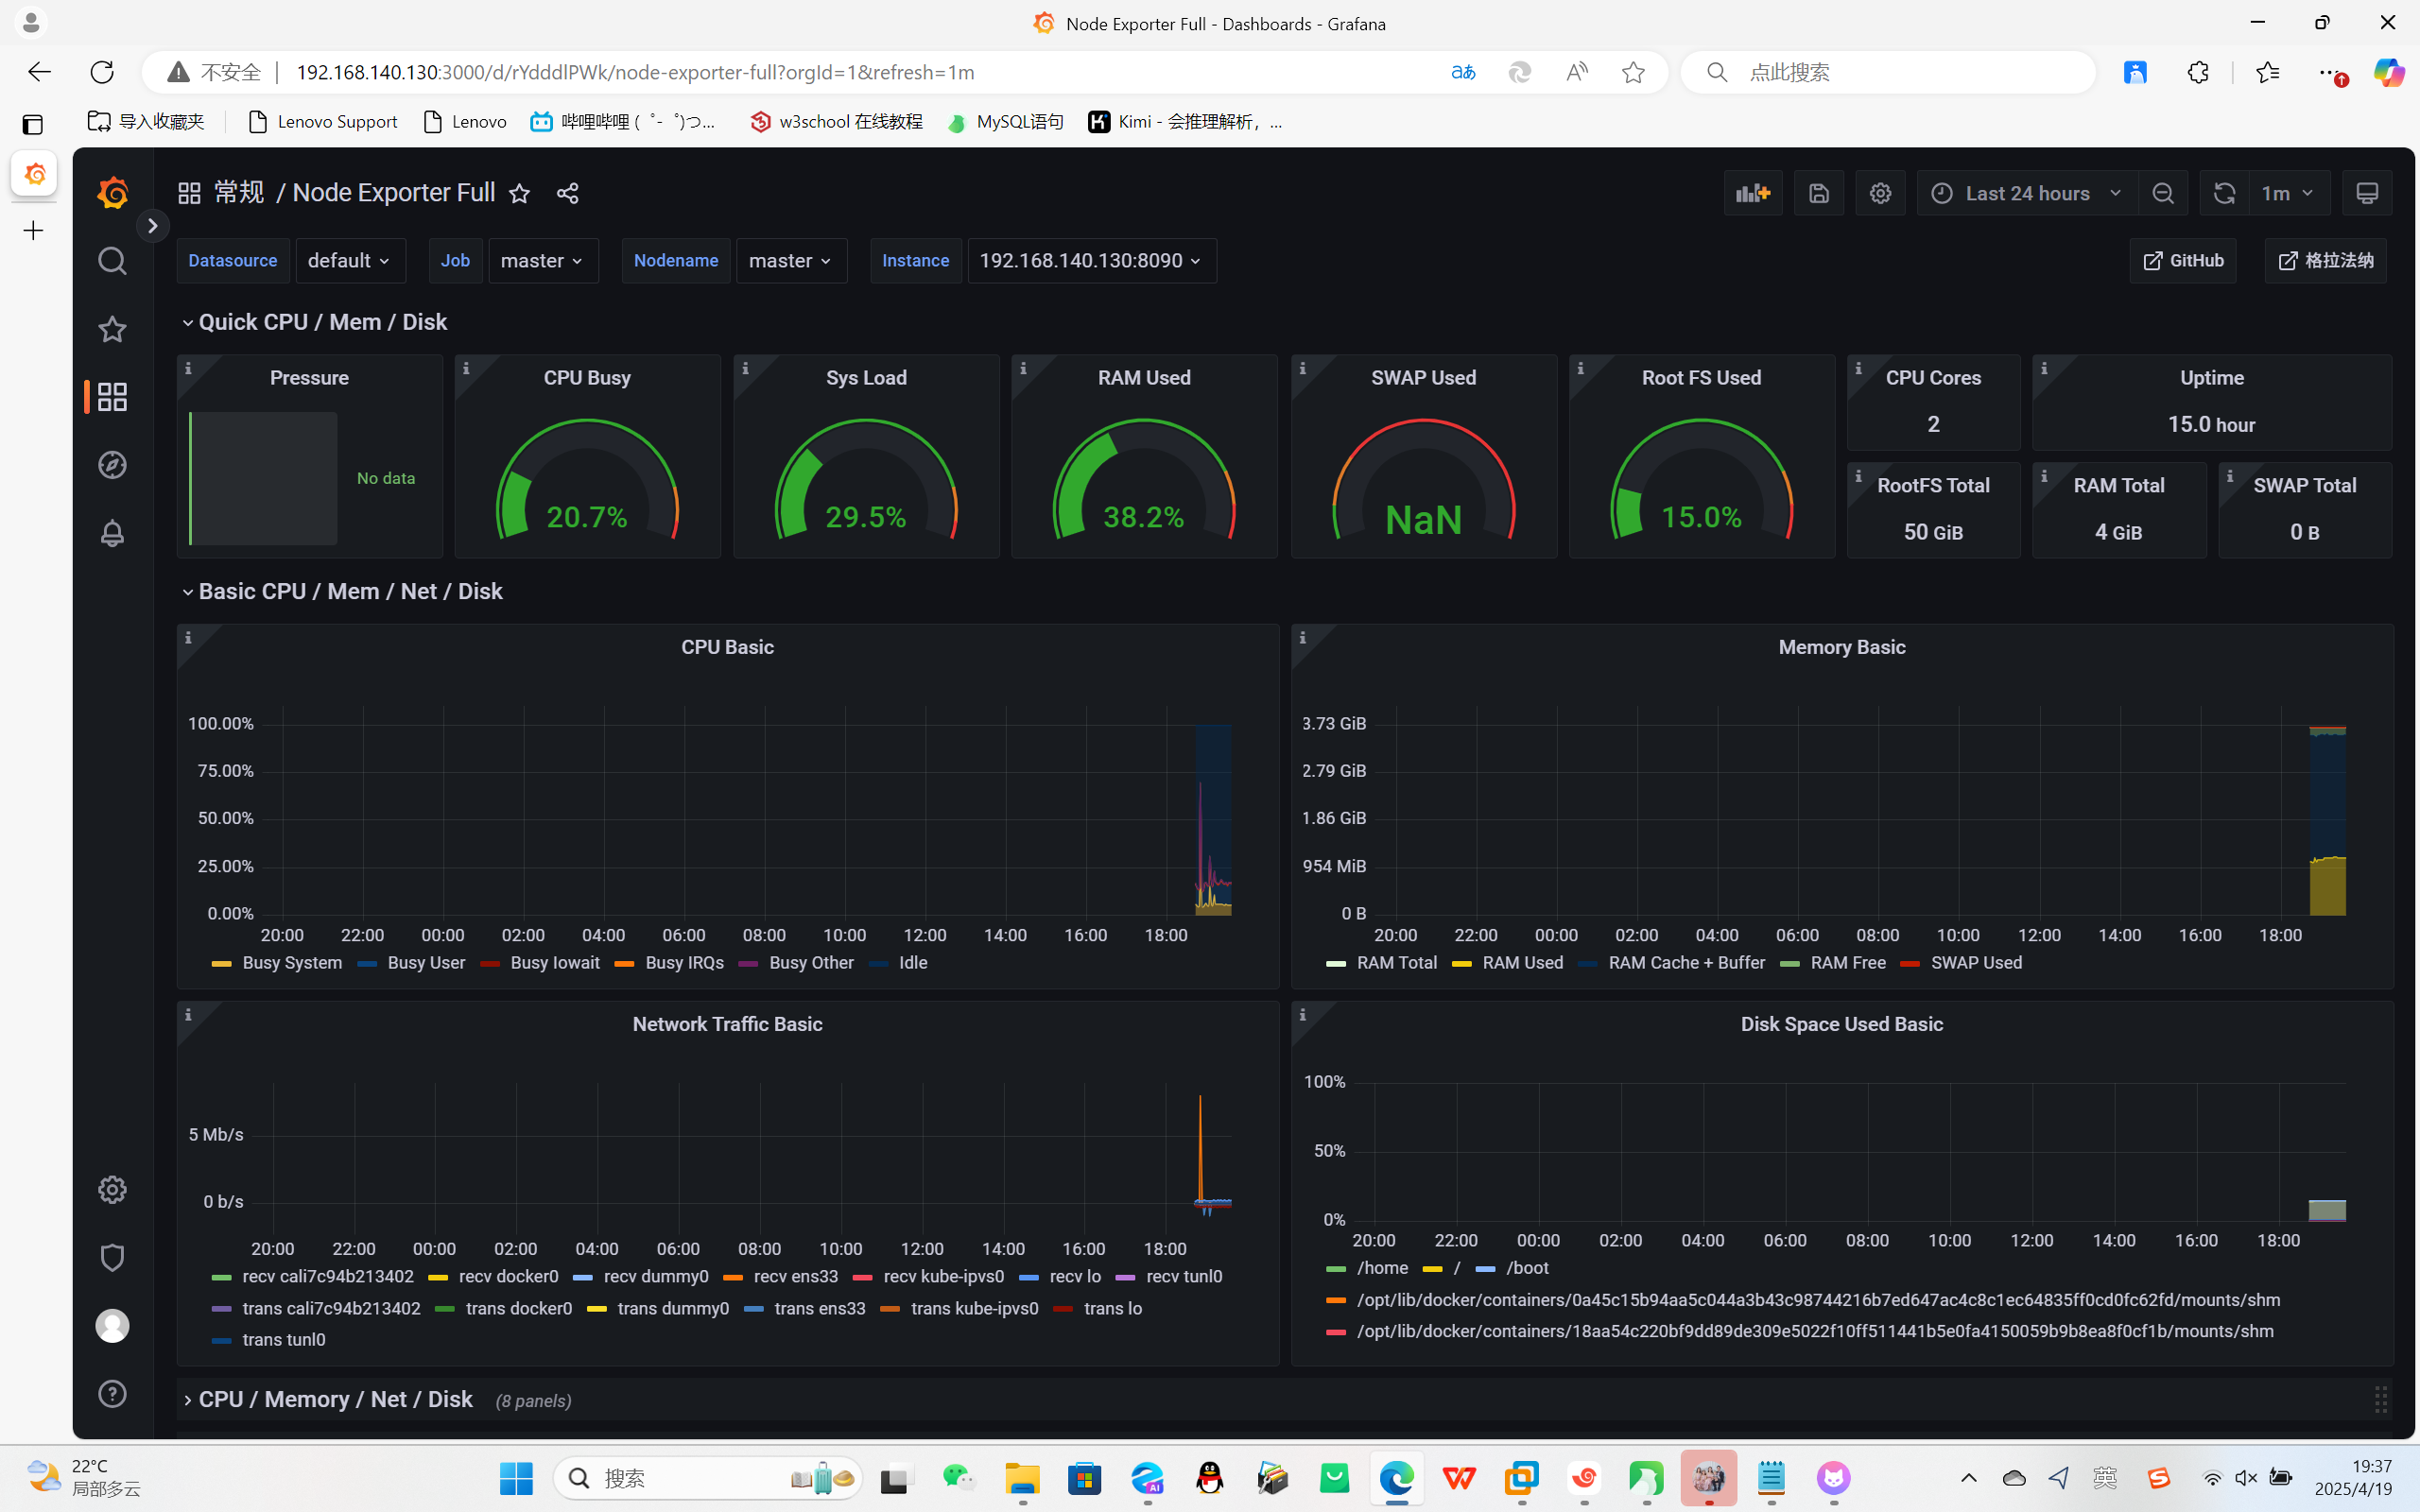
安装部署Grafana
[root@prometheus ~]# ls
anaconda-ks.cfg  grafana-enterprise-9.1.2-1.x86_64.rpm  node_exporter-1.4.0-rc.0.linux-amd64.tar.gz

[root@prometheus ~]# yum install grafana-enterprise-9.1.2-1.x86_64.rpm  -y
启动
[root@prometheus ~]# service grafana-server start
Starting grafana-server (via systemctl):                   [  确定  ]

[root@prometheus ~]# ps aux|grep grafana
grafana    8230  6.6  3.8 1195912 71472 ?       Ssl  16:48   0:00 /usr/sbin/grafana-server --config=/etc/grafana/grafana.ini --pidfile=/var/run/grafana/grafana-server.pid --packaging=rpm cfg:default.paths.logs=/var/log/grafana cfg:default.paths.data=/var/lib/grafana cfg:default.paths.plugins=/var/lib/grafana/plugins cfg:default.paths.provisioning=/etc/grafana/provisioning
root       8238  0.0  0.0 112824   976 pts/0    R+   16:49   0:00 grep --color=auto grafana

[root@prometheus ~]# netstat -anplut|grep grafana
tcp        0      0 192.168.121.108:44674   34.120.177.193:443      ESTABLISHED 8230/grafana-server
tcp6       0      0 :::3000                 :::*                    LISTEN      8230/grafana-server

# 浏览器访问 ip:3000
默认用户名:admin
默认密码:admin

Configuration --> Add data source -> 选择Prometheus
填 http://192.168.140.130:9090
dashboard -> import -> 添加模板 1860 -> 选择Prometheus数据源