前言
行业的凛冬已至,现在越来越多的前端岗位要求全干,其中小程序开发是其中必不可少的一环。尽管 uni-app 仍存在一些不足和问题,但它的一个显著优势在于能够解决大部分的兼容性问题,从而大幅提升了开发效率。
2024/02/19我写了篇 微信小程序《入门级教程》,其中文章开头提到uni-app在招聘市场上已鲜少提及,但在2025年招聘岗位上,uni-app的身影又活跃起来(🤣🤣🤣)。
目前使用uni-app的一个很大的问题,就是周边生态跟不上,很多第三方库都不维护了(毕竟谁都不能一直用爱发电),我也看到了一些库通过看广告和打赏的方式勉强维持着更新。
本篇文章为了实用性,不会过多介绍第三方库的使用,尽量只介绍官方的。
一、快速上手
下载开发工具HBuilderX:www.dcloud.io/hbuilderx.h...
1.创建uni-app
点击工具栏里的文件 -> 新建 -> 项目
- 输入工程名;2. 选择项目目录文件;3. 选择uni-ui模板;4. 选择vue的版本,点击创建
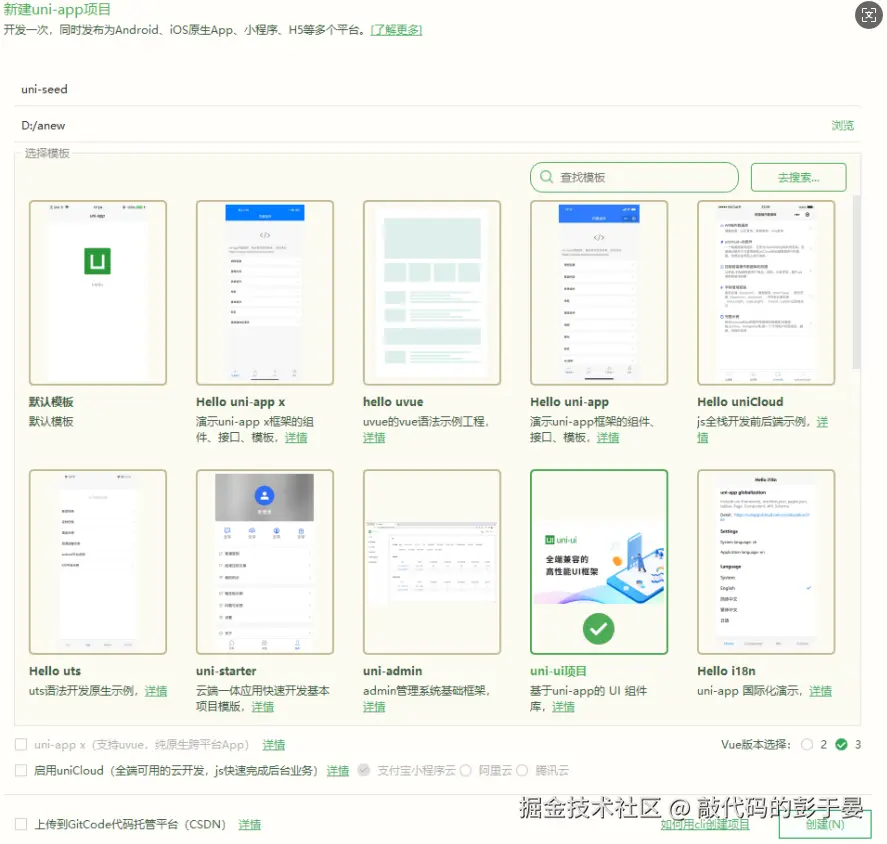
提示:在代码区输入字母u,即可通过代码助手列出所有可用组件。光标置于组件名称处按F1,即可查看组件文档
2. 运行uni-app
(1)浏览器运行
点击工具栏的运行 -> 运行到浏览器 -> 选择浏览器
(2)真机运行
步骤一:开启USB调试
Android版:在设置,系统,关于手机中找到版本号,连续点击五次,会进入开发者模式,然后回退一下,有个开发者选项,然后开启USB调试,(华为手机要关闭掉监控ADB安装应用选项:)
步骤二:进行授权
使用USB将手机插入电脑。如果设备出现调试授权提示,请授权你的电脑可以访问该设备。
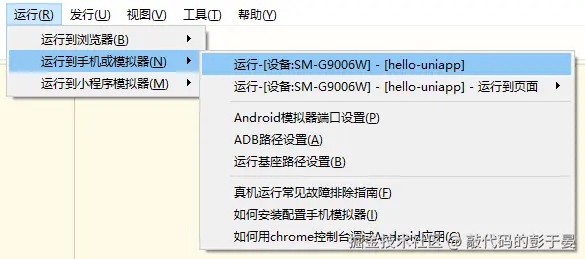
步骤三:运行程序
点击工具栏的运行 -> 真机运行 -> 选择运行的设备
(3)微信开发者工具里运行
下载微信开发者工具:developers.weixin.qq.com/miniprogram...
在微信开发者工具中,选择设置 -> 安全设置 -> 开启服务端口
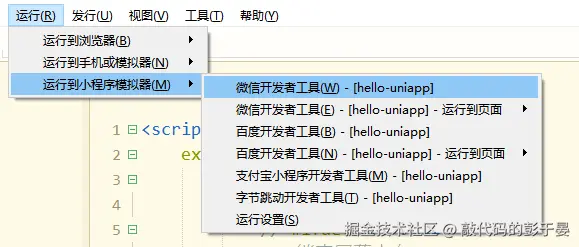
提示:如果是第一次使用,还需配置微信开发者工具的安装目录。在运行到小程序模拟器 > 运行设置中中配置

点击工具栏的运行 -> 运行到小程序模拟器 -> 微信开发者工具
3. 安装常用插件
插件市场:ext.dcloud.net.cn/?cat1=1&cat...
二、VSCode改造
如果使用VSCode开发习惯了,使用HBuilderX开发可能不太顺手。可使用HBuilderX运行程序,使用VSCode修改程序代码。使用VSCode开发uni-app,需做一些额外配置。
1. TypeScript
使TypeScript能够使用识别 uni 相关API;并且配置路径映射,配合别名使用
- 安装
js
yarn add @types/node -D
yarn add @dcloudio/types -D- 新建tsconfig.json
js
{
  "compilerOptions": {
    "target": "esnext",
    "module": "esnext",
    "strict": true,
    "jsx": "preserve",
    "moduleResolution": "node",
    "esModuleInterop": true,
    "sourceMap": true,
    "skipLibCheck": true,
    "importHelpers": true,
    "allowSyntheticDefaultImports": true,
    "useDefineForClassFields": true,
    "resolveJsonModule": true,
    "lib": ["esnext", "dom"],
    "types": ["@dcloudio/types", "node"],
    "baseUrl": ".",
    "paths": { "@/*": ["./*"] }
  },
  "exclude": ["node_modules", "uni_modules", "unpackage", "src/**/*.nvue"]
}注意:uni-app中的路径别名@指的是项目的根目录,而非src目录,因此"paths": { "@/*": ["./*"] }
2. ESlint、Prettier
- 安装
js
//eslint 安装
yarn add eslint@^8.39.0 -D

//eslint vue插件安装
yarn add eslint-plugin-vue@^9.11.0 -D

//eslint 识别ts语法
yarn add @typescript-eslint/parser@^6.19.0 -D

//eslint ts默认规则补充
yarn add @typescript-eslint/eslint-plugin@^6.19.0 -D

//eslint prettier插件安装
yarn add eslint-plugin-prettier@^5.1.3 -D

//用来解决与eslint的冲突
yarn add eslint-config-prettier@^9.1.0 -D

//安装prettier
yarn add prettier@^3.2.4 -D- 新建.eslintrc.cjs
js
module.exports = {
    globals: {
        uni: 'readonly', // 声明 uni 为全局只读变量
    },
    parser: "vue-eslint-parser",
    extends: [
        "eslint:recommended", //继承 ESLint 内置的推荐规则
        "plugin:vue/vue3-recommended", // 继承 Vue.js 3 的推荐规则
        "plugin:@typescript-eslint/recommended", //继承 TypeScript ESLint 插件的推荐规则
        "plugin:prettier/recommended", //继承 Prettier 的推荐规则
        "eslint-config-prettier", //关闭 ESLint 中与 Prettier 冲突的规则
    ],
    parserOptions: {
        ecmaVersion: "latest",
        parser: "@typescript-eslint/parser",
        sourceType: "module",
        ecmaFeatures: {
            jsx: true,
        },
    },
    ignorePatterns: ["dist", "node_modules", ".eslintrc.cjs", "commitlint.config.cjs"],
    plugins: ["vue", "@typescript-eslint", "prettier"],
    rules: {
        "vue/multi-word-component-names": "off", // 禁用vue文件强制多个单词命名
        'vue/require-default-prop':"off", //允许props没有默认值
        "@typescript-eslint/no-explicit-any": "off", //允许使用any
        "@typescript-eslint/no-this-alias": [
            "error",
            {
                allowedNames: ["that"], // this可用的局部变量名称
            },
        ],
        "@typescript-eslint/ban-ts-comment": "off", //允许使用@ts-ignore
        "@typescript-eslint/no-non-null-assertion": "off", //允许使用非空断言
        "no-console": [
            //提交时不允许有console.log
            "warn",
            {
                allow: ["warn", "error"],
            },
        ],
        "no-debugger": "warn", //提交时不允许有debugger
    },
};- 新建 .prettierrc
js
{
    "endOfLine": "auto",
    "printWidth": 120,
    "semi": true,
    "singleQuote": true,
    "tabWidth": 2,
    "trailingComma": "all",
    "bracketSpacing": true
}- 新建 .prettierignore
js
# 忽略格式化文件 (根据项目需要自行添加)
node_modules
dist-
重启vscode使配置生效
-
配置package.json
js
"scripts": { "lint": "eslint --fix --ext .js,.ts,.vue --report-unused-disable-directives --max-warnings 0" },运行 yarn run lint 修复一些ESlint能够自动修复的问题,例如双引号改为单引号
三、差异点
1. 标签
组件标签靠近小程序规范(div 使用 <view>,span 使用 <text>)
2. 接口
接口能力靠近微信小程序规范,但需将前缀wx替换为uni
3. 尺寸单位
px 、% 、rpx
rpx与微信小程序rpx效果相同。
举例说明:
若设计稿宽度为 640px,元素 A 在设计稿上的宽度为 100px,那么元素 A 在uni-app里面的宽度应该设为:750 * 100 / 640,结果为:117rpx。
若设计稿宽度为 375px,元素 B 在设计稿上的宽度为 375px,那么元素 B 在uni-app里面的宽度应该设为:750 * 375 / 375,结果为:750rpx。
若设计稿宽度为 750px,元素 B 在设计稿上的宽度为 750px,那么元素 B 在uni-app里面的宽度应该设为:750 * 750 / 750,结果为:750rpx。
4. 引用
对于静态文件使用绝对路径(从根目录开始)
js
<image src="/static/index/banner.png"></image>但 js 文件不支持绝对路径的方式引入,可使用相对路径,或路径别名@(指向项目根目录)
js
import { transformUrl } from '@/utils/url';5. 条件编译
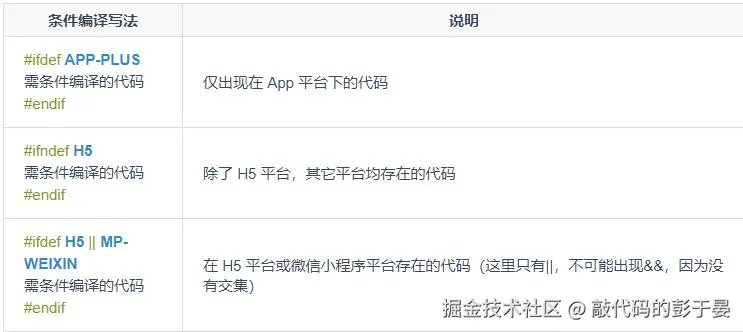
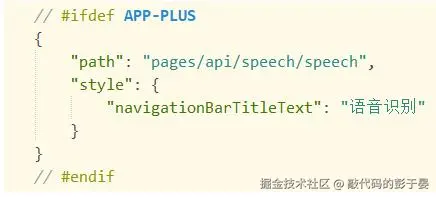
条件编译是用特殊的注释作为标记,在编译时根据这些特殊的注释,将注释里面的代码编译到不同平台。
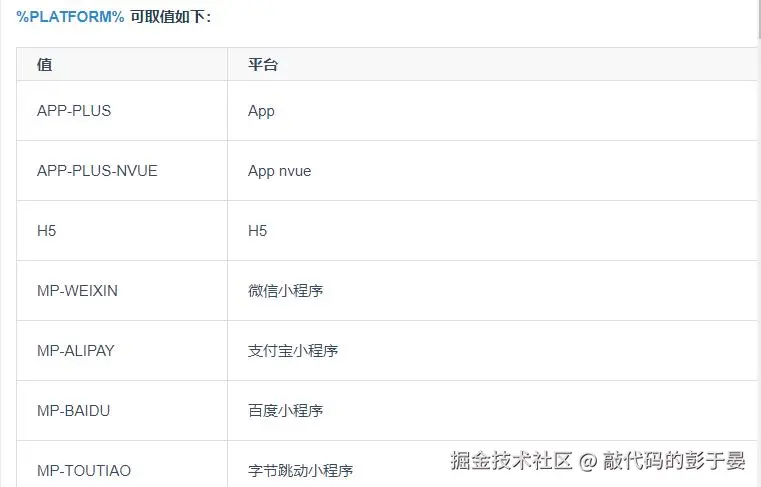
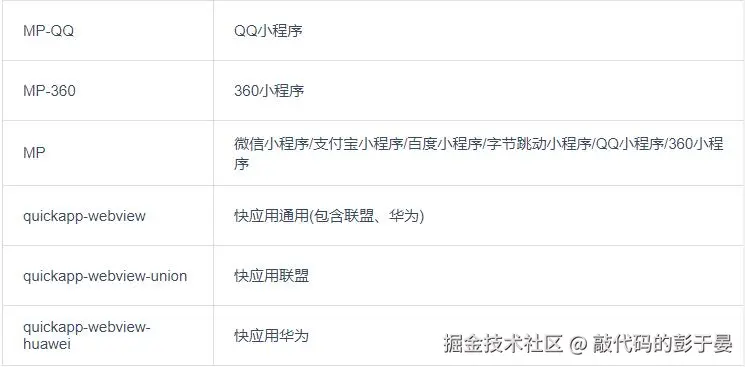
写法:以 #ifdef 或 #ifndef 加 %PLATFORM%,以#endif结尾
- #ifdef:if defined 仅在某平台存在
- #ifndef:if not defined 除了某平台均存在
- %PLATFORM%:平台名称
在HBuilderX 中,按ctrl+alt+/ 即可生成正确注释。支持API条件编译,组件条件编译,样式条件编译,pages.json条件编译
static目录的条件编译。static目录下新建不同平台的专有目录(目录名称同%PLATFORM%,但字母均为小写),专有目录下的静态资源只有在特定平台才会被编译进去。
如以下目录结构,a.png 只有在微信小程序平台才会编译进去,b.png 在所有平台都会被编译。
js
┌─static
│  ├─mp-weixin
│  │  └─a.png
│  └─b.png
├─main.js
├─App.vue
├─manifest.json
└─pages.json
整体目录条件编译。在uni-app项目根目录创建platforms目录,然后在下面进一步创建app-plus、mp-weixin等子目录,存放不同平台的文件
注意:platforms目录下只支持放置页面文件(即页面vue文件),如果需要对其他资源条件编译建议使用static 目录的条件编译
四、全局配置
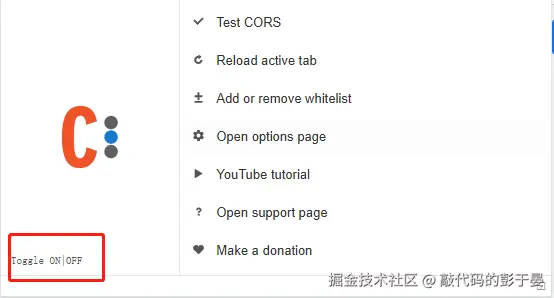
1. H5跨域
方案一:使用HBuilderX内置浏览器

方案二:使用Chrome代理插件
安装完扩展后,选择开启
2. 小程序配置域名白名单
在各个小程序平台运行时,网络相关的API在使用前需要配置域名白名单
以微信小程序为例,登录小程序后台 ,在开发 -> 开发管理 -> 开发设置 -> 服务器域名中进行配置。
注意点:
-
域名不能使用IP地址或localhost,且不能带端口号
-
域名必须经过ICP备案
-
对于每个接口,分别可以配置最多20个域名
在本地开发中,选择小程序开发者工具 -> 详情 -> 本地设置 -> 打开不校验合法域名。等到上线时再打开去检查域名的合法性
3. 拦截器
使用uni.addInterceptor可实现全局拦截功能
1. 请求拦截器
可做接口权限等相关配置
新建interceptors/request.ts
js
const baseUrl = '';

// 拦截器配置
const httpInterceptor = {
  // 拦截前触发
  invoke(options: CustomRequestOptions) {
    // 添加
    options.url = baseUrl + options.url
    // 添加 token 请求头标识
    options.header.Authorization = `Bearer ${token}`
  },
}

export const requestInterceptor = {
  install() {
    // 拦截 request 请求
    uni.addInterceptor('request', httpInterceptor)
    // 拦截 uploadFile 文件上传
    uni.addInterceptor('uploadFile', httpInterceptor)
  },
}
新建interceptors/index.ts
js
export { requestInterceptor } from './request'修改main.ts
js
import { createSSRApp } from 'vue'

import App from './App.vue'
import { requestInterceptor } from './interceptors'

export function createApp() {
  const app = createSSRApp(App)
  app.use(requestInterceptor)

  return {
    app,
  }
}
2. 路由拦截器
可做路由权限相关配置
新建interceptors/route.ts
js
const loginRoute = '/pages/login/index'

const navigateToInterceptor = {
  invoke({ url }: { url: string }) {
      //可根据登录状态做一些拦截操作
      return true;
  },
}

export const routeInterceptor = {
  install() {
    uni.addInterceptor('navigateTo', navigateToInterceptor)
    uni.addInterceptor('reLaunch', navigateToInterceptor)
    uni.addInterceptor('redirectTo', navigateToInterceptor)
    uni.addInterceptor('switchTab', navigateToInterceptor)
  },
}
修改 interceptors/index.ts
js
export { routeInterceptor } from './route';
export { requestInterceptor } from './request';
修改main.ts
js
import { createSSRApp } from 'vue'

import App from './App.vue'
import { requestInterceptor,routeInterceptor } from './interceptors'

export function createApp() {
  const app = createSSRApp(App)
  app.use(routeInterceptor)
  app.use(requestInterceptor)

  return {
    app,
  }
}
5. 网络请求
对uni.request进行封装,减少重复代码
- 新建utils/request.ts
js
// 定义请求配置类型
interface RequestConfig {
  url: string;
  method?: "GET" | "POST" | "PUT" | "DELETE" | "OPTIONS" | "HEAD" | "CONNECT" | "TRACE";
  data?: any;
  params?: any; // URL 参数 (uni.request 本身不支持 params,需手动处理)
  header?: Record<string, string>;
  showLoading?: boolean;
  responseType?: "arraybuffer" | "text" | "json";
  [key: string]: any; // 允许其他自定义属性
}

// 定义响应数据结构(根据后端接口约定调整)
interface ResponseData<T = any> {
  code: number;
  msg: string;
  data: T;
}

// 创建请求实例
class Request {
  // 核心请求方法
  request<T = any>(config: RequestConfig): Promise<T> {
    // 合并配置
    let mergedConfig: RequestConfig = {
      method: "GET",
      showLoading: false,
      ...config,
      header: { ...config.header },
    };

    // 处理 URL 参数(手动拼接)
    if (mergedConfig.params) {
      const params = new URLSearchParams(mergedConfig.params).toString();
      mergedConfig.url += `?${params}`;
      delete mergedConfig.params;
    }

    // 显示 Loading
    if (mergedConfig.showLoading) {
      uni.showLoading({ title: "加载中...", mask: true });
    }

    // 发送请求
    return new Promise((resolve, reject) => {
      uni.request({
        url: mergedConfig.url,
        method: mergedConfig.method,
        data: mergedConfig.data,
        header: mergedConfig.header,
        responseType: mergedConfig.responseType,
        success: async (res) => {
          try {
            const data = res.data as ResponseData<T>;

            resolve(data.data);
          } catch (err) {
            reject(err);
          }
        },
        fail: (err) => {
          reject(new Error(`网络错误: ${err.errMsg}`));
        },
        complete: () => {
          // 关闭 Loading
          if (mergedConfig.showLoading) {
            uni.hideLoading();
          }
        },
      });
    });
  }

  get<T>(url: string, params?: Record<string, any>, showLoading?: boolean): Promise<T> {
    return this.request({ method: "GET", url, params, showLoading });
  }

  delete<T>(url: string, data?: Record<string, any>, showLoading?: boolean): Promise<T> {
    return this.request({ method: "DELETE", url, data, showLoading });
  }

  post<T>(url: string, data?: Record<string, any>, showLoading?: boolean): Promise<T> {
    return this.request({ method: "POST", url, data, showLoading });
  }

  put<T>(url: string, data?: Record<string, any>, showLoading?: boolean): Promise<T> {
    return this.request({ method: "PUT", url, data, showLoading });
  }
}

// 创建实例并配置拦截器
const http = new Request();

export default http;
这里我没有封装请求拦截器,因为拦截功能已通过uni.addInterceptor实现。
- 定义 API 接口类型
js
// api/types.ts

// 登录接口响应数据
export interface LoginResponse {
  userId: string;
  username: string;
  token: string;
}

// 用户信息接口响应数据
export interface UserInfoResponse {
  nickname: string;
  avatar: string;
  email: string;
}- 统一管理 API
js
// api/index.ts

import request from '@/utils/request';
import type { LoginResponse, UserInfoResponse } from './types';

// 登录接口
export const login = (data: { username: string; password: string }) => {
  return request.post<LoginResponse>('/user/login',data,showLoading:true);
};
五、pages.json
1. pages
每次新建页面,均需在pages.json中配置pages列表;未在pages.json -> pages 中注册的页面,uni-app会在编译阶段进行忽略。
在pages文件夹上右击,新建页面,HBuilderX会自动在pages.json中完成页面注册。
配置项中的第一个页面,作为当前工程的首页(启动页)
提示:
-
删除或修改页面时,记得在pages.json中同步修改
-
新建页面后,需在编译器中点击重新运行编译
2. tabBar
js
"tabBar": {
  "color": "#7A7E83",
  "selectedColor": "#3cc51f",
  "borderStyle": "black",
  "backgroundColor": "#ffffff",
  "height": "50px",
  "fontSize": "10px",
  "iconWidth": "24px",
  "spacing": "3px",
  "list": [
      {
      "text": "菜谱",
      "pagePath": "pages/index/index",
      "iconPath": "static/tabs/menus.png",
      "selectedIconPath": "static/tabs/menus-active.png"
      },
      {
      "text": "电影",
      "pagePath": "pages/message/index",
      "iconPath": "static/tabs/movie.png",
      "selectedIconPath": "static/tabs/movie-active.png"
      }
  ]
  }
提示:
(1)tabBar 中的 list 是一个数组,只能配置最少2个、最多5个 tab,tab 按数组的顺序排序。
(2)tabbar 切换第一次加载时可能渲染不及时,可以在每个tabbar页面的onLoad生命周期里先弹出一个等待雪花(hello uni-app使用了此方式)
(3)tabbar 的页面展现过一次后就保留在内存中,再次切换 tabbar 页面,只会触发每个页面的onShow,不会再触发onLoad。
(4)顶部的 tabbar 目前仅微信小程序上支持。需要用到顶部选项卡的话,建议不使用 tabbar 的顶部设置,而是自己做顶部选项卡,可参考 hello uni-app->模板->顶部选项卡。
3. globalStyle
用于设置应用的状态栏、导航条、标题、窗口背景色等。
js
"globalStyle": {
  "navigationBarTextStyle": "white",
  "navigationBarTitleText": "网易云音乐",
  "navigationBarBackgroundColor": "#d43c33",
  "backgroundColor": "#FFFFFF",
  "maxWidth": 375
},更多配置:uniapp.dcloud.net.cn/collocation...
六、使用
1. 生命周期
(1)应用的生命周期(在App.vue页面定义)
-
onLaunch:当uni-app初始化完成时触发(全局只触发一次)
-
onShow:当uni-app启动,或从后台进入前台显示
-
onHide:当uni-app从前台进入后台
-
onError:当uni-app报错时触发
其他的看文档:uniapp.dcloud.io/collocation...
(2)页面的生命周期
-
onLoad:监听页面加载,其参数为上个页面传递的数据(用于页面传参),在该生命周期中获取接口数据
-
onReady:监听页面渲染完成(只会触发一次)
-
onShow:监听页面显示,页面每次出现在屏幕上触发
-
onHide:监听页面影藏
-
onUnload:监听页面卸载
-
onPullDownRefresh:监听下拉事件
-
onReachBottom:监听触底事件
其他的看文档:uniapp.dcloud.io/collocation...
2.下拉刷新
一般不配置全局下拉刷新,哪个页面需要就配置哪个页面的刷新
(1)需要在pages.json里,找到当前页面的pages节点,并在style选项中开启enablePullDownRefresh。
js
{
  "path": "pages/message/index",
  "style":{
    "enablePullDownRefresh":true
  }
(2)在js中定义onPullDownRefresh处理函数(和onload生命周期函数同级),监听用户页面下拉刷新事件。
当处理完数据后,调用uni.stopPullDownRefresh()停止刷新动作
js
onPullDownRefresh() {
  console.log('触发了下拉刷新');
  setTimeout(()=>{
    uni.stopPullDownRefresh()
  },2000)
},
(3)可以通过触发点击事件,调用uni.startPullDownRefresh()来模拟用户的下拉刷新
3.上拉加载
(1)配置页面上拉触底事件触发时距页面底部距离
js
"globalStyle": {
  "onReachBottomDistance": 50
},
(2)在js中定义onReachBottom处理函数,监听用户页面上拉加载事件。
js
onReachBottom() {
  console.log('上拉')
},
4. 数据缓存
(1)异步存储
js
uni.setStorage({
	key:'id',
	data:80,
	success() {
		console.log('存储成功')
	}
})
(2)异步获取
js
uni.getStorage({
	key:'id',
	success(res) {
		console.log('获取成功',res.data)
	}
})
(3)同步存储
js
try {
  uni.setStorageSync('storage_key', 'hello');
} catch (e) {
  // error
}
(4)同步获取
js
try {
  const value = uni.getStorageSync('storage_key');
  if (value) {
      console.log(value);
  }
} catch (e) {
  // error
}
(5)异步删除
js
uni.removeStorage({
  key: 'storage_key',
  success: function (res) {
      console.log('success');
  }
});
(6)同步删除
js
try {
  uni.removeStorageSync('storage_key');
} catch (e) {
  // error
}
(7)异步清空
js
uni.clearStorage();(8)同步清空
js
try {
    uni.clearStorageSync();
} catch (e) {
    // error
}
注意:
-
H5端为localStorage,浏览器限制5M大小,是缓存概念,可能会被清理
-
App端为原生的plus.storage,无大小限制,不是缓存,是持久化
-
各个小程序端为其自带的storage api,数据存储生命周期跟小程序本身一致,即除用户主动 删除或超过一定时间被自动清理,否则数据都一直可用。
-
微信小程序单个key允许存储的最大数据长度为1MB,所有数据存储上限为10MB。
-
支付宝小程序单条数据转换成字符串后,字符串长度最大200*1024。同一个支付宝用户,同一个小程序缓存总上限为10MB。
-
百度、字节跳动小程序文档未说明大小限制
5. 路由跳转
1. 保留当前页面,跳转到应用内的某个页面
js
uni.navigateTo({url:`../login/login?id=${value}`})参数通过?拼接在url上,新页面在onLoad生命周期获取。
js
onLoad(options) {
    console.log(options) //{id: "80"}
}
提示:不要将过多的信息存储在url上,可传递Id等关键信息,然后使用pinia存储全部数据,使用Id去找相关信息
2. 关闭当前页面,跳转到应用内的某个页面
js
uni.redirectTo()3. 关闭所有页面,打开到应用内的某个页面
js
uni.reLaunch()4. 跳转到tabBar页面,并关闭其他所有非tabBar页面
js
uni.switchTab()提示:
1.路径不能带参数,可以将值进行数据缓存
2.tabBar页面通过uni.navigateTo跳转到其他页面,是会保留当前页面,所以当使用uni.switchTab跳转回来时,是不会触发onLoad钩子函数。只会触发onShow钩子函数。
5. 关闭当前页面,返回上一页面或多级页面
js
uni.navigateBack({delta:1})6. 发布/订阅
发布:uni.$emit
订阅:uni.$on
取消订阅:uni.$off
只订阅一次:uni.$once
7. Pinia
uni-app 内置了 Pinia,不需要额外安装,在HBuilderX目录HBuilderX\plugins\hbuilderx-language-services\builtin-dts\uniapp@vue3\node_modules目录下
-
在项目根目录新建store文件夹,用来存放状态管理相关数据
-
在 main.js 中编写以下代码:
js
import App from './App'
import { createSSRApp } from 'vue';
import * as Pinia from 'pinia';

export function createApp() {
	const app = createSSRApp(App);
	app.use(Pinia.createPinia());
	return {
		app,
		Pinia, // 此处必须将 Pinia 返回
	};
}- 首先创建一个 Store:
js
// stores/counter.js
import { defineStore } from 'pinia';

export const useCounterStore = defineStore('counter', {
	state: () => {
		return { count: 0 };
	},
	// 也可以这样定义
	// state: () => ({ count: 0 })
	actions: {
		increment() {
			this.count++;
		},
	},
});- 使用
js
<template>
 <view>
	 <text>{{count}}</text>
	  <button @click="increment">按钮</button>
  </view>
</template>

 <script setup>
import { storeToRefs } from 'pinia';
import { useCounterStore } from '@/stores/counter'

const counterStore = useCounterStore()
const { count } = storeToRefs(counterStore);
const {increment} = counterStore

 </script>
七、打包发布
1. 分包
在pages.json文件中配置
| 属性 | 类型 | 必填 | 描述 | 平台兼容 |
|---|---|---|---|---|
| subPackages | Object Array | 否 | 分包加载配置 | H5 不支持 |
| preloadRule | Object | 否 | 分包预下载规则 | 微信小程序 |
subPackages:
| 属性 | 类型 | 是否必填 | 描述 |
|---|---|---|---|
| root | String | 是 | 子包的根目录 |
| pages | Array | 是 | 子包由哪些页面组成,参数同 pages |
preloadRule:
| 字段 | 类型 | 必填 | 默认值 | 说明 |
|---|---|---|---|---|
| packages | StringArray | 是 | 无 | 进入页面后预下载分包的 root 或 name。APP 表示主包。 |
| network | String | 否 | wifi | 在指定网络下预下载,可选值为:all(不限网络)、wifi(仅wifi下预下载) |
App下开启分包,除在pages.json中配置分包规则外,还需要在manifest中设置在app端开启分包设置,详见:uniapp.dcloud.io/collocation...
注意:
subPackages 里的pages的路径是 root 下的相对路径,不是全路径。
微信小程序每个分包的大小是2M,总体积一共不能超过20M。
百度小程序每个分包的大小是2M,总体积一共不能超过8M。
支付宝小程序每个分包的大小是2M,总体积一共不能超过8M。
QQ小程序每个分包的大小是2M,总体积一共不能超过24M。
抖音小程序每个分包的大小是2M,总体积一共不能超过16M(抖音小程序基础库 1.88.0 及以上版本开始支持,抖音小程序开发者工具请使用大于等于 2.0.6 且小于 3.0.0 的版本)。
快手小程序每个分包的大小是2M,总体积一共不能超过24M。
分包下支持独立的 static 目录,用来对静态资源进行分包。
使用方法:假设支持分包的 uni-app 目录结构如下
js
┌─pages
│  ├─index
│  │  └─index.vue
│  └─login
│     └─login.vue
├─pagesA
│  ├─static
│  └─list
│     └─list.vue
├─pagesB
│  ├─static
│  └─detail
│     └─detail.vue
├─static
├─main.js
├─App.vue
├─manifest.json
└─pages.json
则需要在 pages.json 中填写
js
{
	"pages": [{
		"path": "pages/index/index",
		"style": { ...}
	}, {
		"path": "pages/login/login",
		"style": { ...}
	}],
	"subPackages": [{
		"root": "pagesA",
		"pages": [{
			"path": "list/list",
			"style": { ...}
		}]
	}, {
		"root": "pagesB",
		"pages": [{
			"path": "detail/detail",
			"style": { ...}
		}]
	}],
	"preloadRule": {
		"pagesA/list/list": {
			"network": "all",
			"packages": ["__APP__"]
		},
		"pagesB/detail/detail": {
			"network": "all",
			"packages": ["pagesA"]
		}
	}
}
2. 打包
(1)小程序打包发布
1:在manifest.json中配置小程序AppID,并开启ES6转ES5等功能
2:在微信公告平台,小程序中配置服务器域名白名单
3:点击发行按钮后,会在项目的目录 unpackage/dist/build/mp-weixin 生成微信小程序项目代码
4:在微信小程序开发者工具中,导入生成的微信小程序项目,点击微信开发工具的上传
(2)H5打包
步骤一:在manifest.json进行h5配置,配置页面标题,index.html模板、路由模式
步骤二:点击发行 -> 网站,H5原生版
步骤三:根据导出的路径,将静态资源配置到服务器上
(3)App打包
步骤一:在manifest.json进行基础配置,配置AppID,如果没有的话就登录创建然后重新获取
步骤二:选择App图标配置,在自动生成图标下选择logo,然后点击自动生成所有图标并替换
步骤三:App启动界面配置,可以选择自定义启动图
步骤四:App模块配置,点击需要用到的权限,比如用到了通讯录和地图,就勾选起来
步骤五:选择发行 -> 原生App云打包。选择Android包,还是IOS包,然后配置自有证书(自有证书企业用的,可使用公共测试证书,不过有下载次数限制)。点击打包。
步骤五:打包成功后,会返回一个地址,这时使用二维码生成器将地址转为二维码
结尾
文章内容如果有不准确或不及时的地方,欢迎大家在评论区指出。如果后续本篇文章对大家有帮助,收藏多的话,将会一直更新下去。