前言
公司的项目使用的都是 react + ts + mobx + antd 的技术栈,每次搞新组件或者重构组件的时候都要重复新建文件夹,比较麻烦,而且每个人的代码风格、习惯也有差异。所以搭建一个快速创建业务组件的脚手架方便开发。
初始化
项目根目录运行命令
js
npm init -y然后安装依赖包
js
npm i await-to-js fs-extra inquirer@7.0.4然后在 package.json 里面配置 添加 bin 节点 txCli 命令,配置脚手架的入口文件为根目录下 index.js
js
//package.json
{
  "bin": {
    "txCli": "./index.js"
  },
}
创建项目目录如下
js
|-- 根目录
|-- template //模板
|--web //web端模块
|--组件模板1
|--组件模板2
|--index.js //web端模块的入口文件
|--h5 //h5模块
|--组件模板1
|--组件模板2
|--index.js //h5端模块的入口文件
|--wx //微信小程序模块
|--组件模板1
|--组件模板2
|--index.js //微信小程序的入口文件
|-- index.js //脚手架入口文件
|-- tool.js //工具函数模块
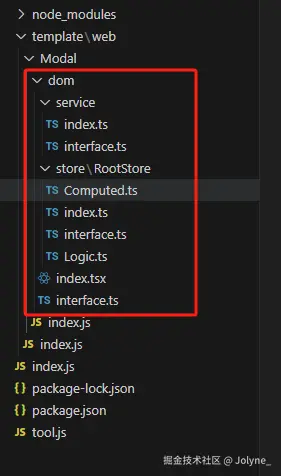
|-- package.json组件模板的目录结构如下
js
|--组件模板
   |--dom                          //写好的组件模板配置
   |--index.js                     //组件模板配置的入口文件
脚手架编写
以web端组件模块为例子
脚手架入口文件
在根目录下的 index.js 文件,顶部写上 #!/usr/bin/env node
js
#!/usr/bin/env node

const args = process.argv.slice(2);
// type 可以拿到脚手架命令后的参数 比如 txCli --webComp 拿到的就是 --webComp
const type = args[0];
const { createWeb } = require("./template/web");

switch (type) {
  case "--webComp":
    {
      createWeb();
    }
    break;
  default: {
    console.log("无效操作参数");
  }
}
当我们运行 txCli --webComp 命令的时候,就会走到 createWeb() 里面
模块入口文件
在 template/web/index.js 中,这是创建 web端组件模块的入口文件
js
const inquirer = require('inquirer');
const { to } = require("await-to-js");
const { createModal } = require("./Modal/index");
async function createWeb() {
const [err, res] = await to(
inquirer.prompt([
{
type: "list",
name: "type",
message: "请选择web组件模块",
choices: [{ value: 1, name: "1-弹窗" }],
default: 0,
},
])
);
switch (res.type) {
case 1:
{
createModal();
}
break;
}
}
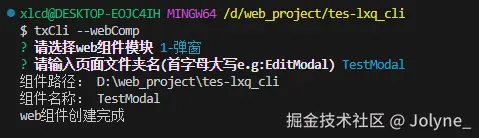
module.exports = { createWeb };因为 web 端会有很多业务组件,这里拿创建一个 Modal 为例子,当我们选择 1-弹窗的时候,就会走到 createModal() 里面

组件模板配置
首先在 template/web/modal/dom 里面,写好组件的模板
比如这儿咱们用的 react + ts + mobx 来搞组件模板
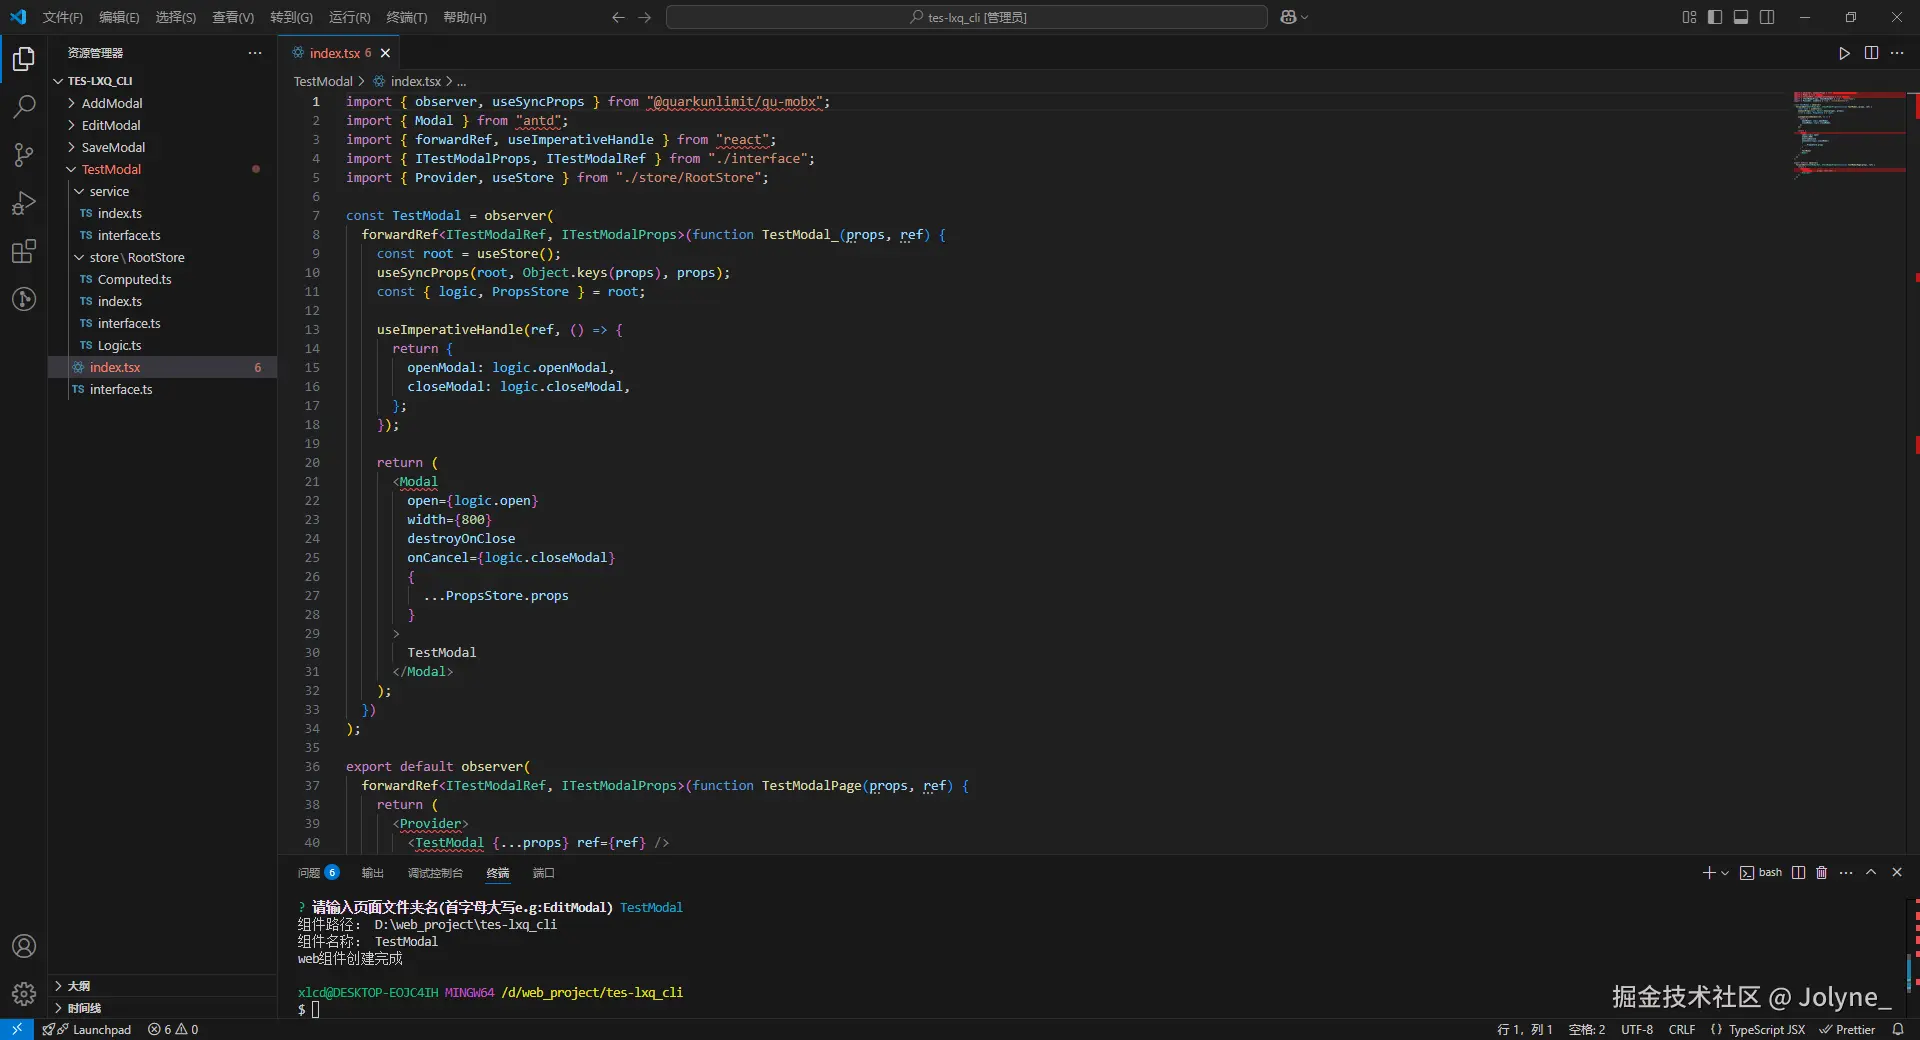
比如 web 端 Modal 组件的编写如下:
tsx
import { observer, useSyncProps } from "@quarkunlimit/qu-mobx";
import { Modal } from "antd";
import { forwardRef, useImperativeHandle } from "react";
import { IXXXProps, IXXXRef } from "./interface";
import { Provider, useStore } from "./store/RootStore";

const XXX = observer(
  forwardRef<IXXXRef, IXXXProps>(function XXX_(props, ref) {
    const root = useStore();
    useSyncProps(root, Object.keys(props), props);
    const { logic, PropsStore } = root;

    useImperativeHandle(ref, () => {
      return {
        openModal: logic.openModal,
        closeModal: logic.closeModal,
      };
    });

    return (
      <Modal
        open={logic.open}
        width={800}
        destroyOnClose
        onCancel={logic.closeModal}
        {
          ...PropsStore.props
        }
      >
        XXX
      </Modal>
    );
  })
);

export default observer(
  forwardRef<IXXXRef, IXXXProps>(function XXXPage(props, ref) {
    return (
      <Provider>
        <XXX {...props} ref={ref} />
      </Provider>
    );
  })
);
在 template/web/Modal/index.js 中,就是 web端 Modal 组件的入口创建文件了
js
const { to } = require("await-to-js");
const { existsSync } = require("fs");
const fse = require("fs-extra");
const inquirer = require("inquirer");
const path = require("path");
const { replaceFileInfo } = require("../../../tool");

async function createModal() {
  const [err, res] = await to(
    inquirer.prompt([
      {
        type: "input",
        name: "page",
        message: "请输入页面文件夹名(首字母大写e.g:EditModal)",
      },
    ])
  );

  const Page = res.page?.trim?.();
  if (!Page) {
    console.log("请输入正确的页面名");
    return;
  }
  const workPath = process.cwd();
  const dirPath = path.join(workPath, Page);
  if (existsSync(dirPath)) {
    console.log("该页面已存在");
    return;
  }
  console.log("组件路径:", workPath);
  console.log("组件名称:", Page);
  try {
    await fse.copy(path.resolve(__dirname, "./dom"), dirPath);
  } catch (error) {
    console.log("发生了异常:");
    console.log(error);
    return;
  }
  // 替换页面名称
  replaceFileInfo(path.join(dirPath, "index.tsx"), "XXX", Page);
  // 替换interface名称
  replaceFileInfo(path.join(dirPath, "interface.ts"), "XXX", Page);
  // 替换store相关内容
  replaceFileInfo(path.join(dirPath, "store/RootStore/index.ts"), "XXX", Page);
  replaceFileInfo(
    path.join(dirPath, "store/RootStore/interface.ts"),
    "XXX",
    Page
  );
  console.log("web组件创建完成");
}

module.exports = { createModal };
上面做的事情就是
- 用户输入这个组件的名称
- 判断当前路径下有没有重复组件
- 复制模板到指定路径下
- 然后把模板里面的 XXX 替换成输入的组件名称
这里的 replaceFileInfo 就是一个文件内容替换的方法,在根目录下的 tool.js 中
js
// tool.js
const fs = require("fs");

const fileConfig = {
  encoding: "utf-8",
};
const replaceFileInfo = (filePath, oldInfo, newInfo) => {
  //读取指定目录的文件内容
  let content = fs.readFileSync(filePath, fileConfig);
  //替换内容
  content = content.replaceAll(oldInfo, newInfo);
  //覆盖旧内容
  fs.writeFileSync(filePath, content, fileConfig);
};

module.exports = {
  replaceFileInfo,
};
脚手架实践
写好脚手架后,把代码推到 gitlab,然后本地执行 npm link
然后在项目里面执行命令即可
这样就可以去配置不同端的各种业务组件了