作为一位前端开发,Vue3 知识的掌握是必不可少的,Vue3 是一个渐进式 JavaScript 框架,易学易用,性能出色,适用场景丰富的 Web 前端框架。同时能让我们在开发时更加得心应手,可以将更多的精力专注于功能的实现上。接下来着重讲解Vue3的相关知识点~~
一、引入
首先,我们需要创建一个具有Vue3环境的开发模式,主要有以下几种方式,接下来我们来一起认识一下。
1、通过 CDN 使用 Vue3
javascript
<head>
    <script src="https://unpkg.com/vue@3/dist/vue.global.js"></script>
</head>
<body>
    <div id="app">{{ message }}</div>
    <script>
         const { createApp, ref } = Vue
         createApp({
            setup() {
              const message = ref('Hello Vue3!')
              return { message }
            }
          }).mount('#app')
    </script>
</body>从上述代码可知,通过全局构建版本的Vue,该版本的所有顶层 API 都以属性的形式暴露在了全局的Vue对象上,因此在页面上就会展示一个Hello Vue3!。
2、使用 ES 模块构建版本
javascript
<div id="app">{{ message }}</div>
<script type="module">
import { createApp, ref } from 'https://unpkg.com/vue@3/dist/vue.esm-browser.js'
const { createApp, ref } = Vue
createApp({
    setup() {
        const message = ref('Hello vue!')
        return { message }
    }
}).mount('#app')
</script>
这部分引入Vue3,使用的主要是 ES 模块语法,现代浏览器大多都已原生支持 ES 模块。注意到我们使用了<script type="module">,且导入的 CDN URL 指向的是 Vue 的 ES 模块构建版本,最终在浏览器上也是会显示Hello Vue3!。
3、启用 Import maps
javascript
<script type="importmap">
  {
    "imports": {
      "vue": "https://unpkg.com/vue@3/dist/vue.esm-browser.js"
    }
  }
</script>

<div id="app">{{ message }}</div>

<script type="module">
  import { createApp, ref } from 'vue'
  createApp({
    setup() {
      const message = ref('Hello Vue!')
      return {
        message
      }
    }
  }).mount('#app')
</script>
上述例子中,可以使用导入映射表 (Import Maps) 来告诉浏览器如何定位到导入的 vue,同理也在页面上就会展示Hello Vue3!。
4、使用工程化方式启动Vue项目🔥
该方式是目前 Vue 开发最常见的方式,也是我们必须要学习的创建 Vue 项目的方式,接下来一起学习下创建 Vue 的开发环境。
- 使用 @vue/cli 方式创建 Vue 项目
ts
// 安装
npm install -g @vue/cli
// 查看版本
vue -V
// 更新版本
npm update -g @vue/cli
// 创建项目
vue create projectName
需要注意的是,该项目创建出来是以 Webpack5 进行打包的构建工具
- 使用 Vite 方式创建项目
ts
// 创建项目
npm create vue@latest
注意: 这一指令将会安装并执行 create-vue,它是 Vue 官方的项目脚手架工具。
二、选项式 API
关于其他的配置项是跟Vue2是保持一致的,我们只讨论跟Vue2有所区别的选项。
1、emits 选项
js
// 数组写法
export default {
  emits: ['check'],
  created() {
    this.$emit('check')
  }
}
// 对象写法
export default {
  emits: {
    // 没有验证函数
    click: null,
    // 具有验证函数
    submit: (payload) => {
      if (payload.email && payload.password) {
        return true
      }
      console.warn(`Invalid submit event payload!`)
      return false
    }
  }
}
注意: 用于声明由组件触发的自定义事件。
2、expose 选项
js
// 子组件
export default {
  // 只有 `publicMethod` 在公共实例上可用
  expose: ['publicMethod'],
  methods: {
    publicMethod() {
      console.log("publicMethod")
    },
    privateMethod() {
      console.log("privateMethod")
    }
  }
}

// 父组件
export default {
  created() {
    // 打印 publicMethod
    this.$refs.ChildComponent.publicMethod();
  }
}
注意: 在父组件想使用子组件里定义的方法时,需要在子组件通过
expose定义相应方法来暴露给父组件使用。
3、生命周期函数
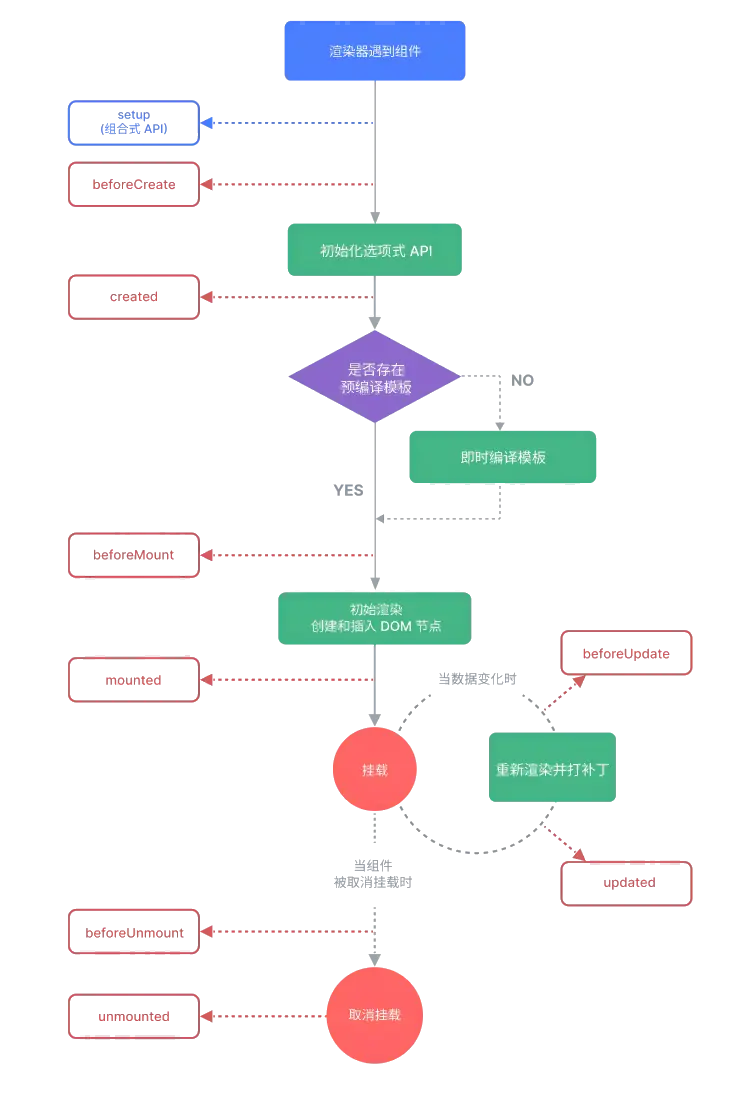
注意:
beforeUnmount、unmounted对应 Vue2 中的beforeDestory、destrory,分别代表在一个组件实例被卸载前后调用。
三、组合式 API
1、什么是组合式 API?
组合式 API (Composition API) 是一系列 API 的集合,使我们可以使用函数而不是声明选项的方式书写 Vue 组件。它是一个概括性的术语,涵盖了响应式 API、生命周期钩子、依赖注入。下面是一个使用组合式 API 的组件示例:
js
<script setup>
import { ref, onMounted } from 'vue'
// 响应式状态
const count = ref(0)
// 更改状态、触发更新的函数
function increment() {
  count.value++
}
// 生命周期钩子
onMounted(() => {
  console.log(`The initial count is ${count.value}.`)
})
</script>
<template>
  <button @click="increment">Count is: {{ count }}</button>
</template>
2、为什么要有组合式 API
使用组合式API有以下优势:
- 更好的逻辑复用
- 更灵活的代码组织
- 更好的类型推导
- 更小的生产包体积
相对于组合式API来组织代码逻辑而言,Vue2 在处理相同逻辑关注点的代码被强制拆分在了不同的选项中,位于文件的不同部分,要读懂代码中的一个逻辑关注点,需要在文件中反复上下滚动,这并不理想。如果用组合式 API 重构这个组件,将会变成下面右边这样:  从上面的图片可知,可以很轻松地将这一组代码移动到一个外部文件中,不再需要为了抽象而重新组织代码,大大降低了重构成本,这在长期维护的大型项目中非常关键。
3、响应式API:核心
1、ref()
接收一个内部值,返回一个响应式的、可更改的ref对象,此对象只有一个指向其内部值的属性.value。
js
// 类型定义
function ref<T>(value: T): Ref<UnwrapRef<T>>
interface Ref<T> {
  value: T
}
js
// 示例
const count = ref(0)
console.log(count.value) // 0

count.value = 1
console.log(count.value) // 1
2、reactive()
返回一个对象的响应式代理。
js
// 类型
function reactive<T extends object>(target: T): UnwrapNestedRefs<T>
js
// 示例
const count = ref(1)
const obj = reactive({ count })
// ref 会被解包
console.log(obj.count === count.value) // true
// 会更新 `obj.count`
count.value++
console.log(count.value) // 2
console.log(obj.count) // 2
// 也会更新 `count` ref
obj.count++
console.log(obj.count) // 3
console.log(count.value) // 3
3、computed()
接收一个getter函数,返回一个只读的响应式ref对象。
js
// 类型
// 只读
function computed<T>(
  getter: () => T,
  // 查看下方的 "计算属性调试" 链接
  debuggerOptions?: DebuggerOptions
): Readonly<Ref<Readonly<T>>>

// 可写的
function computed<T>(
  options: {
    get: () => T
    set: (value: T) => void
  },
  debuggerOptions?: DebuggerOptions
): Ref<T>
创建一个只读的计算属性ref:
js
const count = ref(1)
const plusOne = computed(() => count.value + 1)

console.log(plusOne.value) // 2

plusOne.value++ // 错误,因为只读
创建一个可写的计算属性ref:
js
const count = ref(1)
const plusOne = computed({
  get: () => count.value + 1,
  set: (val) => {
    count.value = val - 1
  }
})
plusOne.value = 1
console.log(count.value) // 0
4、watch()
侦听一个或多个响应式数据源,并在数据源变化时调用所给的回调函数。
js
// 类型
// 侦听单个来源
function watch<T>(
  source: WatchSource<T>,
  callback: WatchCallback<T>,
  options?: WatchOptions
): StopHandle

// 侦听多个来源
function watch<T>(
  sources: WatchSource<T>[],
  callback: WatchCallback<T[]>,
  options?: WatchOptions
): StopHandle

type WatchCallback<T> = (
  value: T,
  oldValue: T,
  onCleanup: (cleanupFn: () => void) => void
) => void

type WatchSource<T> =
  | Ref<T> // ref
  | (() => T) // getter
  | T extends object
  ? T
  : never // 响应式对象

interface WatchOptions extends WatchEffectOptions {
  immediate?: boolean // 默认:false
  deep?: boolean // 默认:false
  flush?: 'pre' | 'post' | 'sync' // 默认:'pre'
  onTrack?: (event: DebuggerEvent) => void
  onTrigger?: (event: DebuggerEvent) => void
}
侦听一个 getter 函数:
js
// 示例
const state = reactive({ count: 0 })
watch(
  () => state.count,
  (count, prevCount) => {
    /* ... */
  }
)
侦听一个 ref:
js
const count = ref(0)
watch(count, (count, prevCount) => {
  /* ... */
})
当侦听多个来源时,回调函数接受两个数组,分别对应来源数组中的新值和旧值:
js
watch([fooRef, barRef], ([foo, bar], [prevFoo, prevBar]) => {
  /* ... */
})
当使用 getter 函数作为源时,回调只在此函数的返回值变化时才会触发。如果你想让回调在深层级变更时也能触发,你需要使用 { deep: true } 强制侦听器进入深层级模式。
js
const state = reactive({ count: 0 })
watch(
  () => state,
  (newValue, oldValue) => {
    // newValue === oldValue
  },
  { deep: true }
)
当直接侦听一个响应式对象时,侦听器会自动启用深层模式:
js
const state = reactive({ count: 0 })
watch(state, () => {
  /* 深层级变更状态所触发的回调 */
})
watch() 和 watchEffect() 享有相同的刷新时机和调试选项:
js
watch(source, callback, {
  flush: 'post',
  onTrack(e) {
    debugger
  },
  onTrigger(e) {
    debugger
  }
})
停止侦听器:
js
const stop = watch(source, callback)

// 当已不再需要该侦听器时:
stop()
副作用清理:
js
watch(id, async (newId, oldId, onCleanup) => {
  const { response, cancel } = doAsyncWork(newId)
  // 当 `id` 变化时,`cancel` 将被调用,
  // 取消之前的未完成的请求
  onCleanup(cancel)
  data.value = await response
})
5、watchEffect()
立即运行一个函数,同时响应式地追踪其依赖,并在依赖更改时重新执行。
js
// 类型
function watchEffect(
  effect: (onCleanup: OnCleanup) => void,
  options?: WatchEffectOptions
): StopHandle

type OnCleanup = (cleanupFn: () => void) => void

interface WatchEffectOptions {
  flush?: 'pre' | 'post' | 'sync' // 默认:'pre'
  onTrack?: (event: DebuggerEvent) => void
  onTrigger?: (event: DebuggerEvent) => void
}

type StopHandle = () => void
js
// 示例
const count = ref(0)
watchEffect(() => console.log(count.value))
// -> 输出 0
count.value++
// -> 输出 1
副作用清除:
js
watchEffect(async (onCleanup) => {
  const { response, cancel } = doAsyncWork(id.value)
  // `cancel` 会在 `id` 更改时调用
  // 以便取消之前
  // 未完成的请求
  onCleanup(cancel)
  data.value = await response
})
停止侦听器:
js
const stop = watchEffect(() => {})
// 当不再需要此侦听器时:
stop()
选项:
js
watchEffect(() => {}, {
  flush: 'post',
  onTrack(e) {
    debugger
  },
  onTrigger(e) {
    debugger
  }
})
6、readonly()
接受一个对象 (不论是响应式还是普通的) 或是一个 ref,返回一个原值的只读代理。
js
// 类型
function readonly<T extends object>(
  target: T
): DeepReadonly<UnwrapNestedRefs<T>>
js
// 示例
const original = reactive({ count: 0 })
const copy = readonly(original)
watchEffect(() => {
  // 用来做响应性追踪
  console.log(copy.count)
})
// 更改源属性会触发其依赖的侦听器
original.count++
// 更改该只读副本将会失败,并会得到一个警告
copy.count++ // warning!
7、toRefs()
将一个响应式对象转换为一个普通对象,这个普通对象的每个属性都是指向源对象相应属性的 ref。每个单独的 ref 都是使用 toRef() 创建的。
js
function toRefs<T extends object>(
  object: T
): {
  [K in keyof T]: ToRef<T[K]>
}

type ToRef = T extends Ref ? T : Ref<T>
js
// 示例
const state = reactive({
  foo: 1,
  bar: 2
})

const stateAsRefs = toRefs(state)
/*
stateAsRefs 的类型:{
  foo: Ref<number>,
  bar: Ref<number>
}
*/

// 这个 ref 和源属性已经"链接上了"
state.foo++
console.log(stateAsRefs.foo.value) // 2

stateAsRefs.foo.value++
console.log(state.foo) // 3
当从组合式函数中返回响应式对象时,toRefs 相当有用。使用它,消费者组件可以解构/展开返回的对象而不会失去响应性:
js
function useFeatureX() {
  const state = reactive({
    foo: 1,
    bar: 2
  })

  // ...基于状态的操作逻辑

  // 在返回时都转为 ref
  return toRefs(state)
}

// 可以解构而不会失去响应性
const { foo, bar } = useFeatureX()
8、toRef()
该方法可以分为规范化签名和对象属性签名;
- 规范化签名: 可以将值、refs 或 getters 规范化为 refs (3.3+);
- 对象属性签名: 基于响应式对象上的一个属性,创建一个对应的 ref。这样创建的 ref 与其源属性保持同步:改变源属性的值将更新 ref 的值,反之亦然;
js
// 规范化签名 (3.3+)
function toRef<T>(
  value: T
): T extends () => infer R
  ? Readonly<Ref<R>>
  : T extends Ref
  ? T
  : Ref<UnwrapRef<T>>

// 对象属性签名
function toRef<T extends object, K extends keyof T>(
  object: T,
  key: K,
  defaultValue?: T[K]
): ToRef<T[K]>

type ToRef<T> = T extends Ref ? T : Ref<T>
规范化签名 (3.3+):
js
// 按原样返回现有的 ref
toRef(existingRef)

// 创建一个只读的 ref,当访问 .value 时会调用此 getter 函数
toRef(() => props.foo)

// 从非函数的值中创建普通的 ref
// 等同于 ref(1)
toRef(1)
对象属性签名:
js
const state = reactive({
  foo: 1,
  bar: 2
})

// 双向 ref,会与源属性同步
const fooRef = toRef(state, 'foo')

// 更改该 ref 会更新源属性
fooRef.value++
console.log(state.foo) // 2

// 更改源属性也会更新该 ref
state.foo++
console.log(fooRef.value) // 3
9、customRef()
创建一个自定义的 ref,显式声明对其依赖追踪和更新触发的控制方式。
js
// 类型
function customRef<T>(factory: CustomRefFactory<T>): Ref<T>

type CustomRefFactory<T> = (
  track: () => void,
  trigger: () => void
) => {
  get: () => T
  set: (value: T) => void
}
创建一个防抖 ref,即只在最近一次 set 调用后的一段固定间隔后再调用:
js
import { customRef } from 'vue'

export function useDebouncedRef(value, delay = 200) {
  let timeout
  return customRef((track, trigger) => {
    return {
      get() {
        track()
        return value
      },
      set(newValue) {
        clearTimeout(timeout)
        timeout = setTimeout(() => {
          value = newValue
          trigger()
        }, delay)
      }
    }
  })
}
在组件中使用:
js
<script setup>
import { useDebouncedRef } from './debouncedRef'
const text = useDebouncedRef('hello')
</script>

<template>
  <input v-model="text" />
</template>
4、组合式API:生命周期钩子
1、onBeforeMount()
注册一个钩子,在组件被挂载之前被调用。
js
// 类型
function onBeforeMount(callback: () => void): void
特点: 还没有创建 DOM 元素,并且 this、el 不可用。
2、onMounted()
注册一个回调函数,在组件被挂载完成后执行。
js
// 类型
function onMounted(callback: () => void): void
通过模板引用访问一个元素:
ts
<script setup>
import { ref, onMounted } from 'vue'
const el = ref()
onMounted(() => {
  el.value // <div>
})
</script>
<template>
  <div ref="el"></div>
</template>
3、onBeforeUpdate()
注册一个钩子,在组件即将因为响应式状态变更而更新其 DOM 树之前调用。
js
// 类型
function onBeforeUpdate(callback: () => void): void
4、onUpdated()
注册一个回调函数,在组件因为响应式状态变更而更新其 DOM 树之后调用。
js
// 类型
function onUpdated(callback: () => void): void
html
<script setup>
import { ref, onUpdated } from 'vue'
const count = ref(0)
onUpdated(() => {
  // 文本内容应该与当前的 `count.value` 一致
  console.log(document.getElementById('count').textContent)
})
</script>
<template>
  <button id="count" @click="count++">{{ count }}</button>
</template>
5、onBeforeUnmount()
注册一个钩子,在组件实例被卸载之前调用。
js
// 类型
function onBeforeUpdate(callback: () => void): void
6、onUnmounted
注册一个回调函数,在组件实例被卸载之后调用。
js
// 类型
function onUnmounted(callback: () => void): void
html
<script setup>
import { onMounted, onUnmounted } from 'vue'
let intervalId
onMounted(() => {
  intervalId = setInterval(() => {
    // ...
  })
})
onUnmounted(() => clearInterval(intervalId))
</script>
7、onActivated()
注册一个回调函数,若组件实例是<KeepAlive>缓存树的一部分,当组件被插入到 DOM 中时调用。
js
// 类型
function onActivated(callback: () => void): void
8、onDeactivated()
注册一个回调函数,若组件实例是<KeepAlive>缓存树的一部分,当组件从 DOM 中被移除时调用。
js
// 类型
function onDeactivated(callback: () => void): void
5、组合式 API:依赖注入
1、provide()
提供一个值,可以被后代组件注入。
js
// 类型
function provide<T>(key: InjectionKey<T> | string, value: T): void
html
<script setup>
import { ref, provide } from 'vue'
import { countSymbol } from './injectionSymbols'

// 提供静态值
provide('path', '/project/')

// 提供响应式的值
const count = ref(0)
provide('count', count)

// 提供时将 Symbol 作为 key
provide(countSymbol, count)
</script>
2、inject()
注入一个由祖先组件或整个应用 (通过 app.provide()) 提供的值。
js
// 类型
// 没有默认值
function inject<T>(key: InjectionKey<T> | string): T | undefined

// 带有默认值
function inject<T>(key: InjectionKey<T> | string, defaultValue: T): T

// 使用工厂函数
function inject<T>(
  key: InjectionKey<T> | string,
  defaultValue: () => T,
  treatDefaultAsFactory: true
): T
假设有一个父组件已经提供了一些值,如前面 provide() 的例子中所示:
html
<script setup>
import { inject } from 'vue'
import { countSymbol } from './injectionSymbols'

// 注入不含默认值的静态值
const path = inject('path')

// 注入响应式的值
const count = inject('count')

// 通过 Symbol 类型的 key 注入
const count2 = inject(countSymbol)

// 注入一个值,若为空则使用提供的默认值
const bar = inject('path', '/default-path')

// 注入一个值,若为空则使用提供的函数类型的默认值
const fn = inject('function', () => {})

// 注入一个值,若为空则使用提供的工厂函数
const baz = inject('factory', () => new ExpensiveObject(), true)
</script>
四、<script setup>
相比于普通的<script>语法,它具有更多优势:
- 更少的样板内容,更简洁的代码
- 能够使用纯 TypeScript 声明 props 和自定义事件
- 更好的运行时性能
- 更好的 IDE 类型推导性能
1、基本语法
要启用该语法,需要在 <script> 代码块上添加 setup attribute:
html
<script setup>
console.log('hello script setup')
</script>
执行时机:
<script setup>中的代码会在每次组件实例被创建的时候执行。
2、顶层的绑定会被暴露给模板
当使用<script setup>的时候,任何在<script setup>声明的顶层的绑定 (包括变量,函数声明,以及 import 导入的内容) 都能在模板中直接使用:
html
<script setup>
import { capitalize } from './helpers'
// 变量
const msg = 'Hello!'
// 函数
function log() {
  console.log(msg)
}
</script>
<template>
  <button @click="log">{{ msg }}</button>
  <div>{{ capitalize('hello') }}</div>
</template>
3、响应式
响应式状态需要明确使用响应式 API 来创建。和setup()函数的返回值一样,ref在模板中使用的时候会自动解包:
html
<script setup>
import { ref } from 'vue'
const count = ref(0)
</script>
<template>
  <button @click="count++">{{ count }}</button>
</template>
4、使用组件
<script setup>范围里的值也能被直接作为自定义组件的标签名使用:
html
<script setup>
import MyComponent from './MyComponent.vue'
</script>
<template>
  <MyComponent />
</template>
推荐使用 PascalCase 格式使用组件名称格式,有助于区分原生的自定义元素。
5、动态组件
由于组件是通过变量引用而不是基于字符串组件名注册的,在<script setup>中要使用动态组件的时候,应该使用动态的 :is 来绑定:
html
<script setup>
import Foo from './Foo.vue'
import Bar from './Bar.vue'
</script>
<template>
  <component :is="Foo" />
  <component :is="someCondition ? Foo : Bar" />
</template>
6、递归组件
一个单文件组件可以通过它的文件名被其自己所引用。例如:名为 FooBar.vue 的组件可以在其模板中用 <FooBar/> 引用它自己。 请注意这种方式相比于导入的组件优先级更低。如果有具名的导入和组件自身推导的名字冲突了,可以为导入的组件添加别名:
js
import { FooBar as FooBarChild } from './components'7、命名空间组件
可以使用带 . 的组件标签,例如<Foo.Bar>来引用嵌套在对象属性中的组件。这在需要从单个文件中导入多个组件的时候非常有用:
html
<script setup>
import * as Form from './form-components'
</script>
<template>
  <Form.Input>
    <Form.Label>label</Form.Label>
  </Form.Input>
</template>
8、使用自定义指令
全局注册的自定义指令将正常工作。本地的自定义指令在 <script setup> 中不需要显式注册,但他们必须遵循 vNameOfDirective 这样的命名规范:
html
<script setup>
const vMyDirective = {
  beforeMount: (el) => {
    // 在元素上做些操作
  }
}
</script>
<template>
  <h1 v-my-directive>This is a Heading</h1>
</template>
如果指令是从别处导入的,可以通过重命名来使其符合命名规范:
html
<script setup>
import { myDirective as vMyDirective } from './MyDirective.js'
</script>
9、defineProps() 和 defineEmits()
html
<script setup>
const props = defineProps({
  foo: String
})

const emit = defineEmits(['change', 'delete'])
// setup 代码
</script>
针对类型的 props/emit 声明
js
const props = defineProps<{
  foo: string
  bar?: number
}>()

const emit = defineEmits<{
  (e: 'change', id: number): void
  (e: 'update', value: string): void
}>()

// 3.3+:另一种更简洁的语法
const emit = defineEmits<{
  change: [id: number] // 具名元组语法
  update: [value: string]
}>()
使用类型声明时的默认 props 值
js
export interface Props {
  msg?: string
  labels?: string[]
}
const props = withDefaults(defineProps<Props>(), {
  msg: 'hello',
  labels: () => ['one', 'two']
})
10、defineExpose()
html
<script setup>
import { ref } from 'vue'

const a = 1
const b = ref(2)

defineExpose({
  a,
  b
})
</script>
11、defineOptions()
html
<script setup>
defineOptions({
  inheritAttrs: false,
  customOptions: {
    /* ... */
  }
})
</script>
这是一个宏定义,选项将会被提升到模块作用域中,无法访问
<script setup>中不是字面常数的局部变量。
12、defineSlots()
html
<script setup lang="ts">
const slots = defineSlots<{
  default(props: { msg: string }): any
}>()
</script>
13、useSlots() 和 useAttrs()
html
<script setup>
import { useSlots, useAttrs } from 'vue'

const slots = useSlots()
const attrs = useAttrs()
</script>
14、与普通的 <script> 一起使用
html
<script>
// 普通 <script>, 在模块作用域下执行 (仅一次)
runSideEffectOnce()

// 声明额外的选项
export default {
  inheritAttrs: false,
  customOptions: {}
}
</script>
<script setup>
// 在 setup() 作用域中执行 (对每个实例皆如此)
</script>
15、顶层 await
<script setup> 中可以使用顶层 await。结果代码会被编译成 async setup():
html
<script setup>
const post = await fetch(`/api/post/1`).then((r) => r.json())
</script>
另外,await 的表达式会自动编译成在 await 之后保留当前组件实例上下文的格式。
五、SCF 中 CSS 功能
1、组件作用域 CSS
html
<style scoped>
.example {
  color: red;
}
</style>

<template>
  <div class="example">hi</div>
</template>
转换为:
html
<style>
.example[data-v-f3f3eg9] {
  color: red;
}
</style>

<template>
  <div class="example" data-v-f3f3eg9>hi</div>
</template>
2、深度选择器
html
<style scoped>
.a :deep(.b) {
  /* ... */
}
</style>
上面的代码会被编译成:
html
.a[data-v-f3f3eg9] .b {
  /* ... */
}
3、插槽选择器
html
<style scoped>
:slotted(div) {
  color: red;
}
</style>
4、全局选择器
html
<style scoped>
:global(.red) {
  color: red;
}
</style>
5、混合使用局部与全局样式
html
<style>
/* 全局样式 */
</style>

<style scoped>
/* 局部样式 */
</style>
6、CSS Modules
html
<template>
  <p :class="$style.red">This should be red</p>
</template>

<style module>
.red {
  color: red;
}
</style>
自定义注入名称
html
<template>
  <p :class="classes.red">red</p>
</template>

<style module="classes">
.red {
  color: red;
}
</style>
与组合式 API 一同使用
js
import { useCssModule } from 'vue'
// 在 setup() 作用域中...
// 默认情况下, 返回 <style module> 的 class
useCssModule()
// 具名情况下, 返回 <style module="classes"> 的 class
useCssModule('classes')
7、CSS 中的 v-bind()
html
<script setup>
const theme = {
  color: 'red'
}
</script>

<template>
  <p>hello</p>
</template>

<style scoped>
p {
  color: v-bind('theme.color');
}
</style>
六、全局API
1、应用实例API
1、createApp()
创建一个应用实例。
js
// 类型
function createApp(rootComponent: Component, rootProps?: object): App
可以直接内联根组件:
js
import { createApp } from 'vue'

const app = createApp({
  /* 根组件选项 */
})
也可以使用从别处导入的组件:
js
import { createApp } from 'vue'
import App from './App.vue'

const app = createApp(App)
2、app.mount()
将应用实例挂载在一个容器元素中。
js
// 类型
interface App {
  mount(rootContainer: Element | string): ComponentPublicInstance
}
js
// 示例
import { createApp } from 'vue'
const app = createApp(/* ... */)

app.mount('#app')
也可以挂载到一个实际的 DOM 元素。
js
app.mount(document.body.firstChild)3、app.unmount()
卸载一个已挂载的应用实例。
js
// 类型
interface App {
  unmount(): void
}
4、app.component()
注册一个全局组件。
js
// 类型
interface App {
  component(name: string): Component | undefined
  component(name: string, component: Component): this
}
如果同时传递一个组件名字符串及其定义,则注册一个全局组件;如果只传递一个名字,则会返回用该名字注册的组件 (如果存在的话)。
js
// 示例
import { createApp } from 'vue'

const app = createApp({})

// 注册一个选项对象
app.component('my-component', {
  /* ... */
})

// 得到一个已注册的组件
const MyComponent = app.component('my-component')
5、app.directive()
注册一个全局指令。
js
// 类型
interface App {
  directive(name: string): Directive | undefined
  directive(name: string, directive: Directive): this
}
js
// 示例
import { createApp } from 'vue'

const app = createApp({
  /* ... */
})

// 注册(对象形式的指令)
app.directive('my-directive', {
  /* 自定义指令钩子 */
})

// 注册(函数形式的指令)
app.directive('my-directive', () => {
  /* ... */
})

// 得到一个已注册的指令
const myDirective = app.directive('my-directive')
6、app.use()
安装一个插件。
js
// 类型
interface App {
  use(plugin: Plugin, ...options: any[]): this
}
js
// 示例
import { createApp } from 'vue'
import MyPlugin from './plugins/MyPlugin'

const app = createApp({
  /* ... */
})

app.use(MyPlugin)
7、app.mixin()
应用一个全局 mixin,一个全局的 mixin 会作用于应用中的每个组件实例。
js
// 类型
interface App {
  mixin(mixin: ComponentOptions): this
}
8、app.provide()
提供一个值,可以在应用中的所有后代组件中注入使用。
js
// 类型
interface App {
  provide<T>(key: InjectionKey<T> | symbol | string, value: T): this
}
js
// 示例
import { createApp } from 'vue'

const app = createApp(/* ... */)

app.provide('message', 'hello')
在应用的某个组件中:
js
import { inject } from 'vue'

export default {
  setup() {
    console.log(inject('message')) // 'hello'
  }
}
9、app.config
js
import { createApp } from 'vue'

const app = createApp(/* ... */)

console.log(app.config)
每个应用实例都会暴露一个 config 对象,其中包含了对这个应用的配置设定。你可以在挂载应用前更改这些属性。
10、app.config.errorHandler
用于为应用内抛出的未捕获错误指定一个全局处理函数。
js
// 类型
interface AppConfig {
  errorHandler?: (
    err: unknown,
    instance: ComponentPublicInstance | null,
    // `info` 是一个 Vue 特定的错误信息
    // 例如:错误是在哪个生命周期的钩子上抛出的
    info: string
  ) => void
}
js
// 示例
app.config.errorHandler = (err, instance, info) => {
  // 处理错误,例如:报告给一个服务
}
11、app.config.warnHandler
用于为 Vue 的运行时警告指定一个自定义处理函数。
js
// 类型
interface AppConfig {
  warnHandler?: (
    msg: string,
    instance: ComponentPublicInstance | null,
    trace: string
  ) => void
}
js
// 示例
app.config.warnHandler = (msg, instance, trace) => {
  // `trace` 是组件层级结构的追踪
}
12、app.config.globalProperties
一个用于注册能够被应用内所有组件实例访问到的全局属性的对象。
js
// 类型
interface AppConfig {
  globalProperties: Record<string, any>
}
这是对 Vue 2 中 Vue.prototype 使用方式的一种替代,此写法在 Vue 3 已经不存在了。
js
// 示例
app.config.globalProperties.msg = 'hello'
选项式组件使用:
js
export default {
  mounted() {
    console.log(this.msg) // 'hello'
  }
}
2、全局API:常规
1、version
暴露当前所使用的 Vue 版本。
js
// 示例
import { version } from 'vue'

console.log(version)
2、nextTick()
等待下一次 DOM 更新刷新的工具方法。
js
// 类型
function nextTick(callback?: () => void): Promise<void>
js
// 示例
<script setup>
import { ref, nextTick } from 'vue'
const count = ref(0)
async function increment() {
  count.value++
  // DOM 还未更新
  console.log(document.getElementById('counter').textContent) // 0
  await nextTick()
  // DOM 此时已经更新
  console.log(document.getElementById('counter').textContent) // 1
}
</script>
<template>
  <button id="counter" @click="increment">{{ count }}</button>
</template>
3、defineComponent()
在定义 Vue 组件时提供类型推导的辅助函数。
js
// 类型
// 选项语法
function defineComponent(
  component: ComponentOptions
): ComponentConstructor


// 函数语法 (需要 3.3+)
function defineComponent(
  setup: ComponentOptions['setup'],
  extraOptions?: ComponentOptions
): () => any
js
// 示例
const Foo = defineComponent(/* ... */)

type FooInstance = InstanceType<typeof Foo>
从 defineComponent() 的返回类型中提取出一个组件的实例类型 (与其选项中的 this 的类型等价)
函数签名
defineComponent() 还有一种备用签名,旨在与组合式 API 和 渲染函数或 JSX 一起使用。
js
import { ref, h } from 'vue'

const Comp = defineComponent(
  (props) => {
    // 就像在 <script setup> 中一样使用组合式 API
    const count = ref(0)

    return () => {
      // 渲染函数或 JSX
      return h('div', count.value)
    }
  },
  // 其他选项,例如声明 props 和 emits。
  {
    props: {
      /* ... */
    }
  }
)
此签名的主要用例是使用 TypeScript (特别是使用 TSX ),因为它支持泛型:
js
const Comp = defineComponent(
  <T extends string | number>(props: { msg: T; list: T[] }) => {
    // 就像在 <script setup> 中一样使用组合式 API
    const count = ref(0)

    return () => {
      // 渲染函数或 JSX
      return <div>{count.value}</div>
    }
  },
  // 目前仍然需要手动声明运行时的 props
  {
    props: ['msg', 'list']
  }
)
4、defineAsyncComponent()
定义一个异步组件,它在运行时是懒加载的。参数可以是一个异步加载函数,或是对加载行为进行更具体定制的一个选项对象。
js
// 类型
function defineAsyncComponent(
  source: AsyncComponentLoader | AsyncComponentOptions
): Component

type AsyncComponentLoader = () => Promise<Component>

interface AsyncComponentOptions {
  loader: AsyncComponentLoader
  loadingComponent?: Component
  errorComponent?: Component
  delay?: number
  timeout?: number
  suspensible?: boolean
  onError?: (
    error: Error,
    retry: () => void,
    fail: () => void,
    attempts: number
  ) => any
}
5、defineCustomElement()
这个方法和 defineComponent 接受的参数相同,不同的是会返回一个原生自定义元素类的构造器。
js
// 类型
function defineCustomElement(
  component:
    | (ComponentOptions & { styles?: string[] })
    | ComponentOptions['setup']
): {
  new (props?: object): HTMLElement
}
js
// 示例
import { defineCustomElement } from 'vue'
const MyVueElement = defineCustomElement({
  /* 组件选项 */
})
// 注册自定义元素
customElements.define('my-vue-element', MyVueElement)
7、待续
待续......