ReentrantLock的超详细源码解析
欢迎来到我的博客:TWind的博客
0.简介
ReentrantLock是基于AQS框架的一个子类,实现了可重入锁,其中有公平与非公平两种类型,是一个非常重要的工具,也是学习鬼斧神工一般的AQS的很好的出发点
注:本文适合想要深究AQS的队列的实现和原理,ReentrantLock的机制的人参考,文章较长
1. AQS框架
AQS全称为AbstractQueuedSynchronizer
- Abstract 译为抽象的,即代表这只是个框架,其中有些抽象方法需要实现后才能使用
- Queued 译为队列,AQS中提供了同步队列(CLH)和条件队列来存储唤醒列表以及Condition表
- Synchronizer 译为同步,意为其为实现同步的工具
AQS支持共享(允许多个线程获得)和独占模式(只允许一个线程获得),其中ReentrantLock属于独占模式
AQS是一个框架,该如何去搭配取决于你自己,你也可以创建一个非公平/公平的共享锁什么的
ReentrantLock只是官方为你提供的一个便于使用的子类
AQS为每一个线程提供了一个Node来存储:
java
static final class Node {
        /** Marker to indicate a node is waiting in shared mode */
        static final Node SHARED = new Node();
        /** Marker to indicate a node is waiting in exclusive mode */
        static final Node EXCLUSIVE = null;

        /** waitStatus value to indicate thread has cancelled */
        static final int CANCELLED =  1;
        /** waitStatus value to indicate successor's thread needs unparking */
        static final int SIGNAL    = -1;
        /** waitStatus value to indicate thread is waiting on condition */
        static final int CONDITION = -2;
        /**
         * waitStatus value to indicate the next acquireShared should
         * unconditionally propagate
         */
        static final int PROPAGATE = -3;

        /**
         * Status field, taking on only the values:
         *   SIGNAL:     The successor of this node is (or will soon be)
         *               blocked (via park), so the current node must
         *               unpark its successor when it releases or
         *               cancels. To avoid races, acquire methods must
         *               first indicate they need a signal,
         *               then retry the atomic acquire, and then,
         *               on failure, block.
         *   CANCELLED:  This node is cancelled due to timeout or interrupt.
         *               Nodes never leave this state. In particular,
         *               a thread with cancelled node never again blocks.
         *   CONDITION:  This node is currently on a condition queue.
         *               It will not be used as a sync queue node
         *               until transferred, at which time the status
         *               will be set to 0. (Use of this value here has
         *               nothing to do with the other uses of the
         *               field, but simplifies mechanics.)
         *   PROPAGATE:  A releaseShared should be propagated to other
         *               nodes. This is set (for head node only) in
         *               doReleaseShared to ensure propagation
         *               continues, even if other operations have
         *               since intervened.
         *   0:          None of the above
         *
         * The values are arranged numerically to simplify use.
         * Non-negative values mean that a node doesn't need to
         * signal. So, most code doesn't need to check for particular
         * values, just for sign.
         *
         * The field is initialized to 0 for normal sync nodes, and
         * CONDITION for condition nodes.  It is modified using CAS
         * (or when possible, unconditional volatile writes).
         */
        volatile int waitStatus;

        /**
         * Link to predecessor node that current node/thread relies on
         * for checking waitStatus. Assigned during enqueuing, and nulled
         * out (for sake of GC) only upon dequeuing.  Also, upon
         * cancellation of a predecessor, we short-circuit while
         * finding a non-cancelled one, which will always exist
         * because the head node is never cancelled: A node becomes
         * head only as a result of successful acquire. A
         * cancelled thread never succeeds in acquiring, and a thread only
         * cancels itself, not any other node.
         */
        volatile Node prev;

        /**
         * Link to the successor node that the current node/thread
         * unparks upon release. Assigned during enqueuing, adjusted
         * when bypassing cancelled predecessors, and nulled out (for
         * sake of GC) when dequeued.  The enq operation does not
         * assign next field of a predecessor until after attachment,
         * so seeing a null next field does not necessarily mean that
         * node is at end of queue. However, if a next field appears
         * to be null, we can scan prev's from the tail to
         * double-check.  The next field of cancelled nodes is set to
         * point to the node itself instead of null, to make life
         * easier for isOnSyncQueue.
         */
        volatile Node next;

        /**
         * The thread that enqueued this node.  Initialized on
         * construction and nulled out after use.
         */
        volatile Thread thread;

        /**
         * Link to next node waiting on condition, or the special
         * value SHARED.  Because condition queues are accessed only
         * when holding in exclusive mode, we just need a simple
         * linked queue to hold nodes while they are waiting on
         * conditions. They are then transferred to the queue to
         * re-acquire. And because conditions can only be exclusive,
         * we save a field by using special value to indicate shared
         * mode.
         */
        Node nextWaiter;

        /**
         * Returns true if node is waiting in shared mode.
         */
        final boolean isShared() {
            return nextWaiter == SHARED;
        }

        /**
         * Returns previous node, or throws NullPointerException if null.
         * Use when predecessor cannot be null.  The null check could
         * be elided, but is present to help the VM.
         *
         * @return the predecessor of this node
         */
        final Node predecessor() throws NullPointerException {
            Node p = prev;
            if (p == null)
                throw new NullPointerException();
            else
                return p;
        }

        Node() {    // Used to establish initial head or SHARED marker
        }

        Node(Thread thread, Node mode) {     // Used by addWaiter
            this.nextWaiter = mode;
            this.thread = thread;
        }

        Node(Thread thread, int waitStatus) { // Used by Condition
            this.waitStatus = waitStatus;
            this.thread = thread;
        }
    }
看着很复杂,其实的确挺复杂的,这个Node主要有以下功能:
Node解析
1.int waitStatus:标志着一个节点的状态,有如下:
- CANCELLED = 1 标志着这个节点已经被取消(失效)
- SIGNAL = -1 标志着这个节点会正常的运作,即用完锁会唤醒自己的后继节点
- CONDITION = -2 这个节点是条件队列中的,不应该在同步队列中直接使用(除非被sign唤醒,这时候会改成0然后加入同步队列)
- PROPAGATE = -3 这个节点是共享模式的节点,应该传播到其他节点,本文不介绍
实际上,大多数情况下这些值都不会严格的用来区分,最大的作用是区别正负--->正代表已处理/取消,负代表还能处理
2.Node prev,Node next:存储这个节点的 上/下 一个节点
逻辑如下:
mid 代表当前节点
3.Thread thread
存储这个节点所代表的线程,每个要竞争的线程就存储在节点中
4.Node nextWaiter
在条件队列中用于标志下一个等着的节点(线程)
同步队列中没有这种需求,但是需要一个数据来存储是共享还是同步模式,于是复用了:
java
    static final Node SHARED = new Node();
    static final Node EXCLUSIVE = null;
通过判断这个值是不是为null判断是那种模式
同步队列
AQS的同步队列是CLH(Craig, Landin, and Hagersten)队列的一种变体,得名于其发明者:Craig,Landin,Hagersten
CLH的特点是每一个节点都维护一个自己的前一个节点,每一个节点都在不断自旋监视前一个节点,看其释放锁没有,避免了惊群效应(全部节点都去竞争锁),每一个节点中的线程都在某一个地方自旋,必然相对来说很耗性能
于是,AQS对其进行了改进:
每个节点变为维护其前后节点,对于进入队列的节点获取锁失败会直接阻塞,节省资源
只有头结点会获得锁,头结点执行完成后会尝试唤醒下一个节点,一旦下一个节点抢锁成功就会将自己设成头结点,删除原来的头结点,至于能不能一定抢到,取决于是公平还是非公平锁
加入了独占/共享机制,更复杂也更强大
具体而言:
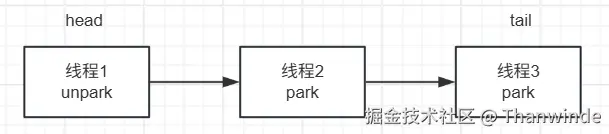
这是一个AQS同步队列,当线程1执行完后,它会唤醒线程2去抢锁,如果线程2没抢到就会再次阻塞等待下一次唤醒,只有唤醒了才会把把头结点换成线程2并删除线程1的节点**(注意顺序!!!)**
这样的话就成了
如果抢锁失败呢(比如有外来线程抢到了锁),道理也是一样的:等待外来线程结束后会再次唤醒线程2,具体是怎么实现的得看源码
这是同步队列的大致讲解,更详尽的在下面源码解析
条件队列
AQS中的条件队列相对简单,由于ReentrantLock并未使用,故不再赘述
2.ReentrantLock
整体代码剖析
源码位于ReentrantLock.class
可以看到:
java
public class ReentrantLock implements Lock, java.io.Serializable ReentrantLock是实现了Lock类的一个接口,lock(),lockInterruptibly(),tryLock(),unlock(),newCondition()便是ReentrantLock的主要接口
java
private final Sync sync;这里代表的是ReentrantLock的同步模式:公平或不公平
具体是怎么区分的?
java
    /**
     * Sync object for non-fair locks
     */
    static final class NonfairSync extends Sync {
        private static final long serialVersionUID = 7316153563782823691L;

        /**
         * Performs lock.  Try immediate barge, backing up to normal
         * acquire on failure.
         */
        //非公平锁
		final void lock() {
            if (compareAndSetState(0, 1))
                setExclusiveOwnerThread(Thread.currentThread());	//尝试用CAS操作直接获得锁
            else
                acquire(1);	//失败了才会进入队列
        }

        protected final boolean tryAcquire(int acquires) {	//调用nonfairTryAcquire来尝试一次获取锁
            return nonfairTryAcquire(acquires); //代码及注释,解释在下方
        }
    }

    /**
     * Sync object for fair locks
     */


    static final class FairSync extends Sync {
        private static final long serialVersionUID = -3000897897090466540L;

        //公平锁
		final void lock() {
    		acquire(1);	//直接进入队列
		}

        /**
         * Fair version of tryAcquire.  Don't grant access unless
         * recursive call or no waiters or is first.
         */
        protected final boolean tryAcquire(int acquires) {	//尝试一次获取锁
            final Thread current = Thread.currentThread();
            int c = getState();	//获取重入次数
            if (c == 0) {	//如果为0,就上锁
                if (!hasQueuedPredecessors() &&	//因为是公平锁,得看队列是不是是空的,是空的才能直接上锁,不能插队
                    compareAndSetState(0, acquires)) {
                    setExclusiveOwnerThread(current);
                    return true;
                }
            }
            else if (current == getExclusiveOwnerThread()) {	//如果上锁是当前线程,就重入
                int nextc = c + acquires;
                if (nextc < 0)	//这里利用的是int的溢出机制,加锁到了int最大值后会变成负数,触发错误
                    throw new Error("Maximum lock count exceeded");
                setState(nextc);
                return true;
            }
            return false;	//获取锁失败
        }
    }
可以看到,公平锁和非公平锁区别其实不大,最大的区别在于:
公平锁在有新线程来的时候,会直接加入队列等待,而非公平锁会直接尝试获取锁,获取不了再进入队列
具体来说:
java
//非公平锁
final void lock() {
            if (compareAndSetState(0, 1))
                setExclusiveOwnerThread(Thread.currentThread());	//尝试用CAS操作直接获得锁
            else
                acquire(1);	//失败了才会进入队列
        }
而公平锁:
java
//公平锁
final void lock() {
    acquire(1);	//直接进入队列
}
至于acquire,待会再说,这是AQS的核心,篇幅较长
你会发现在NonfairSync和FairSync里面都有tryAcquire方法,这个方法是 尝试获取一次锁
除此之外两个类没有区别
NonfairSync 和 FairSync 都继承了 Sync,Sync提供了一系列已经实现的接口,重要的有譬如:
nonfairTryAcquire(给非公平锁用)
java
final boolean nonfairTryAcquire(int acquires) {
    final Thread current = Thread.currentThread();
    int c = getState();	//获取当前重入次数
    if (c == 0) {	//为0则直接获取锁
        if (compareAndSetState(0, acquires)) {
            setExclusiveOwnerThread(current);
            return true;
        }
    }
    else if (current == getExclusiveOwnerThread()) {	//否则看是不是自己线程的锁,是的话就重入
        int nextc = c + acquires;
        if (nextc < 0) 	//这里利用的是int的溢出机制,加锁到了int最大值后会变成负数,触发错误
            throw new Error("Maximum lock count exceeded");
        setState(nextc);
        return true;
    }
    return false;
}
注意:你会发现公平锁的tryAcquire是由自己实现的,但是非公平锁的是直接调用Sync里面的nonfairTryAcquire?为什么要把其移到Sync中呢?
因为Sync中有方法tryLock()
它会直接调用nonfairTryAcquire来直接尝试获取一次锁,是非公平的,这种"插队"方法是作特殊用途的,所以为了复用代码就给提出来了
tryRelease (尝试释放锁)
java
protected final boolean tryRelease(int releases) {
    int c = getState() - releases;//算如果释放锁后重入次数(可重入锁)
    if (Thread.currentThread() != getExclusiveOwnerThread())	//判断释放锁的线程是不是这个锁的拥有者
        throw new IllegalMonitorStateException();
    boolean free = false;
    if (c == 0) {	//c == 0说明锁已经全部被释放
        free = true;
        setExclusiveOwnerThread(null);
    }		//释放锁
    setState(c);
    return free;
}
看到这里你可能会有点晕,但你可以看下面这个图:
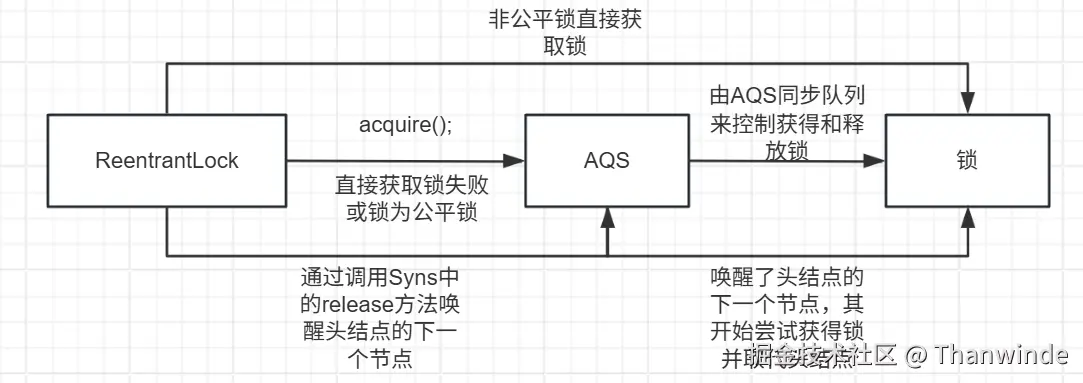
你可以认为,ReentrantLock和AQS的接口上最重要和最基本的联系就是acquire()和release(),我们的主要研究点就在这
其他的接口大多都是对acquire,release的修饰和包装
其实也有其他的接口,比如获得节点线程什么的,但这些接口不是其主要功能
release()
为什么先从release开始讲?因为其比较简单,而且知道了是如何释放锁后能更好的理解其是怎么获得锁的
源码位于AbstractQueuedSynchronizer.class
java
public final boolean release(int arg) {
    if (tryRelease(arg)) {	//调用ReentrantLock里面的tryRelease尝试释放锁
        Node h = head;	//释放成功会调用unparkSuccessor来唤醒头节点的后继节点让其来抢锁
        if (h != null && h.waitStatus != 0)
            unparkSuccessor(h);
        return true;
    }
    return false;	//释放失败返回false
}
tryRelease就是在ReentrantLock里面的,简单的CAS释放锁操作(上面那个)
java
protected final boolean tryRelease(int releases) {
    int c = getState() - releases;//算如果释放锁后重入次数(可重入锁)
    if (Thread.currentThread() != getExclusiveOwnerThread())	//判断释放锁的线程是不是这个锁的拥有者
        throw new IllegalMonitorStateException();
    boolean free = false;
    if (c == 0) {	//c == 0说明锁已经全部被释放
        free = true;
        setExclusiveOwnerThread(null);
    }		//释放锁
    setState(c);
    return free;
}
这里我们知道了,release会直接尝试释放锁,释放成功就唤醒下一个线程(unparkSuccessor)
acquire()
这个是ReentrantLock的核心,我们看一下其源码:
java
public final void acquire(int arg) {
    if (!tryAcquire(arg) &&
        acquireQueued(addWaiter(Node.EXCLUSIVE), arg))
        selfInterrupt();
}
如果tryAcquire不成功而且acquireQueued返回false就中断自己???什么东西
!NOTE
对于同步队列,等待中的线程是处于挂起状态的(park),如果其被中断了(interrupt),就会强行被唤醒但是由于java的中断机制,通过中断来唤醒一个park的线程,是不会抛出InterruptedException的,只会将其中断状态位设成true,而在acquireQueued里面的parkAndCheckInterrupt方法里面使用的是return Thread.interrupted();来检测是不是被打断了,interrupted会将中断位设置成false来防止线程再次park时因为中断位是true而马上苏醒。但这样的话就无法判断线程有没有被中断过了(一直为false),所以acquireQueued会记录有没有被中断过,如果被中断过,会在获得锁之后再把中断位设置成true
即调用selfInterrupt
这是ReentrantLock的同步队列的又一特点:中断会累计到获得锁后再抛出
如果想要一遇到中断就抛出的话,tryLock(long time, TimeUnit unit)就会在一有中断就会抛出
tryAcquire就是简单的尝试一次获得锁,如果失败了就会执行 &&后面的acquireQueued(addWaiter(Node.EXCLUSIVE), arg),addWaiter会构造一个节点(参考文章开头对Node结构的解析),这个节点为独占模式(Node.EXCLUSIVE)。
然后我们来看看acquireQueued里面会干什么......
java
final boolean acquireQueued(final Node node, int arg) {
boolean failed = true; //标志着是否成功
try {
boolean interrupted = false; //标志着是否被中断过
for (;;) { //一直循环,同步队列中的所有线程都会在这个循环挂起
final Node p = node.predecessor(); //获得该节点的前驱
if (p == head && tryAcquire(arg)) { //如果前驱是头节点而且**本身获取锁成功**
setHead(node); //就会把自己设成头节点,删除头结点,退出循环(开始执行自己的线程)
p.next = null; // help GC
failed = false;
return interrupted; //返回的是是否被中断,可以看上方的Note部分理解
}
if (shouldParkAfterFailedAcquire(p, node) && //如果线程不是头结点的后继节点或者获取锁失败,会先执行
parkAndCheckInterrupt()) //shouldParkAfterFailedAcquire来处理一些事和判断是否该挂起,如果
interrupted = true; //是真的话会通过parkAndCheckInterrupt挂起,如果通过中断唤醒, //parkAndCheckInterrupt会返回true,就会把interrupted设成true
}
} finally {
if (failed) //如果出现了异常,唤醒失败,就会直接删除该节点
cancelAcquire(node);
}
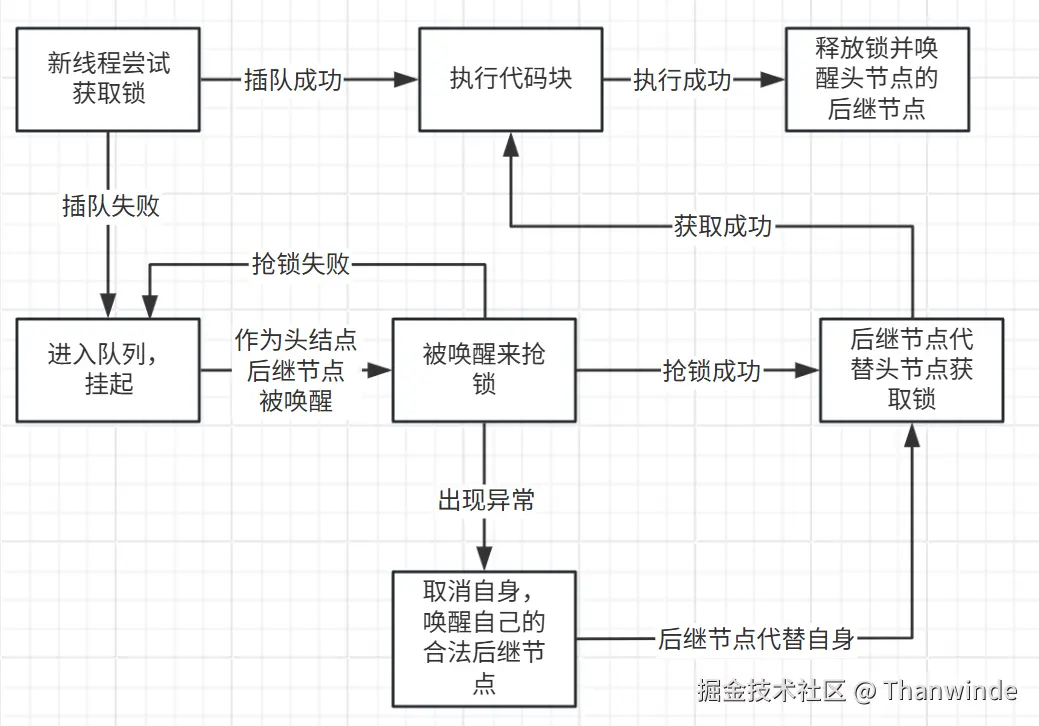
}这里能发现,所有的线程都会卡在这个for循环之中,如果自己是头结点的后继节点就会把自己变成头节点退出从而执行代码,执行完后释放锁(即上文的release方法来唤醒后继线程),从而让后继节点重复上述操作来实现同步
之前说过,同步队列只有头结点能获得锁,头节点用完后释放锁会通过release唤醒后继节点让其抢锁,如果抢到锁了,就会成为新的头结点来重复上述操作,如果没抢到的话就会再次阻塞,这只会在非公平锁中出现,或者公平锁调用tryLock来"插队"
这样的话就会等到这个"插队"线程释放锁后来再次唤醒其来抢锁
抢锁用的是tryAcquire,单纯的尝试抢一次锁
那抢到锁了可以理解,要是没抢到锁了具体会怎么做呢?
我们来看:
java
if (shouldParkAfterFailedAcquire(p, node) &&
    parkAndCheckInterrupt())
    interrupted = true;
首先,执行shouldParkAfterFailedAcquire:
java
private static boolean shouldParkAfterFailedAcquire(Node pred, Node node) {
    int ws = pred.waitStatus;
    if (ws == Node.SIGNAL)
        //如果前驱节点是SIGNAL状态,代表正常,其结束后会把当前节点唤醒,可以正常park
        return true;
    if (ws > 0) {
        //如果前驱节点的状态大于0,代表其不可用,这里就会向前遍历来找到一个可用的节点来连接到当前节点
        //有点类似于"删除了"中间这些节点,这样的话就能保证当前节点的前驱节点一定会唤醒自己,避免一直park造成死锁
        do {
            node.prev = pred = pred.prev;
        } while (pred.waitStatus > 0);
        pred.next = node;
    } else {
        //如果前驱节点只是状态不是SIGNAL,就将其改成SIGNAL来唤醒自己
        compareAndSetWaitStatus(pred, ws, Node.SIGNAL);
    }
    return false;
}
这里可能会有疑惑,直接把前驱节点设成SIGNAL,不会有什么问题吗?比如我们在Node结构里看到:
!NOTE
- CANCELLED = 1 标志着这个节点已经被取消(失效)
- SIGNAL = -1 标志着这个节点会正常的运作,即用完锁会唤醒自己的后继节点
- CONDITION = -2 这个节点是条件队列中的,不应该在同步队列中直接使用(除非被sign唤醒,这时候会改成0然后加入同步队列)
- PROPAGATE = -3 这个节点是共享模式的节点,应该传播到其他节点,本文不介绍
但其实,在独占模式下,这个状态除了是正数来标记节点被删除/出错 之外没有任何作用,这也印证了注释里说的,很多情况下只需要判断正负即可
经过了shouldParkAfterFailedAcquire,如果返回true,就代表已经准备好了,可以直接park挂起了。反之,第一遍循环会返回false,shouldParkAfterFailedAcquire会把前驱节点设置好,再下一个循环就会返回true了,效果是一样的
接着会执行parkAndCheckInterrupt:
java
private final boolean parkAndCheckInterrupt() {
    LockSupport.park(this);
    return Thread.interrupted();
}
代码相对简单,单纯的park线程,队列中所有的节点(线程)都会在这个地方被挂起
如果有中断将其唤醒,就会返回Thread.interrupted(),就是true,这样acquireQueued就会把打断标记设置为true,从而记录下是否被中断过(详细解释请看acquire开头的Note)
这里其实acquire就差不多了
但是要注意,如果中途出现了异常,就会触发cancelAcquire:
java
private void cancelAcquire(Node node) {
    if (node == null)	//如果当前节点不存在直接返回
        return;

    node.thread = null;	//把节点的线程设成空

    Node pred = node.prev;
    while (pred.waitStatus > 0)
        node.prev = pred = pred.prev;
					//和之前的shouldParkAfterFailedAcquire有点像,找前面能用的第一个前驱节点
    Node predNext = pred.next;

    node.waitStatus = Node.CANCELLED;	//把当前节点设成已取消

    //如果已经是尾节点了,把自己删掉再把前驱节点连上null就行
    if (node == tail && compareAndSetTail(node, pred)) {
        compareAndSetNext(pred, predNext, null);
    } else {

        int ws;
        if (pred != head &&
            ((ws = pred.waitStatus) == Node.SIGNAL ||
             (ws <= 0 && compareAndSetWaitStatus(pred, ws, Node.SIGNAL))) &&
            pred.thread != null) {	//尝试方式1:如果前继节点不是头结点且是正常的或者能把前驱节点设成SIGNAL且线程不为空
            Node next = node.next;	//就会把前驱节点的next设成自己的next,相当于"跳过"当前节点
            if (next != null && next.waitStatus <= 0)
                compareAndSetNext(pred, predNext, next);
        } else {
            unparkSuccessor(node);	//方式2:不能通过方式1来正常删除自己,那么只能手动尝试唤醒后继节点,因为这个节点已经失效了
        }						//不去手动唤醒其后面的节点那这些节点将不可能被调用,就会死锁

        node.next = node; // 切断node的联系,帮助GC来将其回收
    }
}
那unparkSuccessor又是怎么工作的呢?
java
private void unparkSuccessor(Node node) {

    int ws = node.waitStatus;
    if (ws < 0)
        compareAndSetWaitStatus(node, ws, 0);
    //如果当前节点状态不为0,就换成0,标记为无状态
    Node s = node.next;
    if (s == null || s.waitStatus > 0) {
        s = null;
        for (Node t = tail; t != null && t != node; t = t.prev)
            if (t.waitStatus <= 0)
                s = t;
    }	//这里会找到其下一个合法的后继节点,如果其next不是个有效节点,就会从后往前找到一个最接近自己的节点将其唤醒

    if (s != null)
        LockSupport.unpark(s.thread);
}
这里看上去可能会有个疑惑:唤醒的线程会不会因为自己不是头结点的后继节点而被继续挂起呢?
然而实际上,这里的一系列操作都会保证这里唤醒的节点一定是头节点的后继节点,因为
java
if (pred != head &&
            ((ws = pred.waitStatus) == Node.SIGNAL ||
             (ws <= 0 && compareAndSetWaitStatus(pred, ws, Node.SIGNAL))) &&
            pred.thread != null)
只要前驱节点是头节点就一定是false,就会直接唤醒
就这样,acquire巧妙且优雅的实现了线程入队等待以及唤醒后继节点并正确的处理异常
小总结
其实还是比较好理解的,只要理解了基本框架,接下来的超时锁,可打断锁,条件队列这些就不足为惧了
超时锁,可打断锁源码剖析
java
public boolean tryLock(long timeout, TimeUnit unit)
        throws InterruptedException {
    return sync.tryAcquireNanos(1, unit.toNanos(timeout));
}
这是位于ReentrantLock的接口,给定超时时间和单位,会调用tryAcquireNanos
注意!调用一次只会锁一次!这里硬编码成了一次
进入tryAcquireNanos:
Java
public final boolean tryAcquireNanos(int arg, long nanosTimeout)
        throws InterruptedException {
    if (Thread.interrupted())
        throw new InterruptedException();
    return tryAcquire(arg) ||
        doAcquireNanos(arg, nanosTimeout);
}
这里已经进入了AbstractQueuedSynchronizer类,可以看出,超时锁也属于非公平锁,因为会先尝试tryAcquire获取一次锁
超时锁都会抛出InterruptedException,意味着只要有中断就会直接抛出
这里先尝试直接获得锁tryAcquire,如果不行的话就会加入队列(带超时)doAcquireNanos(arg, nanosTimeout)
跟进去:
java
private boolean doAcquireNanos(int arg, long nanosTimeout)
        throws InterruptedException {
    if (nanosTimeout <= 0L)
        return false;	//如果等待时间为负,不合法直接返回false
    final long deadline = System.nanoTime() + nanosTimeout;	//final变量,是过期时间
    final Node node = addWaiter(Node.EXCLUSIVE);
    boolean failed = true;	//acquireQueued一样
    try {
        for (;;) {
            final Node p = node.predecessor();
            if (p == head && tryAcquire(arg)) {
                setHead(node);
                p.next = null; // 设成null来让GC回收
                failed = false;
                return true;	//和之前的acquireQueued一样
            }
            nanosTimeout = deadline - System.nanoTime();
            if (nanosTimeout <= 0L)
                return false;	//判断是否到期了,nanosTimeout是还剩的时间
            if (shouldParkAfterFailedAcquire(p, node) &&
                nanosTimeout > spinForTimeoutThreshold)
                LockSupport.parkNanos(this, nanosTimeout);	//这里如果获取锁失败,如果可以正常挂起,且剩下的时间大于预设值,就
            											//会挂起,否则会直接自旋
            if (Thread.interrupted())
                throw new InterruptedException();	//判断被打断了就直接抛出异常
        }
    } finally {
        if (failed)
            cancelAcquire(node);	//有异常就取消当前节点,和之前的acquireQueued一样
    }
}
这里的spinForTimeoutThreshold是一个固定值,是1000L,如果一个节点只剩了1000L纳秒,也就是一微秒,就会直接自旋而不是挂起,这样能一定程度上节省线程状态切换带来的性能损耗
其他的原理和acquireQueued一模一样,本质上只是加了个超时机制和抛出异常的功能
可打断锁的话,那更简单了
java
public void lockInterruptibly() throws InterruptedException {
    sync.acquireInterruptibly(1);
}
这是入口
java
public final void acquireInterruptibly(int arg)
        throws InterruptedException {
    if (Thread.interrupted())
        throw new InterruptedException();
    if (!tryAcquire(arg))
        doAcquireInterruptibly(arg);
}
可以看出,可打断锁也属于非公平锁,因为会先尝试tryAcquire获取一次锁
跟进去是这样,会检测打断并抛出
java
private void doAcquireInterruptibly(int arg)
    throws InterruptedException {
    final Node node = addWaiter(Node.EXCLUSIVE);
    boolean failed = true;
    try {
        for (;;) {
            final Node p = node.predecessor();
            if (p == head && tryAcquire(arg)) {
                setHead(node);
                p.next = null; // help GC
                failed = false;
                return;
            }
            if (shouldParkAfterFailedAcquire(p, node) &&
                parkAndCheckInterrupt())
                throw new InterruptedException();
        }
    } finally {
        if (failed)
            cancelAcquire(node);
    }
}
把原来的把打断标志直接换成了抛出异常
超时,可打断锁小总结
本质上就是把普通的可重入锁加了个超时结束,遇到打断直接抛出异常
最大的区别在于,原本的可重入锁对于中断并不会取消该节点,而是会吞掉这个中断,等当前节点执行完再设置中断
而超时,可打断锁一旦遇到中断就会直接抛出中断异常,导致当前节点直接被取消,这是最大的区别
其他地方,和普通的可重入锁没有任何区别
总结
ReentrantLock是一个独占模式,分为公平与非公平的,支持超时与可打断锁的一个锁工具类
采用AQS作为框架,AQS为其提供了同步队列来高效的管理线程
代码堪称鬼斧神工,没有一行代码是多余的,赞美大哥李
源码里面的注释也非常详细,读一下会有不小的收获
前前后后研究了快一个星期,虽然中间有事耽误了,但仍然很花时间(代码太过高超)
ReentrantLock只用到了AQS中的一部分,还有共享锁,读写锁等等,无不是代码瑰宝
ReentrantLock可以说是里面最简单的,学懂了ReentrantLock的原理后学习其他内容就会轻松不少!
后面我也会尝试写一下其他锁的源码分析...