通过本篇博客,你会学习到在vue项目的基础上,引入高德地图、自制点标记、轨迹绘制。欢迎大家访问我其他博客网站(微信公众号、掘金),都是同名(极客三刀流)
1. 准备工作
1. 搭建你自己的vue项目
2. 成为高德开发者
按照官方文档(准备-地图 JS API 2.0|高德地图API)创建API,记住你的key、安全秘钥,我绑定的服务为Web端

3. npm安装Loader
bash
npm i @amap/amap-jsapi-loader --save创建地图
下面的标题1-3的实现步骤 都能在官方文档中找到(JS API 结合 Vue 使用-基础-进阶教程-地图 JS API 2.0|高德地图API)
1. 创建地图容器
html
<template>
  <div id = "container">

  </div>
</template>
2. 设置地图样式
css
<style>
#container {
  margin: auto auto;
  width: calc(100vw - 200px);
  height: calc(100vh - 50px);
}
</style>
3. js部分代码
js
<script setup>
import { onMounted, onUnmounted } from "vue";
import AMapLoader from "@amap/amap-jsapi-loader";

let map = null;

onMounted(() => {
  window._AMapSecurityConfig = {
    securityJsCode: "「你申请的安全密钥」",
  };
  AMapLoader.load({
    key: "[你申请的key]", // 申请好的Web端开发者Key,首次调用 load 时必填
    version: "2.0", // 指定要加载的 JSAPI 的版本,缺省时默认为 1.4.15
    plugins: ["AMap.Scale"], //需要使用的的插件列表,如比例尺'AMap.Scale',支持添加多个如:['...','...']
  })
    .then((AMap) => {
      map = new AMap.Map("container", {
        // 设置地图容器id
        viewMode: "3D", // 是否为3D地图模式
        zoom: 11, // 初始化地图级别
        center: [116.397428, 39.90923], // 初始化地图中心点位置
      });
    })
    .catch((e) => {
      console.log(e);
    });
});

onUnmounted(() => {
  map?.destroy();
});
</script>
4. 完整代码
下面以浙大为例
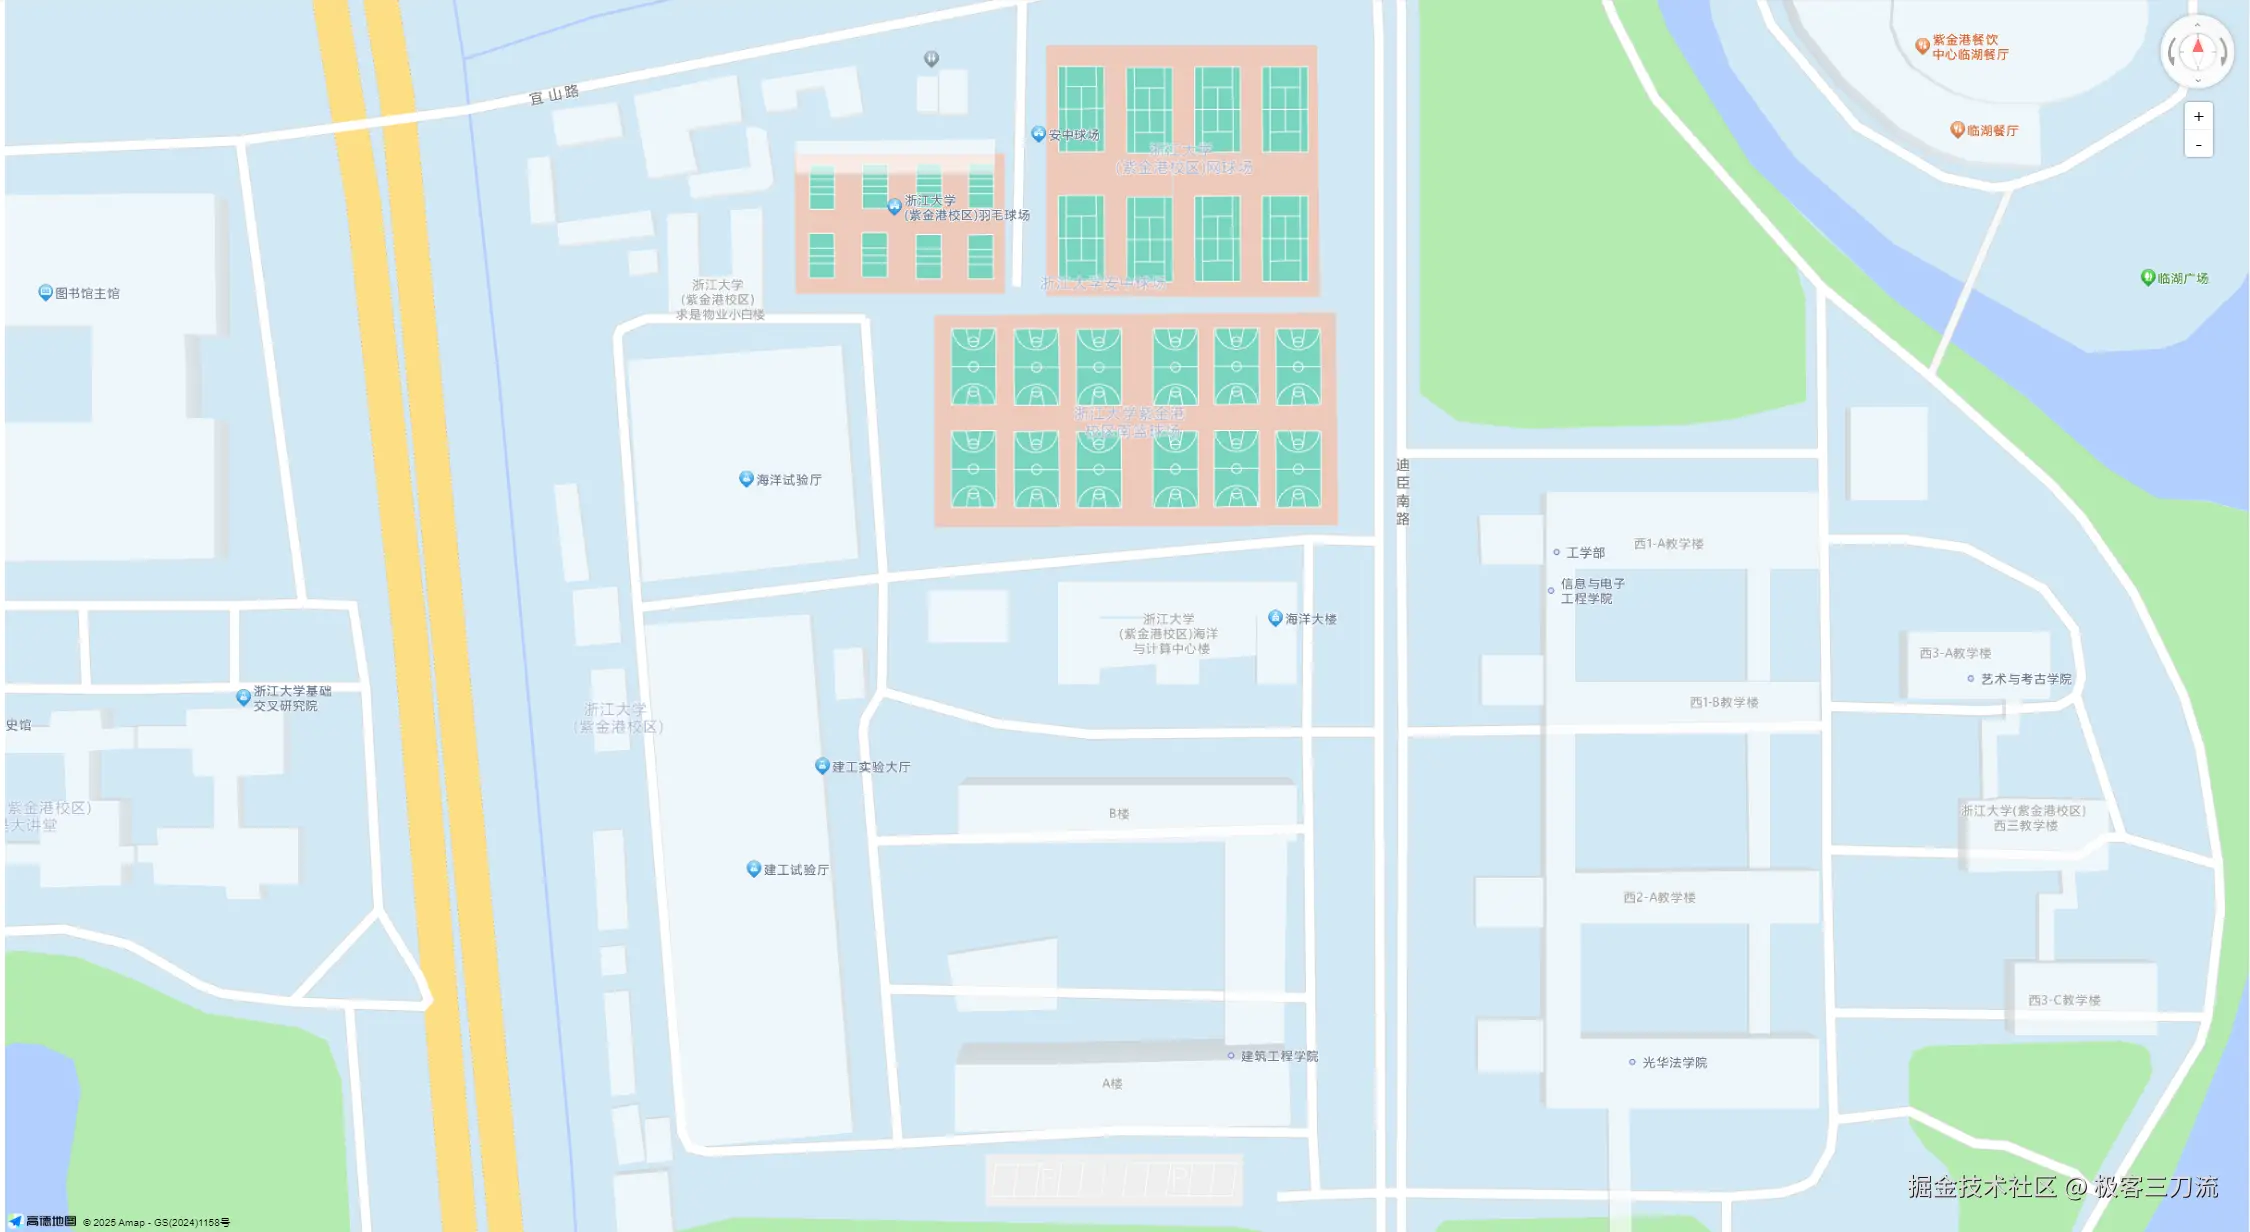
4.1. 效果
浙大地图
html
<template>
<div id="container">
</div>
</template>
<script setup>
import {onMounted, onUnmounted} from "vue";
import AMapLoader from "@amap/amap-jsapi-loader";
let map = null; // 地图命名
onMounted(() => {
window._AMapSecurityConfig = {
securityJsCode: "「你申请的安全密钥」",
};
AMapLoader.load({
key: "[你申请的key]", // 申请好的Web端开发者Key,首次调用 load 时必填
version: "2.0", // 指定要加载的 JSAPI 的版本,缺省时默认为 1.4.15 plugins: ["AMap.Scale"], //需要使用的的插件列表,如比例尺'AMap.Scale',支持添加多个如:['...','...']
})
.then((AMap) => {
map = new AMap.Map("container", {
// 设置地图容器id
viewMode: "3D", // 是否为3D地图模式
rotateEnable: true, //是否开启地图旋转交互 鼠标右键 + 鼠标画圈移动 或 键盘Ctrl + 鼠标左键画圈移动
pitchEnable: true,
zoom: 19, // 初始化地图级别
center: [120.08344, 30.302504], // 初始化地图中心点位置
});
AMap.plugin(['AMap.ControlBar', 'AMap.ToolBar'], function () { //异步加载插件
var controlBar = new AMap.ControlBar({ //控制地图旋转插件
position: {
right: '10px',
top: '10px'
}
});
map.addControl(controlBar);
var toolBar = new AMap.ToolBar({ //地图缩放插件
position: {
right: '40px',
top: '110px'
}
});
map.addControl(toolBar)
});
})
.catch((e) => {
console.log(e);
});
});
onUnmounted(() => {
map?.destroy();
});
</script>
<style>
#container {
margin: auto auto;
width: calc(100vw - 200px);
height: calc(100vh - 50px);
}
/* 点标记 */.custom-content-marker {
text-align: center;
width: 190px;
height: 90px;
border-radius: 50%;
border: 2px solid #0004a1;
background: rgba(183, 226, 255, 0.7);
}
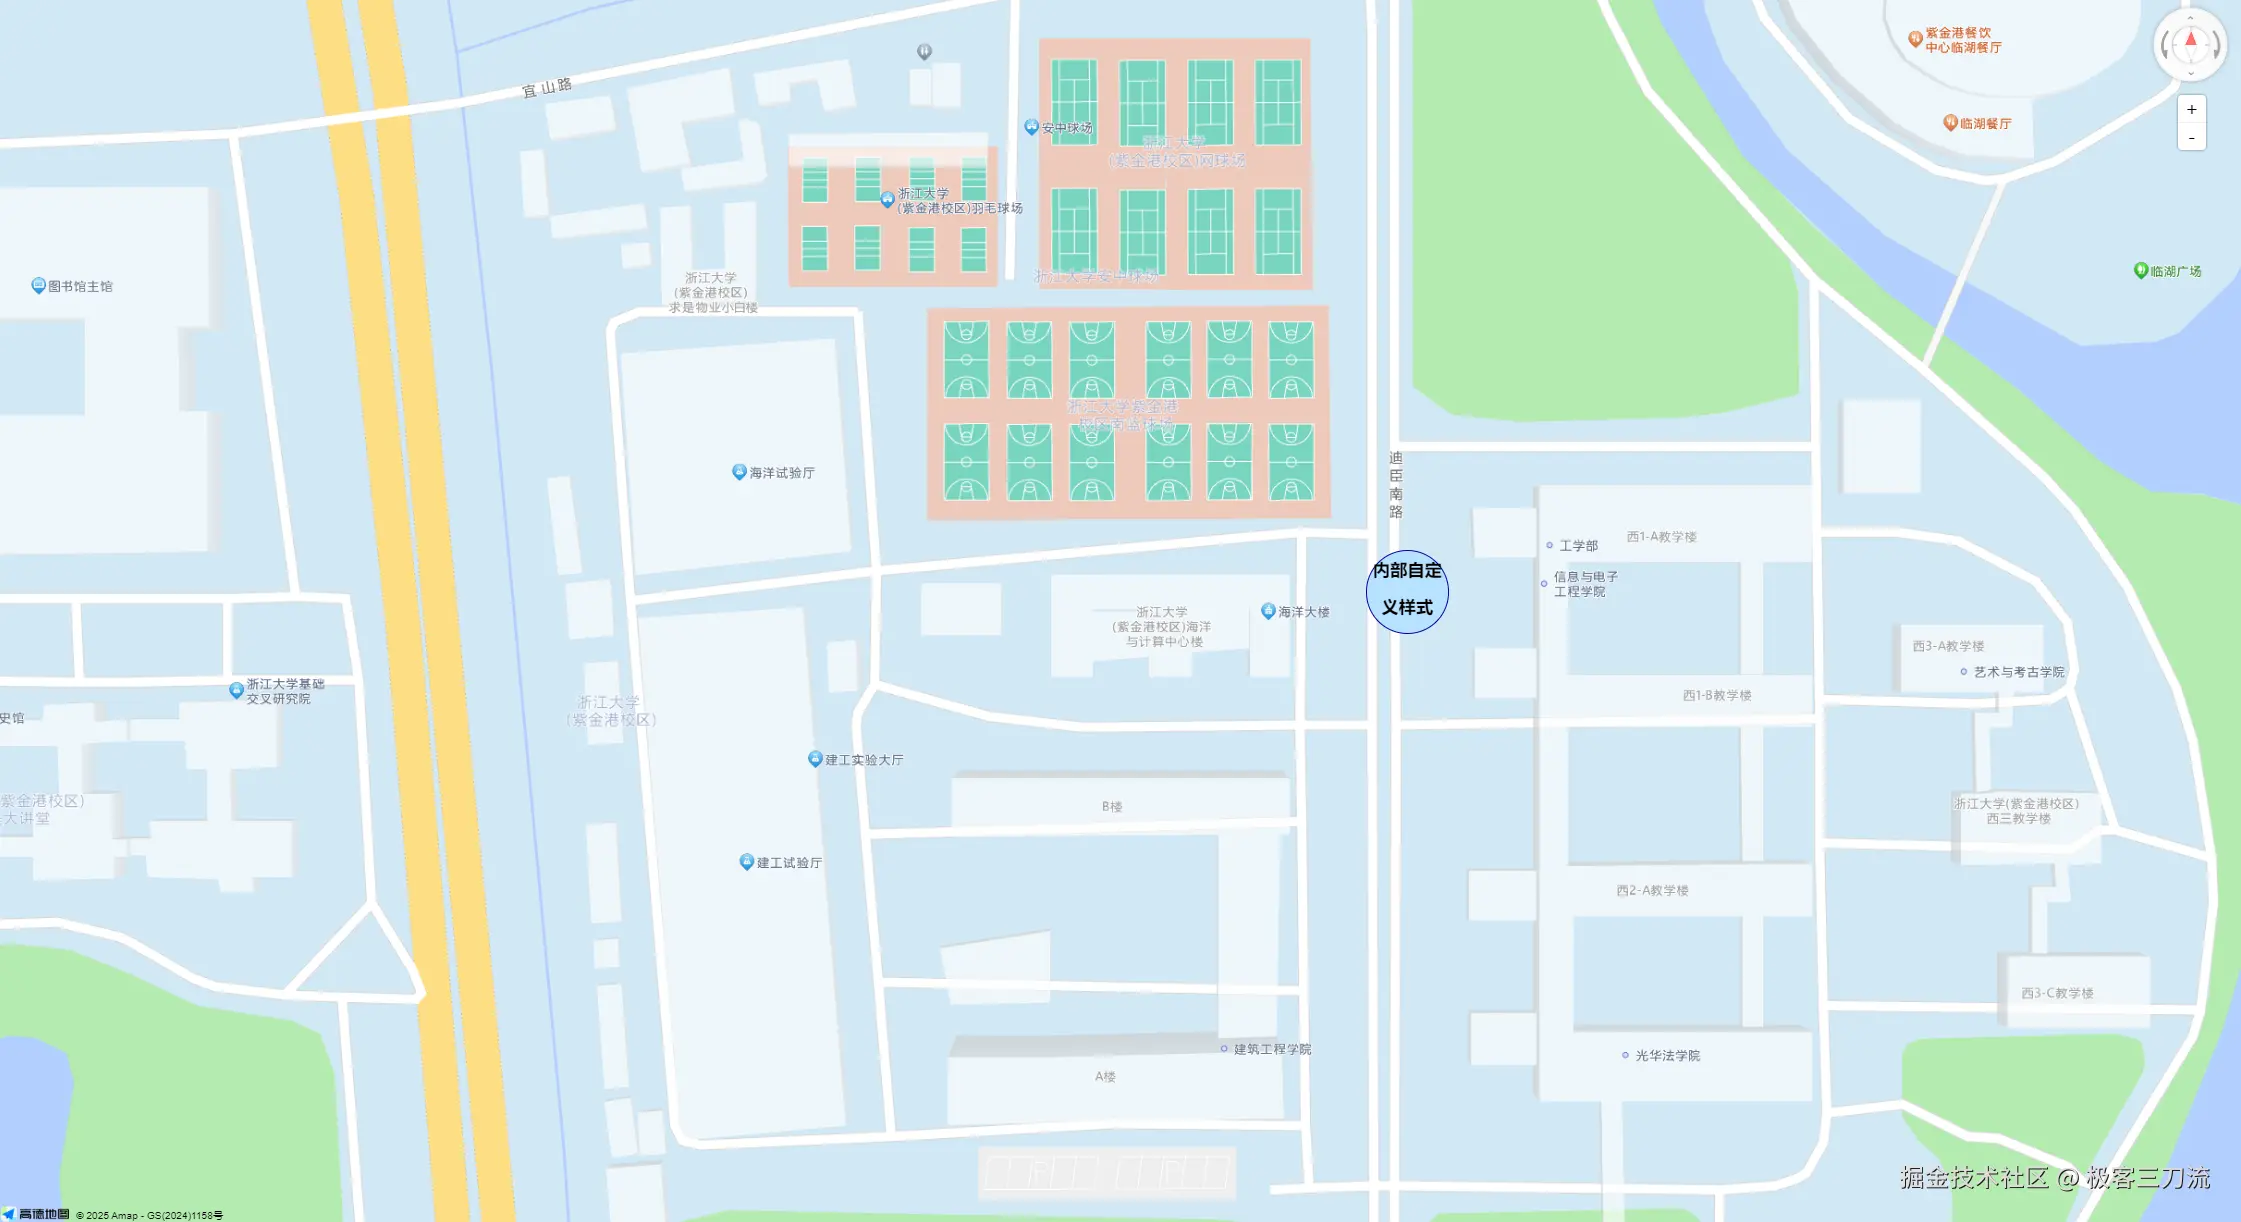
</style>自制点标记
其他基础的点标记,可以在官方文档中默认点标记-点标记-进阶教程-地图 JS API 2.0|高德地图API找到
1. 效果
2. css代码
css
/* 点标记 */
.custom-content-marker {
  text-align: center;
  width: 90px;
  line-height: 40px;
  height: 90px;
  border-radius: 45px;
  border: 2px solid #0004a1;
  background: rgb(183, 226, 255);
}
3. 点标记代码
js
// 自定义点标记
const content = `<div class="custom-content-marker">
   <h3>内部自定义样式</h3>
  </div>`
const marker = new AMap.Marker({
  position: new AMap.LngLat(120.084153, 30.302651), // 点标记位置
  offset: new AMap.Pixel(0, 0), // 偏移量
  title: 'zju',
  content: content, // 自定义点标记内容
});
map.add(marker); // 加入地图
4. 完整代码
html
<template>
<div id="container">
</div>
</template>
<script setup>
import {onMounted, onUnmounted} from "vue";
import AMapLoader from "@amap/amap-jsapi-loader";
let map = null; // 地图命名
onMounted(() => {
window._AMapSecurityConfig = {
securityJsCode: "「你申请的安全密钥」",
};
AMapLoader.load({
key: "[你申请的key]", // 申请好的Web端开发者Key,首次调用 load 时必填
version: "2.0", // 指定要加载的 JSAPI 的版本,缺省时默认为 1.4.15
plugins: ["AMap.Scale"], //需要使用的的插件列表,如比例尺'AMap.Scale',支持添加多个如:['...','...']
})
.then((AMap) => {
map = new AMap.Map("container", {
// 设置地图容器id
viewMode: "3D", // 是否为3D地图模式
rotateEnable: true, //是否开启地图旋转交互 鼠标右键 + 鼠标画圈移动 或 键盘Ctrl + 鼠标左键画圈移动
pitchEnable: true,
zoom: 19, // 初始化地图级别
center: [120.08344, 30.302504], // 初始化地图中心点位置
});
AMap.plugin(['AMap.ControlBar', 'AMap.ToolBar'], function () { //异步加载插件
var controlBar = new AMap.ControlBar({ //控制地图旋转插件
position: {
right: '10px',
top: '10px'
}
});
map.addControl(controlBar);
var toolBar = new AMap.ToolBar({ //地图缩放插件
position: {
right: '40px',
top: '110px'
}
});
map.addControl(toolBar)
});
// 自定义点标记
const content = `<div class="custom-content-marker">
<h3>内部自定义样式</h3>
</div>`
const marker = new AMap.Marker({
position: new AMap.LngLat(120.084153, 30.302651), // 点标记位置
offset: new AMap.Pixel(0, 0), // 偏移量
title: 'zju',
content: content, // 自定义点标记内容
});
map.add(marker); // 加入地图
})
.catch((e) => {
console.log(e);
});
});
onUnmounted(() => {
map?.destroy();
});
</script>
<style>
#container {
margin: auto auto;
width: calc(100vw - 200px);
height: calc(100vh - 50px);
}
/* 点标记 */.custom-content-marker {
text-align: center;
width: 90px;
line-height: 40px;
height: 90px;
border-radius: 45px;
border: 2px solid #0004a1;
background: rgb(183, 226, 255);
}
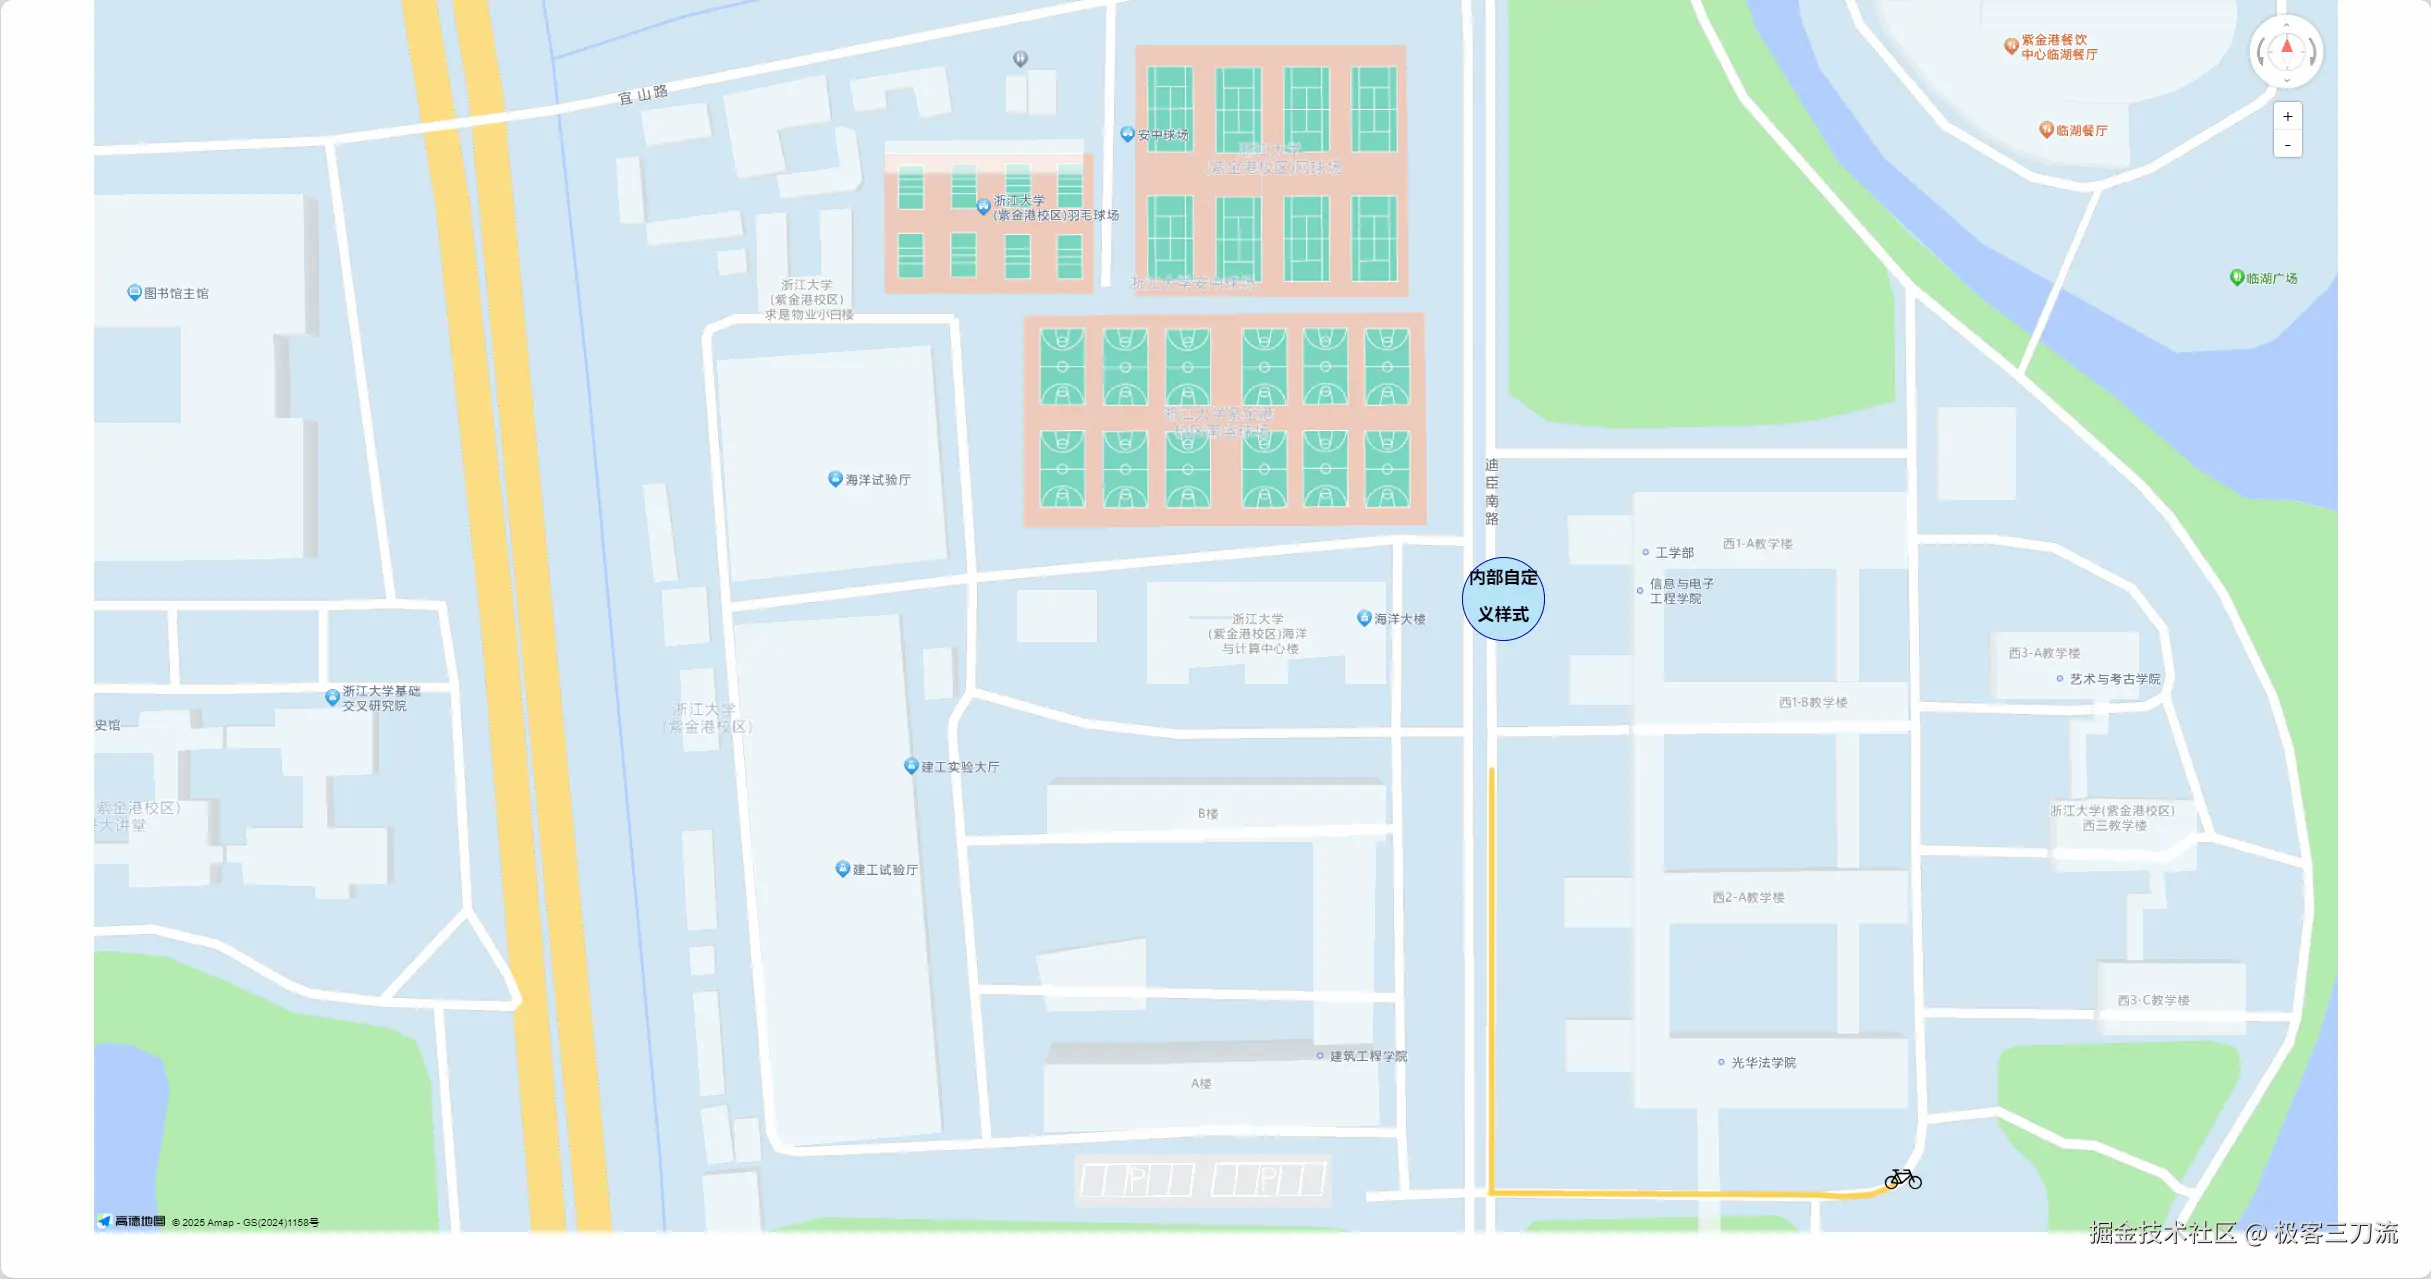
</style>动态轨迹实现
首先选择一种出行方式(如骑车、步行、开车等),可以参考官方文档路线规划-服务插件和工具-进阶教程-地图 JS API 2.0|高德地图API
下面我以骑车为例
1. 效果图
2. 代码
2.1. 新增plugins
在 plugins 中加入AMap.Riding
js
AMapLoader.load({
  key: "[你申请的key]", // 申请好的Web端开发者Key,首次调用 load 时必填
  version: "2.0", // 指定要加载的 JSAPI 的版本,缺省时默认为 1.4.15
  plugins: ["AMap.Scale", "AMap.Riding"], //需要使用的的插件列表,如比例尺'AMap.Scale',支持添加多个如:['...','...']
})
2.2. 规划路径
打开控制台,观察result里的内容,不同出行方式,结果会有区别 选择自行车出行的话,要注意的result.routes[0].rides(因为会跟我们接下轨迹绘制有关系)
js
//骑行导航
var riding = new AMap.Riding({
  map: map,
  panel: "panel"
});
//根据起终点坐标规划骑行路线
riding.search([120.084268,30.302119], [120.08541,30.301091], function (status, result) {
  if (status === 'complete') {
    console.log('绘制骑行路线完成', result)
    const route = result.routes[0];
    // console.log('route', route)
	 route.rides.forEach(ride => {
      ride.path.forEach(point => {
        path.push(point)
      })
    })
    // console.log(path)
    drawLine()
  } else {
    console.log('骑行路线数据查询失败')
  }
});
2.3. 轨迹绘制
我将其命名为 drawLine
2.3.1. 引入图片
js
import cyclePng from "@/assets/cycle.png";2.3.2. path数组
用于存储路径点
js
let path = [];// 存储路径点2.3.3. drawLine
内部要设置定时器,最后别忘记关掉
js
let cycleMarker = null
let index = 0;
const drawLine = () => {
  let polyLine = new AMap.Polyline({
    map: map,
    path: [],
    strokeColor: "#fed151",
    strokeOpacity: 1,
    strokeWeight: 6,
    strokeStyle: "solid",
    strokeDasharray: [10, 5],
    lineJoin: "round",
    lineCap: "round",
    cursor: "pointer",
    zIndex: 50
  });

  let index = 0;
  const interval = setInterval(() => {
    /**
     * 自行车图标
     * @type {AMap.Icon}
     */
    const cycleIcon = new AMap.Icon({
      size: new AMap.Size(40, 40), //图标大小
      image: cyclePng,
      imageSize: new AMap.Size(40, 40),
    });

    if (index < path.length) {
      polyLine.setPath(path.slice(0, index + 1));

      // 移除之前的图标如果存在
      if (cycleMarker) {
        cycleMarker.setMap(null);
        cycleMarker = null;
      }

      if (index > 0) {
        const startPoint = path[index - 1];
        const endPoint = path[index];

        // 计算方向(箭头的角度)
        const dx = endPoint[0] - startPoint[0];
        const dy = endPoint[1] - startPoint[1];
        const angle = Math.atan2(dy, dx) * (180 / Math.PI);

        /**
         * 自行车 marker
         * @type {Property.Marker}
         */
        cycleMarker = new AMap.Marker({
          map: map,
          position: endPoint,
          icon: cycleIcon,
          offset: new AMap.Pixel(-12, -24),
          angle: angle
        });
      } else {
        // 若只有一个点
        cycleMarker = new AMap.Marker({
          map: map,
          position: path[index],
          icon: cycleIcon,
          offset: new AMap.Pixel(-12, -24),
          angle: 0
        });
      }
      index++;
    } else {
      clearInterval(interval);
    }
  }, 300); // 每100ms读取一个点
}
完整代码
html
<template>
  <div id="container">

  </div>
</template>

<script setup>
import {onMounted, onUnmounted} from "vue";
import AMapLoader from "@amap/amap-jsapi-loader";
import cyclePng from "@/assets/cycle.png";

let map = null;  // 地图命名
let path = [];// 存储路径点

onMounted(() => {
  window._AMapSecurityConfig = {
    securityJsCode: "「你申请的安全密钥」",
  };

  AMapLoader.load({
	key: "[你申请的key]", // 申请好的Web端开发者Key,首次调用 load 时必填
    version: "2.0", // 指定要加载的 JSAPI 的版本,缺省时默认为 1.4.15
    plugins: ["AMap.Scale", "AMap.Riding"], //需要使用的的插件列表,如比例尺'AMap.Scale',支持添加多个如:['...','...']
  })
      .then((AMap) => {
        map = new AMap.Map("container", {
          // 设置地图容器id
          viewMode: "3D", // 是否为3D地图模式
          rotateEnable: true, //是否开启地图旋转交互 鼠标右键 + 鼠标画圈移动 或 键盘Ctrl + 鼠标左键画圈移动
          pitchEnable: true,
          zoom: 19, // 初始化地图级别
          center: [120.08344, 30.302504], // 初始化地图中心点位置
        });


        AMap.plugin(['AMap.ControlBar', 'AMap.ToolBar'], function () { //异步加载插件
          var controlBar = new AMap.ControlBar({ //控制地图旋转插件
            position: {
              right: '10px',
              top: '10px'
            }
          });
          map.addControl(controlBar);
          var toolBar = new AMap.ToolBar({ //地图缩放插件
            position: {
              right: '40px',
              top: '110px'
            }
          });
          map.addControl(toolBar)
        });

        // 自定义点标记
        const content = `<div class="custom-content-marker">
           <h3>内部自定义样式</h3>
          </div>`
        const marker = new AMap.Marker({
          position: new AMap.LngLat(120.084153, 30.302651), // 点标记位置
          offset: new AMap.Pixel(0, 0), // 偏移量
          title: 'zju',
          content: content, // 自定义点标记内容
        });
        map.add(marker); // 加入地图

        //骑行导航
        var riding = new AMap.Riding({
          map: map,
          panel: "panel"
        });
        //根据起终点坐标规划骑行路线
        riding.search([120.084268,30.302119], [120.08541,30.301091], function (status, result) {
          if (status === 'complete') {
            console.log('绘制骑行路线完成', result)
            const route = result.routes[0];
            // console.log('route', route)
            // console.log('route.rides.path', route.rides[0].path)
            route.rides.forEach(ride => {
              ride.path.forEach(point => {
                path.push(point)
              })
            })
            // console.log(path)
            drawLine()
          } else {
            console.log('骑行路线数据查询失败')
          }
        });


      })
      .catch((e) => {
        console.log(e);
      });
});

onUnmounted(() => {
  map?.destroy();
});

let cycleMarker = null
let index = 0;
const drawLine = () => {
  let polyLine = new AMap.Polyline({
    map: map,
    path: [],
    strokeColor: "#fed151",
    strokeOpacity: 1,
    strokeWeight: 6,
    strokeStyle: "solid",
    strokeDasharray: [10, 5],
    lineJoin: "round",
    lineCap: "round",
    cursor: "pointer",
    zIndex: 50
  });

  let index = 0;
  const interval = setInterval(() => {
    /**
     * 自行车图标
     * @type {AMap.Icon}
     */
    const cycleIcon = new AMap.Icon({
      size: new AMap.Size(40, 40), //图标大小
      image: cyclePng,
      imageSize: new AMap.Size(40, 40),
    });

    if (index < path.length) {
      polyLine.setPath(path.slice(0, index + 1));

      // 移除之前的图标如果存在
      if (cycleMarker) {
        cycleMarker.setMap(null);
        cycleMarker = null;
      }

      if (index > 0) {
        const startPoint = path[index - 1];
        const endPoint = path[index];

        // 计算方向(箭头的角度)
        const dx = endPoint[0] - startPoint[0];
        const dy = endPoint[1] - startPoint[1];
        const angle = Math.atan2(dy, dx) * (180 / Math.PI);

        /**
         * 自行车 marker
         * @type {Property.Marker}
         */
        cycleMarker = new AMap.Marker({
          map: map,
          position: endPoint,
          icon: cycleIcon,
          offset: new AMap.Pixel(-12, -24),
          angle: angle
        });
      } else {
        // 若只有一个点
        cycleMarker = new AMap.Marker({
          map: map,
          position: path[index],
          icon: cycleIcon,
          offset: new AMap.Pixel(-12, -24),
          angle: 0
        });
      }
      index++;
    } else {
      clearInterval(interval);
    }
  }, 300); // 每100ms读取一个点
}

</script>

<style>
#container {
  margin: auto auto;
  width: calc(100vw - 200px);
  height: calc(100vh - 50px);
}

/* 点标记 */
.custom-content-marker {
  text-align: center;
  width: 90px;
  line-height: 40px;
  height: 90px;
  border-radius: 45px;
  border: 2px solid #0004a1;
  background: rgb(183, 226, 255);
}
</style>