前言
MCP (Model Context Protocol)即模型上下文协议目前不要太火爆了,关于它是什么相信大家已经很熟悉了。目前主流的AI开发框架和AI工具都支持集成MCP,这也正是它的意义所在。毕竟作为一个标准的协议,当然是更多的生态接入进来才会有意义。使用MCP我们可以把Tools调用标准化,这意味着我们可以忽略语言、框架快速把工具融合到不同的模型中去。现在,如何把现有的业务逻辑快速的接入到模型中,成为模型落地很关键的一步,今天我们就借助微软的Semantic Kernel和Microsoft.Extensions.AI框架,通过简单的示例展示,如何把现有的ASP NET Core WebApi转换成MCP Server。
概念相关
接下来我们大致介绍一下本文设计到的相关的概念以及涉及到的相关类库
MCP
MCP是一个开放协议,它为应用程序向 LLM 提供上下文的方式进行了标准化。它的重点是标准化,而不是取代谁。它涉及到几个核心的概念
- MCP Hosts: 如
Claude Desktop、IDE、AI工具、或者是你开发的AI程序等 - MCP Clients: 维护与
MCP Servers一对一连接的协议客户端 - MCP Servers: 轻量级程序,通过标准的
Model Context Protocol提供特定能力
简单来说就是你写的AI应用就是MCP Hosts,因为MCP是一个协议,所以你需要通过MCP Clients访问MCP Servers,MCP Servers提供的就是工具或者一些其他能力。需要说明的是,如果想在AI应用中使用MCP,模型需要支持Function Calling,当然如果你能通过提示词的方式调试出来也是可以的,但是效果肯定不如本身就支持Function Calling。
因为MCP是一个开放协议,所以我们可以把原来固定在AI应用里的工具代码单独抽离出来,使用不同的开发语言形成独立的应用,这样这个Tools应用就可以和AI应用隔离,他们可以不是同一种语言,甚至可以在不同的机器上。所以现在很多开源的组件和平台都可以提供自己的MCP Server了。就和没有微服务概念之前我们代码都写到一个项目里,有了微服务之后我们可以把不同的模块形成单独的项目,甚至可以使用不同的开发语言。可以通过HTTP、RPC等多种方式进行通信。
框架
简单介绍一下本文涉及到的相关框架及地址:
-
Microsoft.Extensions.AI:微软提供的通过.NET实现AIGC操作的开发基础框架,提供了基础
对话和Function Calling等基础操作,使用简单扩展性强,支持OTEL要测协议监控模型调用情况。目前已适配Ollama、OpenAI、Azure OpenAI等。项目地址https://github.com/dotnet/extensions/tree/main/src/Libraries/Microsoft.Extensions.AI -
Semantic Kernel:以
Microsoft.Extensions.AI为基础(低版本的不是)打造的更强大的AI开发框架,提供了基础对话和Function Calling功能的同时,还提供了多模态、RAG、智能体、流程处理等强大的应用级功能,有.NET、Python、Java三种语言版本。项目地址https://github.com/microsoft/semantic-kernel -
mcpdotnet(modelcontextprotocol/csharp-sdk):原名为mcpdotnet,现在是.NET构建MCP的官方项目,可以使的Microsoft.Extensions.AI和Semantic Kernel快速的适配到MCP。项目地址https://github.com/modelcontextprotocol/csharp-sdk
实现
整体来说实现的思路也很简单,因为Semantic Kernel支持加载OpenAPI格式的数据加载成它的Plugins,我们可以把Plugins转换成Microsoft.Extensions.AI提供的标准的AIFunction类型,通过mcpdotnet可以把AIFunction标准类型转换成mcpdotnet的Tools。
WebApi
我们需要新建一个ASP.NET Core WebAPI项目,用来完成查询天气的功能。首先,添加Swagger支持。当然你使用别的库也可以,这里的重点就是可以得到该项目接口的OpenAPI数据信息。
<PackageReference Include="Swashbuckle.AspNetCore" Version="8.1.1" />其次,添加根据IP查询地址信息的功能
<PackageReference Include="IPTools.China" Version="1.6.0" />因为IPTools使用的是sqlite数据库,所以需要把db加载到项目里。具体使用细节可以查看该库的具体地址https://github.com/stulzq/IPTools
<ItemGroup>
 <None Update="ip2region.db">
    <CopyToOutputDirectory>Always</CopyToOutputDirectory>
  </None>
</ItemGroup>接下来实现具体功能的Controller代码
csharp
 /// <summary>
 /// 获取城市天气
 /// </summary>
 [ApiController]
 [Route("api/[controller]/[action]")]
 public class WeatherController(IHttpClientFactory _httpClientFactory) : ControllerBase
 {
     /// <summary>
     /// 获取当前时间
     /// </summary>
     /// <returns>当前时间</returns>
     [HttpGet]
     public string GetCurrentDate()
     {
         return DateTime.Now.ToString("MM/dd");
     }

     /// <summary>
     /// 获取当前城市信息
     /// </summary>
     /// <returns>当前城市信息</returns>
     [HttpGet]
     public async Task<IpInfo> GetLocation()
     {
         var httpClient = _httpClientFactory.CreateClient();
         IpData ipInfo = await httpClient.GetFromJsonAsync<IpData>("https://ipinfo.io/json");
         var ipinfo = IpTool.Search(ipInfo!.ip);
         return ipinfo;
     }

     /// <summary>
     /// 获取天气信息
     /// </summary>
     /// <param name="region">省份</param>
     /// <param name="city">城市</param>
     /// <param name="currentDate">日期(格式:月份/日期)</param>
     /// <returns>天气信息</returns>
     [HttpGet]
     public async Task<string> GetCurrentWeather(string region, string city, string currentDate)
     {
         var httpClient = _httpClientFactory.CreateClient();
         WeatherRoot weatherRoot = await httpClient.GetFromJsonAsync<WeatherRoot>($"https://cn.apihz.cn/api/tianqi/tqybmoji15.php?id=88888888&key=88888888&sheng={region!}&place={city!}")!;
         DataItem today = weatherRoot!.data!.FirstOrDefault(i => i.week2 == currentDate)!;
         return $"{today!.week2} {today.week1},天气{today.wea1}转{today.wea2}。最高气温{today.wendu1}摄氏度,最低气温{today.wendu2}摄氏度。";
     }
 }

public class IpData
{
    public string ip { get; set; }
    public string city { get; set; }
    public string region { get; set; }
    public string country { get; set; }
    public string loc { get; set; }
    public string org { get; set; }
    public string postal { get; set; }
    public string timezone { get; set; }
    public string readme { get; set; }
}

public class DataItem
{
    public string week1 { get; set; }
    public string week2 { get; set; }
    public string wea1 { get; set; }
    public string wea2 { get; set; }
    public string wendu1 { get; set; }
    public string wendu2 { get; set; }
    public string img1 { get; set; }
    public string img2 { get; set; }
}

public class WeatherRoot
{
    public List<DataItem> data { get; set; }
    public int code { get; set; }
    public string place { get; set; }
}
代码里实现了三个action,分别是获取城市天气、获取当前城市信息、获取天气信息接口。接下来添加项目配置
csharp
var builder = WebApplication.CreateBuilder(args);

builder.Services.AddControllers();
builder.Services.AddEndpointsApiExplorer();
builder.Services.AddSwaggerGen(options =>
{
    options.SwaggerDoc("v1", new OpenApiInfo
    {
        Version = "v1",
        Title = "",
        Description = "",
    });

    var xmlFilename = $"{Assembly.GetExecutingAssembly().GetName().Name}.xml";
    options.IncludeXmlComments(Path.Combine(AppContext.BaseDirectory, xmlFilename));
});
builder.Services.AddHttpClient();

var app = builder.Build();

//使用OpenApi的版本信息
app.UseSwagger(options =>
{
    options.OpenApiVersion = Microsoft.OpenApi.OpenApiSpecVersion.OpenApi3_0;
});
app.UseSwaggerUI(options =>
{
    options.SwaggerEndpoint("/swagger/v1/swagger.json", "v1");
});

app.UseAuthorization();

app.MapControllers();

app.Run();完成上面的代码之后,可以运行起来该项目。通过http://项目地址:端口/swagger/v1/swagger.json获取WebApi接口的OpenAPI的数据格式。
MCP Server
接下来搭建MCP Server项目,来把上面的WebApi项目转换成MCP Server。首先添加MCP和SemanticKernel OpenApi涉及到的类库,因为我们需要使用SemanticKernel来把swagger.json加载成Plugins
<ItemGroup>
  <PackageReference Include="Microsoft.Extensions.Hosting" Version="8.0.0" />
  <PackageReference Include="Microsoft.SemanticKernel.Plugins.OpenApi" Version="1.47.0" />
  <PackageReference Include="ModelContextProtocol" Version="0.1.0-preview.11" />
</ItemGroup>
接下来我们来编写具体的代码实现
csharp
IKernelBuilder kernelBuilder = Kernel.CreateBuilder();;
Kernel kernel = kernelBuilder.Build();

#pragma warning disable SKEXP0040

//把swagger.json加载成Plugin
//这里也可以是本地路径或者是文件流
await kernel.ImportPluginFromOpenApiAsync(
   pluginName: "city_date_weather",
   uri: new Uri("http://localhost:5021/swagger/v1/swagger.json"),
   executionParameters: new OpenApiFunctionExecutionParameters
   {
       EnablePayloadNamespacing = true
   }
 );

#pragma warning restore SKEXP0040

var builder = Host.CreateEmptyApplicationBuilder(settings: null);
builder.Services
    //添加MCP Server
    .AddMcpServer()
    //使用Stdio模式
    .WithStdioServerTransport()
    //把Plugins转换成McpServerTool
    .WithTools(kernel.Plugins);

await builder.Build().RunAsync();


public static class McpServerBuilderExtensions
{
    /// <summary>
    /// 把Plugins转换成McpServerTool
    /// </summary>
    public static IMcpServerBuilder WithTools(this IMcpServerBuilder builder, KernelPluginCollection plugins)
    {
        foreach (var plugin in plugins)
        {
            foreach (var function in plugin)
            {
                builder.Services.AddSingleton(services => McpServerTool.Create(function.AsAIFunction()));
            }
        }

        return builder;
    }
}
MCP的传输层协议可以使用
stdio(既标准输入输出)、sse或者是streamable,甚至是自定义的方式进行通信。其中stdio可以本机进程间通信,sse或者是streamable进行远程通信。它的消息格式,或者理解为数据传输的格式是JSON-RPC 2.0。
其中ImportPluginFromOpenApiAsync方法是其中比较关键的点,它是把OpenApi接口信息转换成Kernel Plugins。它通过读取swagger.json里的接口信息的元数据构建成KernelFunction实例,而具体的触发操作则转换成Http调用。具体的实现方式可以通过阅读CreateRestApiFunction方法源码的实现。
再次AsAIFunction方法则是把KernelFunctionFromMethod转换成KernelAIFunction,因为KernelFunctionFromMethod是继承了KernelFunction类,KernelAIFunction则是继承了AIFunction类,所以这个操作是把KernelFunction转换成AIFunction。可以把KernelAIFunction理解成KernelFunction的外观类,它只是包装了KernelFunction的操作,所以触发的时候还是KernelFunctionFromMethod里的操作。具体的实现可以查看KernelAIFunction类的实现。
几句简单的代码既可以实现一个Mcp Server,虽然上面我们使用的是Uri的方式加载的OpenAPI文档地址,但是它也支持本地文件地址或者文件流的方式。不得不说微软体系下的框架在具体的落地方面做得确实够实用,因为具体的逻辑都是WebApi实现的,Mcp Server只是一个媒介。
MCP Client
最后实现的是MCP Client是为了验证Mcp Server效果用的,这里可以使用任何框架来实现,需要引入ModelContextProtocol和具体的AI框架,AI框架可以是Microsoft.Extensions.AI,也可以是Semantic Kernel。这里我们使用Microsoft.Extensions.AI,因为它足够简单也足够简洁,引入相关的类库
csharp
<ItemGroup>
    <PackageReference Include="Microsoft.Extensions.AI.OpenAI" Version="9.4.3-preview.1.25230.7" />
    <PackageReference Include="ModelContextProtocol" Version="0.1.0-preview.12" />
</ItemGroup>其中ModelContextProtocol提供了McpClient功能,Microsoft.Extensions.AI提供具体的AI功能集成。具体实现如下所示
csharp
//加载McpServer,以为我们构建的是使用Stdio的方式,所以这里直接使用McpServer路径即可
await using IMcpClient mcpClient = await McpClientFactory.CreateAsync(new StdioClientTransport(new()
{
    Name = "city_date_weather",
    Command = "..\\..\\..\\..\\McpServerDemo\\bin\\Debug\\net9.0\\McpServerDemo.exe"
}));

//加载MCP Tools
var tools = await mcpClient.ListToolsAsync();
foreach (AIFunction tool in tools)
{
    Console.WriteLine($"Tool Name: {tool.Name}");
    Console.WriteLine($"Tool Description: {tool.Description}");
    Console.WriteLine();
}

//中文的function calling,国内使用qwen-max系列效果最好
string apiKey = "sk-****";
var chatClient = new ChatClient("qwen-max-2025-01-25", new ApiKeyCredential(apiKey), new OpenAIClientOptions
{
    Endpoint = new Uri("https://dashscope.aliyuncs.com/compatible-mode/v1")
}).AsIChatClient();

IChatClient client = new ChatClientBuilder(chatClient)
    //开启function calling支持
    .UseFunctionInvocation()
    .Build();

//构建Tools
ChatOptions chatOptions = new()
{
    Tools = [.. tools],
};

//创建对话代码
List<Microsoft.Extensions.AI.ChatMessage> chatList = [];

string question = "";
do
{
    Console.Write($"User:");
    question = Console.ReadLine();

    if (string.IsNullOrWhiteSpace(question) || question == "exists")
    {
        break;
    }

    chatList.Add(new Microsoft.Extensions.AI.ChatMessage(ChatRole.User, question));

    Console.Write($"Assistant:");
    StringBuilder sb = new StringBuilder();
    await foreach (var update in client.GetStreamingResponseAsync(chatList, chatOptions))
    {
        if (string.IsNullOrWhiteSpace(update.Text))
        {
            continue;
        }
        sb.Append(update.Text);

        Console.Write(update.Text);
    }

    chatList.Add(new Microsoft.Extensions.AI.ChatMessage(ChatRole.Assistant, sb.ToString()));

    Console.WriteLine();

} while (true);

Console.ReadLine();上面的代码实现了McpClient接入AI应用
- 首先,通过
McpClient加载McpServer里的工具 - 其次,把
MCP Tools加载到Microsoft.Extensions.AI里 - 最后,在和AI模型对话的时候把Tools转换成
function calling。中文的function calling,个人体验下来国内使用qwen-max系列效果最好
其中mcpClient.ListToolsAsync()获取到的是McpClientTool集合,而McpClientTool继承自AIFunction类,具体可查看McpClientTool实现源码。由此可以看出微软封装Microsoft.Extensions.AI基座的重要性,以后更多的框架都可以围绕Microsoft.Extensions.AI进行封装统一操作,这样大大提升了扩展的便捷性。
当然,你也可以使用Semantic Kernel框架进行上面的操作,这里就不过多赘述了,直接上代码
csharp
//加载McpServer,以为我们构建的是使用Stdio的方式,所以这里直接使用McpServer路径即可
await using IMcpClient mcpClient = await McpClientFactory.CreateAsync(new StdioClientTransport(new()
{
    Name = "city_date_weather",
    Command = "..\\..\\..\\..\\McpServerDemo\\bin\\Debug\\net9.0\\McpServerDemo.exe"
}));

//加载MCP Tools
var tools = await mcpClient.ListToolsAsync();

using HttpClientHandler handler = new HttpClientHandler
{
    ClientCertificateOptions = ClientCertificateOption.Automatic
};

using HttpClient httpClient = new(handler)
{
    BaseAddress = new Uri("https://dashscope.aliyuncs.com/compatible-mode/v1")
};

#pragma warning disable SKEXP0070
IKernelBuilder kernelBuilder = Kernel.CreateBuilder();
kernelBuilder.AddOpenAIChatCompletion("qwen-max-2025-01-25", "sk-***", httpClient: httpClient);
//把Tools加载成sk的Plugins
kernelBuilder.Plugins.AddFromFunctions("weather", tools.Select(aiFunction => aiFunction.AsKernelFunction()));

Kernel kernel = kernelBuilder.Build();
var chatCompletionService = kernel.GetRequiredService<IChatCompletionService>();

PromptExecutionSettings promptExecutionSettings = new()
{
    FunctionChoiceBehavior = FunctionChoiceBehavior.Auto()
};

var history = new ChatHistory();

while (true)
{
    Console.Write($"User:");
    string input = Console.ReadLine();

    if (string.IsNullOrWhiteSpace(input) || input == "exists")
    {
        break;
    }

    history.AddUserMessage(input);
    var chatMessage = await chatCompletionService.GetChatMessageContentAsync(
    history,
    executionSettings: promptExecutionSettings,
    kernel: kernel);

    Console.WriteLine("Assistant:" + chatMessage.Content);

    history.AddAssistantMessage(chatMessage.Content);
}

Console.ReadLine();因为MCP是一个协议标准,所以MCP Server可以做到一次构建,到处使用。
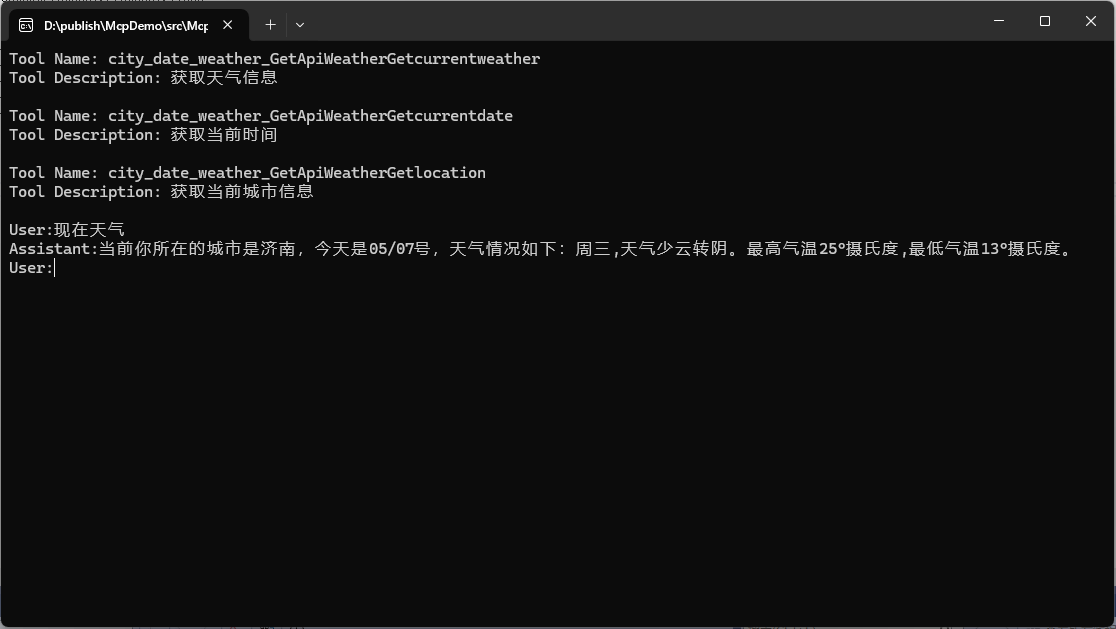
运行效果
运行的时候需要先运行起来WebApi项目,然后把McpServer编译成exe文件,然后运行McpClient项目,我们打印出来了可用的Tools列表。在Client项目进行对话,询问当前天气效果如下
感兴趣的如果想运行具体的代码示例,可以查看我上传的代码示例https://github.com/softlgl/McpDemo
总结
本文演示了如何把ASP.NET Core WebApi打造成Mcp Server,通过讲解基本概念,介绍使用的框架,以及简单的示例展示了这一过程,整体来说是比较简单的。MCP的重点是标准化,而不是取代。如果想在AI应用中使用MCP,模型需要支持Function Calling.我们可以把原来固定在AI应用里的工具代码单独抽离出来,形成独立的应用,这样这个Tools应用就可以和AI应用隔离,形成独立可复用的工具。
现在AI大部分时候确实很好用,但是它也不是银弹。至于它的边界在哪里,只有不断地使用实践。你身边的事情都可以先用AI尝试去做,不断地试探它的能力。AI帮你做完的事情,如果能达到你的预期,你可以看它的实现方式方法,让自己学习到更好的思路。如果是完全依赖AI,而自己不去思考,那真的可能会被AI取代掉。只有你自己不断的进步,才能进一步的探索AI,让它成为你的好工具。
👇欢迎扫码关注我的公众号👇 