🍠 WPF MVVM进阶系列教程
- 一、对话框
在前面的文章中,我们介绍了MVVM开发的一些基础知识。
对于日常开发来说,基本已经足够应付大部分场景。
从这里开始,介绍的都是在MVVM模式开发中,提升程序可维护性、灵活性、健壮性等方面的技巧。
包括对话框、单元测试、数据验证、Ioc、数据访问及三方MVVM框架使用等。
可以根据自身学习情况阅读。
Dialog
在WPF中,我们经常会用到对话框,包括非模态(Show())和模态(ShowDialog())两种。
在基于Code-Behind模式的开发中,我们一般会直接在逻辑代码中,直接操作对话框。
类似下面这样
消息框
1         private void Button_Click(object sender, RoutedEventArgs e)
2         {
3             System.Windows.MessageBox.Show("HelloWorld");
4         }
自定义对话框
1         private void Button_Click(object sender, RoutedEventArgs e)
2         {
3             MyDialogWindow dialog = new MyDialogWindow();
4             MyDialogWindow.DataContext = new MyDialogWindowViewModel();
5             MyDialogWindow.Owner = Application.Current.MainWindow;
6             dialog.Show();
7 }但在MVVM模式中,不建议使用这种直接去操作对话框的方式。
主要考虑以下几个因素
1、直接调用 Show() 或 ShowDialog() 需要ViewModel引用System.Windows。这就打破了 MVVM 所期望的关注点分离,使测试代码等工作变得更加困难。
2、另一个问题与对话框的所有权(Owner)有关,因为我们需要设置对话框的父窗口,但显然在ViewModel中无法做到。即使我们直接从ViewModel中显示对话框,也无法直接从ViewModel中设置所有者,除非我们从View中引用ViewModel。
3、不利于模块化和代码重用,如果将对话框做成独立的模块,可以更方便移植。
4、不利于单元测试。
接下来我们就来看看如何使用DialogService来规避这些问题
使用DialogService
DialogService(对话框服务)是一种使用抽象层来显示对话框的方法。
ViewModel将显示对话框的责任委托给DialogService,只需向服务提供显示所需的数据即可。
DialogService拥有显示对话框的职责,因此我们可以将ViewModel与 System.Windows解耦,避免从View到ViewModel之间的引用。
在单元测试中,我们可以注入一个虚假的对话框服务实例,而不是显示实际的对话框,并使用我们的虚假对象进行预留和模拟。
说明:因为目前我们还没有使用Ioc容器,所以需要手动创建DialogService实例,并声明为单例模式,且不能通过注入的形式进行调用。
在后面会介绍如何在MVVM模式中使用Ioc。使用Ioc容器后,容器会帮我们完成这个操作。
不过使用Ioc容器不是必须的,手动操作也可以达到同样的功能。
使用DialogService的MessageBox示例
1、定义DialogService的接口
IDialogService.cs
在这个对话框服务的接口中,我们定义了一个显示消息的接口。
1     public interface IDialogService
2     {
3         MessageBoxResult ShowMessage(string title, string content);
4     }
说明:为了方便演示,该示例中还是使用了System.WIndows.MessageBox及相关类型。
2、定义DialogService的实现
因为我们目前还没有使用Ioc容器,所以我们将DialogService类型定义成单例模式。
DialogService.cs
 1  public class DialogService : IDialogService
 2  {
 3      private static volatile DialogService instance;
 4      private static object obj = new object();
 5
 6      /// <summary>
 7      /// 单例模式
 8      /// </summary>
 9      public static DialogService Instance
10      {
11          get
12          {
13              if(instance == null)
14              {
15                  lock(obj)
16                  {
17                      if (instance == null)
18                          instance = new DialogService();
19                  }
20              }
21
22              return instance;
23          }
24      }
25
26      /// <summary>
27      /// ShowMessage接口实现
28      /// </summary>
29      /// <param name="title"></param>
30      /// <param name="content"></param>
31      /// <returns></returns>
32      public MessageBoxResult ShowMessage(string title, string content)
33      {
34          return MessageBox.Show(title, content);
35      }
36  }
3、定义主界面
在界面上放置一个按钮,当按钮点击时,弹出对话框
MainWindow.xaml
1 <Window x:Class="_1_DialogService.MainWindow"
2         Title="MainWindow" Height="450" Width="800">
3     <Grid>
4         <Button Content="ShowMessage" Width="88" Height="28" Command="{Binding ShowMessageCommand}"></Button>
5     </Grid>
6 </Window>
4、定义主界面ViewModel并绑定到DataContext
MainWindowViewModel.cs
 1     public class MainWindowViewModel
 2     {
 3         /// <summary>
 4         /// DialogService实例
 5         /// </summary>
 6         private IDialogService dialogService;
 7
 8         public ICommand ShowMessageCommand { get; set; }
 9
10         public MainWindowViewModel()
11         {
12             ShowMessageCommand = new RelayCommand(ShowMessage);
13
14             //如果通过注入的形式,可以我们从构造函数取得IDialogService的实例
15             //这里我们手动获取
16             this.dialogService = DialogService.DialogService.GetInstance();
17         }
18
19         private void ShowMessage()
20         {
21             var result = this.dialogService.ShowMessage("标题", "内容");
22         }
23     }
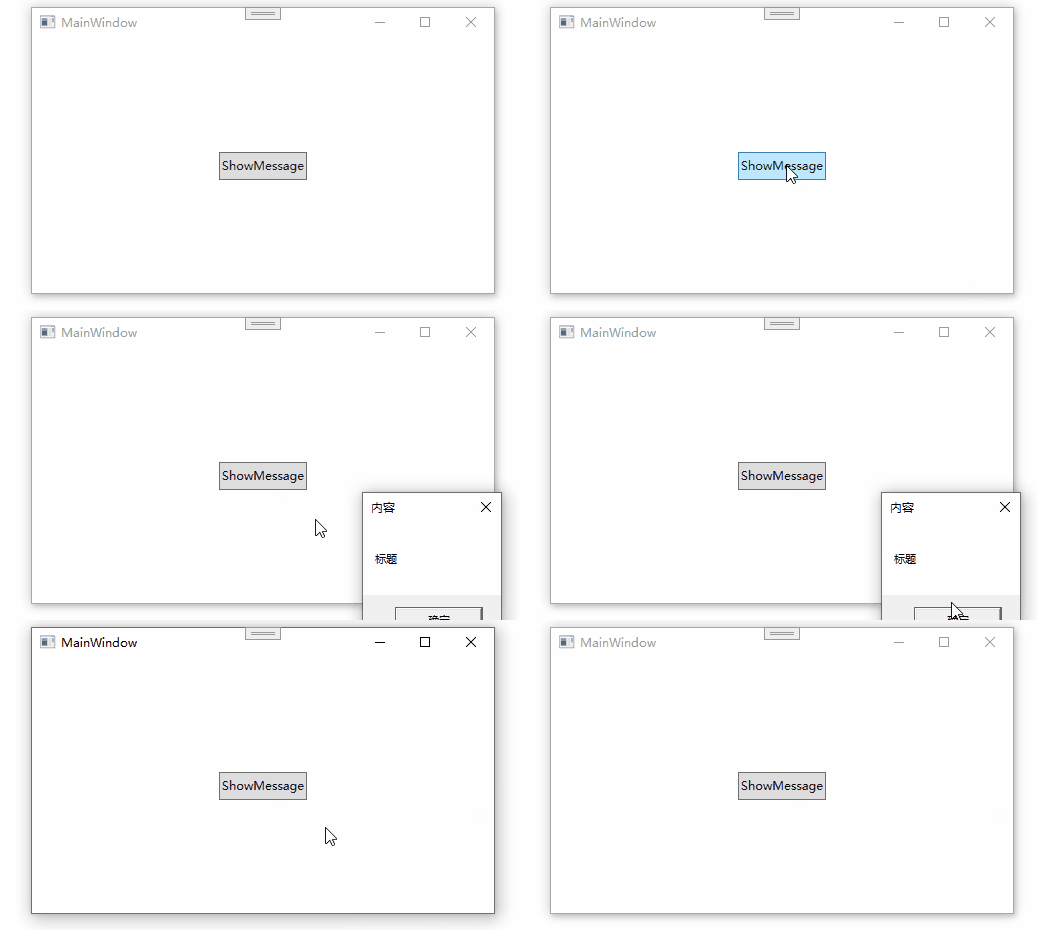
运行效果如下:

这样我们就拥有了一个基于DialogService的最简单的实践示例。
这种情况对于普通消息框都可以应付。
基于DialogService的复杂对话框示例
前面的示例中,我们演示了使用DialogService对普通 的消息框进行操作。
但是如果我们需要显示一个复杂的数据对话框,应该如何去操作呢?
这里就需要借助数据模板的相关功能。
在《TabControl绑定到列表并单独指定每一页内容》,文章中,介绍过如何通过数据模板功能将ViewModel和View绑定起来。
假设我们有一个Student列表,Student具备Id、Name、Age三个属性,当在界面选择列表项后,单击显示详情按钮,使用对话框显示Student的详细信息。
1、定义StudentViewModel
StudentViewModel.cs
StudentViewModel内部定义了Id、Name、Age三个属性。
日常使用时,它内部可能会有更复杂的逻辑,这里我们只定义简单的数据进行演示。
 1   public class StudentViewModel : INotifyPropertyChanged
 2   {
 3       public event PropertyChangedEventHandler? PropertyChanged;
 4
 5       private int id;
 6
 7       private string name;
 8
 9       private string age;
10
11       public int Id
12       {
13           get => id;
14           set
15           {
16               id = value;
17               PropertyChanged?.Invoke(this, new PropertyChangedEventArgs("Id"));
18           }
19       }
20
21       public string Name
22       {
23           get => name;
24           set
25           {
26               name = value;
27               PropertyChanged?.Invoke(this, new PropertyChangedEventArgs("Name"));
28           }
29       }
30
31       public string Age
32       {
33           get => age;
34           set
35           {
36               age = value;
37               PropertyChanged?.Invoke(this, new PropertyChangedEventArgs("Age"));
38           }
39       }
40   }
2、定义IDialogService接口
IDialogService.cs
1   public interface IDialogService
2   {
3       void ShowStudentDetail(StudentViewModel student);
4   }
这里我们暂时先不做接口的实现,等后面的准备工作都完成了再去实现这个接口。
3、定义对话框窗口
因为我们要将ViewModel和View绑定,所以这个对话框窗口并不是实际要显示的内容,它只是一个"壳"。
在窗口里放置一个ContentControl,并使用自动绑定,用于内容显示
DialogView.xaml
1 <Window x:Class="_2_DialogServiceShowDetail.Views.DialogView"
2         mc:Ignorable="d"
3         Title="DialogView" Height="450" Width="800">
4     <Grid>
5         <ContentControl Content="{Binding}"></ContentControl>
6     </Grid>
7 </Window>
4、定义数据展示界面
有了前面的DialogView窗口后,我们可以增加一个UserControl,用于实际数据显示
StudentView.xaml
StudentView内部绑定到StudentViewModel对应的属性
 1 <UserControl x:Class="_2_DialogServiceShowDetail.Views.StudentView"
 2              d:DesignHeight="450" d:DesignWidth="800">
 3     <Grid>
 4         <Grid.ColumnDefinitions>
 5             <ColumnDefinition/>
 6             <ColumnDefinition/>
 7         </Grid.ColumnDefinitions>
 8
 9         <Grid.RowDefinitions>
10             <RowDefinition/>
11             <RowDefinition/>
12             <RowDefinition/>
13         </Grid.RowDefinitions>
14
15         <Label Content="Id" HorizontalAlignment="Left" Margin="10,0,0,0" VerticalAlignment="Center"/>
16         <TextBox Grid.Column="1" Text="{Binding Id}" VerticalAlignment="Center" Margin="10,0"></TextBox>
17
18         <Label Grid.Row="1" Content="Name" HorizontalAlignment="Left" Margin="10,0,0,0" VerticalAlignment="Center"/>
19         <TextBox Grid.Row="1" Grid.Column="1" Text="{Binding Name}" VerticalAlignment="Center" Margin="10,0"></TextBox>
20
21         <Label Grid.Row="2" Content="Age" HorizontalAlignment="Left" Margin="10,0,0,0" VerticalAlignment="Center"/>
22         <TextBox Grid.Row="2" Grid.Column="1" Text="{Binding Age}" VerticalAlignment="Center" Margin="10,0"></TextBox>
23     </Grid>
24 </UserControl>
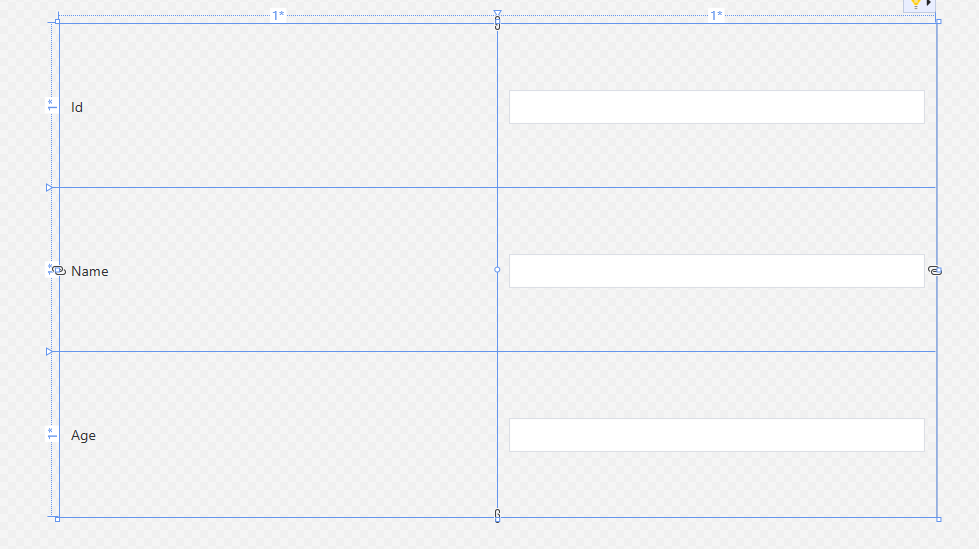
大概效果如下

4、定义View和ViewModel的映射
这里我们借助数据模板功能,实现StudentViewModel和StudentView的映射
增加一个资源字典
DialogTemplate.xaml
1 <ResourceDictionary xmlns="http://schemas.microsoft.com/winfx/2006/xaml/presentation"
2                     xmlns:x="http://schemas.microsoft.com/winfx/2006/xaml"
3                     xmlns:vm="clr-namespace:_2_DialogServiceShowDetail.ViewModels"
4                     xmlns:view="clr-namespace:_2_DialogServiceShowDetail.Views">
5     <DataTemplate DataType="{x:Type vm:StudentViewModel}">
6         <view:StudentView />
7     </DataTemplate>
8 </ResourceDictionary>
5、在App.xaml中使用资源字典
1  <Application.Resources>
2      <ResourceDictionary>
3          <ResourceDictionary.MergedDictionaries>
4              <ResourceDictionary Source="DialogTemplate.xaml"></ResourceDictionary>
5          </ResourceDictionary.MergedDictionaries>
6      </ResourceDictionary>
7  </Application.Resources>
说明:我们可以直接将这个数据模板定义在App.xaml里面,DialogTemplate.xaml这个资源字典不是必须的。
新建资源字典文件再引入的原因是使项目结构更清晰,更容易查找 。
6、实现IDialogService接口
在这里我们就可以实现IDialogService接口了,在显示对话框时,只需要将StudentViewModel传递到DialogView的数据上下文,DialogView就会自动加载StudentView到DialogView中显示。
DialogService.cs
 1  public class DialogService : IDialogService
 2  {
 3      private static volatile DialogService instance;
 4      private static object obj = new object();
 5
 6      /// <summary>
 7      /// 单例模式
 8      /// </summary>
 9      public static DialogService GetInstance()
10      {
11          if (instance == null)
12          {
13              lock (obj)
14              {
15                  if (instance == null)
16                      instance = new DialogService();
17              }
18          }
19
20          return instance;
21      }
22
23      //显示对话框
24      public void ShowStudentDetail(StudentViewModel studentViewModel)
25      {
26          //设置StudentViewModel到DialogView的数据上下文
27          //DialogView会自动加载StudentView
28          var dialog = new DialogView() { DataContext = studentViewModel };
29          dialog.Owner = Application.Current.MainWindow;
30          dialog.ShowInTaskbar = false;
31          dialog.ShowDialog();
32
33      }
34  }
7、定义主界面
在主界面中放置一个ListBox和Button,当点击Button时,弹窗显示选中项的详情。
MainWindow.xaml
 1 <Window x:Class="_2_DialogServiceShowDetail.MainWindow"
 2         Title="MainWindow" TitleVisibility="Collapsed" Height="400" Width="300" MinimizeVisibility="Collapsed" MaximizeVisibility="Collapsed" WindowStartupLocation="CenterScreen">
 3     <tianxia:BlurWindow.Background>
 4         <SolidColorBrush Color="White" Opacity=".9"></SolidColorBrush>
 5     </tianxia:BlurWindow.Background>
 6     <Grid>
 7         <Grid.RowDefinitions>
 8             <RowDefinition/>
 9             <RowDefinition Height="35"/>
10         </Grid.RowDefinitions>
11
12         <ListBox ItemsSource="{Binding StudentList}" SelectedIndex="{Binding StudentListSelectedIndex}" BorderThickness="0" DisplayMemberPath="Name"></ListBox>
13
14         <Button Content="显示详情" Width="88" Height="28" HorizontalAlignment="Center" VerticalAlignment="Center" Grid.Row="1" Command="{Binding ShowStudentDetailCommand}"></Button>
15     </Grid>
16 </Window>
8、定义主界面ViewModel并绑定到DataContext
MainWindowViewModel.cs
MainWindowViewModel中定义描述如下:
StudentList:用于绑定到列表显示。
StudentListSelectedIndex:用于绑定到列表选中索引。
ShowStudentDetailCommand:显示详情命令,绑定到显示详情按钮上
IDialogService:对话框服务接口,通过DialogService单例获取实例。
 1 public class MainWindowViewModel : INotifyPropertyChanged
 2 {
 3     private IDialogService dialogService;
 4
 5     private ObservableCollection<StudentViewModel> studentList = new ObservableCollection<StudentViewModel>();
 6
 7     public ObservableCollection<StudentViewModel> StudentList
 8     {
 9         get => studentList;
10         set
11         {
12             studentList = value;
13             PropertyChanged?.Invoke(this, new PropertyChangedEventArgs("StudentList"));
14         }
15     }
16
17     private int studentListSelectedIndex = -1;
18
19     public int StudentListSelectedIndex
20     {
21         get => studentListSelectedIndex;
22         set
23         {
24             studentListSelectedIndex = value;
25             PropertyChanged?.Invoke(this, new PropertyChangedEventArgs("StudentListSelectedIndex"));
26         }
27     }
28
29
30     public ICommand ShowStudentDetailCommand { get; private set; }
31
32     public event PropertyChangedEventHandler? PropertyChanged;
33
34     public MainWindowViewModel()
35     {
36         dialogService = DialogService.DialogService.GetInstance();
37
38         ShowStudentDetailCommand = new RelayCommand(ShowStudentDetail);
39
40         StudentList.Add(new StudentViewModel() { Id = 1,Name  = "测试1",Age = "17"});
41         StudentList.Add(new StudentViewModel() { Id = 2, Name = "测试2", Age = "18" });
42         StudentList.Add(new StudentViewModel() { Id = 3, Name = "测试3", Age = "19" });
43     }
44
45     private void ShowStudentDetail()
46     {
47         dialogService.ShowStudentDetail(StudentList[StudentListSelectedIndex]);
48     }
49 }
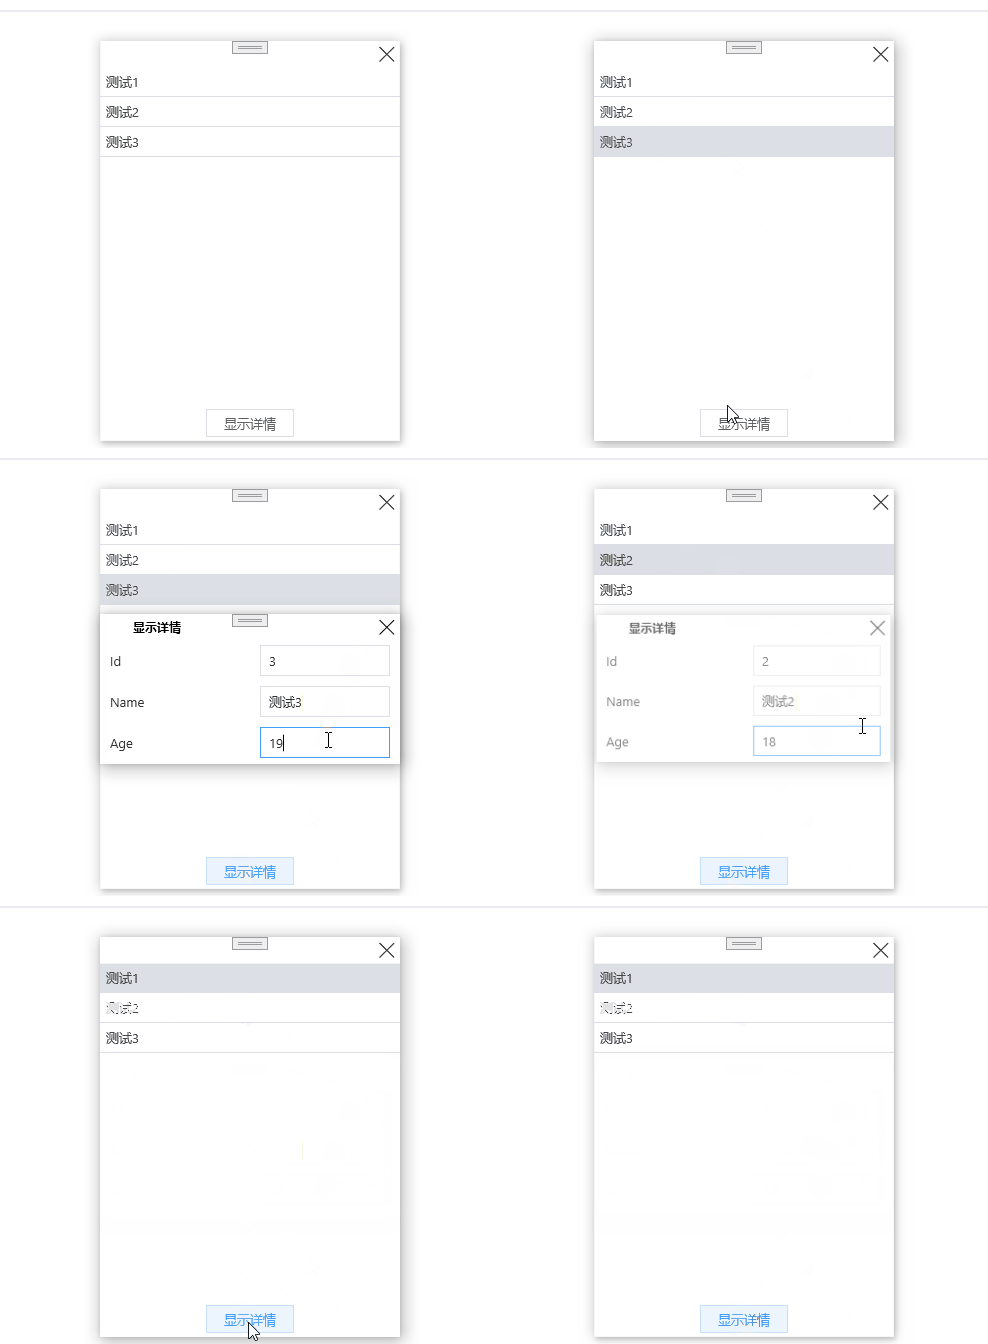
运行效果如下:

手动关闭对话框并获取对话框结果
通过上述两个示例,我们对DialogService已经有了较为深入的认识。
但是现在还存在一个关键问题没有解决,就是如何关闭对话框,并获取对话框结果。
接下来我们讲解一下如何在DialogService的基础上,实现关闭对话框并获取对话框结果。
在过去,我们一般会使用类似下面的代码结构来获取对话框的结果
 1  var dialogResult = System.Windows.MessageBox.Show("是否确认", "标题", System.Windows.MessageBoxButton.YesNoCancel, System.Windows.MessageBoxImage.Information);
 2
 3  if(dialogResult == System.Windows.MessageBoxResult.Yes)
 4  {
 5      //是
 6  }
 7  else if(dialogResult == System.Windows.MessageBoxResult.No)
 8  {
 9      //否
10  }
11  else
12  {
13      //取消
14 }但是使用了DialogService后,我们不会直接操作对话框窗口,应该如何实现呢?
先说一下大概实现思路
1、给DialogViewModel里增加一个事件,当在Dialog上点击相应的按钮时,引发这个事件
2、将界面点击的结果以参数形式传到事件,例如点击确认时传递Ok
3、在DialogService内部创建DialogView的ViewModel时,为这个事件添加处理程序
4、事件处理程序内部负责关闭对话框,并获取结果供下一步调用。
5、封装DialogService时,传入一个回调,当对话框关闭时,将获取的对话框结果通过这个回调传出去。
简单点来说,就是在DialogService里创建对话框时,创建一个回调,让对话框通过回调的形式来操作对话框的关闭并返回结果。
实现步骤
1、定义对话框结果枚举
DialogResult.cs
1     public enum DialogResult
2     {
3         Ok,
4         Cancel
5     }
2、创建封装DialogViewModel内部事件的接口
IMyDialog.cs
1     public interface IMyDialog
2     {
3         event Action<DialogResult> RequestClose;
4     }
3、创建DialogView
这个是用于显示对话框的壳
DialogView.xaml
1 <Window x:Class="_3_DialogResult.Views.DialogView"
2         Title="DialogView" Height="280" Width="350" WindowStartupLocation="CenterScreen">
3     <Grid>
4         <ContentControl Content="{Binding}"></ContentControl>
5     </Grid>
6 </Window>
4、创建对话框内容
NotificationDialog.xaml
这里我们放置了两个按钮,Ok和Cancel
当点击Ok时执行OkCommand
当点击Cancel时执行CancelCommand
 1 <UserControl x:Class="_3_DialogResult.Views.NotificationDialog"
 2              d:DesignHeight="450" d:DesignWidth="800">
 3     <Grid x:Name="LayoutRoot" Margin="5">
 4         <Grid.RowDefinitions>
 5             <RowDefinition />
 6             <RowDefinition Height="Auto" />
 7         </Grid.RowDefinitions>
 8
 9         <TextBlock Text="Hello World" HorizontalAlignment="Center" VerticalAlignment="Center" FontSize="50" Grid.Row="0" TextWrapping="Wrap" />
10         <StackPanel Orientation="Horizontal" HorizontalAlignment="Right" Margin="0,10,0,0" Grid.Row="1" >
11             <Button Command="{Binding OkCommand}" Content="OK" Width="75" Height="25" IsDefault="True" />
12             <Button Command="{Binding CancelCommand}" Content="Cancel" Width="75" Height="25" Margin="10,0,0,0" IsCancel="True" />
13         </StackPanel>
14     </Grid>
15 </UserControl>
5、创建对话框ViewModel
当点击Ok/Cancel按钮时,引发IMyDialog里的RequestClose事件。
NotificationDialogViewModel.cs
 1  public class NotificationDialogViewModel : IMyDialog
 2  {
 3      public ICommand OkCommand { get; private set; }
 4
 5      public ICommand CancelCommand { get; private set; }
 6
 7      public NotificationDialogViewModel()
 8      {
 9          OkCommand = new RelayCommand(Ok);
10          CancelCommand = new RelayCommand(Cancel);
11      }
12
13      public event Action<DialogResult> RequestClose;
14
15      private void Cancel()
16      {
17          RaiseRequestClose(DialogResult.Cancel);
18      }
19
20      private void Ok()
21      {
22          RaiseRequestClose(DialogResult.Ok);
23      }
24
25      private void RaiseRequestClose(DialogResult dialogResult)
26      {
27          RequestClose?.Invoke(dialogResult);
28      }
29  }
6、创建IDialogService
在显示对应框时,传入一个回调Action<DialogResult> resultCallback,这个回调会在对话框关闭时调用,并返回对话框结果
1    public interface IDialogService
2    {
3        void ShowNotificationDialog(Action<DialogResult> resultCallback);
4    }
7、创建DialogService
这里我们可以看到,在创建NotificationDialogViewModel时,我们为IMyDialog.RequestClose事件增加了一个事件处理程序。
这个事件处理程序里有如下逻辑:
1、获取了对话框结果
2、然后关闭对话框
3、调用IDialogService创建对话框时传进来的回调,通知外部对话框已经关闭,并传回对话框结果
 1  public class DialogService : IDialogService
 2  {
 3
 4      public void ShowNotificationDialog(Action<DialogResult> resultCallback)
 5      {
 6          DialogResult dialogResult;
 7          var dialog = new DialogView();
 8
 9          NotificationDialogViewModel notificationDialogViewModel = new NotificationDialogViewModel();
10          notificationDialogViewModel.RequestClose += (x)=>
11          {
12              dialogResult = x;
13              dialog.Close();
14              resultCallback?.Invoke(dialogResult);
15          };
16
17          dialog.ShowInTaskbar = false;
18          dialog.DataContext = notificationDialogViewModel;
19          dialog.ShowDialog();
20      }
21  }
其它部分的代码暂时就省略了,可以到示例代码中进行查看。
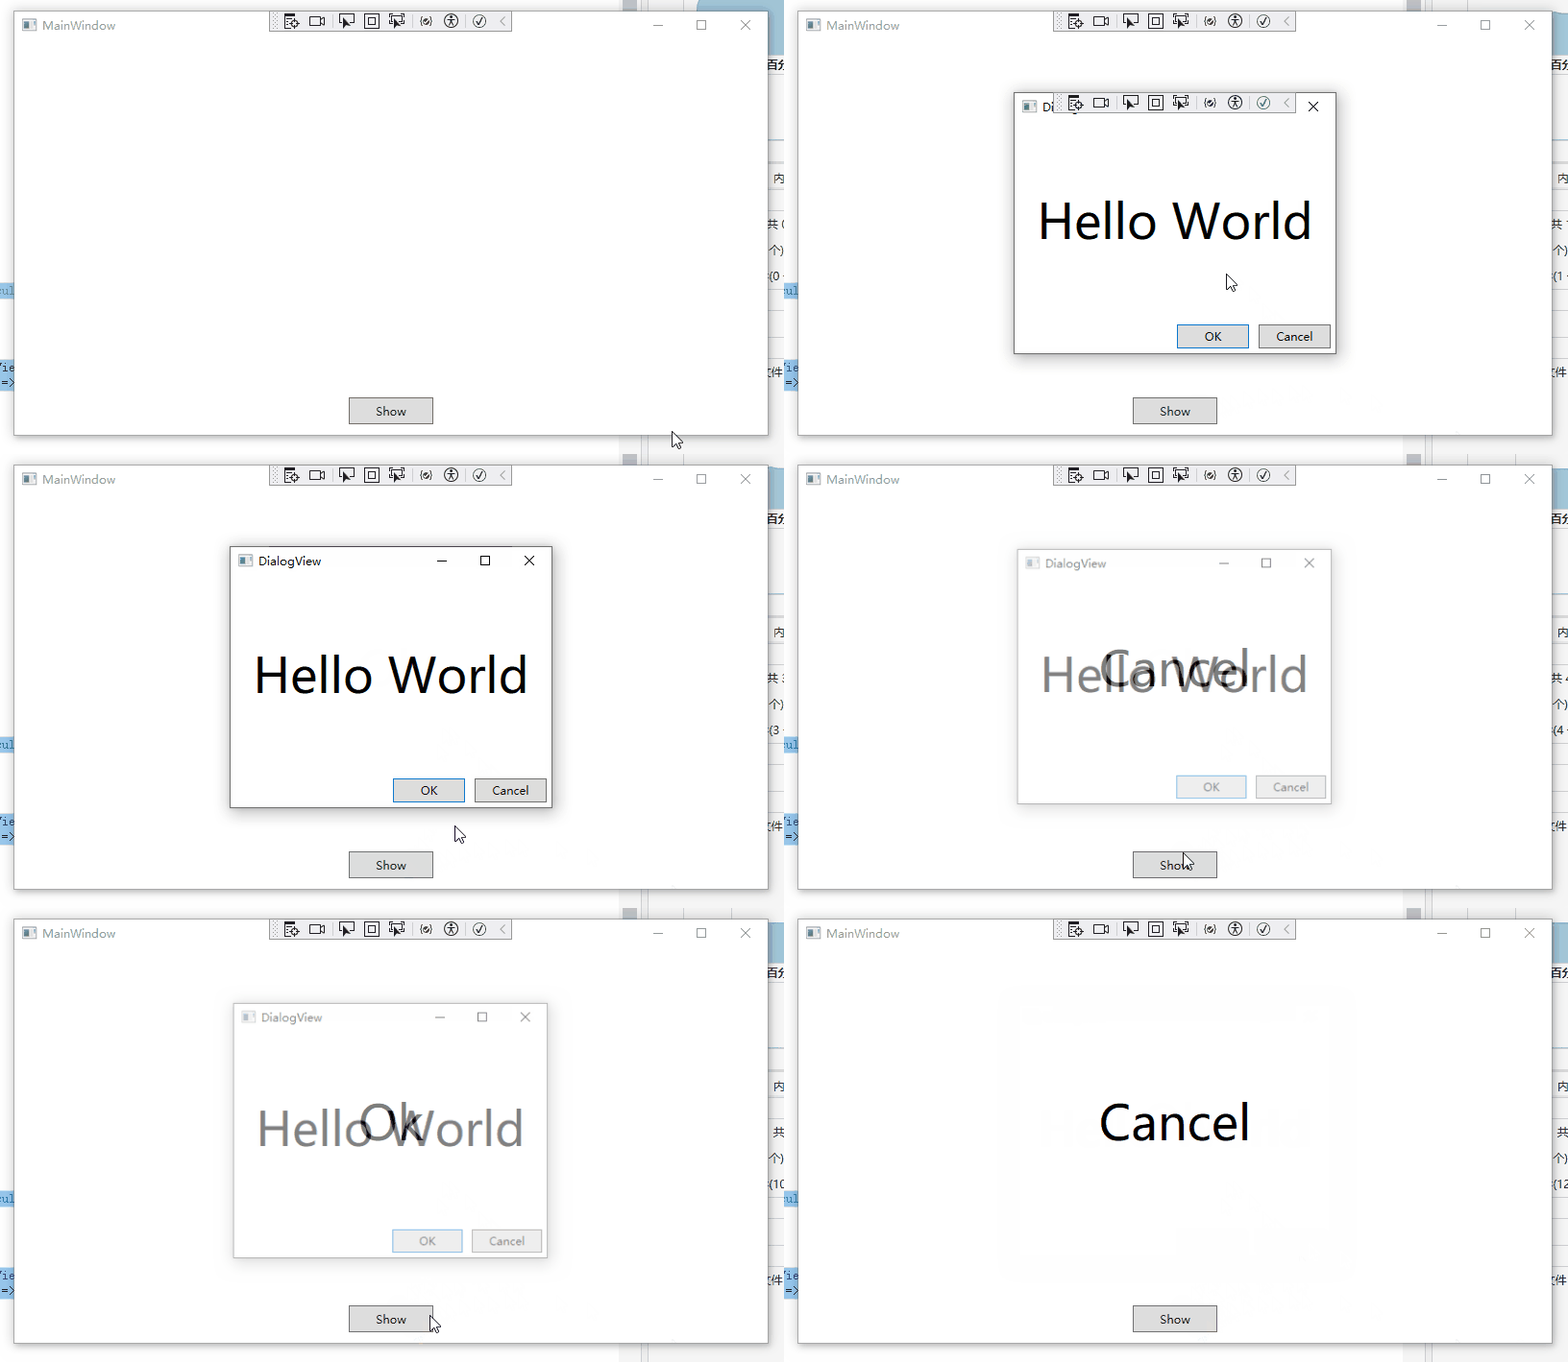
运行效果如下:

说明:这里只是展示原理,正式使用时,可以根据实际使用情况进行优化。
示例代码
https://github.com/zhaotianff/WPF-MVVM-Beginner/tree/main/7_Dialog