这两天为了利用云服务器实现 Nginx 进行OBS Rtmp推流,Flv拉流时发生了诸多情况,记录实现过程。
环境
- OS:阿里云CentOS 7.9 64位
- Nginx:nginx-1.28.0
- Nginx-http-flv-module:nginx-http-flv-module-1.2.12
安装Nginx编译的依赖包:
shell
yum install -y gcc gcc-c++ autoconf automake make
yum install zlib zlib-devel openssl openssl-devel pcre pcre-devel wget httpd-tools vim -y
Nginx配置
2.1 获取nginx源码
shell
wget http://nginx.org/download/nginx-1.28.0.tar.gz2.2 解压
shell
tar -xzvf nginx-1.28.0.tar.gz2.3 重命名
shell
mv nginx-1.28.0 nginx2.4 移动到/usr/local/
shell
mv nginx/ usr/local/Nginx-http-flv-module配置
3.1 在/usr/local/nginx中下载
shell
wget https://github.com/winshining/nginx-http-flv-module/archive/refs/tags/v1.2.12.tar.gz3.2 解压
shell
tar -xzvf v1.2.12.tar.gz3.3 关闭防火墙
shell
systemctl disable --now firewalld
setenforce 0
getenforce
3.4 配置nginx编译环境
shell
./configure --prefix=/usr/local/nginx --add-module=/usr/local/nginx/nginx-http-flv-module-1.2.123.5编译&安装
shell
make
make install
3.6设置Nginx环境变量
shell
vi /etc/profile # vi 打开环境变量文件
export PATH=$PATH:/usr/local/nginx/sbin # 添加到文件最后一行
source /etc/profile # 立即生效
修改Nginx配置文件
4.1 将下方文本替换/usr/local/nginx/conf/nginx.conf的内容:
bash
#user  nobody;
worker_processes  1;

#error_log  logs/error.log;
#error_log  logs/error.log  notice;
#error_log  logs/error.log  info;

#pid        logs/nginx.pid;


events {
    worker_connections  1024;
}

rtmp_auto_push on;
rtmp_auto_push_reconnect 1s;
rtmp_socket_dir /tmp;

rtmp {
    out_queue           4096;
    out_cork            8;
    max_streams         128;
    timeout             15s;
    drop_idle_publisher 15s;

    log_interval 5s; #log模块在access.log中记录日志的间隔时间,对调试非常有用
    log_size     1m; #log模块用来记录日志的缓冲区大小

    server {
        listen 1935;

        #ffmpeg推流的application
        application app {
            live on;
            allow publish all;
            allow play all;
            record off;
            meta copy;
            gop_cache on; #打开GOP缓存,减少首屏等待时间
        }
    }
}


http {
    include       mime.types;
    default_type  application/octet-stream;

    #log_format  main  '$remote_addr - $remote_user [$time_local] "$request" '
    #                  '$status $body_bytes_sent "$http_referer" '
    #                  '"$http_user_agent" "$http_x_forwarded_for"';

    #access_log  logs/access.log  main;

    sendfile        on;
    #tcp_nopush     on;

    #keepalive_timeout  0;
    keepalive_timeout  65;

    #gzip  on;

    server {
        listen       80; # http-flv 拉流端口
        #server_name  localhost;
	location /live {
            flv_live on; #打开HTTP播放FLV直播流功能
            chunked_transfer_encoding on; #支持'Transfer-Encoding: chunked'方式回复

            add_header 'Access-Control-Allow-Origin' '*'; #添加额外的HTTP头
            add_header 'Access-Control-Allow-Credentials' 'true'; #添加额外的HTTP头
        }
        #charset koi8-r;

        #access_log  logs/host.access.log  main;

        location / {
            root   html;
            index  index.html index.htm;
        }

        #error_page  404              /404.html;

        # redirect server error pages to the static page /50x.html
        #
        error_page   500 502 503 504  /50x.html;
        location = /50x.html {
            root   html;
        }

        # proxy the PHP scripts to Apache listening on 127.0.0.1:80
        #
        #location ~ \.php$ {
        #    proxy_pass   http://127.0.0.1;
        #}

        # pass the PHP scripts to FastCGI server listening on 127.0.0.1:9000
        #
        #location ~ \.php$ {
        #    root           html;
        #    fastcgi_pass   127.0.0.1:9000;
        #    fastcgi_index  index.php;
        #    fastcgi_param  SCRIPT_FILENAME  /scripts$fastcgi_script_name;
        #    include        fastcgi_params;
        #}

        # deny access to .htaccess files, if Apache's document root
        # concurs with nginx's one
        #
        #location ~ /\.ht {
        #    deny  all;
        #}
    }


    # another virtual host using mix of IP-, name-, and port-based configuration
    #
    #server {
    #    listen       8000;
    #    listen       somename:8080;
    #    server_name  somename  alias  another.alias;

    #    location / {
    #        root   html;
    #        index  index.html index.htm;
    #    }
    #}


    # HTTPS server
    #
    #server {
    #    listen       443 ssl;
    #    server_name  localhost;

    #    ssl_certificate      cert.pem;
    #    ssl_certificate_key  cert.key;

    #    ssl_session_cache    shared:SSL:1m;
    #    ssl_session_timeout  5m;

    #    ssl_ciphers  HIGH:!aNULL:!MD5;
    #    ssl_prefer_server_ciphers  on;

    #    location / {
    #        root   html;
    #        index  index.html index.htm;
    #    }
    #}

}
4.2 新建/usr/local/nginx/logs文件夹存放日志
shell
sudo mkdir -p /usr/local/nginx/logs # sudo 是使用root权限创建4.3 测试配置文件是否问题
shell
/usr/local/nginx/sbin/nginx -t4.4 运行Nginx
shell
nginx4.5 查看端口,如果1935 & 80端口正在监听就表明完成了
shell
netstat -tulnp # 查看所有端口 加上 | grep x 可以过滤出端口x的情况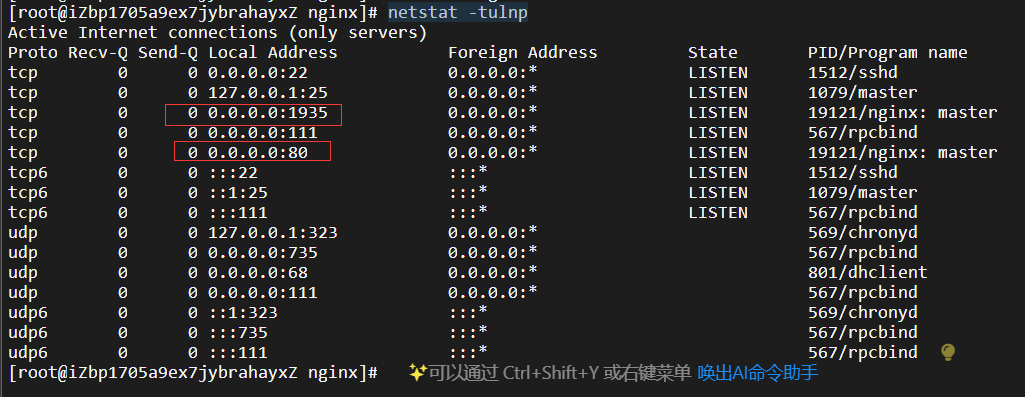
5.OBS推流
rtmp://${服务器公网地址}:1935/app/room-1
使用obs进行推流,其中推流地址和推流码为:

6.使用VLC进行拉流
6.1 rtmp拉流地址为:rtmp://${服务器公网地址}:80/app/room-1
6.2 flv 拉流地址为:http://${服务器公网地址}:80/live?port=1935&app=app&stream=room-1
flv拉流地址,其中
live的是配置文件中的http模块设置的、port的值应该是推流端口、app的值是配置文件中rtmp模块自定义的名称、stream的值是OBS推流自定义的推流码。
效果:
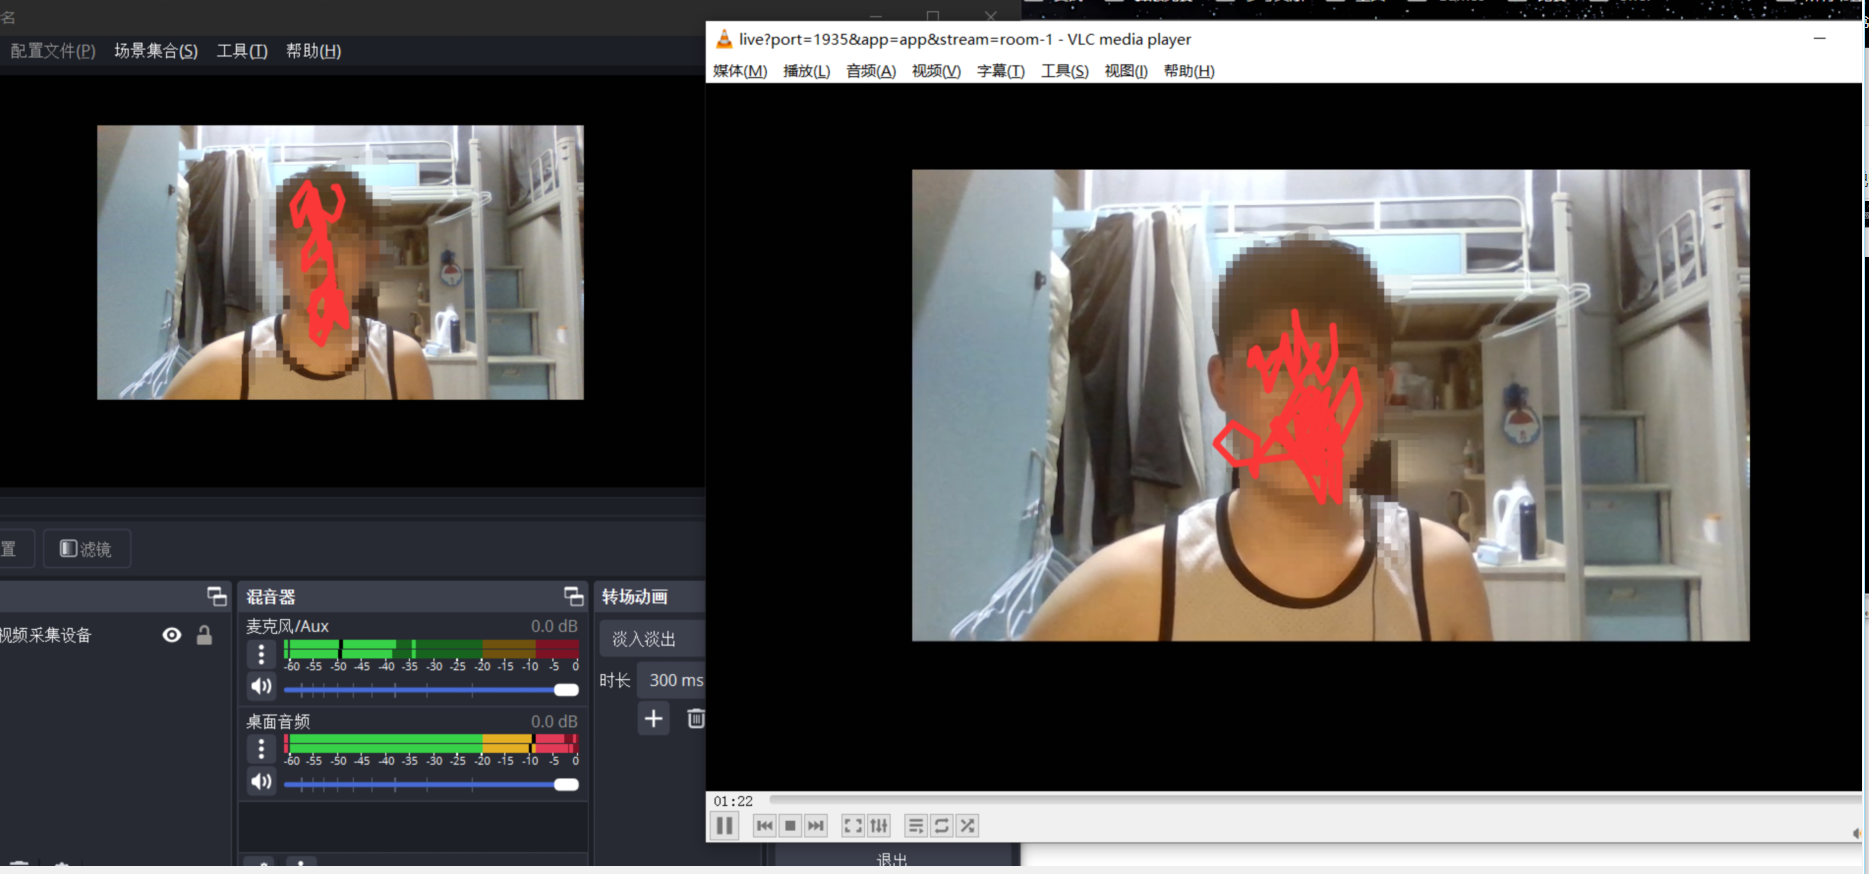
( 延迟大概15s )