技巧一:复用组件逻辑
具体而言,高阶组件是参数为组件,返回值为新组件的函数
typescript
const EnhancedComponent = higherOrderComponent(WrappedComponent);For example:
参数复用
typescript
const withSize = (Component) => {
	return class toSize extends Component {
		state = {
			xPos: document.documentElement.clientWidth,
			yPos: document.documentElement.clientHeight
		}

		getPos = () => {
			this.setState({
				xPox: document.documentElement.clientWidth,
				yPos: document.documentElement.clientHeight
			})
		}

		componentDidMount(){
			window.addEventListener('resize', this.getPos)
		}

		componentWillUnmount(){
			window.removeEventListener('resize', this.getPos)
		}

		render() {
			return <Component {...this.state}/>
		}
	}
}

class Foo extends Component {
	render() {
		return (
			<div>
				<p>x:{ this.props.xPos} -- y: {this.props.yPos} </p>
			</div>
		)
	}
}

class Sub extends Component {
	render() {
		return (
			<div>
				<button>x:{ this.props.xPos} -- y: {this.props.yPos} </button>
			</div>
		)
	}
}

const SubWithSize = withSize(Sub)
const FooWithSize = withSize(Foo)

class App extends Component {
	render() {
		return (
			<div>
				<SubWithSize />
				<FooWithSize />
			</div>
		)
	}
}
函数逻辑复用
typescript
// PhotoList.js
import React from 'react'
import withFetch from '../withFetch'

const url = 'https://www.abc.com/photos?_limit=5

const PhotoList = ({ list }) => {
	return (
		<ul>
			{list.map((photo) => {
				return <li key={photo.id}> 图片URL:{photo.url}</li>
			})}
		</ul>
	)
}
export default withFetch(PhotoList, url)
typescript
// UserList.js
import React from 'react'
import withFetch from '../withFetch'

const url = 'https://www.abc.com/users?_limit=5

const UserList = ({ list }) => {
	return (
		<ul>
			{list.map((user) => {
				return <li key={user.id}> 用户名:{user.name}</li>
			})}
		</ul>
	)
}
export default withFetch(UserList, url)
typescript
import React from 'react'
import axios from 'axios'

const withFetch = (Component, url) => {
	return class WithFetchComponent extends React.Component {
		state = {
			list: []
		}

		async componentDidMount() {
			const { data: list } = await axios.get(url)
			this.setState({
				list
			})
		}

		render() {
			return <Component {...this.props} list={this.state.list} /}
		}
	}
}
技巧二:组件的异步加载
利用lazy、suspense来实现组件的异步加载
- 1、lazy引入异步组件
typescript
import ReactDOM from 'react-dom'
import React, { Component, lazy, Suspense } from 'react'
const sub = lazy(() => import('./Sub'))
2、suspense调用组件
typescript
class App extends Component {
	render() {
		return (
			<div>
				/*fallback的作用是在异步加载的空档中填充一些内容让页面可以正常渲染 */
				<Suspense fallback = { <div>loading</div> }>
					<Sub />
				</Suspense>
			</div>
		)
	}
}

ReactDOM.render(
	<App />,
	document.getElementById('rroot')
)
技巧三:组件的生命周期
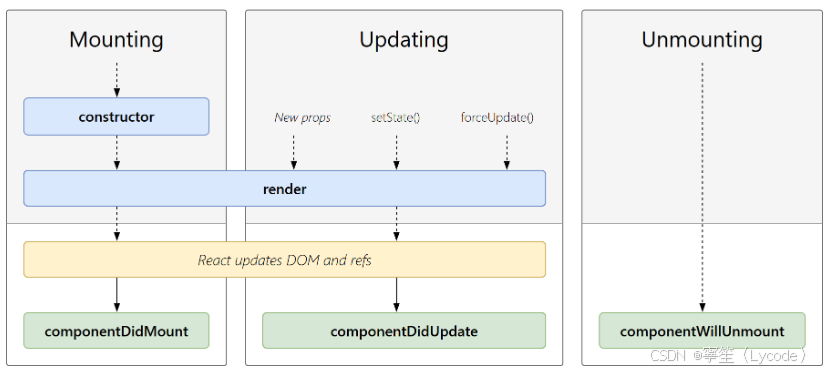
Mounting(挂载)
- constructor(): 在 React 组件挂载之前,会调用它的构造函数。
- getDerivedStateFromProps(): 在调用 render 方法之前调用,并且在初始挂载及后续更新时都会被调用。
- render(): 唯一必须实现的纯函数;
- componentDidMount(): 在组件挂载后(插入 DOM 树中)立即调用。
Updating(更新)
- componentDidUpdate(): 在组件更新后立即调用
Unmounting(卸载)
- componentWillUnmount(): 在组件卸载后理解调用
For example:
typescript
class App extends Component {
	constructor(props) {
		super(props)
		this.state = { count: 0 }
		console.log('cons');
	}

	onclick = () => {
		this.setState({
			count: this.state.count + 1
		})
	}

	componentDidMount(){
		console.log('did mount');
	}

	componentDidUpdate(){
		console.log('did update');
	}

	componentWillUnmount(){
		console.log('will unmount');
	}

	return() {
		console.log('render')
		return (
			<div>
				<p> {this.state.count} </p>
				<button onclick={this.onclick}>add</button>
			</div>
		)
	}

// 执行顺序:()
// cons -> render -> did mount (mounting阶段)
// -> render -> did update (updating阶段)
// -> will unmount (unmounting阶段)
技巧四:组件的优化
- 避免无数据更新的自组件反复更新
typescript
import ReactDOM from 'react-dom'
import React, { Component, PureComponent, memo } from 'react'

//组件的优化一: 类组件
class Sub extends Component //方法二:替换成PureComponent {
	// 方法一
	shouldComponentUpdate(nextProps, nextState){
		if (nextProps.name === this.props.name) {
			return false;
		}
		return true;
	}
	render() {
		console.log('sub render');
		return (
			<div>
				sub
			</div>
		)
	}
}

//组件的优化二: 函数组件
const Sub = memo((params) => {
	console.log('sub render');
	return (
		<div>
			sub
		</div>
	)
})

class App extends Component {
	state = {
		count: 0
	}

	onclick = () => {
		this.setState({
			count: this.state.count + 1
		})
	}

	callback = () => {
	}

	render() {
		return (
			<div>
				<Sub name="zhangsan" />
				// 函数同理
				<Sub func={this.callback} />
				<p> {this.state.count} </p>
				<button onclick={this.onclick}>add</button>
			</div>
		)
	}
}

ReactDOM.render(
	<App />,
	document.getElementById('rroot')
)