1 限流的重要性
在高并发系统中,保护系统稳定运行的关键技术有缓存、降级和限流。
- 缓存通过在内存中存储常用数据,减少对数据库的访问,提升系统响应速度,如浏览器缓存、CDN缓存等多种应用层面。
- 降级则是在系统压力过大或部分服务不可用时,暂时关闭非核心服务,保障核心服务正常运行,包括页面降级、功能降级和服务降级等。
- 限流是控制请求速率的技术,防止系统过载,常见算法有令牌桶算法、漏桶算法等。
这三大技术通常结合使用,根据系统具体需求和特点合理配置,以实现最佳效果。
2 限流的基本概念
限流是限制单位时间内系统处理的请求数量,确保系统正常运行,避免因超负荷而崩溃的一种技术。
其中,阈值 是单位时间内允许的最大请求数量,例如每秒请求数(QPS)限制为500,即系统1秒内最多处理500个请求。
拒绝策略 是请求数量超过阈值时系统的处理方式,常见的有直接拒绝 (立即拒绝超过阈值的请求)和排队等待(将超过阈值的请求放入队列依次处理)。
目前有两个比较主流的限流方案:
- 网关层限流。将限流规则应用在所有流量的入口处。
- 中间件限流。将限流信息存储在分布式环境中某个中间件里(比如redis),每个组件都可以从这里获取到当前时间的流量统计,从而决定是否放行还是拒绝。
3 常见限流算法对比
| 限流算法 | 原理 | 优点 | 缺点 |
|---|---|---|---|
| 计数器(Counter)法 | 在固定时间窗口内统计请求数,超过阈值则拒绝请求 | 实现简单,适用于固定时间窗口的流量控制 | 无法处理突发流量 |
| 滑动窗口计数器法 | 将固定时间窗口分成多个小窗口,通过滑动小窗口动态统计总请求数 | 平滑处理流量,比固定窗口更有效 | 实现复杂度较高 |
| 漏桶(Leaky Bucket)算法 | 请求进入漏桶,漏桶以恒定速率出水,当桶满时新的请求被丢弃 | 平滑突发流量,严格控制请求处理速率 | 可能导致请求延迟增加 |
| 令牌桶(Token Bucket)算法 | 系统按恒定速率生成令牌,请求消耗令牌,当没有令牌时请求被拒绝或排队 | 允许突发流量处理,能长期控制处理速率 | 实现相对复杂,需要管理令牌 |
| 漏桶与令牌桶的组合 | 将漏桶与令牌桶结合,既能控制平均速率,又能应对突发流量 | 综合两者优点,既能平滑流量又能应对突发流量 | 实现复杂度更高 |
3.1 计数器
实现方式:控制单位时间内的请求数量。
以下是使用计数器算法实现限流的 Java 示例代码,该示例模拟了在固定时间窗口内对请求进行计数,并判断是否超过设定的阈值:
java
import java.util.concurrent.atomic.AtomicInteger;

public class CounterRateLimiter {

    // 最大访问数量
    private final int limit;
    // 访问时间差,单位为毫秒
    private final long timeout;
    // 请求时间
    private long time;
    // 当前计数器
    private AtomicInteger reqCount = new AtomicInteger(0);

    public CounterRateLimiter(int limit, long timeout) {
        this.limit = limit;
        this.timeout = timeout;
        this.time = System.currentTimeMillis();
    }

    // 判断是否允许请求通过
    public boolean tryAcquire() {
        long now = System.currentTimeMillis();
        if (now < time + timeout) {
            // 单位时间内
            int count = reqCount.incrementAndGet();
            return count <= limit;
        } else {
            // 超出单位时间,重置计数器和时间
            time = now;
            reqCount.set(1);
            return true;
        }
    }

    public static void main(String[] args) {
        // 示例:设置每 1000 毫秒内最多允许 5 个请求
        CounterRateLimiter limiter = new CounterRateLimiter(5, 1000);

        for (int i = 0; i < 10; i++) {
            boolean allowed = limiter.tryAcquire();
            if (allowed) {
                System.out.println("请求 " + i + " 通过限流");
            } else {
                System.out.println("请求 " + i + " 被限流");
            }
            try {
                // 模拟请求间隔
                Thread.sleep(200);
            } catch (InterruptedException e) {
                e.printStackTrace();
            }
        }
    }
}
在上述代码中:
CounterRateLimiter类实现了计数器限流逻辑。- 构造函数
CounterRateLimiter(int limit, long timeout)用于设置限流的阈值limit和时间窗口timeout。 tryAcquire方法用于判断请求是否能通过限流,在单位时间内对请求计数,并根据阈值决定是否允许请求通过;当超出单位时间时,重置计数器和时间。- 在
main方法中,创建了一个限流实例,并模拟了一系列请求,展示了限流的效果。
3.2 滑动窗口
实现方式:滑动窗口是对计数器方式的改进,增加一个时间粒度的度量单位,把一分钟分成若干等分(6 份,每份 10 秒),在每一份上设置独立计数器,在 00:00-00:09 之间发生请求计数器累加 1。当等分数量越大限流统计就越详细。
以下是一个滑动窗口实现限流的Java示例代码,该示例将一分钟分成若干等分,通过ConcurrentLinkedQueue来记录请求时间,从而实现对请求的限流控制。
java
import java.util.Iterator;
import java.util.Random;
import java.util.concurrent.ConcurrentLinkedQueue;
import java.util.stream.IntStream;

public class TimeWindow {
    private ConcurrentLinkedQueue<Long> queue = new ConcurrentLinkedQueue<>();
    /**
     * 间隔秒数
     */
    private int seconds;
    /**
     * 最大限流
     */
    private int max;

    public TimeWindow(int max, int seconds) {
        this.seconds = seconds;
        this.max = max;
        /**
         * 永续线程执行清理queue 任务
         */
        new Thread(() -> {
            while (true) {
                try {
                    // 等待 间隔秒数-1 执行清理操作
                    Thread.sleep((seconds - 1) * 1000L);
                } catch (InterruptedException e) {
                    e.printStackTrace();
                }
                clean();
            }
        }).start();
    }

    /**
     * 获取令牌,并且添加时间
     */
    public void take() {
        long start = System.currentTimeMillis();
        synchronized (queue) {
            int size = sizeOfValid();
            if (size > max) {
                System.err.println("超限");
            }
            queue.offer(System.currentTimeMillis());
        }
        System.out.println("queue中有 " + queue.size() + " 最大数量 " + max);
    }

    /**
     * 计算有效请求数量
     */
    private int sizeOfValid() {
        long currentTime = System.currentTimeMillis();
        Iterator<Long> iterator = queue.iterator();
        while (iterator.hasNext()) {
            long time = iterator.next();
            if (currentTime - time > seconds * 1000L) {
                iterator.remove();
            }
        }
        return queue.size();
    }

    /**
     * 清理过期的请求时间
     */
    private void clean() {
        long currentTime = System.currentTimeMillis();
        Iterator<Long> iterator = queue.iterator();
        while (iterator.hasNext()) {
            long time = iterator.next();
            if (currentTime - time > seconds * 1000L) {
                iterator.remove();
            }
        }
    }

    public static void main(String[] args) throws Exception {
        final TimeWindow timeWindow = new TimeWindow(10, 1);
        // 测试3个线程
        IntStream.range(0, 3).forEach((i) -> {
            new Thread(() -> {
                while (true) {
                    try {
                        Thread.sleep(new Random().nextInt(20) * 100);
                    } catch (InterruptedException e) {
                        e.printStackTrace();
                    }
                    timeWindow.take();
                }
            }).start();
        });
    }
}
在上述代码中:
TimeWindow类实现了滑动窗口限流的逻辑。take方法用于获取令牌(即处理请求),在方法内部会检查当前有效请求数量是否超过最大限流数量,若超过则打印超限信息,同时将当前请求时间添加到队列中。sizeOfValid方法用于计算当前有效的请求数量,会移除过期的请求时间。clean方法用于清理过期的请求时间,通过一个单独的线程定时执行清理操作,以保证队列中只保留有效的请求时间。main方法用于模拟多个线程发送请求,测试滑动窗口限流的效果。
你可以根据实际需求调整max(最大限流数量)和seconds(时间间隔)的值来满足不同的限流要求。
3.3 Leaky Bucket 漏桶
实现方式:规定固定容量的桶,有水进入,有水流出。对于流进的水我们无法估计进来的数量、速度,对于流出的水我们可以控制速度。
以下是一个使用Java实现的Leaky Bucket(漏桶)算法进行限流的示例代码:
java
public class LeakyBucket {
    // 时间(单位:毫秒)
    private long time;
    // 漏桶的总量
    private double total;
    // 水流出的速度(单位:个/毫秒)
    private double rate;
    // 当前桶内的数量
    private double nowSize;

    public LeakyBucket(double total, double rate) {
        this.total = total;
        this.rate = rate;
        this.nowSize = 0;
        this.time = System.currentTimeMillis();
    }

    // 判断是否允许请求通过
    public boolean limit() {
        long now = System.currentTimeMillis();
        // 根据时间计算当前桶内的数量(考虑水流出的情况)
        nowSize = Math.max(0, nowSize - (now - time) * rate);
        time = now;
        if (nowSize + 1 <= total) {
            nowSize++;
            return true;
        } else {
            return false;
        }
    }

    public static void main(String[] args) {
        // 创建一个漏桶实例,总量为10,流出速度为0.1个/毫秒
        LeakyBucket leakyBucket = new LeakyBucket(10, 0.1);

        // 模拟一系列请求
        for (int i = 0; i < 20; i++) {
            boolean allowed = leakyBucket.limit();
            System.out.println("请求 " + (i + 1) + " 是否被允许:" + allowed);
            try {
                // 模拟请求间隔
                Thread.sleep(100);
            } catch (InterruptedException e) {
                e.printStackTrace();
            }
        }
    }
}
在上述代码中:
LeakyBucket类包含了漏桶的属性,如总量total、流出速度rate、当前数量nowSize和时间time。- 构造函数用于初始化漏桶的总量和流出速度。
limit方法根据当前时间和流出速度计算桶内剩余数量,并判断是否允许新的请求进入(即桶是否已满)。如果桶内剩余空间足够,则允许请求通过,并更新桶内数量;否则,拒绝请求。main方法模拟了一系列请求,并调用limit方法判断每个请求是否被允许,同时模拟了请求之间的间隔时间。
3.4 令牌桶Token Bucket
实现方式:规定固定容量的桶, token 以固定速度往桶内填充, 当桶满时 token 不会被继续放入, 每过来一个请求把 token 从桶中移除, 如果桶中没有 token 不能请求
以下是一个令牌桶算法实现限流的 Java 示例代码,模拟了令牌桶的基本功能,包括令牌的生成和请求的处理:
java
import java.util.concurrent.TimeUnit;

public class TokenBucket {
    // 桶的容量
    private final double capacity;
    // 令牌生成速度(每秒生成的令牌数)
    private final double rate;
    // 当前桶中的令牌数量
    private double tokens;
    // 上一次添加令牌的时间
    private long lastUpdateTime;

    public TokenBucket(double capacity, double rate) {
        this.capacity = capacity;
        this.rate = rate;
        this.tokens = capacity;
        this.lastUpdateTime = System.currentTimeMillis();
    }

    // 获取令牌,如果有足够的令牌则返回true,否则返回false
    public synchronized boolean tryConsume(int tokensToConsume) {
        // 更新当前桶中的令牌数量
        updateTokens();
        if (tokens >= tokensToConsume) {
            tokens -= tokensToConsume;
            return true;
        }
        return false;
    }

    // 更新桶中的令牌数量,根据时间计算新生成的令牌
    private void updateTokens() {
        long now = System.currentTimeMillis();
        // 计算从上次更新到现在的时间差(秒)
        double timeDiff = (now - lastUpdateTime) / 1000.0;
        // 计算新生成的令牌数量
        double newTokens = timeDiff * rate;
        tokens = Math.min(capacity, tokens + newTokens);
        lastUpdateTime = now;
    }

    public static void main(String[] args) {
        // 创建一个容量为100,令牌生成速度为20(每秒生成20个令牌)的令牌桶
        TokenBucket bucket = new TokenBucket(100, 20);

        // 模拟多次请求
        for (int i = 0; i < 10; i++) {
            if (bucket.tryConsume(10)) {
                System.out.println("请求成功,剩余令牌: " + bucket.tokens);
            } else {
                System.out.println("请求失败,剩余令牌: " + bucket.tokens);
            }
            try {
                // 模拟请求间隔
                TimeUnit.SECONDS.sleep(1);
            } catch (InterruptedException e) {
                e.printStackTrace();
            }
        }
    }
}
在上述代码中:
TokenBucket类表示令牌桶,包含桶的容量、令牌生成速度、当前令牌数量和上次更新时间等属性。tryConsume方法用于尝试消耗指定数量的令牌,如果桶中有足够的令牌则消耗并返回true,否则返回false。updateTokens方法根据时间计算新生成的令牌数量,并更新当前桶中的令牌数量,确保不超过桶的容量。- 在
main方法中,创建了一个令牌桶实例,并模拟了多次请求,每次请求消耗一定数量的令牌,并根据结果输出相应的信息。
这样的实现可以帮助控制请求的速率,模拟令牌桶限流的基本功能。
Spring Cloud Gateway官方提供了
RequestRateLimiterGatewayFilterFactory过滤器工厂,使用的就是 Redis 和Lua脚本实现了令牌桶的方式。
4 Redis和Lua脚本介绍
Redis主要用于缓存,支持多种数据结构,如字符串(String)、散列(Hash)、列表(List)、集合(Set)、有序集合(Sorted Set)、位图(Bitmap)、HyperLogLog和地理空间索引(Geospatial)等。
Lua是一种轻量级、嵌入式脚本语言,常用于游戏开发、脚本编程和嵌入式系统。Redis从2.6版本开始支持Lua脚本,可通过EVAL命令执行。
Lua脚本与MySQL数据库的存储过程类似,执行一组命令时,要么全部成功要么全部失败,保证了操作的原子性,可理解为一段具有业务逻辑的代码块。
5 Redis和Lua脚本的结合优势
- 原子性:Lua脚本在Redis中原子执行,运行期间不会有其他命令插入,保证操作的原子性。
- 减少网络开销:将多条Redis命令封装在Lua脚本中,减少客户端与服务器之间的网络通信次数,提高性能。
- 复杂操作:能在脚本中实现复杂逻辑操作,解决Redis原生命令繁琐的问题。
6 Lua脚本示例
以下是一个简单的Lua脚本示例,用于原子性地将一个键的值加1,并返回新的值,可通过EVAL命令在Redis中执行该脚本。
lua
-- Lua脚本:将键的值加1
local current = redis.call("GET", KEYS[1])
if not current then
    current = 0
else
    current = tonumber(current)
end
current = current + 1
redis.call("SET", KEYS[1], current)
return current- 执行该脚本
bash
EVAL "local current = redis.call('GET', KEYS[1]) if not current then current = 0 else current = tonumber(current) end current = current + 1 redis.call('SET', KEYS[1], current) return current" 1 mykey7 常见使用场景
- 分布式锁:利用Lua脚本实现分布式锁,确保锁操作的原子性。
- 计数器限流:使用Lua脚本实现精确的计数器进行限流,避免并发问题。
- 复杂事务:在Lua脚本中处理多步事务,保证操作的完整性。
8 PmHub项目中的限流实战
在PmHub项目中,Redis限流作为网关限流的补充,针对异常频繁访问场景以及可能绕过网关认证的场景设置自定义限流逻辑。具体实现步骤如下:
8.1 定义限流配置
在RedisConfig中注入限流配置,脚本通过检查和递增指定键的值,并在首次递增时设置过期时间,实现指定时间窗口内限制请求次数的功能。
java
@Configuration
@EnableCaching
@AutoConfigureBefore(RedisAutoConfiguration.class)
public class RedisConfig extends CachingConfigurerSupport
{
    @Bean
    @SuppressWarnings(value = {"unchecked", "rawtypes"})
    public RedisTemplate<Object, Object> redisTemplate(RedisConnectionFactory connectionFactory) {
        RedisTemplate<Object, Object> template = new RedisTemplate<>();
        template.setConnectionFactory(connectionFactory);

        FastJson2JsonRedisSerializer serializer = new FastJson2JsonRedisSerializer(Object.class);

        // 使用StringRedisSerializer来序列化和反序列化redis的key值
        template.setKeySerializer(new StringRedisSerializer());
        template.setValueSerializer(serializer);

        // Hash的key也采用StringRedisSerializer的序列化方式
        template.setHashKeySerializer(new StringRedisSerializer());
        template.setHashValueSerializer(serializer);

        template.afterPropertiesSet();
        return template;
    }

    @Bean
    public DefaultRedisScript<Long> limitScript() {
        DefaultRedisScript<Long> redisScript = new DefaultRedisScript<>();
        redisScript.setScriptText(limitScriptText());
        redisScript.setResultType(Long.class);
        return redisScript;
    }

    /**
     * 限流脚本
     */
    private String limitScriptText() {
        return "local key = KEYS[1]\n" +
                "local count = tonumber(ARGV[1])\n" +
                "local time = tonumber(ARGV[2])\n" +
                "local current = redis.call('get', key);\n" +
                "if current and tonumber(current) > count then\n" +
                "    return tonumber(current);\n" +
                "end\n" +
                "current = redis.call('incr', key)\n" +
                "if tonumber(current) == 1 then\n" +
                "    redis.call('expire', key, time)\n" +
                "end\n" +
                "return tonumber(current);";
    }
}
8.2 限流注解
自定义注解RateLimiter,方便在需要限流的方法中直接添加。
java
@Target(ElementType.METHOD)
@Retention(RetentionPolicy.RUNTIME)
@Documented
public @interface RateLimiter {
    /**
     * 限流key
     */
    public String key() default CacheConstants.RATE_LIMIT_KEY;

    /**
     * 限流时间,单位秒
     */
    public int time() default 60;

    /**
     * 限流次数
     */
    public int count() default 100;

    /**
     * 限流类型
     */
    public LimitType limitType() default LimitType.DEFAULT;
}
8.3 AOP切面类逻辑
自定义AOP切面控制类RateLimiterAspect,进行限流逻辑处理以及降级提醒。代码位置:com.laigeoffer.pmhub.base.core.aspectj.RateLimiterAspect
java
@Aspect
@Component
public class RateLimiterAspect {
// 日志记录器
private static final Logger log = LoggerFactory.getLogger(RateLimiterAspect.class);
// Redis操作模板(用于执行限流计数)
private RedisTemplate<Object, Object> redisTemplate;
// Redis限流脚本(LUA脚本实现原子操作)
private RedisScript<Long> limitScript;
// 注入自定义的RedisTemplate(支持复杂对象序列化)
@Autowired
public void setRedisTemplate1(RedisTemplate<Object, Object> redisTemplate) {
this.redisTemplate = redisTemplate;
}
// 注入预定义的限流LUA脚本
@Autowired
public void setLimitScript(RedisScript<Long> limitScript) {
this.limitScript = limitScript;
}
// 限流切面核心逻辑(在方法执行前进行流量控制)
@Before("@annotation(rateLimiter)")
public void doBefore(JoinPoint point, RateLimiter rateLimiter) throws Throwable {
// 获取注解参数:时间窗口(秒)和最大允许请求数
int time = rateLimiter.time();
int count = rateLimiter.count();
// 生成复合缓存key(包含方法签名和客户端IP)
String combineKey = getCombineKey(rateLimiter, point);
List<Object> keys = Collections.singletonList(combineKey);
try {
// 执行LUA脚本(原子操作:计数+过期时间设置)
Long number = redisTemplate.execute(limitScript, keys, count, time);
// 请求数超过阈值时抛出限流异常
if (StringUtils.isNull(number) || number.intValue() > count) {
throw new ServiceException("访问过于频繁,请稍候再试");
}
// 记录限流日志(生产环境建议改为DEBUG级别)
log.info("限制请求'{}',当前请求'{}',缓存key'{}'", count, number.intValue(), combineKey);
} catch (ServiceException e) {
throw e; // 直接抛出已知业务异常
} catch (Exception e) {
// 将系统异常转换为业务异常,避免泄露技术细节
throw new RuntimeException("服务器限流异常,请稍候再试");
}
}
// 构建全局唯一的限流key(格式:注解key + [IP] + 类名 + 方法名)
public String getCombineKey(RateLimiter rateLimiter, JoinPoint point) {
StringBuffer stringBuffer = new StringBuffer(rateLimiter.key());
// 按IP限流时追加客户端IP地址
if (rateLimiter.limitType() == LimitType.IP) {
stringBuffer.append(IpUtils.getIpAddr(ServletUtils.getRequest())).append("-");
}
// 追加方法签名信息(类名+方法名)
MethodSignature signature = (MethodSignature) point.getSignature();
Method method = signature.getMethod();
Class<?> targetClass = method.getDeclaringClass();
stringBuffer.append(targetClass.getName()).append("-").append(method.getName());
return stringBuffer.toString();
}
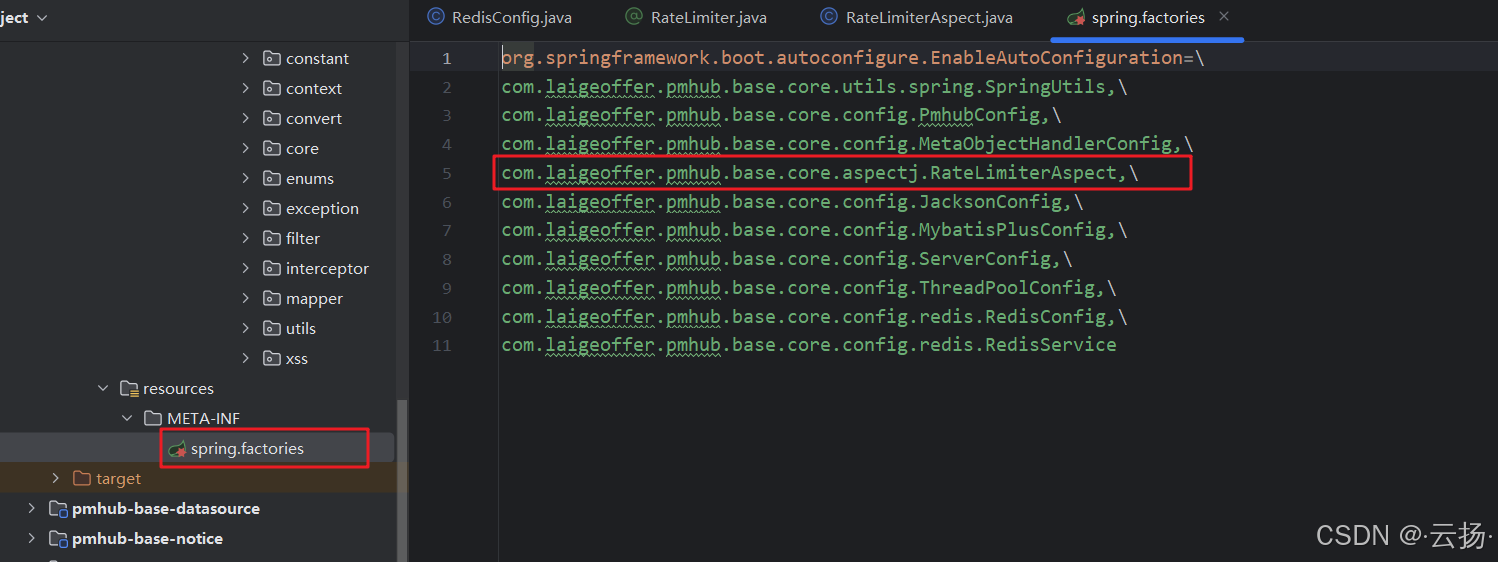
}由于该类定义在公共包core下,需手动加入给spring管理。
8.4 限流具体使用场景
在PmHub的登录接口添加二道防线,通过自定义限流措施保障系统安全。使用时,通过注解自定义时间和访问控制数。代码路径:com.laigeoffer.pmhub.auth.controller.LoginController#login
java
/**
 * 登录接口,因为登录接口无token,所以不走网关鉴权,且安全级别极高
 * 需要自定义Redis限流逻辑
 * 这里配置了 30 秒内仅允许访问 10 次
 * @param form
 * @return
 */
@RateLimiter(key = "rate_limit:login", time = 30, count = 10)
@PostMapping("login")
public AjaxResult login(@RequestBody LoginBody form) {
    AjaxResult ajax = success();
    // 用户登录
    LoginUser userInfo = sysLoginService.login(form.getUsername(), form.getPassword());
    // 获取登录token
    String token = tokenService.createToken(userInfo);
    ajax.put(Constants.TOKEN, token);
    return ajax;
}
9 JMeter压测过程
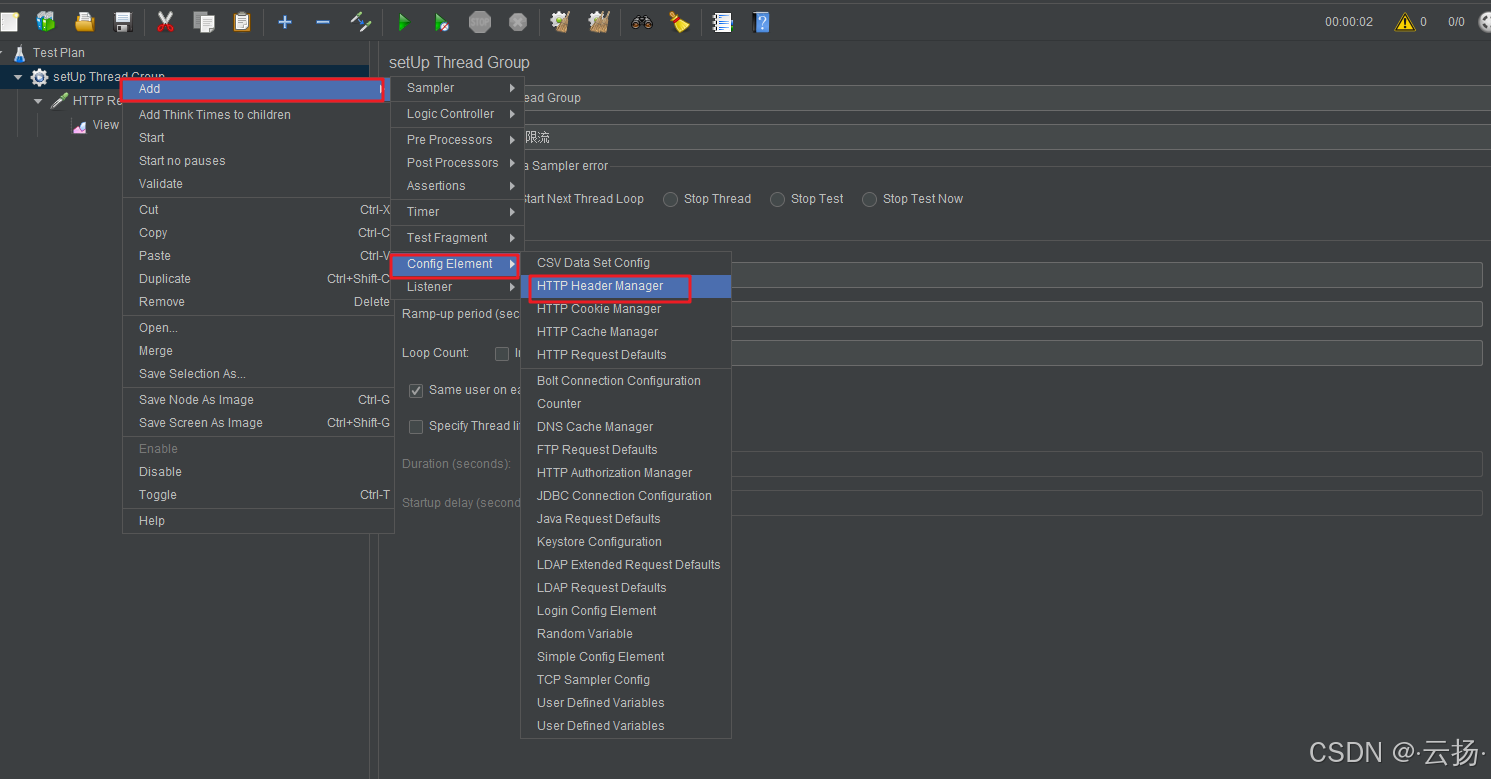
9.1 下载安装
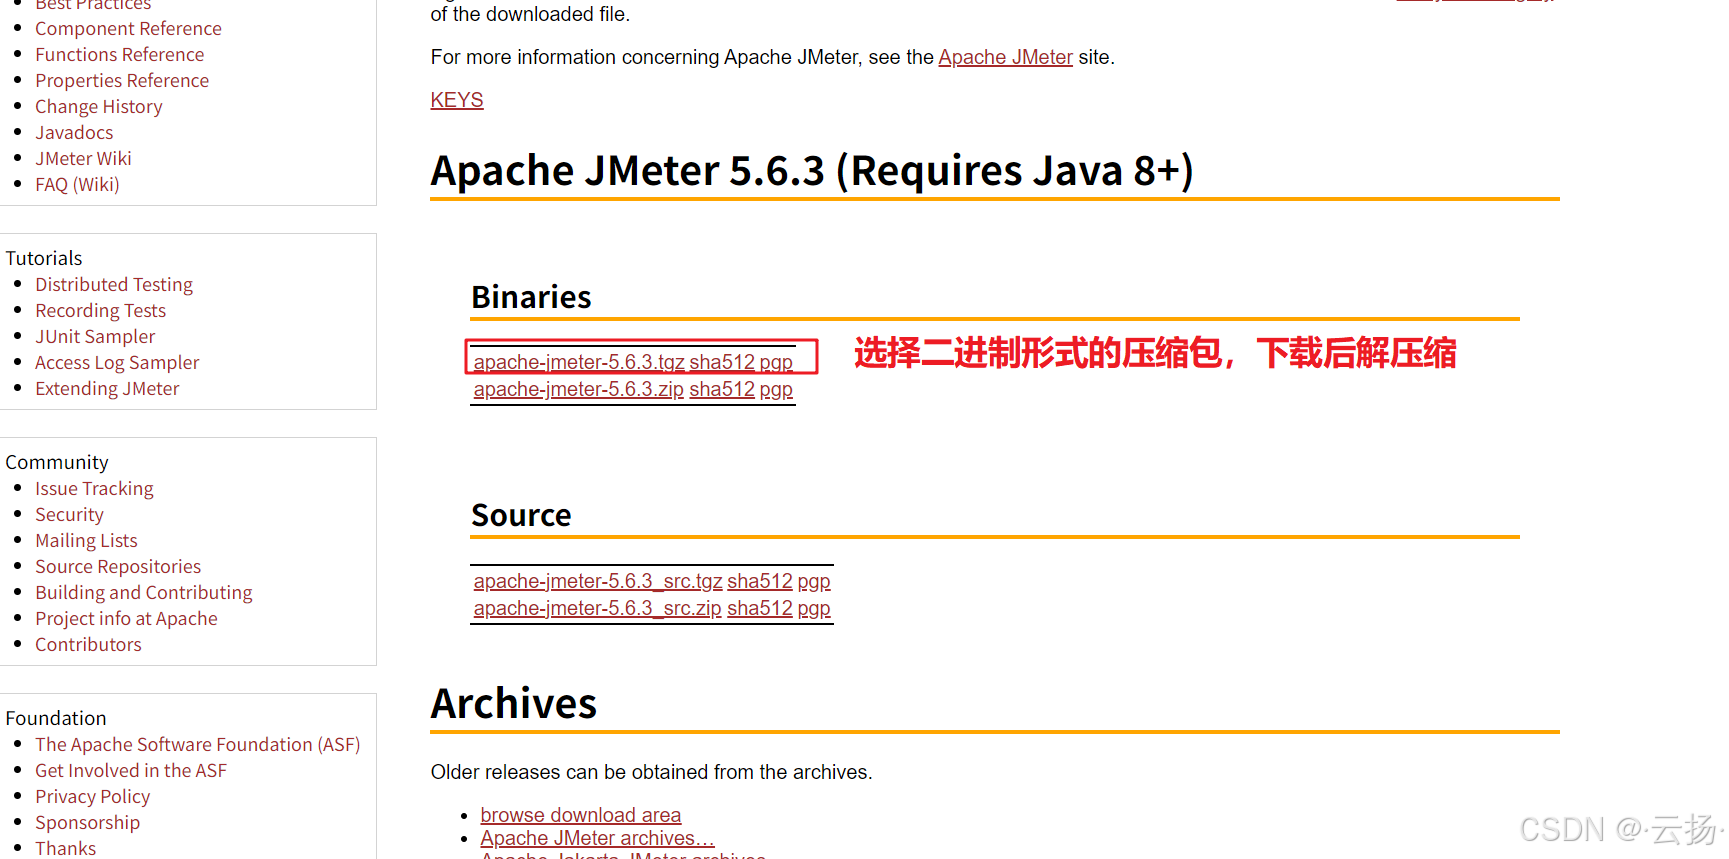
借助JMeter工具模拟并发,从指定地址下载二进制形式的压缩包并解压。
下载地址:Jmeter官方下载地址
9.2 启动
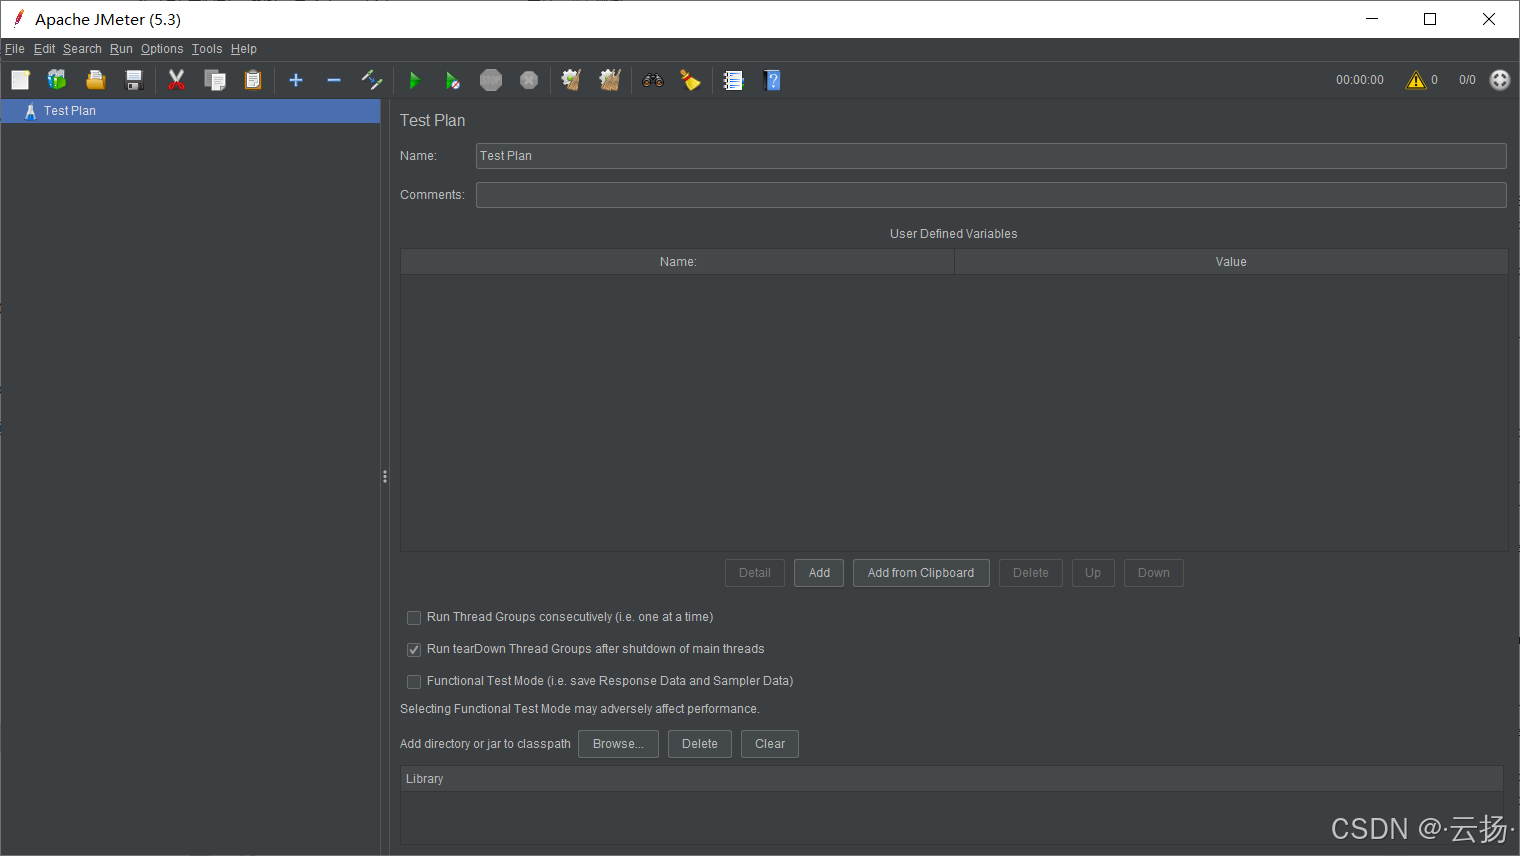
进入jmeter的bin文件夹,运行jmeter.sh(windows系统运行jmeter.bat)。
9.3 简单测试
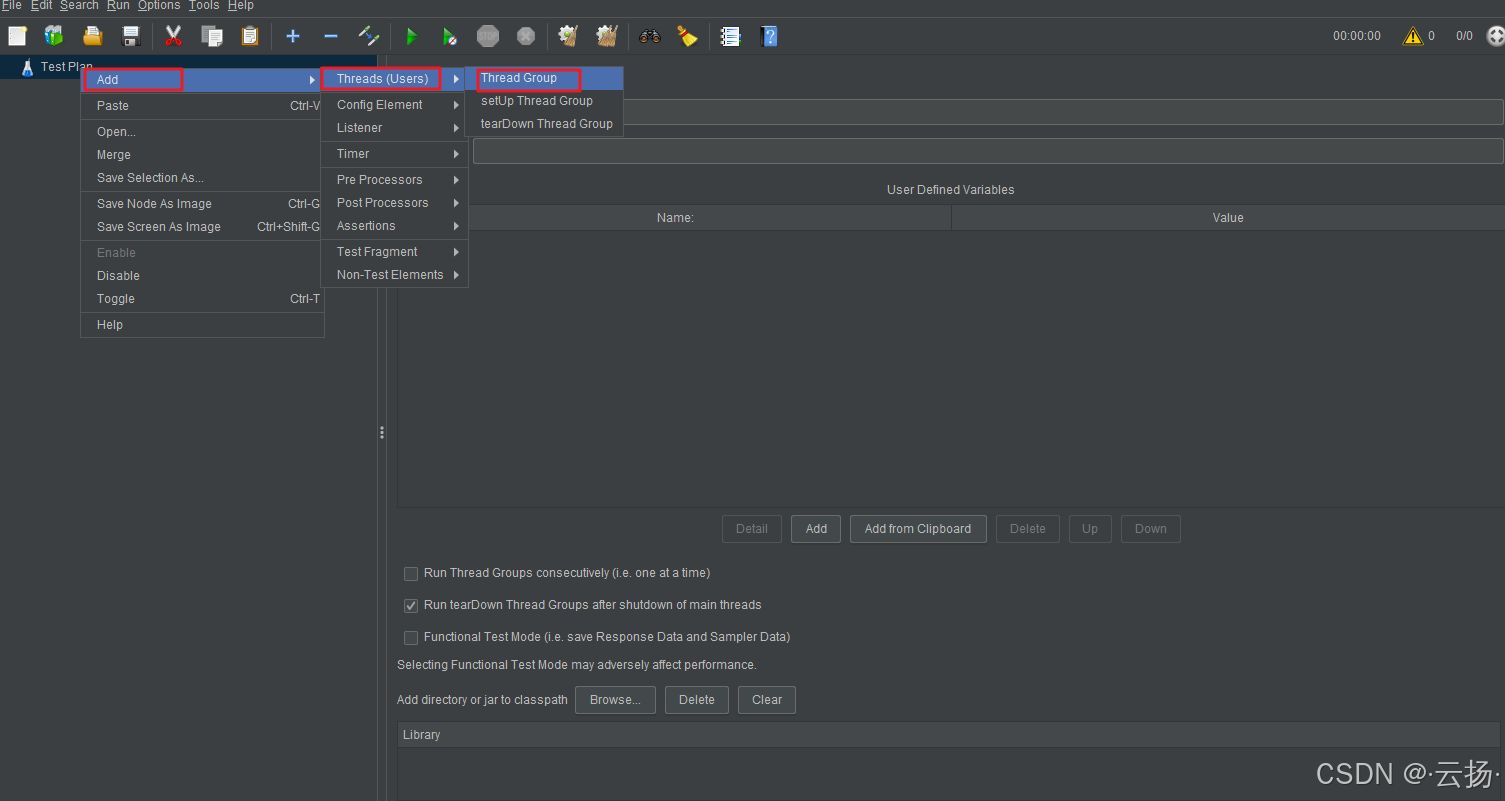
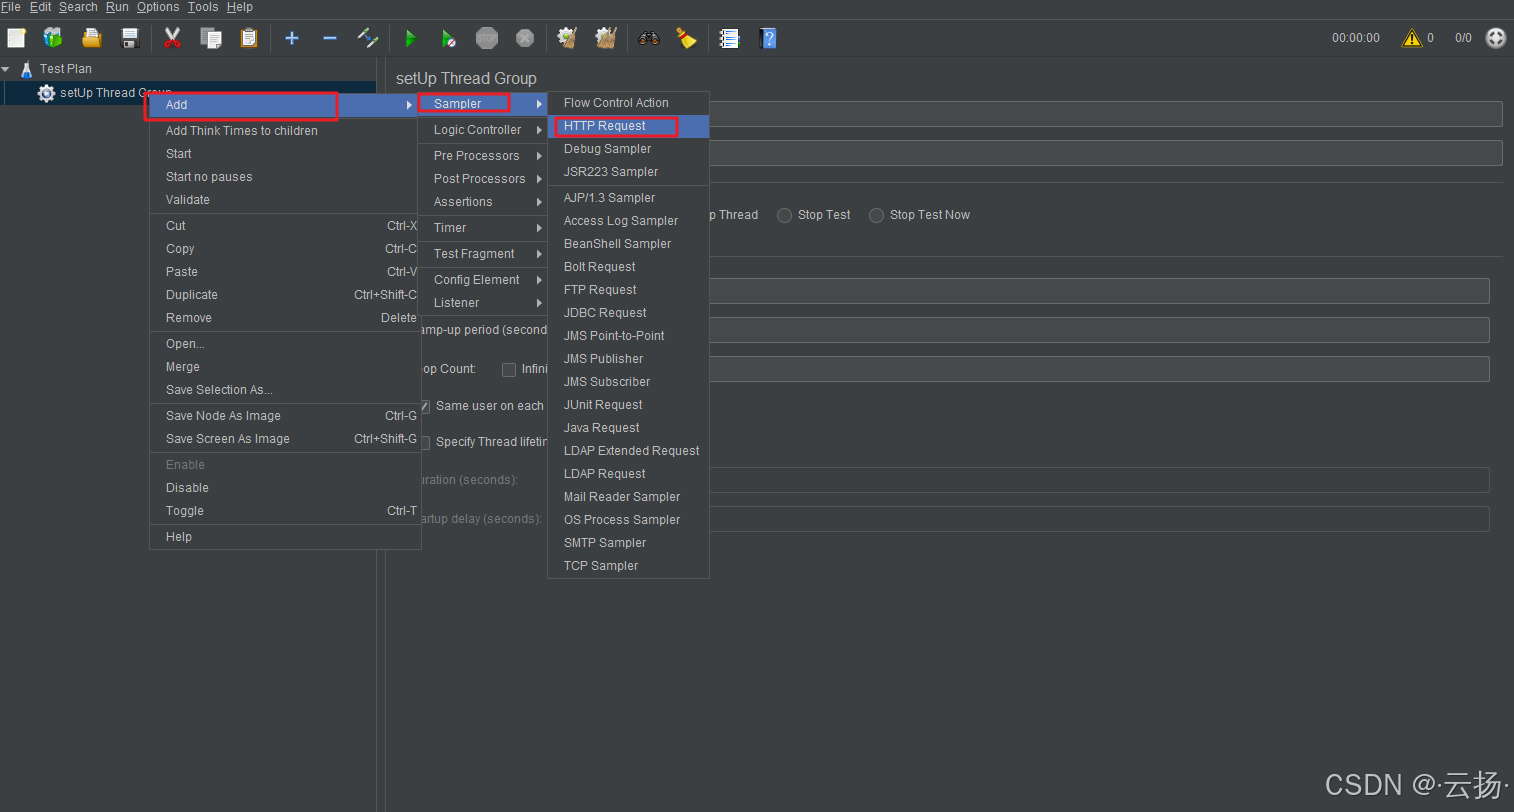
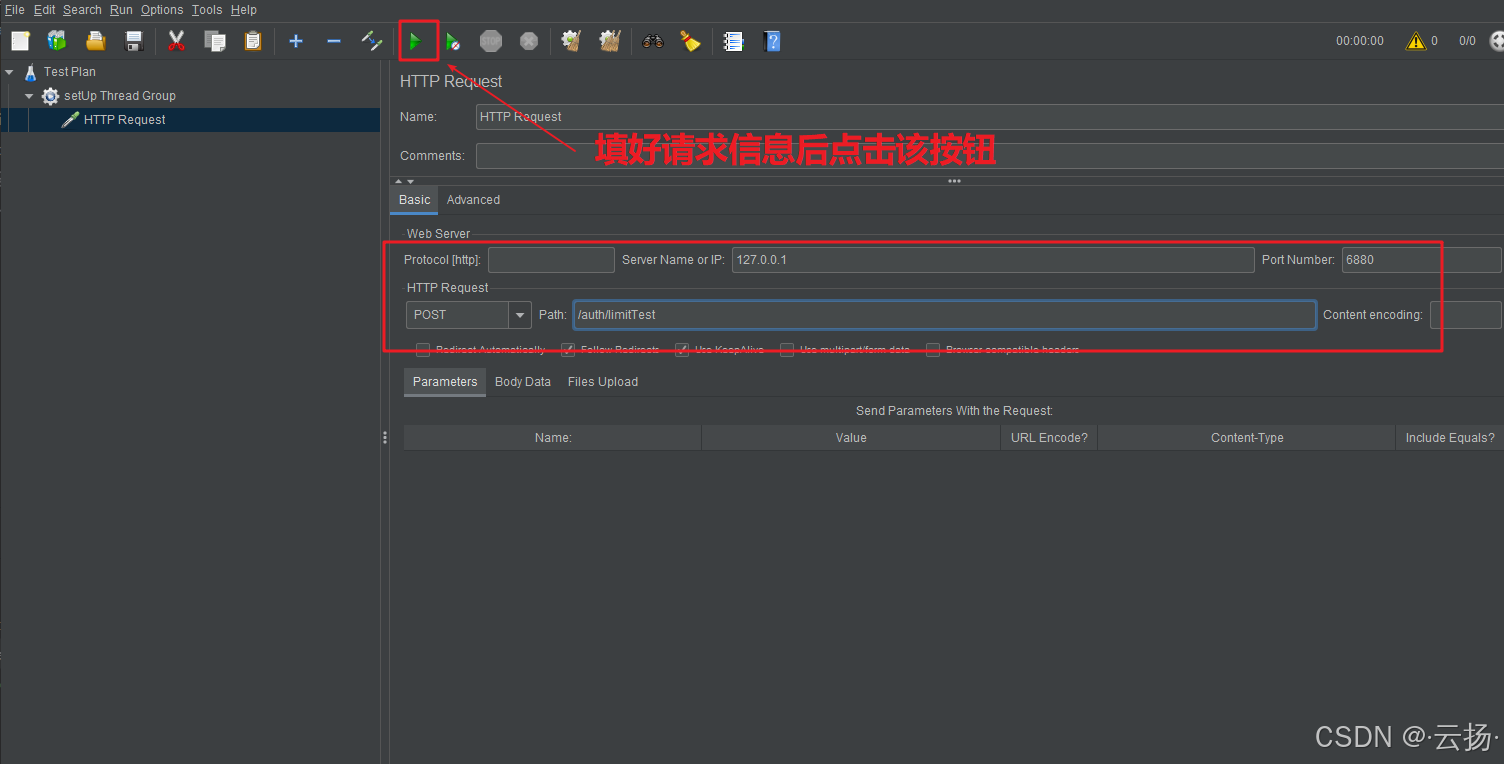
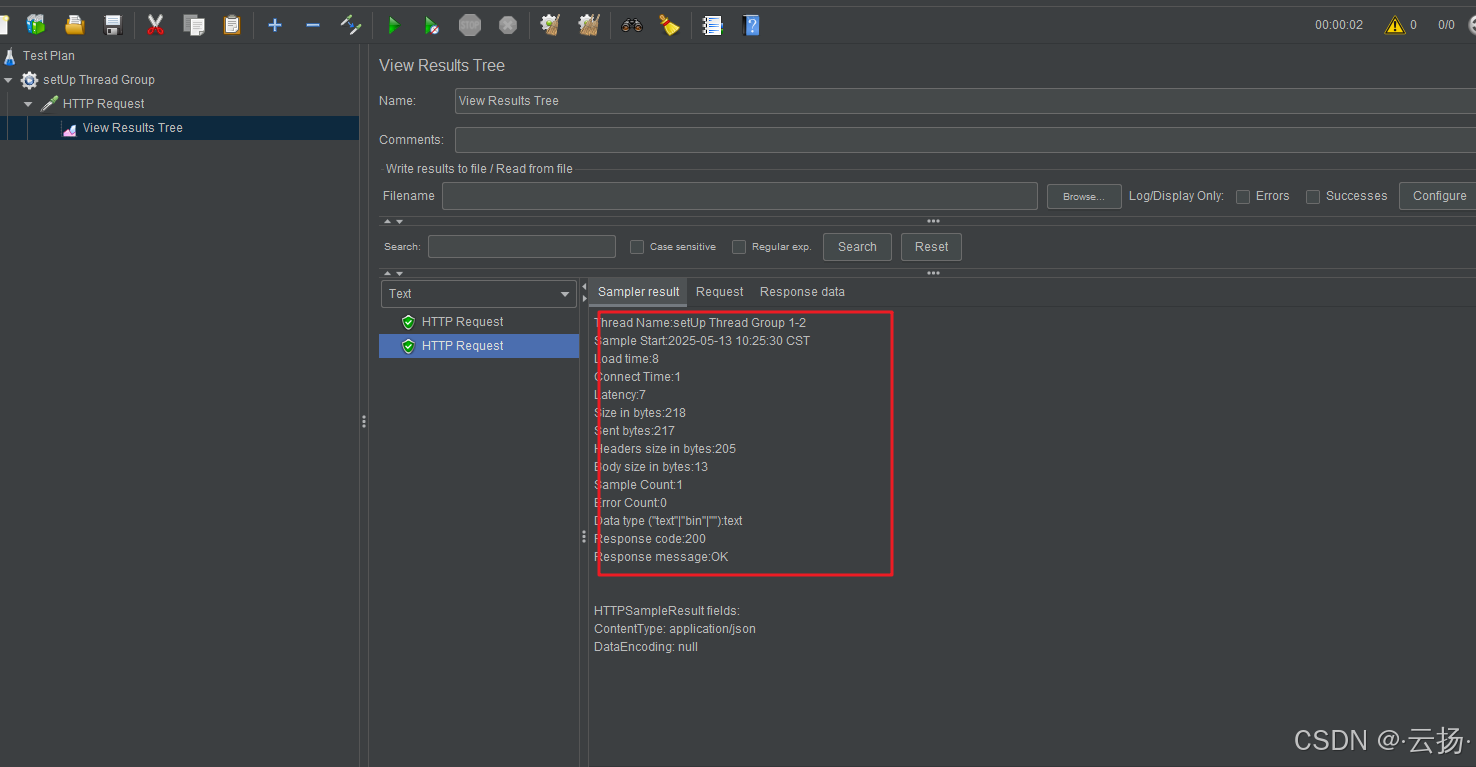
在pmhub-auth模块的LoginController接口下新增测试接口,设置1秒发送10个请求,添加http请求,点击开始测试,保存测试结果,查看结果树获取请求结果信息。
java
//@RateLimiter(key = "limitTest", time = 10, count = 2)
@PostMapping(value = "/limitTest")
public Long limitTest() {
    System.out.println("limitTest");
    return 1L;
}


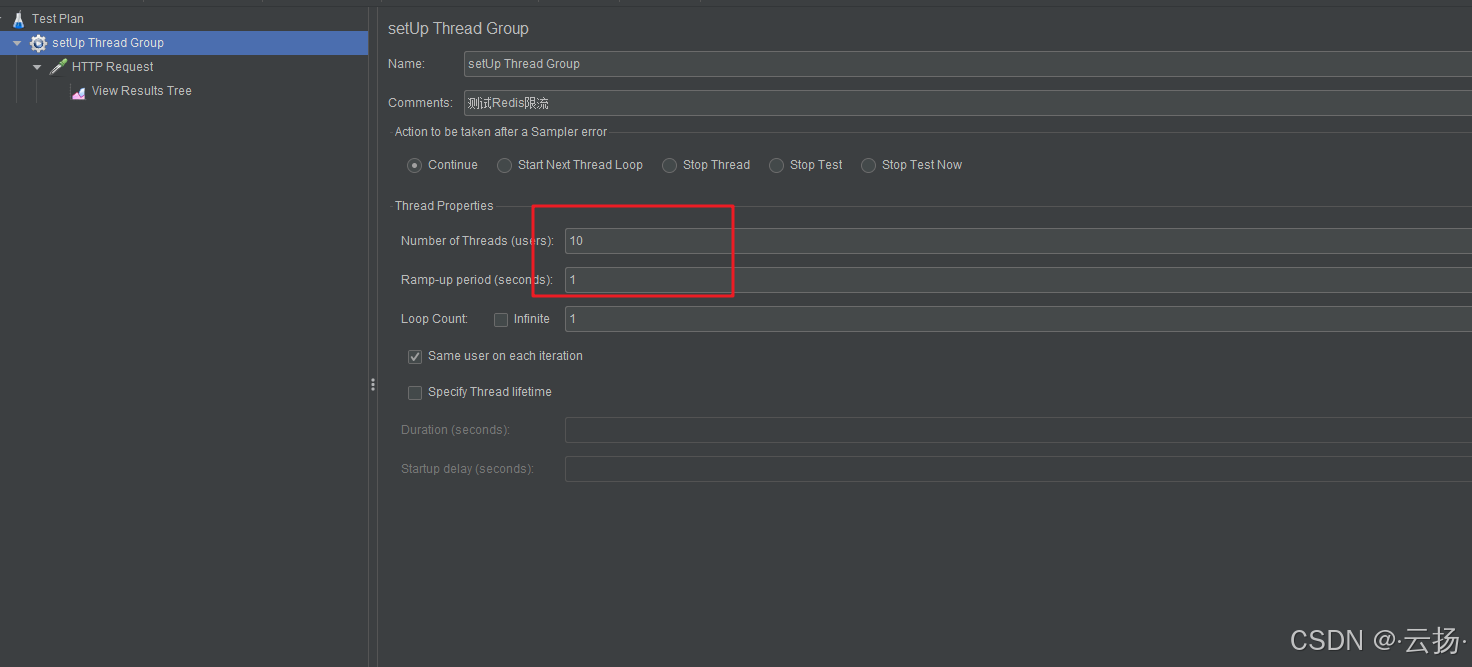
9.4 模拟接口压测
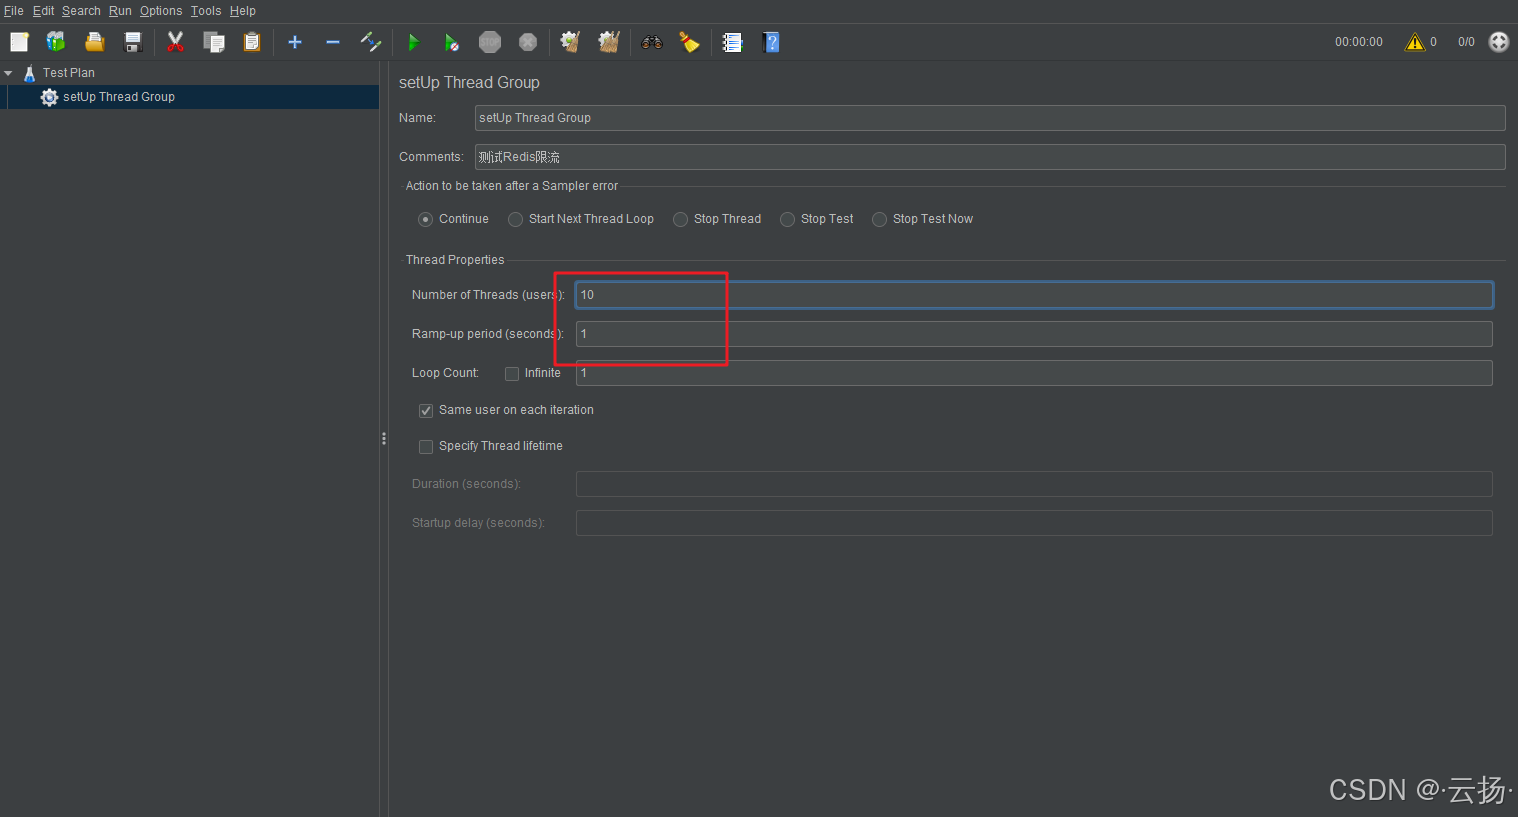
设置线程组1秒10个请求,限流逻辑配置为接口10s只允许2个请求数,发送请求并查看日志,验证限流配置是否成功。
java
 @RateLimiter(key = "limitTest", time = 10, count = 2)
 @PostMapping(value = "/limitTest")
 public Long limitTest() {
     System.out.println("limitTest");
     return 1L;
 }
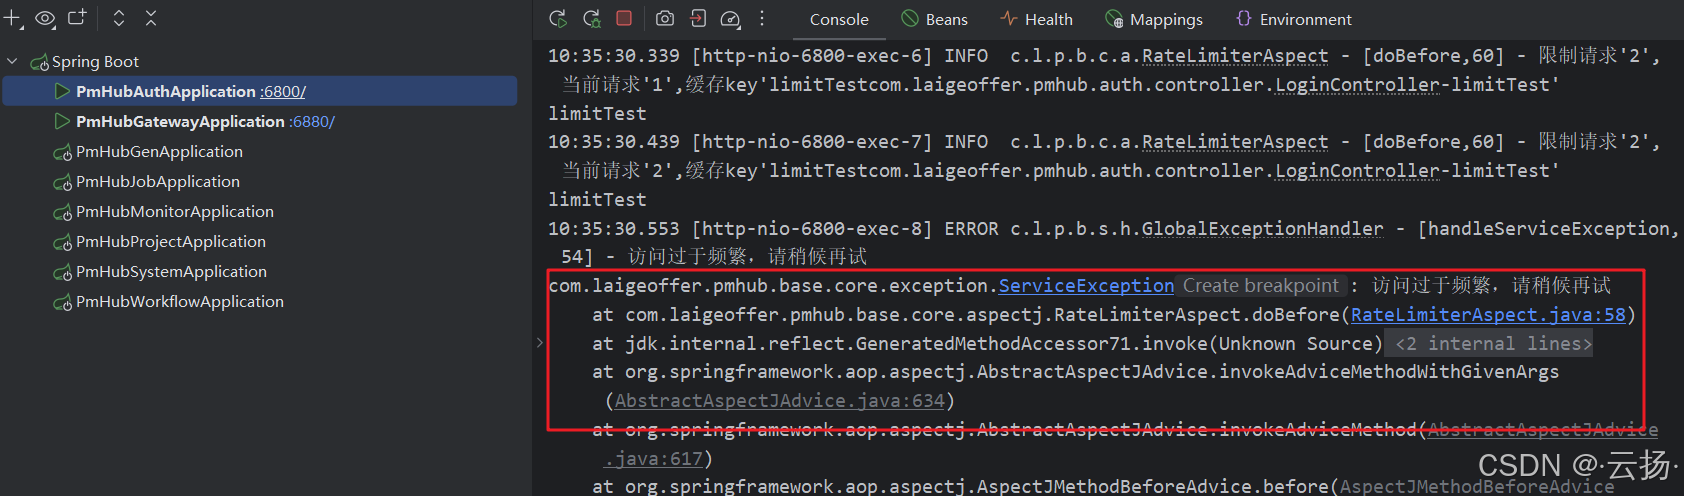
9.5 真实登录接口限流
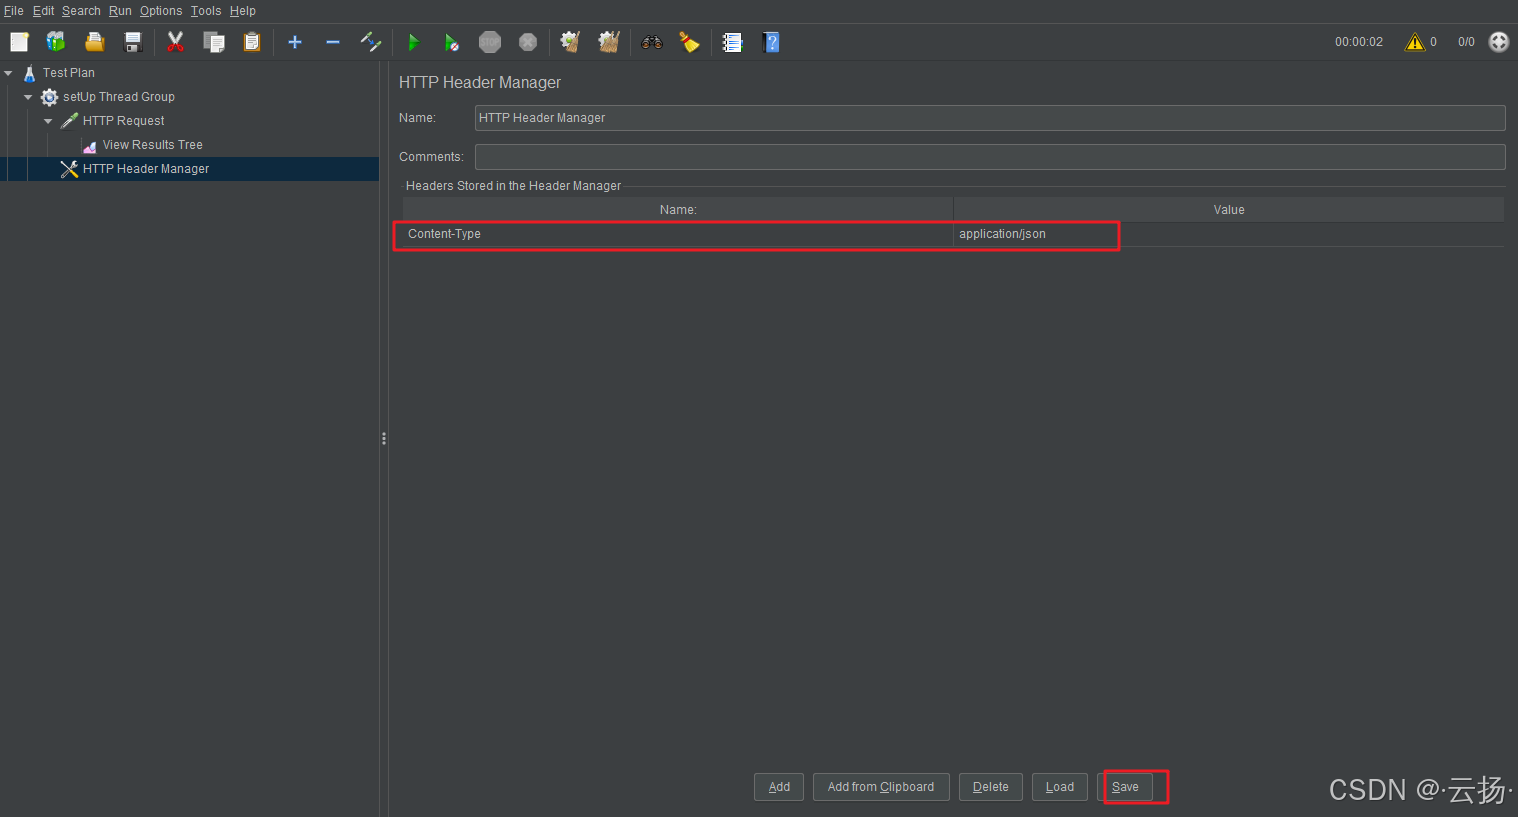
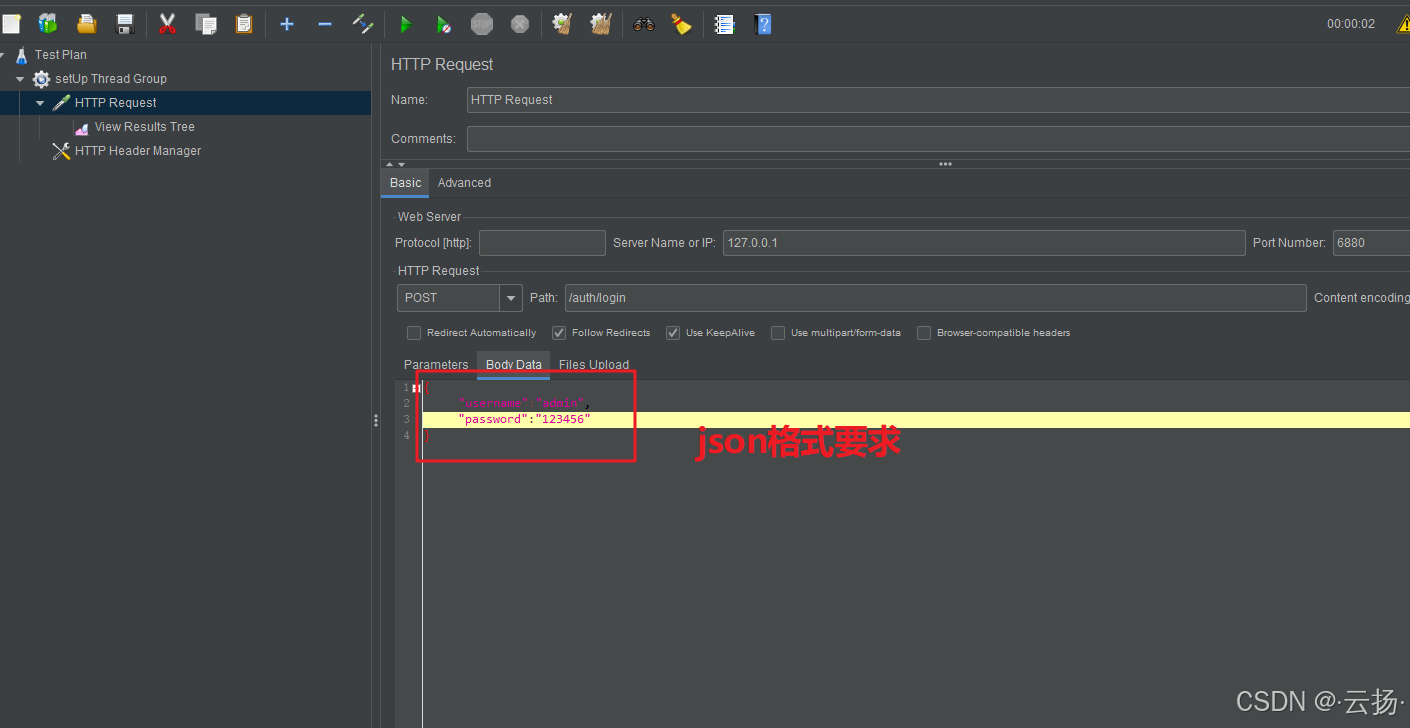
在登录接口中配置限流注解,如配置30秒内仅允许访问10次。发送post请求,设置json格式请求参数,分别进行正常情况(1秒发送9个请求,未超过阈值)和异常情况(1秒发送11个请求,超过阈值)的压测,查看JMeter返回数据和控制台日志,验证限流目的是否达到。
java
/**
 * 登录接口,因为登录接口无token,所以不走网关鉴权,且安全级别极高
 * 需要自定义Redis限流逻辑
 * 这里配置了 30 秒内仅允许访问 10 次
 * @param form
 * @return
 */
@RateLimiter(key = "rate_limit:login", time = 30, count = 10)
@PostMapping("login")
public AjaxResult login(@RequestBody LoginBody form) {
    AjaxResult ajax = success();
    // 用户登录
    LoginUser userInfo = sysLoginService.login(form.getUsername(), form.getPassword());
    // 获取登录token
    String token = tokenService.createToken(userInfo);
    ajax.put(Constants.TOKEN, token);
    return ajax;
}
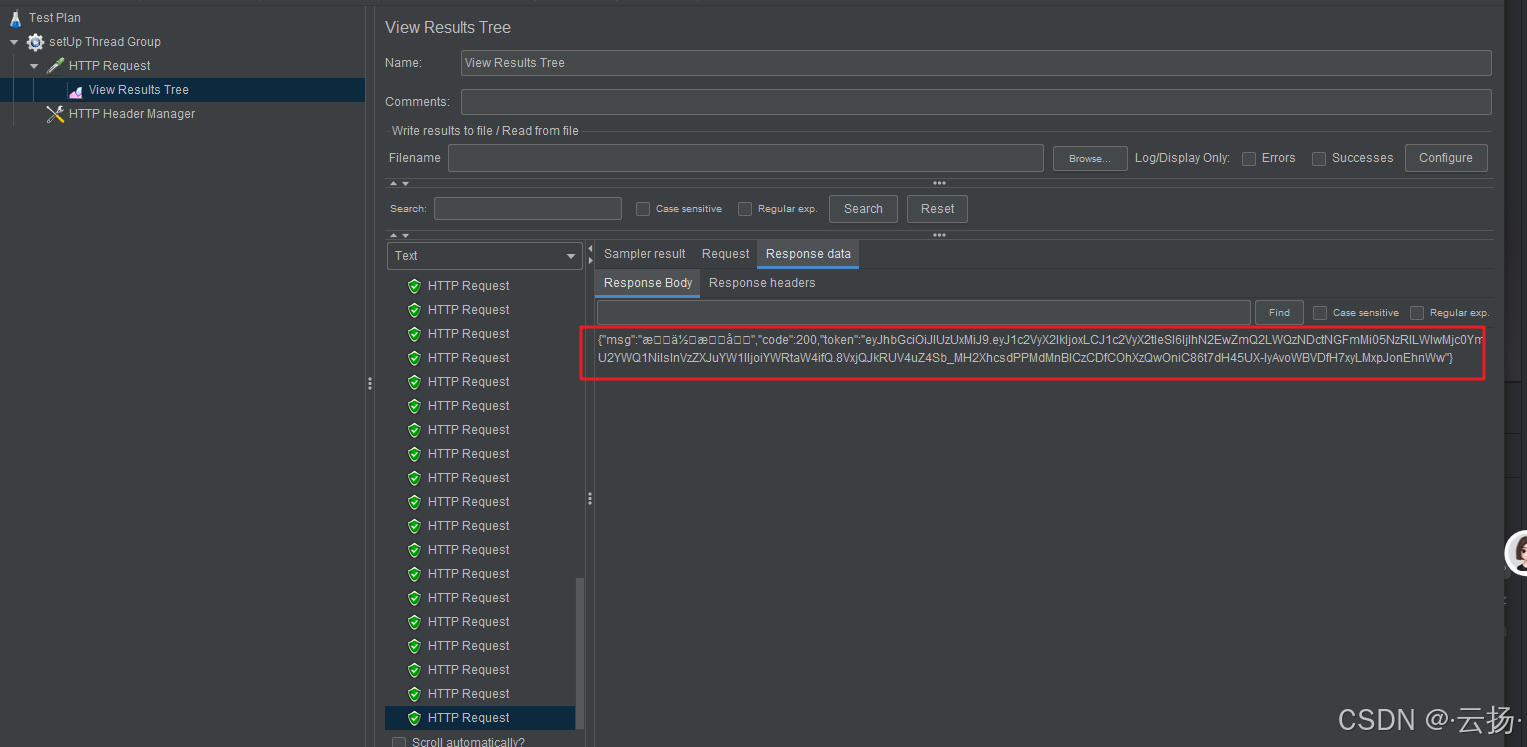
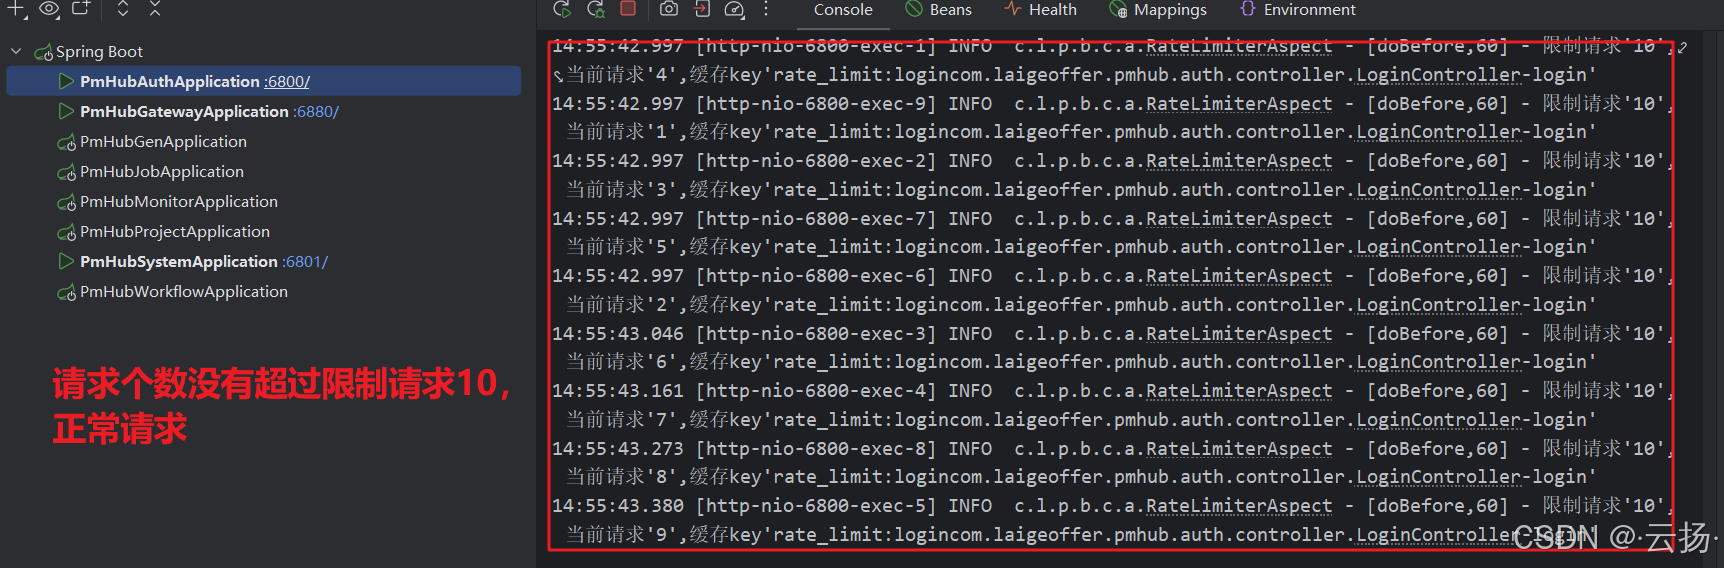
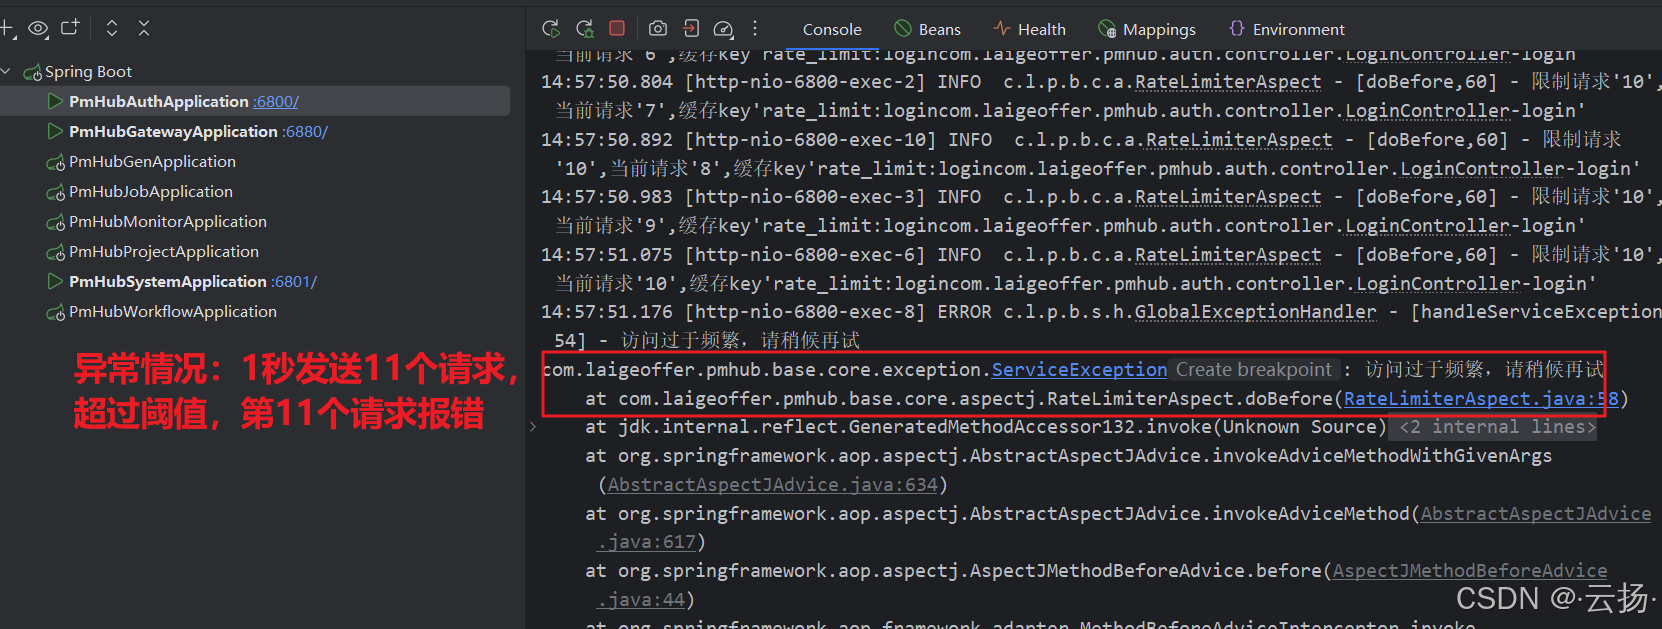
说明达到了限流的目的。
10 总结
通过以上在PmHub项目中基于Redis加Lua脚本的计数器算法限流实现以及JMeter压测验证,确保了系统在高并发场景下的稳定性和安全性,有效防止了系统因过载而出现问题。
11 参考链接
- PmHub实现Redis加Lua脚本基于计数器算法的限流
- 项目仓库(GitHub)
- 项目仓库(码云):(国内访问速度更快)