文章目录
前言
阅读本文前请注意最后编辑时间,文章内容可能与目前最新的技术发展情况相去甚远。欢迎各位评论与私信,指出错误或是进行交流等。
allure简介
官方文档地址:https://allurereport.org/docs/
- 它是一个生成HTML测试报告的工具包
- 使用java开发,需要java环境
- 功能强大 , 生成的报告美观、直观
allure安装
软件下载
想更好地使用allure,可以安装如下软件 :
| 安装软件 | 用途 | 链接地址 |
|---|---|---|
| java | allure使用java开发,所以必须要有运行环境 | https://www.oracle.com/cn/java/technologies/downloads/ |
| allure | 生成测试报告 | https://repo.maven.apache.org/maven2/io/qameta/allure/allure-commandline/ |
| python | 编写测试用例等所需语言 | https://www.python.org/ |
| pycharm | 开发工具IDE | https://www.jetbrains.com/pycharm/download/?section=windows |
| pytest | python测试框架 | pip install pytest |
| allure-pytest | pytest的插件 让allure和pytest配合 | pip install allure-pytest |
安装
- allure无需安装,直接解压到一个指定的路径下即可
- java、python、pycharm的安装教程请各位自行搜索资料
- 在安装完python后,pytest只需要在cmd命令中运行pip install pytest即可自动安装 。
- 在安装完pytest后,只需要在cmd命令中运行pip install allure-pytest即可自动安装 。
配置环境变量
Java、python、allure都需要进行环境变量配置,Java、python的环境变量配置请各位自行搜索资料。
allure环境配置
此电脑-鼠标右击-属性-高级系统设置-环境变量-系统变量下的Path-新建-添加allure环境变量(填写 allure 解压的路径),具体如下:

安装成功验证
除了pycharm无需验证外,其它的都可以输入命令进行验证,打开cmd窗口输入以下命令进行验证:
cpp
# 1. java验证 :
java --version
# 2. python验证 :
python -V
# 3. allure验证
allure --version
# 4. pytest验证
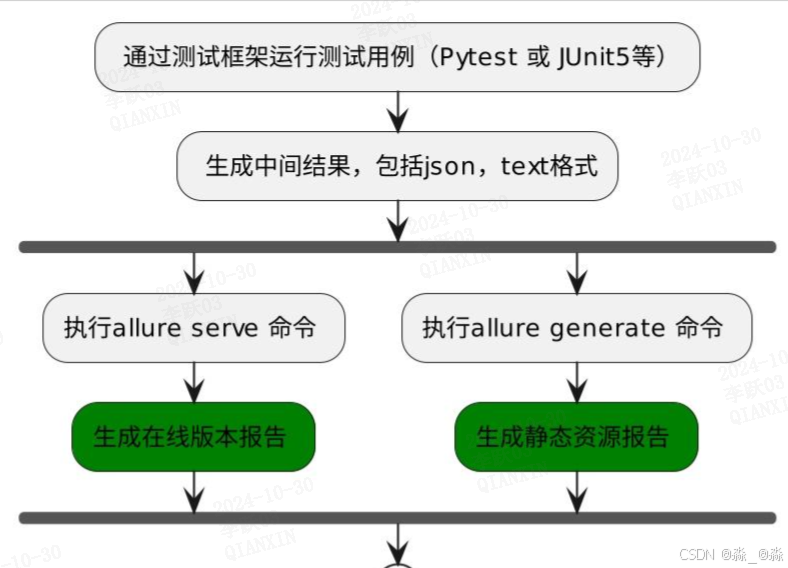
pip show pytestallure运行流程
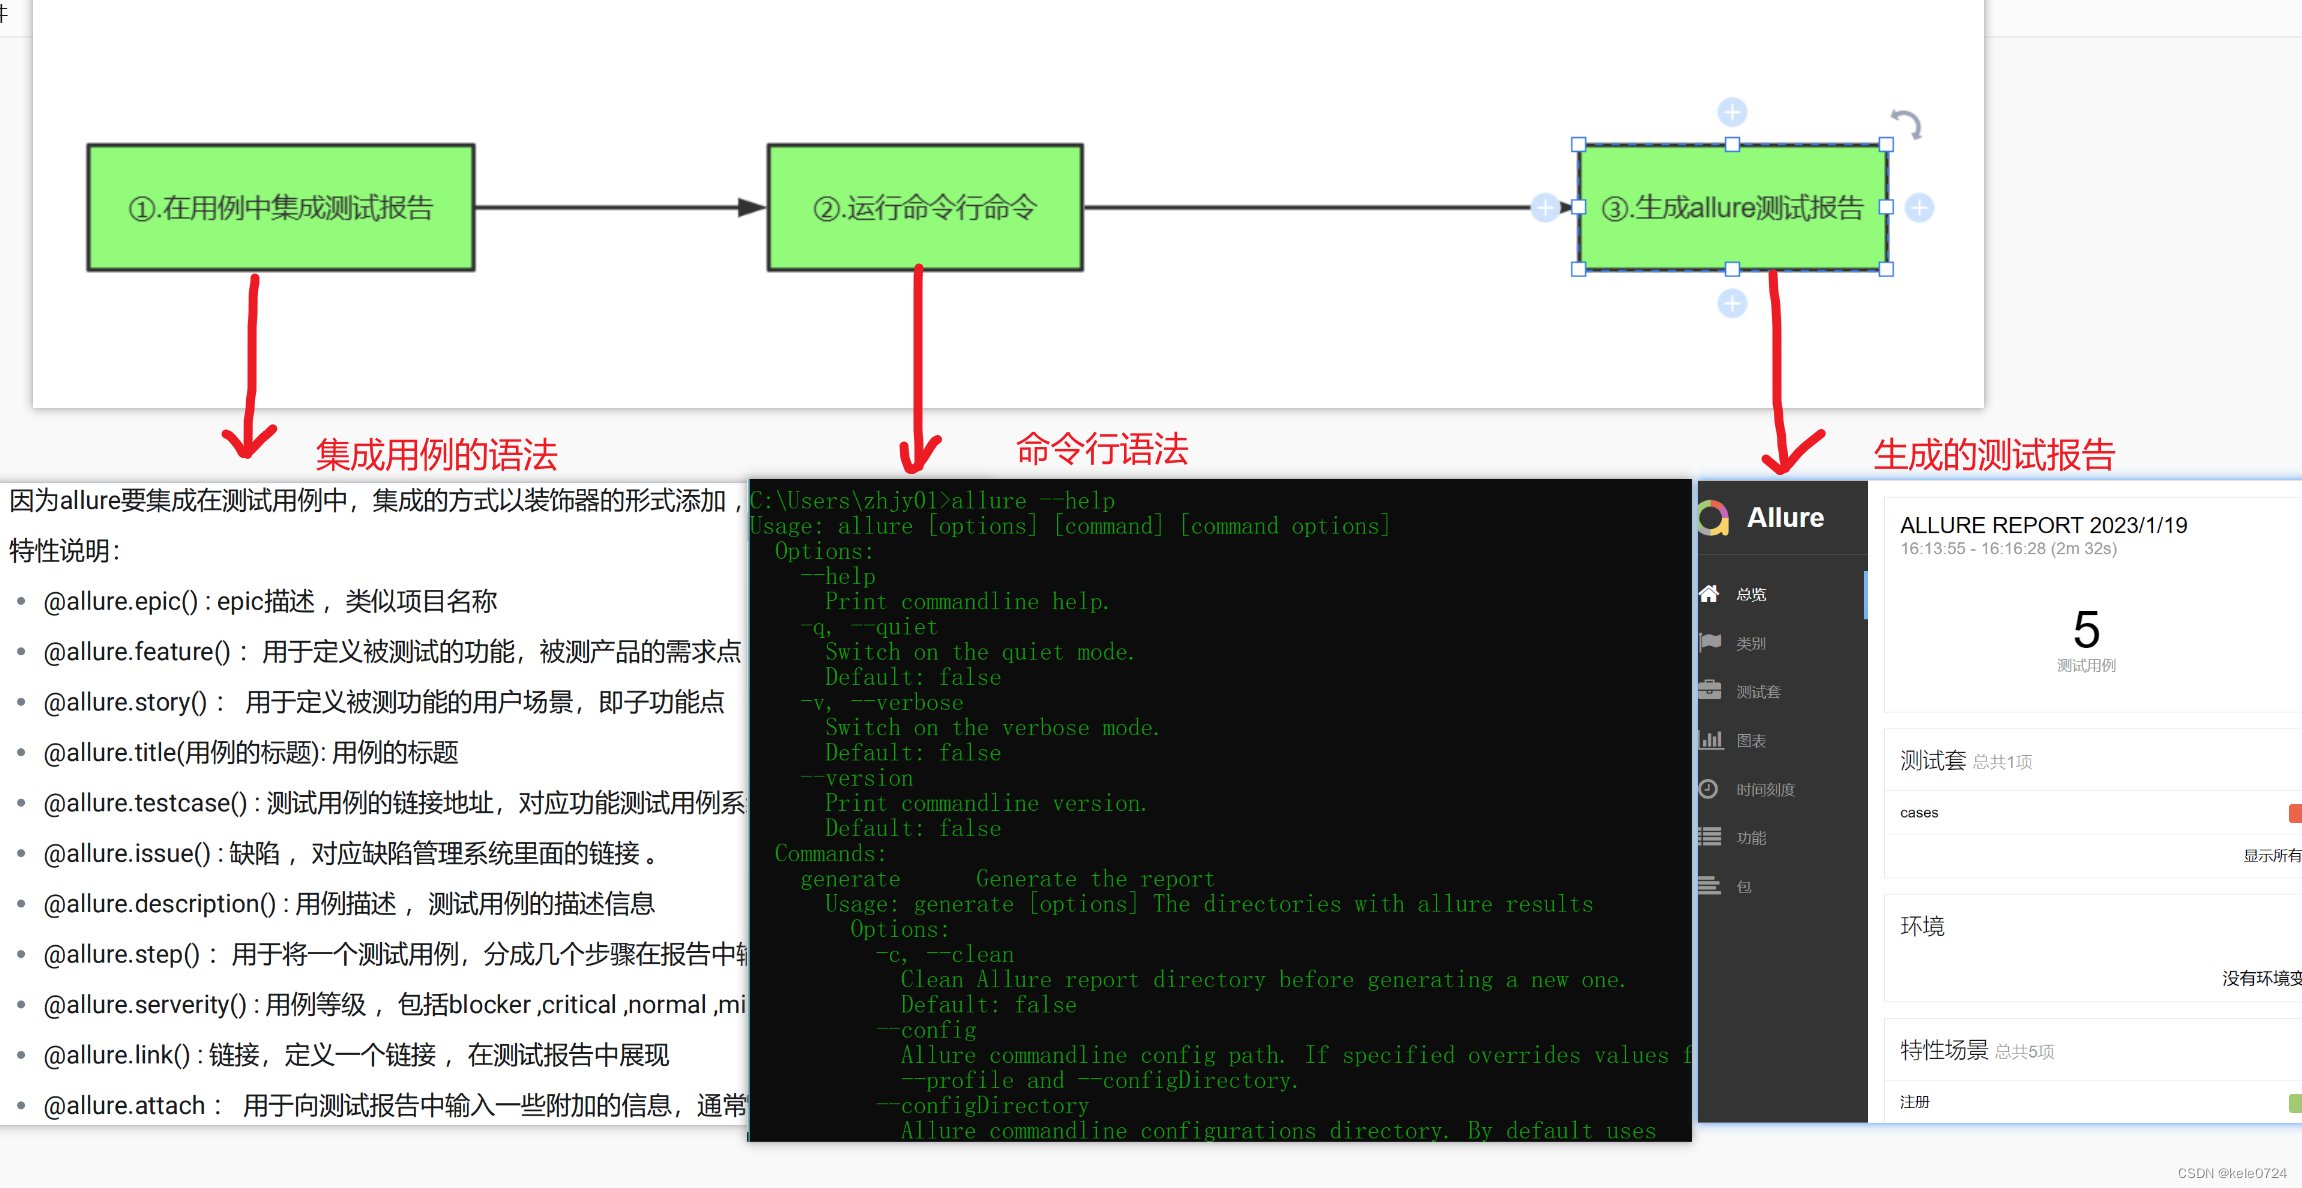
allure运行流程主要分为以上的三步:
- 在编写好的测试用例中添加allure装饰器
- 在cmd处,运行allure命令 添加所需参数 ,它就会生成测试报告
- 通过浏览器查看生成的测试报告
allure装饰器函数
基本说明
cpp
# 作用:用于将测试用例的数据展示到测试报告中
# 导入:import allure
# 说明 :
    1.需要将这些装饰器函数添加在测试方法或测试类的开头。
    2.同一个类或者一个方法可以添加多个装饰器函数
装饰器函数
| 函数 | 说明 |
|---|---|
| @allure.epic() | 项目名称 |
| @allure.feature() | 模块名称 |
| @allure.story() | 子模块 |
| @allure.title(用例标题) | 用例标题 |
| @allure.severity() | 用例等级 包括:blocker,critical,normal,minor,trivial |
| @allure.step() | 测试步骤 |
| @allure.description() | 测试用例描述 例:可以写预期结果 |
| @allure.testcase(url) | 测试用例链接 |
| @allure.issue(url) | 测试bug链接 |
| @allure.link(url) | 链接到被测系统地址 |
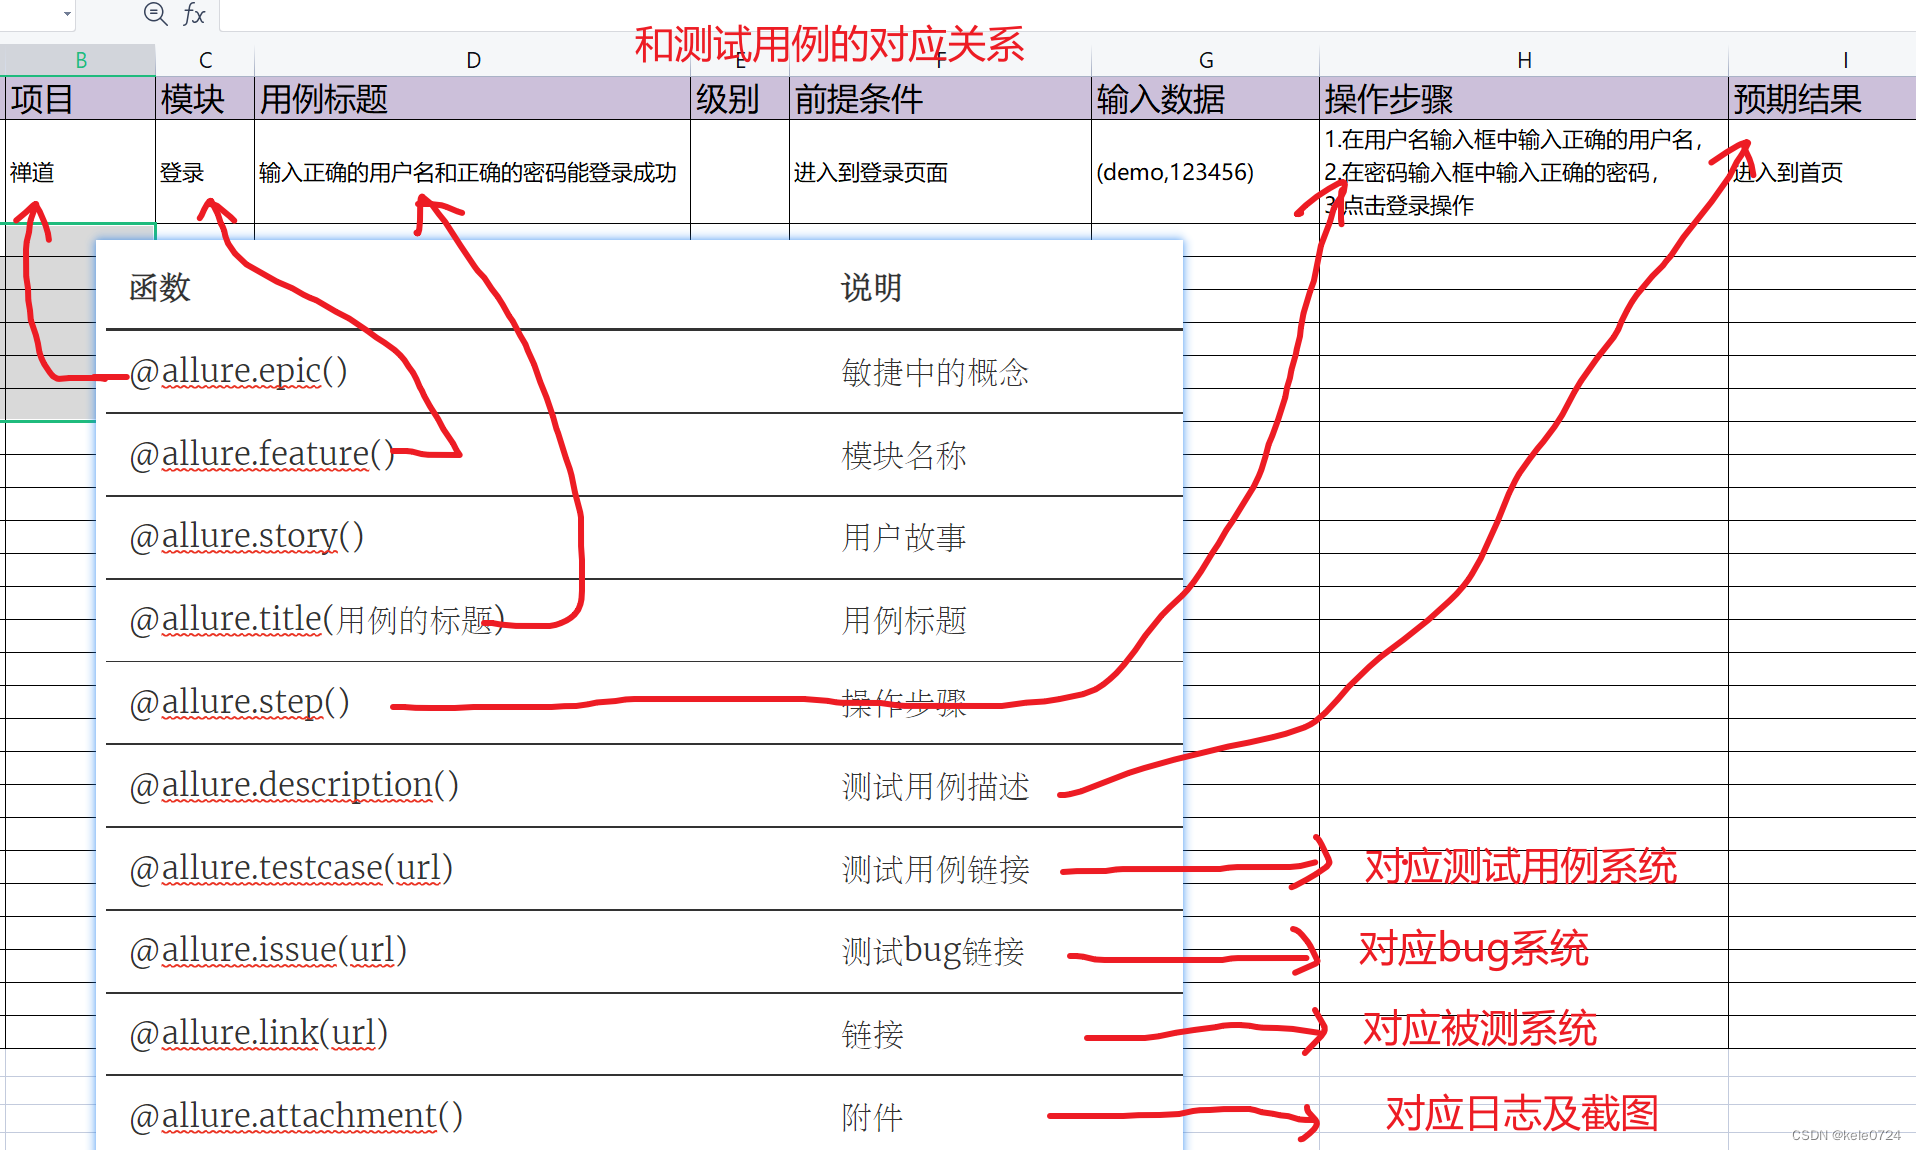
| @allure.attachment() | 附件 可以添加截图或者日志 |
以上的装饰器其实就是对应测试用例模板中的一些字段 ,具体如下 :
使用
allure.attach
allure.attach(body, name, attachment_type, extension)
作用:在测试报告中生成指定内容、名称、类型的附件,可以补充测试数据、测试结果截图等;
参数列表
- body:要显示的内容(附件),也可以理解为写入附件的内容
- name:附件名字
- attachment_type:附件类型,是 allure.attachment_type 里面的其中一种
- extension:附件的扩展名(比较少用)
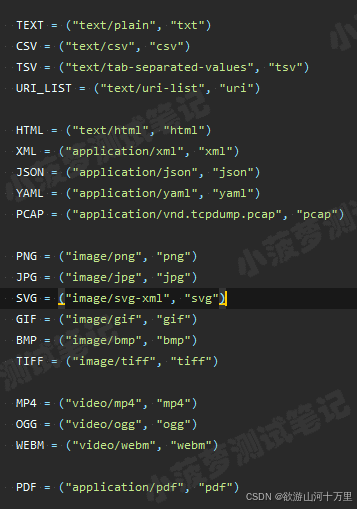
allure.attachment_type提供的附件类型 如下所示
另外一种方式 allure.attach.file(source, name=None, attachment_type=None, extension=None)
作用:向测试用例中上传附件
参数说明:source为文件路径,其他参数与allure.attach()参数一致。
在UI自动化测试中,会经常用到这个方法来上传用例执行的截图。
示例
cpp
import allure
import pytest
import requests
import json
data = [("lilei", "123456"), ("hanmeimei", "888888"), ("xiaoming", "111111")]
ids = ["username:{}-password:{}".format(username, password) for username, password in data]
@allure.epic("xx在线购物平台接口测试")
@allure.feature("登录模块")
class TestLogin:
@allure.story("用户登录")
@allure.title("登录")
@pytest.mark.parametrize("username, password", data, ids=ids)
def test_login(self, username, password):
headers = {"Content-Type": "application/json;charset=utf8"}
url = "http://127.0.0.1:5000/login"
_data = {
"username": username,
"password": password
}
allure.attach(
body="用户名-{},密码-{}".format(username, password),
name="登录参数",
attachment_type=allure.attachment_type.TEXT
)
res = requests.post(url=url, headers=headers, json=_data).text
res = json.loads(res)
assert res['code'] == 1000
@allure.story("用户退出登录")
@allure.title("退出登录")
def test_logout(self):
'''这条测试用例仅仅只是为了举例说明allure.attach.file的使用'''
print("退出登录,并截图")
# 截图路径
testcase_path = os.path.dirname(os.path.dirname(os.path.abspath(__file__)))
source_path = testcase_path + "/screenshot/logout.jpg"
allure.attach.file(
source=source_path,
name="退出登录后截图",
attachment_type=allure.attachment_type.JPG
)
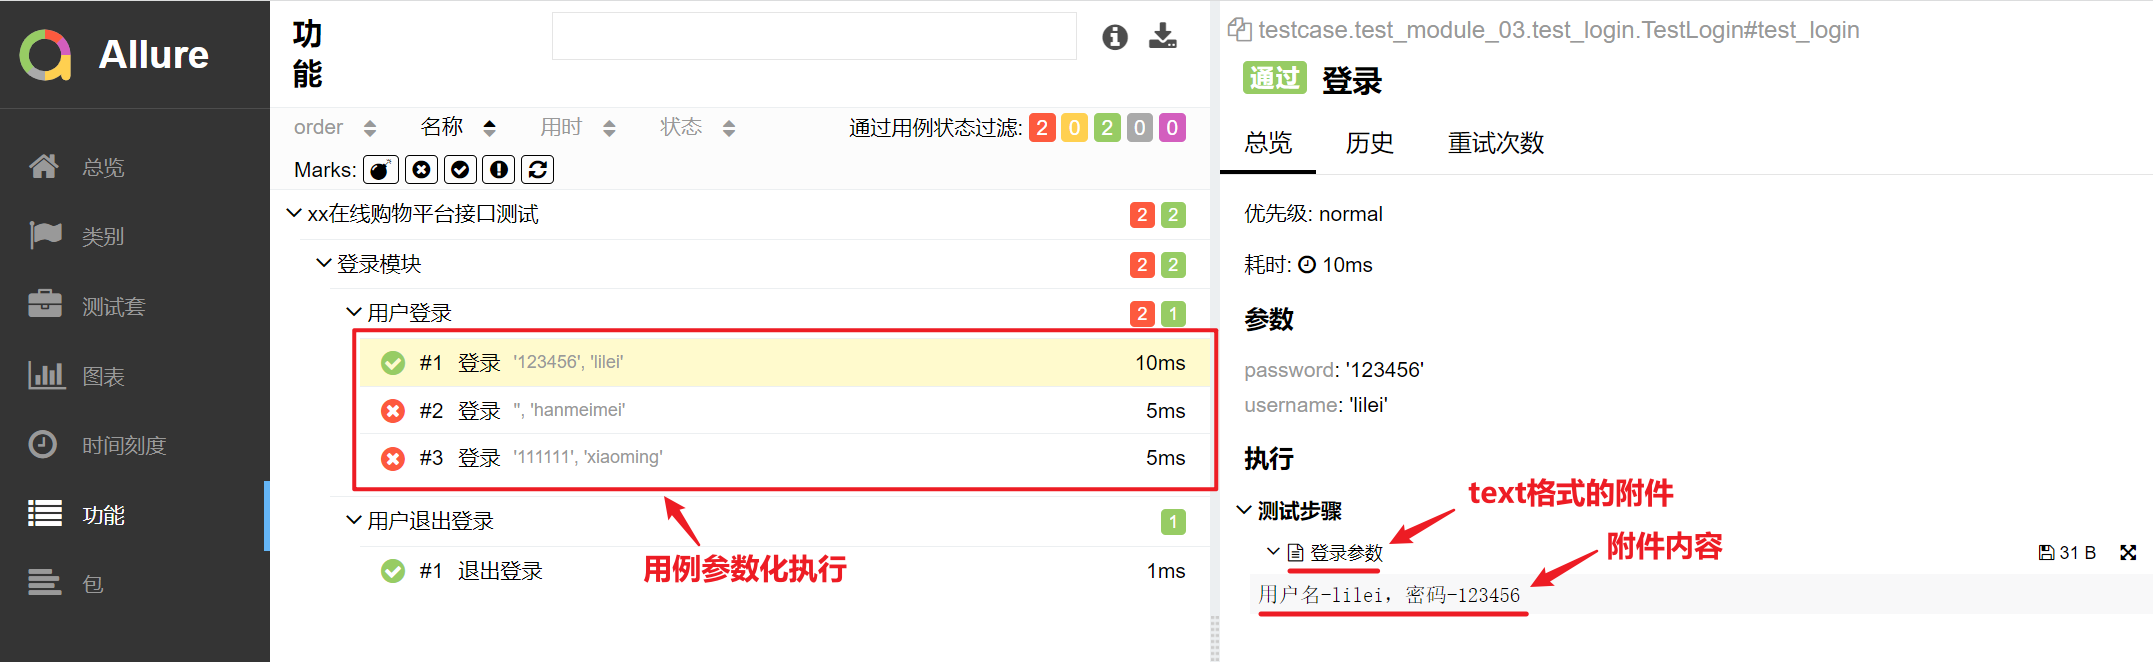
assert True测试报告结果展示如下:
allure.attach()结果:
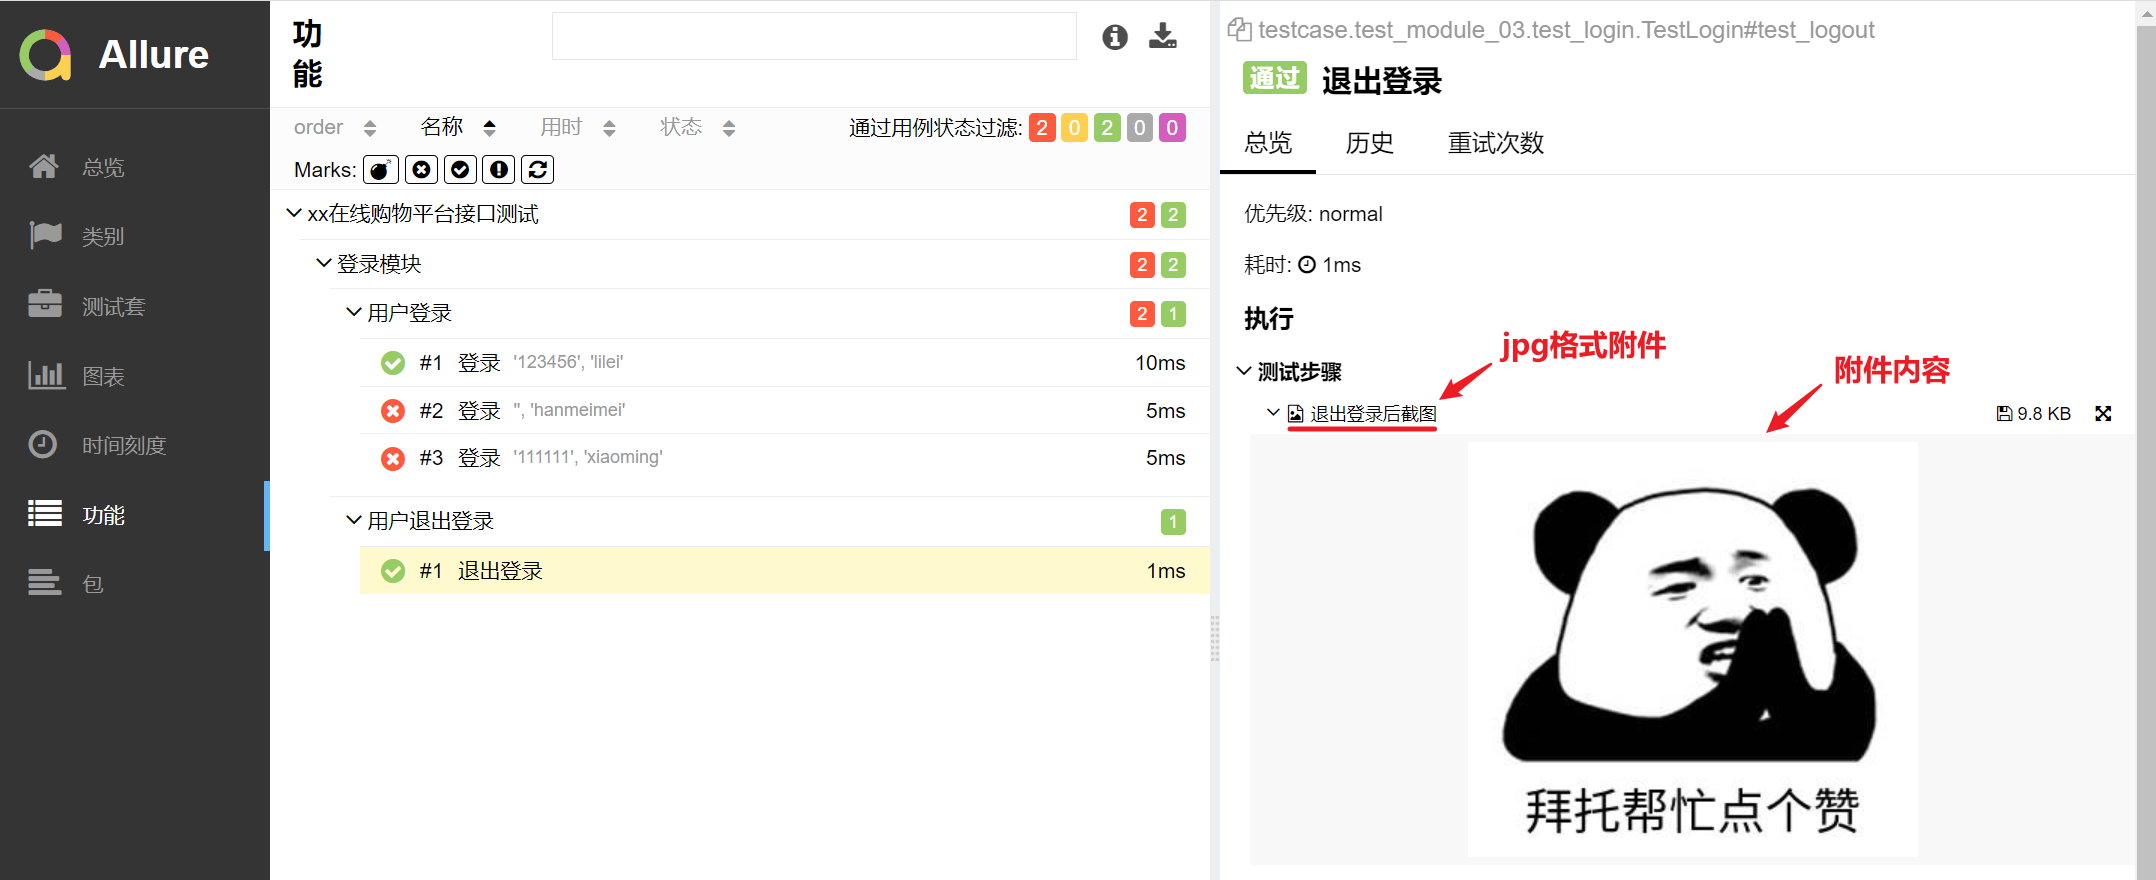
allure.attach.file()结果:
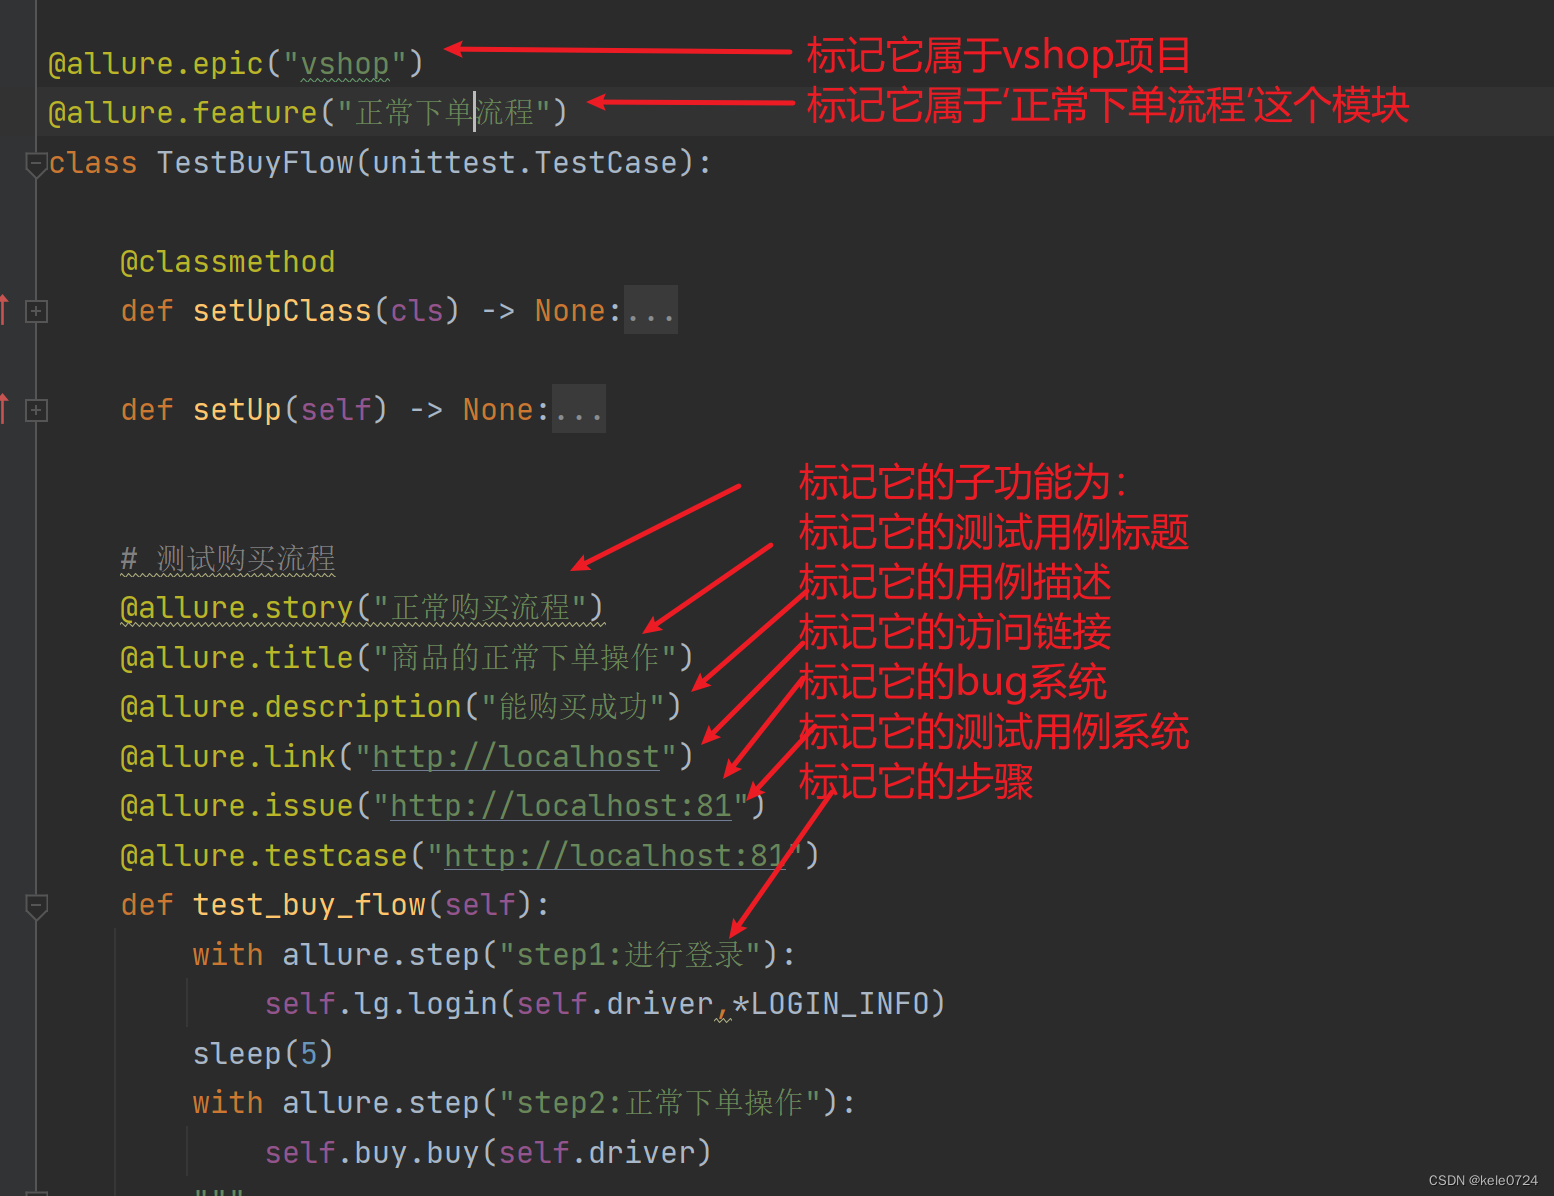
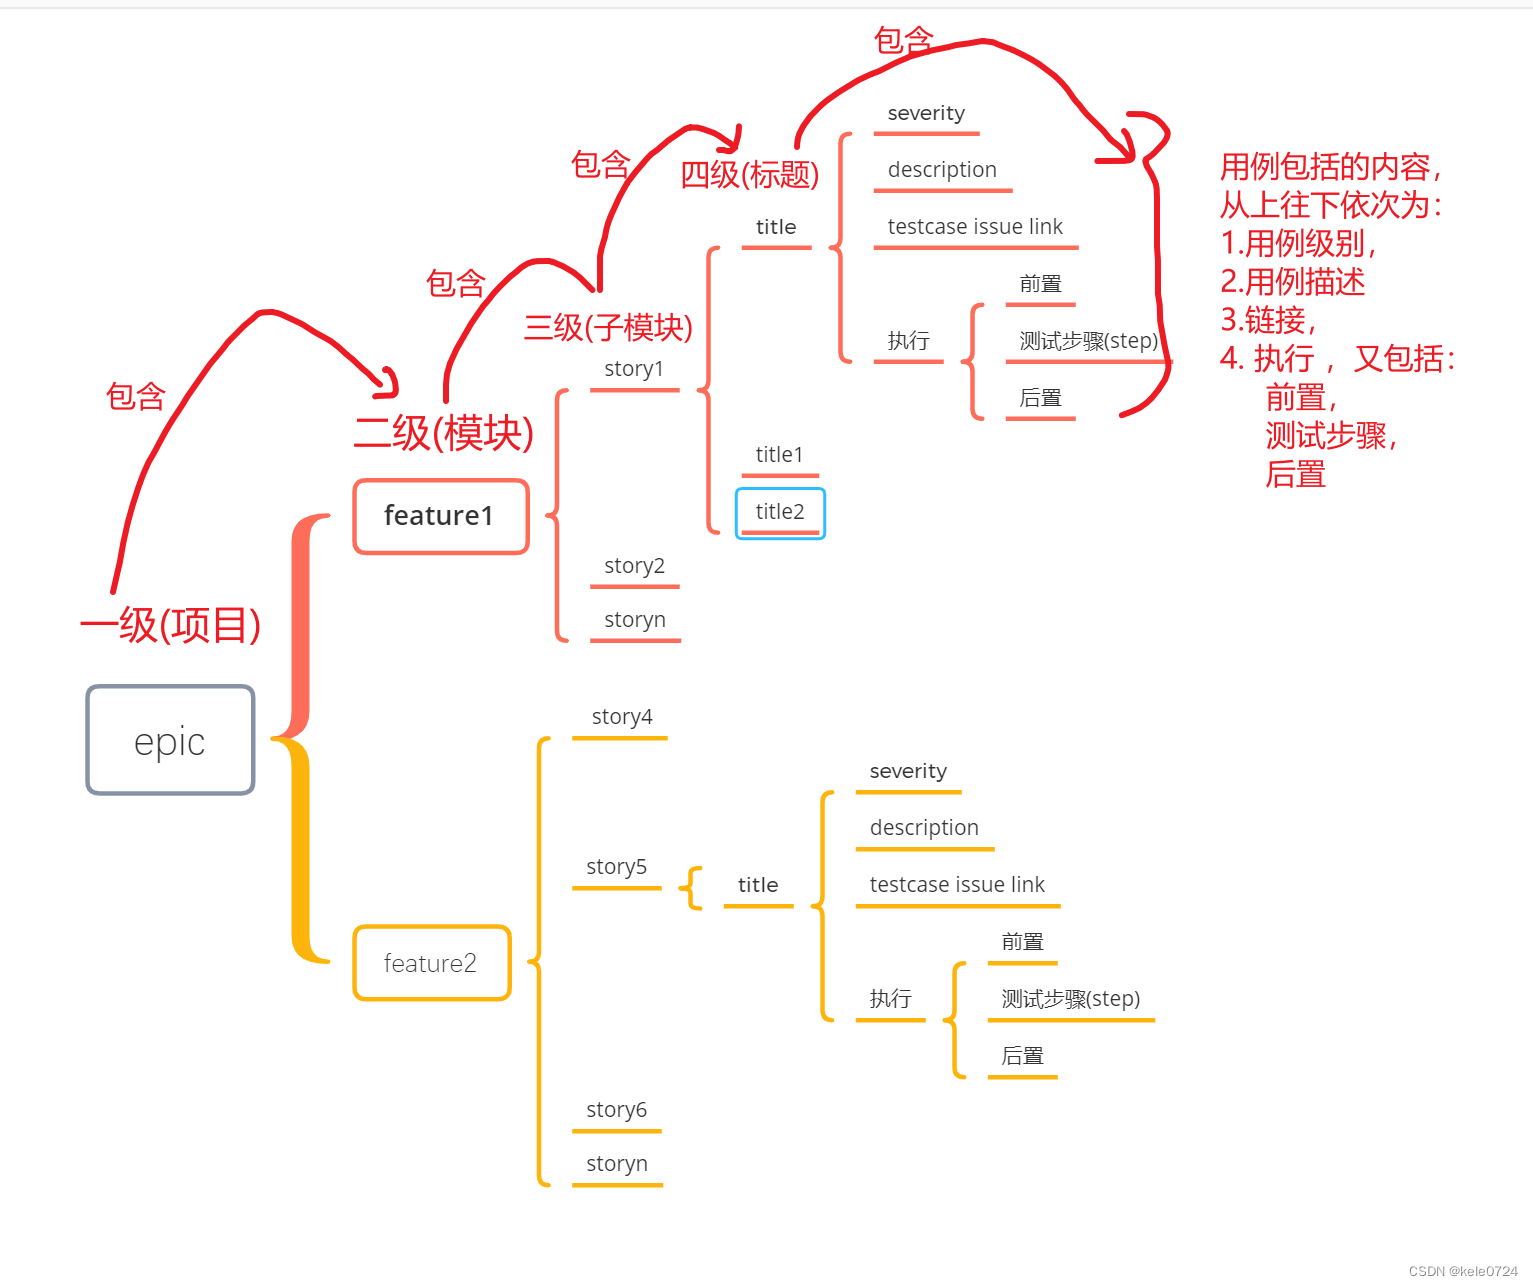
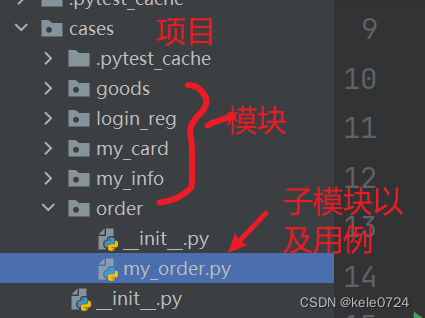
将以上的装饰器整理后就是如下的结构 ,按照此结构可以整理出你的测试用例 。
注意:
- 每一个装饰器都是可选项,可加可不加 。比如你把feature去掉了,那么在报告中就不展示这一层级了 ,其它也是如此。
- epic、feature、story、title主要用来显示层级 ,而到了title层里,就是显示具体的内容 ,内容包括severity,description,testcase ,issue,link,step等
- 除了step和attachment比较特殊以外,它们都是放在方法内使用 ,其它的都是标注在测试方法的开头或者类的开头 。
根据层级结构,在项目中该怎么组织我们的测试用例呢 ?一般就是按照项目结构一层一层的组织下来 ,比如 :(仅作参考)
命令行运行
allure命令行参数,可以打开cmd窗口输入以下命令查看帮助
cpp
allure --help帮助信息:
cpp
Usage: allure [options] [command] [command options]
Options:
--help
Print commandline help.
-q, --quiet
Switch on the quiet mode.
Default: false
-v, --verbose
Switch on the verbose mode.
Default: false
--version
Print commandline version.
Default: false
Commands:
generate Generate the report
Usage: generate [options] The directories with allure results
        Options:
          -c, --clean
            Clean Allure report directory before generating a new one.
            Default: false
          --config
            Allure commandline config path. If specified overrides values from
            --profile and --configDirectory.
          --configDirectory
            Allure commandline configurations directory. By default uses
            ALLURE_HOME directory.
          --profile
            Allure commandline configuration profile.
          -o, --report-dir, --output
            The directory to generate Allure report into.
            Default: allure-report
serve Serve the report
Usage: serve [options] The directories with allure results
Options:
--config
Allure commandline config path. If specified overrides values from
--profile and --configDirectory.
--configDirectory
Allure commandline configurations directory. By default uses
ALLURE_HOME directory.
-h, --host
This host will be used to start web server for the report.
-p, --port
This port will be used to start web server for the report.
Default: 0
--profile
Allure commandline configuration profile.
open Open generated report
Usage: open [options] The report directory
Options:
-h, --host
This host will be used to start web server for the report.
-p, --port
This port will be used to start web server for the report.
Default: 0
plugin Generate the report
Usage: plugin [options]
Options:
--config
Allure commandline config path. If specified overrides values from
--profile and --configDirectory.
--configDirectory
Allure commandline configurations directory. By default uses
ALLURE_HOME directory.
--profile
Allure commandline configuration profile.具体格式如下:
allure格式: allure options command command options
第一部分是options,这里我们不做介绍。
主要着眼于command中的 generate 以及其command options
cpp
Usage: generate [options] The directories with allure results
Options:
-c, --clean
Clean Allure report directory before generating a new one.
Default: false
--config
Allure commandline config path. If specified overrides values from
--profile and --configDirectory.
--configDirectory
Allure commandline configurations directory. By default uses
ALLURE_HOME directory.
--profile
Allure commandline configuration profile.
-o, --report-dir, --output
The directory to generate Allure report into.
Default: allure-report主要使用的两个command options :
-c : 每次生成报告前清除之前生成的报告文件 ,不加此选项则默认为不清除 。
-o : 生成报告的路径 ,也就是你要将测试报告输出到哪里 。
最终可以在cmd窗口运行如下命令:
cpp
allure generate JSON路径 -o 生成测试报告路径 -c 这里有一个JSON路径,这个需要通过pytest生成一堆json文件,存放这堆JSON文件的这个路径就是JSON路径。
随后allure将这些Pytest生成的中间结果json,转换成测试报告。
利用allure-pytest生成中间结果json
在安装了allure-pytest之后,我们可以通过配置 pytest.ini 全局配置文件,
或者是利用命令行运行,添加上下方对应的参数。使得pytest生成中间结果json。
cpp
# --alluredir=./temps:设置allure生成临时的json格式的报告存放的路径(相对于 pytest 命令所在目录的测试报告目录)
# --clean-alluredir:清空上一次运行的记录

addopts = -vs --alluredir=./temps --clean-alluredir
命令执行完后,会在目录下生成一些中间结果json文件:

随后使用allue命令
cpp
import os
import pytest
# ./temps 是中间结果json的存放目录
if __name__ == '__main__':
    pytest.main()
    # 调用allure生成报告
    os.system("allure generate ./temps -o ./report --clean")
查看测试报告
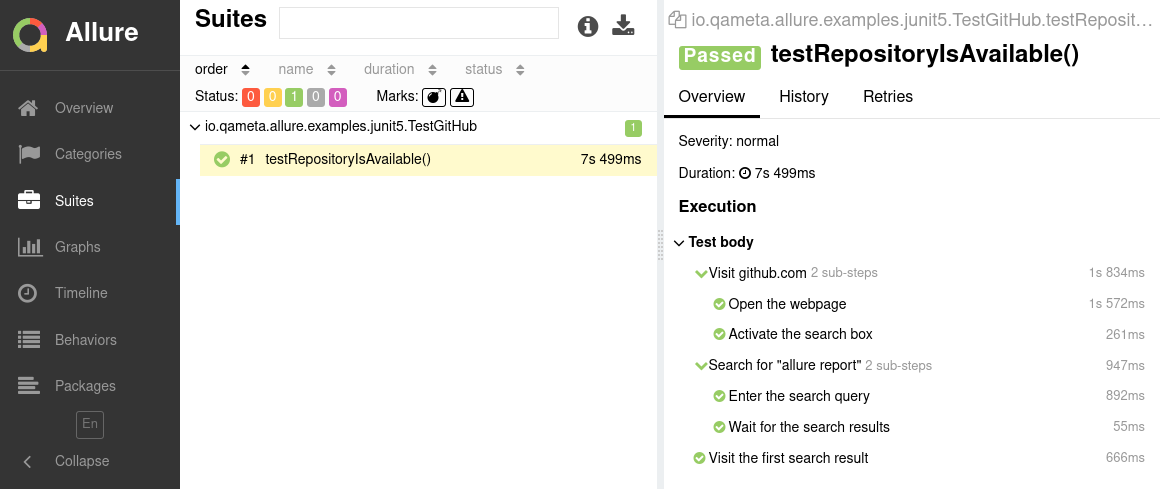
总览页面
生成的报告就是如下的情况 :默认在总览页面

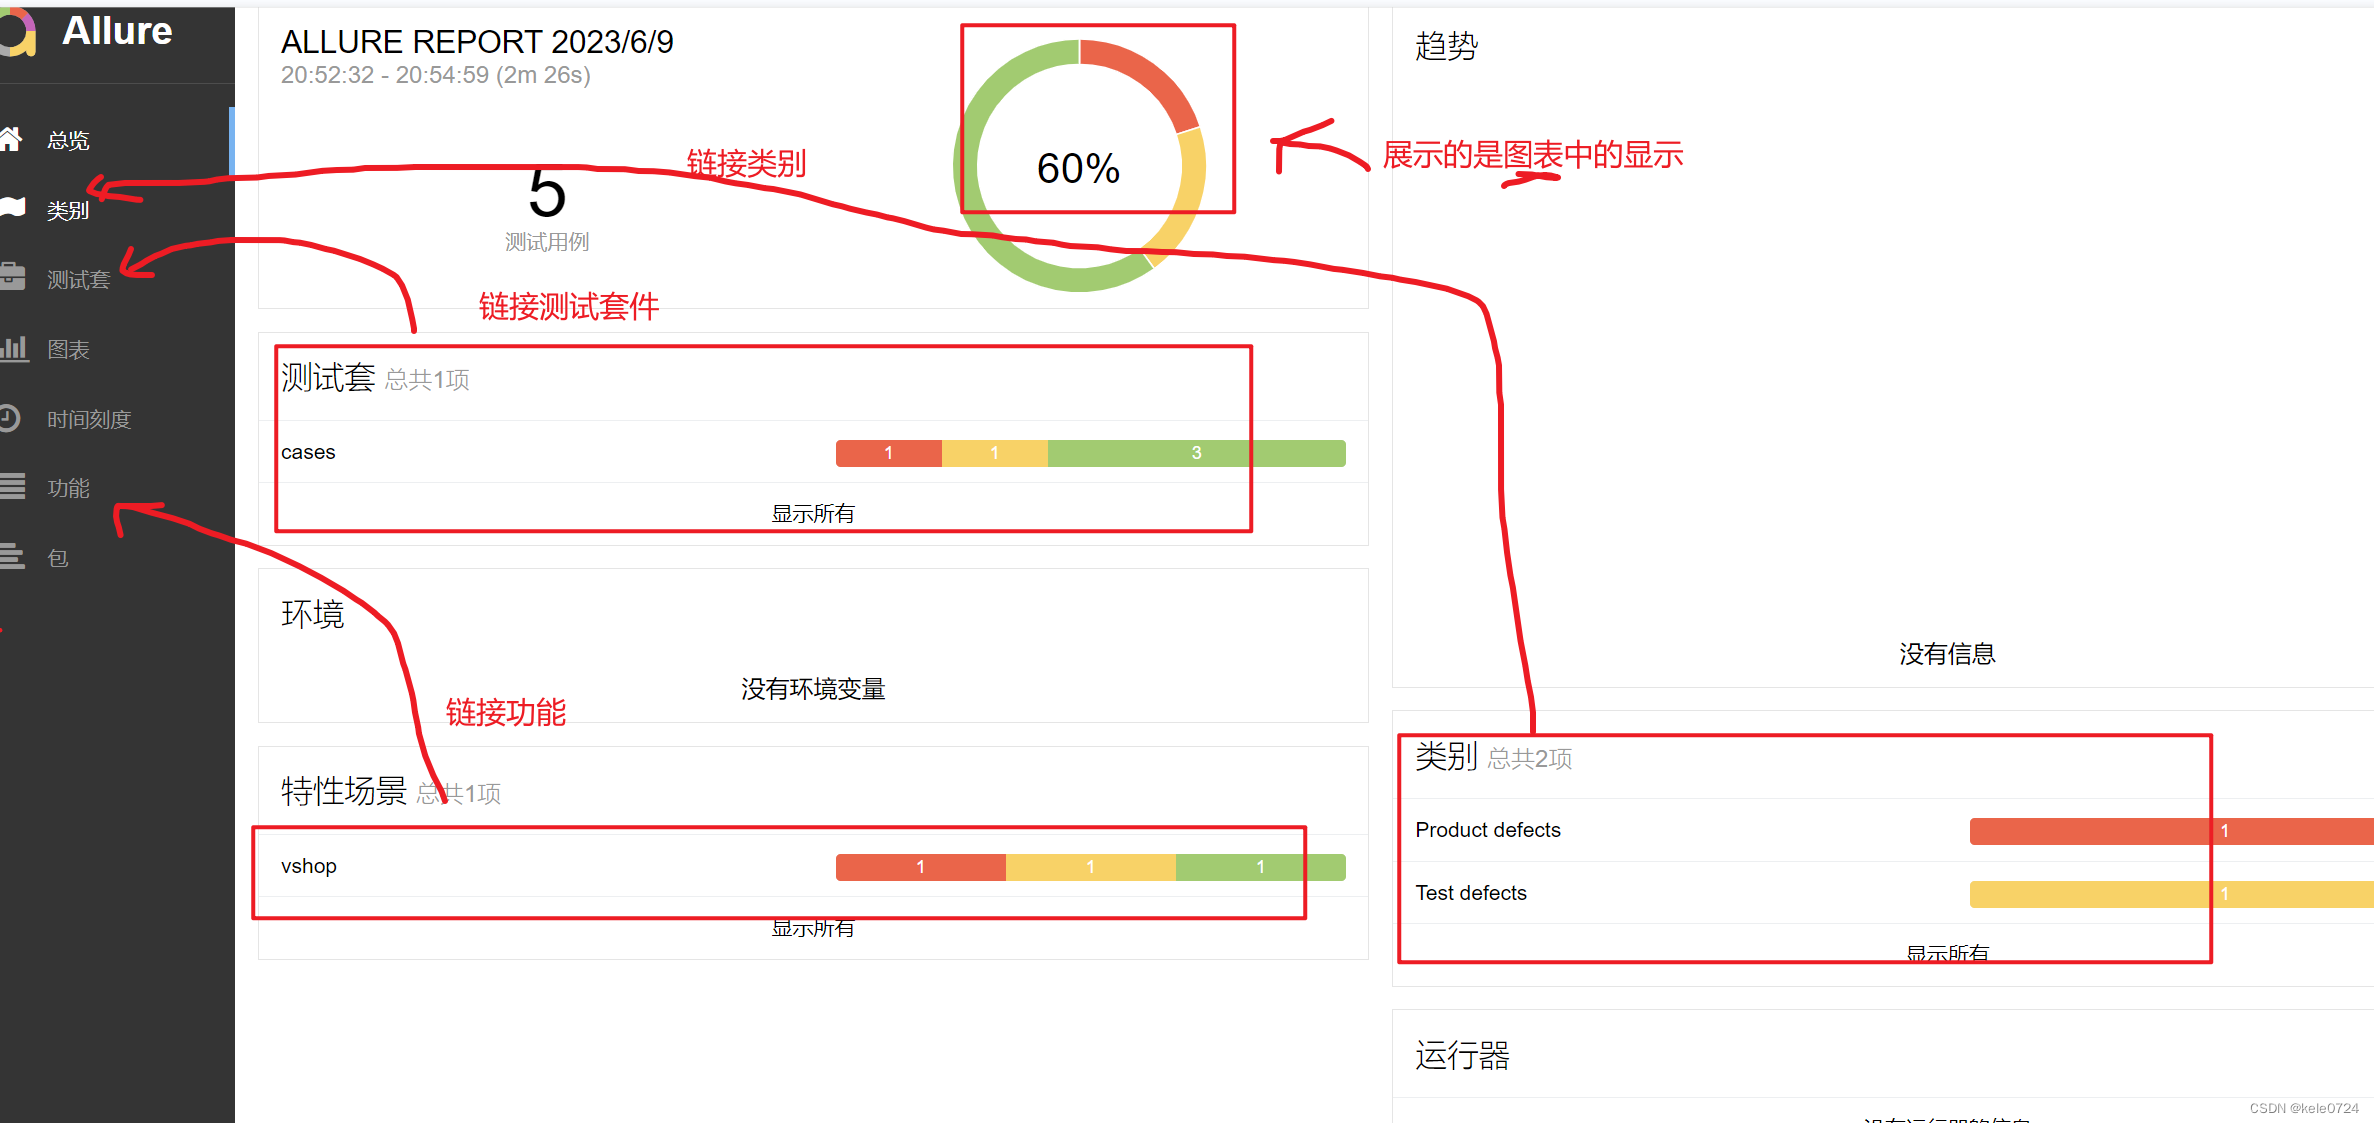
每个tab页的说明
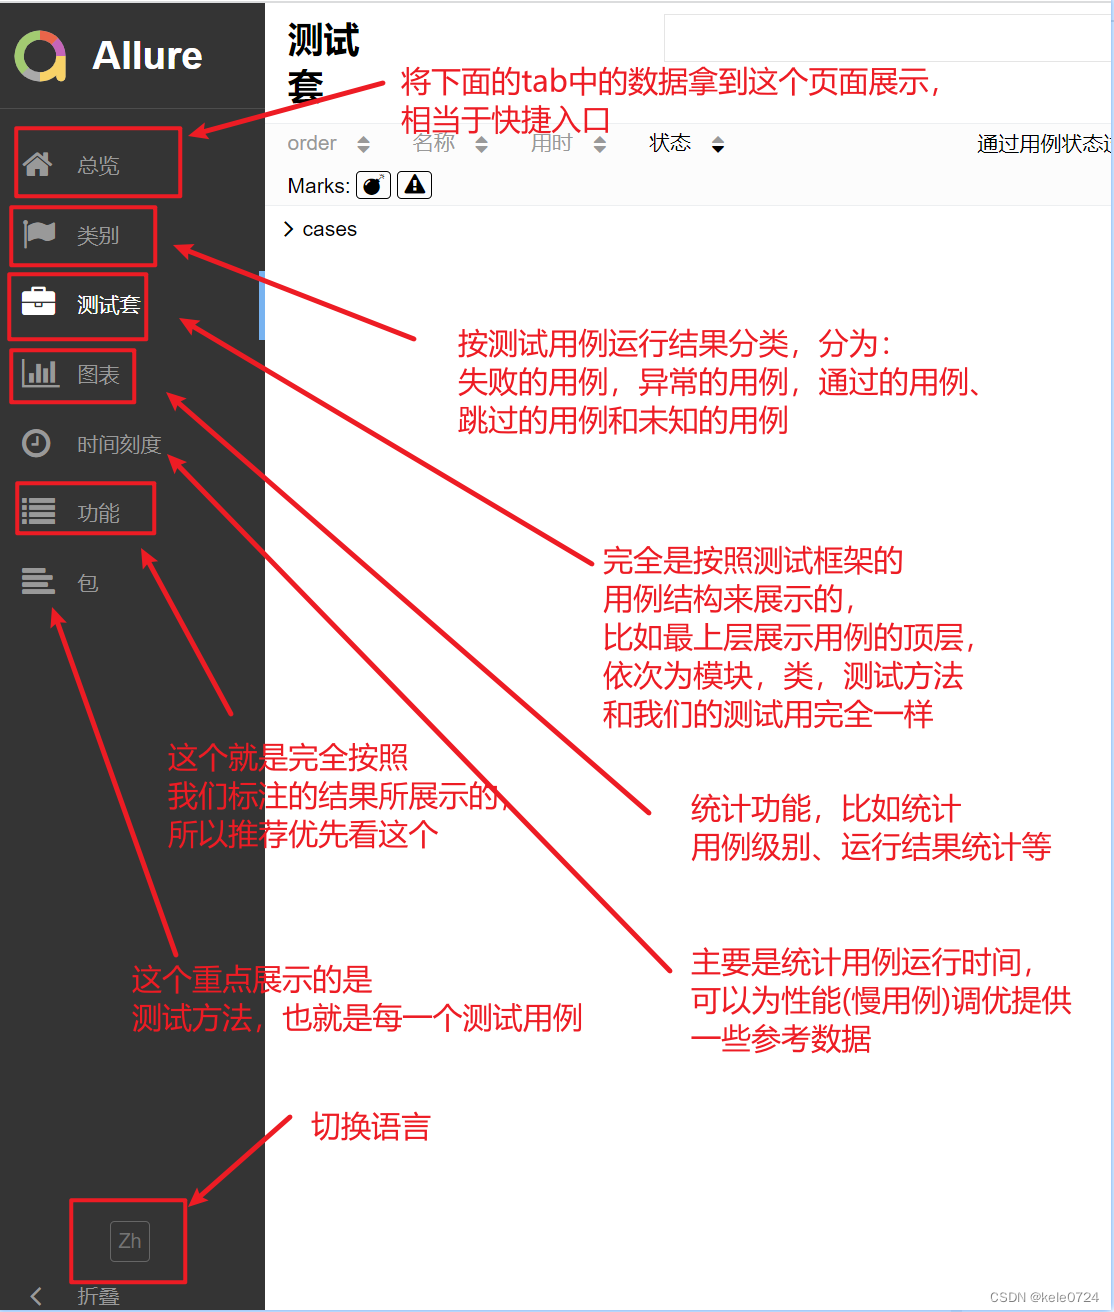
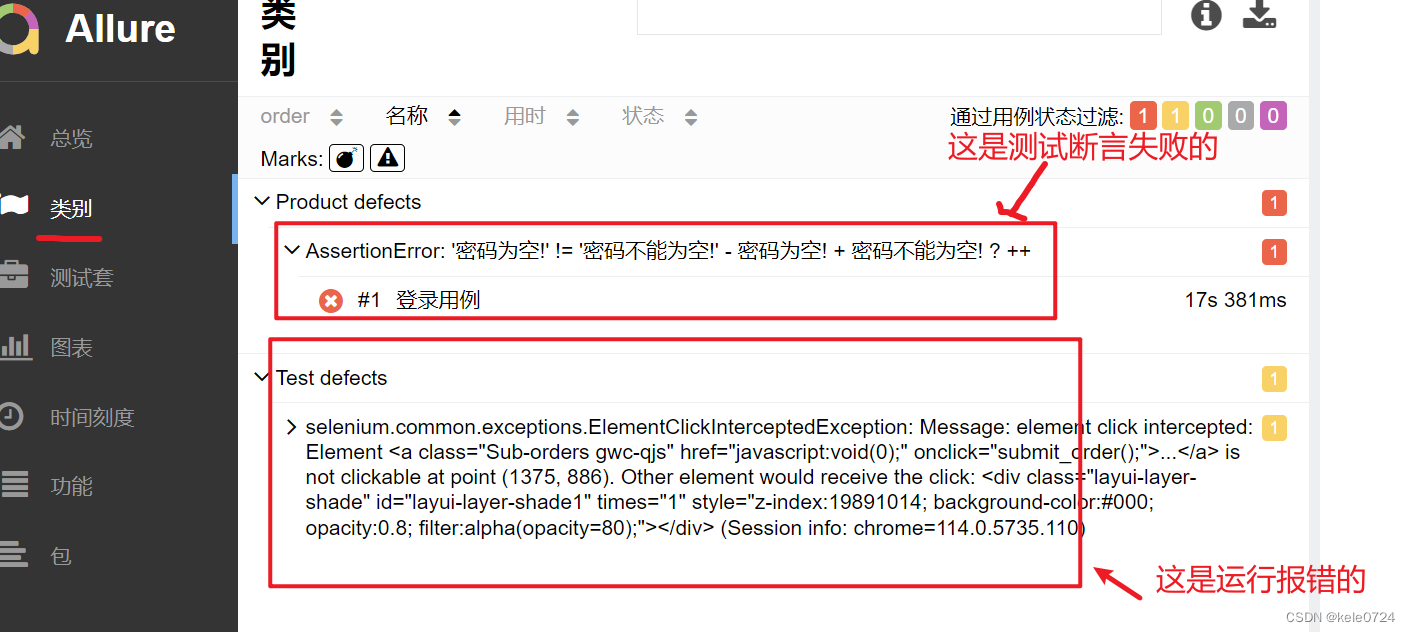
类别页面
所谓类别,就是按照不同用例的运行结果划分的一个分类 ,具体包括 :
- 报错的用例
- 运行失败的用例
- 运行成功的用例
- 跳过的用例
- 未知的用例
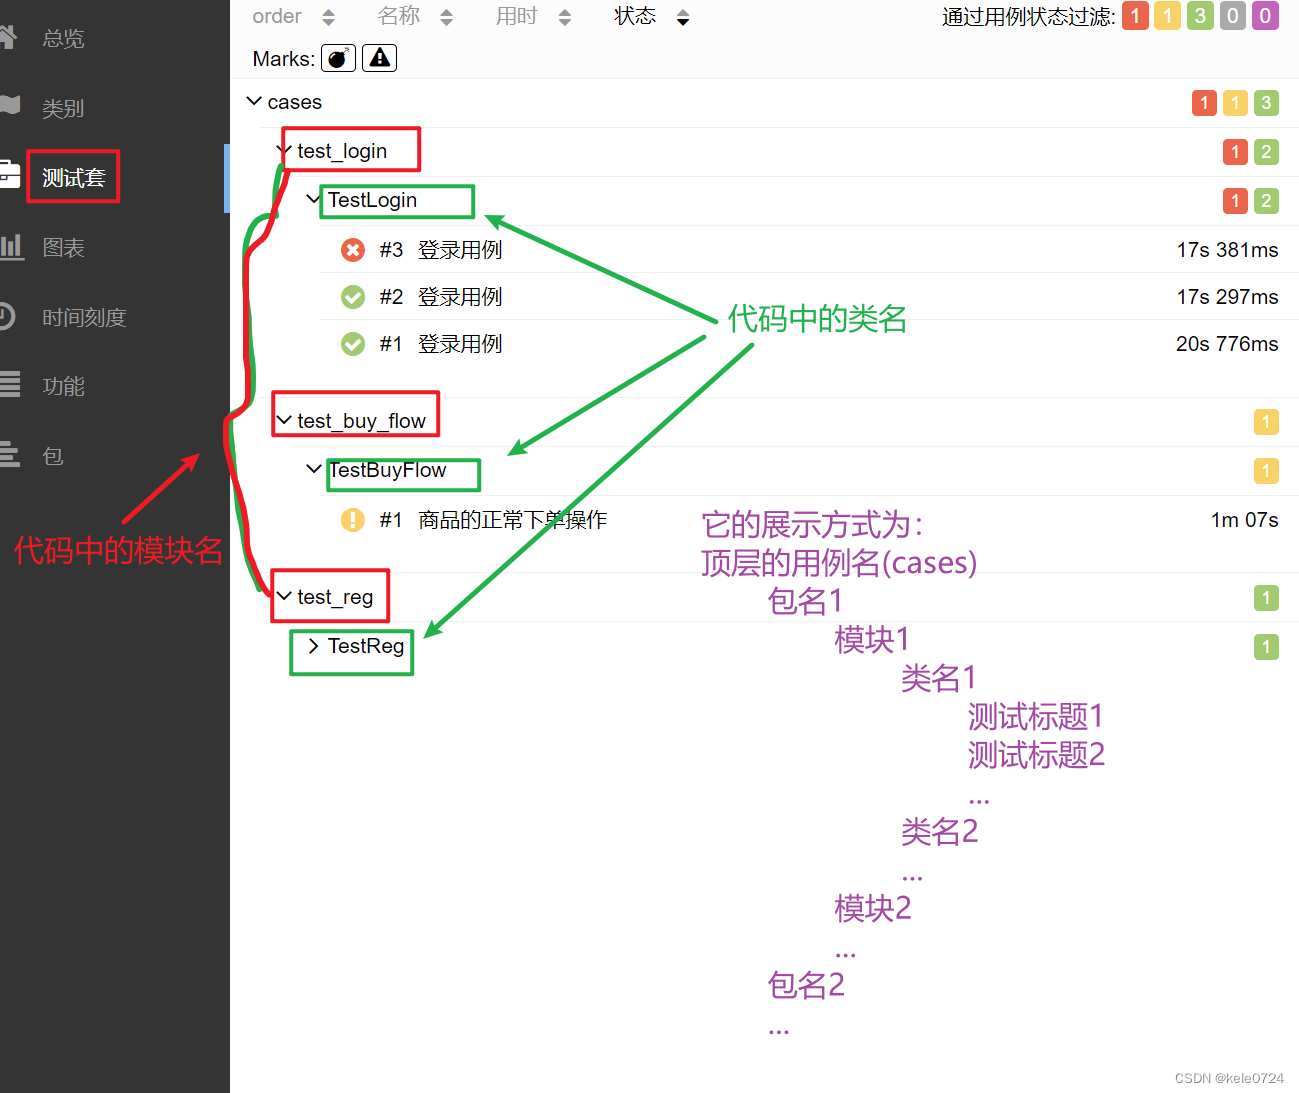
测试套
这里的测试套,并不是测试套件 ,它只是按照你项目测试用例的层级一层一层的组织展示的。比如代码层级为:
cpp
cases:
    test_login.py
    test_buy_flow.py
    test_reg.py

# test_login.py中的代码为:
class TestLogin():
    pass

# test_buy_flow.py中的代码为:
class TestBuyFlow():
    pass

# test_reg.py中的代码为
class TestReg():
    pass
以上的用例组织结构就变为下图的展示方式了 。
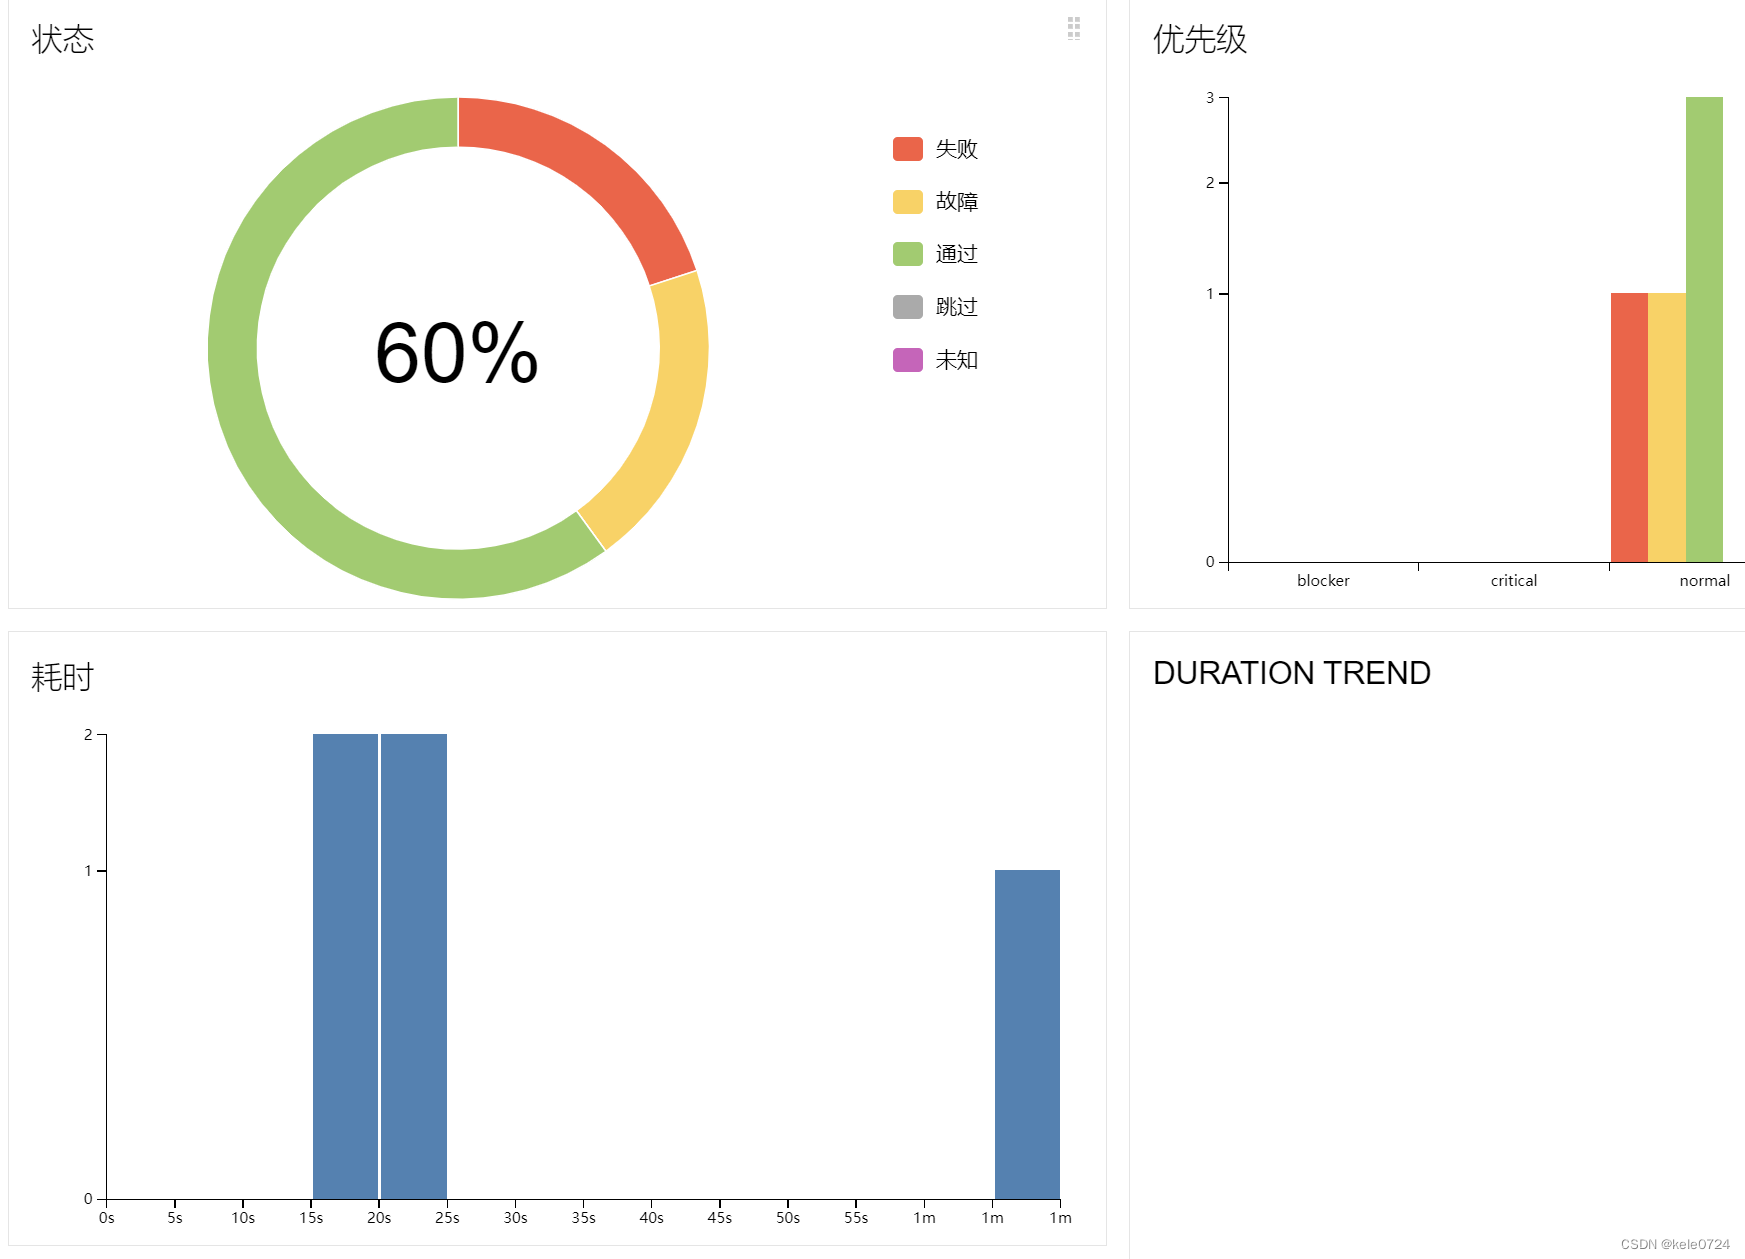
图表页面
这个就是按照不同的维度进行了数据统计,包括:用例状态、优先级、耗时等。
时间刻度
主要统计各个用例的运行时间 ,比如想知道那些用例运行花费的时间长,看这个数据就可以知道 。
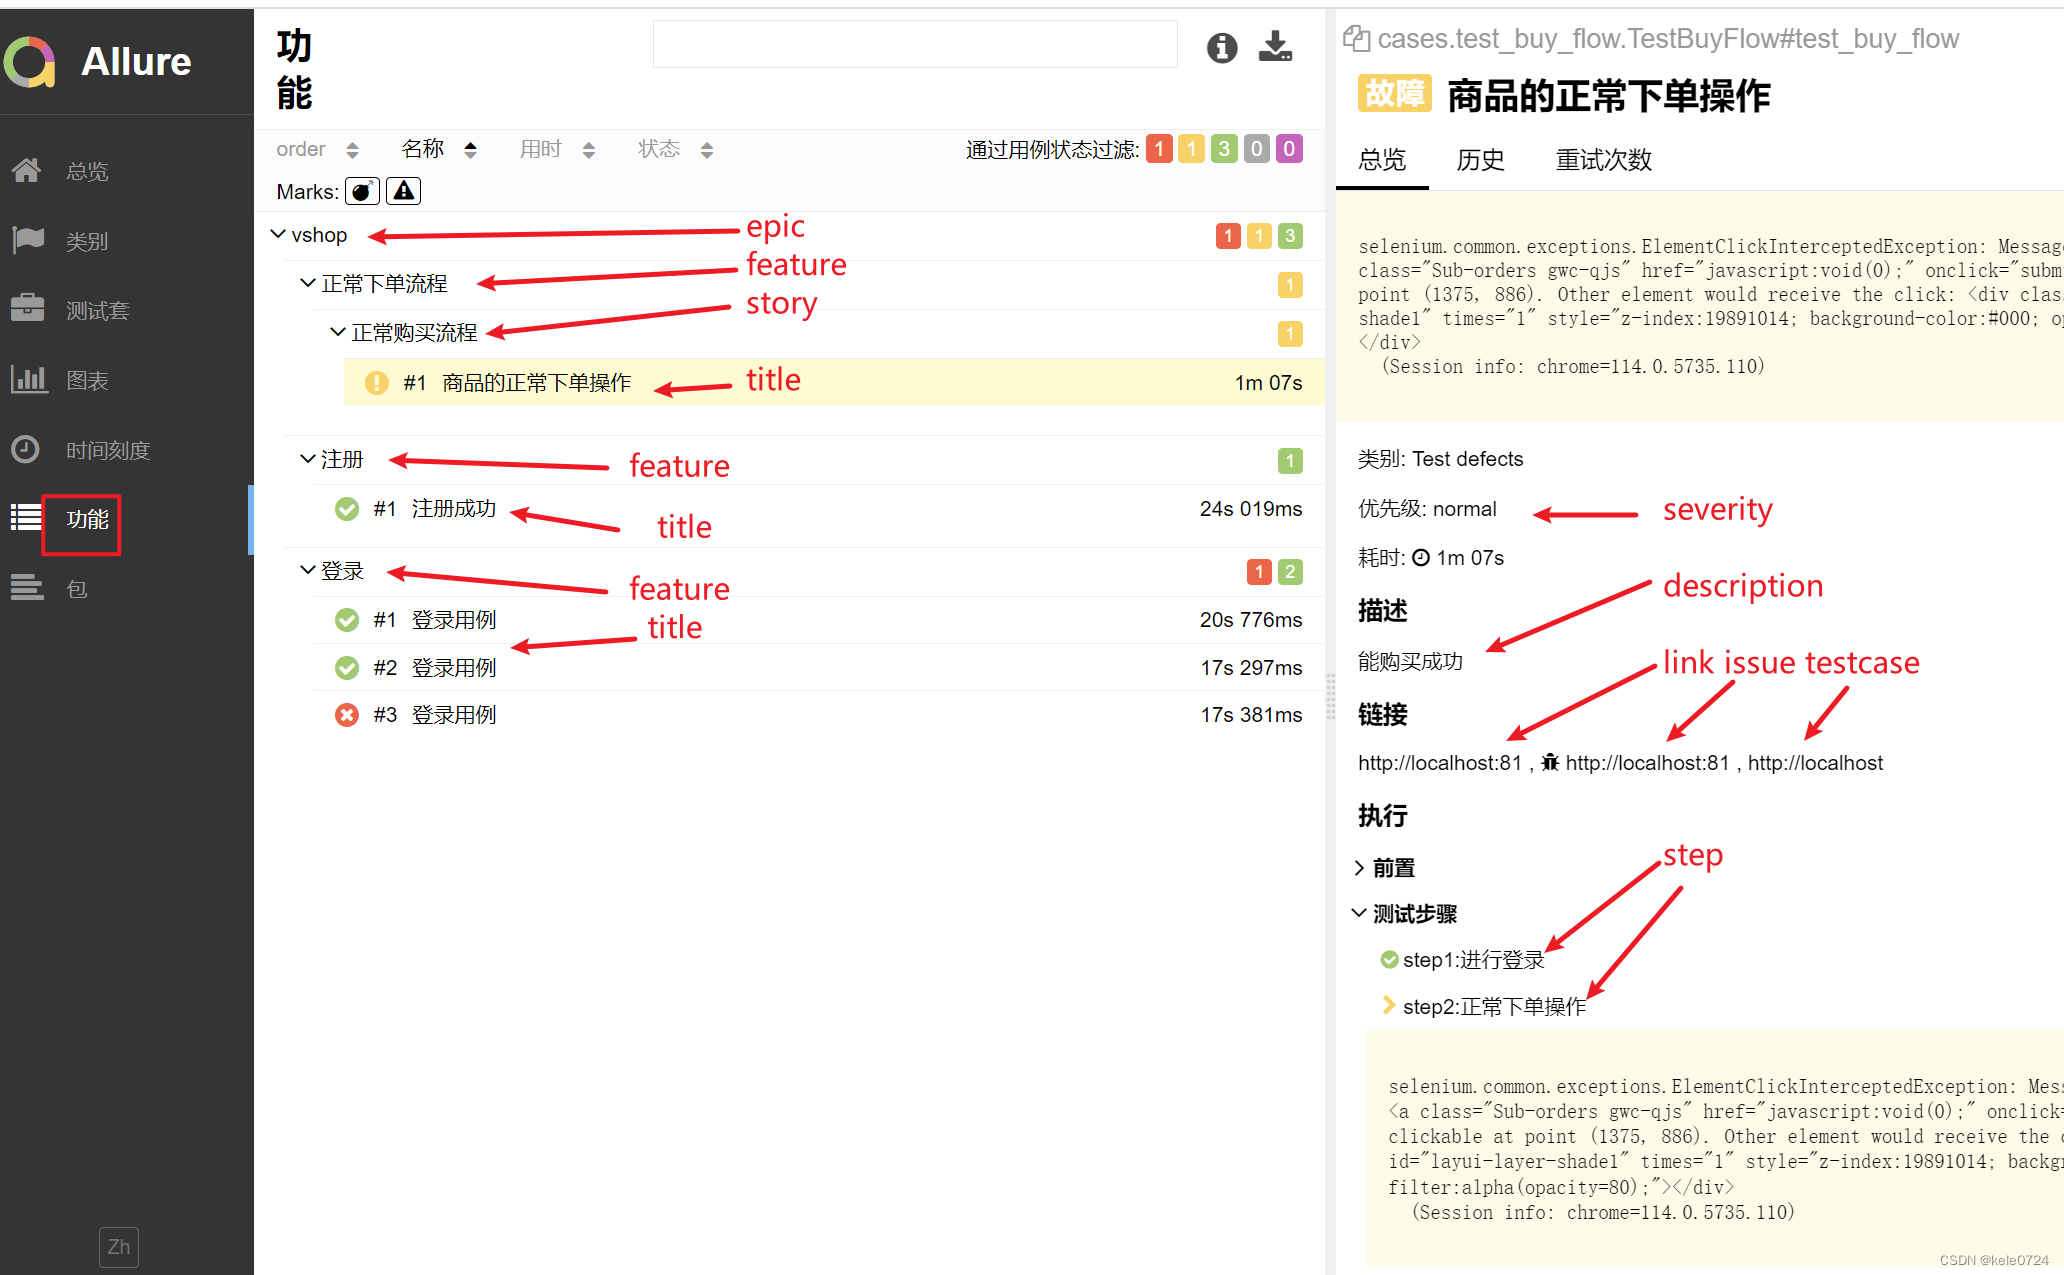
功能页面
allure的装饰器函数 ,分别给每个用例都做了标记 ,那么所标记的结果就是从功能里查看 ,具体如下:
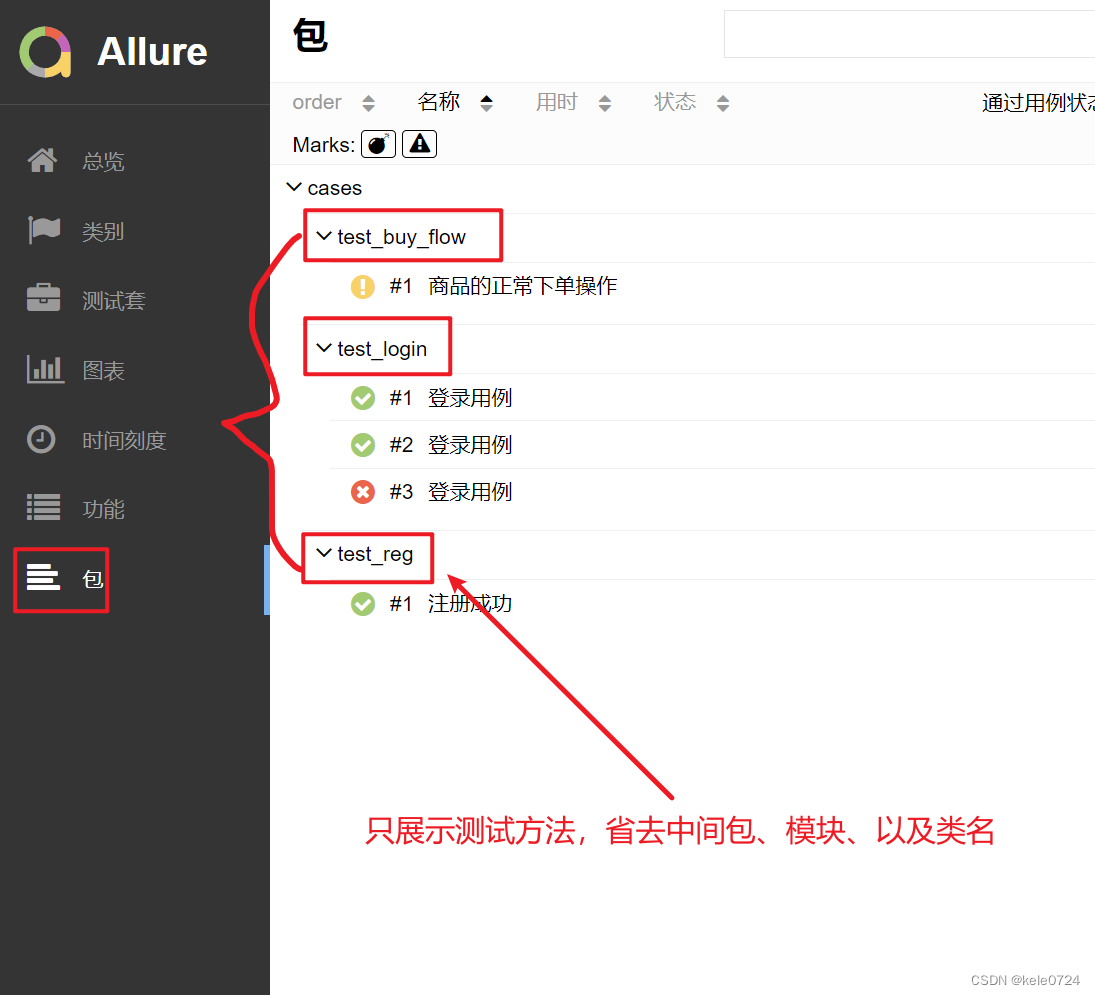
包
此功能忽略中间层级 ,只展示测试方法,即测试用例 ,对于看测试具体结果来说更加直观。
参考目录
https://www.bilibili.com/video/BV1yg411o7EV
https://www.bilibili.com/video/BV1gB4y1v7Ki
https://www.bilibili.com/video/BV15F4m1w7Wg
https://www.bilibili.com/video/BV1zS4y167RY
https://www.bilibili.com/video/BV1Uk4y1Y7pA
https://blog.csdn.net/venustech0919/article/details/133852086
https://blog.csdn.net/weixin_44904239/article/details/135647536
https://blog.csdn.net/qq_53071851/article/details/131013824
https://blog.csdn.net/u012111923/article/details/133147327
https://blog.csdn.net/hlsxjh/article/details/144191616
https://blog.csdn.net/YZL40514131/article/details/129109202
https://blog.csdn.net/liuchunming033/article/details/79624474
https://blog.csdn.net/HUA6911/article/details/136911347