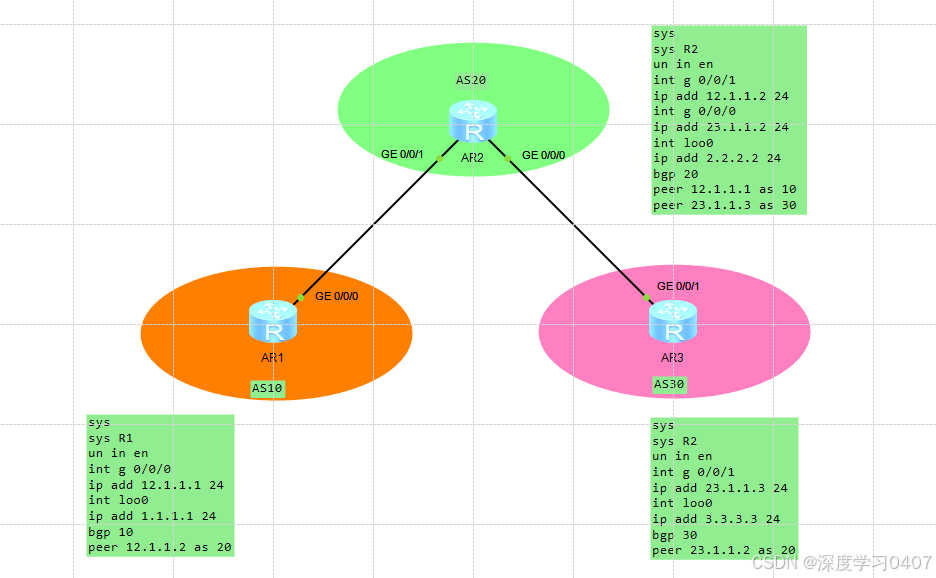
实验拓扑
实验要求:
使用两种方式建立不同AS号的BGP邻居,不同AS号路由器之间建立的邻居称为EBGP邻居
实验目的:
熟悉使用物理口和环回口建立邻居的方式
IP地址规划:
| 路由器 | 接口 | IP地址 |
|---|---|---|
| AR1 | G0/0/0 | 12.1.1.1/24 |
| AR1 | Loopback 0 | 1.1.1.1/24 |
| AR2 | G0/0/0 | 12.1.1.2/24 |
| AR2 | G0/0/1 | 23.1.1.2/24 |
| AR2 | Loopback 0 | 2.2.2.2/24 |
| AR3 | G0/0/1 | 23.1.1.3/24 |
| AR3 | Loopback 0 | 3.3.3.3/24 |
实验配置:
物理接口方式:
shell
AR1:
<Huawei>sys
Enter system view, return user view with Ctrl+Z.
[Huawei]sys R1
[R1]un in en
Info: Information center is disabled.
[R1]int g 0/0/0
[R1-GigabitEthernet0/0/0]ip add 12.1.1.1 24
[R1-GigabitEthernet0/0/0]int loo0
[R1-LoopBack0]ip add 1.1.1.1 24
[R1-LoopBack0]bgp 10
[R1-bgp]peer 12.1.1.2 as 20
[R1-bgp]network 12.1.1.0 24
[R1-bgp]network 1.1.1.0 24
shell
AR2:
<Huawei>sys
Enter system view, return user view with Ctrl+Z.
[Huawei]sys R2
[R2]un in en
Info: Information center is disabled.
[R2]int g 0/0/1
[R2-GigabitEthernet0/0/1]ip add 12.1.1.2 24
[R2-GigabitEthernet0/0/1]int g 0/0/0
[R2-GigabitEthernet0/0/0]ip add 23.1.1.2 24
[R2-GigabitEthernet0/0/0]int loo0
[R2-LoopBack0]ip add 2.2.2.2 24
[R2-LoopBack0]bgp 20
[R2-bgp]peer 12.1.1.1 as 10
[R2-bgp]peer 23.1.1.3 as 30
[R2-bgp]net 12.1.1.0 24
[R2-bgp]net 23.1.1.0 24
[R2-bgp]net 2.2.2.0 24
shell
AR3:
<Huawei>sys
Enter system view, return user view with Ctrl+Z.
[Huawei]sys R3
[R3]un in en
Info: Information center is disabled.
[R3]int g 0/0/1
[R3-GigabitEthernet0/0/1]ip add 23.1.1.3 24
[R3-GigabitEthernet0/0/1]int loo0
[R3-LoopBack0]ip add 3.3.3.3 24
[R3-LoopBack0]bgp 30
[R3-bgp]peer 23.1.1.2 as 20
[R3-bgp]net 23.1.1.0 24
[R3-bgp]net 3.3.3.0 24
环回口方式:
重启路由器,恢复初始配置
shell
AR1:
<Huawei>sys
Enter system view, return user view with Ctrl+Z.
[Huawei]sys R1
[R1]un in en
[R1]ip route-static 2.2.2.0 24 12.1.1.2
Info: Information center is disabled.
[R1]int g 0/0/0
[R1-GigabitEthernet0/0/0]ip add 12.1.1.1 24
[R1-GigabitEthernet0/0/0]int loo0
[R1-LoopBack0]ip add 1.1.1.1 24
[R1-LoopBack0]bgp 10
[R1-bgp]peer 2.2.2.2 as-number 20
[R1-bgp]peer 2.2.2.2 connect-interface LoopBack 0
[R1-bgp]peer 2.2.2.2 ebgp-max-hop
[R1-bgp]network 12.1.1.0 24
[R1-bgp]network 1.1.1.0 24
shell
AR2:
<Huawei>sys
Enter system view, return user view with Ctrl+Z.
[Huawei]sys R2
[R2]un in en
Info: Information center is disabled.
[R2]ip route-static 1.1.1.0 24 12.1.1.1
[R2]ip route-static 3.3.3.0 24 23.1.1.3
[R2]int g 0/0/1
[R2-GigabitEthernet0/0/1]ip add 12.1.1.2 24
[R2-GigabitEthernet0/0/1]int g 0/0/0
[R2-GigabitEthernet0/0/0]ip add 23.1.1.2 24
[R2-GigabitEthernet0/0/0]int loo0
[R2-LoopBack0]ip add 2.2.2.2 24
[R2-LoopBack0]bgp 20
[R2-bgp]peer 1.1.1.1 as-number 10
[R2-bgp]peer 1.1.1.1 connect-interface LoopBack 0
[R2-bgp]peer 1.1.1.1 ebgp-max-hop
[R2-bgp]peer 3.3.3.3 as-number 30
[R2-bgp]peer 3.3.3.3 connect-interface LoopBack 0
[R2-bgp]peer 3.3.3.3 ebgp-max-hop
[R2-bgp]net 2.2.2.0 24
[R2-bgp]net 23.1.1.0 24
[R2-bgp]net 12.1.1.0 24
shell
AR3:
<Huawei>sys
Enter system view, return user view with Ctrl+Z.
[Huawei]sys R3
[R3]un in en
Info: Information center is disabled.
[R3]ip route-static 2.2.2.0 24 23.1.1.2
[R3]int g 0/0/1
[R3-GigabitEthernet0/0/1]ip add 23.1.1.3 24
[R3-GigabitEthernet0/0/1]int loo0
[R3-LoopBack0]ip add 3.3.3.3 24
[R3-LoopBack0]bgp 30
[R3-bgp]peer 2.2.2.2 as-number 20
[R3-bgp]peer 2.2.2.2 connect-interface LoopBack 0
[R3-bgp]peer 2.2.2.2 ebgp-max-hop
[R3-bgp]net 23.1.1.0 24
[R3-bgp]net 3.3.3.0 24
验证:
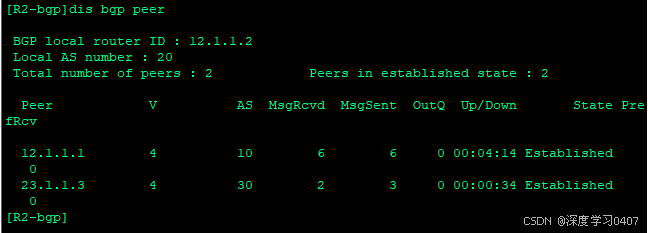
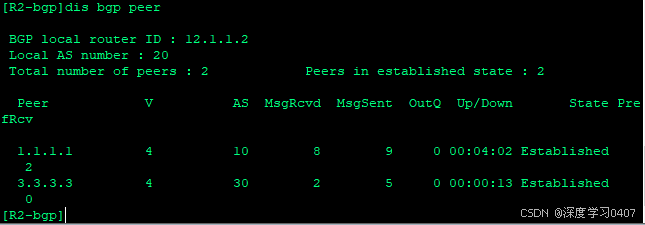
通过display bgp peer命令查看BGP邻居关系,以AR2为例,可以看到状态为Established,证明EBGP邻居已经建立完成。
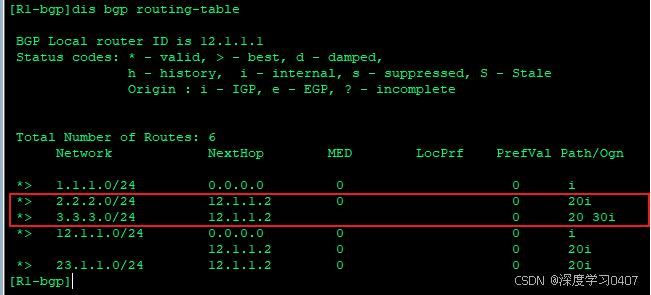
通过display bgp routing-table查看BGP路由情况,可以看到已经学习到了其他区域发送过来的路由条目。
注意事项:
无
实验结论:
EBGP既可以通过物理口建立邻居,也可以通过环回口建立邻居