安装之前:先关闭所有服务器的防火墙!!!!!!!!!!!!
systemctl stop firewalld 关闭防火墙
systemctl disable firewalld 开机不启动防火墙
1.上传 /opt/modules下面

2.解压到/opt/installs下面
tar -zxvf zookeeper-3.4.10.tar.gz -C /opt/installs/3.重命名
mv zookeeper-3.4.10/ zookeeper4.修改配置文件
进入/opt/installs/zookeeper/conf文件夹,重命名zoo_sample.cfg
mv zoo_sample.cfg zoo.cfg将配置文件修改
# The number of milliseconds of each tick
tickTime=2000
# The number of ticks that the initial
# synchronization phase can take
initLimit=10
# The number of ticks that can pass between
# sending a request and getting an acknowledgement
syncLimit=5
# the directory where the snapshot is stored.
# do not use /tmp for storage, /tmp here is just
# example sakes.
dataDir=/opt/installs/zookeeper/zkData
# the port at which the clients will connect
clientPort=2181
# the maximum number of client connections.
# increase this if you need to handle more clients
#maxClientCnxns=60
#
# Be sure to read the maintenance section of the
# administrator guide before turning on autopurge.
#
# http://zookeeper.apache.org/doc/current/zookeeperAdmin.html#sc_maintenance
#
# The number of snapshots to retain in dataDir
#autopurge.snapRetainCount=3
# Purge task interval in hours
# Set to "0" to disable auto purge feature
#autopurge.purgeInterval=1
server.1=bigdata01:2888:3888
server.2=bigdata02:2888:3888
server.3=bigdata03:2888:3888
记得在zookeeper中创建zkData文件夹,以及myid文件
5.配置环境变量:
export ZOOKEEPER_HOME=/opt/installs/zookeeper
export PATH=$PATH:$ZOOKEEPER_HOME/bin
刷新一下环境变量:
source /etc/profile接着配置第二台和第三台:
xsync.sh /opt/installs/zookeeper

xsync.sh /etc/profile

xcall.sh source /etc/profile
在bigdata02中,修改myid 为2
bigdata03中,修改myid为3
6.每一台电脑上,都启动zkServer
zkServer.sh start
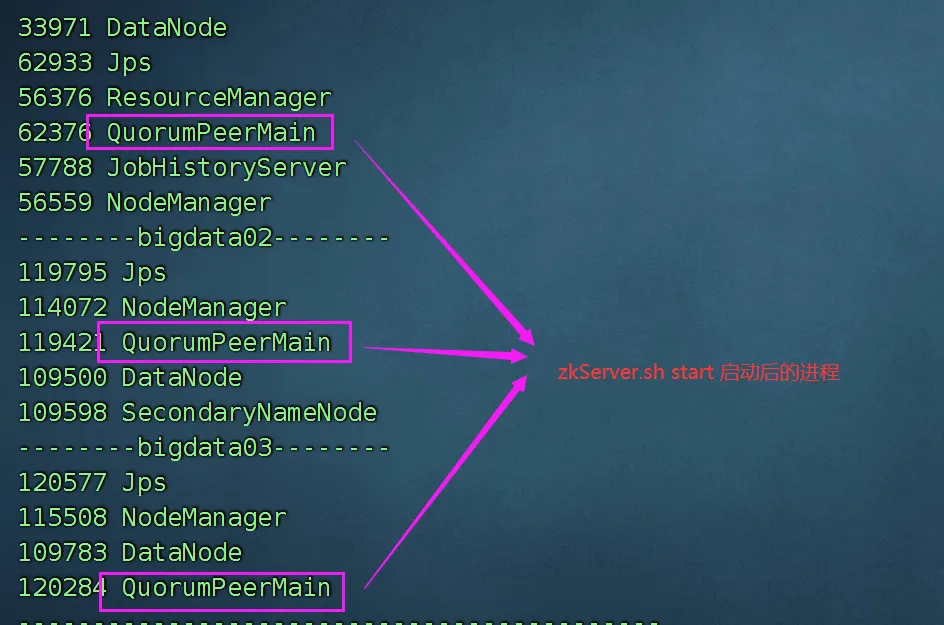
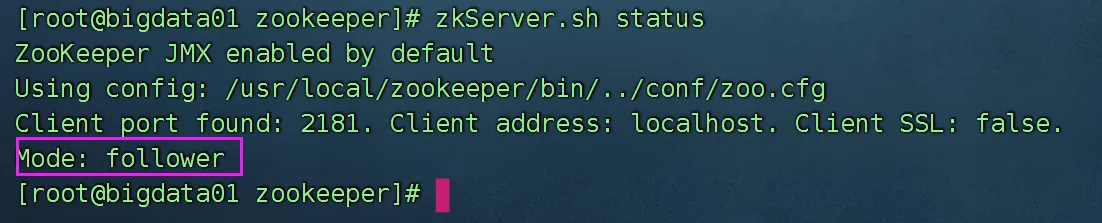
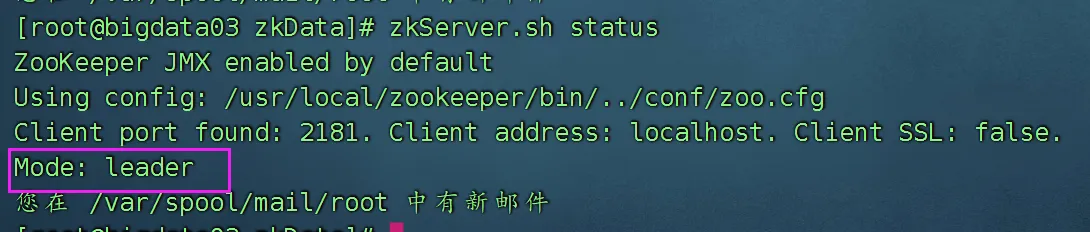
查看状态:

因为zookeeper安装的节点比较多,每一个一个个操作非常的繁琐,所以我们可以编写一个脚本,管理zookeeper集群。
在/usr/local/bin 下面,创建zk.sh
#!/bin/bash

# 获取参数
COMMAND=$1
if [ ! $COMMAND ]; then
    echo "please input your option in [start | stop | status]"
    exit -1
fi
if [ $COMMAND != "start" -a $COMMAND != "stop" -a $COMMAND != "status" ]; then
    echo "please input your option in [start | stop | status]"
    exit -1
fi

# 所有的服务器
HOSTS=( bigdata01 bigdata02 bigdata03 )
for HOST in ${HOSTS[*]}
do
    ssh -T $HOST << TERMINATOR
    echo "---------- $HOST ----------"
    zkServer.sh $COMMAND 2> /dev/null | grep -ivh SSL
    exit
TERMINATOR
done
加权限chomd u+x zk.sh
使用:
zk.sh start
zk.sh stop
zk.sh status