集成组件包括MySQL分库分表及读写分离、seata以及Sentinel
需要结合ruoyi代码配合看,前提是熟悉基本代码结构,熟悉feign调用和基础网关配置等。
采用的版本信息
java
<java.version>1.8</java.version>
<spring-boot.version>2.7.18</spring-boot.version>
<spring-cloud.version>2021.0.9</spring-cloud.version>
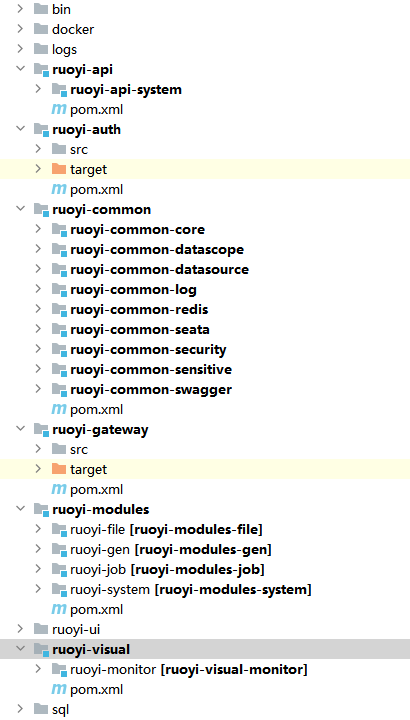
<spring-cloud-alibaba.version>2021.0.6.1</spring-cloud-alibaba.version>项目目录结构
MYSQL分库分表及读写分离,版本基于MySQL8.0+版本
- 在ruoyi-file和ruoyi-system中引入ShardingSphere依赖,采用的是5.1.2版本
java
 <!-- ShardingSphere 读写分离/分库分表 -->
<dependency>
    <groupId>org.apache.shardingsphere</groupId>
    <artifactId>shardingsphere-jdbc-core-spring-boot-starter</artifactId>
    <version>5.1.2</version>
</dependency>- 在bootstrap.yaml中配置
ruoyi-system,中有分表操作,对应
java
spring:
  main:
    allow-bean-definition-overriding: true
  shardingsphere:
    props:
      sql-show: true
    datasource:
      names: master,slave
      master:
        type: com.zaxxer.hikari.HikariDataSource
        driver-class-name: com.mysql.cj.jdbc.Driver
        url: jdbc:mysql://192.168.0.177:3306/ry-user?useUnicode=true&characterEncoding=utf8&zeroDateTimeBehavior=convertToNull&useSSL=true&serverTimezone=GMT%2B8
        username: xxxx
        password: xxxx
      slave:
        type: com.zaxxer.hikari.HikariDataSource
        driver-class-name: com.mysql.cj.jdbc.Driver
        url: jdbc:mysql://192.168.0.179:3306/ry-user?useUnicode=true&characterEncoding=utf8&zeroDateTimeBehavior=convertToNull&useSSL=true&serverTimezone=GMT%2B8
        username: xxxx
        password: xxxxx
    rules:
      readwrite-splitting:
        data-sources:
          rw_ds:
            type: Static
            props:
              write-data-source-name: master
              read-data-source-names: slave
            load-balancer-name: round_robin
        load-balancers:
          round_robin:
            type: ROUND_ROBIN
      sharding:
        tables:
          lake_company_info:
            actual-data-nodes: rw_ds.xx_sd,rw_ds.xxx_ah,rw_ds.xxx_js,rw_ds.xxx_other
            table-strategy:
              standard:
                sharding-column: init_province_id
                sharding-algorithm-name: province-algorithm
        sharding-algorithms:
          province-algorithm:
            type: CLASS_BASED
            props:
              strategy: standard
              algorithmClassName: com.ruoyi.system.shardingconfig.ProvinceIdShardingAlgorithm
涉及到的类
java
package com.ruoyi.system.shardingconfig;

import lombok.extern.slf4j.Slf4j;
import org.apache.shardingsphere.sharding.api.sharding.standard.PreciseShardingValue;
import org.apache.shardingsphere.sharding.api.sharding.standard.RangeShardingValue;
import org.apache.shardingsphere.sharding.api.sharding.standard.StandardShardingAlgorithm;
import org.springframework.stereotype.Component;

import java.util.Collection;
import java.util.Properties;


//sharding分表规则
@Slf4j
public class ProvinceIdShardingAlgorithm implements StandardShardingAlgorithm<String> {


    @Override
    public String doSharding(Collection<String> collection, PreciseShardingValue<String> preciseShardingValue) {
        StringBuilder resultTableName = new StringBuilder();
        String logicTableName = preciseShardingValue.getLogicTableName();
        String value = preciseShardingValue.getValue();
        String postTable = "other" ;
        if("370000".equals(value)) {
            postTable = "sd" ;
        }
        if("340000".equals(value)) {
            postTable = "ah" ;
        }
        if("320000".equals(value)) {
            postTable = "js" ;
        }
        resultTableName.append(logicTableName)
                .append("_").append(postTable);
        log.error("操作的表名{}",resultTableName);
        return ShardingAlgorithmTool.shardingTablesCheckAndCreatAndReturn(logicTableName, resultTableName.toString());
    }

    @Override
    public Collection<String> doSharding(Collection<String> collection, RangeShardingValue<String> rangeShardingValue) {
        return null;
    }

    @Override
    public Properties getProps() {
        return null;
    }

    @Override
    public void init(Properties properties) {
        System.out.println();
    }
}
package com.ruoyi.system.shardingconfig;

import lombok.extern.slf4j.Slf4j;

import java.util.ArrayList;
import java.util.HashSet;
import java.util.List;

@Slf4j
public class ShardingAlgorithmTool {
    private static final HashSet<String> tableNameCache = new HashSet<>();

//    private static HssHistoryMapper hssHistoryMapper=SpringUtil.getBean(HssHistoryMapper.class);

    /**
     * 判断 分表获取的表名是否存在 不存在则自动建表
     *
     * @param logicTableName  逻辑表名(表头)
     * @param resultTableName 真实表名
     * @return 确认存在于数据库中的真实表名
     */
    public static String shardingTablesCheckAndCreatAndReturn(String logicTableName, String resultTableName) {
        synchronized (logicTableName.intern()) {
            // 缓存中有此表 返回
            if (tableNameCache.contains(resultTableName)) {
                return resultTableName;
            }
            // 缓存中无此表 建表 并添加缓存
            // 调用mapper 创建表
            // @Update("CREATE TABLE IF NOT EXISTS ${name} LIKE hss_history")
//            hssHistoryMapper.createTable(resultTableName);
            tableNameCache.add(resultTableName);
        }
        return resultTableName;
    }

    /**
     * 缓存重载方法
     */
    public static void tableNameCacheReload() {
        // 读取数据库中所有表名
        List<String> tableNameList = getAllTableNameBySchema();
        // 删除旧的缓存(如果存在)
        ShardingAlgorithmTool.tableNameCache.clear();
        // 写入新的缓存9
        ShardingAlgorithmTool.tableNameCache.addAll(tableNameList);
    }

    /**
     * 获取数据库中的表名
     */
    public static List<String> getAllTableNameBySchema() {
        List<String> res = new ArrayList<>();
        // 获取数据中的表名,需要自己构建数据源 SHOW TABLES like 'hss_history%'
//         List<String> res = hssHistoryMapper.showTables();
//        Environment env = SpringUtil.getApplicationContext().getEnvironment();
//        try (Connection connection = DriverManager.getConnection(env.getProperty("spring.datasource.druid.url"), env.getProperty("spring.datasource.druid.username"), env.getProperty("spring.datasource.druid.password"));
//             Statement st = connection.createStatement()) {
//            try (ResultSet provinceRs = st.executeQuery("SHOW TABLES like 'lake_company_info%'")) {
//                while (provinceRs.next()) {
//                    res.add(provinceRs.getString(1));
//                }
//            }
//        } catch (Exception e) {
//            e.printStackTrace();
//        }
        res.add("lake_company_info");
        res.add("lake_company_info_sd");
        res.add("lake_company_info_ah");
        res.add("lake_company_info_js");
        res.add("lake_company_info_other");
        return res;
    }

    /**
     * 获取缓存中的表名
     * @return
     */
    public static HashSet<String> cacheTableNames() {
        return tableNameCache;
    }
}

package com.ruoyi.system.shardingconfig;

import lombok.extern.slf4j.Slf4j;
import org.springframework.boot.CommandLineRunner;
import org.springframework.core.annotation.Order;
import org.springframework.stereotype.Component;

/**
 * 项目启动后 读取已有分表 进行缓存
 */
@Slf4j
@Order(value = 1) // 数字越小 越先执行
@Component
public class ShardingTablesLoadRunner implements CommandLineRunner {
    @Override
    public void run(String... args) {
        ShardingAlgorithmTool.tableNameCacheReload();
    }
}
ruoyi-file中引入
java
spring:
  main:
    allow-bean-definition-overriding: true
  application:
    # 应用名称
    name: ruoyi-file
  profiles:
    # 环境配置
    active: dev
  cloud:
    nacos:
      discovery:
        # 服务注册地址
        server-addr: 192.168.0.227:8848
      config:
        # 配置中心地址
        server-addr: 192.168.0.227:8848
        # 配置文件格式
        file-extension: yml
        # 共享配置
        shared-configs:
          - application-${spring.profiles.active}.${spring.cloud.nacos.config.file-extension}
  shardingsphere:
    props:
      sql-show: true
    datasource:
      names: master,slave
      master:
        type: com.zaxxer.hikari.HikariDataSource
        driver-class-name: com.mysql.cj.jdbc.Driver
        url: jdbc:mysql://192.168.0.177:3306/seata_file?useUnicode=true&characterEncoding=utf8&zeroDateTimeBehavior=convertToNull&useSSL=true&serverTimezone=GMT%2B8
        username: xxxx
        password: xxxx
      slave:
        type: com.zaxxer.hikari.HikariDataSource
        driver-class-name: com.mysql.cj.jdbc.Driver
        url: jdbc:mysql://192.168.0.179:3306/seata_file?useUnicode=true&characterEncoding=utf8&zeroDateTimeBehavior=convertToNull&useSSL=true&serverTimezone=GMT%2B8
        username: xxxxx
        password: xxxxxx
    rules:
      readwrite-splitting:
        data-sources:
          rw_ds:
            type: Static
            props:
              write-data-source-name: master
              read-data-source-names: slave
            load-balancer-name: round_robin
        load-balancers:
          round_robin:
type: ROUND_ROBIN- 测试
可以自行测试,可以正确看到写入走master,读取操作走slave

sentinel集成 ,版本采用的是1.7.2
项目集成
先配置网关请求路由限流策略,在ruoyi-gateway中引入依赖
java
<!-- SpringCloud Alibaba Sentinel -->
<dependency>
    <groupId>com.alibaba.cloud</groupId>
    <artifactId>spring-cloud-starter-alibaba-sentinel</artifactId>
</dependency>

<!-- SpringCloud Alibaba Sentinel Gateway -->
<dependency>
    <groupId>com.alibaba.cloud</groupId>
    <artifactId>spring-cloud-alibaba-sentinel-gateway</artifactId>
</dependency>

<!-- Sentinel Datasource Nacos -->
<dependency>
    <groupId>com.alibaba.csp</groupId>
    <artifactId>sentinel-datasource-nacos</artifactId>
</dependency>
在bootstrap中引入
java
spring:
  application:
    # 应用名称
    name: ruoyi-gateway
  profiles:
    # 环境配置
    active: dev
  cloud:
    nacos:
      discovery:
        # 服务注册地址
        server-addr: 192.168.0.227:8848
      config:
        # 配置中心地址
        server-addr: 192.168.0.227:8848
        # 配置文件格式
        file-extension: yml
        # 共享配置
        shared-configs:
          - application-${spring.profiles.active}.${spring.cloud.nacos.config.file-extension}
    sentinel:
      # 取消控制台懒加载
      eager: true
      transport:
        # 控制台地址
        dashboard: 192.168.0.172:8080
      # nacos配置持久化
      datasource:
        ds1:
          nacos:
            server-addr: 192.168.0.227:8848
            dataId: sentinel-ruoyi-gateway
            groupId: DEFAULT_GROUP
            data-type: json
            rule-type: gw-flow
nacos上的配置

具体内容如下:
java
[
    {
        "resource": "ruoyi-auth",
        "count": 500,
        "grade": 1,
        "limitApp": "default",
        "strategy": 0,
        "controlBehavior": 0
    },
	{
        "resource": "ruoyi-system",
        "count": 1000,
        "grade": 1,
        "limitApp": "default",
        "strategy": 0,
        "controlBehavior": 0
    },
	{
        "resource": "ruoyi-gen",
        "count": 200,
        "grade": 1,
        "limitApp": "default",
        "strategy": 0,
        "controlBehavior": 0
    },
	{
        "resource": "ruoyi-job",
        "count": 300,
        "grade": 1,
        "limitApp": "default",
        "strategy": 0,
        "controlBehavior": 0
    }
]
在网关项目中建立对应的类
java
package com.ruoyi.gateway.config;

import org.springframework.context.annotation.Bean;
import org.springframework.context.annotation.Configuration;
import org.springframework.core.Ordered;
import org.springframework.core.annotation.Order;
import com.ruoyi.gateway.handler.SentinelFallbackHandler;

/**
 * 网关限流配置
 *
 * @author ruoyi
 */
@Configuration
public class GatewayConfig
{
    @Bean
    @Order(Ordered.HIGHEST_PRECEDENCE)
    public SentinelFallbackHandler sentinelGatewayExceptionHandler()
    {
        return new SentinelFallbackHandler();
    }
}
自定义限流异常处理类
java
package com.ruoyi.gateway.handler;
import com.alibaba.csp.sentinel.adapter.gateway.sc.callback.GatewayCallbackManager;
import com.alibaba.csp.sentinel.slots.block.BlockException;
import com.ruoyi.common.core.utils.ServletUtils;
import org.springframework.web.reactive.function.server.ServerResponse;
import org.springframework.web.server.ServerWebExchange;
import org.springframework.web.server.WebExceptionHandler;
import reactor.core.publisher.Mono;
/**
* 自定义限流异常处理
*
* @author ruoyi
*/
public class SentinelFallbackHandler implements WebExceptionHandler
{
private Mono<Void> writeResponse(ServerResponse response, ServerWebExchange exchange)
{
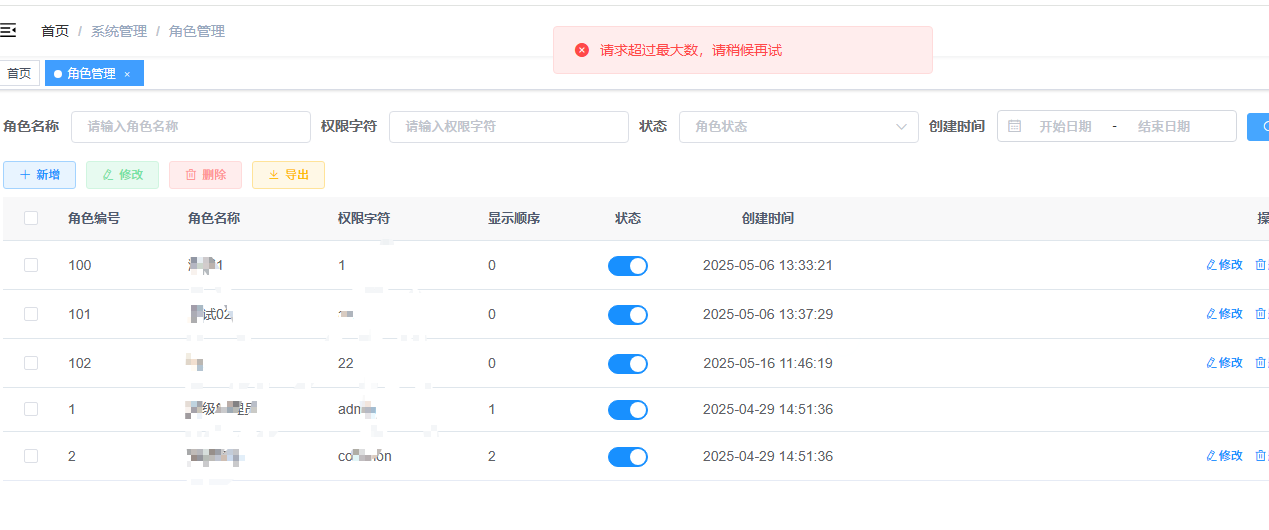
return ServletUtils.webFluxResponseWriter(exchange.getResponse(), "请求超过最大数,请稍候再试");
}
@Override
public Mono<Void> handle(ServerWebExchange exchange, Throwable ex)
{
if (exchange.getResponse().isCommitted())
{
return Mono.error(ex);
}
if (!BlockException.isBlockException(ex))
{
return Mono.error(ex);
}
return handleBlockedRequest(exchange, ex).flatMap(response -> writeResponse(response, exchange));
}
private Mono<ServerResponse> handleBlockedRequest(ServerWebExchange exchange, Throwable throwable)
{
return GatewayCallbackManager.getBlockHandler().handleRequest(exchange, throwable);
}
}运行前后端项目,访问对应接口。
之后对具体项目进行限流,在ruoyi-system中实操。同样的在ruoyi-system中引入依赖
java
<!-- SpringCloud Alibaba Sentinel -->
<dependency>
   <groupId>com.alibaba.cloud</groupId>
   <artifactId>spring-cloud-starter-alibaba-sentinel</artifactId>
</dependency>
<dependency>
   <groupId>com.alibaba.csp</groupId>
   <artifactId>sentinel-transport-simple-http</artifactId>
</dependency>
<!-- Sentinel Datasource Nacos -->
<dependency>
   <groupId>com.alibaba.csp</groupId>
   <artifactId>sentinel-datasource-nacos</artifactId>
</dependency>
在bootstrap文件中创建对应的限流和降级策略
java
spring:
  application:
    # 应用名称
    name: ruoyi-system
  profiles:
    # 环境配置
    active: dev
  cloud:
    nacos:
      discovery:
        # 服务注册地址
        server-addr: 192.168.0.227:8848
      config:
        # 配置中心地址
        server-addr: 192.168.0.227:8848
        # 配置文件格式
        file-extension: yml
        # 共享配置
        shared-configs:
          - application-${spring.profiles.active}.${spring.cloud.nacos.config.file-extension}
    sentinel:
      eager: true
      transport:
        dashboard: 192.168.0.172:8080
      datasource:
        flow:
          nacos:
            server-addr: 192.168.0.227:8848
            dataId: ruoyi-system-flow-rules
            groupId: DEFAULT_GROUP
            data-type: json
            rule-type: flow
        degrade:
          nacos:
            server-addr: 192.168.0.227:8848
            dataId: ruoyi-system-degrade-rules
            groupId: DEFAULT_GROUP
            data-type: json
            rule-type: degrade
      enabled: true
在nacos上分别建立对应的文件


对应文件内容如下
ruoyi-system-flow-rules
java
[
    {
        "app": "ruoyi-system",  //对应应用
        "clusterMode": false,  // 是否集群模式
        "controlBehavior": 0,  // 流控效果(0:快速失败、1:warm up 2:排队等待)
        "count": 10,  // 阈值(QPS=2)
        "gmtModified": 1747376424368,
        "grade": 1,  // 限流类型 (1:QPS,2:线程数)
        "id": 40,
        "limitApp": "default", // 限流应用(default表示不区分来源)
        "resource": "dictList",  // 资源名称 (@SentinelResuorce的value)
        "strategy": 0 // 流控模式(0:直接 1:关联 2:链路)
    }
]
ruoyi-system-degrade-rules
java
[
  {
    "resource": "dictList",  // 资源名称
    "grade": 0,  // 0慢调用比例,1异常比例,2异常数
    "count": 23, // 阈值(RT=23ms)
    "timeWindow": 1, // 熔断恢复时间(秒)
    "minRequestAmount": 5, //最小请求数(触发熔断的最小请求)
    "statIntervalMs": 1000, // 统计窗口(毫秒)
    "slowRatioThreshold": 0.5 // 慢调用比例阈值(仅 grade=0 时生效)
  }
]
在代码中进行集成
bash
RequiresPermissions("system:dict:list")
    @GetMapping("/list")
    @SentinelResource(value = "dictList", blockHandler = "selectUserByNameBlockHandler", fallback = "selectUserByNameFallback")
    public TableDataInfo list(SysDictType dictType)
    {
        startPage();
        R<Boolean> booleanR = this.remoteLogService.saveLogA("1", SecurityConstants.INNER);
        System.out.println(JSONObject.toJSONString(booleanR));
//        int x=1/0 ;
        List<SysDictType> list = dictTypeService.selectDictTypeList(dictType);
        return getDataTable(list);
    }

    // 服务流量控制处理,触发走这个
    public TableDataInfo selectUserByNameBlockHandler(SysDictType dictType, BlockException ex)
    {
        System.out.println("selectUserByNameBlockHandler异常信息:" + ex.getMessage());
        return getDataTable(new ArrayList<>());
    }

    // 服务熔断降级处理,函数签名与原函数一致或加一个 Throwable 类型的参数  抛出异常走这个
    public TableDataInfo selectUserByNameFallback(SysDictType dictType, Throwable throwable)
    {
        System.out.println("selectUserByNameFallback异常信息:" + throwable.getMessage());
        return getDataTable(new ArrayList<>());
    }
以上代码会触发对应的规则,需要注意必须为public ,返回值必须一致,请求参数必须一致,熔断和流量控制的参数为额外传递一个Throwable throwable和 BlockException ex。如果想定义在某个类中,可以blockHandlerclass和fallbackclass并在类中定义不同的方法。
feign的集成
bash
package com.ruoyi.system.api;

import org.springframework.cloud.openfeign.FeignClient;
import org.springframework.web.bind.annotation.PostMapping;
import org.springframework.web.bind.annotation.RequestBody;
import org.springframework.web.bind.annotation.RequestHeader;
import com.ruoyi.common.core.constant.SecurityConstants;
import com.ruoyi.common.core.constant.ServiceNameConstants;
import com.ruoyi.common.core.domain.R;
import com.ruoyi.system.api.domain.SysLogininfor;
import com.ruoyi.system.api.domain.SysOperLog;
import com.ruoyi.system.api.factory.RemoteLogFallbackFactory;
import org.springframework.web.bind.annotation.RequestParam;

import javax.validation.Valid;

/**
 * 日志服务
 *
 * @author ruoyi
 */
@FeignClient(contextId = "remoteLogService", value = ServiceNameConstants.SYSTEM_SERVICE, fallbackFactory = RemoteLogFallbackFactory.class)
public interface RemoteLogService
{
    /**
     * 保存系统日志
     *
     * @param sysOperLog 日志实体
     * @param source 请求来源
     * @return 结果
     */
    @PostMapping("/operlog")
    public R<Boolean> saveLog(@RequestBody SysOperLog sysOperLog, @RequestHeader(SecurityConstants.FROM_SOURCE) String source) throws Exception;

    /**
     * 保存访问记录
     *
     * @param sysLogininfor 访问实体
     * @param source 请求来源
     * @return 结果
     */
    @PostMapping("/logininfor")
    public R<Boolean> saveLogininfor(@RequestBody SysLogininfor sysLogininfor, @RequestHeader(SecurityConstants.FROM_SOURCE) String source);

    /**
     * 测试使用
     * @param aa
     * @param source
     * @return
     */
    @PostMapping("/operlog/a")
    public R<Boolean> saveLogA(@RequestParam(value = "aa")String aa, @RequestHeader(SecurityConstants.FROM_SOURCE) String source);
}
服务不可用时会走这个类,RemoteLogFallbackFactory
bash
package com.ruoyi.system.api.factory;

import org.slf4j.Logger;
import org.slf4j.LoggerFactory;
import org.springframework.cloud.openfeign.FallbackFactory;
import org.springframework.stereotype.Component;
import com.ruoyi.common.core.domain.R;
import com.ruoyi.system.api.RemoteLogService;
import com.ruoyi.system.api.domain.SysLogininfor;
import com.ruoyi.system.api.domain.SysOperLog;

/**
 * 日志服务降级处理
 *
 * @author ruoyi
 */
@Component
public class RemoteLogFallbackFactory implements FallbackFactory<RemoteLogService>
{
    private static final Logger log = LoggerFactory.getLogger(RemoteLogFallbackFactory.class);

    @Override
    public RemoteLogService create(Throwable throwable)
    {
        log.error("日志服务调用失败:{}", throwable.getMessage());
        return new RemoteLogService()
        {
            @Override
            public R<Boolean> saveLog(SysOperLog sysOperLog, String source)
            {
                return R.fail("保存操作日志失败:" + throwable.getMessage());
            }

            @Override
            public R<Boolean> saveLogininfor(SysLogininfor sysLogininfor, String source)
            {
                return R.fail("保存登录日志失败:" + throwable.getMessage());
            }

            @Override
            public R<Boolean> saveLogA(String aa, String source) {
                return R.fail("保存操作日志失败:" + throwable.getMessage());
            }
        };

    }
}
以上代码结合ruoyi框架,可以自行模拟,在下游服务不可用时,会走降级方法。
sentinel集成 ,版本采用的是1.4.x
在项目中集成,使用ruoyi-system和ruoyi-file
先引入依赖
ruoyi-system
bash
<!-- SpringBoot Seata -->
<dependency>
    <groupId>com.alibaba.cloud</groupId>
    <artifactId>spring-cloud-starter-alibaba-seata</artifactId>
</dependency>
ruoyi-file
bash
<!-- SpringBoot Seata -->
<dependency>
    <groupId>com.alibaba.cloud</groupId>
    <artifactId>spring-cloud-starter-alibaba-seata</artifactId>
</dependency>
在ruoyi-system的bootstrap中引入
bash
# seata配置
seata:
  enabled: true
  # Seata 应用编号,默认为 ${spring.application.name}
  application-id: ${spring.application.name}
  # Seata 事务组编号,用于 TC 集群名
  tx-service-group: my_test_tx_group # 要和nacos配置文件中一致
  # 关闭自动代理
  enable-auto-data-source-proxy: false
  # 服务配置项
  service:
    # 虚拟组和分组的映射
    vgroup-mapping:
      my_test_tx_group: default # 要和nacos配置文件中一致
    grouplist:
      default: 192.168.0.172:8091 #seata启动地址
  config:
    type: nacos
    nacos:
      serverAddr: 192.168.0.227:8848
      group: SEATA_GROUP
      namespace: seata
  registry:
    type: nacos
    nacos:
      application: seata-server
      server-addr: 192.168.0.227:8848
      namespace: seata
在ruoyi-file的bootstrap中引入
bash
seata:
  enabled: true
  # Seata 应用编号,默认为 ${spring.application.name}
  application-id: ${spring.application.name}
  # Seata 事务组编号,用于 TC 集群名
  tx-service-group: my_test_tx_group
  # 关闭自动代理
  enable-auto-data-source-proxy: false
  # 服务配置项
  service:
    # 虚拟组和分组的映射
    vgroup-mapping:
      my_test_tx_group: default
    grouplist:
      default: 192.168.0.172:8091
  config:
    type: nacos
    nacos:
      serverAddr: 192.168.0.227:8848
      group: SEATA_GROUP
      namespace: seata
  registry:
    type: nacos
    nacos:
      application: seata-server
      server-addr: 192.168.0.227:8848
      namespace: seata
因为集成了ShardingSphere,所以需要额外配置代理数据源,该配置在两个项目中都要引入
bash
package com.ruoyi.file.config;

import com.alibaba.druid.pool.DruidDataSource;
import io.seata.rm.datasource.DataSourceProxy;
import org.springframework.boot.context.properties.ConfigurationProperties;
import org.springframework.context.annotation.Bean;
import org.springframework.context.annotation.Configuration;
import org.springframework.context.annotation.Primary;

import javax.sql.DataSource;

@Configuration
public class DataSourceProxyConfig {
//    @Bean
//    @ConfigurationProperties(prefix = "spring.datasource")
//    public DataSource druidDataSource() {
//        return new DruidDataSource();
//    }

    @Primary
    @Bean
    public DataSourceProxy dataSourceProxy(DataSource dataSource) {
        return new DataSourceProxy(dataSource);
    }
}
以上就配置完成,接下来进行测试。
点击新增菜单按钮,调用后端接口
bash
 @RequiresPermissions("system:menu:add")
    @Log(title = "菜单管理", businessType = BusinessType.INSERT)
    @PostMapping
//    @Transactional
    @GlobalTransactional(rollbackFor = Exception.class)
    public AjaxResult add(@Validated @RequestBody SysMenu menu)
    {
        if (!menuService.checkMenuNameUnique(menu))
        {
            return error("新增菜单'" + menu.getMenuName() + "'失败,菜单名称已存在");
        }
        else if (UserConstants.YES_FRAME.equals(menu.getIsFrame()) && !StringUtils.ishttp(menu.getPath()))
        {
            return error("新增菜单'" + menu.getMenuName() + "'失败,地址必须以http(s)://开头");
        }
        menu.setCreateBy(SecurityUtils.getUsername());

        log.info("当前 XID: {}", RootContext.getXID());

        SysFileInfo fileInfo = new SysFileInfo();
        fileInfo.setFileName("11111111111");
        fileInfo.setFilePath("222222");


        AjaxResult ajaxResult = toAjax(menuService.insertMenu(menu));
		// 调用远程服务
        R<Boolean> booleanR = this.remoteFileService.saveFile(fileInfo);
        // 要根据上面的爆出对应的异常信息
        log.error(JSONObject.toJSONString(booleanR));
        if(booleanR.getCode() == 500) {
            throw new RuntimeException("巴伯错");
        }
//        int x=1/0;

        return ajaxResult ;
    }
ruoyi-file中的内容
bash
package com.ruoyi.file.service;

import javax.annotation.Resource;
import org.slf4j.Logger;
import org.slf4j.LoggerFactory;
import org.springframework.stereotype.Service;
import org.springframework.transaction.annotation.Propagation;
import org.springframework.transaction.annotation.Transactional;
import com.ruoyi.file.mapper.SysFileInfoMapper;
import com.ruoyi.system.api.domain.SysFileInfo;
import io.seata.core.context.RootContext;

@Service
public class SysFileInfoServiceImpl implements ISysFileInfoService
{
    private static final Logger log = LoggerFactory.getLogger(SysFileInfoServiceImpl.class);

    @Resource
    private SysFileInfoMapper sysFileInfoMapper;

    /**
     * 事务传播特性设置为 REQUIRES_NEW 开启新的事务 重要!!!!一定要使用REQUIRES_NEW
     */
    @Override
    @Transactional(propagation = Propagation.REQUIRES_NEW)
    public void insertFile(SysFileInfo fileInfo)
    {
        fileInfo.setFileId(System.currentTimeMillis()+"");
        log.info("=============FILE START=================");
        log.info("当前 XID: {}", RootContext.getXID());

        sysFileInfoMapper.insert(fileInfo);
        int x=1/0;
        log.info("=============FILE END=================");
    }

}
在调用远程服务 在新增菜单成功后,远程调用 this.remoteFileService.saveFile(fileInfo) 保存时出错。代码回滚成功,此时有一个注意事项,在下游服务报错,回传了降级方法内容或者全局异常时,需要在上游服务中抛出,要不然不能够正常处理。
还有一种情况,远程服务调用成功,在上游服务中报错,此时也会正常回滚。
bash
 @RequiresPermissions("system:menu:add")
    @Log(title = "菜单管理", businessType = BusinessType.INSERT)
    @PostMapping
//    @Transactional
    @GlobalTransactional(rollbackFor = Exception.class)
    public AjaxResult add(@Validated @RequestBody SysMenu menu)
    {
        if (!menuService.checkMenuNameUnique(menu))
        {
            return error("新增菜单'" + menu.getMenuName() + "'失败,菜单名称已存在");
        }
        else if (UserConstants.YES_FRAME.equals(menu.getIsFrame()) && !StringUtils.ishttp(menu.getPath()))
        {
            return error("新增菜单'" + menu.getMenuName() + "'失败,地址必须以http(s)://开头");
        }
        menu.setCreateBy(SecurityUtils.getUsername());

        log.info("当前 XID: {}", RootContext.getXID());

        SysFileInfo fileInfo = new SysFileInfo();
        fileInfo.setFileName("11111111111");
        fileInfo.setFilePath("222222");

	   // 调用远程服务
        R<Boolean> booleanR = this.remoteFileService.saveFile(fileInfo);
          // 要根据上面的爆出对应的异常信息
        log.error(JSONObject.toJSONString(booleanR));
        if(booleanR.getCode() == 500) {
            throw new RuntimeException("巴伯错");
        }
        int x=1/0;

        return  toAjax(menuService.insertMenu(menu));
    }
ruoyi-file中的内容
bash
package com.ruoyi.file.service;

import javax.annotation.Resource;
import org.slf4j.Logger;
import org.slf4j.LoggerFactory;
import org.springframework.stereotype.Service;
import org.springframework.transaction.annotation.Propagation;
import org.springframework.transaction.annotation.Transactional;
import com.ruoyi.file.mapper.SysFileInfoMapper;
import com.ruoyi.system.api.domain.SysFileInfo;
import io.seata.core.context.RootContext;

@Service
public class SysFileInfoServiceImpl implements ISysFileInfoService
{
    private static final Logger log = LoggerFactory.getLogger(SysFileInfoServiceImpl.class);

    @Resource
    private SysFileInfoMapper sysFileInfoMapper;

    /**
     * 事务传播特性设置为 REQUIRES_NEW 开启新的事务 重要!!!!一定要使用REQUIRES_NEW
     */
    @Override
    @Transactional(propagation = Propagation.REQUIRES_NEW)
    public void insertFile(SysFileInfo fileInfo)
    {
        fileInfo.setFileId(System.currentTimeMillis()+"");
        log.info("=============FILE START=================");
        log.info("当前 XID: {}", RootContext.getXID());

        sysFileInfoMapper.insert(fileInfo);
        log.info("=============FILE END=================");
    }

}
代码基本完成了,可能还有其他类型的,也基本差不多,遵循对应的规则就可以。