网络编程 之 从BIO到 NIO加多线程高性能网络编程实战
阻塞非阻塞/同步异步
概念
阻塞与非阻塞是对同一个线程来说的,在某个时刻,线程要么处于阻塞,要么处于非阻塞
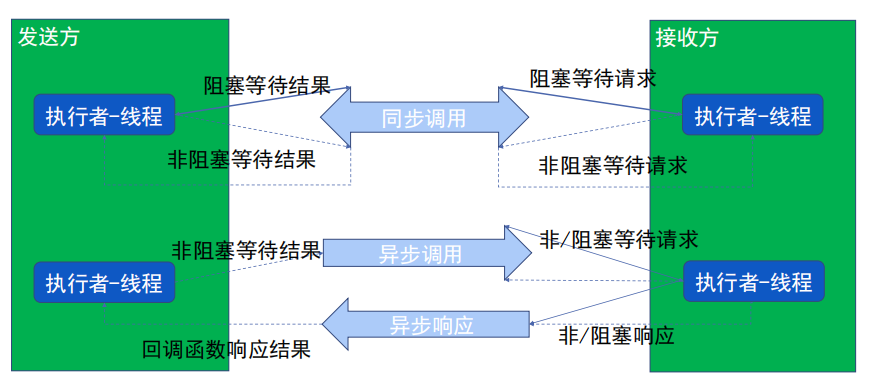
同步和异步是指:发送方和接收方是否协调步调一致
- 阻塞(blocking) IO:资源不可用时,IO请求一直阻塞,直到反馈结果(有数据或超时)。
- 非阻塞(non-blocking)IO: 资源不可用时,IO请求离开返回,返回数据标识资源不可用。
- 同步(synchronous) IO:应用阻塞在发送或接收数据的状态,直到数据传输成功或返回结果。
- 异步(asynchronous) IO:应用发送或接收数据后立刻返回,处理结果通过回调来通知。
阻塞和非阻塞是进程在访问数据的时候,数据是否准备就绪的一种处理方式,当数据没有准备的时候。
阻塞:往往需要等待缓冲区中的数据准备好过后才处理其他的事情,否则一直等待在那里。
非阻塞:当我们的进程访问我们的数据缓冲区的时候,如果数据没有准备好则直接返回,不会等待。如果数据已经准备好,也直接返回。
同步和异步都是基于应用程序和操作系统处理 IO 事件所采用的方式。比如同步:是应用程序要直接参与 IO 读写的操作。异步:所有的 IO 读写交给操作系统去处理,应用程序只需要等待通知。
同步方式在处理 IO 事件的时候,必须阻塞在某个方法上面等待我们的 IO 事件完成(阻塞 IO 事件或者通过轮询 IO事件的方式),对于异步来说,所有的 IO 读写都交给了操作系统。这个时候,我们可以去做其他的事情,并不需要去完成真正的 IO 操作,当操作完成 IO 后,会给我们的应用程序一个通知。
同步 : 阻塞到 IO 事件,阻塞到 read 或则 write。这个时候我们就完全不能做自己的事情。让读写方法加入到线程里面,然后阻塞线程来实现,对线程的性能开销比较大。
代码中使用的API:ServerSocket#accept、InputStream#read 都是阻塞的API。操作系统底层API中,默认Socket操作都是Blocking型,send/recv等接口都是阻塞的。
带来的问题: 阻塞导致在处理网络I/O时,一个线程只能处理一个网络连接。
组合
同步阻塞
同步非阻塞
异步阻塞
异步非阻塞
IO模型
5种IO模型
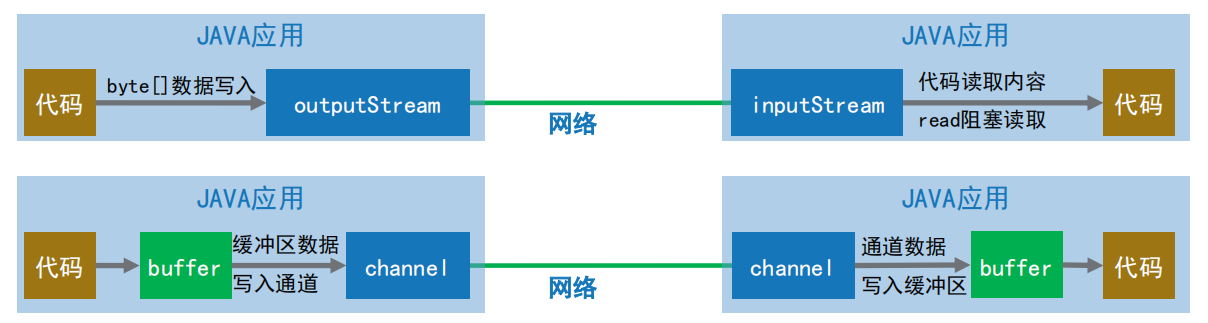
- 阻塞IO模型:Socket Read 面向字节流InputStream、OutPutStream
- 非阻塞IO模型:不再面向字节流,面向缓冲 API,Java NIO 面向缓冲实现
- IO复用模型
- 信号驱动IO模型
- 异步IO模型:AIO Windows的IOCP支持比较好,目前linux没有好的支持
linux底层IO多路复用事件模型
select、poll,返回后遍历文件描述符来获取已经就绪的socket,描述符越多效率越低
epoll、kqueue,不需要遍历了,注册了一个事件函数,效率比poll要高
windows aio 事件模型:IOCP
JAVA NIO
始于Java 1.4,提供了新的JAVA IO操作非阻塞API。用意是替代Java IO 和 Java Networking相关的API。
NIO中的三个核心组件
- Buffer:缓冲区
- Channel:通道
- Selector:选择器
Buffer 缓冲区
Buffer 缓冲区介绍
缓冲区本质上是一个可以写入数据的内存块(类似数组),然后可以再次读取。此内存块包含在NIO Buffer对象中,该对象提供了一组方法,可以更轻松地使用内存块。
相比较直接对数组的操作,Buffer API更加容易操作和管理。
使用Buffer进行数据写入与读取,需要进行如下四个步骤:
将数据写入缓冲区
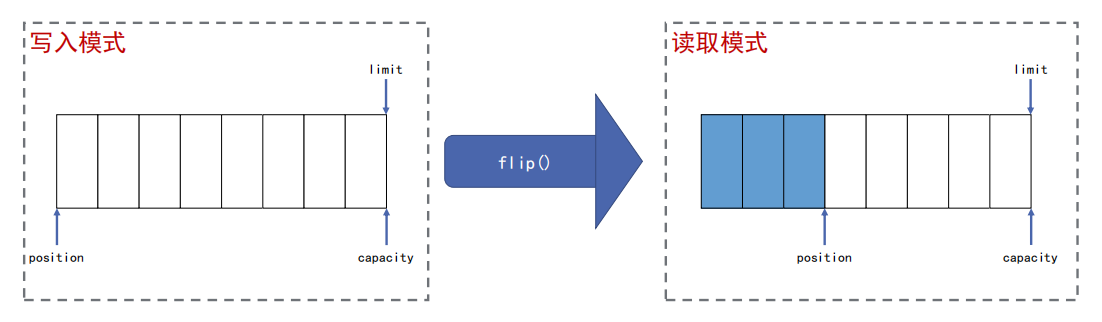
调用buffer.flip(),转换为读取模式
缓冲区读取数据
调用buffer.clear()或buffer.compact()转为写模式
Buffer 缓冲区工作原理
Buffer三个重要属性:
capacity 容量: 作为一个内存块,Buffer具有一定的固定大小,也称为"容量" 。
position 位置: 写入模式时代表写数据的位置。读取模式时代表读取数据的位置。
limit 限制: 写入模式,限制等于buffer的容量。读取模式下,limit等于写入的数据量。
ByteBuffer内存类型
介绍
ByteBuffer为性能关键型代码提供了直接内存(direct堆外)和非直接内存(heap堆)两种实现。
堆内内存获取的方式:
java
ByteBuffer directByteBuffer = ByteBuffer.allocate(noBytes);堆外内存获取的方式:
java
ByteBuffer directByteBuffer = ByteBuffer.allocateDirect(noBytes);好处:
1、 进行网络IO或者文件IO时比heapBuffer少一次拷贝。(file/socket ---- OS memory ---- jvm heap)
GC会移动对象内存,在写file或socket的过程中, JVM的实现中,会先把数据复制到堆外,再进行写入。
2、 GC范围之外,降低GC压力,但实现了自动管理。DirectByteBuffer中有一个Cleaner对象(PhantomReference),
Cleaner被GC前会执行clean方法,触发DirectByteBuffer中定义的Deallocator
建议:
1、 性能确实可观的时候才去使用;分配给大型、长寿命; (网络传输、文件读写场景)
2、 通过虚拟机参数MaxDirectMemorySize限制大小,防止耗尽整个机器的内存;
使用
堆内
java
public class BufferDemo {
    public static void main(String[] args) {
        // 构建一个byte字节缓冲区,容量是4
        ByteBuffer byteBuffer = ByteBuffer.allocate(10);
        // 默认写入模式,查看三个重要的指标
        System.out.println(String.format("初始化:capacity容量:%s, position位置:%s, limit限制:%s", byteBuffer.capacity(),
                byteBuffer.position(), byteBuffer.limit()));
        // 写入2字节的数据
        byteBuffer.put((byte) 1);
        byteBuffer.put((byte) 2);
        byteBuffer.put((byte) 3);
        // 再看数据
        System.out.println(String.format("写入3字节后,capacity容量:%s, position位置:%s, limit限制:%s", byteBuffer.capacity(),
                byteBuffer.position(), byteBuffer.limit()));

        // 转换为读取模式(不调用flip方法,也是可以读取数据的,但是position记录读取的位置不对)
        System.out.println("#######开始读取");
        byteBuffer.flip();
        byte a = byteBuffer.get();
        System.out.println(a);
        byte b = byteBuffer.get();
        System.out.println(b);
        System.out.println(String.format("读取2字节数据后,capacity容量:%s, position位置:%s, limit限制:%s", byteBuffer.capacity(),
                byteBuffer.position(), byteBuffer.limit()));

        // 继续写入3字节,此时读模式下,limit=3,position=2.继续写入只能覆盖写入一条数据
        // clear()方法清除整个缓冲区。compact()方法仅清除已阅读的数据。转为写入模式
        byteBuffer.compact(); // buffer : 1 , 3
        byteBuffer.put((byte) 3);
        byteBuffer.put((byte) 4);
        byteBuffer.put((byte) 5);
        System.out.println(String.format("最终的情况,capacity容量:%s, position位置:%s, limit限制:%s", byteBuffer.capacity(),
                byteBuffer.position(), byteBuffer.limit()));

        // rewind() 重置position为0
        // mark() 标记position的位置
        // reset() 重置position为上次mark()标记的位置

    }
}
堆外
java
public class DirectBufferDemo {
   public static void main(String[] args) {
      // 构建一个byte字节缓冲区,容量是4
      ByteBuffer byteBuffer = ByteBuffer.allocateDirect(4);
      // 默认写入模式,查看三个重要的指标
      System.out.println(String.format("初始化:capacity容量:%s, position位置:%s, limit限制:%s", byteBuffer.capacity(),
            byteBuffer.position(), byteBuffer.limit()));
      // 写入2字节的数据
      byteBuffer.put((byte) 1);
      byteBuffer.put((byte) 2);
      byteBuffer.put((byte) 3);
      // 再看数据
      System.out.println(String.format("写入3字节后,capacity容量:%s, position位置:%s, limit限制:%s", byteBuffer.capacity(),
            byteBuffer.position(), byteBuffer.limit()));

      // 转换为读取模式(不调用flip方法,也是可以读取数据的,但是position记录读取的位置不对)
      System.out.println("#######开始读取");
      byteBuffer.flip();
      byte a = byteBuffer.get();
      System.out.println(a);
      byte b = byteBuffer.get();
      System.out.println(b);
      System.out.println(String.format("读取2字节数据后,capacity容量:%s, position位置:%s, limit限制:%s", byteBuffer.capacity(),
            byteBuffer.position(), byteBuffer.limit()));

      // 继续写入3字节,此时读模式下,limit=3,position=2.继续写入只能覆盖写入一条数据
      // clear()方法清除整个缓冲区。compact()方法仅清除已阅读的数据。转为写入模式
      byteBuffer.compact();
      byteBuffer.put((byte) 3);
      byteBuffer.put((byte) 4);
      byteBuffer.put((byte) 5);
      System.out.println(String.format("最终的情况,capacity容量:%s, position位置:%s, limit限制:%s", byteBuffer.capacity(),
            byteBuffer.position(), byteBuffer.limit()));
      byteBuffer.array();
      // rewind() 重置position为0
      // mark() 标记position的位置
      // reset() 重置position为上次mark()标记的位置
   }
}
Channel通道
详解
Channel的API涵盖了UDP/TCP网络和文件IO
FileChannel
DatagramChannel
SocketChannel
ServerSocketChannel
和标准IO Stream操作的区别
在一个通道内进行读取和写入,可以非阻塞读取和写入通道,通道始终读取或写入缓冲区,而stream通常是单向的(input或output)
SocketChannel 客户端
SocketChannel用于建立TCP网络连接,类似java.net.Socket。有两种创建socketChannel形式:
-
客户端主动发起和服务器的连接。
-
服务端获取的新连接
java
// 客户端主动发起连接的方式
SocketChannel socketChannel = SocketChannel.open();
socketChannel .configureBlocking( false ); // 设置为非阻塞模式
socketChannel.connect(new InetSocketAddress("127.0.0.1",8080));

socketChannel.write(byteBuffer); // 发送请求数据 -- 向通道写入数据
int bytesRead = socketChannel.read( byteBuffer ); // 读取服务端返回 -- 读取缓冲区的数据
socketChannel.close(); // 关闭连接write写: write()在尚未写入任何内容时就可能返回了。需要在循环中调用write()。
read读: read()方法可能直接返回而根本不读取任何数据,根据返回的int值判断读取了多少字节。
ServerSocketChannel 服务端
ServerSocketChannel可以监听新建的TCP连接通道,类似ServerSocket。
java
// 创建网络服务端
ServerSocketChannel serverSocketChannel = ServerSocketChannel.open();
serverSocketChannel.configureBlocking(false); // 设置为非阻塞模式
serverSocketChannel.socket().bind(new InetSocketAddress(8080)); // 绑定端口
while(true){
    SocketChannel socketChannel = serverSocketChannel.accept(); // 获取新tcp连接通道
    if(socketChannel != null){
    // tcp请求 读取/响应
    }
}
**serverSocketChannel.accept():**如果该通道处于非阻塞模式,那么如果没有挂起的连接,该方法将立即返回null。 必须检查返回的 SocketChannel是否为null
使用Channel写一个服务器
模拟服务端NIOServer
java
/**
 * 直接基于非阻塞的写法
 */
public class NIOServer {

    public static void main(String[] args) throws Exception {
        // 创建网络服务端
        ServerSocketChannel serverSocketChannel = ServerSocketChannel.open();
        serverSocketChannel.configureBlocking(false); // 设置为非阻塞模式
        serverSocketChannel.socket().bind(new InetSocketAddress(8080)); // 绑定端口
        System.out.println("启动成功");
        while (true) {
            SocketChannel socketChannel = serverSocketChannel.accept(); // 获取新tcp连接通道
            // tcp请求 读取/响应
            if (socketChannel != null) {
                System.out.println("收到新连接 : " + socketChannel.getRemoteAddress());
                socketChannel.configureBlocking(false); // 默认是阻塞的,一定要设置为非阻塞
                try {
                    ByteBuffer requestBuffer = ByteBuffer.allocate(1024);
                    while (socketChannel.isOpen() && socketChannel.read(requestBuffer) != -1) {
                        // 长连接情况下,需要手动判断数据有没有读取结束 (此处做一个简单的判断: 超过0字节就认为请求结束了)
                        if (requestBuffer.position() > 0) break;
                    }
                    if(requestBuffer.position() == 0) continue; // 如果没数据了, 则不继续后面的处理
                    requestBuffer.flip();
                    byte[] content = new byte[requestBuffer.limit()];
                    requestBuffer.get(content);
                    System.out.println(new String(content));
                    System.out.println("收到数据,来自:"+ socketChannel.getRemoteAddress());

                    // 响应结果 200
                    String response = "HTTP/1.1 200 OK\r\n" +
                            "Content-Length: 11\r\n\r\n" +
                            "Hello World";
                    ByteBuffer buffer = ByteBuffer.wrap(response.getBytes());
                    while (buffer.hasRemaining()) {
                        socketChannel.write(buffer);// 非阻塞
                    }
                } catch (IOException e) {
                    e.printStackTrace();
                }
            }
        }
        // 用到了非阻塞的API, 在设计上,和BIO可以有很大的不同.继续改进
    }
}
模拟客户端NIOClient
java
public class NIOClient {

    public static void main(String[] args) throws Exception {
        SocketChannel socketChannel = SocketChannel.open();
        socketChannel.configureBlocking(false);
        socketChannel.connect(new InetSocketAddress("127.0.0.1", 8080));
        while (!socketChannel.finishConnect()) {
            // 没连接上,则一直等待
            Thread.yield();
        }
        Scanner scanner = new Scanner(System.in);
        System.out.println("请输入:");
        // 发送内容
        String msg = scanner.nextLine();
        ByteBuffer buffer = ByteBuffer.wrap(msg.getBytes());
        while (buffer.hasRemaining()) {
            socketChannel.write(buffer);
        }
        // 读取响应
        System.out.println("收到服务端响应:");
        ByteBuffer requestBuffer = ByteBuffer.allocate(1024);

        while (socketChannel.isOpen() && socketChannel.read(requestBuffer) != -1) {
            // 长连接情况下,需要手动判断数据有没有读取结束 (此处做一个简单的判断: 超过0字节就认为请求结束了)
            if (requestBuffer.position() > 0) break;
        }
        requestBuffer.flip();
        byte[] content = new byte[requestBuffer.limit()];
        requestBuffer.get(content);
        System.out.println(new String(content));
        scanner.close();
        socketChannel.close();
    }

}
模拟服务端NIOServer的升级版1
升级前的版本是一直轮询通道的方式,接收到一个客户端channel就处理一个
缺点:只能一个挨着一个执行,轮询通道的方式,低效,浪费CPU
升级后的版本也是一直轮询通道的方式,接收一个客户端channel,先缓存到一个列表中,当没有客户端channel的时候再去遍历列表处理
缺点:虽然能在少量的请求中,解决轮询浪费CPU,但是请求量大了导致要么一直在接受channel,添加到列表中,无法处理请求,要么一直在处理请求无法接收请求
java
**
 * 直接基于非阻塞的写法,一个线程处理轮询所有请求
 */
public class NIOServer1 {
    /**
     * 已经建立连接的集合
     */
    private static ArrayList<SocketChannel> channels = new ArrayList<>();

    public static void main(String[] args) throws Exception {
        // 创建网络服务端
        ServerSocketChannel serverSocketChannel = ServerSocketChannel.open();
        serverSocketChannel.configureBlocking(false); // 设置为非阻塞模式
        serverSocketChannel.socket().bind(new InetSocketAddress(8080)); // 绑定端口
        System.out.println("启动成功");
        while (true) {
            SocketChannel socketChannel = serverSocketChannel.accept(); // 获取新tcp连接通道
            // tcp请求 读取/响应
            if (socketChannel != null) {
                System.out.println("收到新连接 : " + socketChannel.getRemoteAddress());
                socketChannel.configureBlocking(false); // 默认是阻塞的,一定要设置为非阻塞
                channels.add(socketChannel);
            } else {
                // 没有新连接的情况下,就去处理现有连接的数据,处理完的就删除掉
                Iterator<SocketChannel> iterator = channels.iterator();
                while (iterator.hasNext()) {
                    SocketChannel ch = iterator.next();
                    try {
                        ByteBuffer requestBuffer = ByteBuffer.allocate(1024);

                        if (ch.read(requestBuffer) == 0) {
                            // 等于0,代表这个通道没有数据需要处理,那就待会再处理
                            continue;
                        }
                        while (ch.isOpen() && ch.read(requestBuffer) != -1) {
                            // 长连接情况下,需要手动判断数据有没有读取结束 (此处做一个简单的判断: 超过0字节就认为请求结束了)
                            if (requestBuffer.position() > 0) break;
                        }
                        if (requestBuffer.position() == 0) continue; // 如果没数据了, 则不继续后面的处理
                        requestBuffer.flip();
                        byte[] content = new byte[requestBuffer.limit()];
                        requestBuffer.get(content);
                        System.out.println(new String(content));
                        System.out.println("收到数据,来自:" + ch.getRemoteAddress());

                        // 响应结果 200
                        String response = "HTTP/1.1 200 OK\r\n" +
                                "Content-Length: 11\r\n\r\n" +
                                "Hello World";
                        ByteBuffer buffer = ByteBuffer.wrap(response.getBytes());
                        while (buffer.hasRemaining()) {
                            ch.write(buffer);
                        }
                        iterator.remove();
                    } catch (IOException e) {
                        e.printStackTrace();
                        iterator.remove();
                    }
                }
            }
        }
        // 用到了非阻塞的API, 再设计上,和BIO可以有很大的不同
        // 问题: 轮询通道的方式,低效,浪费CPU
    }
}
模拟服务器NIOServer的升级版2
java
/**
 * 结合Selector实现非阻塞服务器
 */
public class NIOServerV2 {

    public static void main(String[] args) throws Exception {
        // 1. 创建服务端的channel对象
        ServerSocketChannel serverSocketChannel = ServerSocketChannel.open();
        serverSocketChannel.configureBlocking(false); // 设置为非阻塞模式

        // 2. 创建Selector
        Selector selector = Selector.open();

        // 3. 把服务端的channel注册到selector,注册accept事件
        SelectionKey selectionKey = serverSocketChannel.register(selector, 0);
        selectionKey.interestOps(SelectionKey.OP_ACCEPT);

        // 4. 绑定端口,启动服务
        serverSocketChannel.socket().bind(new InetSocketAddress(8080)); // 绑定端口
        System.out.println("启动成功");

        while (true) {
            // 5. 启动selector(管家)
            selector.select();// 阻塞,直到事件通知才会返回

            Set<SelectionKey> selectionKeys = selector.selectedKeys();
            Iterator<SelectionKey> iterator = selectionKeys.iterator();
            while (iterator.hasNext()) {
                SelectionKey key = iterator.next();
                iterator.remove();

                if (key.isAcceptable()) {
                    SocketChannel socketChannel = ((ServerSocketChannel) key.channel()).accept();
                    socketChannel.configureBlocking(false);
                    socketChannel.register(selector, SelectionKey.OP_READ);
                    System.out.println("收到新连接:" + socketChannel);
                } else if (key.isReadable()) {// 客户端连接有数据可以读时触发
                    try {
                        SocketChannel socketChannel = (SocketChannel) key.channel();

                        ByteBuffer requestBuffer = ByteBuffer.allocate(1024);
                        while (socketChannel.isOpen() && socketChannel.read(requestBuffer) != -1) {
                            // 长连接情况下,需要手动判断数据有没有读取结束 (此处做一个简单的判断: 超过0字节就认为请求结束了)
                            if (requestBuffer.position() > 0) break;
                        }
                        if (requestBuffer.position() == 0) continue; // 如果没数据了, 则不继续后面的处理
                        requestBuffer.flip();
                        byte[] content = new byte[requestBuffer.remaining()];
                        requestBuffer.get(content);
                        System.out.println(new String(content));
                        System.out.println("收到数据,来自:" + socketChannel.getRemoteAddress());
                        // TODO 业务操作 数据库 接口调用等等

                        // 响应结果 200
                        String response = "HTTP/1.1 200 OK\r\n" +
                                "Content-Length: 11\r\n\r\n" +
                                "Hello World";
                        ByteBuffer buffer = ByteBuffer.wrap(response.getBytes());
                        while (buffer.hasRemaining()) {
                            socketChannel.write(buffer);
                        }
                    } catch (Exception e) {
                        e.printStackTrace();
                        key.cancel();
                    }
                }
            }
        }
    }
}
模拟客户端NIOClient的升级版2
java
public class NIOClientV2 {

    public static void main(String[] args) throws Exception {
        SocketChannel socketChannel = SocketChannel.open();
        Selector selector = Selector.open();
        socketChannel.configureBlocking(false);
        socketChannel.register(selector, SelectionKey.OP_CONNECT);
        socketChannel.connect(new InetSocketAddress("localhost", 8080));

        while (true) {
            selector.select();
            Set<SelectionKey> selectionKeys = selector.selectedKeys();
            Iterator<SelectionKey> iterator = selectionKeys.iterator();
            while (iterator.hasNext()) {
                SelectionKey selectionKey = iterator.next();
                iterator.remove();

                if (selectionKey.isConnectable()) { // 连接到远程服务器
                    try {
                        if (socketChannel.finishConnect()) { // 完成连接
                            // 连接成功
                            System.out.println("连接成功-" + socketChannel);

                            ByteBuffer buffer = ByteBuffer.allocateDirect(20480);

                            // 切换到感兴趣的事件
                            selectionKey.attach(buffer);
                            selectionKey.interestOps(SelectionKey.OP_WRITE);
                        }
                    } catch (IOException e) {
                        // 连接失败
                        e.printStackTrace();
                        return;
                    }
                } else if (selectionKey.isWritable()) {// 可以开始写数据
                    ByteBuffer buf = (ByteBuffer) selectionKey.attachment();
                    buf.clear();
                    Scanner scanner = new Scanner(System.in);
                    System.out.print("请输入:");
                    // 发送内容
                    String msg = scanner.nextLine();
                    scanner.close();

                    buf.put(msg.getBytes());
                    buf.flip();

                    while (buf.hasRemaining()) {
                        socketChannel.write(buf);
                    }

                    // 切换到感兴趣的事件
                    selectionKey.interestOps(SelectionKey.OP_READ);
                } else if (selectionKey.isReadable()) {// 可以开始读数据
                    // 读取响应
                    System.out.println("收到服务端响应:");
                    ByteBuffer requestBuffer = ByteBuffer.allocate(1024);

                    while (socketChannel.isOpen() && socketChannel.read(requestBuffer) != -1) {
                        // 长连接情况下,需要手动判断数据有没有读取结束 (此处做一个简单的判断: 超过0字节就认为请求结束了)
                        if (requestBuffer.position() > 0) break;
                    }
                    requestBuffer.flip();
                    byte[] content = new byte[requestBuffer.remaining()];
                    requestBuffer.get(content);
                    System.out.println(new String(content));
//                    selectionKey.interestOps(SelectionKey.OP_WRITE);

                }
            }
        }
    }

}
模拟服务器NIOServer的升级版2的改动
服务器端读事件后,不直接写了,改为关注写事件,然后在写事件中,进行写回复客户端的相应信息
java
public class NIOServerV2 {
    public static void main(String[] args) throws IOException {
        ServerSocketChannel serverSocketChannel = ServerSocketChannel.open();
        serverSocketChannel.configureBlocking(false);

        Selector selector = Selector.open();

        SelectionKey selectionKey = serverSocketChannel.register(selector, 0);
        selectionKey.interestOps(SelectionKey.OP_ACCEPT);

        serverSocketChannel.socket().bind(new InetSocketAddress(8080));
        System.out.println("服务启动成功");

        while (true) {
            selector.select();//阻塞

            Set<SelectionKey> selectionKeys = selector.selectedKeys();
            Iterator<SelectionKey> iterator = selectionKeys.iterator();
            while (iterator.hasNext()) {
                SelectionKey key = iterator.next();
                iterator.remove();


                if (key.isAcceptable()) {
                    SocketChannel channel = ((ServerSocketChannel) key.channel()).accept();
                    channel.configureBlocking(false);
                    channel.register(selector, SelectionKey.OP_READ);
                    System.out.println("收到新连接:" + channel.getRemoteAddress());
                } else if (key.isReadable()) {
                    SocketChannel channel = (SocketChannel) key.channel();
                    ByteBuffer byteBuffer = ByteBuffer.allocate(2014);
                    while(channel.isOpen() && channel.read(byteBuffer) != -1){
                        if(byteBuffer.position() > 0) break;
                    }
                    if (byteBuffer.position() == 0) continue; // 如果没数据了, 则不继续后面的处理
                    byteBuffer.flip();
                    byte[] content = new byte[byteBuffer.remaining()];
                    byteBuffer.get(content);
                    System.out.println("收到新连接:" + channel.getRemoteAddress() + " 数据:"+new String(content));
                    channel.register(selector,SelectionKey.OP_WRITE);
                } else if (key.isWritable()){
                    System.out.println("开始写");
                    SocketChannel channel = (SocketChannel) key.channel();
                    String response = "HTTP/1.1 200 OK\r\n" +
                            "Content-Length: 11\r\n\r\n" +
                            "Hello World";
                    ByteBuffer byteBuffer = ByteBuffer.wrap(response.getBytes());
                    while(byteBuffer.hasRemaining()){
                        channel.write(byteBuffer);
                    }
                    //写完后,一定取消写的关注,否则轮询中就会一直写
                    key.interestOps(0);
                }

            }
        }
    }
}
Selector 选择器
详解
Selector是一个Java NIO组件,可以检查一个或多个NIO通道,并确定哪些通道已准备好进行读取或写入。实现单个线程可以管理多个通道,从而管理多个网络连接
一个线程使用Selector监听多个channel的不同事件:四个事件分别对应SelectionKey四个常量。
- Connect 连接(SelectionKey.OP_CONNECT)
- Accept 准备就绪(OP_ACCEPT)
- Read 读取(OP_READ)
- Write 写入(OP_WRITE)
实现一个线程处理多个通道的核心概念理解:事件驱动机制
非阻塞的网络通道下,开发者通过Selector注册对于通道感兴趣的事件类型,线程通过监听事件来
触发相应的代码执行。(拓展:更底层是操作系统的多路复用机制)
java
Selector selector = Selector.open();
channel.configureBlocking(false);
SelectionKey key = channel.register(selector, SelectionKey.OP_READ); //注册感兴趣的事件
while(true) { // 由accept轮询,变成了事件通知的方式。
    int readyChannels = selector.select(); // select 收到新的事件,方法才会返回
    if(readyChannels == 0) continue;
    Set<SelectionKey> selectedKeys = selector.selectedKeys();
    Iterator<SelectionKey> keyIterator = selectedKeys.iterator();
    while(keyIterator.hasNext()) {
        SelectionKey key = keyIterator.next();
        // 判断不同的事件类型,执行对应的逻辑处理
        // key.isAcceptable() / key.isConnectable() / key.isReadable() / key.isWritable()}
        keyIterator.remove();
    }
}
:更底层是操作系统的多路复用机制)
java
Selector selector = Selector.open();
channel.configureBlocking(false);
SelectionKey key = channel.register(selector, SelectionKey.OP_READ); //注册感兴趣的事件
while(true) { // 由accept轮询,变成了事件通知的方式。
    int readyChannels = selector.select(); // select 收到新的事件,方法才会返回
    if(readyChannels == 0) continue;
    Set<SelectionKey> selectedKeys = selector.selectedKeys();
    Iterator<SelectionKey> keyIterator = selectedKeys.iterator();
    while(keyIterator.hasNext()) {
        SelectionKey key = keyIterator.next();
        // 判断不同的事件类型,执行对应的逻辑处理
        // key.isAcceptable() / key.isConnectable() / key.isReadable() / key.isWritable()}
        keyIterator.remove();
    }
}