第三部分:结构型模式 - 桥接模式 (Bridge Pattern)
在学习了适配器模式如何解决接口不兼容问题后,我们来看看桥接模式。桥接模式是一种更侧重于系统设计的模式,它旨在将抽象部分与其实现部分分离,使它们可以独立地变化。
- 核心思想:将抽象部分与它的实现部分分离,使它们都可以独立地变化。
桥接模式 (Bridge Pattern)
"将抽象部分与它的实现部分分离,使它们都可以独立地变化。" (Decouple an abstraction from its implementation so that the two can vary independently.)
想象一下,你正在开发一个跨平台的图形绘制程序。你有不同的形状(如圆形、矩形、三角形),这些形状需要在不同的操作系统上绘制(如Windows、Linux、macOS)。
- 抽象部分 (Abstraction) :形状(Circle, Rectangle)。它们有
draw()这样的抽象操作。 - 实现部分 (Implementation):绘制API(WindowsAPI, LinuxAPI, MacOSAPI)。它们负责实际在特定平台上绘制像素点、线条等。
如果直接让每个形状去适配每个平台的API,比如 WindowsCircle, LinuxCircle, MacCircle, WindowsRectangle... 这样会导致类的数量急剧膨胀(形状数量 x 平台数量),并且每当增加一种新形状或支持一个新平台时,都需要创建大量新类,维护困难。
桥接模式通过引入一个"桥梁"来连接抽象部分和实现部分,使得它们可以各自独立地演化。
1. 目的 (Intent)
桥接模式的主要目的:
- 解耦抽象和实现:这是核心目的。将一个对象的抽象(它能做什么)与其具体实现(它如何做)分离开来。
- 独立变化:使得抽象部分和实现部分可以沿着各自的维度独立地扩展和修改,而不会相互影响。
- 提高可扩展性:当需要增加新的抽象或新的实现时,可以更容易地进行,而不需要修改已有的代码或产生大量的子类。
2. 生活中的例子 (Real-world Analogy)
-
遥控器与电视机:
- 抽象部分 (Abstraction) :遥控器(
RemoteControl)。它有turnOn(),turnOff(),changeChannel()等操作。 - 具体抽象 (RefinedAbstraction) :不同品牌的遥控器,比如
SonyRemoteControl,SamsungRemoteControl。它们可能有一些特定的按钮或功能,但都基于通用的遥控操作。 - 实现部分 (Implementor) :电视机设备接口(
TV)。它定义了电视机实际执行操作的接口,如powerOn(),powerOff(),tuneChannel()。 - 具体实现 (ConcreteImplementor) :不同品牌的电视机,比如
SonyTV,SamsungTV。它们各自实现了TV接口。
遥控器(抽象)通过一个"桥梁"(持有TV接口的引用)来控制电视机(实现)。你可以用一个通用的索尼遥控器去控制不同型号的索尼电视,也可以为新的电视品牌设计新的电视实现,而遥控器的设计基本不变。
- 抽象部分 (Abstraction) :遥控器(
-
开关与电器:
- 抽象部分 :开关(
Switch)。它有on()和off()方法。 - 具体抽象 :不同类型的开关,如墙壁开关(
WallSwitch)、遥控开关(RemoteSwitch)。 - 实现部分 :电器接口(
Appliance)。它定义了电器被操作的接口,如turnOnAppliance(),turnOffAppliance()。 - 具体实现 :不同类型的电器,如灯(
Light)、风扇(Fan)。
开关通过桥梁控制电器。一个墙壁开关可以控制灯,也可以控制风扇。如果增加一种新的电器(如空调),只需要实现Appliance接口,现有的开关类型仍然可用。
- 抽象部分 :开关(
-
不同类型的画笔和颜色:
- 抽象部分 :画笔(
Pen)。它有drawShape()方法。 - 具体抽象 :毛笔(
BrushPen)、蜡笔(CrayonPen)。 - 实现部分 :颜色接口(
Color)。它定义了applyColor()方法。 - 具体实现 :红色(
RedColor)、蓝色(BlueColor)。
画笔(抽象)使用颜色(实现)来绘制。你可以用毛笔蘸红色画,也可以用毛BIC笔蘸蓝色画。增加新的画笔类型或新的颜色都相对独立。
- 抽象部分 :画笔(
3. 结构 (Structure)
桥接模式通常包含以下角色:
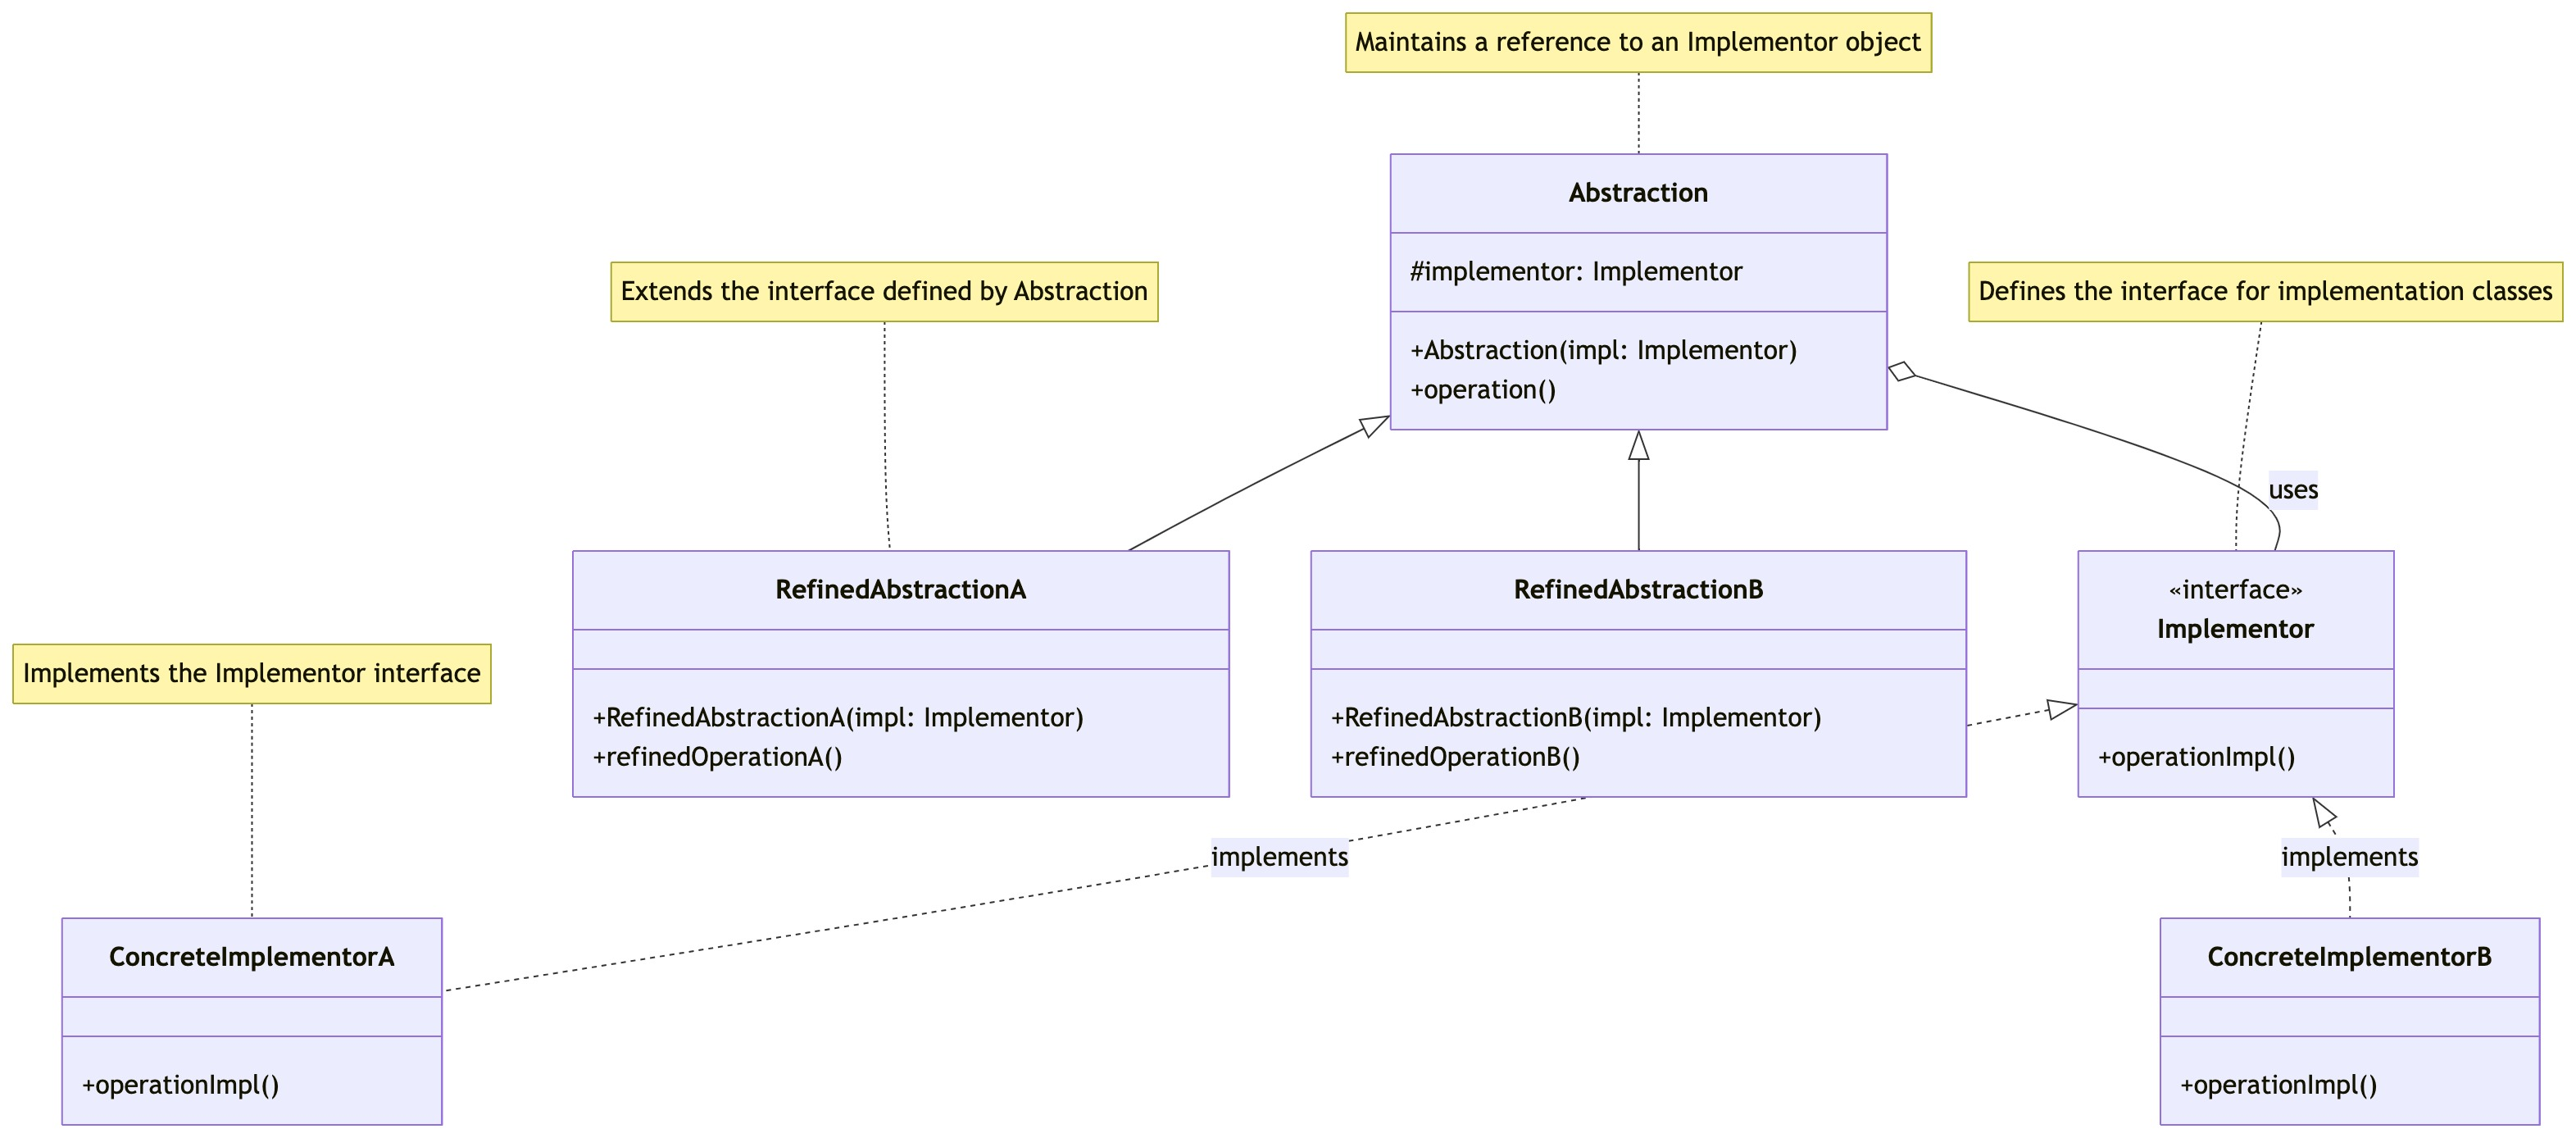
- Abstraction (抽象类):定义抽象类的接口,并维护一个指向 Implementor 类型对象的指针或引用。
- RefinedAbstraction (扩充抽象类/精确抽象):扩展 Abstraction 定义的接口,实现更具体的操作。这些操作通常会调用 Implementor 的方法。
- Implementor (实现类接口):定义实现类的接口,该接口不一定要与 Abstraction 的接口完全一致。Implementor 接口仅提供基本操作,而 Abstraction 则定义了基于这些基本操作的较高层次的操作。
- ConcreteImplementor (具体实现类) :实现 Implementor 接口并给出具体实现。
工作流程:
- 客户端创建一个
ConcreteImplementor对象和一个RefinedAbstraction对象。 RefinedAbstraction对象在构造时会持有一个ConcreteImplementor对象的引用(通过Implementor接口)。- 当客户端调用
RefinedAbstraction的操作时,这些操作会委托给其持有的Implementor对象去执行实际的底层操作。
4. 适用场景 (When to Use)
- 当你不希望在抽象和它的实现部分之间有一个固定的绑定关系时。例如,当需要在运行时选择或切换实现部分。
- 当类的抽象以及它的实现都应该可以通过生成子类的方法加以扩充时。这时桥接模式使你可以对不同的抽象接口和实现部分进行组合,并分别对它们进行扩充。
- 当对一个抽象的实现部分的修改应对客户不产生影响,即客户的代码不必重新编译。
- 当一个类存在两个或多个独立变化的维度,并且你希望避免使用继承导致子类数量爆炸式增长时。这是桥接模式最典型的应用场景。
- 你想在几个独立扩展的维度上共享一个实现。例如,多个GUI窗口(抽象)可能共享同一个底层的绘图API(实现)。
5. 优缺点 (Pros and Cons)
优点:
- 分离抽象和实现:使得抽象和实现可以独立地变化和演化,降低了耦合度。
- 提高可扩展性 :可以独立地扩展抽象部分和实现部分,而不会相互影响。例如,增加一个新的
RefinedAbstraction或一个新的ConcreteImplementor都很方便。 - 符合开闭原则:对扩展开放,对修改关闭。增加新的抽象或实现通常不需要修改现有代码。
- 客户端代码更稳定:客户端依赖于抽象接口,实现细节的改变对客户端透明。
缺点:
- 增加了系统的理解和设计难度:引入了额外的抽象层和间接性,可能会使系统更难理解。
- 可能导致类的数量增加:虽然避免了笛卡尔积式的类爆炸,但仍然需要创建抽象、具体抽象、实现接口、具体实现等多个类。
6. 实现方式 (Implementations)
让我们通过一个"消息发送"的例子来说明桥接模式。我们有不同类型的消息(如文本消息、图片消息),这些消息需要通过不同的方式发送(如邮件、短信、App推送)。
实现类接口 (MessageSender - Implementor)
go
// message_sender.go (Implementor)
package messaging

// MessageSender 实现类接口
type MessageSender interface {
	Send(messageContent string, recipient string) error
}
java
// MessageSender.java (Implementor)
package com.example.messaging.sender;

// 实现类接口
public interface MessageSender {
    void sendMessage(String messageContent, String recipient);
}
具体实现类 (EmailSender, SMSSender - ConcreteImplementor)
go
// email_sender.go (ConcreteImplementor)
package messaging

import "fmt"

// EmailSender 具体实现类
type EmailSender struct{}

func (s *EmailSender) Send(messageContent string, recipient string) error {
	fmt.Printf("Sending EMAIL to %s: %s\n", recipient, messageContent)
	// 实际的邮件发送逻辑
	return nil
}

// sms_sender.go (ConcreteImplementor)
package messaging

import "fmt"

// SMSSender 具体实现类
type SMSSender struct{}

func (s *SMSSender) Send(messageContent string, recipient string) error {
	fmt.Printf("Sending SMS to %s: %s\n", recipient, messageContent)
	// 实际的短信发送逻辑
	return nil
}
java
// EmailSender.java (ConcreteImplementor)
package com.example.messaging.sender;

public class EmailSender implements MessageSender {
    @Override
    public void sendMessage(String messageContent, String recipient) {
        System.out.printf("Sending EMAIL to %s: %s%n", recipient, messageContent);
        // 实际的邮件发送逻辑
    }
}

// SMSSender.java (ConcreteImplementor)
package com.example.messaging.sender;

public class SMSSender implements MessageSender {
    @Override
    public void sendMessage(String messageContent, String recipient) {
        System.out.printf("Sending SMS to %s: %s%n", recipient, messageContent);
        // 实际的短信发送逻辑
    }
}
抽象类 (Notification - Abstraction)
go
// notification.go (Abstraction)
package messaging

// Notification 抽象类
type Notification struct {
	sender MessageSender // 持有实现部分的引用
}

func NewNotification(sender MessageSender) *Notification {
	return &Notification{sender: sender}
}

// SetSender 允许动态改变发送方式
func (n *Notification) SetSender(sender MessageSender) {
    n.sender = sender
}

// Notify 抽象方法,由子类实现具体的消息格式化和发送调用
// 注意:在Go中,通常通过接口组合或嵌入来实现类似抽象类的效果,
// 或者让具体通知类型直接持有sender并实现一个通用接口。
// 这里为了更贴合经典UML结构,我们让具体通知类型持有sender。
// 或者,我们可以定义一个 Notify 方法,它接收格式化后的消息。
func (n *Notification) SendNotification(formattedMessage string, recipient string) error {
    if n.sender == nil {
        return fmt.Errorf("sender not set")
    }
	return n.sender.Send(formattedMessage, recipient)
}
java
// Notification.java (Abstraction)
package com.example.messaging.notification;

import com.example.messaging.sender.MessageSender;

// 抽象类
public abstract class Notification {
    protected MessageSender sender; // 持有实现部分的引用

    public Notification(MessageSender sender) {
        System.out.println("Notification: Initialized with sender: " + sender.getClass().getSimpleName());
        this.sender = sender;
    }

    // 允许动态改变发送方式
    public void setSender(MessageSender sender) {
        System.out.println("Notification: Sender changed to: " + sender.getClass().getSimpleName());
        this.sender = sender;
    }

    // 抽象方法,由子类实现具体的消息格式化和发送调用
    public abstract void notifyUser(String message, String recipient);
}
扩充抽象类 (TextMessage, ImageMessage - RefinedAbstraction)
go
// text_message.go (RefinedAbstraction)
package messaging

import "fmt"

// TextNotification 精确抽象
type TextNotification struct {
	Notification // 嵌入 Notification,继承其字段和方法
}

func NewTextNotification(sender MessageSender) *TextNotification {
	return &TextNotification{
		Notification: *NewNotification(sender),
	}
}

func (tn *TextNotification) Send(text string, recipient string) error {
	formattedMessage := fmt.Sprintf("[Text]: %s", text)
	fmt.Printf("TextNotification: Formatting message for %s\n", recipient)
	return tn.SendNotification(formattedMessage, recipient) // 调用父类(嵌入结构)的方法
}

// image_message.go (RefinedAbstraction)
package messaging

import "fmt"

// ImageNotification 精确抽象
type ImageNotification struct {
	Notification
}

func NewImageNotification(sender MessageSender) *ImageNotification {
	return &ImageNotification{
		Notification: *NewNotification(sender),
	}
}

func (in *ImageNotification) Send(imageURL string, caption string, recipient string) error {
	formattedMessage := fmt.Sprintf("[Image]: URL=%s, Caption='%s'", imageURL, caption)
	fmt.Printf("ImageNotification: Formatting message for %s\n", recipient)
	return in.SendNotification(formattedMessage, recipient)
}
java
// TextNotification.java (RefinedAbstraction)
package com.example.messaging.notification;

import com.example.messaging.sender.MessageSender;

public class TextNotification extends Notification {
    public TextNotification(MessageSender sender) {
        super(sender);
        System.out.println("TextNotification: Created.");
    }

    @Override
    public void notifyUser(String message, String recipient) {
        String formattedMessage = "[Text]: " + message;
        System.out.println("TextNotification: Formatting message for " + recipient);
        sender.sendMessage(formattedMessage, recipient); // 调用实现部分的方法
    }
}

// ImageNotification.java (RefinedAbstraction)
package com.example.messaging.notification;

import com.example.messaging.sender.MessageSender;

public class ImageNotification extends Notification {
    private String imageURL;

    public ImageNotification(MessageSender sender, String imageURL) {
        super(sender);
        this.imageURL = imageURL;
        System.out.println("ImageNotification: Created with URL: " + imageURL);
    }

    @Override
    public void notifyUser(String caption, String recipient) {
        String formattedMessage = String.format("[Image]: URL=%s, Caption='%s'", this.imageURL, caption);
        System.out.println("ImageNotification: Formatting message for " + recipient);
        sender.sendMessage(formattedMessage, recipient);
    }
}
客户端使用
go
// main.go (示例用法)
/*
package main

import (
	"./messaging"
	"fmt"
)

func main() {
	// 创建实现部分的对象
	emailSender := &messaging.EmailSender{}
	smsSender := &messaging.SMSSender{}

	// 1. 发送文本消息通过邮件
	fmt.Println("--- Sending Text via Email ---")
	textMail := messaging.NewTextNotification(emailSender)
	err := textMail.Send("Hello from Go Bridge Pattern!", "user1@example.com")
	if err != nil {
		fmt.Println("Error:", err)
	}

	fmt.Println("\n--- Sending Image via SMS ---")
	// 2. 发送图片消息通过短信
	imageSMS := messaging.NewImageNotification(smsSender)
	err = imageSMS.Send("http://example.com/image.jpg", "Check out this cool pic!", "+1234567890")
	if err != nil {
		fmt.Println("Error:", err)
	}

	fmt.Println("\n--- Sending Text via SMS (changing sender for existing notification object) ---")
	// 3. 同一个文本消息对象,改变发送方式为短信
	textMail.SetSender(smsSender) // 动态改变实现部分
	err = textMail.Send("This is a test text message via SMS now!", "+0987654321")
	if err != nil {
		fmt.Println("Error:", err)
	}

    // 4. 增加新的发送方式 (e.g., AppPushSender)
    //    只需要创建 AppPushSender struct 实现 MessageSender 接口
    //    appPushSender := &messaging.AppPushSender{}
    //    textPush := messaging.NewTextNotification(appPushSender)
    //    textPush.Send("Push notification content", "userID123")

    // 5. 增加新的消息类型 (e.g., VideoNotification)
    //    只需要创建 VideoNotification struct 嵌入 Notification
    //    并实现其特定的 Send 方法 (如 Send(videoURL, title, recipient))
    //    videoMail := messaging.NewVideoNotification(emailSender)
    //    videoMail.Send("http://example.com/video.mp4", "My new video", "friend@example.com")
}
*/
java
// Main.java (示例用法)
/*
package com.example;

import com.example.messaging.notification.ImageNotification;
import com.example.messaging.notification.Notification;
import com.example.messaging.notification.TextNotification;
import com.example.messaging.sender.EmailSender;
import com.example.messaging.sender.MessageSender;
import com.example.messaging.sender.SMSSender;
// import com.example.messaging.sender.AppPushSender; // 假设新增了App推送

public class Main {
    public static void main(String[] args) {
        // 创建实现部分的对象
        MessageSender emailSender = new EmailSender();
        MessageSender smsSender = new SMSSender();
        // MessageSender appPushSender = new AppPushSender(); // 新增的发送方式

        System.out.println("--- Sending Text via Email ---");
        // 1. 发送文本消息通过邮件
        Notification textMail = new TextNotification(emailSender);
        textMail.notifyUser("Hello from Java Bridge Pattern!", "user1@example.com");

        System.out.println("\n--- Sending Image via SMS ---");
        // 2. 发送图片消息通过短信
        Notification imageSMS = new ImageNotification(smsSender, "http://example.com/image.jpg");
        imageSMS.notifyUser("Check out this cool pic!", "+1234567890");

        System.out.println("\n--- Sending Text via SMS (changing sender for existing notification object) ---");
        // 3. 同一个文本消息对象,改变发送方式为短信
        textMail.setSender(smsSender); // 动态改变实现部分
        textMail.notifyUser("This is a test text message via SMS now!", "+0987654321");

        // System.out.println("\n--- Sending Text via App Push ---");
        // 4. 使用新的发送方式 (如果 AppPushSender 已添加)
        // Notification textPush = new TextNotification(appPushSender);
        // textPush.notifyUser("This is an App Push notification!", "userID789");

        // 5. 增加新的消息类型 (e.g., VideoNotification)
        //    只需要创建 VideoNotification class 继承 Notification
        //    并实现其特定的 notifyUser 方法
        //    Notification videoEmail = new VideoNotification(emailSender, "http://example.com/video.mp4");
        //    videoEmail.notifyUser("My new video", "friend@example.com");
    }
}
*/
7. 与适配器模式的区别
桥接模式和适配器模式都用于处理不同类之间的协作,但它们的意图和结构不同:
-
意图 (Intent):
- 适配器模式:改变一个已有类的接口,使其适配另一个接口。通常是解决两个不兼容接口的问题,属于"事后补救"。
- 桥接模式:将抽象和实现分离,使它们可以独立变化。通常是在设计阶段就考虑分离多个变化维度,属于"事前设计"。
-
结构 (Structure):
- 适配器模式通常涉及三个角色:目标接口、适配器、被适配者。
- 桥接模式通常涉及四个角色:抽象、精确抽象、实现者接口、具体实现者。
-
解决的问题:
- 适配器解决的是"如何让两个不兼容的接口协同工作"。
- 桥接解决的是"如何避免因多个独立变化的维度导致类的数量爆炸,并使这些维度能独立演化"。
简单来说,适配器是让"旧的"能"用起来",桥接是让"新的"能"灵活组合和扩展"。
8. 总结
桥接模式是一种强大的结构型模式,它通过将抽象和实现分离到不同的类层次结构中,使得它们可以独立地进行扩展和修改。这对于处理具有多个变化维度的系统非常有用,可以有效地控制类的数量,提高系统的灵活性和可维护性。
记住它的核心:分离抽象与实现,独立变化。