How to set up SSH, Git and Copilot Extensions in Visual Studio Code
- [1- Prerequisites](#1- Prerequisites)
- [2- Installation, configuration and connection of Remote-SSH Extension in Visual Studio Code](#2- Installation, configuration and connection of Remote-SSH Extension in Visual Studio Code)
-
- [2.1 Install Remote-SSH Extension](#2.1 Install Remote-SSH Extension)
- [2.2 Configure SSH connection](#2.2 Configure SSH connection)
- [2.3 Connect to Remote Host](#2.3 Connect to Remote Host)
- [3- Installation, configuration and use of Git Extension in Visual Studio Code](#3- Installation, configuration and use of Git Extension in Visual Studio Code)
-
- [3.1 Install Git](#3.1 Install Git)
- [3.2 Configure Git in VS Code](#3.2 Configure Git in VS Code)
- [3.3 Use basic Git](#3.3 Use basic Git)
- [4- Installation and use of the GitHub Copilot Extension in Visual Studio Code](#4- Installation and use of the GitHub Copilot Extension in Visual Studio Code)
-
- [4.1 Install GitHub Copilot Extension](#4.1 Install GitHub Copilot Extension)
- [4.2 Use GitHub Copilot Extension](#4.2 Use GitHub Copilot Extension)
- [4.3The problem encountered and its solution:](#4.3The problem encountered and its solution:)
1- Prerequisites
-
1.1 Ensure VS Code installed (VS Official Website)
- For now, please don't install the latest version1.100.x , choose 1.98.2 or below
- Recommended VSCodeUserSetup-x64-1.98.2.exe
-
1.2 Active internet connection required
-
1.3 GitHub Copilot account
2- Installation, configuration and connection of Remote-SSH Extension in Visual Studio Code
2.1 Install Remote-SSH Extension
1. Open Visual Studio Code Extensions Marketplace
- Use the Ctrl+Shift+X shortcut key or click 'Extensions' on the left side
2. Search and install Extension
- Due to some issues with the latest version (0.120.0), it is advisable to avoid using it until these are resolved
- If you are currently in the process of installing the latest version (0.120.0) of Remote-SSH, you will need to uninstall it and install an earlier version (i.e. 0.119.0).
- Then type Remote-SSH in the search box and click Install
3. Verify installation
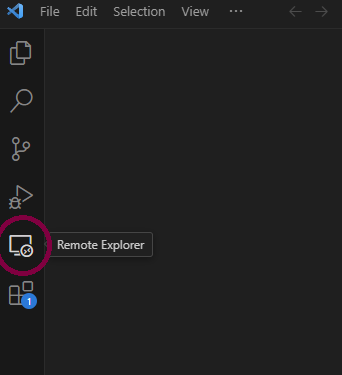
- When the 'Remote Explorer' icon appears in the left activity bar, the extension has been successfully installed
2.2 Configure SSH connection
1. Generate SSH key(If needed)
-
The command is:
ssh-keygen
2. Add public key to remote host(optional)
- If you want to log into the machine remotely without entering a password, do this step
- Manually copy the contents of ~/.ssh/id_rsa.pub to the remote machine ~/.ssh/authorized_keys
- Please note that this is an addition, not an overwrite
3. Add host in VS Code
-
- Click 'Remote Explorer' in the leftmost column of VSCode
-
- The following picture appears, click '+' (New Remote) on the right side of SSH to add a new SSH Host
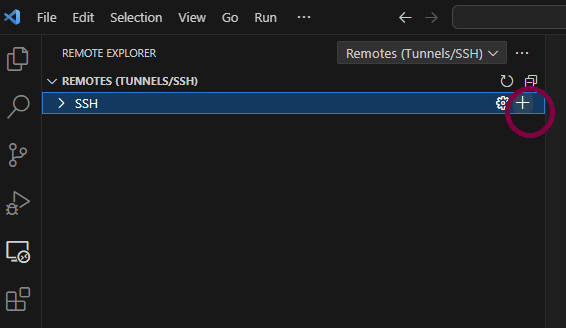
- The following picture appears, click '+' (New Remote) on the right side of SSH to add a new SSH Host
-
-
Enter the connect command

- Input command format:
ssh username@remote_host_ip
-
-
- Next select the config file save path (The first one is selected by default , ~/.ssh/config)
-
- When you see 'Host added' in the lower right corner of the VSCode, it means that the Host has been added successfully

- When you see 'Host added' in the lower right corner of the VSCode, it means that the Host has been added successfully
2.3 Connect to Remote Host
1. Initiate connection
- Click 'Refresh' to the right of REMOTES(TUNNELS/SSH)
- The machine name you just configured will appear under SSH
- Click on the target host and select 'Connect to Host in New Window'
2. Check connection status
- When the lower left corner of the screen appears 'SSH:remote_host_ip' , indicates that the remote connection to the machine was successful
3. Open remote project
- Click File→Open Folder and select the remote directory
3- Installation, configuration and use of Git Extension in Visual Studio Code
3.1 Install Git
1. Download and install Git
- Windows: Visit the Git official website to download the installer
2. Verify installation
-
The command:
git --version
-
The version number is displayed after a successful installation
3.2 Configure Git in VS Code
1. Install Git Extension
- VS Code has built-in Git support, so there is no need to install any additional extensions
- For enhancements, search for 'GitLens' . Use the Ctrl+Shift+X shortcut key or click Extensions on the left side of the VS Code
- Then type GitLens in the search box, click Install
2. Set Git user info and check
Set Info
    git config --global user.name "your name"
    git config --global user.email "your.email@example.com"
Check Configuration
git config --list3.3 Use basic Git
1. Clone a remote repository
-
Get the repository URL
-
Clone in VS Code
Open VS Code and press ' Ctrl+` '
Run command : git clone Repository URL
2. Open the cloned repository
- Load project
Click File→Open Folder and select the cloned repository directory - Verify repository status
Click ... -> Terminal-> New Terminal, Then type the git command in the termainal box below
4- Installation and use of the GitHub Copilot Extension in Visual Studio Code
4.1 Install GitHub Copilot Extension
1. Open Visual Studio Code Extensions Marketplace
-
- Use the Ctrl+Shift+X shortcut key or click Extensions on the left side
-
- Search and install Extension
- Then type GitHub Copilot in the search box, click Install
- The same way you can install the GitHub Copilot Chat Extention
- Search and install Extension
-
- Verify installation
- The GitHub Copilot Extension has been installed successfully when a small robot icon appears in the bottom right corner and we are prompted to log in to our GitHub accont
- The GitHub Copilot Chat Extension has been installed successfully when two intersecting text boxed appear in the left column
- Verify installation
-
- Sign in with your GitHub Copilot account
4.2 Use GitHub Copilot Extension
1. Assisted Programming
- As you write code, Copilot will automatically provide you with suggestions based on the context
- Press the Tab key to select the suggestion, or press Enter to accept it
2. Chat about specific lines of code - We can input any questions to GitHub Copilot Chat by click chat icon
4.3The problem encountered and its solution:
- The problem:
A locally installed GitHub Copilot is only available in your local instance of VS Code and will not be synchronised with the remote machine.
- The solution:
You also need to install GitHub Copilot on the remote machine.