如何在 Visual Studio Code 中配置SSH、Git 和 Copilot 插件
- [1- 先决条件](#1- 先决条件)
- [2- 在 Visual Studio Code 中安装、配置和连接 Remote-SSH 扩展](#2- 在 Visual Studio Code 中安装、配置和连接 Remote-SSH 扩展)
-
- [2.1 安装 Remote-SSH Extension](#2.1 安装 Remote-SSH Extension)
- [2.2 配置 SSH connection](#2.2 配置 SSH connection)
- [2.3 连接 Remote Host](#2.3 连接 Remote Host)
- [3- Installation, configuration and use of Git Extension in Visual Studio Code](#3- Installation, configuration and use of Git Extension in Visual Studio Code)
-
- [3.1 Install Git](#3.1 Install Git)
- [3.2 Configure Git in VS Code](#3.2 Configure Git in VS Code)
- [3.3 Use basic Git](#3.3 Use basic Git)
- [4- Installation and use of the GitHub Copilot Extension in Visual Studio Code](#4- Installation and use of the GitHub Copilot Extension in Visual Studio Code)
-
- [4.1 Install GitHub Copilot Extension](#4.1 Install GitHub Copilot Extension)
- [4.2 Use GitHub Copilot Extension](#4.2 Use GitHub Copilot Extension)
- [4.3The problem encountered and its solution:](#4.3The problem encountered and its solution:)
1- 先决条件
-
1.1 确保已安装 VS Code (VS 官方网站)
- 暂时请勿安装最新版本1.100.x,请选择 1.98.2 或以下版本
- 推荐 VSCodeUserSetup-x64-1.98.2.exe
-
1.2 需要激活的互联网连接
-
1.3 GitHub Copilot 账户
2- 在 Visual Studio Code 中安装、配置和连接 Remote-SSH 扩展
2.1 安装 Remote-SSH Extension
**1. 打开Visual Studio Code Extensions **
- 使用 Ctrl+Shift+X shortcut key 或者点击 左侧的 'Extensions'
2. 搜索并安装Extension
- 由于目前最新的版本 (0.120.0)有问题, 在还没有被解决以前最好避免去使用它
- 如果你现在安装了最新的Remote-SSH (0.120.0) , 你需要去uninstall 并且去安装早一个版本 (i.e. 0.119.0).
- 然后在搜索框输入 Remote-SSH 并且点击安装
3. 验证安装
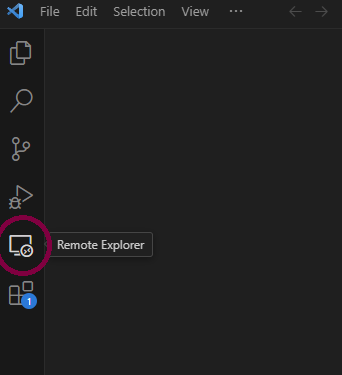
- 当Remote Explorer' 图标出现在左侧活动区, 说明该extension已经被安装成功了
2.2 配置 SSH connection
1. 生成SSH key(如果你目前还没有)
-
命令是:
ssh-keygen
2. 添加public key到 remote host(可选择的)
- 如果你想要登录远端机器时不输入密码,就需要手动做这一步
- 手动复制 ~/.ssh/id_rsa.pub内容到远端机器的 ~/.ssh/authorized_keys 文件中
- 请注意是追加,并不是覆盖文件
3. 在VS Code添加 host
-
- 点击VSCode左侧的'Remote Explorer'
-
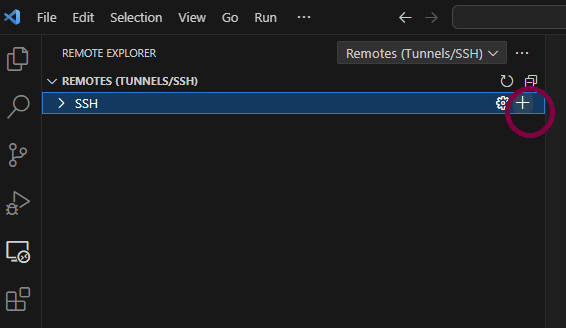
- 下面的图片会出现, 点击SSH右侧的 '+' (New Remote) 去添加一个新的SSH Host
- 下面的图片会出现, 点击SSH右侧的 '+' (New Remote) 去添加一个新的SSH Host
-
-
输入连接命令

- 输入命令的格式:
ssh username@remote_host_ip
-
-
- 接着选择 config file保存的位置 (第一行就是默认的位置, ~/.ssh/config)
-
- 当你看见VSCode右下角出现了 'Host added' ,说明host添加成功了

- 当你看见VSCode右下角出现了 'Host added' ,说明host添加成功了
2.3 连接 Remote Host
1. 初始化连接
- 点击REMOTES(TUNNELS/SSH)'右边的Refresh'
- 你配置的机器就会出现在SSH下方
- 点击目标主机并且选择 'Connect to Host in New Window'
2. 检查连接状态
- 当屏幕的左下角出现'SSH:remote_host_ip' , 说明远程连接机器成功
3. 打开remote project
- 点击 File→Open Folder 并且去选择远端机器的目录
3- Installation, configuration and use of Git Extension in Visual Studio Code
3.1 Install Git
1. Download and install Git
- Windows: Visit the Git official website to download the installer
2. Verify installation
-
The command:
git --version
-
The version number is displayed after a successful installation
3.2 Configure Git in VS Code
1. Install Git Extension
- VS Code has built-in Git support, so there is no need to install any additional extensions
- For enhancements, search for 'GitLens' . Use the Ctrl+Shift+X shortcut key or click Extensions on the left side of the VS Code
- Then type GitLens in the search box, click Install
2. Set Git user info and check
Set Info
    git config --global user.name "your name"
    git config --global user.email "your.email@example.com"
Check Configuration
git config --list3.3 Use basic Git
1. Clone a remote repository
-
Get the repository URL
-
Clone in VS Code
Open VS Code and press ' Ctrl+` '
Run command : git clone Repository URL
2. Open the cloned repository
- Load project
Click File→Open Folder and select the cloned repository directory - Verify repository status
Click ... -> Terminal-> New Terminal, Then type the git command in the termainal box below
4- Installation and use of the GitHub Copilot Extension in Visual Studio Code
4.1 Install GitHub Copilot Extension
1. Open Visual Studio Code Extensions Marketplace
-
- Use the Ctrl+Shift+X shortcut key or click Extensions on the left side
-
- Search and install Extension
- Then type GitHub Copilot in the search box, click Install
- The same way you can install the GitHub Copilot Chat Extention
- Search and install Extension
-
- Verify installation
- The GitHub Copilot Extension has been installed successfully when a small robot icon appears in the bottom right corner and we are prompted to log in to our GitHub accont
- The GitHub Copilot Chat Extension has been installed successfully when two intersecting text boxed appear in the left column
- Verify installation
-
- Sign in with your GitHub Copilot account
4.2 Use GitHub Copilot Extension
1. Assisted Programming
- As you write code, Copilot will automatically provide you with suggestions based on the context
- Press the Tab key to select the suggestion, or press Enter to accept it
2. Chat about specific lines of code - We can input any questions to GitHub Copilot Chat by click chat icon
4.3The problem encountered and its solution:
- The problem:
A locally installed GitHub Copilot is only available in your local instance of VS Code and will not be synchronised with the remote machine.
- The solution:
You also need to install GitHub Copilot on the remote machine.