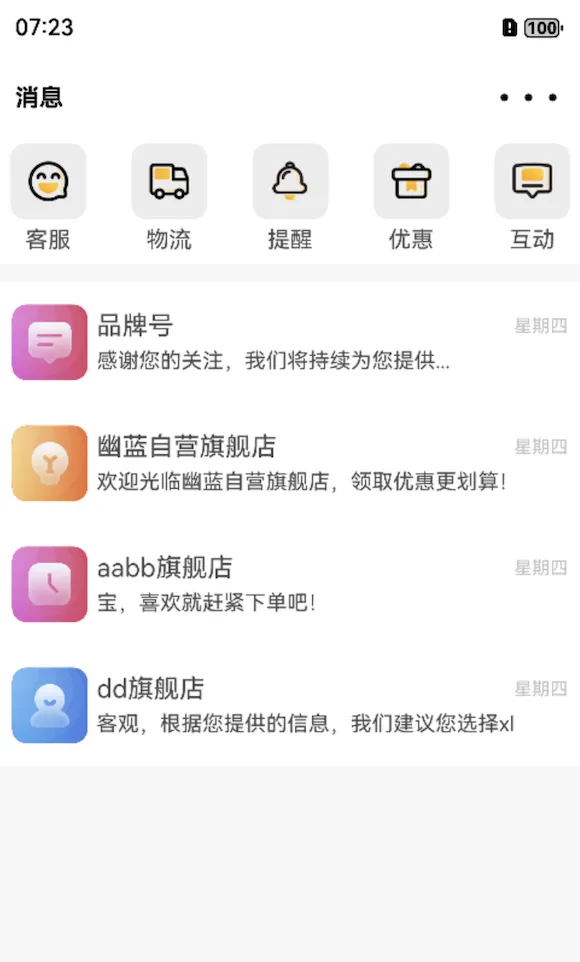
大家好,今天要分享的是仓颉语言开发商城应用实战教程的消息列表页面。

这个页面的导航栏和之前有所不同,不过难度并没有增加,只是标题移到了左边,我们使用两端对齐方式就能实现,导航栏部分的具体代码如下:
Row(8){
     Text('消息')
        .fontSize(16)
        .fontColor(Color.BLACK)
        .fontWeight(FontWeight.Bold)
       Text('•••')
        .fontSize(16)
        .fontColor(Color.BLACK)
        .fontWeight(FontWeight.Bold)
}
.width(100.percent)
.height(60.vp)
.alignItems(VerticalAlign.Center)
.justifyContent(FlexAlign.SpaceBetween)
.padding(left:12,right:12)
.backgroundColor(Color.WHITE)
紧邻导航栏下方的是消息筛选列表,因为列表里元素的样式相同,所以我们使用Foreach循环加载。实现这种列表首先需要的是数据,有了数据才能进行遍历。而在创建数据之前我们需要创建对应的结构体:
public class TypeItem{
    private let title: String;
    private let image: CJResource;
    public TypeItem(title:String, image:CJResource){
        this.title = title
        this.image = image
    }
    public func getTitle():String{
        return this.title
    }
     public func getImage():CJResource{
        return this.image
    }
}
然后创建上方结构体类型的数组:
@State var topList:ArrayList<TypeItem> = ArrayList<TypeItem>(
    TypeItem('客服',@r(app.media.kefu)),
     TypeItem('物流',@r(app.media.wuliu)),
     TypeItem('提醒',@r(app.media.tixing)),
     TypeItem('优惠',@r(app.media.youhui)),
     TypeItem('互动',@r(app.media.hudong))
)
有了数组我们就可以遍历了,仓颉中循环渲染的组件我们目前使用的是Foreach,这里再把Foreach跟大家详细介绍一下,Foreach一共有三个参数,第一个是dataSource,也就是数据源,第二个叫itemGeneratorFunc,是生成子组件的地方,第三个参数叫keyGeneratorFunc,是生成子组件ID的地方,第三个参数不太常用。所以我们循环加载消息类型列表的具体代码是这样的:
Scroll{
    Row(30){
        ForEach(topList, itemGeneratorFunc: {item:TypeItem,index:Int64 =>
                    Column(5){
                    Row{
                        Image(item.getImage())
                        .width(26)
                        .height(26)
                        .objectFit(ImageFit.Contain)
                    }
                    .width(50)
                    .height(50)
                    .backgroundColor(Color(236,236,236))
                    .borderRadius(10)
                    .alignItems(VerticalAlign.Center)
                    .justifyContent(FlexAlign.Center)
                    Text(item.getTitle())
                    .fontColor(0x4a4a4a)
                    .fontSize(15)
                }
               .alignItems(HorizontalAlign.Center)
               .justifyContent(FlexAlign.Center)
                })
    }
}
.width(100.percent)
.backgroundColor(Color.WHITE)
.padding(bottom:7)
最后是消息列表,它和上方的类型列表大同小异,结构体多了字段,Scroll组件换成了List,不再赘述,直接贴代码:
List{
    ForEach(msgList, itemGeneratorFunc: {item:MessageItem,index:Int64 =>
                ListItem{
                Row(6){
                    Image(item.getImage())
                    .width(50)
                    .height(50)
                    .borderRadius(10)
                    .backgroundColor(Color.RED)
                    Column(5){
                        Row{
                            Text(item.getTitle())
                            .fontColor(0x4a4a4a)
                            .fontSize(17)
                            Text('星期四')
                            .fontSize(12)
                            .fontColor(Color.GRAY)
                        }
                        .alignItems(VerticalAlign.Center)
                        .justifyContent(FlexAlign.SpaceBetween)
                        .width(100.percent)
                        Text(item.getContent())
                        .fontColor(0x4a4a4a)
                        .fontSize(14)
                    }
                    .alignItems(HorizontalAlign.Start)
                    .layoutWeight(1)
                }
                .width(100.percent)
                .height(80)
                .alignItems(VerticalAlign.Center)
                .justifyContent(FlexAlign.Start)
                .padding(left:10,right:10)
            }
            })
}
.margin(top:12)
.backgroundColor(Color.WHITE)
今天的内容就是这样,感谢阅读。##HarmonyOS语言##仓颉##购物#