传送门
分布式定时任务系列5:XXL-job中blockingQueue的应用
分布式定时任务系列6:XXL-job触发日志过大引发的CPU告警
第一个问题:XXL-job是如何做到定时触发的?
不知道大家在看XXL-job源码的过程中,有没有像我一样产生过一个疑惑:那就是XXL-job到底是怎样做到让任务按时触发的呢,或者说让任务定时定点如此"听话"?
比如说一个邮件提醒功能,每天晚上20:00点给相关的值班人员发邮件,它到时间(晚上20:00)一定会触发吗,会不会漏?会不会判断不准,超过时间21:00才触发?
触发整体时序图
在分布式定时任务系列7:XXL-job源码分析之任务触发节中,从整体上梳理过任务触发的调用逻辑,通过一个时序图来展现: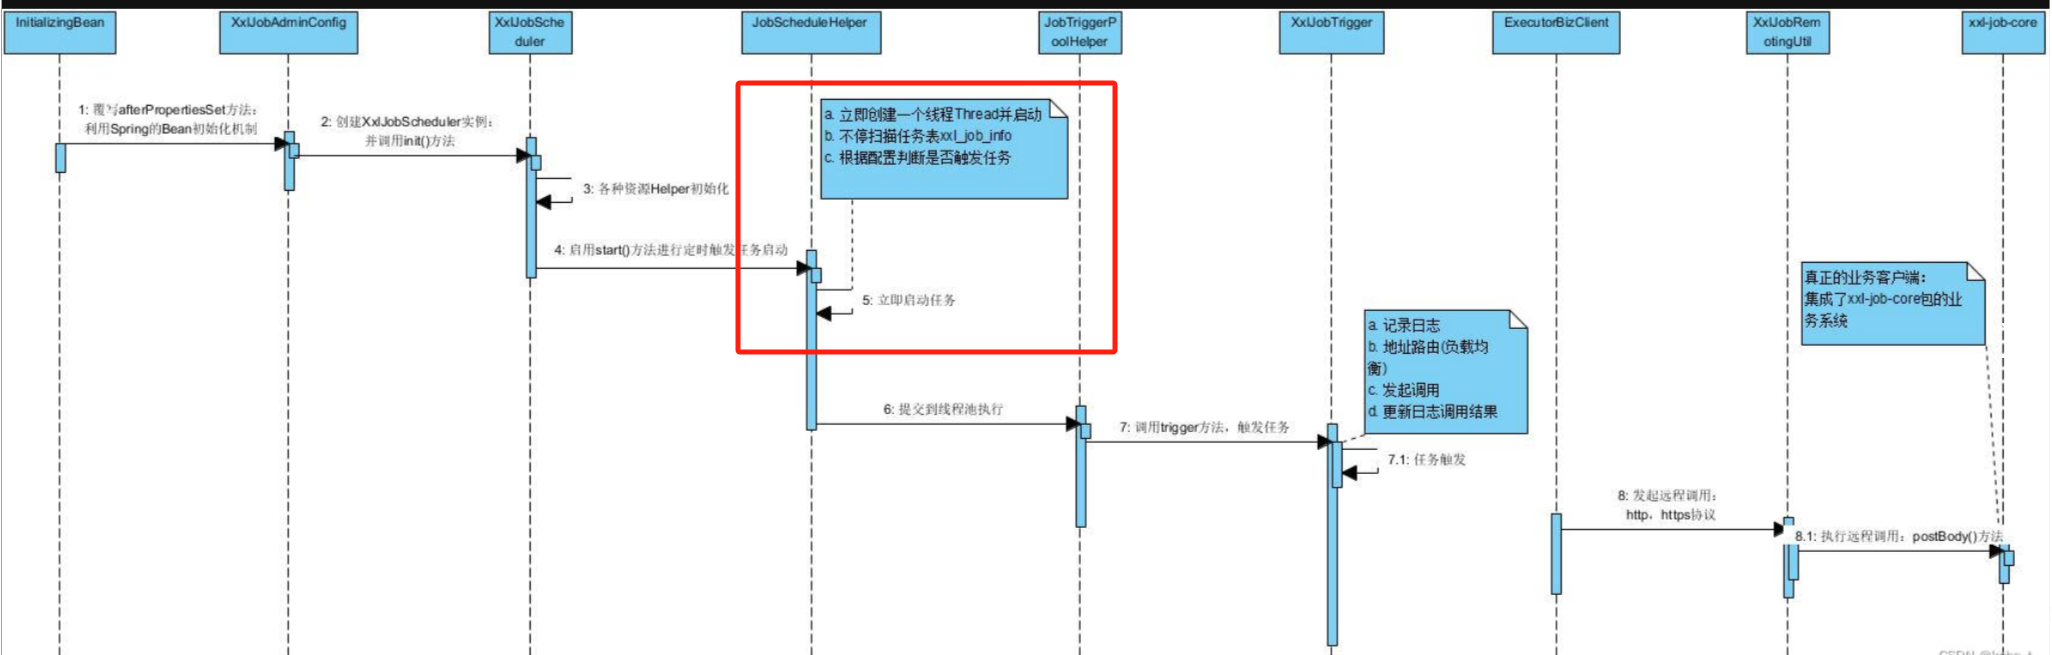
上面图中圈起来的地方:
- 立即创建一个线程Thread并启动
- 不停扫描任务表xxl_job_info
- 根据配置判断是否触发任务
对应的代码如下,我把核心的地方贴出来了:
java
{

        // 立即创建一个线程
        scheduleThread = new Thread(new Runnable() {
            @Override
            public void run() {

                try {
                    TimeUnit.MILLISECONDS.sleep(5000 - System.currentTimeMillis()%1000 );
                } catch (InterruptedException e) {
                    if (!scheduleThreadToStop) {
                        logger.error(e.getMessage(), e);
                    }
                }
                logger.info(">>>>>>>>> init xxl-job admin scheduler success.");

                // pre-read count: treadpool-size * trigger-qps (each trigger cost 50ms, qps = 1000/50 = 20)
                int preReadCount = (XxlJobAdminConfig.getAdminConfig().getTriggerPoolFastMax() + XxlJobAdminConfig.getAdminConfig().getTriggerPoolSlowMax()) * 20;

                // 不停扫描任务表xxl_job_info,相当于线程的自旋
                while (!scheduleThreadToStop) {

                    // Scan Job
                    long start = System.currentTimeMillis();

                    Connection conn = null;
                    Boolean connAutoCommit = null;
                    PreparedStatement preparedStatement = null;

                    boolean preReadSuc = true;
                    try {
                        // JDBC操作数据库
                        conn = XxlJobAdminConfig.getAdminConfig().getDataSource().getConnection();
                        connAutoCommit = conn.getAutoCommit();
                        conn.setAutoCommit(false);

                        // 加上db悲观锁,防止并发执行
                        preparedStatement = conn.prepareStatement(  "select * from xxl_job_lock where lock_name = 'schedule_lock' for update" );
                        preparedStatement.execute();

                        // tx start

                        // 1、pre read
                        long nowTime = System.currentTimeMillis();
                        // 查询所有任务列表,一次最多6000个
                        List<XxlJobInfo> scheduleList = XxlJobAdminConfig.getAdminConfig().getXxlJobInfoDao().scheduleJobQuery(nowTime + PRE_READ_MS, preReadCount);
                        if (scheduleList!=null && scheduleList.size()>0) {
                            // 2、push time-ring
                            for (XxlJobInfo jobInfo: scheduleList) {

                                // time-ring jump
                                if (nowTime > jobInfo.getTriggerNextTime() + PRE_READ_MS) {
                                    // 2.1、trigger-expire > 5s:pass && make next-trigger-time
                                    logger.warn(">>>>>>>>>>> xxl-job, schedule misfire, jobId = " + jobInfo.getId());

                                    // 1、错过触发时间,根据策略决定,是否立即补尝执行一次
                                    MisfireStrategyEnum misfireStrategyEnum = MisfireStrategyEnum.match(jobInfo.getMisfireStrategy(), MisfireStrategyEnum.DO_NOTHING);
                                    if (MisfireStrategyEnum.FIRE_ONCE_NOW == misfireStrategyEnum) {
                                        // FIRE_ONCE_NOW 》 trigger
                                        JobTriggerPoolHelper.trigger(jobInfo.getId(), TriggerTypeEnum.MISFIRE, -1, null, null, null);
                                        logger.debug(">>>>>>>>>>> xxl-job, schedule push trigger : jobId = " + jobInfo.getId() );
                                    }

                                    // 2、更新下次执行相关时间参数
                                    refreshNextValidTime(jobInfo, new Date());

                                } else if (nowTime > jobInfo.getTriggerNextTime()) {
                                    // 2.2、trigger-expire < 5s:direct-trigger && make next-trigger-time

                                    // 1、触发任务
                                    JobTriggerPoolHelper.trigger(jobInfo.getId(), TriggerTypeEnum.CRON, -1, null, null, null);
                                    logger.debug(">>>>>>>>>>> xxl-job, schedule push trigger : jobId = " + jobInfo.getId() );

                                    // 2、更新下次执行相关时间参数
                                    refreshNextValidTime(jobInfo, new Date());

                                    // next-trigger-time in 5s, pre-read again
                                    if (jobInfo.getTriggerStatus()==1 && nowTime + PRE_READ_MS > jobInfo.getTriggerNextTime()) {

                                        // 1、make ring second
                                        int ringSecond = (int)((jobInfo.getTriggerNextTime()/1000)%60);

                                        // 2、push time ring
                                        pushTimeRing(ringSecond, jobInfo.getId());

                                        // 3、fresh next
                                        refreshNextValidTime(jobInfo, new Date(jobInfo.getTriggerNextTime()));

                                    }

                                } else {
                                    // 2.3、trigger-pre-read:time-ring trigger && make next-trigger-time

                                    // 1、make ring second
                                    int ringSecond = (int)((jobInfo.getTriggerNextTime()/1000)%60);

                                    // 2、push time ring
                                    pushTimeRing(ringSecond, jobInfo.getId());

                                    // 3、fresh next
                                    refreshNextValidTime(jobInfo, new Date(jobInfo.getTriggerNextTime()));

                                }

                            }

                            // 3、更新db表中,下次执行相关时间参数
                            for (XxlJobInfo jobInfo: scheduleList) {
                                XxlJobAdminConfig.getAdminConfig().getXxlJobInfoDao().scheduleUpdate(jobInfo);
                            }

                        } else {
                            preReadSuc = false;
                        }

                        // tx stop


                    } catch (Exception e) {
                        if (!scheduleThreadToStop) {
                            logger.error(">>>>>>>>>>> xxl-job, JobScheduleHelper#scheduleThread error:{}", e);
                        }
                    } finally {

                        // commit
                        if (conn != null) {
                            try {
                                conn.commit();
                            } catch (SQLException e) {
                                if (!scheduleThreadToStop) {
                                    logger.error(e.getMessage(), e);
                                }
                            }
                            try {
                                conn.setAutoCommit(connAutoCommit);
                            } catch (SQLException e) {
                                if (!scheduleThreadToStop) {
                                    logger.error(e.getMessage(), e);
                                }
                            }
                            try {
                                conn.close();
                            } catch (SQLException e) {
                                if (!scheduleThreadToStop) {
                                    logger.error(e.getMessage(), e);
                                }
                            }
                        }

                        // close PreparedStatement
                        if (null != preparedStatement) {
                            try {
                                preparedStatement.close();
                            } catch (SQLException e) {
                                if (!scheduleThreadToStop) {
                                    logger.error(e.getMessage(), e);
                                }
                            }
                        }
                    }
                    long cost = System.currentTimeMillis()-start;


                    // Wait seconds, align second
                    if (cost < 1000) {  // scan-overtime, not wait
                        try {
                            // pre-read period: success > scan each second; fail > skip this period;
                            TimeUnit.MILLISECONDS.sleep((preReadSuc?1000:PRE_READ_MS) - System.currentTimeMillis()%1000);
                        } catch (InterruptedException e) {
                            if (!scheduleThreadToStop) {
                                logger.error(e.getMessage(), e);
                            }
                        }
                    }

                }

                logger.info(">>>>>>>>>>> xxl-job, JobScheduleHelper#scheduleThread stop");
            }
        });
        // 线程启动
        scheduleThread.setDaemon(true);
        scheduleThread.setName("xxl-job, admin JobScheduleHelper#scheduleThread");
        scheduleThread.start();
    }
这个JobScheduleHelper逻辑有多个分支,但是里面核心是:立即创建一个线程(这里是单线程),在run()方法中通过一个while循环来触发任务。但是这个while关键的一点是:如果线程没有停止,就会一直执行下去:
java
// 不停扫描任务表xxl_job_info,相当于线程的自旋
                while (!scheduleThreadToStop) {
                    // 执行任务策略并触好,具体见上,这里略过...
}
我们都知道Java里面的线程有可能阻塞,或者由于CPU切换得不到时间片分配导致任务暂停,这些情况下任务不就触发不了么?所以XXL-job在run()方法里面写了类似死循环来尽量避免任务延迟触发,这一点其实在其它定时任务设计中(或框架)也是一种通用思路,所以这次会通过JDK自带的Timer工具类源码来印证、对比、扩展!
JDK-Timer类源码解析
JDK-Timer什么是
**JDK Timer**是Java开发工具包(JDK)中提供的一个定时器工具,用于在后台线程中安排将来执行的任务。它可以安排任务为一次性执行,或者以固定间隔重复执行。
Timer类自jdk1.3就引入,作者是大名鼎鼎的Josh Bloch(是google的首席JAVA架构师)。既然它开始工作的早,那么"退休"自然也早,现在一般不再推荐使用:
优点:
- 简单易用,适合简单的定时任务需求。
- 线程安全,多个线程可以共享一个Timer对象而无需外部同步。
缺点:
- 单一Timer对象共享一个线程,如果任务执行时间较长,会影响后续任务的执行。
- 不适合高并发或高性能要求的场景。
替代方案:
- ScheduledExecutorService :提供了更强大的功能,包括线程池支持、更灵活的任务调度等。例如,可以使用
scheduleAtFixedRate和scheduleWithFixedDelay方法来安排任务的固定频率执行。- Quartz Scheduler:一个更强大的调度框架,支持复杂的调度需求、持久化存储、集群等功能,适合企业级应用。
但是通过它可以看看任务调度的原理,以及学习一下大师的设计!
JDK-Timer的使用
Timer的API方法并不多,主要有以下几个:
| 变量和类型 | 方法 | 描述 |
|---|---|---|
void |
cancel() |
终止此计时器,丢弃当前计划的任何任务。 |
int |
purge() |
从此计时器的任务队列中删除所有已取消的任务。 |
void |
schedule(TimerTask task, long delay) |
在指定的延迟后安排指定的任务执行。 |
void |
schedule(TimerTask task, long delay, long period) |
在指定 的延迟 之后开始,为重复的 固定延迟执行安排指定的任务。 |
void |
schedule(TimerTasktask,Date time) |
计划在指定时间执行指定的任务。 |
void |
schedule(TimerTasktask,Date firstTime, long period) |
从指定时间开始,为重复的 固定延迟执行安排指定的任务。 |
void |
scheduleAtFixedRate(TimerTask task, long delay, long period) |
在指定的延迟之后开始,为重复的 固定速率执行安排指定的任务。 |
void |
scheduleAtFixedRate(TimerTasktask,Date firstTime, long period) |
从指定时间开始,为重复的 固定速率执行安排指定的任务。 |
下面通过几个测试方法来感受一下:
java
public class TimerTest {

    public static void main(String[] args) {
        // 通过new实例化一个timer实例
        Timer timer = new Timer();

        // 只触发一次的任务:延迟1s执行(如果为0,则表示立即执行)
        timer.schedule(new TimerTask() {
            @Override
            public void run() {
                System.out.println("========name1:" + Thread.currentThread().getName() + ", time:" + new Date());
            }
        }, 1000L);

        // 固定频率执行的任务:延迟1s执行,每2秒执行一次
        TimerTask timerTask2 = new TimerTask() {
            @Override
            public void run() {
                System.out.println("========name2:" + Thread.currentThread().getName() + ", time:" + new Date());
            }
        };
        timer.schedule(timerTask2, 1000L, 2000L);

        // 固定频率执行的任务:延迟1s执行,每3秒执行一次;并指定首次执行的时间
        Date fixedDate = getFixedDate();
        timer.schedule(new TimerTask() {
            @Override
            public void run() {
                System.out.println("========name3:" + Thread.currentThread().getName() + ", time:" + new Date());
            }
        }, fixedDate, 3000L);
    }

    public static Date getFixedDate() {
        String dateString = "2025-06-08 19:19:59";
        SimpleDateFormat sdf = new SimpleDateFormat("yyyy-MM-dd HH:mm:ss");

        try {
            Date specifiedDate = sdf.parse(dateString);
            System.out.println("Specified Date: " + specifiedDate);
            return specifiedDate;
        } catch (Exception e) {
            System.out.println("Error parsing date: " + e.getMessage());
        }
        return null;
    }

}
运行输出结果:
java
Specified Date: Sun Jun 08 21:53:59 CST 2025
// name1输出:在下面日志中可以看出只触发了一次,属于一次性任务
========name1:Timer-0, time:Sun Jun 08 21:53:48 CST 2025
// name2输出:在下面日志中可以每隔2s触发一次,属于固定频率任务
========name2:Timer-0, time:Sun Jun 08 21:53:48 CST 2025
========name2:Timer-0, time:Sun Jun 08 21:53:50 CST 2025
========name2:Timer-0, time:Sun Jun 08 21:53:52 CST 2025
========name2:Timer-0, time:Sun Jun 08 21:53:54 CST 2025
========name2:Timer-0, time:Sun Jun 08 21:53:56 CST 2025
========name2:Timer-0, time:Sun Jun 08 21:53:58 CST 2025
// name3输出:表示在指定的时间节点才触发了任务,,属于固定频率任务
========name3:Timer-0, time:Sun Jun 08 21:53:59 CST 2025
========name2:Timer-0, time:Sun Jun 08 21:54:00 CST 2025
========name3:Timer-0, time:Sun Jun 08 21:54:02 CST 2025
========name2:Timer-0, time:Sun Jun 08 21:54:02 CST 2025
========name2:Timer-0, time:Sun Jun 08 21:54:04 CST 2025
========name3:Timer-0, time:Sun Jun 08 21:54:05 CST 2025
除去上述几个API之外,还有scheduleAtFixedRate相关的几个方法,也是设置固定频率执行的操作,区别是:
- scheduleAtFixedRate更注重任务执行频率,如果任务由于其它原因被阻塞,当恢复时会尽力去补偿执行遗漏的
- schedule这种更注重任务执行时间,如果任务由于其它原因被阻塞,当恢复时不会去补偿执行遗漏的
可以通过如下例子来感受:
java
public static void main(String[] args) {
        // 通过new实例化一个timer实例
        Timer timer = new Timer();

        // 只触发一次的任务:延迟1s执行(如果为0,则表示立即执行)
        timer.schedule(new TimerTask() {
            @Override
            public void run() {
                System.out.println("========name1:" + Thread.currentThread().getName() + ", time:" + new Date());
                try {
                    // 模拟任务阻塞,线程睡眠6s
                    Thread.sleep(6000, TimeUnit.SECONDS.ordinal());
                } catch (InterruptedException e) {
                    throw new RuntimeException(e);
                }
            }
        }, 1000L);


        timer.scheduleAtFixedRate(new TimerTask() {
            @Override
            public void run() {
                System.out.println("========name4:" + Thread.currentThread().getName() + ", time:" + new Date());
            }
        }, 1000L, 2000L);
    }


// name1输出:在下面日志中可以看出只触发了一次,属于一次性任务
========name1:Timer-0, time:Sun Jun 08 22:31:18 CST 2025
// name4输出:在下面几个name4的连续输出中可以看到是同一时刻执行的,这就是由于任务1中线程阻塞了6s所以被补偿执行了
========name4:Timer-0, time:Sun Jun 08 22:31:24 CST 2025
========name4:Timer-0, time:Sun Jun 08 22:31:24 CST 2025
========name4:Timer-0, time:Sun Jun 08 22:31:24 CST 2025
========name4:Timer-0, time:Sun Jun 08 22:31:24 CST 2025
// name4输出:后面都是每隔2s的正常输出了
========name4:Timer-0, time:Sun Jun 08 22:31:26 CST 2025
========name4:Timer-0, time:Sun Jun 08 22:31:28 CST 2025
========name4:Timer-0, time:Sun Jun 08 22:31:30 CST 2025
JDK-Timer的源码
从构造方法看类结构
先看下Timer的创建:
java
// 通过new实例化一个timer实例
        Timer timer = new Timer();
跟进Timer的类的源码看看这个构造方法:
java
/**
     * Creates a new timer.  The associated thread does <i>not</i>
     * {@linkplain Thread#setDaemon run as a daemon}.
     */
    public Timer() {
        this("Timer-" + serialNumber());
    }

    /**
     * Creates a new timer whose associated thread has the specified name.
     * The associated thread does <i>not</i>
     * {@linkplain Thread#setDaemon run as a daemon}.
     *
     * @param name the name of the associated thread
     * @throws NullPointerException if {@code name} is null
     * @since 1.5
     */
    public Timer(String name) {
        thread.setName(name);
        thread.start();
    }
首先Timer()无参构造方法调用会继续调用Timer(String name)这个有参构造,传递一个线程的名称:名称为"Timer-"+序列号:
java
/**
     * This ID is used to generate thread names.
     */
    private final static AtomicInteger nextSerialNumber = new AtomicInteger(0);
    // 上面的原子类注释说明了,nextSerialNumber是生成一个线程名称
    private static int serialNumber() {
        return nextSerialNumber.getAndIncrement();
    }
那么这个线程到底是什么呢?
TimerThread-定时器线程
我们在前面说过Timer是单线程的,其实就是在这里绑定的,继续看下thread定义:
java
    /**
     * The timer task queue.  This data structure is shared with the timer
     * thread.  The timer produces tasks, via its various schedule calls,
     * and the timer thread consumes, executing timer tasks as appropriate,
     * and removing them from the queue when they're obsolete.
     */
    private final TaskQueue queue = new TaskQueue();

    /**
     * The timer thread.
     */
    private final TimerThread thread = new TimerThread(queue);
这里创建了一个TimerThread对象得到一个实例线程:
java
class TimerThread extends Thread {
    /**
     * This flag is set to false by the reaper to inform us that there
     * are no more live references to our Timer object.  Once this flag
     * is true and there are no more tasks in our queue, there is no
     * work left for us to do, so we terminate gracefully.  Note that
     * this field is protected by queue's monitor!
     */
    boolean newTasksMayBeScheduled = true;

    /**
     * Our Timer's queue.  We store this reference in preference to
     * a reference to the Timer so the reference graph remains acyclic.
     * Otherwise, the Timer would never be garbage-collected and this
     * thread would never go away.
     */
    private TaskQueue queue;

    TimerThread(TaskQueue queue) {
        this.queue = queue;
    }

    public void run() {
        try {
            mainLoop();
        } finally {
            // Someone killed this Thread, behave as if Timer cancelled
            synchronized(queue) {
                newTasksMayBeScheduled = false;
                queue.clear();  // Eliminate obsolete references
            }
        }
    }

    /**
     * The main timer loop.  (See class comment.)
     */
    private void mainLoop() {
		// 实现暂时略,后面会详细讨论
           }
}
这里创建了一个TimerThread对象得到一个实例线程:
在学习Java并发编程的时候,肯定学习过线程创建的2种方式:继承Thread或者实现Runnable接口,这里就是典型的继续Thread类!
TaskQueue-定时器任务队列
除此以外在创建Timer实例的时候还实例化了一个队列:
java
// 定时器任务队列。这一数据结构与定时器线程共享。
//定时器通过不同的调度调用生成任务,定时器线程则负责消费这些任务,在适当时机执行它们,并在任务过期后从队列中移除。
private final TaskQueue queue = new TaskQueue();
从上面可以得到它的主要作用:
- 数据结构共享:队列由定时器和定时器线程共同操作。
- 生产者-消费者模型:定时器(生产者)创建任务,定时器线程(消费者)处理任务。
- 任务生命周期:执行后或过期时,任务会被移出队列。
继续跟进定时器任务队列的类定义:
java
class TaskQueue {

    // 任务数组,是一个最少堆结构
    private TimerTask[] queue = new TimerTask[128];
}
里面定义了一个TimerTask数组,定义了定时任务:
TimerTask-定时任务
java
// 定义了一个抽象类,实现了Runnable接口
public abstract class TimerTask implements Runnable {

    // 定义了一个抽象方法,定时任务要执行业务方法就是通过实现这个方法
    public abstract void run();

    // 其余参数先略过...
}
至此Timer的相关类已经都出现了,可以据此得到它的类图:
类图
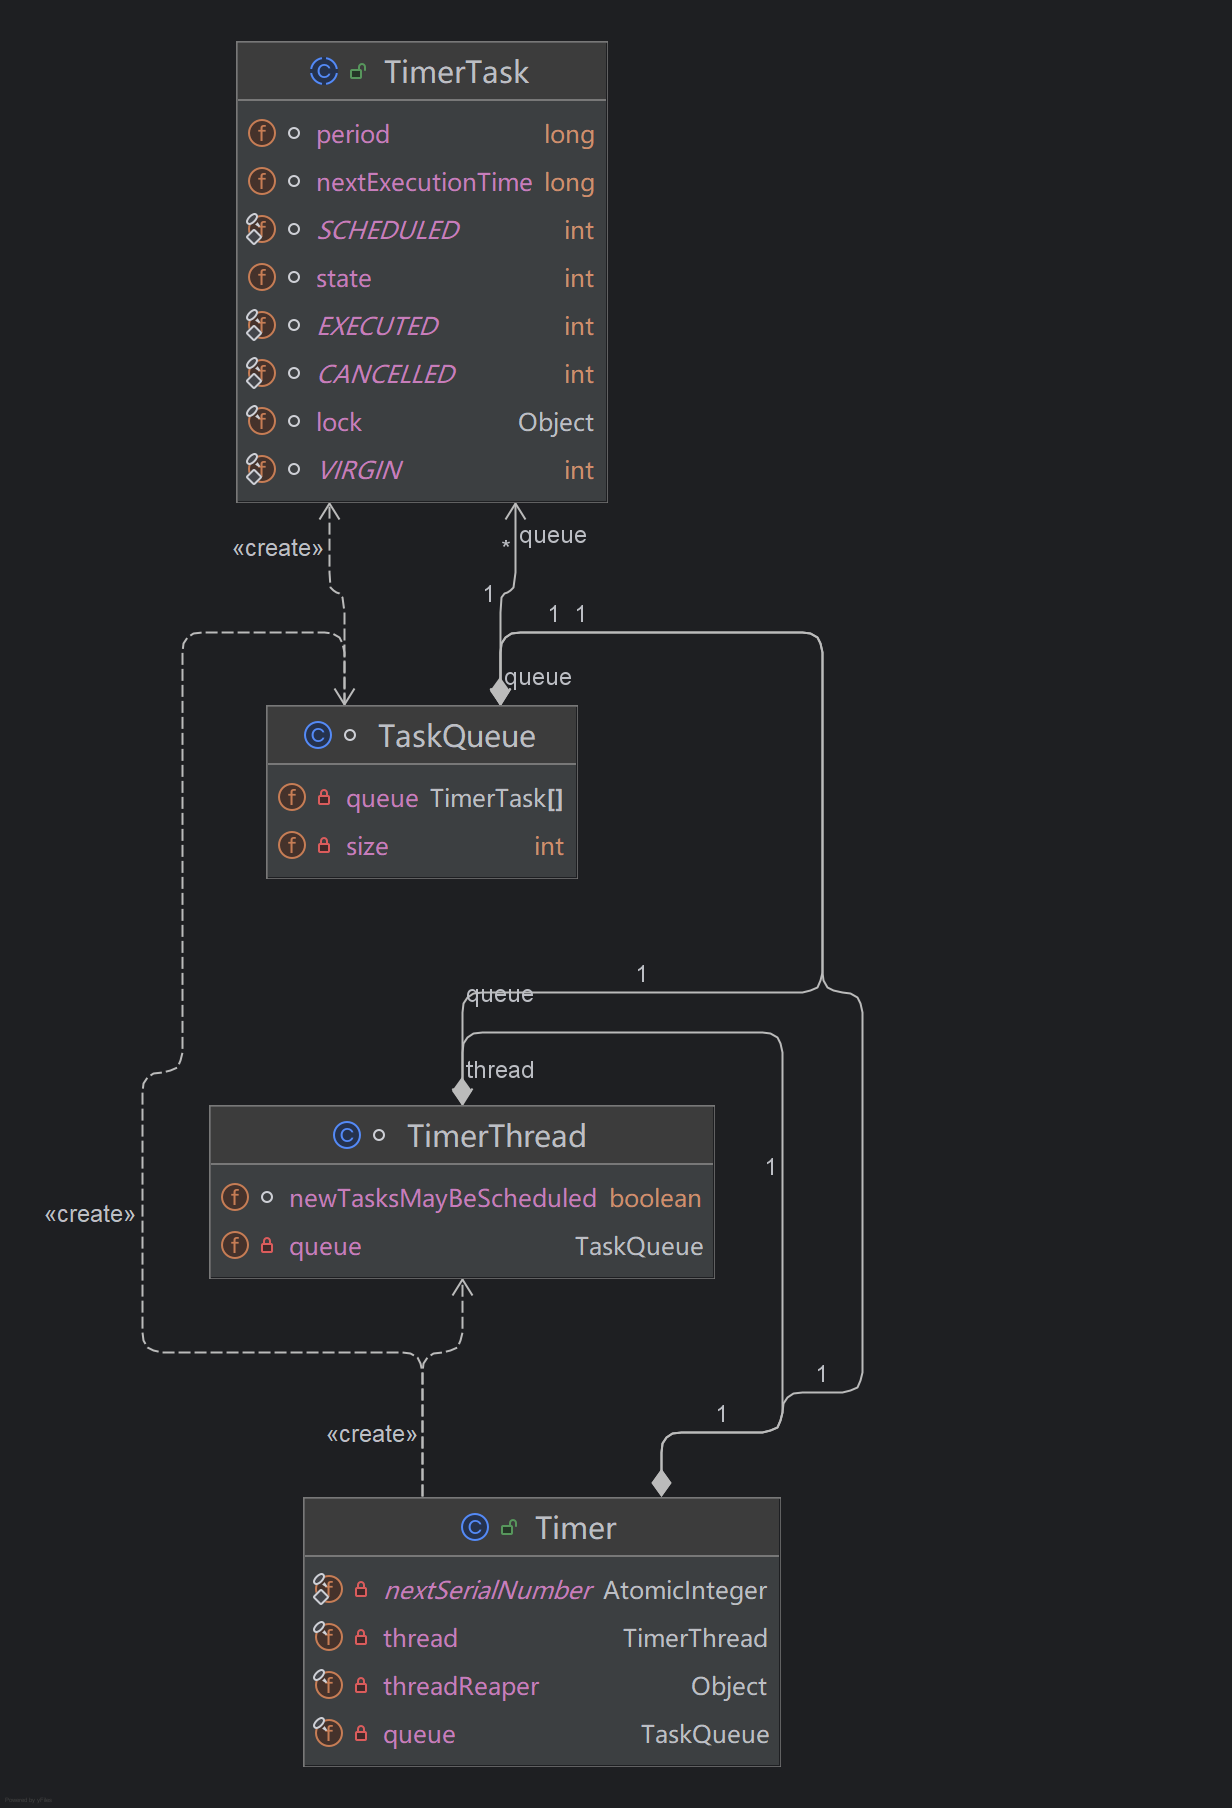
至此得到了Timer类的完整类图,其中:
- Timer是定时器主类,持有一个执行线程TimerThread和一个任务队列TaskQueue
- TimerThread类负责执行定时任务,引用了任务队列TaskQueue
- TaskQueue类为任务队列,里面持有一个TimerTask数组(也是最小堆结构)
- TimerTask为业务要实现的定时任务接口(抽象类),它实现Runable接口,所以自然要求实现对应的run()方法
接下来就仔细分析一下,定时任务的整个管理、执行流程!
定时器-任务线程启动
再回到刚才的构造方法来:
java
 public Timer(String name) {
        thread.setName(name);
        // 线程启动
        thread.start();
    }
只要创建了一个Timer实例(new Timer()),就会立即启动执行线程(thread.start)
定时任务执行
线程启动之后,会立即执行线程的run方法:
java
public void run() {
        try {
            // 主循环,所有的定时任务都是在这里触发执行的
            mainLoop();
        } finally {
            // Someone killed this Thread, behave as if Timer cancelled
            synchronized(queue) {
                newTasksMayBeScheduled = false;
                queue.clear();  // Eliminate obsolete references
            }
        }
    }
从方法命名上就可以看出,这个mainLoop是一个循环方法,继续跟进它:
java
private void mainLoop() {
	// 死循环
        while (true) {
            try {
		// 当前需要触发的定时任务
                TimerTask task;
		// 触发标志位
                boolean taskFired;
		// 直接同步任务队列,防止并发
                synchronized(queue) {
                    // Wait for queue to become non-empty
		    // 如果队列为空且Timer未取消,则进行等待;关于Timer取消造成newTasksMayBeScheduled为false的,放到后面讨论
                    while (queue.isEmpty() && newTasksMayBeScheduled)
                        queue.wait();
		    // 如果队列为空且Timer取消(主动或被动),则跳出循环:注意只有这种情况才会真正结束死循环,其实就是newTasksMayBeScheduled为false了
                    if (queue.isEmpty())
                        break; // Queue is empty and will forever remain; die

                    // Queue nonempty; look at first evt and do the right thing
                    long currentTime, executionTime;
		   // 获取第一个任务
                    task = queue.getMin();
		    // 同步任务,也是防止并发
                    synchronized(task.lock) {
			// 如果任务取消,虽从任务队列中删除任务
                        if (task.state == TimerTask.CANCELLED) {
                            queue.removeMin();
                            continue;  // No action required, poll queue again
                        }
                        currentTime = System.currentTimeMillis();
                        executionTime = task.nextExecutionTime;
			// 判断任务是否需要触发:触发条件是执行时间在当前时间之前,即executionTime<=currentTime
                        if (taskFired = (executionTime<=currentTime)) {
			    // 如果是一次性任务
                            if (task.period == 0) { // Non-repeating, remove
				// 则从任务队列中删除任务
                                queue.removeMin();
				// 修改任务的状态为"已执行"
                                task.state = TimerTask.EXECUTED;
			   // 如果是周期性任务
                            } else { // Repeating task, reschedule
				// 则重新计算下一次触发时间
                                queue.rescheduleMin(
                                  task.period<0 ? currentTime   - task.period
                                                : executionTime + task.period);
                            }
                        }
                    }
		   // 如果任务未触发,则继续等待时间:executionTime - currentTime
                    if (!taskFired) // Task hasn't yet fired; wait
                        queue.wait(executionTime - currentTime);
                }
		// 如果任务触发,则调用run()方法执行任务
                if (taskFired)  // Task fired; run it, holding no locks
                    task.run();
            } catch(InterruptedException e) {
            }
        }
    }
从第一行代码就看到了我们今天引出的问题,为什么定时任务的触发是死循环?看来不止是XXL-job这样实现的,JDK-Timer也是这样实现的:
java
while (true) {
}
关于这个问题网上AI给出的一种解释:
任务调度原理采用死循环设计的原因在于其能够有效地管理和执行多任务,提高系统的整体效率和响应速度。在任务调度中,每个任务通常设计为一个死循环,这是因为死循环结构能够确保任务持续运行并等待事件或条件的发生,从而实现对任务的持续监控和执行。
死循环在任务调度中的作用
- 持续运行:死循环确保任务能够持续运行,不断检查和处理事件或条件。这对于实时响应和任务管理至关重要。
- 事件驱动:死循环结构使得任务能够响应各种事件或信号,如定时器中断、外部事件等。当特定事件发生时,任务可以执行相应的操作。
- 资源分配:通过维护就绪队列和数据结构,调度程序能够动态选择待执行任务,实现处理器资源的有效分配和管理
定时任务添加
关于定时任务执行主流程源码的讨论先点到为止。回过头来再看看定时器添加任务的例子:
java
// 只触发一次的任务:延迟1s执行(如果为0,则表示立即执行)
        timer.schedule(new TimerTask() {
            @Override
            public void run() {
                System.out.println("========name1:" + Thread.currentThread().getName() + ", time:" + new Date());
            }
        }, 1000L);
继续跟进schedule方法:
java
public void schedule(TimerTask task, long delay) {
        // 延迟时间要>0,意思就是任务只能当前时间之后,这点很容易理解
        if (delay < 0)
            throw new IllegalArgumentException("Negative delay.");
        // 从这里就可以看出delay>0原因:因为执行时间直接取的是 当前时间+延迟时间
        sched(task, System.currentTimeMillis()+delay, 0);
    }

private void sched(TimerTask task, long time, long period) {
        // 任务执行时间
        if (time < 0)
            throw new IllegalArgumentException("Illegal execution time.");

        // Constrain value of period sufficiently to prevent numeric
        // overflow while still being effectively infinitely large.
        if (Math.abs(period) > (Long.MAX_VALUE >> 1))
            period >>= 1;

        // 同步队列
        synchronized(queue) {
            // 如果定时器被取消,直接抛出异常
            if (!thread.newTasksMayBeScheduled)
                throw new IllegalStateException("Timer already cancelled.");

            // 同步任务
            synchronized(task.lock) {
                if (task.state != TimerTask.VIRGIN)
                    throw new IllegalStateException(
                        "Task already scheduled or cancelled");
                // 更新任务信息:设置下次执行时间、周期、任务状态为"SCHEDULED",在这个状态的任务才能被执行,这个可以在上面执行器中代码可以印证!
                task.nextExecutionTime = time;
                task.period = period;
                task.state = TimerTask.SCHEDULED;
            }

            // 添加到任务队列中
            queue.add(task);
            // 如果任务恰好是队列第一个元素,则直接"通知"任务队列执行任务
            if (queue.getMin() == task)
                // 这个代码还有另外一个作用,就是唤醒被阻塞的队列,因为在执行的代码中如果队列为空会进行等待的。
                queue.notify();
        }
    }
任务执行流程图
结合上面的任务执行/添加源码分析,在不考虑主动取消定时器的情况,可以大致得出下面的任务执行流程图:
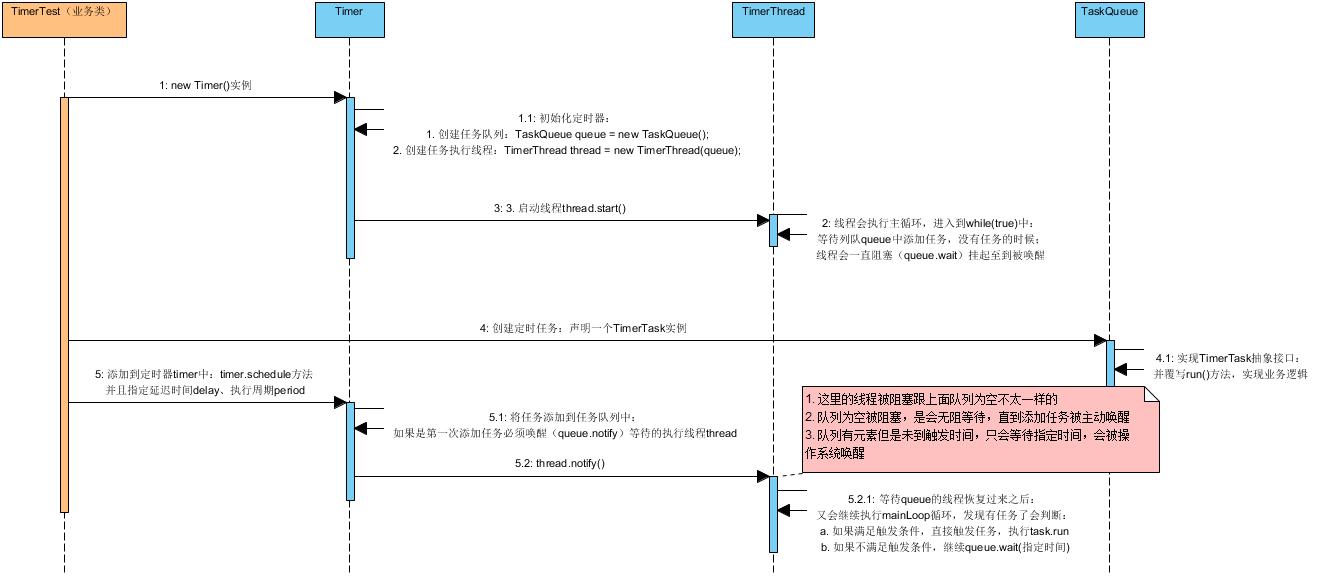
生产者-消费者模型
至此梳理了任务执行的流程,留意一下可以看到里面用到了wait(),notify()方法用来做线程的阻塞与唤醒,这其实是典型的生产者-消费者模型:
生产者
- 业务类通过调用Timer的schedule方法添加任务TimerTask,其实就是生产者,比如上面的TimerTest
消费者
- 这里的执行线程TimerThread其实就是消费者,它通过while循环不停的从任务队列中取出定时任务
但是这里要明确一下,执行线程既是消费者也是生产者!
可以从mainLoop()的方法可以体现:
java
if (taskFired = (executionTime<=currentTime)) {
			    // 如果是一次性任务
                            if (task.period == 0) { // Non-repeating, remove
				// 则从任务队列中删除任务
                                queue.removeMin();
				// 修改任务的状态为"已执行"
                                task.state = TimerTask.EXECUTED;
			   // 如果是周期性任务
                            } else { // Repeating task, reschedule
				// 则重新计算下一次触发时间
                                queue.rescheduleMin(
                                  task.period<0 ? currentTime   - task.period
                                                : executionTime + task.period);
                            }
                        }
如果任务的周期字段是period,如果是0表示一次性任务;如果period>0,则表示周期性任务:在任务触发时同时计算下一次触发时间就是queue.rescheduleMin方法:
java
void rescheduleMin(long newTime) {
        // 更新下次执行时间:当前时间+周期
        queue[1].nextExecutionTime = newTime;
        // 调整堆顺序,保持最小堆特性
        fixDown(1);
    }
通过这个方法其实"相当"于又往队列了放了一个元素:就是同一个任务还在队列中,只是下次执行时间nextExecutionTime被更新了,这样在任务触发之后可以继续被执行!
关于复用wait和notify实现线程间的协作,这里不展开。只是列出一下相关的API:
|--------|---------------------------------------------------------------------------------------------------------------------|---------------------|
| void | notify() | 唤醒正在此对象监视器上等待的单个线程。 |
| void | notifyAll() | 唤醒等待此对象监视器的所有线程。 |
|--------|--------------------------------------------------------------------------------------------------------------------------------------------|---------------------------------------------|
| void | wait() | 导致当前线程等待它被唤醒,通常是 通知 或 中断 。 |
| void | wait(long timeoutMillis) | 导致当前线程等待它被唤醒,通常是 通知 或 中断 ,或者直到经过一定量的实时。 |
| void | wait(long timeoutMillis, int nanos) | 导致当前线程等待它被唤醒,通常是 通知 或 中断 ,或者直到经过一定量的实时。 |
最小堆
前面提到过:
TaskQueue类为任务队列,里面持有一个TimerTask数组(也是最小堆结构)
关于最小堆的介绍在这里列出来:
经过排序的完全二叉树
最小堆,是一种经过排序的完全二叉树,其中任一非终端节点的数据值均不大于其左子结点和右子结点的值。
这里在添加任务的时候,其实就进行堆排序:
java
void add(TimerTask task) {
        // Grow backing store if necessary
        if (size + 1 == queue.length)
            queue = Arrays.copyOf(queue, 2*queue.length);

        queue[++size] = task;
        fixUp(size);
    }


private void fixUp(int k) {
        while (k > 1) {
            int j = k >> 1;
            if (queue[j].nextExecutionTime <= queue[k].nextExecutionTime)
                break;
            TimerTask tmp = queue[j];  queue[j] = queue[k]; queue[k] = tmp;
            k = j;
        }
    }
附录Java创建的2种方式
1. 继承
Thread类这是最传统的创建线程的方式。通过创建一个新的类继承自
java.lang.Thread类,并重写run()方法来定义线程的执行体。然后,创建该类的实例并调用其start()方法来启动线程。2. 实现
Runnable接口这种方式更加灵活,因为它允许你将线程的执行代码封装在一个实现了
Runnable接口的类的实例中。这种方式更适合资源共享和便于线程的共享和管理。