1.概述
- 搭建一套Minio集群并提供服务。集群采用6台服务器,每台8块7.2K 2T机械硬盘,EC:4,容量64T。
- 网络受限于千兆网络,每台服务器做了3网卡链路聚合(3G,src-dst-ip),接近机械硬盘写入极限速度。
- 集群代理使用Openresty和Keepalived,配置了双活代理和基于IP或sessionid的hash负载均衡。
- 配置使用参见 Minio简单配置及使用说明
2. 参考
3. 环境
3.1 服务器
- DELL 720XD 48C/256G/10块硬盘,6台服务器组成Minio集群
- 172.29.2.1 Ubuntu24.04, 8块2T数据盘(7.2K)
- 172.29.2.2 Ubuntu24.04, 8块2T数据盘(7.2K)
- 172.29.2.3 Ubuntu24.04, 8块2T数据盘(7.2K)
- 172.29.2.4 Ubuntu24.04, 8块2T数据盘(7.2K)
- 172.29.2.5 Ubuntu24.04, 8块2T数据盘(7.2K)
- 172.29.2.6 Ubuntu24.04, 8块2T数据盘(7.2K)
3.2 系统
- Ubuntu24.04
- 300G*2 RAID1 系统盘
- 8块 2T 每块RAID0 Minio数据盘
3.3 网络
- 交换机3个千兆端口做链路聚合 src-dst-ip
- 服务器3个千兆网卡做链路聚合 layer2+3模式
4. 部署Minio
部署采用多节点多硬盘部署 ,参见官方文档: 多节点多硬盘部署
4.1 安装Ubuntu24.04
操作系统安装步骤略 ,期间遇到的问题如下:
1. 问题 :Ubuntu24.04 如果一次性插入10块硬盘(2块RAID1系统盘+8块每块单独RAID0)分区时无法识别,不能继续安装。我测试Ubuntu22.04,存在同样问题,但Centos是没问题。
解决:通过插入两块2块RAID1系统盘,先完成安装操作系统,成功后再插入8块 2T硬盘(每块RAID0),在操作系统中识别后挂载。这方式已验证通过。
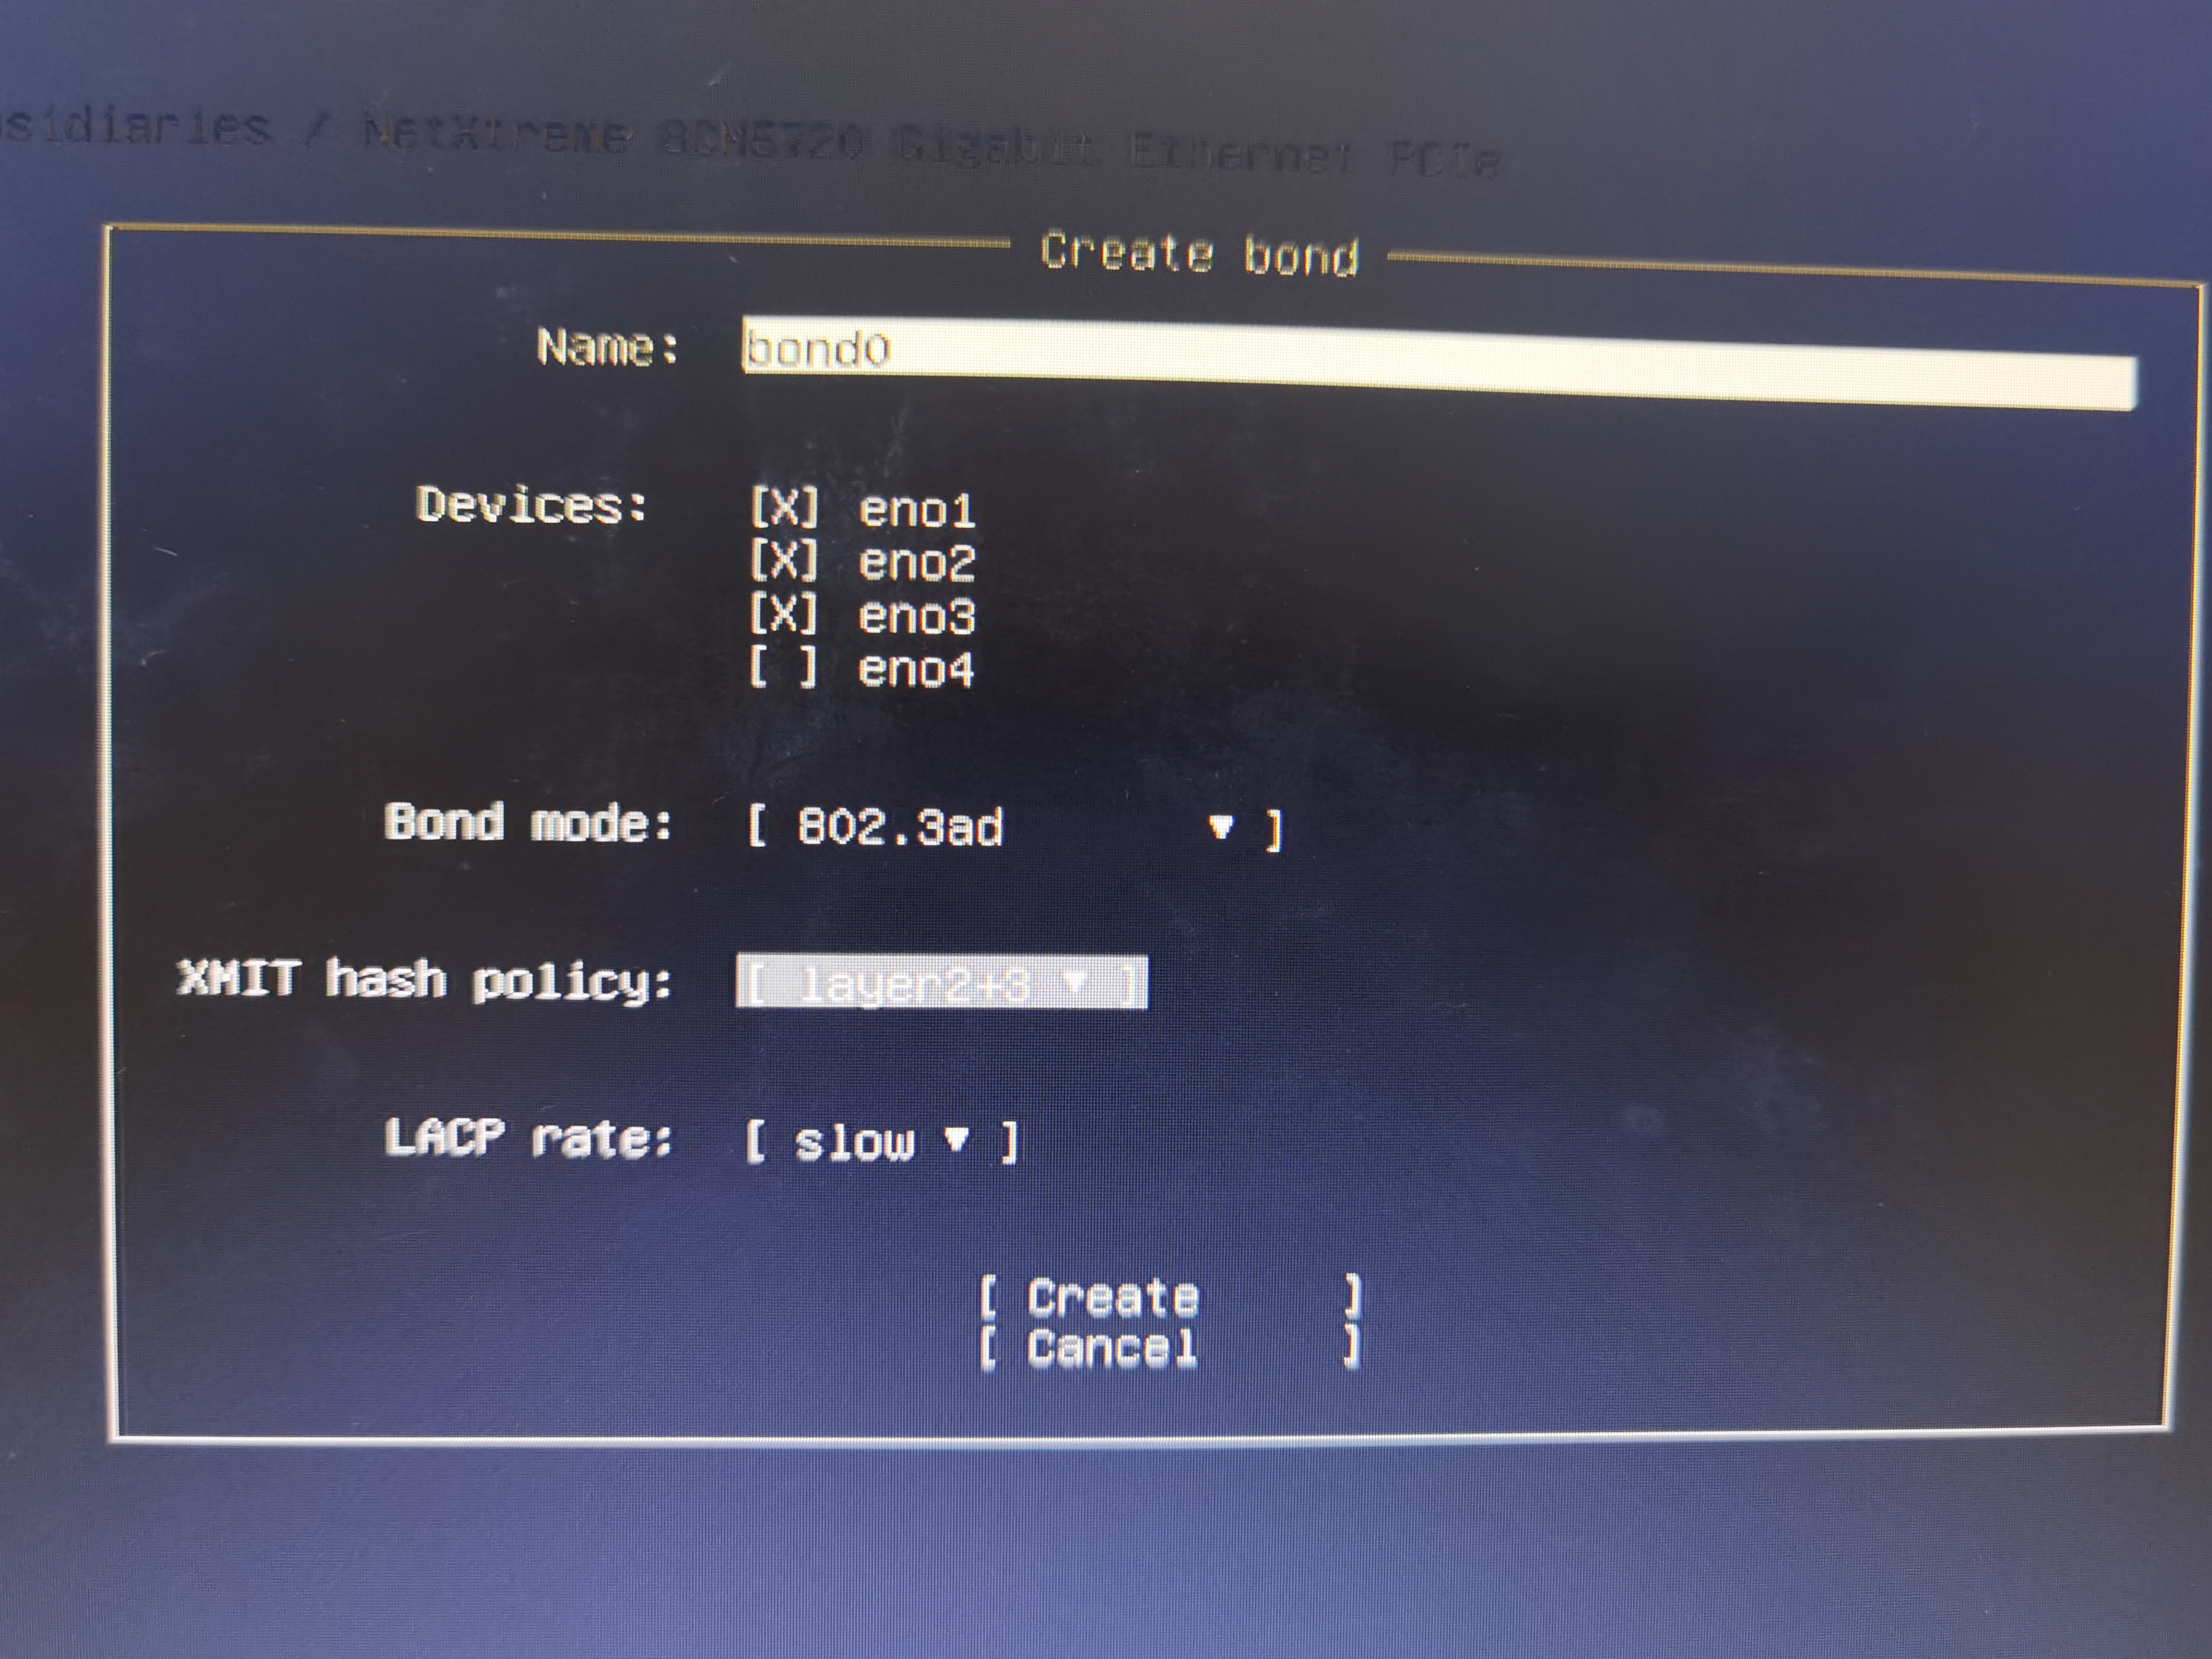
2. 问题 :安装时选择网卡聚合。我的交换机不支持src-dst-ip-port模式,只支持src-dst-ip,所以安装只能选择layer2+3,这会导致聚合链路负载不均衡
解决:此问题无解。网卡聚合也可以安装完操作系统后再修改
-
安装直接创建网卡bind
-
安装后修改
bash
vim /etc/netplan/50-cloud-init.yaml
bash
# This file is generated from information provided by the datasource.  Changes
# to it will not persist across an instance reboot.  To disable cloud-init's
# network configuration capabilities, write a file
# /etc/cloud/cloud.cfg.d/99-disable-network-config.cfg with the following:
# network: {config: disabled}
network:
    ethernets:
        eno1: {}
        eno2: {}
        eno3: {}
        eno4: {}
    bonds:
        bond0:
          addresses:
          - 172.29.2.1/16
          nameservers:
            addresses:
            - 172.26.111.1
            - 172.26.112.2
            search: []
          interfaces:
          - eno1
          - eno2
          - eno3
          parameters:
            mode: 802.3ad
            lacp-rate: slow
            transmit-hash-policy: layer2+3
          routes:
          - to: default
            via: 172.29.0.1

    version: 2
4.2 系统准备
1. 升级系统
bash
apt update -y && apt upgrade -y2. 设置时区
bash
timedatectl set-timezone Asia/Shanghai3. 修改限制
bash
cat>>/etc/security/limits.conf <<EOF
* soft nproc 655350
* hard nproc 655350
* soft nofile 655350
* hard nofile 655350
*
root soft nproc 655350
root hard nproc 655350
root soft nofile 655350
root hard nofile 655350
EOF
4. 必须安装的包
bash
apt install -y procps vim net-tools inetutils-ping telnet traceroute iproute2 lrzsz systemd-timesyncd libsystemd-dev pkg-config cron ntpdate5. 可选安装的包
bash
apt install -y build-essential tcl libicu-dev libreadline-dev zlib1g-dev libperl-dev libpython3-dev
bash
apt-get install -y language-pack-en language-pack-zh-hans4.3 挂载数据盘
1. 格式化后添加的8块2T数据盘
- /dev/sda是系统盘,已安装操作系统
- /dev/sdb-sdi是8块数据盘,供Minio使用
- 官方建议使用xfs文件系统
- 官方建议使用硬盘驱动器标签(Label),便于后期更换
参见官方文档: Storage
bash
mkfs.xfs -f /dev/sdb -L MINIODRIVE1
mkfs.xfs -f /dev/sdc -L MINIODRIVE2
mkfs.xfs -f /dev/sdd -L MINIODRIVE3
mkfs.xfs -f /dev/sde -L MINIODRIVE4
mkfs.xfs -f /dev/sdf -L MINIODRIVE5
mkfs.xfs -f /dev/sdg -L MINIODRIVE6
mkfs.xfs -f /dev/sdh -L MINIODRIVE7
mkfs.xfs -f /dev/sdi -L MINIODRIVE8
2. 创建挂载目录
bash
mkdir -p /mnt/disk{1..8}
bash
ls /mnt
disk1  disk2  disk3  disk4  disk5  disk6  disk7  disk8
3. 系统启动挂载
bash
vim /etc/fstab
bash
# /etc/fstab: static file system information.
#
# Use 'blkid' to print the universally unique identifier for a
# device; this may be used with UUID= as a more robust way to name devices
# that works even if disks are added and removed. See fstab(5).
#
# <file system> <mount point>   <type>  <options>       <dump>  <pass>
# / was on /dev/ubuntu-vg/ubuntu-lv during curtin installation
/dev/disk/by-id/dm-uuid-LVM-xXtPS17TuHVFxmlOe7BeIzlBDutGriB9vwFaG9nkgmajlJmGgXLDVVZ4jsXsJN8s / ext4 defaults 0 1
# /boot was on /dev/sda2 during curtin installation
/dev/disk/by-uuid/d8d6c9d3-7258-414d-afd4-352e99bc2f1f /boot ext4 defaults 0 1
# /boot/efi was on /dev/sda1 during curtin installation
/dev/disk/by-uuid/7A14-6363 /boot/efi vfat defaults 0 1
/swap.img       none    swap    sw      0       0
# mount 2T*8
LABEL=MINIODRIVE1      /mnt/disk1     xfs     defaults,noatime  0       2
LABEL=MINIODRIVE2      /mnt/disk2     xfs     defaults,noatime  0       2
LABEL=MINIODRIVE3      /mnt/disk3     xfs     defaults,noatime  0       2
LABEL=MINIODRIVE4      /mnt/disk4     xfs     defaults,noatime  0       2
LABEL=MINIODRIVE5      /mnt/disk5     xfs     defaults,noatime  0       2
LABEL=MINIODRIVE6      /mnt/disk6     xfs     defaults,noatime  0       2
LABEL=MINIODRIVE7      /mnt/disk7     xfs     defaults,noatime  0       2
LABEL=MINIODRIVE8 /mnt/disk8 xfs defaults,noatime 0 2-
LABEL=MINIODDRIVE1
挂载标签为 MINIODRIVE1 的磁盘分区。
-
/mnt/disk1
文件系统挂载到 /mnt/disk1 目录。
-
xfs
分区使用的文件系统格式为 XFS 文件系统。
-
defaults,noatime
- defaults:包含 rw, suid, dev, exec, auto, nouser, async
- noatime:禁用访问时间更新(提升性能)
-
0
不备份
-
2
在根分区后自检
4. 测试挂载生效
bash
mount -a
bash
# 查看当前磁盘挂载效果
root@ubuntu24-172-029-002-005:~# lsblk -f
NAME                      FSTYPE      FSVER    LABEL       UUID                                   FSAVAIL FSUSE% MOUNTPOINTS
sda
├─sda1                    vfat        FAT32                7A14-6363                                   1G     1% /boot/efi
├─sda2                    ext4        1.0                  d8d6c9d3-7258-414d-afd4-352e99bc2f1f      1.6G    10% /boot
└─sda3                    LVM2_member LVM2 001             PYjEVi-ewNb-B2z0-O2oM-u3HP-HTFF-dA6efl
  └─ubuntu--vg-ubuntu--lv ext4        1.0                  f41b9cd1-4733-43c9-85c0-4990d0f585dd    245.5G     4% /
sdb                       xfs                  MINIODRIVE1 17492807-ad1a-463c-8369-39810d2552a8      1.8T     2% /mnt/disk1
sdc                       xfs                  MINIODRIVE2 20329773-4739-4c5f-8f5a-a397f9b23c63      1.8T     2% /mnt/disk2
sdd                       xfs                  MINIODRIVE3 be375914-c6fe-432c-9bf5-7514567d01e7      1.8T     2% /mnt/disk3
sde                       xfs                  MINIODRIVE4 285012a9-896f-4dcc-ac65-bb69fd16bfba      1.8T     2% /mnt/disk4
sdf                       xfs                  MINIODRIVE5 905534ee-7d49-40eb-863b-218def1db7b8      1.8T     2% /mnt/disk5
sdg                       xfs                  MINIODRIVE6 ca804e00-30dc-463c-aeb5-07bea0de94cc      1.8T     2% /mnt/disk6
sdh                       xfs                  MINIODRIVE7 b2ddafe5-ae42-4796-ac74-94ccaf3c92af      1.8T     2% /mnt/disk7
sdi                       xfs                  MINIODRIVE8 fc636ce8-1713-492e-89fb-63898555f1db      1.8T     2% /mnt/disk8
5. 错误时禁用XFS重试 (官方强烈建议)
- 创建关闭XFS重试脚本
bash
mkdir -p /public/script/
vim /public/script/xfs-retry-settings.sh
bash
#!/bin/bash

# /mnt/disk 是挂载路径,获取的/mnt/disk1-8
for i in $(df -h | grep /mnt/disk | awk '{ print $1 }'); do
      mountPath="$(df -h | grep $i | awk '{ print $6 }')"
      deviceName="$(basename $i)"
      echo "Modifying xfs max_retries and retry_timeout_seconds for drive $i mounted at $mountPath"
      echo 0 > /sys/fs/xfs/$deviceName/error/metadata/EIO/max_retries
      echo 0 > /sys/fs/xfs/$deviceName/error/metadata/ENOSPC/max_retries
      echo 0 > /sys/fs/xfs/$deviceName/error/metadata/default/max_retries
done
exit 0- 添加执行权限
bash
chmod +x /public/script/xfs-retry-settings.sh- 添加启动执行(非常重要 )
Minio依赖系统时间,启动关闭XFS重试
bash
crontab -e
bash
# Edit this file to introduce tasks to be run by cron.
#
# Each task to run has to be defined through a single line
# indicating with different fields when the task will be run
# and what command to run for the task
#
# To define the time you can provide concrete values for
# minute (m), hour (h), day of month (dom), month (mon),
# and day of week (dow) or use '*' in these fields (for 'any').
#
# Notice that tasks will be started based on the cron's system
# daemon's notion of time and timezones.
#
# Output of the crontab jobs (including errors) is sent through
# email to the user the crontab file belongs to (unless redirected).
#
# For example, you can run a backup of all your user accounts
# at 5 a.m every week with:
# 0 5 * * 1 tar -zcf /var/backups/home.tgz /home/
#
# For more information see the manual pages of crontab(5) and cron(8)
#
# m h  dom mon dow   command

# 内部 NTP SERVER
0 */1 * * * /usr/sbin/ntpdate 192.168.5.254 > /dev/null 2>&1
# 阿里云 NTP SERVER
30 */12 * * * /usr/sbin/ntpdate ntp1.aliyun.com > /dev/null 2>&1
# 系统启动时,同步时间,执行关闭XFS重试脚本
@reboot /usr/sbin/ntpdate 192.168.5.254 > /dev/null 2>&1
@reboot /public/script/xfs-retry-settings.sh- 设置cron开机自启动
bash
systemctl enable cron && systemctl start cron
bash
# 查看cron服务状态
root@ubuntu24-172-029-002-001:~# systemctl status cron
● cron.service - Regular background program processing daemon
     Loaded: loaded (/usr/lib/systemd/system/cron.service; enabled; preset: enabled)
     Active: active (running) since Wed 2025-07-16 06:06:56 CST; 10h ago
       Docs: man:cron(8)
   Main PID: 85644 (cron)
      Tasks: 1 (limit: 464162)
     Memory: 424.0K (peak: 12.3M)
        CPU: 1.192s
     CGroup: /system.slice/cron.service
             └─85644 /usr/sbin/cron -f -P
......
4.4 重启系统
1. 重启操作系统
bash
init 62. 验证上述操作
bash
# 查看系统时间
root@ubuntu24-172-029-002-006:~# date
Wed Jul 16 16:01:22 CST 2025
bash
# 查看当前限制
root@ubuntu24-172-029-002-006:~# ulimit -a
real-time non-blocking time  (microseconds, -R) unlimited
core file size              (blocks, -c) 0
data seg size               (kbytes, -d) unlimited
scheduling priority                 (-e) 0
file size                   (blocks, -f) unlimited
pending signals                     (-i) 1031114
max locked memory           (kbytes, -l) 33005564
max memory size             (kbytes, -m) unlimited
open files                          (-n) 1024
pipe size                (512 bytes, -p) 8
POSIX message queues         (bytes, -q) 819200
real-time priority                  (-r) 0
stack size                  (kbytes, -s) 8192
cpu time                   (seconds, -t) unlimited
max user processes                  (-u) 655350
virtual memory              (kbytes, -v) unlimited
file locks                          (-x) unlimited
bash
# 显示驱动器挂载情况
root@ubuntu24-172-029-002-006:~# lsblk -f
NAME                      FSTYPE      FSVER    LABEL       UUID                                   FSAVAIL FSUSE% MOUNTPOINTS
sda
├─sda1                    vfat        FAT32                07C2-C25A                                   1G     1% /boot/efi
├─sda2                    ext4        1.0                  b3e9c910-16ac-4881-8a07-2fe9f3f6d4b1      1.6G    10% /boot
└─sda3                    LVM2_member LVM2 001             NJZPQq-mf3D-JTEe-05uV-XAYK-QdRK-skW5BD
  └─ubuntu--vg-ubuntu--lv ext4        1.0                  c4e3a0d5-d313-4245-afdf-df0d54458bc7    245.5G     4% /
sdb                       xfs                  MINIODRIVE1 d162e234-fc1c-4ffe-b208-1a5bf1897237      1.8T     2% /mnt/disk1
sdc                       xfs                  MINIODRIVE2 e7e93050-8609-4233-8cd6-eb255209671a      1.8T     2% /mnt/disk2
sdd                       xfs                  MINIODRIVE3 675c3cc1-2c5c-4086-a385-90a014ea817f      1.8T     2% /mnt/disk3
sde                       xfs                  MINIODRIVE4 3a614d64-2a3b-4d8e-bdd7-8dc7d266d8ce      1.8T     2% /mnt/disk4
sdf                       xfs                  MINIODRIVE5 fcd687fe-c3c5-4869-b3fe-3a3055da963b      1.8T     2% /mnt/disk5
sdg                       xfs                  MINIODRIVE6 8334d0bf-d550-4f4f-842a-b57e957b2088      1.8T     2% /mnt/disk6
sdh                       xfs                  MINIODRIVE7 2d1f7cee-5c9c-465d-901b-8ab7dde7d010      1.8T     2% /mnt/disk7
sdi                       xfs                  MINIODRIVE8 83cc026d-cd64-4ec3-8be9-2d5d7afe5085      1.8T     2% /mnt/disk8
bash
# 显示max_retries 是否为0
root@ubuntu24-172-029-002-006:~# find /sys/fs/xfs/ -name max_retries | xargs cat
0
0
0
......
4.5 安装Minio
1. 定义主机域名(主机名)
使用内部DNS定义(见下)。也可以在6台服务器的/etc/hosts里直接定义
bash
cluster01-1.minio.xunku.in.             IN      A       172.29.2.1
cluster01-2.minio.xunku.in.             IN      A       172.29.2.2
cluster01-3.minio.xunku.in.             IN      A       172.29.2.3
cluster01-4.minio.xunku.in.             IN      A       172.29.2.4
cluster01-5.minio.xunku.in.             IN      A       172.29.2.5
cluster01-6.minio.xunku.in.             IN      A       172.29.2.6
2. 在6台服务器安装MinIO
bash
wget https://dl.min.io/server/minio/release/linux-amd64/archive/minio_20250408154124.0.0_amd64.deb -O minio.deb
bash
sudo dpkg -i minio.deb3. 创建服务运行账号
这里使用/usr/lib/systemd/system/minio.service 预先定义的账号minio-user
bash
groupadd -r minio-user
useradd -M -r -g minio-user minio-user
4. 创建Minio服务的工作目录
- /mnt/disk1-8/minio 是服务的工作目录
bash
# 批量创建目录(需 root 或 sudo 权限)
for i in {1..8}; do   mkdir -p /mnt/disk$i/minio;   chown -R minio-user:minio-user /mnt/disk$i/minio  # 替换为实际的运行用户
done
5. 在6台服务器修改minio配置文件
bash
vim /etc/default/minio
bash
# Set the hosts and volumes MinIO uses at startup
# The command uses MinIO expansion notation {x...y} to denote a
# sequential series.
#
# The following example covers four MinIO hosts
# with 4 drives each at the specified hostname and drive locations.
# The command includes the port that each MinIO server listens on
# (default 9000)

# 根据域名和驱动器名称定义
MINIO_VOLUMES="http://cluster01-{1...6}.minio.xunku.in:9000/mnt/disk{1...8}/minio"

# Set all MinIO server options
#
# The following explicitly sets the MinIO控制台 listen address to
# port 9001 on all network interfaces. The default behavior is dynamic
# port selection.

MINIO_OPTS=' --console-address=":9001" '

# Set the root username. This user has unrestricted permissions to
# perform S3 and administrative API operations on any resource in the
# deployment.
#
# Defer to your organizations requirements for superadmin user name.

MINIO_ROOT_USER=minioadmin

# Set the root password
#
# Use a long, random, unique string that meets your organizations
# requirements for passwords.

MINIO_ROOT_PASSWORD=填写管理员的密码

# Enables Virtual Host-style requests to the MinIO deployment.
# Set the value to the Fully Qualified Domain Name (FQDN) for MinIO to accept incoming virtual host requests.
# 暂时为启用
MINIO_DOMAIN=*.minio.xunku.in

# Defines the default maximum versions to allow per object.
# 允许最大5个版本
MINIO_API_OBJECT_MAX_VERSIONS=5

# Erasure Code Settings.  https://minio.org.cn/product/erasure-code-calculator.html
# The parity level for the deployment.
# MinIO shards objects written with the default STANDARD storage class using this parity value.
# 默认EC:4,
# 概念详见官方文档https://www.minio.org.cn/product/erasure-code-calculator.html
MINIO_STORAGE_CLASS_STANDARD="EC:4"

# MinIO deployments started with MINIO_PROMETHEUS_AUTH_TYPE set to "public" can omit the bearer_token field
# https://www.minio.org.cn/docs/cn/minio/linux/reference/minio-server/settings/metrics-and-logging.html
# 允许PROMETHEUS免密访问
MINIO_PROMETHEUS_AUTH_TYPE=public
bash
# 同步minio至其它5台服务器的文件
for i in {2..6}; do scp minio 172.29.2.$i:/etc/default/ ;done
4.6 启动Minio
1. 启动Minio服务
bash
systemctl start minio2. 查看服务日志
bash
journalctl -xeu minio.service3. 查看监听端口
bash
root@ubuntu24-172-029-002-001:~# netstat -nltp | grep minio
tcp        0      0 127.0.0.1:9000          0.0.0.0:*               LISTEN      67056/minio
tcp6       0      0 ::1:9000                :::*                    LISTEN      67056/minio
tcp6       0      0 :::9000                 :::*                    LISTEN      67056/minio
tcp6       0      0 :::9001                 :::*                    LISTEN      67056/minio
4.7 登录验证
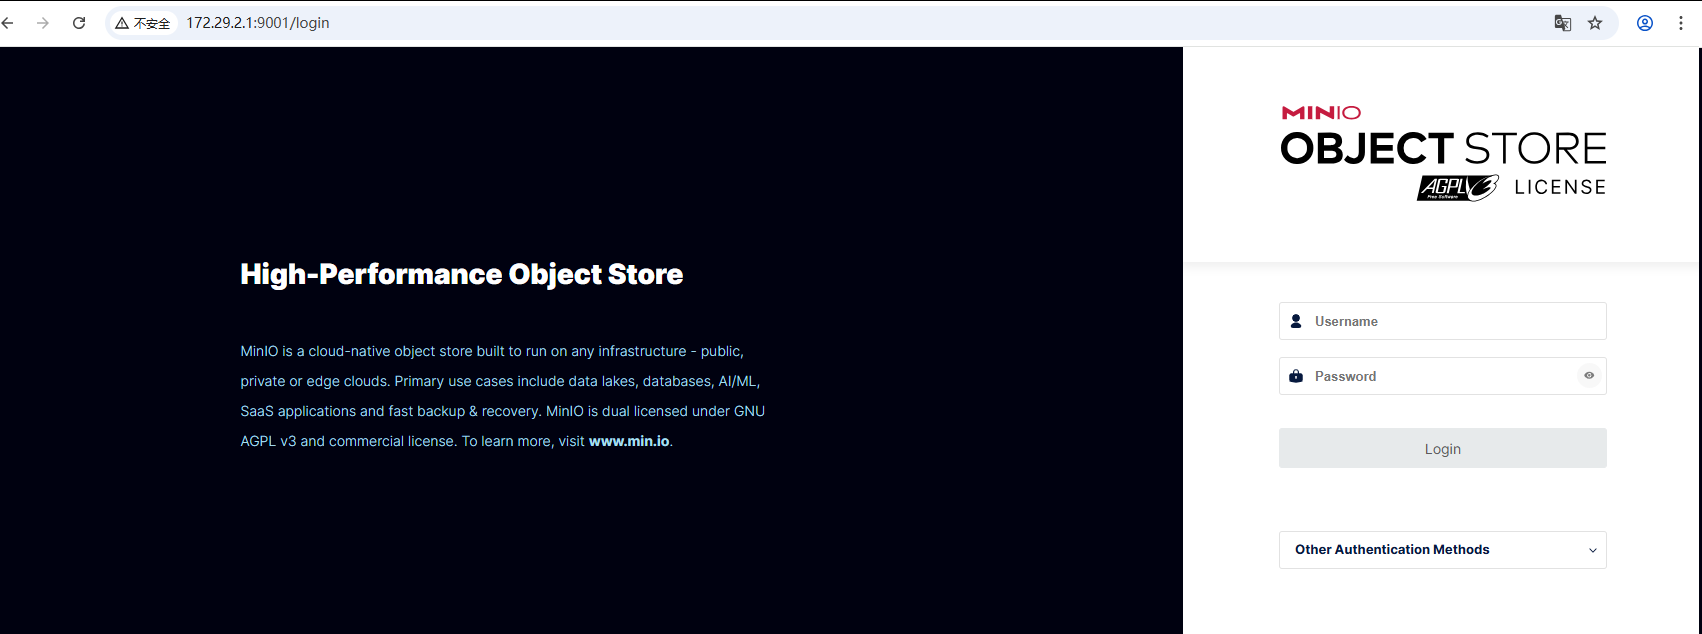
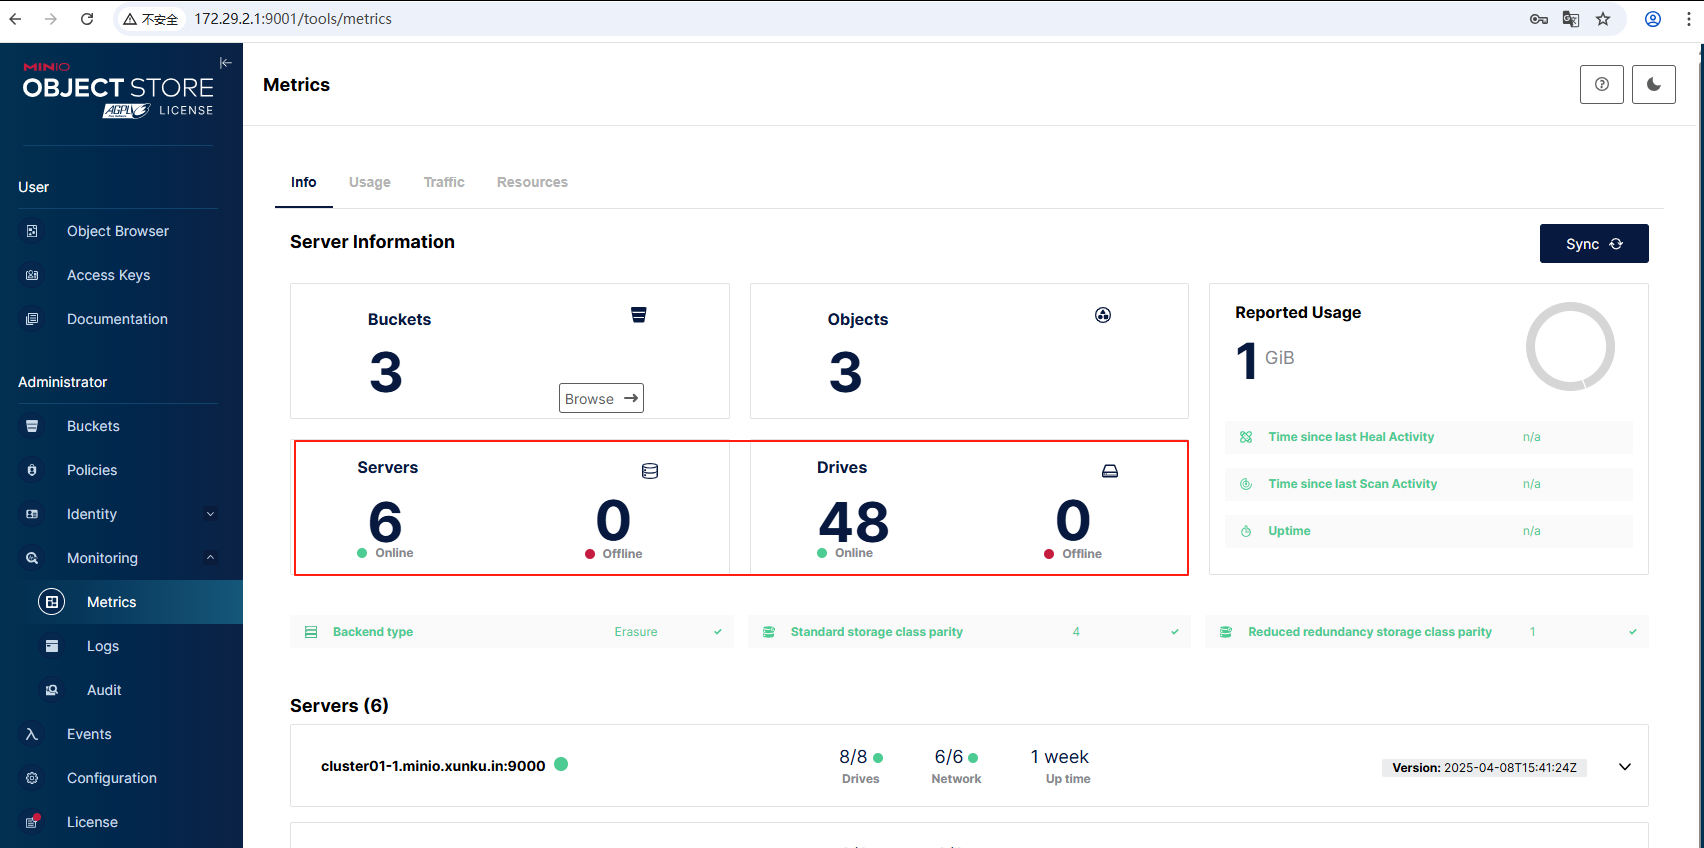
1. 访问172.29.2.1-6:9001,登录系统查看系统情况