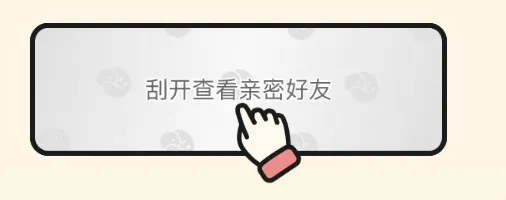
效果展示
刮刮卡是⼀种常见的网页交互元素,通过模拟物理世界的刮涂层来揭示下方的内容。这种效果主要依赖于HTML5的 元素来实现。以下是⼀个基于TypeScript的刮刮卡实现示例,包括配置项、初始化方法和核心的刮开逻辑。下面是展示的效果
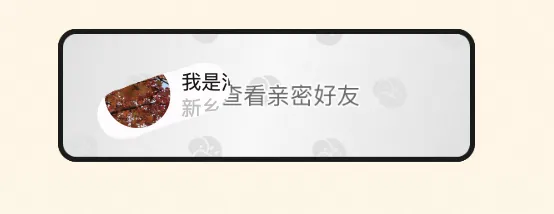
部分刮开效果:
具体实现
配置项
- 蒙层图片:可以是纯色或图片。
- 刮卡画笔半径:控制刮除区域的大小。
- 显示全部的比例:当刮除面积达到⼀定比例时,自动显示全部内容。
- 淡出时间:刮开涂层后的淡出动画时间。
- Canvas元素:用于绘制刮刮卡的HTML5 元素。
代码实现
首先,我们创建⼀个 ScratchCard.ts 文件,并定义 ScratchCard 类及其配置项接口。
js
interface ScratchCardConfig {
 canvas: HTMLCanvasElement; //传⼊的元素
 showAllPercent: number; //1. 到达什么⽐例之后展示全部
 coverImg?: string; //蒙层的图⽚
 coverColor?: string; //纯⾊蒙层
 doneCallback?: () => void; //完成之后的回调
 radius: number; //1. 刮卡画笔的半径
 fadeOut: number; //淡出时间
}
class ScratchCard {
 private config: ScratchCardConfig;
 private canvas: HTMLCanvasElement;
 private ctx: CanvasRenderingContext2D | null;
 private offsetX: number;
 private offsetY: number;
 private isDown: boolean;
 private done: boolean;
 constructor(config: Partial<ScratchCardConfig>) {
 const defaultConfig: ScratchCardConfig = {
 canvas: config.canvas!,
 showAllPercent: 65,
 coverImg: undefined,
 coverColor: undefined,
 doneCallback: undefined,
 radius: 30,
 fadeOut: 2000,
 };
 this.config = { ...defaultConfig, ...config };
 this.canvas = this.config.canvas;
 this.ctx = null;
 this.offsetX = 0;
 this.offsetY = 0;
 this.isDown = false;
 this.done = false;
 }
}
init实现
然后就是要写我们的init方法,在init⾥我们需要初始化数据并且把蒙层先画出来
重点解析
drawImage 用于绘制图像。
fillRect 用于绘制矩形,并且通过fillStyle属性设置绘制的颜色。
并且在绘制之前先充值了⼀下操作模式
globalCompositeOperation 用于标识要使用哪种合成或混合模式操作。
'source-over' 是默认设置,在现有画布内容上绘制新形状
'destination-out' 是将现有内容将保留在不与新形状重叠的位置,具体来说,它会在源图形和目标图形相交的区域,将目标图形的颜色变为透明。这里我们设置的蒙层就是目标图形
为了确保我们的刮刮卡生效,防止操作模式干扰,所以在init时直接将 globalCompositeOperation 重置为 'source-over'
js
class ScratchCard {
 private _init(): void {
 this.ctx = this.canvas.getContext('2d');
 this.offsetX = this.canvas.offsetLeft;
 this.offsetY = this.canvas.offsetTop;
 this._addEvent();
 if (this.config.coverImg) {
 const coverImg = new Image();
 // 添加跨域设置
 coverImg.crossOrigin = 'anonymous';
 coverImg.src = this.config.coverImg;
 coverImg.onload = () => {
 if (this.ctx) {
 this.ctx.globalCompositeOperation = 'source-over'; // 重置组合操作
模式
 this.ctx.drawImage(coverImg, 0, 0);
 this.ctx.globalCompositeOperation = 'destination-out';
 }
 };
 // 添加错误处理
 coverImg.onerror = (e) => {
 console.error('Image loading error:', e);
 // 加载失败时使⽤纯⾊背景作为后备⽅案
 if (this.ctx) {
 this.ctx.fillStyle = this.config.coverColor || '#CCCCCC';
 this.ctx.fillRect(0, 0, this.canvas.width, this.canvas.height);
 this.ctx.globalCompositeOperation = 'destination-out';
 }
 };
 } else if (this.ctx && this.config.coverColor) {
 this.ctx.fillStyle = this.config.coverColor;
 this.ctx.fillRect(0, 0, this.canvas.width, this.canvas.height);
 this.ctx.globalCompositeOperation = 'destination-out';
 }
 }
}
scratch实现
在实现刮刮卡的刮开效果时,关键在于通过 scratch 方法来模拟真实的刮除体验。在此过程中,一个至关重要的细节是正确处理触摸事件中的坐标获取。并且绘制鼠标划过的地方。
重点解析
这里在获取的时候不能直接获取 touch.clientX 和 touch.clientY ,因为Canvas 元素的实际
像素尺寸(往往与其在页面上的显示尺寸(通过 CSS 设置宽度和高度)不同步。如果直接使用未
缩放的坐标绘制内容,可能不会在正确的位置渲染,尤其是在高分辨率屏幕或有缩放的页面布局
中。通过这种方式,我们确保了绘制坐标的准确性。
绘制时我们先通过 beginPath 绘制⼀条路径,然后通过 arc 和之前传⼊的半径值来创建一个圆,最后使用 fill 方法进行填充,在混合透明的前提下,这里就会展示出被擦除的效果
js
class ScratchCard {
 private _scratch(e: MouseEvent | TouchEvent): void {
 e.preventDefault();
 if (!this.done && this.isDown && this.ctx) {
 let eventX: number;
 let eventY: number;
 const rect = this.canvas.getBoundingClientRect();
 if ('changedTouches' in e) {
 const touch = e.changedTouches[0];
 eventX = (touch.clientX - rect.left) * (this.canvas.width / rect.w
idth);
 eventY = (touch.clientY - rect.top) * (this.canvas.height / rect.h
eight);
 } else {
 eventX = (e.clientX + document.body.scrollLeft || e.pageX) - this.
offsetX || 0;
 eventY = (e.clientY + document.body.scrollTop || e.pageY) - this.o
ffsetY || 0;
 }
 //开始绘制
 this.ctx.beginPath();
 this.ctx.arc(eventX, eventY, this.config.radius, 0, Math.PI * 2);
 this.ctx.fill();
 // 如果透明的元素⽐例⼤于设置的值,则全部展现
 if (this._getFilledPercentage() > this.config.showAllPercent) {
 this._scratchAll();
 }
 }
 }
}
getFilledPercentage实现
然后就需要计算已经被擦除的比例,这里通过计算透明的像素的占比来确定擦除的比例
js
class ScratchCard {
 private _getFilledPercentage(): number {
 if (!this.ctx) return 0;
 // 获取画布的像素数据
 const imgData = this.ctx.getImageData(0, 0, this.canvas.width, this.ca
nvas.height);
 const pixels = imgData.data;
 const transPixels: number[] = [];
 // 遍历像素数据(⼀组像素有四个值RGBA所以需要+4)
 for (let i = 0; i < pixels.length; i += 4) {
 // 计算透明度是否⼩于128(128是0~255的中间值,低于128就被认为是半透明或透明
的)
 if (pixels[i + 3] < 128) {
 transPixels.push(pixels[i + 3]);
 }
 }
 // 返回百分⽐数据
 return Number(((transPixels.length / (pixels.length / 4)) * 100).toFixed(2));
 }
}
scratchAll实现
然后就是全部刮开的方法,这⾥需要处理⼀下淡出以及剩余的元素变透明的逻辑
js
class ScratchCard {
 private _scratchAll(): void {
 this.done = true;
 // 需要渐隐就添加渐隐效果,不需要就直接clear
 if (this.config.fadeOut > 0) {
 this.canvas.style.transition = `all ${this.config.fadeOut / 1000}s l
inear`;
 this.canvas.style.opacity = '0';
 setTimeout(() => {
 this._clear();
 }, this.config.fadeOut);
 } else {
 this._clear();
 }
 }
 private _clear(): void {
 if (this.ctx) {
 // destination-out 模式下,它会变成透明
 this.ctx.fillRect(0, 0, this.canvas.width, this.canvas.height);
 }
 // 如果有传⼊的回调就执⾏
 if (this.config.doneCallback) {
 this.config.doneCallback();
 }
 }
}
事件处理
最后我们只需要再加上事件监听,就可以实现刮刮卡的效果咯
重点解析
在addEventListener的option里,默认passive是false。但是如果事件是 touchstart 或touchmove的话,passive的默认值则会变成true(所以preventDefault就会被忽略了),所以这里单独给他写出来
js
class ScratchCard {
 private _addEvent(): void {
 this.canvas.addEventListener('touchstart',this._eventDown.bind(this),{
passive: false });
 this.canvas.addEventListener('touchend',this._eventUp.bind(this), { pa
ssive: false });
 this.canvas.addEventListener('touchmove',this._scratch.bind(this), { p
assive: false });
 this.canvas.addEventListener('mousedown',this._eventDown.bind(this), {
passive: false });
 this.canvas.addEventListener('mouseup', this._eventUp.bind(this), { pa
ssive: false });
 this.canvas.addEventListener('mousemove',this._scratch.bind(this), { p
assive: false });
 }
 private _eventDown(e: MouseEvent | TouchEvent): void {
 e.preventDefault();
 this.isDown = true;
 }
 private _eventUp(e: MouseEvent | TouchEvent): void {
 e.preventDefault();
 this.isDown = false;
 }
}