目录
- [Python 编写私有知识问答系统(RAG)](#Python 编写私有知识问答系统(RAG))
-
- [📝 项目说明](#📝 项目说明)
-
- [📁 目录结构](#📁 目录结构)
- [🚀 使用说明](#🚀 使用说明)
- [🔗 说明](#🔗 说明)
- 一、配置开发环境 (本文选择pycharm开发 )
-
- 1、配置pycharm
-
- 1.1、Ubuntu允许ssh远程连接
- [1.2、如何让 PyCharm Terminal 默认打开 WSL Ubuntu?](#1.2、如何让 PyCharm Terminal 默认打开 WSL Ubuntu?)
- [1.3、通过 WSL 接入解释器(interpreter)](#1.3、通过 WSL 接入解释器(interpreter))
- [1.4、同步本地文件到remote server实时测试](#1.4、同步本地文件到remote server实时测试)
- 二、编写RAG增强实现私有知识问答系统
-
- [✅ RAG 简化流程如下:](#✅ RAG 简化流程如下:)
- [1、 安装依赖](#1、 安装依赖)
- 2、构建向量库(离线阶段)
-
- [2.1、 安装向量库](#2.1、 安装向量库)
-
- [1.1、 安装Faiss向量库(本次测试使用)](#1.1、 安装Faiss向量库(本次测试使用))
- [1.2、 安装 Qdrant向量库(待选)](#1.2、 安装 Qdrant向量库(待选))
- 2.2、选择faiss向量构建脚本
- 3、优先从向量库中回答问题:
- [三、还可封装私有 API 供web调用](#三、还可封装私有 API 供web调用)
-
- [1、选用( **FastAPI** )进行封装](#1、选用( FastAPI )进行封装)
- [2、选择 Chainlit 作为 Web 应用](#2、选择 Chainlit 作为 Web 应用)
Python 编写私有知识问答系统(RAG)
检索增强生成 -- RAG(retrieval-augmented generation)
📝 项目说明
- 不依赖 LangChain,纯Python基于 sentence-transformers + FAISS/Qdrant 构建
- DeepSeek-R1 本地推理通过 Flask 提供 HTTP 接口
- 使用简单,支持 CLI 交互
📁 目录结构
bash
pure_python_rag/
├── Chainlit/ # 前端使用Chainlit,并封装faiss为api调用 (chainlit + faiss + LLM)
│   └── rag_chainlit/
│       ├── app.py  # 前端使用Chainlit调用封装的API
│       └── faiss_api.py # 用Faiss做检索封装成API
├── data/
│   └── raw_docs/ # 文本资料放这里(txt格式)
│       └── how_to_generate_cert.txt
├── embedding_faiss.py  # 选择faiss向量构建脚本
├── embedding_qdrant.py # 选择qdrant向量构建脚本
├── faiss_index/        # FAISS 向量索引自动生成的目录
├── rag_infer_faiss.py  # faiss检索+推理脚本 -- 支持 CLI 交互
├── rag_infer_qdrant.py # qdrant检索+推理脚本 -- 支持 CLI 交互
├── requirements.txt    # 依赖列表
└── test.py			   # 测试各个模块的脚本
🚀 使用说明
-
安装依赖(下有具体安装步骤)
pip install -r requirements.txt
-
准备资料文件(.txt)放入
data/raw_docs/ -
构建索引
python embedding.py
-
启动 cli 问答
python rag_infer.py
🔗 说明
默认使用 all-MiniLM-L6-v2 向量模型,你可替换为其他模型。
DeepSeek-R1 推理服务需提供 /generate 接口,POST JSON 格式如下:
json
{ "prompt": "..." }返回格式为:
json
{ "response": "..." }一、配置开发环境 (本文选择pycharm开发 )
- (可跳过根据自身情况选择即可)
1、配置pycharm
1.1、Ubuntu允许ssh远程连接
WSL 启动的ubuntu默认是没有ssh的,需要在ubuntu上安装ssh服务
shell
sudo apt install openssh-server1.2、如何让 PyCharm Terminal 默认打开 WSL Ubuntu?
设置 Terminal 默认使用 WSL
打开 PyCharm 进入菜单:File > Settings > Tools > Terminal
找到 Shell path(终端路径),改成:
wsl.exe ~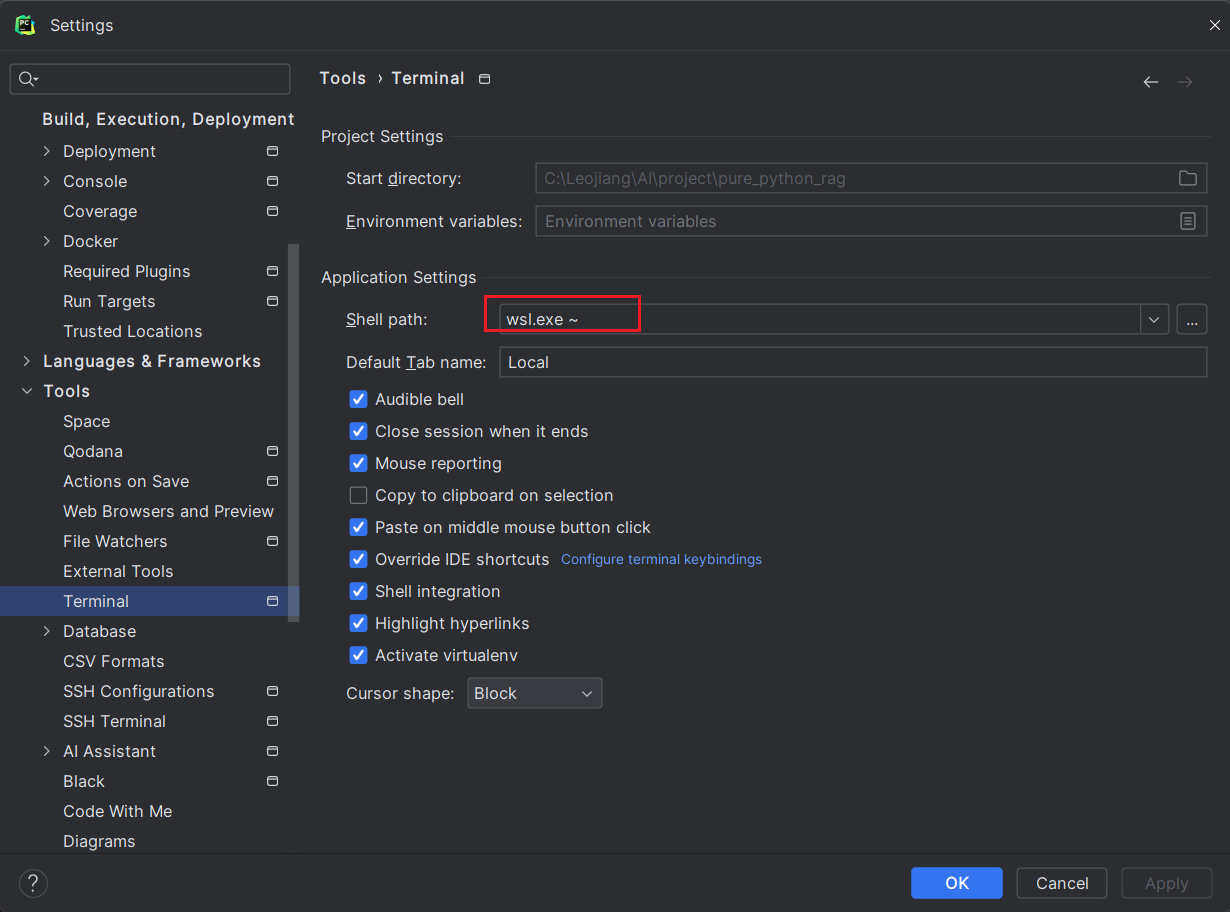
then remoter server "leojiang@E-5CG2310DND" can be used.

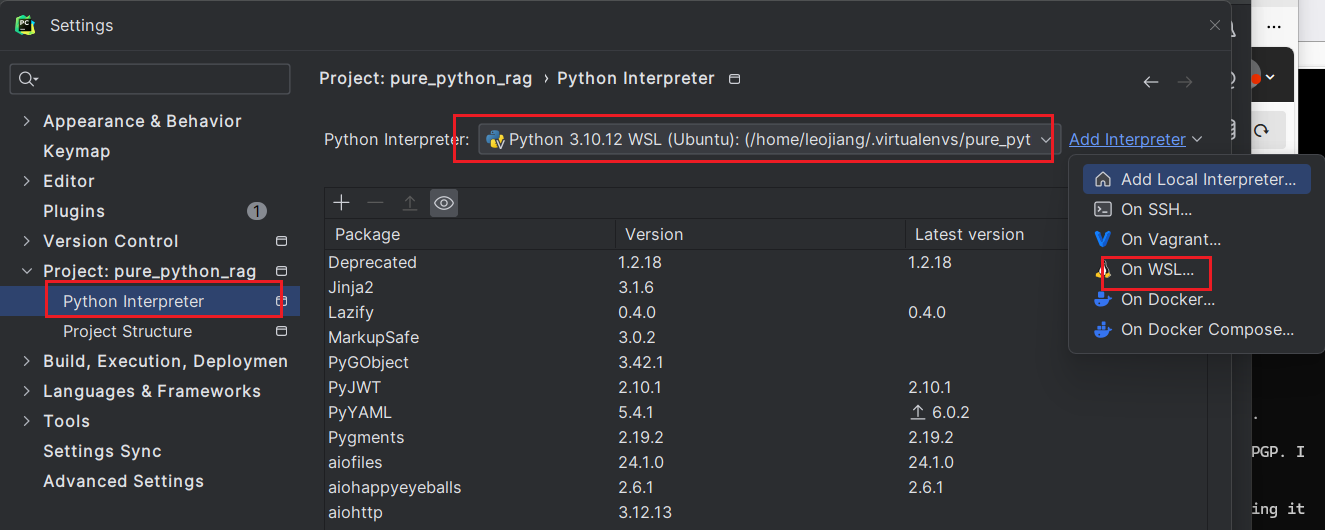
1.3、通过 WSL 接入解释器(interpreter)
打开 PyCharm: File → Settings → Project: your_project_name → Python Interpreter
- 点击右上角 ⚙ → Add... 右侧选择 WSL
- 👉 它会显示你的 WSL 发行版(如 Ubuntu)
- ✅ 点击右下角的 "Existing environment" (注意:这个操作必须在 WSL 模式下,才会可用)
点击 OK,PyCharm 会自动下载 helper 并构建索引
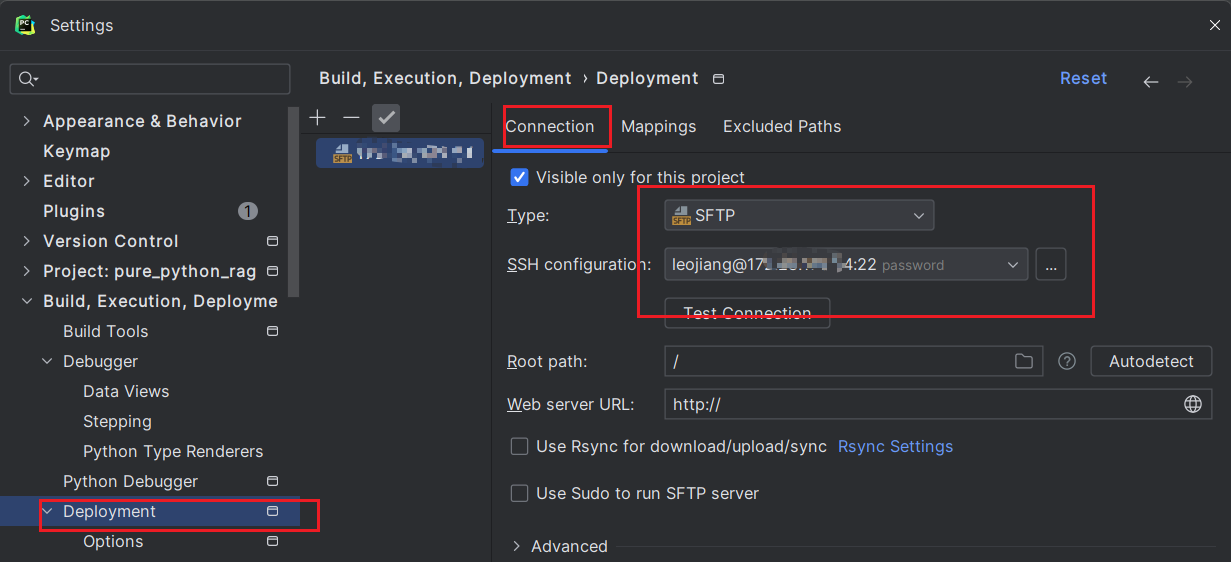
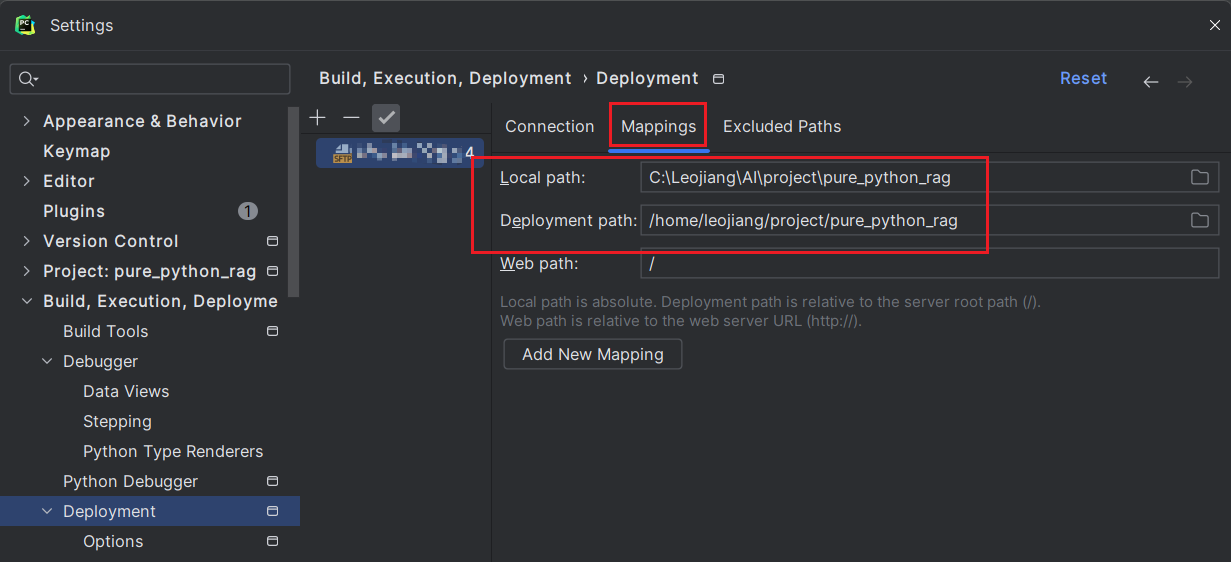
1.4、同步本地文件到remote server实时测试
配置Deployment path mapping -- 同步本地文件到remote server
二、编写RAG增强实现私有知识问答系统
✅ RAG 简化流程如下:
典型的 RAG(Retrieval-Augmented Generation)检索增强生成 工作机制的核心流程:
-
构建向量库(离线阶段):
- 将本地知识文档(如 PDF、txt、Word 等)进行分段(chunk)处理。
- 每个段落生成一个向量(embedding),例如用
all-MiniLM-L6-v2模型。 - 将这些向量存入 FAISS 等向量数据库中,并保留每段原文(方便后续召回使用)。
-
用户提问时(在线阶段):
- 把用户问题用相同的 embedding 模型转成向量。
- 在向量库中查找最近的几个段落(通常是 3~5 段),作为相关上下文。
-
构造 Prompt 提交给大模型(LLM):
-
把这几个相关段落作为 "资料" 或 "上下文" 放入 prompt 模板中:
pythontext复制编辑你是企业内部知识问答助手,请根据下列资料回答用户问题。 资料: {context} 问题: {question} -
将 prompt 发给 LLM(如 DeepSeek、GPT-4、Yi 等)生成答案。
-
-
LLM 根据提供的资料来"总结回答",避免幻觉,更具上下文针对性。
1、 安装依赖
方法一、可以直接指定文件安装.
├── requirements.txt
ruby
faiss-cpu
sentence-transformers
requests
安装
ruby
pip install -r requirements.txt方法二、也可以手动指定安装。
bash
# requests 是 Python 里最流行的 HTTP 库,作用就是让你方便地发送 HTTP 请求,比如 GET、POST、PUT、DELETE 等,跟网络服务器交互。
pip install requests

# sentence_transformers 是一个基于 Transformers 和 PyTorch 的 Python 库,主要用途是将文本(句子、段落等)转换成 向量(embedding),用于各种自然语言处理(NLP)任务。它的核心优势是生成的向量在语义空间上表现良好,可以用于语义搜索、相似度匹配、聚类等应用。https://sbert.net/docs/installation.html
pip install sentence-transformers
2、构建向量库(离线阶段)
2.1、 安装向量库
1.1、 安装Faiss向量库(本次测试使用)
使用 pip 安装(最简单)适用于大多数用户:
bash
pip install faiss-cpu如果你用的是 NVIDIA 显卡 + CUDA 环境,并希望使用 GPU 加速:
bash
pip install faiss-gpu⚠️ 注意:
faiss-gpu需要你的 CUDA 环境配置正确(例如 CUDA 11.8 + NVIDIA 驱动 + PyTorch 已能用 GPU)。
1.2、 安装 Qdrant向量库(待选)
yaml
version: '3.9'
services:
  qdrant:
    image: qdrant/qdrant
    container_name: qdrant
    ports:
      - "6333:6333"
      - "6334:6334"
    volumes:
- ./qdrant_data:/qdrant/storage-
6333: REST API 端口 -
6334: gRPC 端口 -
/qdrant/storage: 存储路径(可持久化)运行:
bashdocker-compose up -d
| 特性 | FAISS | Qdrant |
|---|---|---|
| 部署方式 | 本地库,嵌入 Python | 本地或容器部署,REST/gRPC API |
| 查询方式 | Python 内部调用 | REST API / SDK(Python、JS、Rust 等) |
| 是否持久化 | ❌ 默认不持久化(需手动保存 .index) |
✅ 自动持久化(支持文件或嵌入式 DB) |
| 支持元数据过滤 | ❌ 不支持(需自己维护映射) | ✅ 原生支持(filter 查询非常灵活) |
| 向量更新能力 | ⚠️ 无删除,需重建或全量替换 | ✅ 原生支持增删改 |
| 数据量支持 | ✅ 中小规模(适合 <1 亿条) | ✅ 大小皆宜(内存或 RocksDB) |
| 查询速度 | ⚡ 快(内存中) | ⚡⚡ 快(可持久化,结构优化) |
| 多语言客户端 | ❌ 仅 Python | ✅ Python、Go、Rust、Node.js 等 |
| 社区 & 文档 | ⭐⭐ 中等 | ⭐⭐⭐⭐ 丰富,API 文档全面 |
| 企业部署推荐等级 | ⚠️ 原型开发更适合 | ✅ 推荐用于生产级 RAG |
2.2、选择faiss向量构建脚本
① 将本地知识文档(如 PDF、txt、Word 等)进行分段(chunk)处理。
② 每个段落生成一个向量(embedding),例如用
all-MiniLM-L6-v2模型。③ 将这些向量存入 FAISS 等向量数据库中,并保留每段原文(方便后续召回使用)。
├── embedding_faiss.py
python
from sentence_transformers import SentenceTransformer
import faiss
import os
import numpy as np
import json

DATA_PATH = "./data/raw_docs/"
INDEX_PATH = "/home/leojiang/project/pure_python_rag/faiss_index"
EMBEDDING_MODEL = "/home/leojiang/project/pure_python_rag/all-MiniLM-L6-v2"
model = SentenceTransformer(EMBEDDING_MODEL)

def load_docs():
    texts = []
    for fname in os.listdir(DATA_PATH):
        with open(os.path.join(DATA_PATH, fname), 'r', encoding='utf-8') as f:
            print("file name: ", fname)
            raw = f.read()
            chunks = [raw[i:i+500] for i in range(0, len(raw), 400)]
            texts.extend(chunks)
    return texts

def build_index(texts):
    embeddings = model.encode(texts, normalize_embeddings=True)
    index = faiss.IndexFlatIP(embeddings.shape[1])
    index.add(np.array(embeddings))
    os.makedirs(INDEX_PATH, exist_ok=True)
    faiss.write_index(index, os.path.join(INDEX_PATH, "docs.index"))
    with open(os.path.join(INDEX_PATH, "docs.json"), "w", encoding="utf-8") as f:
        json.dump(texts, f, ensure_ascii=False)

if __name__ == "__main__":
    docs = load_docs()
    build_index(docs)
    print("✅ FAISS 索引构建完成")
运行后会在 ├── faiss_index/ 看到我们生成的索引。raw_docs目录中的文件将会向量化,供之后查询引用。
-
注:如果运行
embedding_faiss.py后embedding的模型无法自动下载,可以手动下载(下载完后对比下大小,要和hugginface上的一致要不无法使用)rubysudo apt install git-lfs git lfs install git clone https://huggingface.co/sentence-transformers/all-MiniLM-L6-v2 cd all-MiniLM-L6-v2 git lfs pull
推荐入门向量模型 下载地址 HuggingFace
| 场景 | 模型名称 | 备注 |
|---|---|---|
| 中文单语句向量 | shibing624/text2vec-base-chinese |
中文专用,效果不错 |
| 英文快速入门 | all-MiniLM-L6-v2 |
轻量快,广泛用 |
| 英文高质量 | all-mpnet-base-v2 |
精度高,速度适中 |
| 多语言支持 | paraphrase-multilingual-MiniLM-L12-v2 |
支持多语言,通用性强 |
| 百度中文BGE | BAAI/bge-base-zh-v1.5 |
需确认是否完全兼容,可能需自定义加载 |
3、优先从向量库中回答问题:
-
用户提问时(在线阶段):
- 把用户问题用相同的 embedding 模型转成向量。
- 在向量库中查找最近的几个段落(通常是 3~5 段),作为相关上下文。
-
构造 Prompt 提交给大模型(LLM):
-
把这几个相关段落作为 "资料" 或 "上下文" 放入 prompt 模板中:
pythontext复制编辑你是企业内部知识问答助手,请根据下列资料回答用户问题。 资料: {context} 问题: {question} -
将 prompt 发给 LLM(如 DeepSeek、GPT-4、Yi 等)生成答案。
-
-
LLM 根据提供的资料来"总结回答",避免幻觉,更具上下文针对性。
├── rag_infer_faiss.py # faiss检索+推理脚本 -- 支持 CLI 交互
python
import threading
import faiss
import numpy as np
import json
from sentence_transformers import SentenceTransformer
import requests
import os
import time

INDEX_PATH = "/home/leojiang/project/pure_python_rag/faiss_index"
EMBEDDING_MODEL = "/home/leojiang/project/pure_python_rag/all-MiniLM-L6-v2"
DEEPSEEK_API = "http://localhost:11434/api/generate"

model = SentenceTransformer(EMBEDDING_MODEL)
index = faiss.read_index(os.path.join(INDEX_PATH, "docs.index"))
texts = json.load(open(os.path.join(INDEX_PATH, "docs.json"), encoding="utf-8"))

thinking = True  # 控制 loading 动画
received_any_response = False  # 控制是否接收到模型的第一个 token
def loading_animation():
    spinner = ["|", "/", "-", "\\"]
    idx = 0
    while thinking:
        print(f"\r🤖 正在思考 {spinner[idx % len(spinner)]}", end="", flush=True)
        idx += 1
        time.sleep(0.1)
def query(question):
    # 启动 loading 动画线程
    global thinking, received_any_response
    thinking = True  # 控制 loading 动画
    received_any_response = False  # 控制是否接收到模型的第一个 token
    t = threading.Thread(target=loading_animation)
    t.start()

    q_emb = model.encode([question], normalize_embeddings=True)
    scores, indices = index.search(np.array(q_emb), k=5)
    context = "\n".join([texts[i] for i in indices[0]])

    prompt = f"""
你是企业内部知识问答助手,请根据下列资料回答用户问题。

资料:
{context}

问题:{question}
"""
    resp = requests.post(DEEPSEEK_API, json={"prompt": prompt
                                             ,"model": "deepseek-r1:7b"
                                             # ,"model": "llama3"
                                             ,"stream": True},stream=True)
    # return resp.json().get("response", "⚠️ 无法获取回答") # 这样是一次性读取完整的响应需要配置stream=False
    print("✅ LLM 流式响应开始:")
    full_response = ""
    print("🤖 回答开始:", end="", flush=True)
    for line in resp.iter_lines():
        if line:
            line_str = line.decode('utf-8')
            try:
                data = json.loads(line_str)
                chunk = data.get("response", "")
                done = data.get("done", False)
                # 过滤无意义内容
                if chunk.strip() and chunk not in ["<think>", "</think>"]:
                    # 检测到返回内容后关闭动画
                    if not received_any_response:
                        thinking = False
                        t.join()
                        received_any_response = True
                    print(chunk, end="", flush=True)  # 实时打印
                    full_response += chunk
                if done:
                    print("\n🤖 回答结束")
                    break
            except json.JSONDecodeError:
                thinking = False
                t.join()
                # 忽略无法解析的行
                pass
    return full_response
    print("✅ LLM 流式响应结束:")

if __name__ == "__main__":
    while True:
        q = input("🧠 请输入问题:")
        query(q)
运行rag_infer_faiss.py ,就可以进行cli实时交互啦。
三、还可封装私有 API 供web调用
├── Chainlit/ # 前端使用Chainlit,并封装faiss为api调用 (chainlit + faiss + LLM)
│ └── rag_chainlit/
│ ├── app.py # 前端使用Chainlit调用封装的API
│ └── faiss_api.py # 用Faiss做检索封装成API
1、选用( FastAPI )进行封装
ruby
pip install fastapi uvicorn
# or
pip install "fastapi[standard]" # 推荐| 安装命令 | 安装内容 | 适用场景 |
|---|---|---|
pip install fastapi uvicorn |
最小依赖 | 快速起项目/最小化依赖需求 |
pip install "fastapi[standard]" |
推荐依赖全安装 | 表单上传、HTML 渲染、验证等完整功能 |
├── faiss_api.py
python
from fastapi import FastAPI, Request
from fastapi.responses import StreamingResponse
import faiss
import numpy as np
import json
from sentence_transformers import SentenceTransformer
import requests
import os
from fastapi.middleware.cors import CORSMiddleware

app = FastAPI()
app.add_middleware(
    CORSMiddleware,
    allow_origins=["*"],
    allow_credentials=True,
    allow_methods=["*"],
    allow_headers=["*"],
)
# 初始化模型和索引
INDEX_PATH = "/home/leojiang/project/pure_python_rag/faiss_index"
EMBEDDING_MODEL = "/home/leojiang/project/pure_python_rag/all-MiniLM-L6-v2"
DEEPSEEK_API = "http://localhost:11434/api/generate"

model = SentenceTransformer(EMBEDDING_MODEL)
index = faiss.read_index(os.path.join(INDEX_PATH, "docs.index"))
texts = json.load(open(os.path.join(INDEX_PATH, "docs.json"), encoding="utf-8"))

def build_prompt(context, question):
    return f"""
你是企业内部知识问答助手,请根据下列资料回答用户问题。

资料:
{context}

问题:{question}
"""

@app.post("/chat")
async def chat(request: Request):
    body = await request.json()
    question = body.get("question", "")

    # 检索相关文档
    q_emb = model.encode([question], normalize_embeddings=True)
    scores, indices = index.search(np.array(q_emb), k=5)
    context = "\n".join([texts[i] for i in indices[0]])
    prompt = build_prompt(context, question)

    # 请求 LLM 流式响应
    def stream_response():
        resp = requests.post(DEEPSEEK_API, json={
            "prompt": prompt,
            "model": "deepseek-r1:7b",
            "stream": True
        }, stream=True)
        for line in resp.iter_lines():
            if line:
                try:
                    data = json.loads(line.decode('utf-8'))
                    chunk = data.get("response", "")
                    done = data.get("done", False)
                    if chunk.strip() and chunk not in ["<think>", "</think>"]:
                        yield chunk
                    if done:
                        break
                except json.JSONDecodeError:
                    continue

return StreamingResponse(stream_response(), media_type="text/plain")- 其实就是把我们
rag_infer_faiss.py中的内容封装成API 供web调用
1.1、启动FastAPI
ruby
# 快速启动 (需要 FastAPI ≥ 0.110.0,引入了 fastapi dev 命令。✅ 内置开发服务器启动器(封装了 uvicorn))
fastapi dev faiss_api.py
## or
fastapi dev faiss_api.py --port 8001 --host 0.0.0.0
# or
uvicorn faiss_api:app --host 0.0.0.0 --port 8001 --reload
1.2、测试
ruby
curl -X POST http://0.0.0.0:8001/chat -d '{"question":"你好"}' -H "Content-Type: application/json"2、选择 Chainlit 作为 Web 应用
2.1、安装
ruby
pip install chainlit
chainlit hello # If this opens the `hello app` in your browser, you're all set!├── app.py
python
import chainlit as cl
import httpx
import os

API_URL = "http://0.0.0.0:8001/chat"

# 清除系统代理变量,避免 httpx 自动走公司网络代理
os.environ.pop("http_proxy", None)
os.environ.pop("https_proxy", None)
os.environ.pop("HTTP_PROXY", None)
os.environ.pop("HTTPS_PROXY", None)

@cl.on_chat_start
async def start():
    cl.user_session.set("history", [])

@cl.on_message
async def on_message(message: cl.Message):
    question = message.content

    try:
        async with httpx.AsyncClient(timeout=None) as client:
            async with client.stream("POST", API_URL, json={"question": question}) as response:
                if response.status_code != 200:
                    await cl.Message(content=f"❌ 请求失败,状态码: {response.status_code}").send()
                    return

                # 先发送一个空消息,后续逐步更新内容
                chat_msg = cl.Message(content="")
                await chat_msg.send()
                # 流式输出的关键在于 使用 httpx.AsyncClient.stream() 配合 response.aiter_text() 逐块读取服务器返回内容,而不是一次性拿到整个响应。
                async for chunk in response.aiter_text():
                    if chunk.strip():
                        chat_msg.content += chunk
                        await chat_msg.update()

                # 追加标记,提示回答完成
                chat_msg.content += "\n✅ 回答完成"
                await chat_msg.update()

    except Exception as e:
        await cl.Message(content=f"❌ 异常: {str(e)}").send()
① 解决日志返回 403 Forbidden
rubyhttpx 默认会读取 http_proxy 环境变量 请求被偷偷转发到 公司代理(如 squid) 然后 squid 判断这个内部地址 不在允许的目标列表中 → 返回 403 Forbidden解决方法 ------ chainlit 所需运行的
app.py中加如下条件绕过限制
ruby# 清除系统代理变量,避免 httpx 自动走公司网络代理 os.environ.pop("http_proxy", None) os.environ.pop("https_proxy", None) os.environ.pop("HTTP_PROXY", None) os.environ.pop("HTTPS_PROXY", None)
2.2、启动
ruby
chainlit run app.py
# or (推荐)
chainlit run app.py --host 0.0.0.0 --port 8501 -w - -w 标志告诉Chainlit启用自动重新加载,这样您就不需要每次更改应用程序时都重新启动服务器

(完,以上是简单的实战流程,愿对大家有所帮助。)
测试模块的脚本供大家参考
└── test.py
cpp
import numpy as np
import requests
import faiss
import json
from sentence_transformers import SentenceTransformer

def main():
    url = "http://localhost:11434/api/generate"
    payload = {
        "model": "deepseek-r1:7b",
        "prompt": "DeepSeek 是什么?",
        "stream": True
    }

    try:
        response = requests.post(url, json=payload,stream=True)
        response.raise_for_status()  # 检查请求是否成功
        # result = response.json() # 这样是一次性读取完整的响应需要配置stream=False
        # print("✅ LLM 响应:", result.get("response", "无返回内容"))
        print("✅ LLM 流式响应开始:")
        full_response = ""
        print("🤖 正在回答...", end="", flush=True)
        for line in response.iter_lines(decode_unicode=True):
            if line:
                line_str = line.decode('utf-8')
                try:
                    data = json.loads(line_str)
                    chunk = data.get("response", "")
                    done = data.get("done", False)
                    # 过滤无意义内容
                    if chunk.strip() and chunk not in ["<think>", "</think>"]:
                        print(chunk, end="", flush=True)  # 实时打印
                        full_response += chunk
                    if done:
                        print("\n🤖 回答结束")
                        break
                except json.JSONDecodeError:
                    # 忽略无法解析的行
                    pass

        return full_response
    except requests.exceptions.RequestException as e:
        print("❌ 请求失败:", e)
    except ValueError:
        print("❌ 无法解析 JSON 响应")

def test_faiss():
    print("FAISS version:", faiss.__version__)

def test_net():
    try:
        r = requests.get("https://huggingface.co")
        print("✅ 能联网,状态码:", r.status_code)
    except Exception as e:
        print("❌ 无法联网:", e)
        print("run command: git lfs install && git clone https://huggingface.co/sentence-transformers/all-MiniLM-L6-v2")

def test_model():
    model = SentenceTransformer("/home/leojiang/project/pure_python_rag/all-MiniLM-L6-v2")

    sentences = [
        "That is a happy person",
        "That is a happy dog",
        "That is a very happy person",
        "Today is a sunny day"
    ]
    # 生成嵌入向量
    embeddings = model.encode(sentences)
    # 计算相似度矩阵(返回PyTorch张量)
    similarities = model.similarity(embeddings, embeddings)
    print("相似度矩阵形状:", similarities.shape)

    # 关键改进1:打印具体数值(保留4位小数)
    print("\n具体相似度矩阵:")
    print(np.round(similarities.cpu().numpy(), 4))  # 转换为numpy并打印
    # [
    #     [1.     0.821  0.9476 0.2107],  # 句子0 vs 所有句子
    #     [0.821  1.     0.7619 0.1836],  # 句子1 vs 所有句子
    #     [0.9476 0.7619 1.     0.2337],  # 句子2 vs 所有句子
    #     [0.2107 0.1836 0.2337 1.]  # 句子3 vs 所有句子
    # ]


if __name__ == "__main__":
    # main() # 流式响应测试所用的 LLM
    # test_faiss() # 测试faiss是否安装成功
    # test_net() # 测试当前环境能否自动获取所需的向量模型
    test_model() # 测试向量模型
更多应用推荐请参考: LLM应用层推荐