环境
window10 22H2
HCL V5.10.3(开启win7兼容模式)
参考视频: B站UP主:大十字不理人
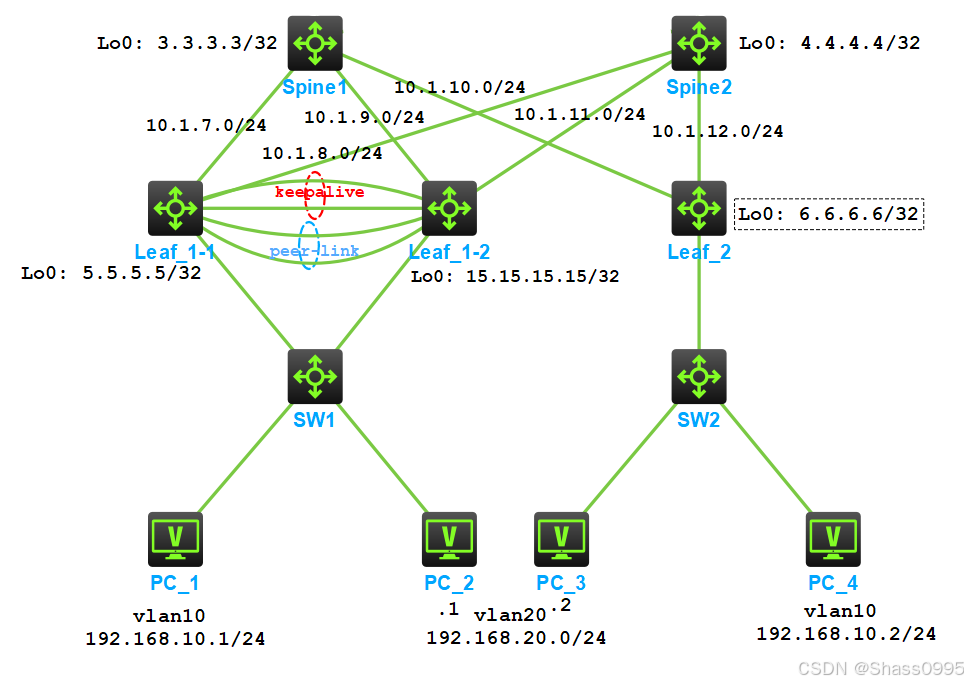
拓扑
本文参考B站视频思路,实现BGP EVPN Vxlan分布式+M-LAG 二层通信,底层IGP使用OSPF。
配置
1 基础IP配置以及IGP配置(略)
OSPF中宣告各设备的链路地址以及回环接口即可。
2 M-LAG配置
Leaf_1-1 与Leaf_1-2直接链路为G1/0/5 To g1/0/8,其中:5、6口用于keepalive链路,7、8口用于peer-link。
2.1 Leaf_1-1
php
#
vlan 10 20
#
ip vpn-instance keepalive	//建立vpn实例,后续给keepalive链路使用(g1/0/5 t g 1/0/6)
 quit
#
interface Bridge-Aggregation 1	//创建peer-link链路(g1/0/7 t g 1/0/8)
 quit
#
interface range g1/0/7 g1/0/8
 port link-aggregation group 1
 quit
#
interface Bridge-Aggregation 1
 port m-lag peer-link 1
 link-aggregation mode  dynamic
 undo port trunk peermit vlan 1
 quit
#
interface Bridge-Aggregation 2	//创建下联聚合口(g1/0/3)
 quit
#
interface g 1/0/3
 port link-aggregation group 2
 quit
#
interface Bridge-Aggregation 2
 port m-lag group 2
 link-aggregation mode dynamic
 port link-type trunk
 port trunk peermit vlan 10 20
 undo port trunk peermit vlan 1
 quit
#
interface ragg 1    //创建keepalive链路
 quit
#
interface range g1/0/5 g1/0/6
 port link-mode route
 port link-aggregation group  1
 quit
#
interface ragg 1
 ip binding vpn-instance  keepalive
 ip address  10.10.10.1 30
 link-aggregation mode dynamic
 quit
#
 m-lag mad exclude interface Route-Aggregation 1	# 排除keepalive聚合口
 m-lag restore-delay 120	# 两边一致
 m-lag system-mac 0001-0001-0001 	# 两边一致
 m-lag system-number 1 	# 两边不一致
 m-lag system-priority 123	# 两边一致
 m-lag consistency-check disable	# 禁用M-LAG的一致性检查,实验中如果不敲下联链路会自行Dowon
 m-lag consistency-check mode loose # 将M-LAG一致性检查设置为宽松模式
 m-lag standalone enable delay 30
 m-lag keepalive ip destination 10.10.10.2 source 10.10.10.1 vpn-instance keepalive
#
2.2 Leaf_1-2
Leaf_1-2的聚合口配置与Leaf_1-1的一致,此处不再赘述,Leaf_1-2的m-lag配置如下:
php
#
interface Route-Aggregation1
 ip binding vpn-instance keepalive
 ip address 10.10.10.2 255.255.255.252
 link-aggregation mode dynamic
#
 m-lag mad exclude interface Route-Aggregation1
 m-lag restore-delay 120
 m-lag system-mac 0001-0001-0001
 m-lag system-number 2
 m-lag system-priority 123
 m-lag consistency-check disable
 m-lag consistency-check mode loose
 m-lag standalone enable delay 30
 m-lag keepalive ip destination 10.10.10.1 source 10.10.10.2 vpn-instance keepalive
#
2.3 SW1
php
vlan 10
#
vlan 20
interface Bridge-Aggregation 2
 quit
#
interface g 1/0/7 to g 1/0/8
 port link-aggregation group 2
 quit
#
interface Bridge-Aggregation 2
 link-aggregation mode dynamic
 port link-type trunk
 port trunk peermit vlan 10 20
 undo port trunk peermit vlan 1
 quit
#
2.4 M-LAG验证
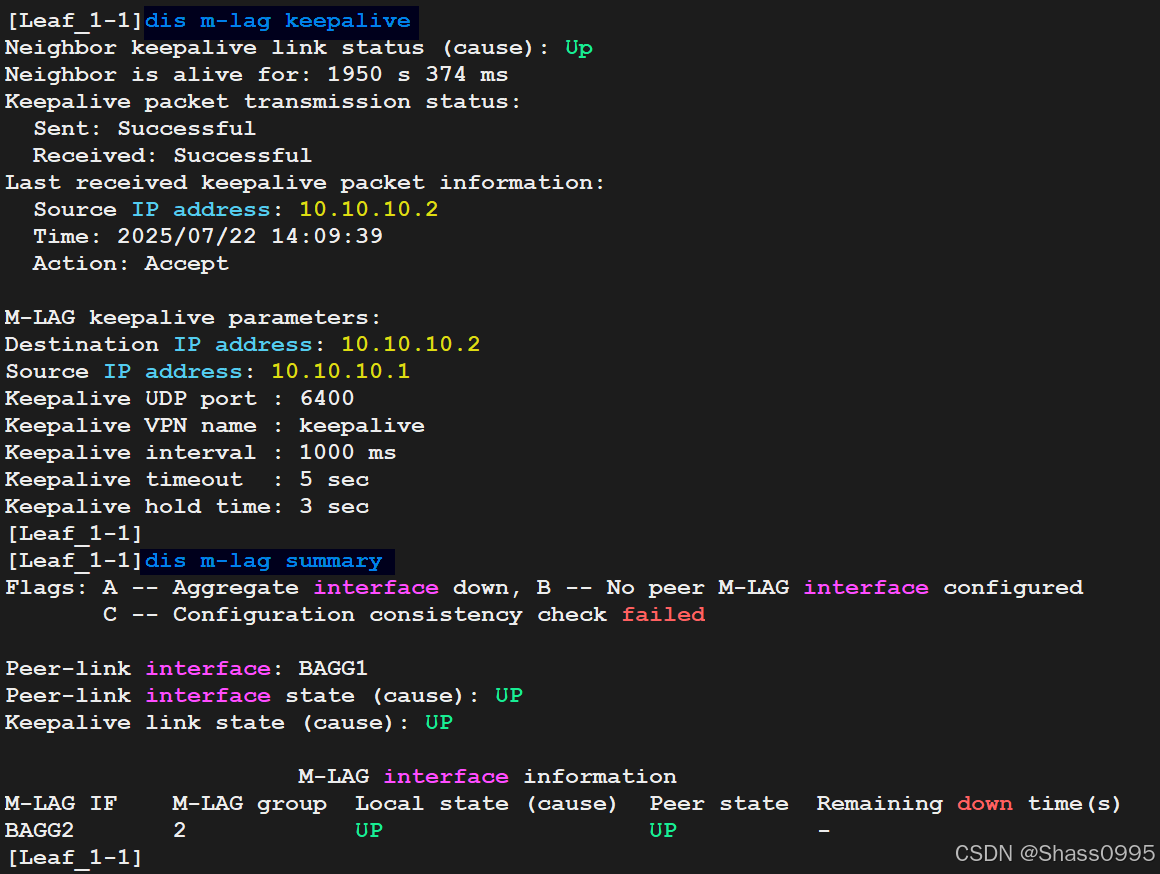
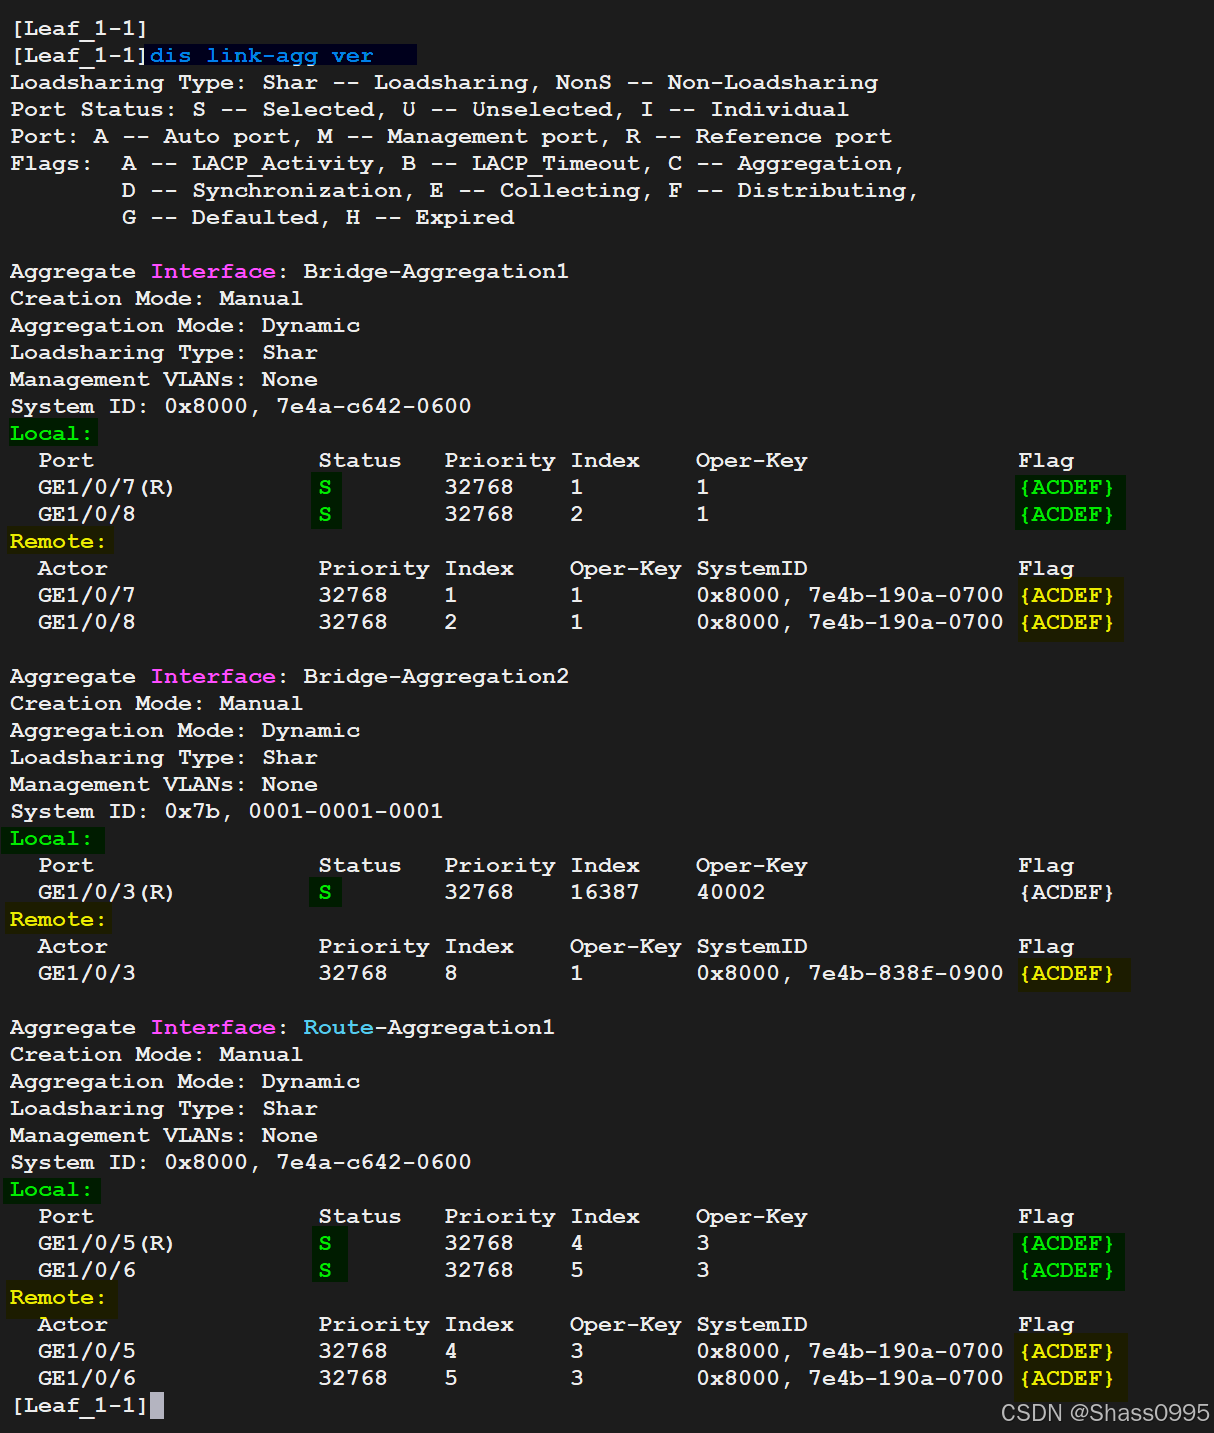
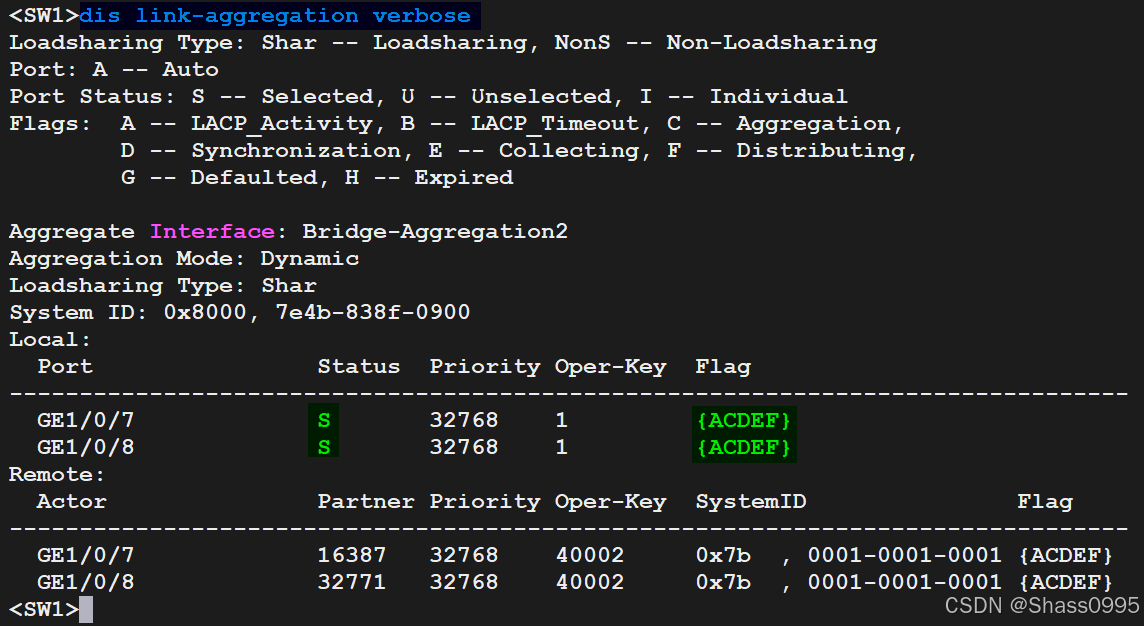
至此,M-LAG配置结束。
3 建立VXLAN隧道
3.1 配置VSI(类似华为的BD)
3.1.1 Leaf_1-1
php
#
l2vpn enable	# 使能l2vpn
vxlan tunnel arp-learning disable
vxlan tunnel mac-learning disable
#
vsi 10
 vxlan 10	# 二层VNI
 evpn encapsulation vxlan	#evpn 封装类型为vxlan
  route-distinguisher 10:10
  vpn-target 10:10 export-extcommunity
  vpn-target 10:10 import-extcommunity
#
vsi 20
 vxlan 20
 evpn encapsulation vxlan
  route-distinguisher 20:20
  vpn-target 20:20 export-extcommunity
  vpn-target 20:20 import-extcommunity
#
interface Bridge-Aggregation2	# 由于下联接口做了聚合,所以VTEP的几口需要在聚合口里面配置
 vtep access port	# 接入端口

 service-instance 10	# 允许vlan10通过,对应vsi 10
  encapsulation s-vid 10
  xconnect vsi 10

 service-instance 20	# # 允许vlan20通过,对应vsi 20
  encapsulation s-vid 20
  xconnect vsi 20
#
bgp 100
 timer keepalive 3 hold 9
 timer connect-retry 3
 peer 3.3.3.3 as-number 100
 peer 3.3.3.3 connect-interface LoopBack0
 peer 4.4.4.4 as-number 100
 peer 4.4.4.4 connect-interface LoopBack0
 #
 address-family l2vpn evpn  # 与Spine1,2建立bgp l2vpn evpn 对等体关系
  peer 3.3.3.3 enable
  peer 4.4.4.4 enable
#
interface loopback 0	# 用于evpn m-lag group地址,
 ip add 1.2.3.4 32
#
evpn m-lag group 1.2.3.4	# 在建立vxlan隧道时,使用该地址作为vtep地址与对端建隧道,该地址也需要宣告到ospf中
Leaf_1-2的配置与Leaf_1-1的一致,此处不再赘述。
3.1.2 Leaf_2
php
l2vpn enable	# 使能l2vpn
vxlan tunnel arp-learning disable
vxlan tunnel mac-learning disable
#
vsi 10
 vxlan 10
 evpn encapsulation vxlan
  route-distinguisher 10:10
  vpn-target 10:10 export-extcommunity
  vpn-target 10:10 import-extcommunity
#
vsi 20
 vxlan 20
 evpn encapsulation vxlan
  route-distinguisher 20:20
  vpn-target 20:20 export-extcommunity
  vpn-target 20:20 import-extcommunity
#
interface GigabitEthernet1/0/3
 vtep access port
 #
 service-instance 10
  encapsulation s-vid 10
  xconnect vsi 10
 #
 service-instance 20
  encapsulation s-vid 20
  xconnect vsi 20
#
bgp 100
 timer keepalive 3 hold 9
 timer connect-retry 3
 peer 3.3.3.3 as-number 100
 peer 3.3.3.3 connect-interface LoopBack0
 peer 4.4.4.4 as-number 100
 peer 4.4.4.4 connect-interface LoopBack0
 #
 address-family l2vpn evpn
  peer 3.3.3.3 enable
  peer 4.4.4.4 enable
#
3.2 配置Spine(RR)
Spine1
php
bgp 100
 timer keepalive 3 hold 9
 timer connect-retry 3
 peer 5.5.5.5 as-number 100
 peer 5.5.5.5 connect-interface LoopBack0
 peer 6.6.6.6 as-number 100
 peer 6.6.6.6 connect-interface LoopBack0
 peer 15.15.15.15 as-number 100
 peer 15.15.15.15 connect-interface LoopBack0
 #
 address-family l2vpn evpn
  undo policy vpn-target
  peer 5.5.5.5 enable
  peer 5.5.5.5 reflect-client
  peer 6.6.6.6 enable
  peer 6.6.6.6 reflect-client
  peer 15.15.15.15 enable
  peer 15.15.15.15 reflect-client
#
Spine2的配置与Spine1一致,此处不再赘述。
3.3 VXLAN隧道建立验证
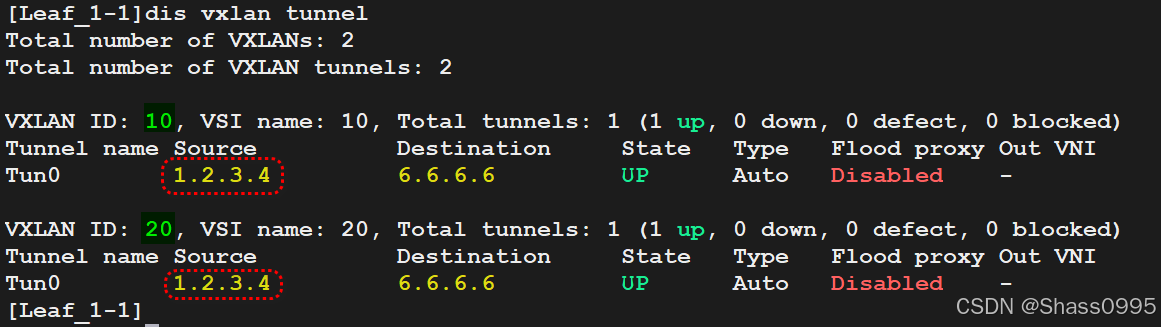
3.3.1 Leaf_1-1
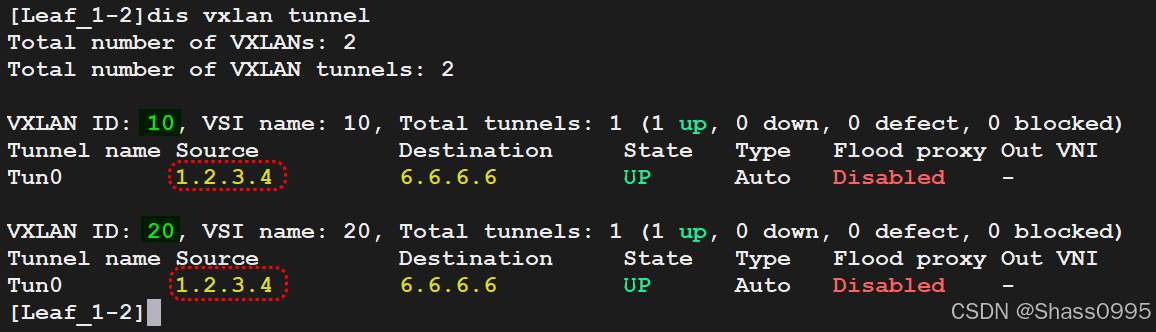
3.3.2 Leaf_1-2
3.3.3 Leaf_2
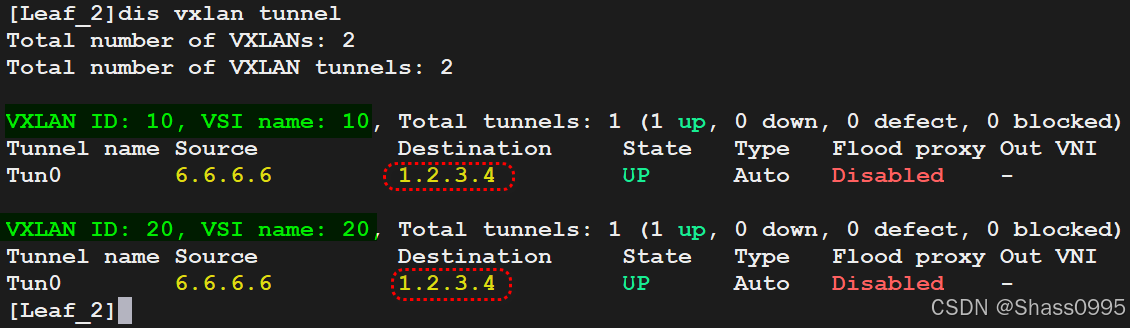
至此,VXLAN隧道通过BGP EVPN成功建立。
4 二层互访测试
4.1 PC_1
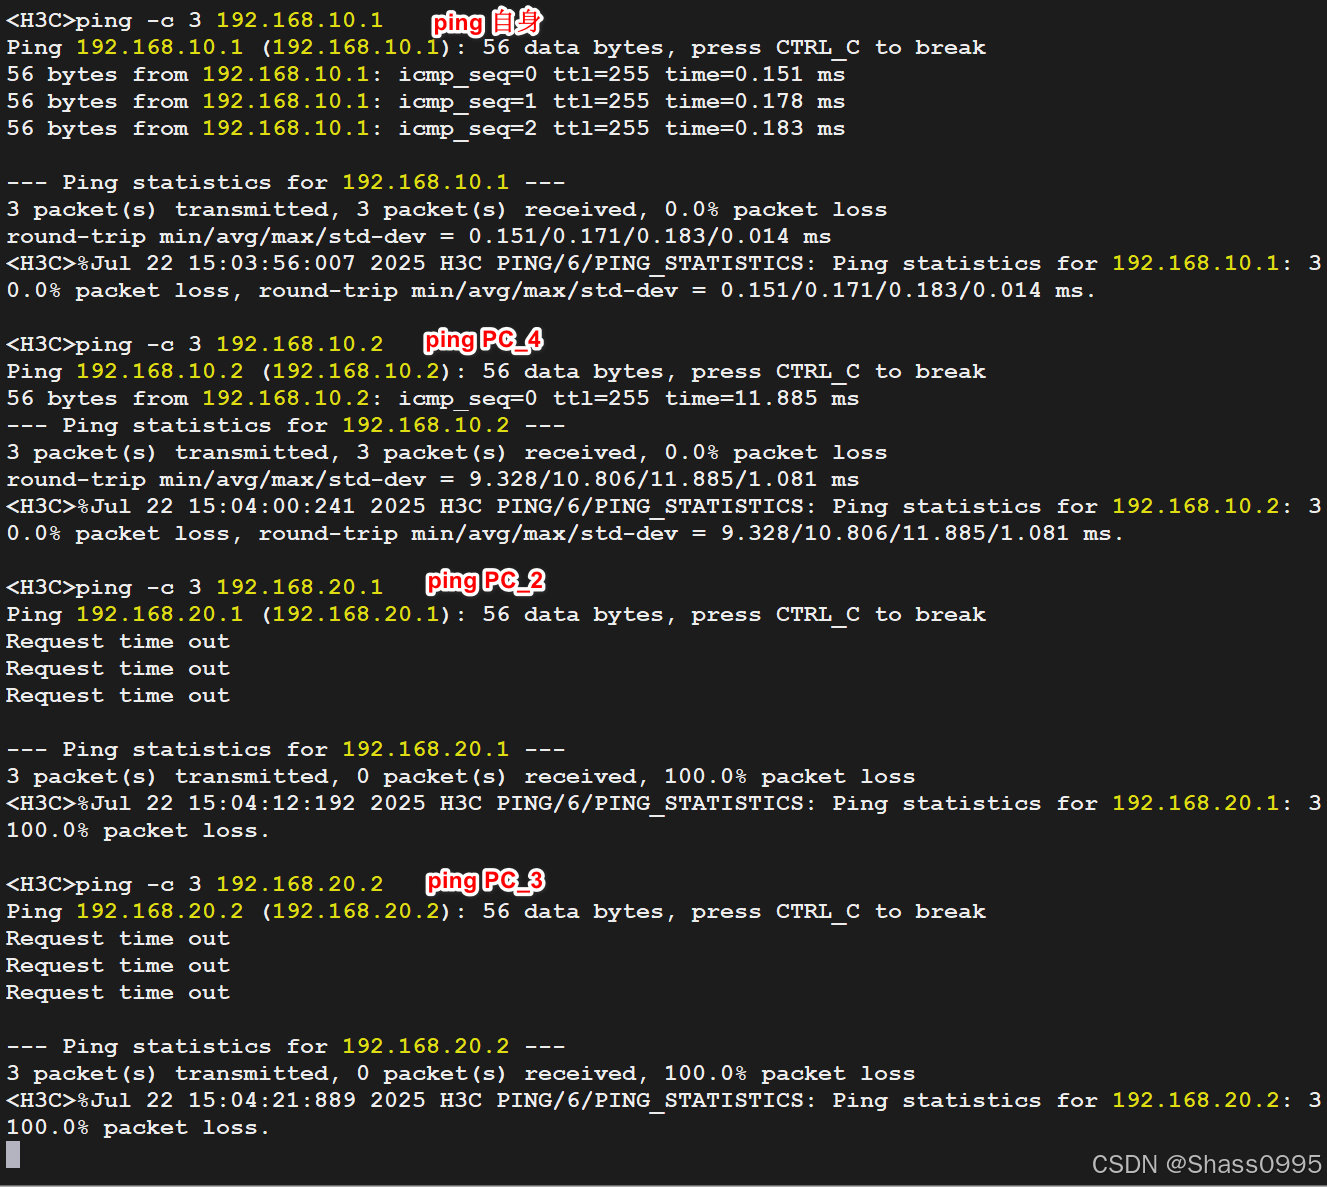
4.2 PC_2
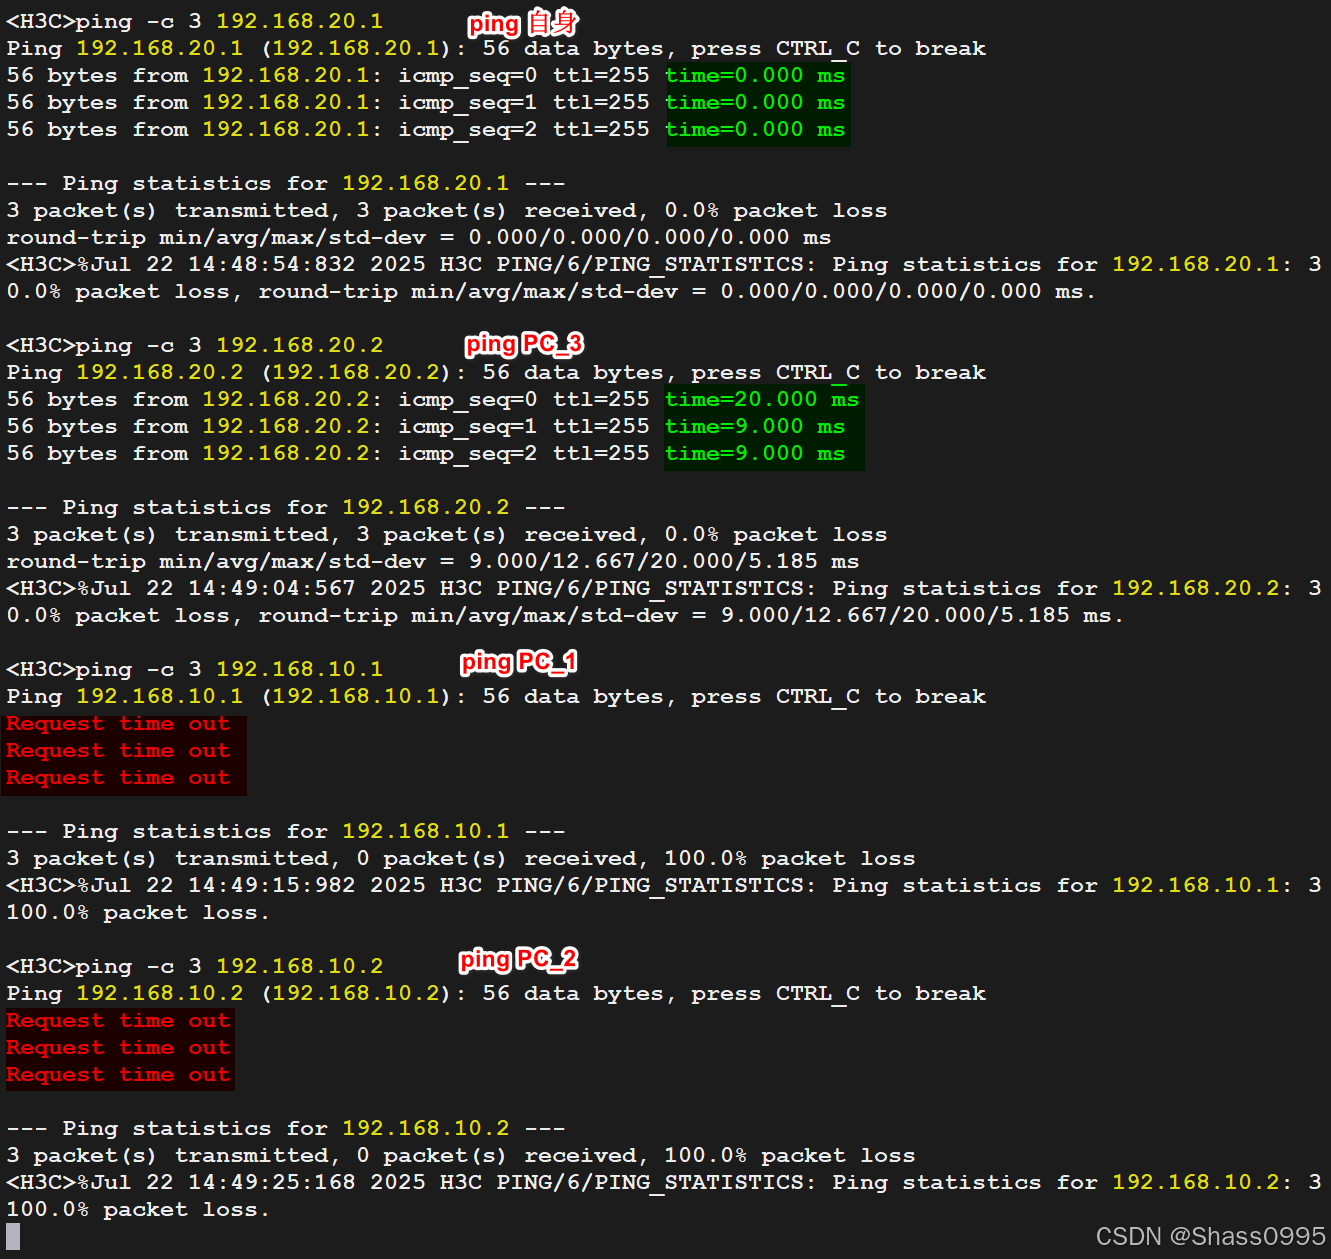
至此,本案例结束,后续会基于该拓扑场景进一步实现VXLAN跨子网通信。