1.效果图

2.功能需求
- 流式布局模型: 模拟 CSS Flexbox 的自动换行特性
- 动态尺寸计算: 根据子元素尺寸自动计算容器大小
- 间距处理: 支持水平和垂直间距,兼容子 View 的 margin
- 垂直滚动容器 : 继承自
ViewGroup,提供垂直滚动能力 - 自适应高度: 流式布局高度根据内容自动调整
3.实现思路
3.1 动态测量
ini
@Override
protected void onMeasure(int widthMeasureSpec, int heightMeasureSpec) {
    // 获取测量模式和可用空间
    int widthSize = MeasureSpec.getSize(widthMeasureSpec);
    int widthMode = MeasureSpec.getMode(widthMeasureSpec);

    int totalWidth = 0;  // 容器总宽度
    int totalHeight = 0; // 容器总高度
    int lineWidth = 0;   // 当前行宽度
    int lineHeight = 0;  // 当前行高度

    for (int i = 0; i < getChildCount(); i++) {
        View child = getChildAt(i);
        if (child.getVisibility() == GONE) continue;

        // 测量子View(包含margin)
        measureChild(child, widthMeasureSpec, heightMeasureSpec);
        MarginLayoutParams lp = (MarginLayoutParams) child.getLayoutParams();
        int childWidth = child.getMeasuredWidth() + lp.leftMargin + lp.rightMargin;
        int childHeight = child.getMeasuredHeight() + lp.topMargin + lp.bottomMargin;

        // 换行判断:当前行宽度+子元素宽度 > 可用宽度
        if (lineWidth + childWidth > widthSize - getHorizontalPadding()) {
            totalWidth = Math.max(totalWidth, lineWidth); // 更新最大行宽
            totalHeight += lineHeight + verticalSpacing;   // 累加行高
            lineWidth = childWidth;                      // 新行起始宽度
            lineHeight = childHeight;                     // 新行起始高度
        } else {
            lineWidth += childWidth + horizontalSpacing;  // 累加行宽
            lineHeight = Math.max(lineHeight, childHeight); // 更新行高
        }
    }

    // 最终尺寸计算(考虑padding)
    totalWidth = Math.max(totalWidth, lineWidth) + getHorizontalPadding();
    totalHeight += lineHeight + getVerticalPadding();

    // 根据测量模式确定最终尺寸
    setMeasuredDimension(
        (widthMode == MeasureSpec.EXACTLY) ? widthSize : totalWidth,
        (heightMode == MeasureSpec.EXACTLY) ? heightSize : totalHeight
    );
}
/**
- 测量流程:
-
- 遍历所有子View,测量每个子View的尺寸
-
- 计算每行的宽度和高度
-
- 当一行放不下时换行,并累加高度
-
- 最终确定FlowLayout的总宽高 */
基础信息获取方法
| 方法 | 作用 | 使用场景 |
|---|---|---|
getChildCount() |
获取子View数量 | 测量/布局开始时遍历子View |
getChildAt(int index) |
获取指定位置的子View | 遍历时访问每个子View |
getPaddingLeft()/Right()/Top()/Bottom() |
获取容器内边距 | 计算可用空间时扣除padding |
| 方法 | 作用 | 关键说明 |
|---|---|---|
measureChild(View child, ...) |
测量子View尺寸 | 必须调用才能获取子View尺寸 |
child.getMeasuredWidth()/Height() |
获取子View测量后宽高 | 测量后才能获取有效值 |
getLayoutParams() |
获取布局参数 | 通常转换为MarginLayoutParams获取margin值 |
setMeasuredDimension(int, int) |
设置容器最终尺寸 | 必须调用的收尾方法 |
-
换行机制:
- 动态计算每行剩余空间:
可用宽度 = 容器宽度 - padding - 当前行已用宽度 - 当
子元素宽度 + 水平间距 > 剩余空间时触发换行
- 动态计算每行剩余空间:
-
尺寸自适应:
- 宽度:取所有行宽度的最大值
- 高度:累加所有行高 + 行间垂直间距
- 支持
EXACTLY/AT_MOST测量模式
-
间距处理:
arduino// 水平间距影响 lineWidth += childWidth + horizontalSpacing; // 垂直间距影响 totalHeight += lineHeight + verticalSpacing; -
Margin支持:
-
使用
MarginLayoutParams获取边距值 -
在测量和布局时额外添加 margin 空间:
iniint childWidth = child.getMeasuredWidth() + lp.leftMargin + lp.rightMargin; int left = childLeft + lp.leftMargin; // 布局时考虑左margin
-
-
性能优化:
-
跳过
GONE状态的子 View -
间距改变时触发
requestLayout()重新布局
-
arduino
// 设置间距方法
public void setHorizontalSpacing(int spacing) {
    this.horizontalSpacing = spacing;
    requestLayout(); // 间距改变需要重新布局
}
为什么要重写generateDefaultLayoutParams? 因为Margin的值 在自定义 ViewGroup 时重写 generateDefaultLayoutParams 是关键步骤,主要原因如下:
核心问题 :FlowLayout 需要处理子 View 的 margin 属性
- 默认的
ViewGroup.generateDefaultLayoutParams()返回的是基础LayoutParams - 基础
LayoutParams不包含 margin 属性
避免类型转换异常
使用的时候用到了
ini
// 获取子View的LayoutParams(我们使用MarginLayoutParams)
MarginLayoutParams lp = (MarginLayoutParams) child.getLayoutParams();
typescript
// 以下方法提供对MarginLayoutParams的支持
@Override
protected LayoutParams generateDefaultLayoutParams() {
    return new MarginLayoutParams(LayoutParams.WRAP_CONTENT, LayoutParams.WRAP_CONTENT);
}

@Override
protected LayoutParams generateLayoutParams(LayoutParams p) {
    return new MarginLayoutParams(p);
}

@Override
public LayoutParams generateLayoutParams(AttributeSet attrs) {
    return new MarginLayoutParams(getContext(), attrs);
}
不重写的后果
- XML 中的
layout_margin属性被忽略 - 代码中获取 margin 时崩溃(ClassCastException)
- 子 View 默认变成 MATCH_PARENT 尺寸(破坏流式布局
这就是为什么所有需要处理 margin 的自定义 ViewGroup 都必须重写此方法(如 LinearLayout、RelativeLayout 源码中都有类似实现)
3.2 动态布局Layout
- 布局流程:
-
- 遍历所有子View
-
- 计算每个子View的位置
-
- 当一行放不下时换行
-
- 调用child.layout()确定子View的最终位置 */
ini
@Override
protected void onLayout(boolean changed, int l, int t, int r, int b) {
    int childLeft = getPaddingLeft();    // 当前子元素X起点
    int childTop = getPaddingTop();      // 当前子元素Y起点
    int lineHeight = 0;                 // 当前行高度

    for (int i = 0; i < getChildCount(); i++) {
        View child = getChildAt(i);
        if (child.getVisibility() == GONE) continue;

        MarginLayoutParams lp = (MarginLayoutParams) child.getLayoutParams();
        int childWidth = child.getMeasuredWidth();
        int childHeight = child.getMeasuredHeight();

        // 换行条件:当前行剩余空间不足
        if (childLeft + childWidth + lp.leftMargin + lp.rightMargin > getWidth() - getPaddingRight()) {
            childLeft = getPaddingLeft();                // 重置X坐标
            childTop += lineHeight + verticalSpacing;     // 下移Y坐标
            lineHeight = 0;                              // 重置行高
        }

        // 计算子元素位置(考虑margin)
        int left = childLeft + lp.leftMargin;
        int top = childTop + lp.topMargin;
        child.layout(left, top, left + childWidth, top + childHeight);

        // 更新布局位置
        childLeft += childWidth + lp.leftMargin + lp.rightMargin + horizontalSpacing;
        lineHeight = Math.max(lineHeight, childHeight + lp.topMargin + lp.bottomMargin);
    }
}| 方法 | 作用 | 关键说明 |
|---|---|---|
getWidth() |
获取容器最终宽度 | 仅在布局阶段有效 |
child.getMeasuredWidth()/Height() |
获取子View最终尺寸 | 布局时使用测量结果 |
child.layout(int l, int t, int r, int b) |
确定子View位置 | 必须为每个子View调用 |
3.2.1 测量和布局的核心方法总结
| 方法 | 测量阶段 | 布局阶段 | 注意要点 |
|---|---|---|---|
getMeasuredWidth() |
✅ 主要使用 | ✅ 使用测量结果 | 值在measureChild后有效 |
getWidth() |
❌ 值为0 | ✅ 主要使用 | 布局完成后才有实际值 |
measureChild() |
✅ 必须调用 | ❌ 禁止调用 | 布局阶段不可再测量 |
child.layout() |
❌ 禁止调用 | ✅ 必须调用 | 每个可见子View都要调用 |
getLayoutParams() |
✅ 获取margin | ✅ 获取margin | 需要类型转换 |
3.3 滑动
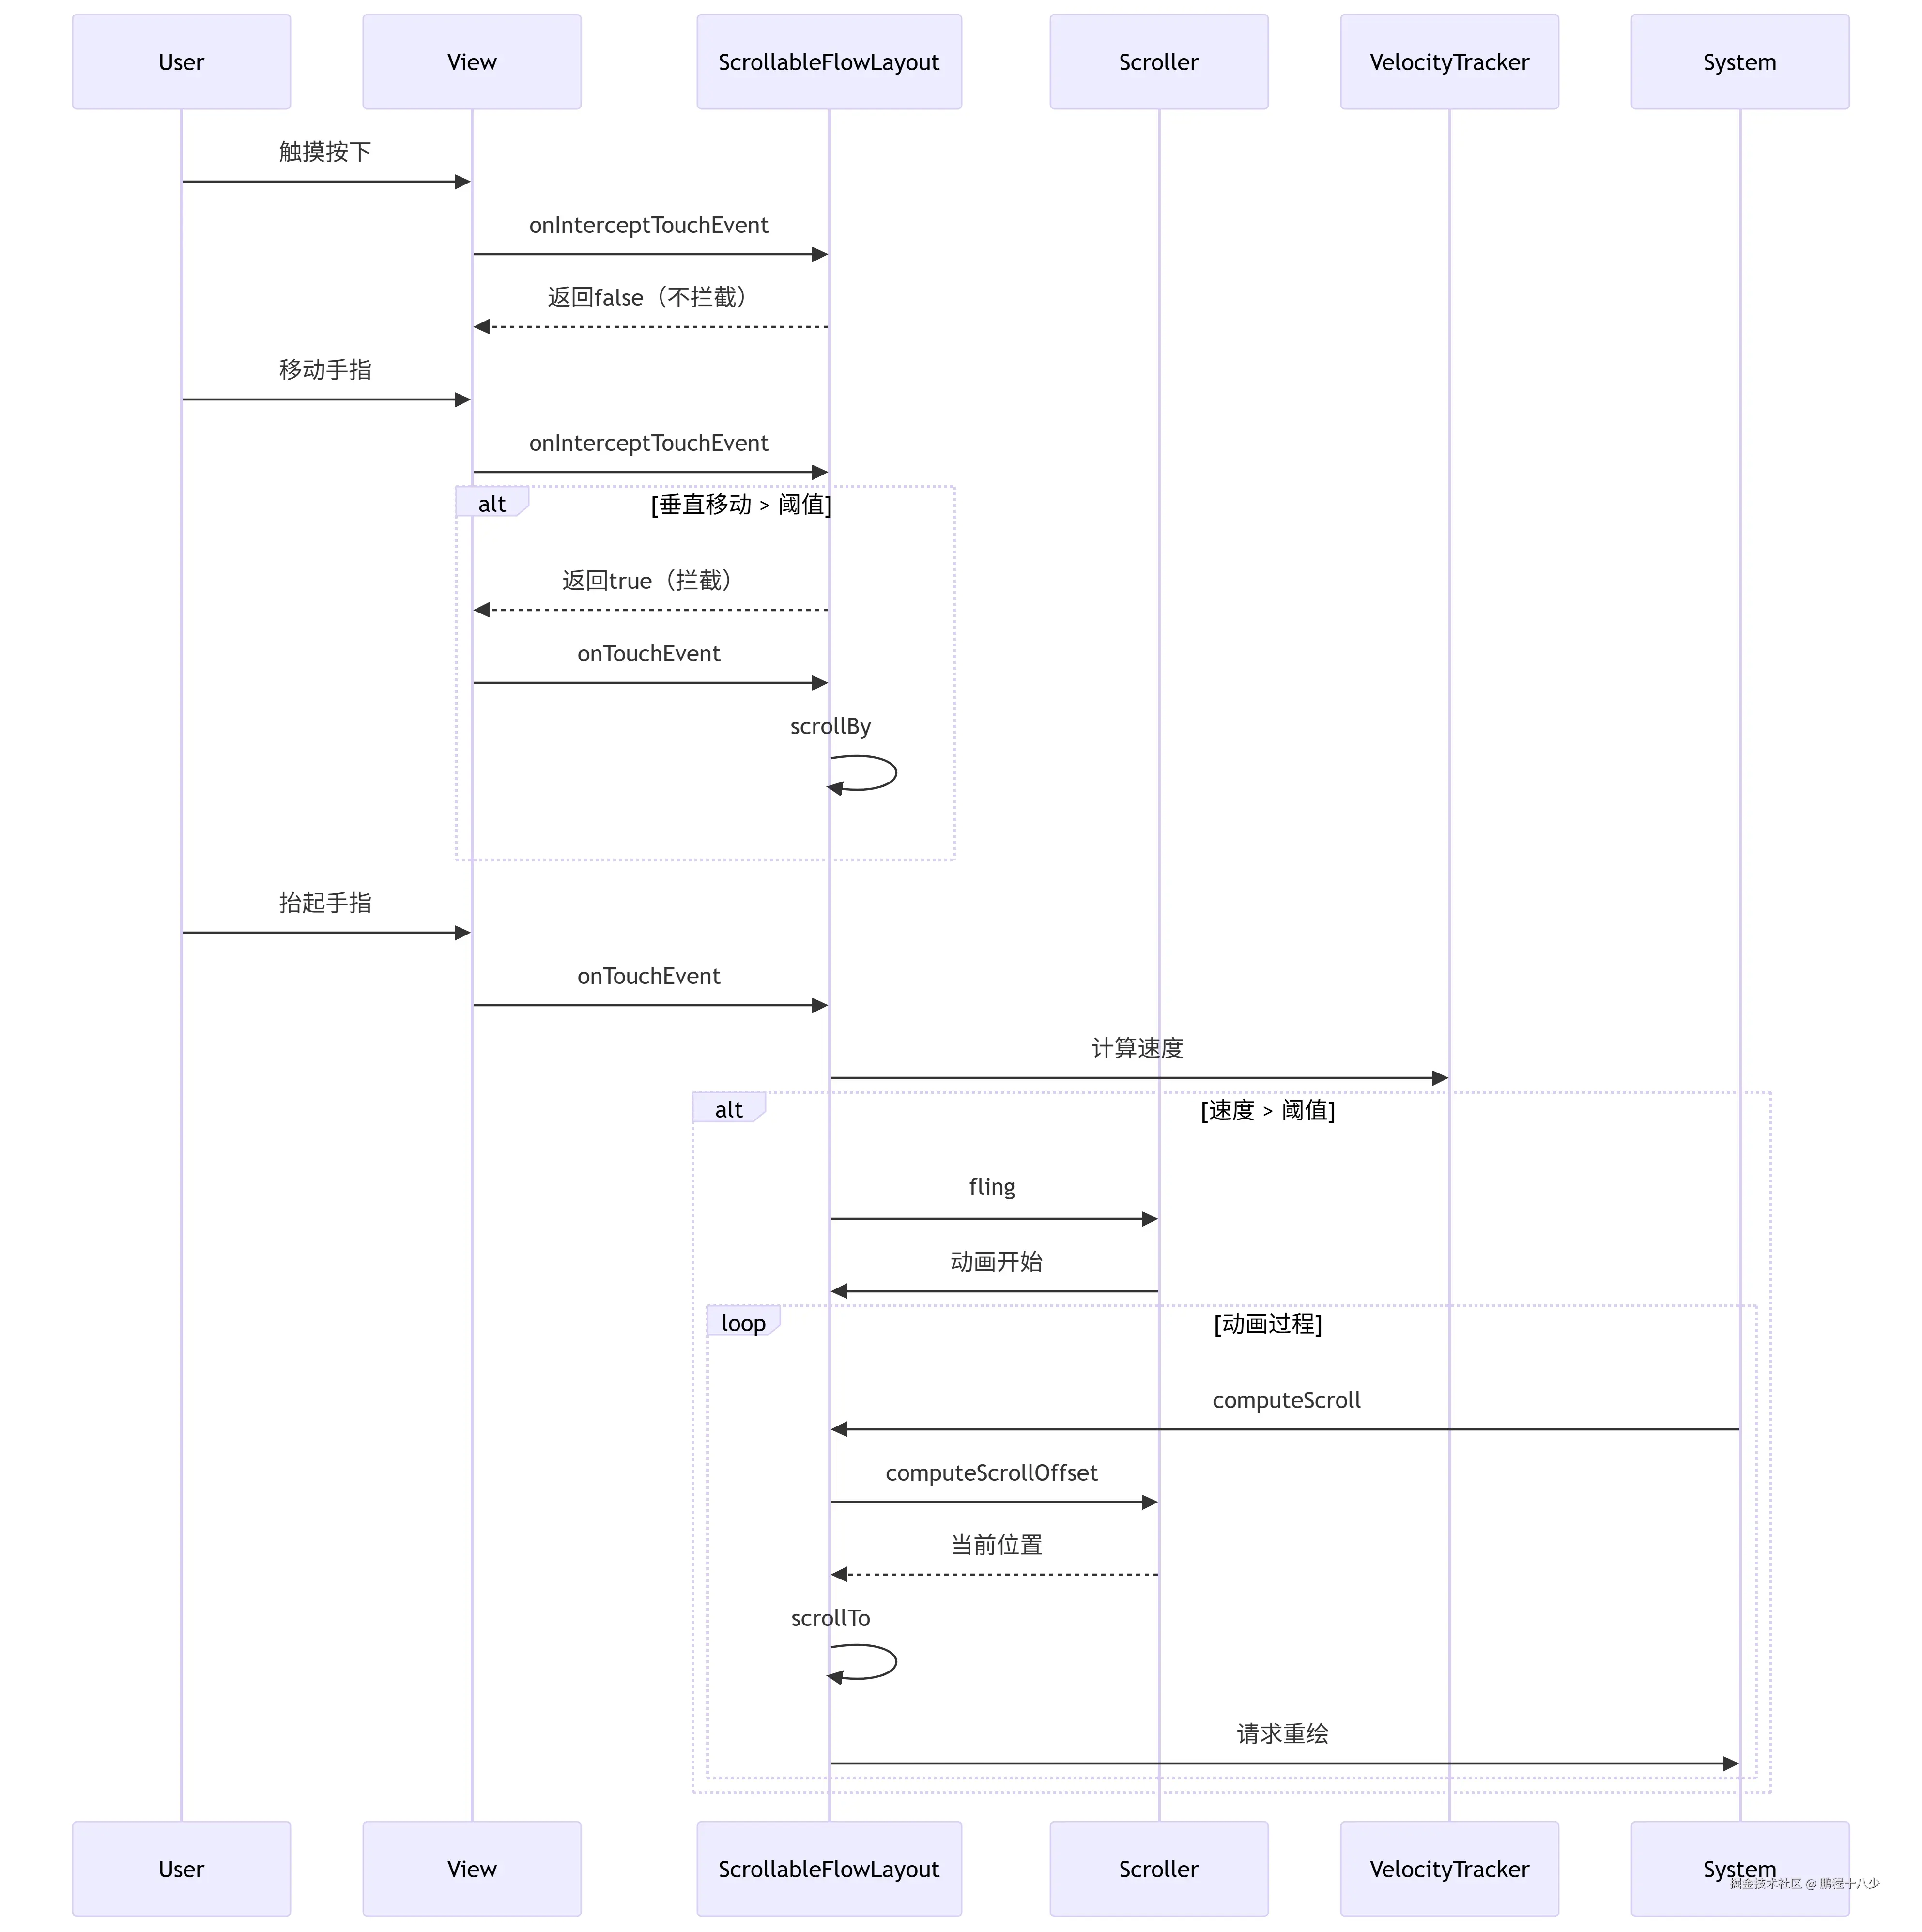
3.3.1 触摸事件处理 (onTouchEvent)
csharp
@Override
public boolean onTouchEvent(MotionEvent event) {
    switch (event.getAction()) {
        case MotionEvent.ACTION_MOVE:
            if (mIsDragging) {
                float dy = mLastY - event.getY();
                scrollBy(0, (int) dy); // 核心滚动方法
                mLastY = event.getY();
            }
            break;

        case MotionEvent.ACTION_UP:
            if (mIsDragging) {
                // 获取Y轴速度
                float yVelocity = mVelocityTracker.getYVelocity();
                if (Math.abs(yVelocity) > mMinimumVelocity) {
                    fling(-(int) yVelocity); // 触发惯性滚动
                }
            }
            break;
    }
}- 拖动处理 :计算手指移动距离,调用
scrollBy()实时滚动 - 惯性滚动:手指抬起时检测速度,满足条件触发 fling
3.3.2 滚动边界控制 (scrollTo)
java
@Override
public void scrollTo(int x, int y) {
    // 计算最大可滚动范围
    int maxScrollY = mContentHeight - getHeight() + getPaddingBottom();
    // 限制Y坐标在[0, maxScrollY]范围内
    int clampedY = Math.max(0, Math.min(y, maxScrollY));
    super.scrollTo(x, clampedY);
}- 防止滚动超出内容边界
- 顶部边界:0(不可滚动到paddingTop上方)
- 底部边界:
内容总高度 - 容器高度 + paddingBottom
3.3.3 惯性滚动实现 (fling)
scss
private void fling(int velocityY) {
    mScroller.fling(
        getScrollX(),
        getScrollY(),
        0,
        velocityY,
        0, 0,
        0,
        mContentHeight - getHeight()
    );
    invalidate(); // 触发重绘
}-
使用
Scroller.fling()实现平滑滚动动画 -
参数说明:
- 起始位置:当前滚动位置 (getScrollX/Y)
- 速度:Y轴方向速度
- 边界:0 到 内容总高度-容器高度
-
最大滚动距离 = 内容总高度 - 容器高度
-
公式:
maxScrollY = mContentHeight - getHeight() + getPaddingBottom()
3.3.4 滚动动画驱动 (computeScroll)
scss
@Override
public void computeScroll() {
    if (mScroller.computeScrollOffset()) {
        scrollTo(mScroller.getCurrX(), mScroller.getCurrY());
        postInvalidate(); // 持续更新
    }
}Scroller计算动画每一帧的位置- 调用
scrollTo()更新滚动位置 - 通过
postInvalidate()持续重绘直到动画结束
为什么要重写scrollTo()方法 防止滚动越界 ,不重写的后果:用户可能将内容滚动到无效区域,出现空白或错位
scrollTo(mScroller.getCurrX(), mScroller.getCurrY()); // 把这里换成mScroller.startScroll() 将 scrollTo() 替换为 startScroll() 是错误的做法,因为这两个方法的作用完全不同
关键区别说明
| 方法 | 作用 | 调用频率 | 典型使用场景 |
|---|---|---|---|
startScroll() |
启动新动画 | 单次 | 触摸抬起时启动 fling |
computeScrollOffset() |
计算当前帧位置 | 每帧 | computeScroll() 内循环调用 |
getCurrX()/getCurrY() |
获取当前帧位置 | 每帧 | 配合 scrollTo() 使用 |
scrollTo() |
执行实际滚动 | 每帧 | 将计算结果应用到视图 |
区别和联系图
computeScroll()是动画执行器:负责逐帧更新位置startScroll()是动画配置器:只应在启动新动画时调用scrollTo()是滚动执行器:将计算结果应用到视图- 三者各司其职:错误替换会破坏整个滚动机制
保持
computeScroll()中的scrollTo(mScroller.getCurrX(), mScroller.getCurrY())是实现流畅滚动动画的核心,这是 Android 滚动机制的标准实现方式。
4. 基于ScrollView的实现原理
scss
public class ScrollViewFlowLayout extends ScrollView {
    private FlowLayout flowLayout;
    private int horizontalSpacing = 16;
    private int verticalSpacing = 16;

    public ScrollViewFlowLayout(Context context) {
        super(context);
        init();
    }

    public ScrollViewFlowLayout(Context context, AttributeSet attrs) {
        super(context, attrs);
        init();
    }

    public ScrollViewFlowLayout(Context context, AttributeSet attrs, int defStyleAttr) {
        super(context, attrs, defStyleAttr);
        init();
    }

    private void init() {
        // 禁用ScrollView的滚动条
        setVerticalScrollBarEnabled(false);
        setHorizontalScrollBarEnabled(false);

        // 创建内部的FlowLayout
        flowLayout = new FlowLayout(getContext());
        flowLayout.setLayoutParams(new LayoutParams(LayoutParams.MATCH_PARENT, LayoutParams.WRAP_CONTENT));
        addView(flowLayout);
    }
与直接继承实现的对比
| 实现方式 | 优点 | 缺点 |
|---|---|---|
| 组合方式(本类) | 1. 复用系统ScrollView 2. 避免重写滚动逻辑 3. 开发简单快速 | 1. 嵌套一层布局 2. 需处理布局参数传递 |
| 直接继承(ViewGroup) | 1. 无布局嵌套 2. 完全控制滚动行为 | 1. 需完整实现滚动逻辑 2. 需处理触摸事件拦截 3. 需实现fling效果 |
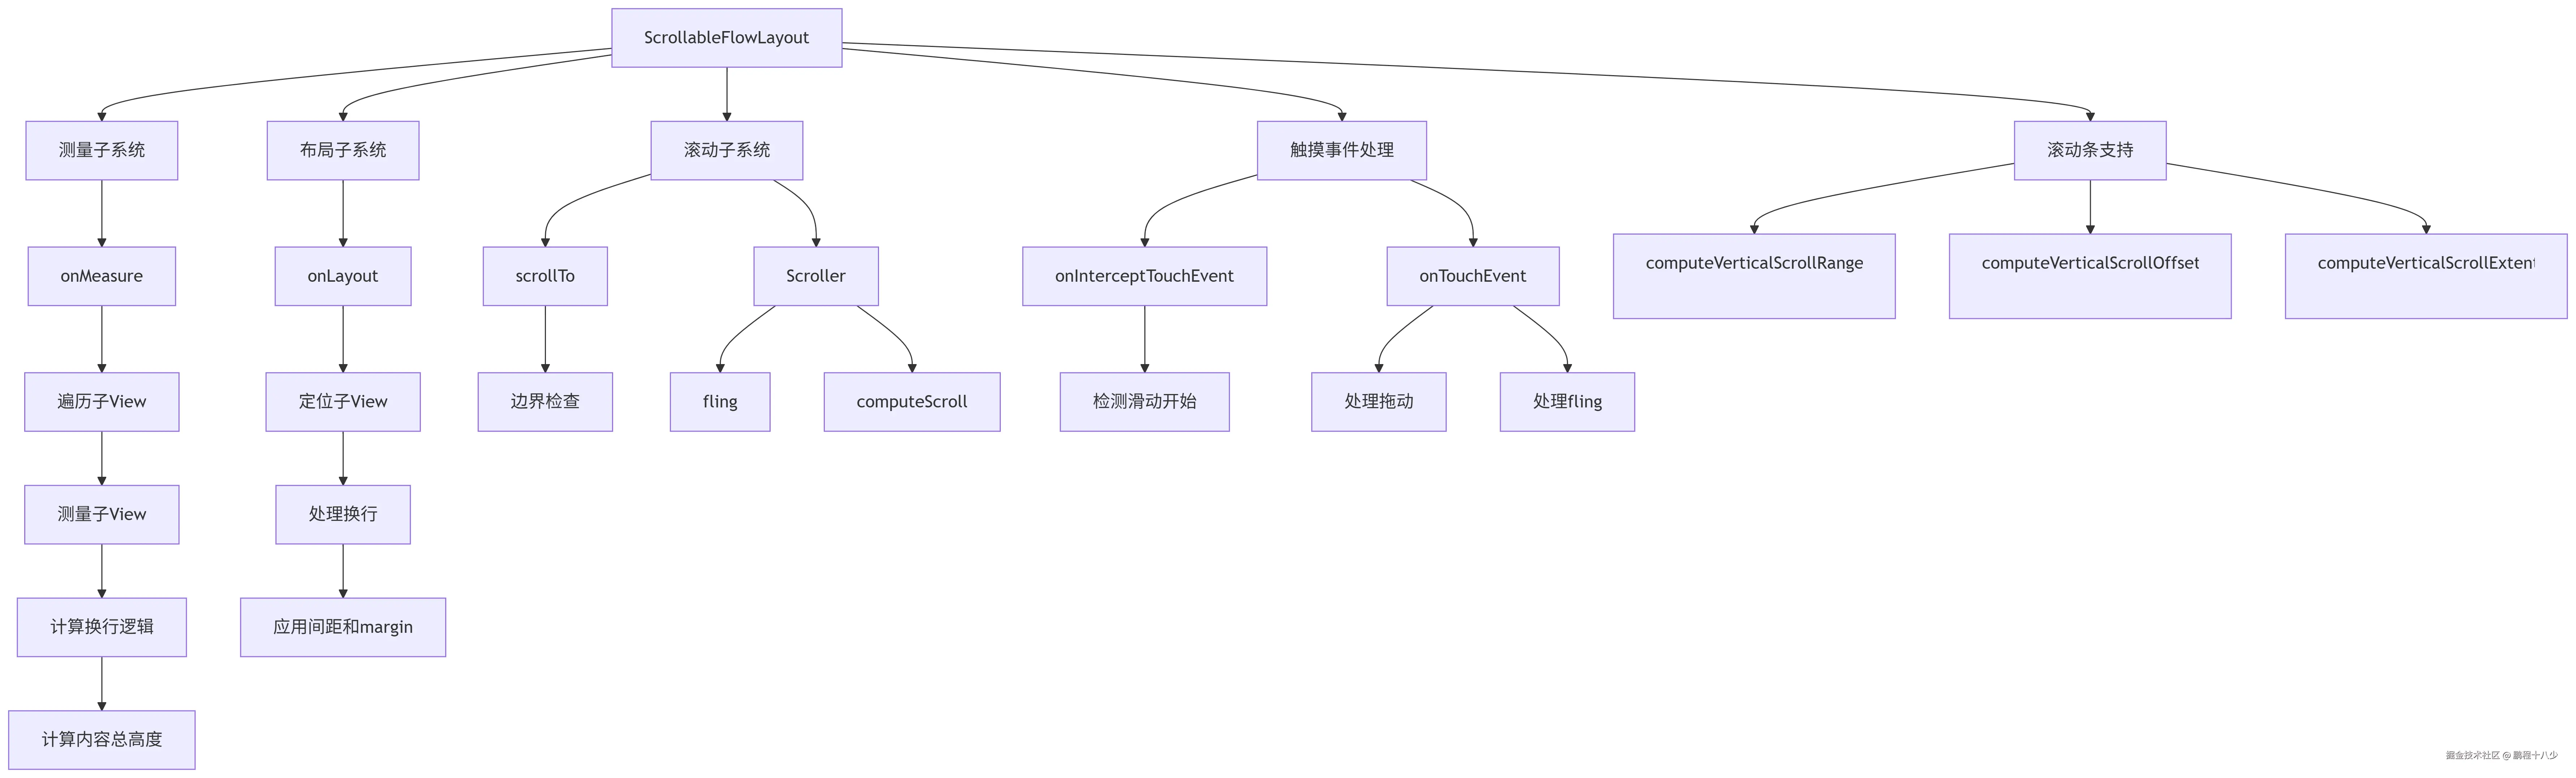
5.架构图
6.优化总结
流式布局和滚轮选择器滚动的核心区别是什么?
流式布局:**scrollTo**滚动是通过直接滚动
滚轮选择器通常通过,重置绘制,进行滚动效果, onDraw() 直接绘制文本项
startScroll和 scrollTo()
| 组件 | 核心目标 | 滚动机制 |
|---|---|---|
| 流式布局(ScrollableFlowLayout) | 内容容器 管理子View布局 | 基于 scrollTo() 的物理滚动 |
| 滚轮选择器(WheelPicker) | 选择器UI 模拟物理滚轮效果 | 基于 虚拟位置 的动画 |