五一出去浪吹风着凉了,今天有点发烧😷
手头的工作放一放,更新一下博客吧。
什么是数据验证(Validation)
数据验证是指用于捕获非法数值并拒绝这些非法数值的逻辑。
大多数采用用户输入的应用都需要有验证逻辑,以确保用户已输入预期信息。 验证检查可以基于类型、范围、格式或其他特定于应用的要求。
例如我有一个文本框,我限制该字段是必填项,当文本框内为空时,就会出现一个提示。
虽然我们可以通过编码来实现限制,但最佳实现方式是使用WPF的数据验证功能。
运行效果如下

WPF 提供了多种工具来帮助我们在应用程序中定义验证。可用的工具非常多,而且细节也非常丰富,本文主要介绍MVVM模式中数据验证功能的实现。
使用依赖属性进行验证
在前面的文章中,我们介绍了依赖属性。
使用的是下面这种方式进行定义
1 public static DependencyProperty Register(string name, Type propertyType, Type ownerType, PropertyMetadata typeMetadata);WPF还提供了一种重载,它增加了一个ValidateValueCallback回调。
1 public static DependencyProperty Register(string name, Type propertyType, Type ownerType, PropertyMetadata typeMetadata, ValidateValueCallback validateValueCallback);这个回调方法用于验证分配给它的值,返回 true(有效)或 false(无效)
当ValidateValueCallback回调返回false 时,会引发 ArgumentException。
如果在绑定时,设置了ValidatesOnException属性为true,那么控件值将被设置为 "0",
并且控件将被设置为默认的错误模板(默认错误模板会用红色高亮显示绑定的控件)
1 <TextBox VerticalContentAlignment="Center" Text="{Binding PositiveNumber,RelativeSource={RelativeSource TemplatedParent},ValidatesOnExceptions=True}"></TextBox>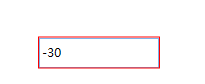
默认错误模板
错误模板(ErrorTemplate)是数据绑定验证失败时的一种样式触发器,它提供视觉上的反馈,后面我们会详细介绍相关功能。
下面我们通过一个案例进行演示,我们新建一个只支持输入正数的自定义控件
PositiveValueTextBox.cs
使用NumberValidateValueCallback对值进行验证,只接受正数,不接受负数
 1 public class MyTextBox : Control
 2 {
 3     static MyTextBox()
 4     {
 5         DefaultStyleKeyProperty.OverrideMetadata(typeof(MyTextBox), new FrameworkPropertyMetadata(typeof(MyTextBox)));
 6     }
 7
 8     public static DependencyProperty PositiveNumberProperty = DependencyProperty.Register("PositiveNumber", typeof(int), typeof(MyTextBox), new PropertyMetadata(), NumberValidateValueCallback);
 9
10     public int PositiveNumber
11     {
12         get => (int)GetValue(PositiveNumberProperty);
13         set => SetValue(PositiveNumberProperty, value);
14     }
15
16     private static bool NumberValidateValueCallback(object value)
17     {
18         if ((int)value >= 0)
19             return true;
20
21         return false;
22     }
23 }
定义控件模板
Generic.xaml
 1  <Style TargetType="{x:Type controls:PositiveValueTextBox}">
 2      <Setter Property="Template">
 3          <Setter.Value>
 4              <ControlTemplate TargetType="{x:Type controls:PositiveValueTextBox}">
 5                  <Border Background="{TemplateBinding Background}"
 6                          BorderBrush="{TemplateBinding BorderBrush}"
 7                          BorderThickness="{TemplateBinding BorderThickness}">
 8                      <TextBox VerticalContentAlignment="Center" Text="{Binding PositiveNumber,RelativeSource={RelativeSource TemplatedParent},ValidatesOnExceptions=True}"></TextBox>
 9                  </Border>
10              </ControlTemplate>
11          </Setter.Value>
12      </Setter>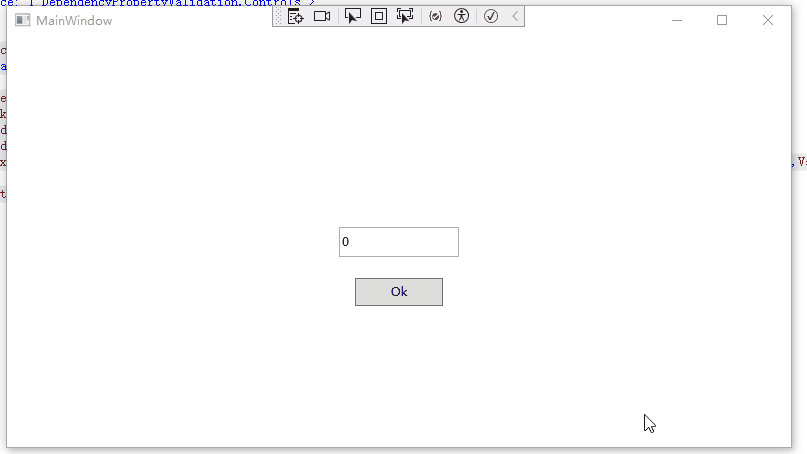
13 </Style>当我们输入负数时,可以看到TextBox会红色高亮显示
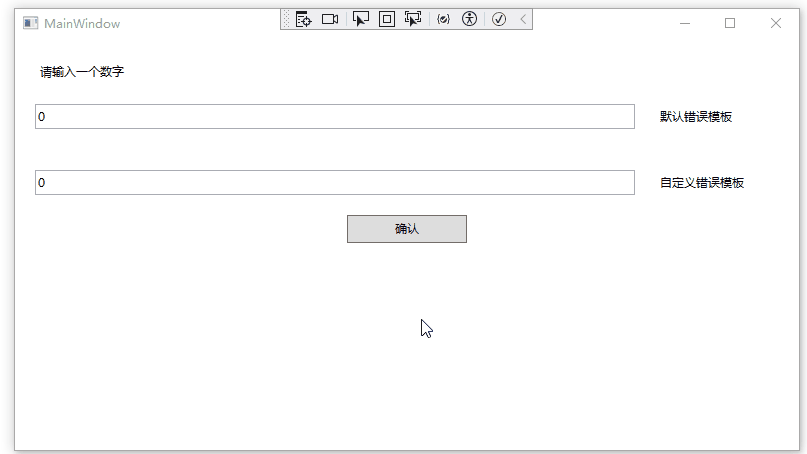
自定义错误模板(Error Templates)
在前面我们提到了错误模板这个概念,我们可以通过在视图中高亮显示验证失败的特定字段来通知用户出错情况。
默认情况下,该元素会以红色边框突出显示。我们可以通过重写错误模板自定义显示效果。
定义错误模板方法如下:
我们在窗口资源中定义一个控件模板
 1  <Window.Resources>
 2      <ControlTemplate x:Key="ValidationErrorTemplate">
 3          <DockPanel LastChildFill="True">
 4              <Border BorderBrush="Green" BorderThickness="2">
 5                  <AdornedElementPlaceholder></AdornedElementPlaceholder>
 6              </Border>
 7              <TextBlock DockPanel.Dock="Right" Foreground="Red" Margin="3,0,0,0" Text="*" FontSize="14" FontWeight="Bold" VerticalAlignment="Center"></TextBlock>
 8          </DockPanel>
 9      </ControlTemplate>
10  </Window.Resources>
使用方法如下:
1 <TextBox Text="{Binding DigitValue}" Width="600" Height="25" VerticalContentAlignment="Center" Validation.ErrorTemplate="{StaticResource ValidationErrorTemplate}"></TextBox>AdornedElementPlaceholder是支持这种技术的粘合剂。它代表控件自身,位于元素层中。
通过使用AdornedElementPlaceholder元素,能在文本框的背后安排自己的内容。
因此,在该例中,边框被直接放在文本框上,而不管文本框的尺寸是多少。
在这个示例中,星号放在右边。而且新的错误模板内容叠加在已存在的内容之上,从而不会在原始窗口的布局中触发任何改变(实际上,如果不小心在装饰层中包含了过多内容,最终会改变窗口的其他部分)。
运行效果如下:
自定义验证规则
在前面的示例中,我们可以对绑定时验证失败的控件进行视觉效果上的显示。但是却无法看到具体的错误信息。
这个时候我们就需要自定义验证规则 。应用自定义验证规则的方法和应用自定义转换器的方法类似。
自定义验证规则方法如下:
1、创建一个类继承自ValidationRule(位于System.Windows.Controls名称空间)的类
2、重写Validation方法
3、自定义错误模板,显示验证失败消息
例如我想限制文本框输入0-100的值
创建RangeLimitRule.cs
1 public class RangeLimitRule : ValidationRule
2 {
3 public override ValidationResult Validate(object value, CultureInfo cultureInfo)
4 {
5 if (int.TryParse(value.ToString(), out int number) == false)
6 {
7 return new ValidationResult(false, "请输入数字");
8 }
9 else
10 {
11 if (number >= 0 && number <= 100)
12 return ValidationResult.ValidResult;
13
14 return new ValidationResult(false, $"输入{value}格式错误,请输入0-100的数字");
15 }
16 }
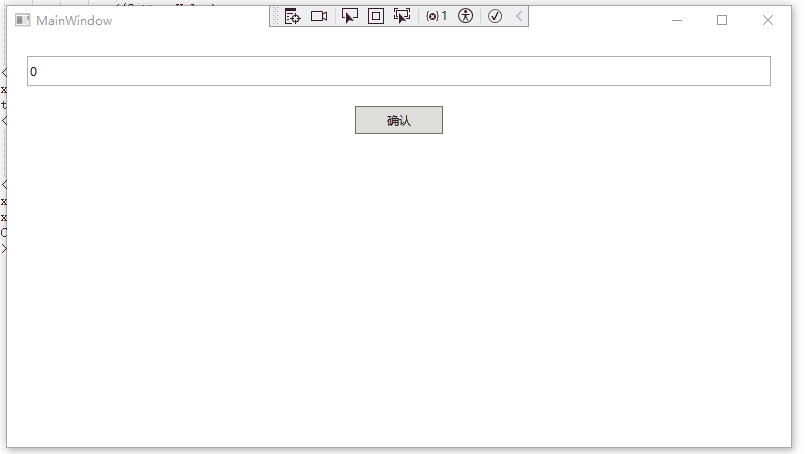
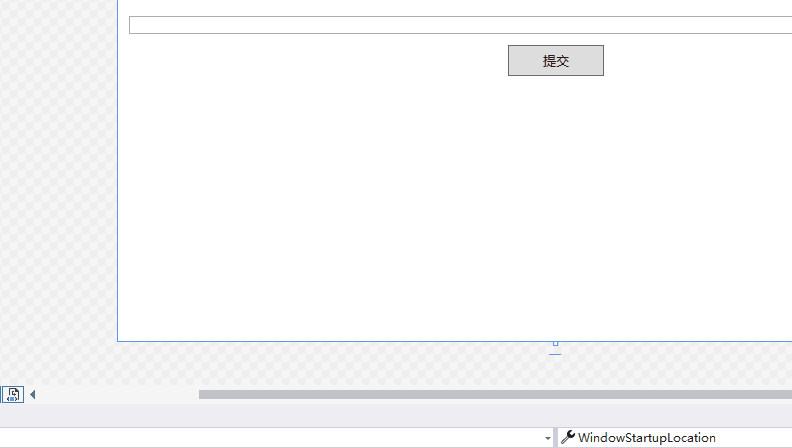
17 }放置一个TextBox并进行绑定,在绑定时,指定使用的验证规则。
MainWindow.xaml
 1 <Window x:Class="_3_ValidationRule.MainWindow"
 2         xmlns:validationRules="clr-namespace:_3_ValidationRule.CustomValidationRule"
 3         xmlns:local="clr-namespace:_3_ValidationRule"
 4         mc:Ignorable="d"
 5         Title="MainWindow" Height="450" Width="800">
 6   <StackPanel>
 7       <TextBox Height="30" Margin="20" VerticalContentAlignment="Center">
 8           <TextBox.Text>
 9               <Binding Path="RangeDigitValue">
10                   <Binding.ValidationRules>
11                       <validationRules:RangeLimitRule></validationRules:RangeLimitRule>
12                   </Binding.ValidationRules>
13               </Binding>
14           </TextBox.Text>
15       </TextBox>
16       <Button Content="确认" Width="88" Height="28" HorizontalAlignment="Center"></Button>
17   </StackPanel>
18 </Window>
然后再自定义错误模板,对验证失败的信息进行显示
 1  <Style TargetType="TextBox">
 2      <Setter Property="Validation.ErrorTemplate">
 3          <Setter.Value>
 4              <ControlTemplate>
 5                  <DockPanel LastChildFill="True">
 6                      <Border BorderBrush="Green" BorderThickness="2">
 7                          <AdornedElementPlaceholder Name="adornedElement"></AdornedElementPlaceholder>
 8                      </Border>
 9                      <TextBlock DockPanel.Dock="Right" Foreground="Red" Margin="3,0,0,0" Text="*" FontSize="14" FontWeight="Bold" VerticalAlignment="Center"></TextBlock>
10                  </DockPanel>
11              </ControlTemplate>
12          </Setter.Value>
13      </Setter>
14
15      <Style.Triggers>
16          <Trigger Property="Validation.HasError" Value="True">
17              <Setter Property="ToolTip">
18                  <Setter.Value>
19                      <Binding RelativeSource="{x:Static RelativeSource.Self}" Path="(Validation.Errors)[0].ErrorContent"></Binding>
20                  </Setter.Value>
21              </Setter>
22          </Trigger>
23      </Style.Triggers>
24  </Style>
为检索实际错误,需要检查这个元素的 Validation.Error属性。
注意,需要用圆括号包围Validation.Errors属性,从而指示它是附加属性而不是TextBox类的属性。
最后,需要使用索引器从集合中检索第一个ValidationError 对象,然后提取该对象的ErrorContent属性:
1 <Binding RelativeSource="{x:Static RelativeSource.Self}" Path="(Validation.Errors)[0].ErrorContent"></Binding>运行效果如下:
传递参数到ValidationRule
XAML 技术在向转换器/命令/自定义验证传递参数方面非常灵活。我们甚至可以将整个数据上下文作为参数传递。
自定义验证规则时,如果需要传递参数,可以直接在自定义验证规则中增加属性,并在XAML中使用它。
我们对前面的验证规则进行升级,增加最大最小值属性。
RangeLimitRuleWithParameter.cs
 1 public class RangeLimitRuleWithParameter : ValidationRule
 2 {
 3     public int MinValue { get; set; }
 4
 5     public int MaxValue { get; set; }
 6
 7
 8     public override ValidationResult Validate(object value, CultureInfo cultureInfo)
 9     {
10         if (int.TryParse(value.ToString(), out int number) == false)
11         {
12             return new ValidationResult(false, "请输入数字");
13         }
14         else
15         {
16             if (number >= MinValue && number <= MaxValue)
17                 return ValidationResult.ValidResult;
18
19             return new ValidationResult(false, $"输入{value}格式错误,请输入{MinValue}-{MaxValue}的数字");
20         }
21     }
22 }
使用方法如下:
1 <TextBox.Text>
2     <Binding Path="RangeDigitValue">
3         <Binding.ValidationRules>
4             <!--传递参数-->
5             <validationRules:RangeLimitRuleWithParameter MinValue="0" MaxValue="100"></validationRules:RangeLimitRuleWithParameter>
6         </Binding.ValidationRules>
7     </Binding>
8 </TextBox.Text>
自定义验证时使用转换器
假设我们需要在界面上输入一些数字,但是又要考虑多语言,比如我输入一(中文)/one(英文) 都要支持,那么应该如何去操作呢?
对于界面中的同一字段,我们可以同时定义转换器规则和验证规则。
可以通过ValidationRule的 ValidationStep属性用于控制规则的应用时间。
它是一个枚举类型,定义如下:
 1     //
 2     // 摘要:
 3     //     Specifies when a System.Windows.Controls.ValidationRule runs.
 4     public enum ValidationStep
 5     {
 6         //
 7         // 摘要:
 8         //    在进行任何转换之前运行
 9         RawProposedValue = 0,
10         //
11         // 摘要:
12         //   在进行任何转换之后运行
13         ConvertedProposedValue = 1,
14         //
15         // 摘要:
16         //   在源更新以后运行
17         UpdatedValue = 2,
18         //
19         // 摘要:
20         //    在值提交到源后运行
21         CommittedValue = 3
22 }我们这里就可以使用ValidationStep.ConvertedProposedValue,在值进行转换以后运行。
我们先来看看如何使用:
我们需要在绑定时设置Converter,以及在ValidationRule里设置ValidationStep属性。
1  <TextBox.Text>
2      <Binding Path="RangeDigitValueWithConverter" Converter="{StaticResource MultiLangDigitConverter}">
3          <Binding.ValidationRules>
4              <validationRules:RangeLimitRuleWithParameter MinValue="1" MaxValue="3" ValidationStep="ConvertedProposedValue"></validationRules:RangeLimitRuleWithParameter>
5          </Binding.ValidationRules>
6      </Binding>
7  </TextBox.Text>
接下来我们演示一下详细的实现过程
在上个示例的基础上,我们增加一个字段RangeDigitValueWithConverter
MainWindowViewModel.cs
 1  public class MainWindowViewModel : INotifyPropertyChanged
 2  {
 3      public event PropertyChangedEventHandler? PropertyChanged;
 4
 5      private int rangeDigitValueWithConverter = 1;
 6
 7      public int RangeDigitValueWithConverter
 8      {
 9          get => rangeDigitValueWithConverter;
10          set
11          {
12              rangeDigitValueWithConverter = value;
13              PropertyChanged?.Invoke(this, new PropertyChangedEventArgs("RangeDigitValueWithConverter"));
14          }
15      }
16  }
然后我们增加一个Converter
需要注意的是,这里的实现是写在ConvertBack函数下的。
MultiLangDigitConverter.cs
 1 public class MultiLangDigitConverter : IValueConverter
 2 {
 3     /// <summary>
 4     /// 从源到目标
 5     /// </summary>
 6     /// <param name="value"></param>
 7     /// <param name="targetType"></param>
 8     /// <param name="parameter"></param>
 9     /// <param name="culture"></param>
10     /// <returns></returns>
11     /// <exception cref="NotImplementedException"></exception>
12     public object Convert(object value, Type targetType, object parameter, CultureInfo culture)
13     {
14         return value;
15     }
16
17     /// <summary>
18     /// 从目标到源
19     /// </summary>
20     /// <param name="value"></param>
21     /// <param name="targetType"></param>
22     /// <param name="parameter"></param>
23     /// <param name="culture"></param>
24     /// <returns></returns>
25     /// <exception cref="NotImplementedException"></exception>
26     public object ConvertBack(object value, Type targetType, object parameter, CultureInfo culture)
27     {
28         var val = value.ToString();
29
30         //直接输入了数字
31         if (int.TryParse(val, out int numValue))
32         {
33             return numValue;
34         }
35         else
36         {
37             var res = Application.Current.TryFindResource(val);
38
39             if(res != null)
40             {
41                 return res;
42             }
43
44             return value;
45         }
46     }
47 }
en-US.xaml
1 <ResourceDictionary xmlns="http://schemas.microsoft.com/winfx/2006/xaml/presentation"
2                     xmlns:x="http://schemas.microsoft.com/winfx/2006/xaml"
3                     xmlns:sys="clr-namespace:System;assembly=mscorlib">
4     <!--仅供演示-->
5     <sys:Int32 x:Key="One">1</sys:Int32>
6     <sys:Int32 x:Key="Two">2</sys:Int32>
7     <sys:Int32 x:Key="Three">3</sys:Int32>
8 </ResourceDictionary>
zh-CN.xaml
1 <ResourceDictionary xmlns="http://schemas.microsoft.com/winfx/2006/xaml/presentation"
2                     xmlns:x="http://schemas.microsoft.com/winfx/2006/xaml"
3                     xmlns:sys="clr-namespace:System;assembly=mscorlib">
4     <!--仅供演示-->
5     <sys:Int32 x:Key="一">1</sys:Int32>
6     <sys:Int32 x:Key="二">2</sys:Int32>
7     <sys:Int32 x:Key="三">3</sys:Int32>
8 </ResourceDictionary>
说明:
1、这里仅为演示自定义验证规则时使用Converter,不考虑实用性。
2、这里我们定义了多语言资源字典,从资源字典里去查找值。关于这里多语言切换是如何实现的,可以查看这篇文章里的第二种实现方法(使用.Net Core开发WPF App系列教程( 其他、实现多语言切换的几种方式) - zhaotianff - 博客园)
运行效果如下:
当切换为中文时,输入数字或中文一、二、三都能被验证成功。
当切换为英文时,输入数字或英文One、Two、Three都能被验证成功

使用 IDataErrorInfo验证
当我们使用MVVM模式进行开发时,在ViewModel里就可以实现这个接口,对界面上的状态进行验证。
在前面的示例中,我们只是在界面上进行了视觉效果上的提醒,但是却没有去限制用户提交数据,因为我们无法在ViewModel层取到错误信息。
使用IDataErrorInfo就可以实现真正意义上的限制提交。
IDataErrorInfo的使用类似于前面介绍过的INotifyPropertyChanged.
它的定义如下:
 1     //
 2     // 摘要:
 3     //     提供了提供自定义错误信息的功能,用户界面 可绑定的自定义错误信息。
 4     [DefaultMember("Item")]
 5     public interface IDataErrorInfo
 6     {
 7         //
 8         // 摘要:
 9         //     获取指定属性的错误信息
10         //
11         // 参数:
12         //   columnName:
13         //     属性名
14         //
15         // 返回结果:
16         //     错误信息,默认为""
17         string this[string columnName] { get; }
18
19         //
20         // 摘要:
21         //    获取当前对象的错误消息
22         //
23         // 返回结果:
24         //     当前对象的错误消息,默认为""
25         string Error { get; }
26     }
通过索引器方法,传入需要验证的属性名。当验证失败时,这个索引器就会返回错误消息。
Error属性也可以返回错误消息,但它是针对整个对象的,而不是某个具体的属性。
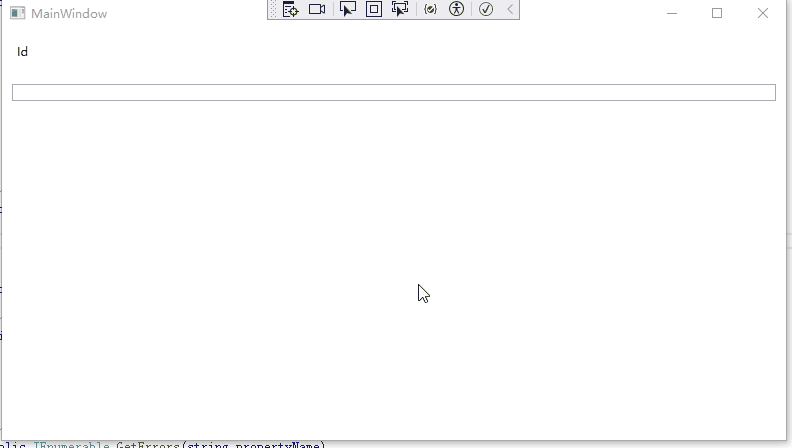
下面我们来进行演示一下
我们在界面上放置两个文本框,限制两个文本框为必填。再放置一个提交按钮。
首先我们定义一下错误模板
MainWindow.xaml
 1   <Window.Resources>
 2       <ControlTemplate x:Key="ValidationErrorTemplate">
 3           <DockPanel LastChildFill="True">
 4               <Border BorderBrush="Pink" BorderThickness="2">
 5                   <AdornedElementPlaceholder></AdornedElementPlaceholder>
 6               </Border>
 7               <TextBlock DockPanel.Dock="Right" Foreground="Red" Margin="3,0,0,0" Text="*" FontSize="14" FontWeight="Bold" VerticalAlignment="Center"></TextBlock>
 8           </DockPanel>
 9       </ControlTemplate>
10       <Style TargetType="TextBox">
11           <Style.Triggers>
12               <Trigger Property="Validation.HasError" Value="True">
13                   <Setter Property="ToolTip">
14                       <Setter.Value>
15                           <Binding RelativeSource="{RelativeSource Mode=Self}" Path="(Validation.Errors)[0].ErrorContent"></Binding>
16                       </Setter.Value>
17                   </Setter>
18               </Trigger>
19           </Style.Triggers>
20       </Style>
21   </Window.Resources>
然后定义一下界面
MainWindow.xaml
 1 <Window x:Class="_4_IDataErrorInfo.MainWindow"
 2         xmlns:local="clr-namespace:_4_IDataErrorInfo"
 3         mc:Ignorable="d"
 4         Title="MainWindow" Height="450" Width="800">
 5     <StackPanel>
 6         <Label Content="Id" Margin="10"></Label>
 7         <TextBox Margin="10" Text="{Binding Id,ValidatesOnDataErrors=True}" Validation.ErrorTemplate="{StaticResource ValidationErrorTemplate}"></TextBox>
 8
 9         <Label Content="Name" Margin="10"></Label>
10         <TextBox Margin="10" Text="{Binding Name,ValidatesOnDataErrors=True}" Validation.ErrorTemplate="{StaticResource ValidationErrorTemplate}"></TextBox>
11
12         <Button Content="提交" HorizontalAlignment="Center" Width="88" Height="28" Command="{Binding ConfirmCommand}"></Button>
13     </StackPanel>
14 </Window>
注意:这里我们在绑定时,使用了ValidatesOnDataErrors=True,它的作用就是使用系统提供的DataErrorValidationRule验证规则。
它等同于以下代码
1 <TextBox Margin="10" Validation.ErrorTemplate="{StaticResource ValidationErrorTemplate}">
2     <TextBox.Text>
3         <Binding Path="Name">
4             <Binding.ValidationRules>
5                 <DataErrorValidationRule></DataErrorValidationRule>
6             </Binding.ValidationRules>
7         </Binding>
8     </TextBox.Text>
9 </TextBox>而DataErrorValidationRule的作用是代表检查源对象的 System.ComponentModel.IDataErrorInfo实现引发的错误。
最后我们在ViewModel定义错误验证
MainWindowViewModel实现了IDataErrorInfo接口,它公开了一个Error属性和一个索引器方法。
这个索引器方法会在运行时被调用,索引器会将属性名作为参数传递给验证逻辑,并获取任何验证错误信息。
当验证失败时,通过这个索引器方法返回错误信息,这里我们是通过反射判断了是否为空,它可以是其它的逻辑。
当验证成功时,通过这个索引器方法返回null。
当我们运行应用程序并在字段中输入数据时,每次在视图中改变焦点时,运行时都会调用索引器。
因为这里与常规验证规则一样,IDataErrorInfo依赖于绑定的 UpdateSourceTrigger属性。
MainWindowViewModel.cs
 1  public class MainWindowViewModel : INotifyPropertyChanged, IDataErrorInfo
 2  {
 3      public event PropertyChangedEventHandler? PropertyChanged;
 4
 5      private string id;
 6      public string Id
 7      {
 8          get => id;
 9          set
10          {
11              id = value;
12              PropertyChanged?.Invoke(this, new PropertyChangedEventArgs("Id"));
13          }
14      }
15
16
17      private string name;
18      public string Name
19      {
20          get => name;
21          set
22          {
23              name = value;
24              PropertyChanged?.Invoke(this, new PropertyChangedEventArgs("Name"));
25          }
26      }
27
28      public ICommand ConfirmCommand { get; private set; }
29
30      public string Error => null;
31
32      public string this[string columnName]
33      {
34          get
35          {
36              object propertyValue = this.GetType().GetProperty(columnName).GetValue(this, null);
37
38              if (propertyValue == null || string.IsNullOrEmpty( propertyValue.ToString().Trim()))
39              {
40                  return $"{columnName}不能为空";
41              }
42
43              return null;
44          }
45
46      }
47
48      public MainWindowViewModel()
49      {
50          ConfirmCommand = new RelayCommand(Confirm);
51      }
52
53      private void Confirm()
54      {
55          if (this[nameof(Id)] != null || this[nameof(Name)] != null)
56              return;
57
58          MessageBox.Show($"Id:{Id}\r\nName:{Name}");
59      }
60  }
注意:我们需要在提交时使用索引器方法对字段进行再次判断是否符合要求。
运行效果如下:

验证状态问题
在前面的示例中,我们可以发现一个明显的问题,就是程序运行后,所有的字段都进行了验证,都显示为验证失败模板。
这肯定 是不好的用户体验,那么如何去解决呢?
现在主流网站的验证规则 是只有当值更改后/点击提交后再进行验证,初次进入不会验证。
我们也可以通过增加一个枚举变量控制,来实现一样的功能。
当软件初次启动时,不需要验证,点击后/输入值更改后,才需要验证。
ValidationState.cs
1     public enum ValidationState
2     {
3         Initial,
4         Loaded,
5         Submit,
6 }我们在ViewModel中增加一个枚举变量,并在点击提交按钮后,更新这个变量,并进行属性更改通知。
MainWindowViewModel.cs
 1   public class MainWindowViewModel : INotifyPropertyChanged, IDataErrorInfo
 2   {
 3       public Validations.ValidationState ValidationState { get; private set; } = Validations.ValidationState.Initial;
 4
 5       public event PropertyChangedEventHandler? PropertyChanged;
 6
 7       //字段省略
 8
 9       public ICommand ConfirmCommand { get; private set; }
10
11       public string Error => null;
12
13       public string this[string columnName]
14       {
15           get
16           {
17
18               object propertyValue = this.GetType().GetProperty(columnName).GetValue(this, null);
19
20               if (propertyValue == null || string.IsNullOrEmpty( propertyValue.ToString().Trim()))
21               {
22                   return $"{columnName}不能为空";
23               }
24
25               return null;
26           }
27
28       }
29
30       public MainWindowViewModel()
31       {
32           ConfirmCommand = new RelayCommand(Confirm);
33       }
34
35       private void RaiseChanges()
36       {
37           PropertyChanged?.Invoke(this, new PropertyChangedEventArgs("Id"));
38           PropertyChanged?.Invoke(this, new PropertyChangedEventArgs("Name"));
39       }
40
41       private void Confirm()
42       {
43           ValidationState = Validations.ValidationState.Submit;
44           RaiseChanges();
45
46           if (this[nameof(Id)] != null || this[nameof(Name)] != null)
47               return;
48
49           MessageBox.Show($"Id:{Id}\r\nName:{Name}");
50       }
51 }然后我们引入Microsoft.XAML.Behavior包,增加窗口Loaded事件的处理
MainWindow.xaml
 1   <Window x:Class="_5_IDataErrorInfoWithValidationState.MainWindow"
 2           xmlns:i="http://schemas.microsoft.com/xaml/behaviors"
 3           mc:Ignorable="d"
 4           Title="MainWindow" Height="450" Width="800">
 5       <i:Interaction.Triggers>
 6           <i:EventTrigger EventName="Loaded">
 7               <i:InvokeCommandAction Command="{Binding LoadedCommand}"></i:InvokeCommandAction>
 8           </i:EventTrigger>
 9       </i:Interaction.Triggers>
10   </Window>
MainWindowViewModel.cs
 public ICommand LoadedCommand { get; private set; }


 public MainWindowViewModel()
 {
     LoadedCommand = new RelayCommand(Loaded);
 }

 private void Loaded()
 {
     ValidationState = Validations.ValidationState.Loaded;
 }
最后我们在索引器方法中更新判断逻辑,当只有在界面加载后,再进行判断
 1 public string this[string columnName]
 2 {
 3     get
 4     {
 5         //判断当前验证状态
 6         if (ValidationState < Validations.ValidationState.Loaded)
 7             return null;
 8
 9         。。。17     }
18
19 }
运行效果如下:
汇总错误验证消息
在前面的示例中,当提交按钮点击时,我们使用索引器对各个字段再次进行了判断
1 object propertyValue = this.GetType().GetProperty(columnName).GetValue(this, null);
2
3 if (propertyValue == null || string.IsNullOrEmpty( propertyValue.ToString().Trim()))
4 {
5     return $"{columnName}不能为空";
6 }
这种方法肯定是不够理想的,因为在字段较多时,需要写很长的判断逻辑。
此外,这种方法也无法对验证错误信息进行汇总。
理想的做法应该是使用一个集合将这些验证错误信息进行存储,然后在统一的地方进行判断或显示。
前面我们介绍过IDataErrorInfo.Error字段,目前我们还没有去使用它,到这里就可以派上用场了。
首先我们定义一下用于存储属性和错误信息的数据模型
ValidationErrorInfo.cs
1     public class ValidationErrorInfo
2     {
3         public string PropertyName { get; set; }
4
5         public string ValidationError { get; set; }
6     }
然后我们定义一个存储错误信息的列表
MainWindowViewModel.cs
 1 private ObservableCollection<ValidationErrorInfo> validationErrorInfoList;
 2
 3 public ObservableCollection<ValidationErrorInfo> ValidationErrorInfoList
 4 {
 5     get
 6     {
 7         if (validationErrorInfoList == null)
 8         {
 9             validationErrorInfoList = new ObservableCollection<ValidationErrorInfo>()
10             {
11                 new ValidationErrorInfo(){PropertyName = "Id" },
12                 new ValidationErrorInfo(){ PropertyName = "Name"}
13             };
14         }
15
16         return validationErrorInfoList;
17     }
18 }
更新一下索引器方法,当有验证失败错误时,就更新到列表中
 1 public string this[string columnName]
 2 {
 3     get
 4     {
 5         if (ValidationState < Validations.ValidationState.Loaded)
 6             return null;
 7
 8         string errorMsg = null;
 9
10         object propertyValue = this.GetType().GetProperty(columnName).GetValue(this, null);
11
12         if (propertyValue == null || string.IsNullOrEmpty(propertyValue.ToString().Trim()))
13         {
14             errorMsg =  $"{columnName}不能为空";
15         }
16
17         ValidationErrorInfoList.FirstOrDefault(x => x.PropertyName == columnName).ValidationError = errorMsg;
18
19         return errorMsg;
20     }
21
22 }
此外,我们还可以进行更复杂 的判断,比如对值进行限制。
1  switch(columnName)
2  {
3      case nameof(Id):
4          Error = "xxxx";
5          break;
6      case nameof(Name):
7          break;
8 }然后我们将IDataErrorInfo.Error字段也修改为可通知类型
 1  private string error = "";
 2
 3  public string Error
 4  {
 5      get => error;
 6      set
 7      {
 8          error = value;
 9          PropertyChanged?.Invoke(this, new PropertyChangedEventArgs("Error"));
10      }
11  }
最后再更新一下提交按钮逻辑,将错误信息列表中的信息进行整合并进行判断
 1  private void Confirm()
 2  {
 3      ValidationState = Validations.ValidationState.Submit;
 4      RaiseChanges();
 5
 6      Error = string.Join("\r\n", ValidationErrorInfoList.Select<ValidationErrorInfo, string>(e => e.ValidationError).ToArray<string>());
 7
 8     if(!string.IsNullOrEmpty(Error))
 9      {
10          MessageBox.Show($"数据验证失败:\r\n{Error}");
11      }
12  }
同时验证多个字段
假设我们界面上有两个密码框,两次输入的密码要一样。
如何同时验证多个字段呢?
只需要在进行属性更改通知的时候,通知另外 一个属性即可
MainWindowViewModel.cs
 1  private string password;
 2  public string Password
 3  {
 4      get => password;
 5      set
 6      {
 7          password = value;
 8          PropertyChanged?.Invoke(this, new PropertyChangedEventArgs("Password"));
 9      }
10  }
11
12
13  private string confirmPassword;
14  public string ConfirmPassword
15  {
16      get => confirmPassword;
17      set
18      {
19          confirmPassword = value;
20          PropertyChanged?.Invoke(this, new PropertyChangedEventArgs("ConfirmPassword"));
21          PropertyChanged?.Invoke(this, new PropertyChangedEventArgs("Password"));
22      }
23  }
为了实现密码对比,只需要在索引器方法中,对两个值进行对比
 1                 switch(columnName)
 2                 {
 3                     case nameof(ConfirmPassword):
 4                         if(!string.IsNullOrEmpty(Password) && Password != ConfirmPassword)
 5                         {
 6                             errorMsg = "两次密码不一致.";
 7                         }
 8
 9                         break;
10                 }
INotifyDataErrorInfo
这个接口是在.NET Framework 4.5版本加入的。
定义如下:
 1 namespace System.ComponentModel
 2 {
 3     //
 4     // 摘要:定义了数据实体类可以实现的成员,以提供自定义同步和异步验证支持。
 5     public interface INotifyDataErrorInfo
 6     {
 7         //
 8         // 摘要:
 9         //     获取指示实体是否存在验证错误的值。
10         //
11         // 返回结果:
12         //     如果实体当前有验证错误,则为 true;否则为 false。
13         bool HasErrors { get; }
14
15         //
16         // 摘要:
17         //     当某个属性或整个 实体的验证错误发生时。
18         event EventHandler<DataErrorsChangedEventArgs>? ErrorsChanged;
19
20         //
21         // 摘要:
22         //     获取指定属性或整个实体的验证错误。
23         //
24         //
25         // 参数:
26         //   propertyName:
27         //    要检索验证错误的属性名称;或空或 System.String.Empty 来检索实体级错误
28         //
29         // 返回结果:
30         //     属性或实体的验证错误。
31         IEnumerable GetErrors(string? propertyName);
32     }
33 }
与 IDataErrorInfo相比,INotifyDataErrorInfo可以为一个属性返回多个错误信息。通过调用 GetErrors函数来 获取与作为参数传递的名称的属性相关的验证错误。
当属性值更新时,我们可以在后台线程中开始验证。如果验证失败,我们可以引发该属性的 ErrorsChanged事件。(跟属性更改通知一样的用法)
这种异步支持提高了应用程序的响应速度。
下面我们使用一个示例来进行演示
我们在界面上放置一个文本框,限制该文本框只能输入数字,且长度不能超过4
然后我们定义一下这个文本框的验证错误模板,这里我们使用了ItemsControl来展示多个验证错误信息。
MainWindow.xaml
 1 <Window x:Class="_8_INotifyDataErrorInfo.MainWindow"
 2         Title="MainWindow" Height="450" Width="800">
 3     <StackPanel>
 4         <Label Content="Id" Margin="10"></Label>
 5         <TextBox Text="{Binding Id, UpdateSourceTrigger=PropertyChanged, ValidatesOnNotifyDataErrors=True}" Margin="10">
 6             <Validation.ErrorTemplate>
 7                 <ControlTemplate>
 8                     <StackPanel>
 9                         <AdornedElementPlaceholder x:Name="textBox"/>
10                         <ItemsControl ItemsSource="{Binding}">
11                             <ItemsControl.ItemTemplate>
12                                 <DataTemplate>
13                                     <TextBlock Text="{Binding ErrorContent}" Foreground="Red"/>
14                                 </DataTemplate>
15                             </ItemsControl.ItemTemplate>
16                         </ItemsControl>
17                     </StackPanel>
18                 </ControlTemplate>
19             </Validation.ErrorTemplate>
20         </TextBox>
21     </StackPanel>
22 </Window>
MainWindowViewModel.cs
定义属性
 1         private string id;
 2
 3         public string Id
 4         {
 5             get => id;
 6             set
 7             {
 8                 id = value;
 9                 PropertyChanged?.Invoke(this, new PropertyChangedEventArgs("Id"));11             }
12         }
定义错误信息容器
这里我们定义为字典类型,一个Key对应一个列表
 1 private Dictionary<string, ICollection<string>> validationErrorInfoList;
 2
 3 public Dictionary<string, ICollection<string>> ValidationErrorInfoList
 4 {
 5     get
 6     {
 7         if (validationErrorInfoList == null)
 8             validationErrorInfoList = new Dictionary<string, ICollection<string>>();
 9
10         return validationErrorInfoList;
11     }
12 }
然后我们封装一个用于内部验证逻辑的函数
说明:在后期正式项目时,这个函数可能来自于某个Service或单独的类
 1 private bool ValidatePropertyInternal(string propertyName, out ICollection<string> validationErrors)
 2 {
 3     validationErrors = new List<string>();
 4
 5     if (string.IsNullOrEmpty(propertyName))
 6         return false;
 7
 8     object propertyValue = this.GetType().GetProperty(propertyName).GetValue(this, null);
 9
10
11     if (propertyValue == null || propertyValue.ToString().Trim().Equals(string.Empty))
12     {
13         validationErrors.Add($"{propertyName}是必须的");
14     }
15
16
17     switch(propertyName)
18     {
19         case nameof(Id):
20             {
21                 if(int.TryParse(propertyValue.ToString(),out int nId) == false)
22                 {
23                     validationErrors.Add($"{propertyName}必须填入数字");
24                 }
25
26                 if(propertyValue.ToString().Length > 4)
27                 {
28                     validationErrors.Add($"{propertyName}限制长度为4");
29                 }
30                 break;
31             }
32
33     }
34
35     return validationErrors.Count == 0;
36
37 }
一切准备就绪后,我们就可以实现INotifyDataErrorInfo接口
在这里我们有一些封装
1、RaiseErrorsChanged
这个函数的功能类似于前面的RaisePropertyChanged,它的作用是用于通知某个属性的验证发生错误。
2、ValidatePropertyAsync
在这个函数里,我们调用ValidatePropertyInternal进行内部验证逻辑,并在验证后调用RaiseErrorsChanged引发错误验证通知。
然后系统会调用HasErrors判断是否有验证错误。如果有验证错误,并当需要获取错误信息时,系统会调用GetErrors函数来进行获取。
 1 public bool HasErrors
 2 {
 3     get { return ValidationErrorInfoList.Count > 0; }
 4 }
 5
 6 public event EventHandler<DataErrorsChangedEventArgs>? ErrorsChanged;
 7
 8 private void RaiseErrorsChanged(string propertyName)
 9 {
10     if (ErrorsChanged != null)
11         ErrorsChanged(this, new DataErrorsChangedEventArgs(propertyName));
12 }
13
14 public IEnumerable GetErrors(string propertyName)
15 {
16     if (string.IsNullOrEmpty(propertyName)|| !ValidationErrorInfoList.ContainsKey(propertyName))
17         return null;
18
19     if(ValidationErrorInfoList.ContainsKey(propertyName))
20     {
21         return ValidationErrorInfoList[propertyName];
22     }
23
24     return null;
25 }
26
27 private async void ValidatePropertyAsync(string propertyName)
28 {
29     ICollection<string> validationErrors = null;
30
31     //异步验证
32     bool isValid = await Task.Run(() =>
33     {
34         return ValidatePropertyInternal(propertyName, out validationErrors);
35     })
36     .ConfigureAwait(false);
37
38     if (!isValid)
39     {
40         ValidationErrorInfoList[propertyName] = validationErrors;
41         RaiseErrorsChanged(propertyName);
42     }
43     else if (ValidationErrorInfoList.ContainsKey(propertyName))
44     {
45         ValidationErrorInfoList.Remove(propertyName);
46         RaiseErrorsChanged(propertyName);
47     }
48 }
最后,我们需要在属性值更改时,调用ValidatePropertyAsync函数进行验证
 1  public string Id
 2  {
 3      get => id;
 4      set
 5      {
 6          id = value;
 7          PropertyChanged?.Invoke(this, new PropertyChangedEventArgs("Id"));
 8          ValidatePropertyAsync("Id");
 9      }
10  }
运行效果如下:
示例代码
https://github.com/zhaotianff/WPF-MVVM-Beginner/tree/main/8_Validation