开篇:为什么学 Nginx?
在互联网时代,Web 服务器是网站运行的核心载体。无论是个人博客、企业官网还是高并发的电商平台,都需要稳定高效的服务器支撑。Nginx(发音为 "engine-x")作为轻量级高性能 Web 服务器,凭借异步非阻塞、高并发低资源消耗的特性,已成为当前最主流的 Web 服务器之一(据 W3Techs 统计,全球超 35% 的网站使用 Nginx)。
一、Web 服务器基础:从浏览器到服务器的通信
1.1 浏览器与 Web 服务器的 "对话"
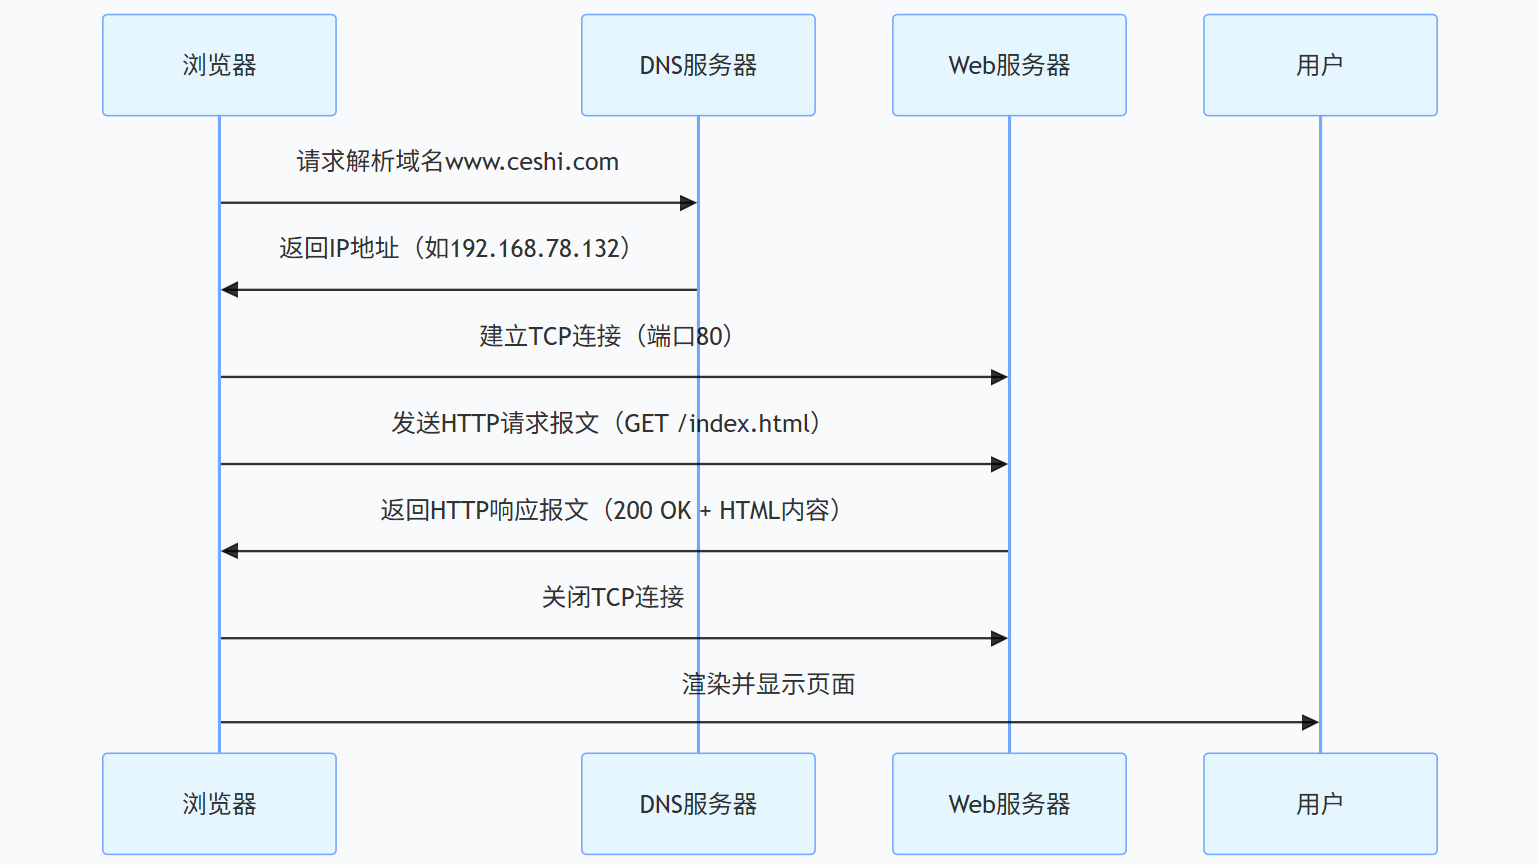
当我们在浏览器输入http://www.ceshi.com:80/index.html并回车时,背后发生了什么?
这是一个典型的HTTP 协议通信流程,核心步骤如下(附示意图):
1.2 URL:定位网络资源的 "地址簿"
URL(统一资源定位符)是访问资源的完整路径,格式如下(以http://user:pass@www.ceshi.com:80/path?query=1#frag为例):
| 组成部分 | 说明 | 示例值 |
|---|---|---|
scheme |
协议(如 HTTP、HTTPS、FTP) | http |
user |
用户名(部分协议需要认证) | user |
password |
密码(与用户名用:分隔) |
pass |
host |
服务器主机名或 IP 地址 | www.ceshi.com |
port |
端口号(HTTP 默认 80,HTTPS 默认 443) | 80 |
path |
服务器资源路径(以/开头) |
/path |
query |
查询参数(以?开头,键值对用&分隔) |
query=1 |
frag |
片段(客户端定位页面锚点,以#开头) |
frag |
1.3 端口号:服务器的 "门牌号"
端口号是区分服务器上不同服务的标识,IANA(互联网数字分配机构)将其分为三类:
- 0-1023:系统保留端口(如 HTTP 80、HTTPS 443)
- 1024-41951:注册端口(需向 IANA 注册,如 MySQL 3306)
- 41952-65535:动态端口(客户端随机使用)
二、HTTP 协议:浏览器与服务器的 "语言"
2.1 HTTP 请求方法:告诉服务器要 "做什么"
HTTP 定义了多种请求方法,最常用的是GET和POST:POST:
| 方法 | 说明 |
|---|---|
GET |
请求指定资源(如获取 HTML 页面、图片) |
POST |
提交数据(如表单提交、文件上传) |
HEAD |
仅获取响应头(用于检查资源是否存在) |
PUT |
上传或覆盖资源(多用于 RESTful API) |
DELETE |
删除资源(需谨慎使用) |
2.2 HTTP 状态码:服务器的 "反馈信号"
状态码是三位数字,第一位表示响应类型,常见状态码如下:
| 分类 | 含义 | 示例 |
|---|---|---|
2xx |
成功 | 200 OK(请求成功) |
3xx |
重定向 | 301 Moved Permanently(永久重定向) |
4xx |
客户端错误 | 404 Not Found(资源不存在) |
5xx |
服务器错误 | 500 Internal Server Error(服务器崩溃) |
2.3 HTTP 通信流程:一次完整的 "问答"
- 建立连接:通过 TCP 三次握手建立连接(HTTP/1.1 默认持久连接)。
- 发送请求:浏览器发送包含方法、URL、头部的请求报文。
- 处理请求:服务器解析请求,访问资源(静态文件或动态生成内容)。
- 返回响应:服务器返回包含状态码、头部、正文的响应报文。
- 关闭连接 :HTTP/1.0 默认短连接,通信后关闭;HTTP/1.1 支持长连接(
Connection: keep-alive)。Connection: keep-alive)。
三、Nginx vs Apache:为什么选 Nginx?
3.1 核心差异对比
| 特性 | NginxNginx 浏览器 | Apache阿帕奇 |
|---|---|---|
| 进程模型 | 异步非阻塞(事件驱动) | 同步阻塞(prefork 多进程) |
| 并发能力 | 单 Worker 进程处理数万并发 | 单进程处理 1 个请求,并发受限 |
| 资源消耗 | 内存占用低(单进程约 10MB) | 内存占用高(单进程约 200MB) |
| 适用场景 | 高并发、静态资源、反向代理 | 动态资源、复杂模块扩展 |
3.2 性能实测:Nginx 的 "高并发" 有多强?
在相同硬件环境下测试:
- Nginx:每秒处理 10 万 + 并发请求,CPU / 内存使用率稳定。
- Apache:每秒处理 3000 + 并发请求,高并发时进程堆积,内存耗尽。
四、Nginx 基础配置:从安装到运行
4.1 安装 Nginx(CentOS 7/8)
# 安装Nginx
yum install nginx -y

# 启动服务(开机自启)
systemctl start nginx && systemctl enable nginx

# 关闭防火墙(测试环境)
systemctl stop firewalld && systemctl disable firewalld

# 临时关闭SELinux(避免权限问题)
setenforce 0命令解释:
yum install nginx -y:自动安装 Nginx(YUM 源需提前配置)。systemctl start nginx:启动 Nginx 服务;enable设置开机自启。firewalld是 CentOS 默认防火墙,关闭后避免端口被拦截。setenforce 0:临时禁用 SELinux(强制安全模块),生产环境建议配置策略而非关闭。
4.2 验证安装:访问默认页面
Nginx 默认网页路径为/usr/share/nginx/html,默认文件是index.html。
通过浏览器或curl命令验证:
# 我们修改一下文件,让我们方便验证
[root@localhost ~]# echo 'hahaha,nihaowa' > /usr/share/nginx/html/index.html

[root@localhost ~]# curl http://192.168.220.169     # 替换为你的服务器IP
hahaha,nihaowa输出应为:hahaha,nihaowa(修改后的页面内容)。
4.3 修改端口与默认目录
Nginx 主配置文件是/etc/nginx/nginx.conf,核心配置段如下:
http {
    server {
        listen       80;   # 默认监听80端口
        server_name  localhost;
        root         /usr/share/nginx/html;  # 默认网页目录
        index        index.html;  # 默认访问文件
    }
}
实验:修改端口为 666,目录为/web
-
编辑配置文件:
vim /etc/nginx/nginx.conf修改
listen和root:server { listen 666; # 改为666端口 root /web; # 改为/web目录 index index.html; } -
创建新目录并写入测试文件:
mkdir /web && echo "my new dir is /web" > /web/index.html -
重启 Nginx 生效:
nginx -t # 检查配置语法(无错误返回ok) nginx -s reload # 重新加载配置(无需重启服务) -
验证访问:
[root@localhost ~]# curl http://192.168.220.169:666
my new dir is /web

# 输出:my new dir is /web
五、Nginx 虚拟主机:一台服务器托管多个网站
虚拟主机(Virtual Host)允许在同一台服务器上通过不同端口、IP、域名或路径托管多个独立网站,适用于共享主机、多域名管理等场景。
5.1 基于端口的虚拟主机
目标 :80 端口访问port80.html,666 端口访问port666.html。
-
创建配置文件
/etc/nginx/conf.d/port.conf:# 创建文件 [root@localhost ~]# touch /etc/nginx/conf.d/port.conf # 编辑文件 [root@localhost ~]# vim /etc/nginx/conf.d/port.conf # 文件内容: server { listen 80; location / { index port80.html; # 指定80端口默认文件 } } server { listen 666; location / { index port666.html; # 指定666端口默认文件 } } -
在默认目录
/usr/share/nginx/html创建测试文件:[root@localhost ~]# echo "my port is 666 " > /usr/share/nginx/html/port666.html [root@localhost ~]# echo "my port is 80 " > /usr/share/nginx/html/port80.html -
重启 Nginx 验证:
# 修改完成后,验证之前记得重启服务
[root@localhost ~]# systemctl restart nginx.service

[root@localhost ~]# curl http://192.168.220.169:80         # 输出port80内容
my port is 80
[root@localhost ~]# curl http://192.168.220.169:666        # 输出port666内容
my port is 666
5.2 基于域名的虚拟主机
目标 :xixi132.com和haha123.com指向不同目录。
-
为服务器绑定多个域名(需在客户端
/etc/hosts添加解析):# 客户端 [root@localhost ~]# vim /etc/hosts 192.168.220.169 xixi132.com haha123.com -
创建 Nginx 配置文件
/etc/nginx/conf.d/domain.conf:# 创建文件 [root@localhost ~]# touch /etc/nginx/conf.d/domain.conf # 编辑文件 [root@localhost ~]# vim /etc/nginx/conf.d/domain.conf # 内容如下: server { listen 80; server_name xixi132.com; # 域名1 root /web/132; # 对应目录 index index.html; } server { listen 80; server_name haha123.com; # 域名2 root /web/123; # 对应目录 index index.html; } -
创建目录并写入测试内容:
mkdir -p /web/{123,132} echo "my domain is xixi132.com" > /web/132/index.html echo "my domain is haha123.com" > /web/123/index.html -
重启 Nginx 验证:
# 重新启动服务
[root@localhost ~]# systemctl restart nginx.service

# 测试
[root@localhost conf.d]# curl http://haha123.com         # 输出haha123内容
my domain is haha123.com
[root@localhost conf.d]# curl http://xixi132.com         # 输出xixi132内容
my domain is xixi132.com
六、Nginx 访问控制:限制谁能访问
6.1 基于用户的认证(HTTP Basic Auth)
目标 :访问/web/132目录需输入用户名密码。
6.2 基于 IP 的访问控制
目标 :仅允许192.168.1.0/24网段访问/test.html。
修改配置文件:
server {
    listen 80;
    location /test.html {
        root /usr/share/nginx/html;
        allow 192.168.1.0/24;  # 允许指定网段
        deny all;  # 拒绝其他所有IP
    }
}
七、Nginx HTTPS 配置:给网站上 "锁"
HTTPS(HTTP over SSL/TLS)通过加密传输防止数据泄露,是现代网站的必备功能。以下是自签名证书配置步骤(生产环境建议使用 Let's Encrypt 等权威证书)。
7.1 生成自签名证书
# 进入证书目录(默认存放位置)
cd /etc/pki/tls/certs

# 生成私钥(2048位RSA)
openssl genrsa -out miyao.key 2048

# 生成证书(有效期100天)
openssl req -new -x509 -key miyao.key -out zhengshu.crt -days 100

# 示例
[root@localhost conf.d]# cd /etc/pki/tls/certs
[root@localhost certs]# openssl genrsa -out miyao.key 2048
[root@localhost certs]# openssl req -new -x509 -key miyao.key -out zhengshu.crt -days 100
You are about to be asked to enter information that will be incorporated
into your certificate request.
What you are about to enter is what is called a Distinguished Name or a DN.
There are quite a few fields but you can leave some blank
For some fields there will be a default value,
If you enter '.', the field will be left blank.
-----
Country Name (2 letter code) [XX]:hh
State or Province Name (full name) []:hh
Locality Name (eg, city) [Default City]:hh
Organization Name (eg, company) [Default Company Ltd]:hh
Organizational Unit Name (eg, section) []:hh
Common Name (eg, your name or your server's hostname) []:192.168.220.169
Email Address []:hhhh
7.2 配置 Nginx 启用 HTTPS
修改配置文件/etc/nginx/conf.d/https.conf:
7.3 验证 HTTPS 访问
# 重启服务
[root@localhost web]# systemctl restart nginx.service

# 忽略自签名证书警告(-k参数)
curl -k https://192.168.78.132:443
# 输出:i am port 443(假设/web/index.html内容为此)
[root@localhost web]# curl -k https://192.168.220.169:443
i am port 443
八、Nginx 动态页面支持:集成 PHP
Nginx 本身不支持动态语言(如 PHP),需通过FastCGI与 PHP-FPM(PHP 进程管理器)协作处理动态请求。
8.1 安装 PHP 与 PHP-FPM
# CentOS 8使用dnf安装(CentOS 7用yum)
dnf install php php-fpm -y

# 启动PHP-FPM并设置开机自启
systemctl start php-fpm && systemctl enable php-fpm
8.2 配置 Nginx 转发 PHP 请求
修改 Nginx 配置文件(如/etc/nginx/conf.d/php.conf):
8.3 测试 PHP 页面
在/usr/share/nginx/html创建info.php:
[root@localhost web]# cd /usr/share/nginx/html/
[root@localhost html]# touch info.php
[root@localhost html]# vim info.php
<?php
phpinfo();
?>
九、总结与常见问题
-
安装
httpd-tools(用于生成密码文件):yum install httpd-tools -y -
生成密码文件(用户
li4,密码redhat123):htpasswd -cb /etc/nginx/conf.d/auth_passwd li4 redhat123 -
修改 Nginx 配置文件
/etc/nginx/conf.d/auth.conf:# 创建文件 [root@localhost conf.d]# touch /etc/nginx/conf.d/auth.conf # 编辑文件 [root@localhost conf.d]# vim /etc/nginx/conf.d/auth.conf #内容如下: server { listen 80; root /web/132; location / { auth_basic "Restricted Area"; # 提示语 auth_basic_user_file /etc/nginx/conf.d/auth_passwd; # 密码文件路径 } } -
重启 Nginx 验证:
# 重新启动服务
[root@localhost conf.d]# systemctl restart nginx.service

# 测试
[root@localhost conf.d]# curl -u li4 http://192.168.220.169
Enter host password for user 'li4':
my domain is xixi132.com                         # 输入密码后返回页面内容
9.1 常见问题排查
- 403 Forbidden :检查目录权限(
chmod -R 755 /web)或 SELinux 策略。 - 404 Not Found :确认文件路径与 Nginx 配置的
root、index是否匹配。 - HTTPS 连接失败 :检查证书路径是否正确,或使用
openssl s_client -connect IP:443调试。
9.2 学习资源推荐
通过本文,你已掌握 Nginx 从基础配置到高级应用的全流程。Nginx 的强大远不止于此,反向代理、负载均衡、缓存优化等功能等待你进一步探索!
- 官方文档:nginx.org/en/docs
- 实战书籍:《Nginx 高性能 Web 服务器详解》
- 工具:
nginx -t(检查配置语法)、netstat -lntup | grep nginx(查看监听端口)