一、概述
SpringBoot 使用一个全局的配置文件,配置文件名称固定:
application.properties
application.yml
且 .properties 的优先级高于 .yml,当没有 .properties 时会使用 .yml 中的配置
使用配置文件可以修改 SpringBoot 自动配置的默认值,SpringBoot 在底层会给我们配置好。
二、YML
1、yml语法
1.基本语法
key: value表示一对键值对,空格必须要有
key:
  key1: value1
  key2: value2
用空格的缩进来控制层级关系,左对齐的一列数据都是同一级,有点类似Python
属性和值大小写敏感
2.值的写法
字面量: 普通值(数字、字符串、布尔值)字符串可以不加引号,使用kv直接来写
(1)单双引号
加上引号时需要注意:
"" : 会进行字符转义,双引号中有 \n 就会换行,有 \t 就相当于 tab 键
"偷吃 \n 闪光弹"
输出:
偷吃
闪光弹
'' : 不会进行字符转义 ,单引号中有 \n 就是 \n,有 \t 就是 \t
'偷吃 \n 闪光弹'
输出:
偷吃 \n 闪光弹
(2)对象和Map
k: v------在下一行来写对象的属性和值的关系;注意空格和缩进
map:
  kua: 8
  tua: 6
也可以在同一行内写出,使用花括号({})
map: {kua: 8,tua: 6}(3)数组
k: v------在下面多行中来写值;注意空格和缩进
firends:
  - zhangsan
  - lisi
  - wangwu
也可以在同一行内写出,使用方括号( \[\] ),并使用逗号或者-隔开
friends: [zhangsan,lisi,wangwu]三、配置文件注入
1、配置文件注入
创建JavaBean,Person和Dog
@Component 将JavaBean 交给 Spring容器 管理
@ConfigurationProperties 告诉 SpringBoot 将本类中的所有属性和配置文件中相关的配置进行绑定
prefix = "person" 说明配置文件中哪个属性与该类中的属性进行映射
JavaBean 是容器中的组件,才能使用容器提供的 @ConfigurationProperties功能
java
// Person.java
@Component
@ConfigurationProperties(prefix = "person")
public class Person {
    private String name;
    private Integer age;
    private boolean Boss;
    private Date birthday;
    private HashMap<String,Integer> map;
    private ArrayList<String> list;
    private Dog doggy;
    // Setter and Getter
    // toString()
    // Person()
}
// Dog.java
@Component
@ConfigurationProperties(prefix = "dog")
public class Dog {
    private Integer age;
    private String name;
    // Setter and Getter
    // toString()
    // Person()
}
导入配置文件处理器
XML
<dependency>
    <groupId>org.springframework.boot</groupId>
    <artifactId>spring-boot-configuration-processor</artifactId>
    <optional>true</optional>
</dependency>
编写配置文件时 ,可以看到提示信息
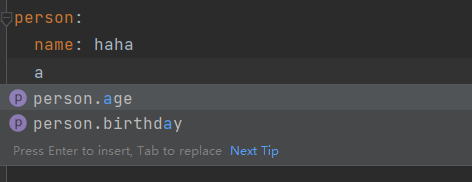
XML
person:
name: haha
age: 18
Boss: false
birthday: "2002/12/1"
map: {tua: 1,kua: 2}
list: [1,4,6,8]
doggy:
name: goffy
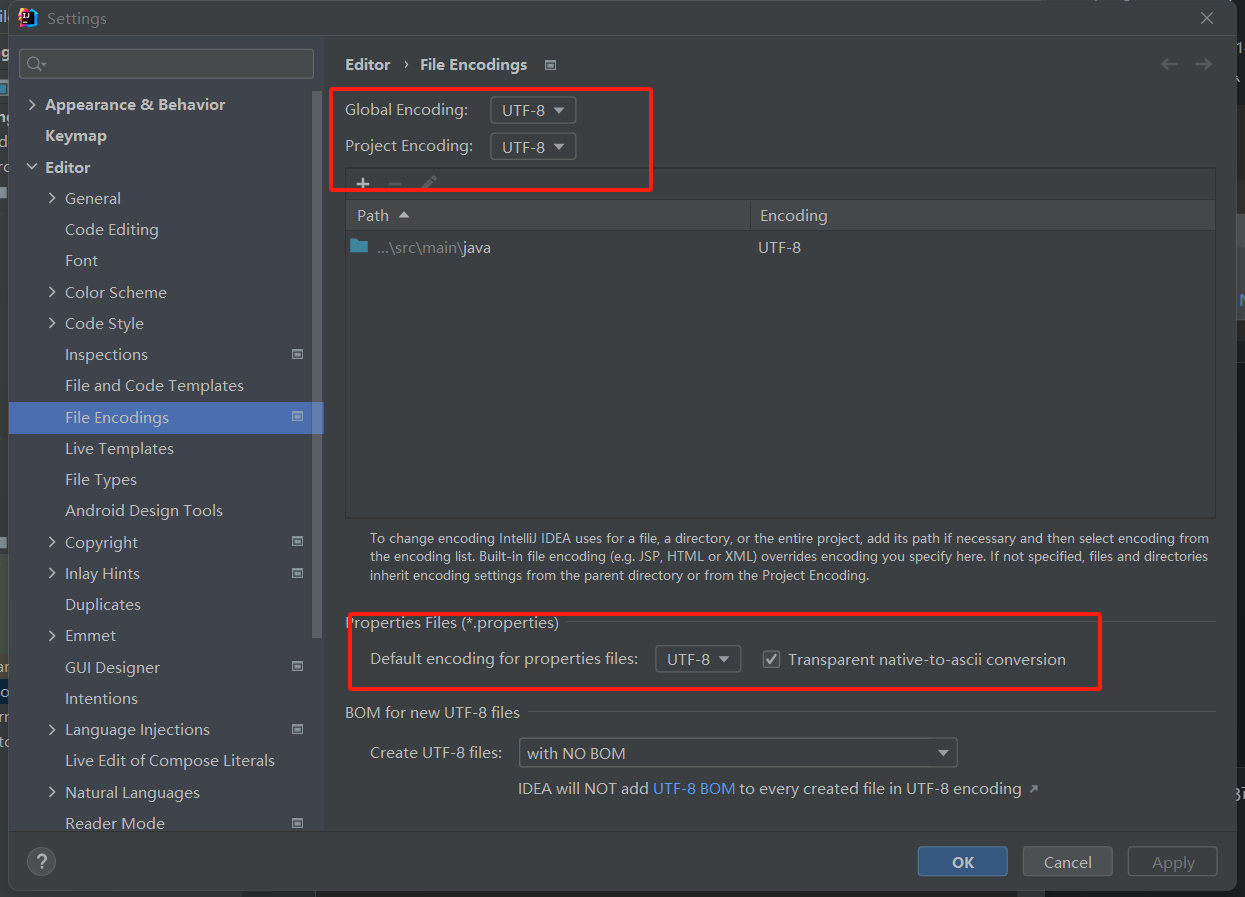
age: 3properties配置文件在idea中默认utf-8可能会乱码,修改 Idea 设置
测试类测试是否注入成功
java
@SpringBootTest
public class PersonTest {
    @Autowired
    private Person person;
    @Test
    public void testPerson(){
        System.out.println(person);
    }
}
输出:
java
Person{lastname='haha', age=18, Boss=false, birthday=Sun Dec 01 00:00:00 GMT+08:00 2002, map={tua=1, kua=2}, list=[1, 4, 6, 8], doggy=Dog{age=3, name='goffy'}}
2、@Value 和 @ConfigurationProperties 获取值比较
|------------|--------------------------|--------|
| | @ConfigurationProperties | @Value |
| 功能 | 批量注入配置文件中的属性 | 一个个指定 |
| 松散绑定 | 支持 | 不支持 |
| SpEL | 不支持 | 支持 |
| JSR303数据校验 | 支持 | 不支持 |
| 复杂类型封装 | 支持 | 不支持 |
1.松散绑定
Person 中有属性 private String firstName,使用@ConfigurationProperties 可以
java
person:
  first_name: John
而使用@Value 的话,则需要完全一致绑定
java
@Value("${person.first_name}")// 此处必须和配置文件中保持一致
private String firstName;
2.数据校验
添加字段 email,将 @Validated 放在类或方法参数上,配合字段上的 @Email,就可以在 Spring 应用中自动校验邮箱格式是否合法。否则,@Email 不会自动执行任何校验逻辑。两者配合,才能完成自动参数校验。
java
// Person.java
@Component
@Validated
@ConfigurationProperties(prefix = "person")
public class Person {
    private String name;
    private Integer age;
    @Email
    private String email;
    private Date birthday;
    private HashMap<String,Integer> map;
    private ArrayList<String> list;
    // Setter and Getter
    // toString()
    // Person()
}
3.@PropertySource加载指定的配置文件
@PropertySource 用于加载配置文件(通常是 .properties 文件),将其中的配置属性加载到 Spring 容器中。这是 Spring 中经典的加载外部配置文件的方式,通常用于普通的 Spring 项目。
在 Spring Boot 中,通常推荐使用 application.properties 或 application.yml 文件来配置项目属性。但在某些特殊场景下,你可能希望加载额外的属性文件,或者通过其他方式管理配置文件。此时,可以使用 @PropertySource 注解来加载指定的配置文件。
这里有个 person.properties 文件
java
person.last-name=John Doe
person.age=30
person.boss=true
可以在JavaBean中通过 @PropertySource 加载这个配置文件
java
@PropertySource("classpath:person.properties")  // 加载person.properties文件
@Component  // 使该类成为Spring管理的Bean
public class Person {

    @Value("${person.last-name}")
    private String lastName;

    @Value("${person.age}")
    private Integer age;

    @Value("${person.boss}")
    private Boolean boss;

    // Getters and Setters
}
@PropertySource("classpath:person.properties") 告诉 Spring 容器去加载 person.properties 文件中的配置。
@Value("${person.last-name}") 将 person.properties 文件中的配置项与类的字段进行绑定。
Spring 会自动注入配置文件中的值
4.@ImportResource导入传统 Spring XML 配置文件
@ImportResource 用于导入传统的 Spring XML 配置文件。Spring Boot 默认没有 XML 配置文件,而是通过注解方式来配置 Bean,但有时我们仍然需要使用 XML 配置文件。这个注解就是用来导入这些 XML 配置文件的。
现有的 Spring 项目或者第三方库使用了 XML 配置,你可以在 Spring Boot 项目中通过 @ImportResource 来加载这些配置。
有 beans.xml 配置文件
XML
<?xml version="1.0" encoding="UTF-8"?>
<beans xmlns="http://www.springframework.org/schema/beans"
       xmlns:xsi="http://www.w3.org/2001/XMLSchema-instance"
       xsi:schemaLocation="http://www.springframework.org/schema/beans
                           http://www.springframework.org/schema/beans/spring-beans.xsd">
    <bean id="helloService" class="com.example.HelloService" />
</beans>
在 Spring Boot 配置类中使用 @ImportResource 加载该配置文件
java
@Configuration
@ImportResource("classpath:beans.xml")  // 导入XML配置文件
public class AppConfig {
}
@ImportResource("classpath:beans.xml") 会加载 beans.xml 文件中的配置内容,并将其注册到 Spring 容器中
5.@Bean 注入
@Bean 注解用于标记一个方法,这个方法会返回一个对象,并将这个对象添加到 Spring 容器中作为一个 Bean。@Bean 注解是 Spring 中传统的注解方式,通常用在 @Configuration 注解的配置类中。
在 Spring Boot 中,通常推荐使用组件扫描(@Component, @Service, @Repository, @Controller 等注解)自动注册 Bean。但如果你需要在配置类中明确控制 Bean 的创建过程,或者你没有使用注解进行标记的类时,可以使用 @Bean 注解手动注册 Bean。
有一个 HelloService 类,并想要通过 @Bean 注解将其注册为 Spring 管理的 Bean
java
@Configuration
public class MyAppConfig {
    // 通过@Bean注解将HelloService对象注册到Spring容器
    @Bean
    public HelloService helloService() {
        System.out.println("配置类@Bean给容器中添加组件了...");
        return new HelloService();
    }
}
@Bean 注解的 helloService() 方法返回一个 HelloService 实例,Spring 会自动将这个实例作为 Bean 管理。
@Configuration 注解标记的类表明这是一个配置类,类似于传统 Spring 中的 XML 配置文件。
Spring 会通过 @Bean 注解的返回值将 HelloService 添加到容器中
四、Profile
1、多Profile文件
1.Profile的作用
Spring Boot 支持多种 profile(配置环境),使得在不同环境下加载不同的配置。你可以根据开发、测试、生产等不同的环境使用不同的配置文件。
Spring Boot 可以使用不同的配置文件来根据不同的 profile 加载不同的配置。
2.激活Profile
(1)在配置文件中指定
在 application.properties 或 application.yml 中,指定 spring.profiles.active 来激活某个 profile。例如,指定 dev 环境
java
spring.profiles.active=dev(2)命令行参数
在运行 Spring Boot 应用时,通过命令行指定 spring.profiles.active 参数
java
java -jar your-app.jar --spring.profiles.active=dev(3)虚拟机参数
还可以通过在启动时指定虚拟机参数来设置
java
java -Dspring.profiles.active=dev -jar your-app.jar3.多文档块
YAML 配置文件支持多个文档块,每个文档块可以定义不同的配置
java
# application-dev.yml
server:
  port: 8080
spring:
  profiles:
    active: dev
---
# application-prod.yml
server:
  port: 9090
spring:
  profiles:
    active: prod
2、配置文件加载参数
Spring Boot 会从以下位置依次加载配置文件:
- file:./config/:从当前目录的 config 子目录中加载。
- file:./:从当前目录加载。
- classpath:/config/:从类路径下的 config 目录加载。
- classpath:/:从类路径的根目录加载。
1.优先级
加载配置文件时,Spring Boot 会按照优先级从高到低加载,高优先级的配置会覆盖低优先级的配置。例如:
命令行参数 > JNDI属性 > Java系统属性 > 环境变量 > 外部配置文件 > 内部配置文件。
java
├── SpringBootDemo5
│   ├── config
│   │    ├── application1.properties
│   ├── src
│   │   ├── main
│   │         ├── java
│   │         │   ├── com.goose
│   │         ├── resources
│   │             ├── config
│   │             │    ├── application2.properties
│   │             ├── application3.properties
│   ├── application4.properties
四个配置文件优先级如下:
|----|-------------------------|--------------------|---------------|
| 排名 | 文件名 | 加载路径 | 优先级说明 |
| 1 | application1.properties | file:./config/ | 最高优先级 ,覆盖其他所有 |
| 2 | application4.properties | file:./ | 第二优先级 |
| 3 | application2.properties | classpath:/config/ | 第三优先级 |
| 4 | application3.properties | classpath:/ | 最低优先级 |
3、外部配置加载顺序
Spring Boot 支持从多个位置加载配置文件,且优先级从高到低,配置会形成互补:
java
java -jar app.jar --server.port=8087 --server.context-path=/abc命令行参数:通过命令行启动时指定配置项,优先级最高。
- 来自 java:comp/env 的 JNDI 属性:从 JNDI(Java Naming and Directory Interface)中获取配置。
- Java 系统属性:通过 System.getProperties() 获取的属性。
- 操作系统环境变量:通过操作系统环境变量获取的配置。
- random.* 配置:通过 RandomValuePropertySource 配置的随机值。
- 外部的 application-{profile}.properties 或 application-{profile}.yml 文件:比如 application-dev.properties,会根据当前的 profile 加载。
- 内部的 application-{profile}.properties 或 application-{profile}.yml 文件:如果是内部的文件,优先级会低于外部文件。
- 外部的 application.properties 或 application.yml 文件。
- 内部的 application.properties 或 application.yml 文件。
- 通过 @Configuration 注解类的 @PropertySource 注解加载的配置文件。
- 通过 SpringApplication.setDefaultProperties() 设置的默认属性。
4、自动配置原理
自动配置是 Spring Boot 的核心特性之一,它可以根据项目的依赖自动配置许多常见的功能,减少手动配置的工作量。
-
启动时加载主配置类:Spring Boot 会加载一个配置类,通常是标注了 @SpringBootApplication 的主类,并开启了自动配置功能(@EnableAutoConfiguration)。
-
@EnableAutoConfiguration 注解:这个注解告诉 Spring Boot 启用自动配置功能,自动根据项目的依赖加载适合的配置。
-
自动配置过程:
-
扫描 META-INF/spring.factories:Spring Boot 会扫描所有 jar 包中的 META-INF/spring.factories 文件,加载其中配置的自动配置类(EnableAutoConfiguration)。
-
自动配置类的配置:自动配置类包含了许多常见的配置。例如,HttpEncodingAutoConfiguration 类会为 Web 项目自动配置 HTTP 编码功能。
-
-
自动配置条件:自动配置类通常会使用 @Conditional 注解,只有满足特定条件时,才会生效。例如:
-
@ConditionalOnClass:当类路径中存在特定的类时,自动配置才会生效。
-
@ConditionalOnProperty:当配置文件中存在特定属性时,自动配置才会生效。
-
java
@Configuration
@EnableConfigurationProperties(HttpEncodingProperties.class)
@ConditionalOnWebApplication
@ConditionalOnClass(CharacterEncodingFilter.class)
@ConditionalOnProperty(prefix = "spring.http.encoding", value = "enabled", matchIfMissing = true)
public class HttpEncodingAutoConfiguration {
    private final HttpEncodingProperties properties;

    public HttpEncodingAutoConfiguration(HttpEncodingProperties properties) {
        this.properties = properties;
    }

    @Bean
    @ConditionalOnMissingBean(CharacterEncodingFilter.class)
    public CharacterEncodingFilter characterEncodingFilter() {
        CharacterEncodingFilter filter = new OrderedCharacterEncodingFilter();
        filter.setEncoding(this.properties.getCharset().name());
        filter.setForceRequestEncoding(this.properties.shouldForce(Type.REQUEST));
        filter.setForceResponseEncoding(this.properties.shouldForce(Type.RESPONSE));
        return filter;
    }
}- @ConditionalOnWebApplication:表示只有当应用是 Web 应用时,自动配置才生效。
- @ConditionalOnClass(CharacterEncodingFilter.class):表示只有当 CharacterEncodingFilter 类存在时,自动配置才生效。
- @ConditionalOnProperty:表示当配置文件中没有明确指定该属性时,自动配置仍会生效。
5、条件注解
Spring Boot 提供了多个基于条件的注解,用于判断是否满足条件时才进行自动配置。
必须是@Conditional指定的条件成立,才给容器中添加组件,配置里面的所有内容才生效
|---------------------------------|--------------------------------|
| @Conditional扩展注解 | 作用(判断是否满足当前指定条件) |
| @ConditionalOnJava | 系统的java版本是否符合要求 |
| @ConditionalOnBean | 容器中存在指定Bean; |
| @ConditionalOnMissingBean | 容器中不存在指定Bean; |
| @ConditionalOnExpression | 满足SpEL表达式指定 |
| @ConditionalOnClass | 系统中有指定的类 |
| @ConditionalOnMissingClass | 系统中没有指定的类 |
| @ConditionalOnSingleCandidate | 容器中只有一个指定的Bean,或者这个Bean是首选Bean |
| @ConditionalOnProperty | 系统中指定的属性是否有指定的值 |
| @ConditionalOnResource | 类路径下是否存在指定资源文件 |
| @ConditionalOnWebApplication | 当前是web环境 |
| @ConditionalOnNotWebApplication | 当前不是web环境 |
| @ConditionalOnJndi | JNDI存在指定项 |
自动配置类必须在一定的条件下才能生效;
我们怎么知道哪些自动配置类生效;
我们可以通过启用 debug=true 属性;来让控制台打印自动配置报告,这样我们就可以很方便的知道哪些自动配置