【iOS】网易云仿写
文章目录
前言
这是暑假第一周的一个稍微大型的任务,写的中间遇到了很多问题,但也学到了很多知识,
推荐页
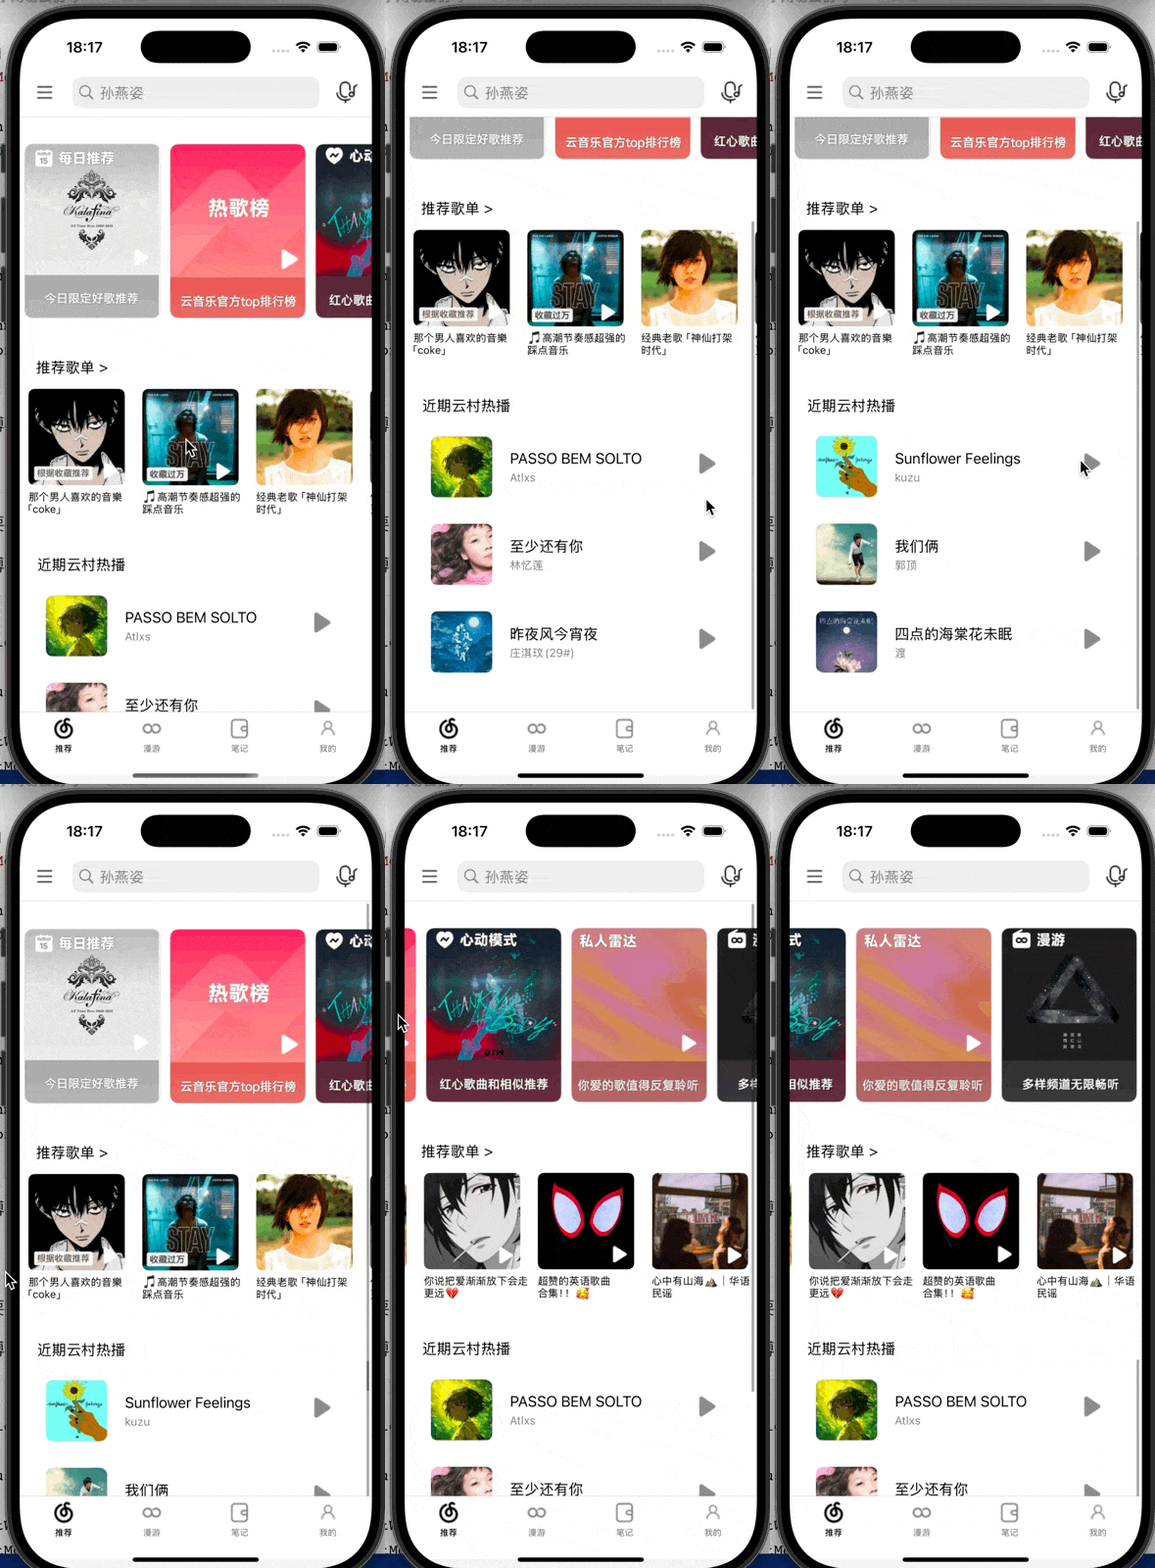
首页的实现效果如下:

主页的界面主要就是一个上下的大的滚动视图,上面嵌入了有关自定义单元格与其他左右的滚动视图的一些内容
上方导航栏
导航栏的左右按钮和搜索框
objc
self.leftBtn = [[UIBarButtonItem alloc] initWithImage:[[UIImage imageNamed:@"菜单黑.png"] imageWithRenderingMode:UIImageRenderingModeAlwaysOriginal] style:UIBarButtonItemStylePlain target:self action:@selector(leftBtnTapped)];
    self.leftBtn.width = 30;
    self.navigationItem.leftBarButtonItem = self.leftBtn;
    UITapGestureRecognizer *tapGesture = [[UITapGestureRecognizer alloc] initWithTarget:self action:@selector(dismissKeyboard)];
    tapGesture.cancelsTouchesInView = NO;
    [self.view addGestureRecognizer:tapGesture];
    self.rightBtn = [[UIBarButtonItem alloc] initWithImage:[[UIImage imageNamed:@"听歌识曲.png"] imageWithRenderingMode:UIImageRenderingModeAlwaysOriginal] style:UIBarButtonItemStylePlain target:self action:nil];
    self.rightBtn.width = 30;
    self.navigationItem.rightBarButtonItem =  self.rightBtn;

    self.searchBar = [[UISearchBar alloc] init];
    self.searchBar.frame = CGRectMake(30, 0, 250, 30);
    self.textField = [[UITextField alloc] initWithFrame: CGRectMake(30, 0, 250, 30)];
    self.searchBar.searchBarStyle = UISearchBarStyleMinimal;
    self.searchBar.placeholder = @"孙燕姿";
    self.searchBar.keyboardType = UIKeyboardTypeDefault;
    self.searchBar.delegate = self;
    self.navigationItem.titleView = self.searchBar;
近期热播
这的热播界面是让每页的单元格落在上下的滚动视图与左右的滚动视图的叠加上
objc
for (int page = 0; page < 3; page++) {
            UIScrollView *pageView = [[UIScrollView alloc] initWithFrame: CGRectMake(page * width, 0, width, 430)];
            pageView.showsVerticalScrollIndicator = YES;
            pageView.showsHorizontalScrollIndicator = NO;
            for (int i = 0; i < 3; i++) {
                int index = page * 3 + i;
                if (index >= self.thirdImageArray.count) {
                    break;
                }
                CGFloat y = i * cellHeight + spacing;
                UIView *cell = [[UIView alloc] initWithFrame:CGRectMake(20, y, width - 40, cellHeight)];
                cell.backgroundColor = isDarkMode ? [UIColor colorWithWhite:0.15 alpha:1.0] : [UIColor colorWithWhite:1.0 alpha:1.0];
                cell.layer.cornerRadius = 10;

                UIImageView *imageView = [[UIImageView alloc] initWithFrame:CGRectMake(10, 15, 70, 70)];
                imageView.image = [UIImage imageNamed:self.thirdImageArray[index]];
                imageView.contentMode = UIViewContentModeScaleAspectFill;
                imageView.clipsToBounds = YES;
                imageView.layer.cornerRadius = 7;
                [cell addSubview:imageView];

                UILabel *titleLabel = [[UILabel alloc] initWithFrame:CGRectMake(100, 28, 200, 25)];
                titleLabel.text = self.thirdTitleArray[index];
                titleLabel.font = [UIFont systemFontOfSize:17];
                titleLabel.textColor = isDarkMode ? [UIColor whiteColor] : [UIColor blackColor];
                [cell addSubview:titleLabel];

                UILabel *subLabel = [[UILabel alloc] initWithFrame:CGRectMake(100, 55, 100, 15)];
                subLabel.text = self.thirdsubTitleArray[index];
                subLabel.font = [UIFont systemFontOfSize:13];
                subLabel.textColor = isDarkMode ? [UIColor lightGrayColor] : [UIColor grayColor];
                [cell addSubview:subLabel];

                UIButton *btn = [UIButton buttonWithType:UIButtonTypeCustom];
                btn.frame = CGRectMake(cell.frame.size.width - 48, 35, 23, 23);
                [btn addTarget:self action:@selector(playButtonTapped:) forControlEvents:UIControlEventTouchUpInside];
                btn.tag = index;
                UIImage *normalImage = [UIImage imageNamed:@"播放.png"];
                UIImage *highlightedImage = [UIImage imageNamed:@"开始播放.png"];
                [btn setBackgroundImage:normalImage forState:UIControlStateNormal];
                [btn setBackgroundImage:highlightedImage forState:UIControlStateHighlighted];
                [cell addSubview:btn];

                [pageView addSubview:cell];
            }
            pageView.contentSize = CGSizeMake(width, 3 * cellHeight + 2 * spacing + 150);
            [self.thirdsongScrollView addSubview:pageView];
  }
        self.thirdsongScrollView.contentSize = CGSizeMake(width * 3, 430);
这里使用了一个双层for循环从而确定其不同的标号从而控制只有一个按钮是可以打开变成开始播放的
推荐页其实主要就是几个视图,具体功能不多
我的界面
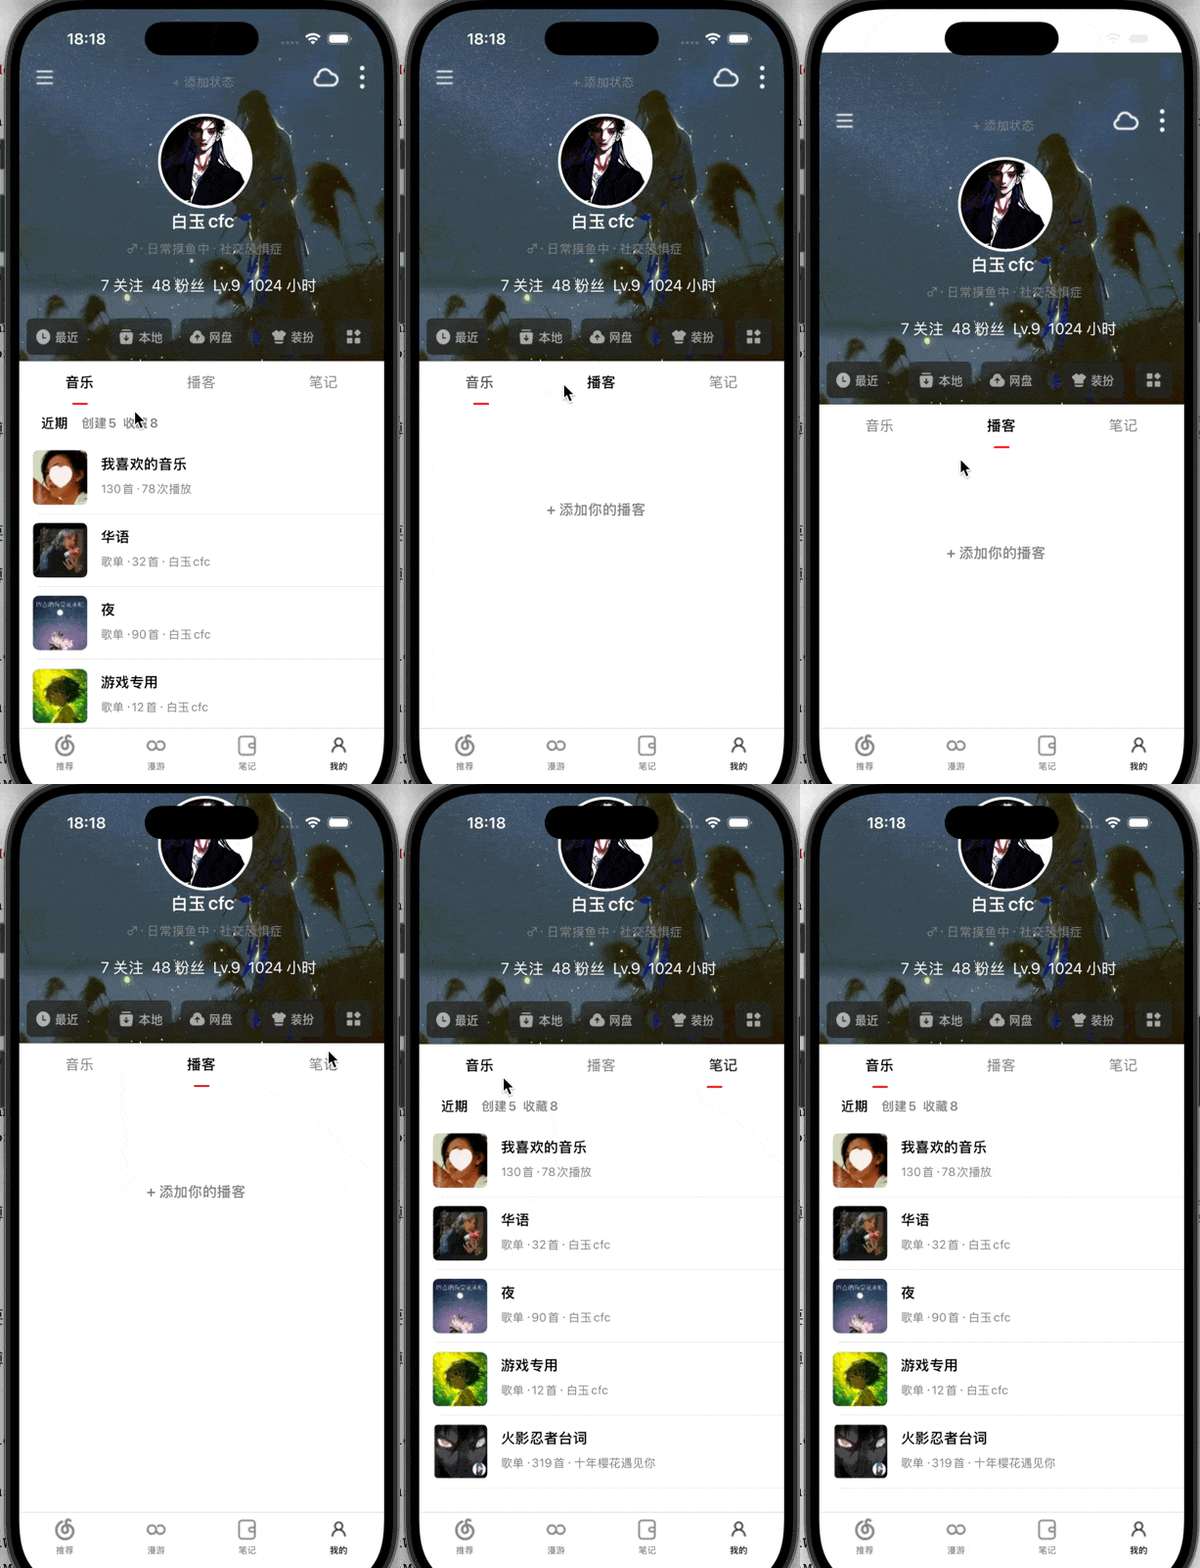
这个界面我主要分成了上下两部分,上面是底下为一个有背景视图的半屏的一个界面,下面是由分栏控件控制的三个界面,第一个是一个自定义cell的界面,其他两个没来的及写什么

上半屏部分代码:
objc
self.mainscrollView.contentSize = CGSizeMake(self.view.frame.size.width, self.view.frame.size.height);
    self.mainscrollView.showsVerticalScrollIndicator = NO;
    UIImageView *mainImageView = [[UIImageView alloc] initWithImage: [UIImage imageNamed: @"底.jpg"]];

    mainImageView.frame = CGRectMake(0, 0, self.view.frame.size.width, self.view.frame.size.height / 2- 50);
    mainImageView.contentMode = UIViewContentModeScaleToFill;
    mainImageView.clipsToBounds = YES;
    [self.navigationController setNavigationBarHidden:YES animated:NO];
    [self.mainscrollView addSubview: mainImageView];
    [self.view addSubview: self.mainscrollView];

    self.leftBtn = [UIButton buttonWithType: UIButtonTypeCustom];
    [self.leftBtn setImage:[[UIImage imageNamed:@"菜单白.png"] imageWithRenderingMode:UIImageRenderingModeAlwaysOriginal] forState:UIControlStateNormal];
    self.leftBtn.frame = CGRectMake(13, 60, 30, 30);
    [self.leftBtn addTarget:self action:@selector(leftBtnTapped) forControlEvents:UIControlEventTouchUpInside];

    self.rightBtn1 = [UIButton buttonWithType: UIButtonTypeCustom];
    [self.rightBtn1 setImage:[[UIImage imageNamed:@"云盘.png"] imageWithRenderingMode:UIImageRenderingModeAlwaysOriginal] forState:UIControlStateNormal];
    self.rightBtn1.frame = CGRectMake(323, 60, 30, 30);
    [self.rightBtn1 addTarget:self action:@selector(thirdBtnTapped) forControlEvents:UIControlEventTouchUpInside];

    self.rightBtn2 = [UIButton buttonWithType: UIButtonTypeCustom];
    [self.rightBtn2 setImage:[[UIImage imageNamed:@"三点白.png"] imageWithRenderingMode:UIImageRenderingModeAlwaysOriginal] forState:UIControlStateNormal];
    self.rightBtn2.frame = CGRectMake(363, 60, 30, 30);
    [self.rightBtn2 addTarget:self action:@selector(leftBtnTapped)
             forControlEvents:UIControlEventTouchUpInside];
下半屏部分代码:
objc
self.segmentedControl = [[UISegmentedControl alloc] initWithItems:@[@"音乐", @"播客", @"笔记"]];
    self.segmentedControl.layer.borderWidth = 0;
    self.segmentedControl.layer.borderColor = [UIColor clearColor].CGColor;
    self.segmentedControl.tintColor = [UIColor clearColor];
    self.segmentedControl.frame = CGRectMake(0, self.view.frame.size.height - 489, self.view.frame.size.width, 50);
    self.segmentedControl.selectedSegmentIndex = 0;

    NSDictionary *normalAttributes = @{
        NSForegroundColorAttributeName: [UIColor grayColor],
        NSFontAttributeName: [UIFont systemFontOfSize:16]
    };
    [self.segmentedControl setTitleTextAttributes:normalAttributes forState:UIControlStateNormal];
    NSDictionary *selectedAttributes = @{
        NSForegroundColorAttributeName: [UIColor blackColor],
        NSFontAttributeName: [UIFont boldSystemFontOfSize:16]
    };
    [self.segmentedControl setTitleTextAttributes:selectedAttributes forState:UIControlStateSelected];
    [self.segmentedControl addTarget:self action:@selector(segmentChanged:) forControlEvents:UIControlEventValueChanged];
    [self.mainscrollView addSubview:self.segmentedControl];

    CGFloat segmentWidth = self.view.frame.size.width / self.segmentedControl.numberOfSegments;
    CGFloat indicatorWidth = segmentWidth / 5 - 10;
    CGFloat indicatorX = (segmentWidth - indicatorWidth) / 2;
    self.indicatorLine = [[UIView alloc] initWithFrame:CGRectMake(indicatorX,
        CGRectGetMaxY(self.segmentedControl.frame) - 2,
        indicatorWidth, 2)];
    self.indicatorLine.backgroundColor = [UIColor redColor];
    [self.mainscrollView addSubview:self.indicatorLine];
//清除分栏的边框和阴影
self.segmentedControl.layer.borderWidth = 0;
self.segmentedControl.layer.borderColor = [UIColor clearColor].CGColor;
self.segmentedControl.layer.shadowOpacity = 0;
self.segmentedControl.layer.shadowRadius = 0;
self.segmentedControl.layer.shadowOffset = CGSizeZero;
self.segmentedControl.layer.shadowColor = [UIColor clearColor].CGColor;
self.segmentedControl.layer.masksToBounds = YES;因为系统对分栏这块的管理比较严格,所以一般来说很难直接取消分栏的边框之类的东西
换头像
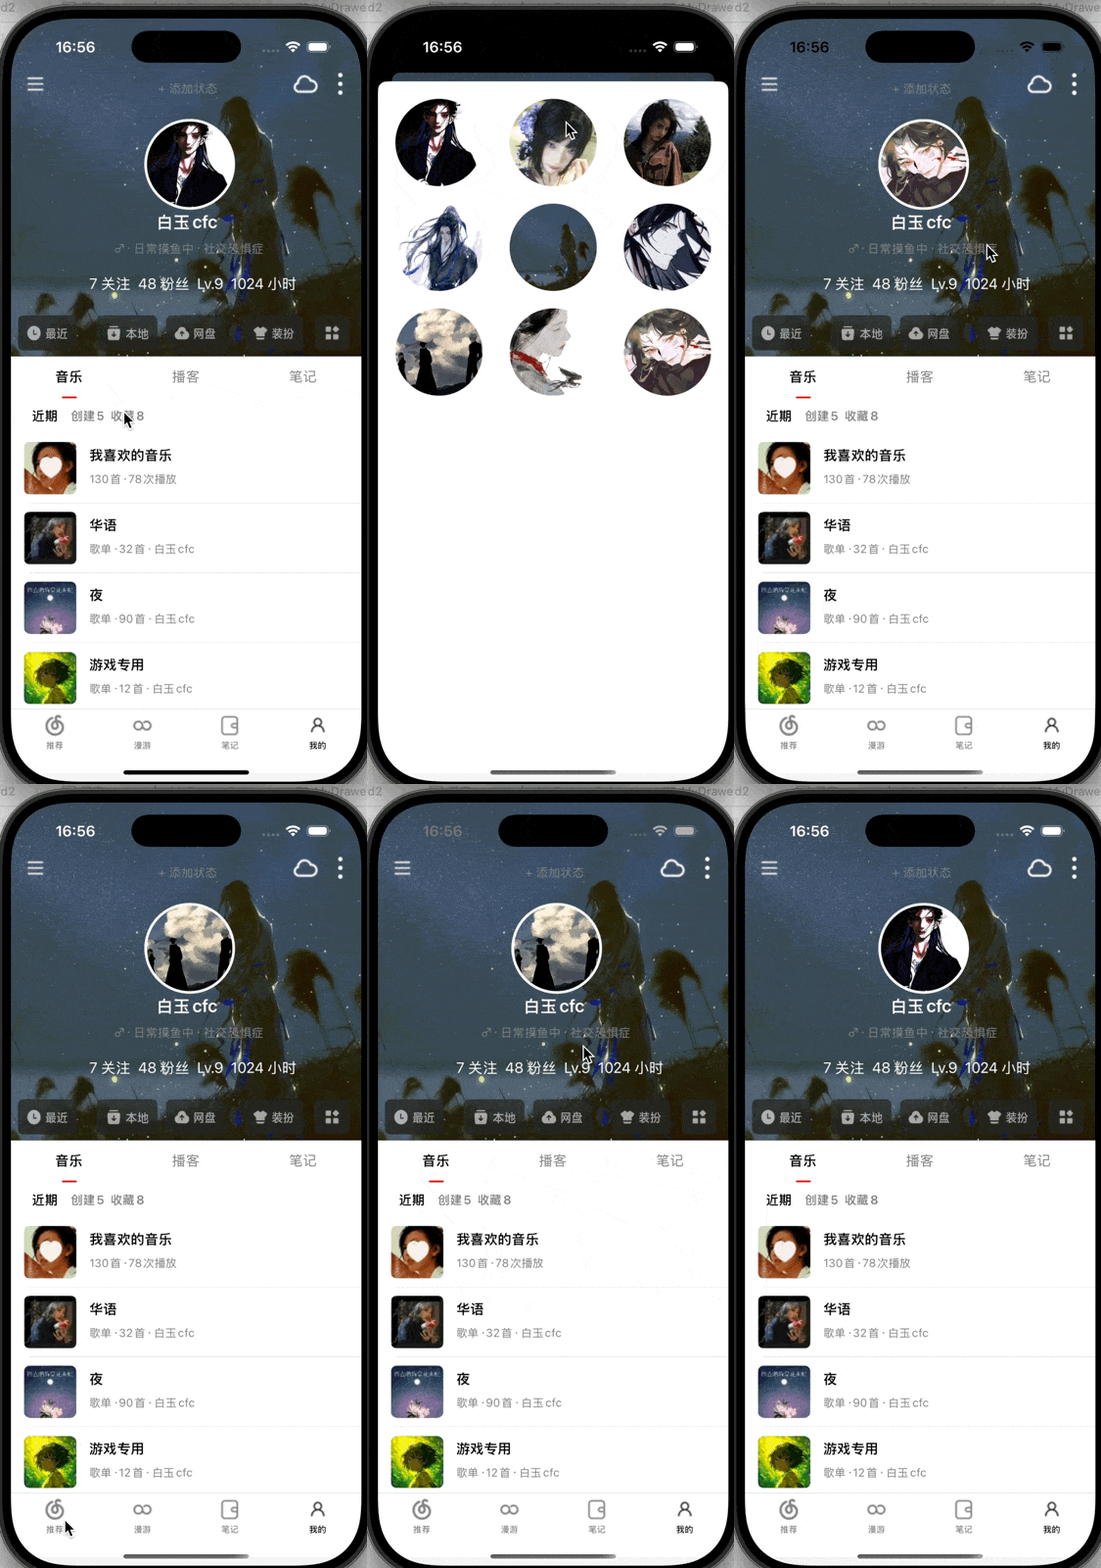
这里还有一个功能就是换头像的功能,即点击当前头像时出现一个照片墙,点击选中一张照片时用协议传值替换外层头像的那张照片

objc
@protocol PhotoWallDelegate <NSObject>
- (void)didSelectImage: (UIImage *) image;
@end

@interface PhotoWallVC : UIViewController<UICollectionViewDelegate, UICollectionViewDataSource>

@property (nonatomic, strong) id<PhotoWallDelegate> delegate;
@property (nonatomic, strong) UICollectionView *collectionView;
@property (nonatomic, strong) NSArray *images;

@end
objc
self.images = @[@"头像1.jpg", @"头像2.jpg", @"头像3.jpg", @"头像4.jpg", @"头像5.jpg", @"头像6.jpg", @"头像7.jpg", @"头像8.jpg", @"头像9.jpg"];
    UICollectionViewFlowLayout *layout = [[UICollectionViewFlowLayout alloc] init];
    layout.itemSize = CGSizeMake(100, 100);
    layout.minimumInteritemSpacing = 10;
    layout.minimumLineSpacing = 20;
    layout.sectionInset = UIEdgeInsetsMake(20, 20, 20, 20);

    self.collectionView = [[UICollectionView alloc] initWithFrame: self.view.bounds collectionViewLayout: layout];
    self.collectionView.delegate = self;
    self.collectionView.dataSource = self;
    self.collectionView.backgroundColor = [UIColor whiteColor];
    [self.collectionView registerClass: [UICollectionViewCell class] forCellWithReuseIdentifier: @"cell"];
    [self.view addSubview: self.collectionView];
即用后一个界面定义的一个传值的协议与代理属性,并在前一个界面进行来遵守这个协议来进行回调,具体的操作过程在我的上篇博客中写了
设置
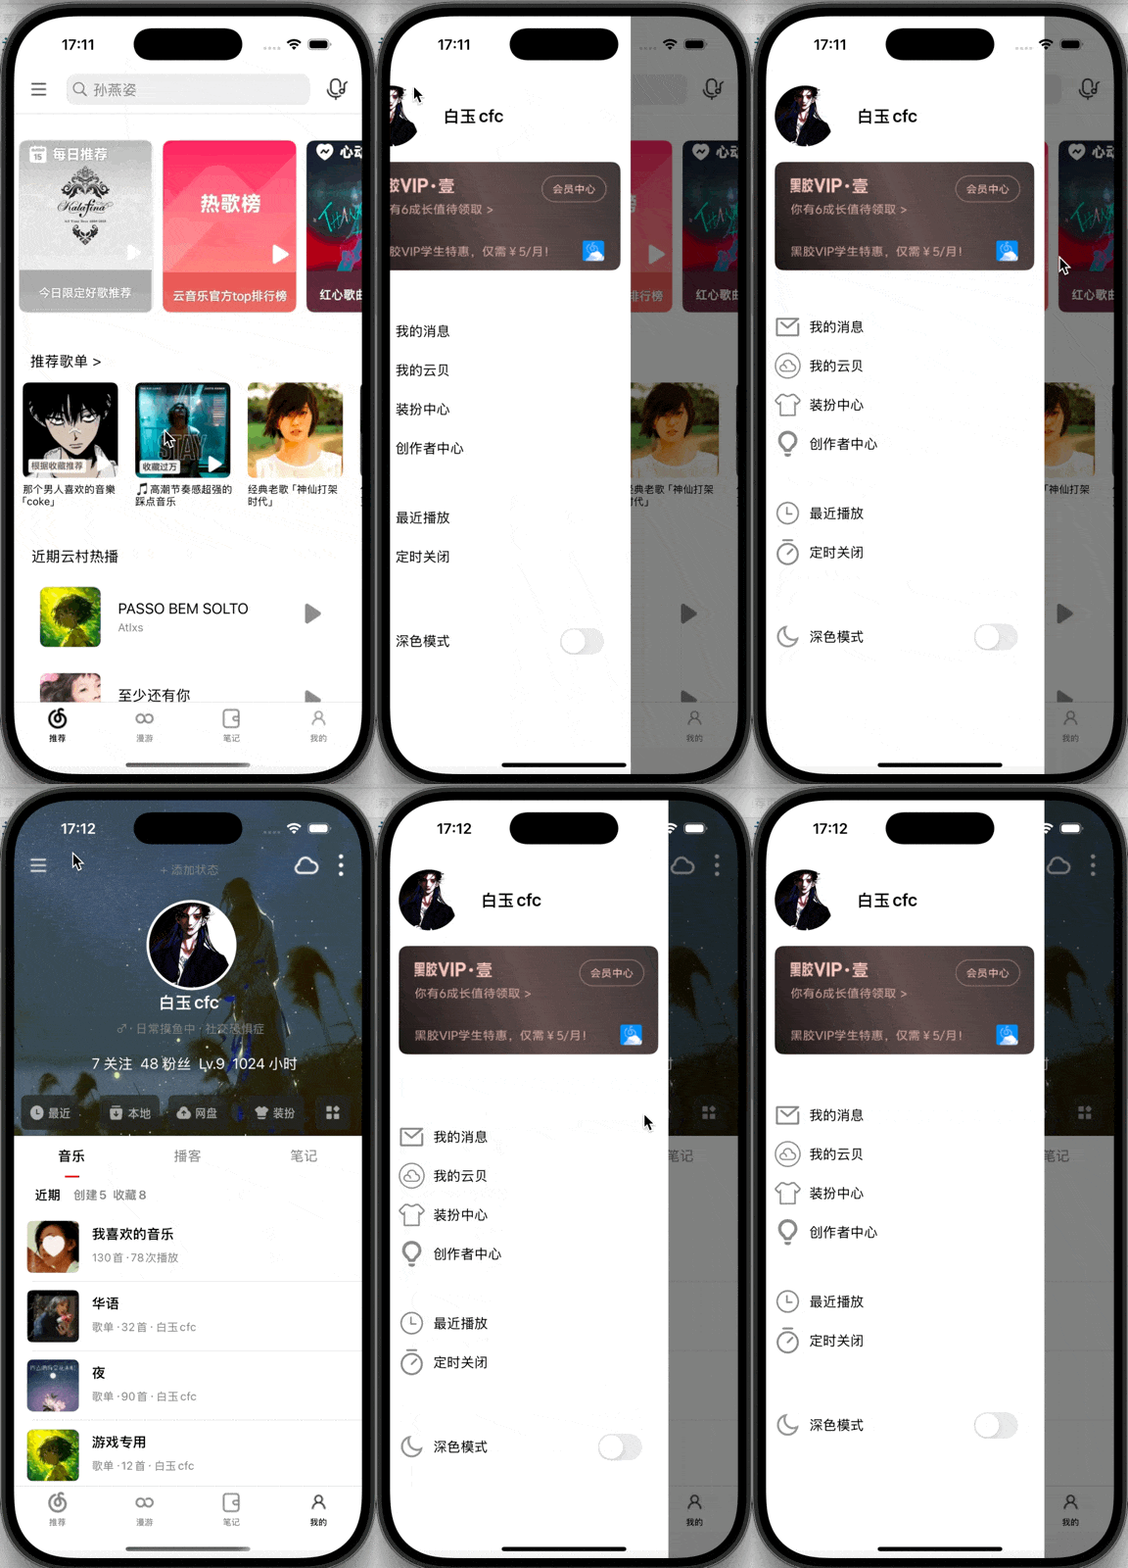
这个界面的弹出逻辑主要是点击相应的按钮时设置事件弹出这个界面:

这个里面其实东西就那些,主要就一个自定义cell,主要就是弹出的一个界面,可以在下面先设置一个灰色的界面,再在其上设置弹出占据大部分屏幕的设置界面
部分代码示例:
objc
self.overlayView = [[UIView alloc] initWithFrame:parentView.bounds];
    self.overlayView.backgroundColor = [[UIColor blackColor] colorWithAlphaComponent:0.5];
    self.overlayView.tag = 999;
    if (!self.superview) {
        [parentView addSubview:self.overlayView];
        [parentView addSubview:self];
    }
    self.frame = CGRectMake(-parentView.frame.size.width * 0.7, 0, parentView.frame.size.width * 0.8, parentView.frame.size.height);
    self.backgroundColor = [UIColor whiteColor];
    self.tag = 998;

    BOOL savedDarkMode = [[NSUserDefaults standardUserDefaults] boolForKey:@"DarkModeEnabled"];
    self.isDarkMode = savedDarkMode;

    [[NSNotificationCenter defaultCenter] addObserver: self selector: @selector(DarkModeChanged:) name: @"DarkModeSwitchNotification" object: nil];

    self.image1 = [[UIImageView alloc] initWithImage:[UIImage imageNamed:@"头像1.jpg"]];
    self.image1.frame = CGRectMake(10, 80, 70, 70);
    self.image1.layer.cornerRadius = 35;
    self.image1.clipsToBounds = YES;
    [self addSubview: self.image1];

    self.name = [[UILabel alloc] initWithFrame:CGRectMake(90, 100, 100, 30)];
    self.name.text = @"白玉cfc";
    self.name.textAlignment = NSTextAlignmentCenter;
    self.name.font = [UIFont boldSystemFontOfSize:20];
[self addSubview:self.name];关于这种抽屉视图正规的写法,详情见一位学长的博客:「iOS」自定义Modal转场------抽屉视图的实现
黑夜模式
我感觉网易云里最麻烦的就是黑夜模式的内容了,要在每个页面都接收并调整颜色
这里我用的是通知传值的方式,具体方法也在上篇博客中有所写出
objc
@implementation MyfinallDrawerCell
- (instancetype) initWithStyle:(UITableViewCellStyle)style reuseIdentifier:(NSString *)reuseIdentifier {
    self = [super initWithStyle:style reuseIdentifier:reuseIdentifier];
    if (self) {
        _moon = [[UIImageView alloc] initWithFrame: CGRectMake(10, 10, 30, 30)];
        _moon.contentMode = UIViewContentModeScaleAspectFit;
        _moon.layer.cornerRadius = 5;
        _moon.clipsToBounds = YES;
        [self.contentView addSubview:_moon];

        _moonLabel = [[UILabel alloc] initWithFrame:CGRectMake(50, 10, 100, 30)];
        _moonLabel.textAlignment = NSTextAlignmentLeft;
        _moonLabel.font = [UIFont systemFontOfSize:16];
        [self.contentView addSubview:_moonLabel];

        _moonSwitch = [[UISwitch alloc] initWithFrame: CGRectMake(240, 10, 50, 30)];
        BOOL savedDarkMode = [[NSUserDefaults standardUserDefaults] boolForKey:@"DarkModeEnabled"];
        _moonSwitch.on = savedDarkMode;
        [_moonSwitch addTarget: self action: @selector(switchChanged:) forControlEvents:UIControlEventValueChanged];
        [self.contentView addSubview: _moonSwitch];
    }
    return self;
}

- (void)switchChanged:(UISwitch *)sender {
    BOOL isOn = sender.isOn;
    [[NSNotificationCenter defaultCenter] postNotificationName:@"DarkModeSwitchNotification"
                        object:nil userInfo:@{@"isDark": @(isOn)}];
    [[NSUserDefaults standardUserDefaults] setBool:isOn forKey:@"DarkModeEnabled"];
    [[NSUserDefaults standardUserDefaults] synchronize];
}
这里的主要作用就是发送通知并持久化保存开关状态向系统广播一个名为 @"DarkModeSwitchNotification" 的通知,附带一个参数 isDark,用于告知其他监听这个通知的对象,夜间模式(DarkMode)是否被开启。
objc
[[NSNotificationCenter defaultCenter] addObserver: self selector: @selector(DarkModeChanged:) name: @"DarkModeSwitchNotification" object: nil];
    // 使用UITabBarAppearance设置tabBar外观
    UITabBarAppearance *tabBarAppearance = [[UITabBarAppearance alloc] init];
    [tabBarAppearance configureWithOpaqueBackground];
    if (self.isDarkMode) {
        tabBarAppearance.backgroundColor = [UIColor blackColor];
        tabBarAppearance.stackedLayoutAppearance.selected.iconColor = [UIColor whiteColor];
        tabBarAppearance.stackedLayoutAppearance.selected.titleTextAttributes = @{NSForegroundColorAttributeName: [UIColor whiteColor]};
        tabBarAppearance.stackedLayoutAppearance.normal.iconColor = [UIColor grayColor];
        tabBarAppearance.stackedLayoutAppearance.normal.titleTextAttributes = @{NSForegroundColorAttributeName: [UIColor grayColor]};
    } else {
        tabBarAppearance.backgroundColor = [UIColor whiteColor];
        tabBarAppearance.stackedLayoutAppearance.selected.iconColor = [UIColor blackColor];
        tabBarAppearance.stackedLayoutAppearance.selected.titleTextAttributes = @{NSForegroundColorAttributeName: [UIColor blackColor]};
        tabBarAppearance.stackedLayoutAppearance.normal.iconColor = [UIColor grayColor];
        tabBarAppearance.stackedLayoutAppearance.normal.titleTextAttributes = @{NSForegroundColorAttributeName: [UIColor grayColor]};
    }
这里的作用是当应用内任意地方发出 "DarkModeSwitchNotification" 通知(比如设置界面切换了深色模式),这个 SceneDelegate 就会收到这个通知,并调用它的回调方法
后面接着根据 self.isDarkMode 的值(从 NSUserDefaults 中读取的)来判断初始是亮色还是暗色
这里面相当坑的一个点就是当你处于黑夜模式打开程序时,因为我把他的颜色状态保存在NSUserDefaults中的,所以当你重新运行时,会因为有的控件初始时没接收到初始模式所发出的通知信息,所以要在打开之前,就把每个界面都加载一次,即类似于下面这种
objc
- (void)applyTheme {
    BOOL savedDarkMode = [[NSUserDefaults standardUserDefaults] boolForKey:@"DarkModeEnabled"];
    self.isDarkMode = savedDarkMode;

    if (self.isDarkMode) {
        self.backgroundColor = [UIColor blackColor];
        self.name.textColor = [UIColor whiteColor];
        self.tableView.backgroundColor = [UIColor blackColor];
        self.tableView2.backgroundColor = [UIColor blackColor];
    } else {
        self.backgroundColor = [UIColor whiteColor];
        self.name.textColor = [UIColor blackColor];
        self.tableView.backgroundColor = [UIColor whiteColor];
        self.tableView2.backgroundColor = [UIColor whiteColor];
    }
    [self.tableView reloadData];
    [self.tableView2 reloadData];
}
即开始时不依赖通知而主动去获取并应用到当前页面主题
objc
self.isDarkMode = [[NSUserDefaults standardUserDefaults] boolForKey:@"DarkModeEnabled"];
[self applyCurrentTheme];
总结
在写黑夜模式时对具体情况思考不全,导致会出现各式各样的问题,但是学到了到了预加载这个新方法,受益颇多,而且还对各种传值方式进行了更具体的运用