添加更多路由
到目前为止,我们的应用程序只有一个页面。让我们来改变这一点!
在本章中,我们将添加一个导航栏、一个欢迎屏幕以及一个"收藏"页面,以便我们可以重新访问我们最喜欢的狗狗。
整理我们的项目
在我们继续添加新页面之前,让我们先更好地整理一下我们的代码库。对于大型项目,你可能需要将应用程序拆分为不同的较小模块。对于HotDog,我们将保持简单。
dx的Jumpstart和Workspace模板为新应用程序提供了优秀的初始化框架!
我们通常建议将组件、模型和后端功能拆分为不同的文件。对于HotDog,我们将使用一个简单的目录结构:
rust
├── Cargo.toml
├── assets
│   └── main.css
└── src
    ├── backend.rs
    ├── components
    │   ├── favorites.rs
    │   ├── mod.rs
    │   ├── nav.rs
    │   └── view.rs
    └── main.rs
我们将有一个包含服务器函数的 backend.rs 文件,以及一个包含组件的 components 文件夹。目前我们还没有 NavBar 或 Favorites 组件,但我们仍然会在添加它们之前创建相关的文件。通过将服务器函数拆分到 backend.rs 文件中,我们将更容易在未来将后端功能提取为共享库,供不同应用程序使用。
我们的 components/mod.rs 文件将简单地导入并重新导出 view.rs、nav.rs 和 favorites.rs 中的组件:
rust
mod favorites;
mod nav;
mod view;

pub use favorites::*;
pub use nav::*;
pub use view::*;
最后,我们需要在 main.rs 文件中将后端和组件纳入作用域:
rust
mod components;
mod backend;

use crate::components::*;
有关使用模块组织 Rust 项目的更多信息,请参阅《Rust 语言手册》中的"模块"章节。
创建路由
您构建的大多数 Dioxus 应用程序将包含多个界面。这可能包括登录、设置和个人资料等页面。我们的 HotDog 应用程序将包含两个界面:DogView 页面和收藏夹页面。
Dioxus 提供了一个原生支持网页、桌面和移动设备的内置路由器。例如,在网页端,当您在浏览器中访问 /favorites 网址时,对应的收藏页面将加载。Dioxus 路由器非常强大,最重要的是,它具有类型安全特性。您可以放心,用户绝不会被引导至无效的路由。要实现这一点,我们首先需要在 Cargo.toml 文件中添加"Router"功能:
rust
[dependencies]
dioxus = { version = "0.6.0", features = ["fullstack", "router"] } # <----- add "router"
接下来,Dioxus 路由器被定义为一个具有 Routable 派生属性的枚举类型:
rust
#[derive(Routable, Clone, PartialEq)]
enum Route {
    #[route("/")]
    DogView,
}
使用 Dioxus 路由器时,每个路由都是一个具有 #[route] 属性的枚举变体,该属性指定了路由的 URL。每次路由渲染我们的路由时,同名的组件将被渲染。
rust
use dioxus::prelude::*;

#[derive(Routable, Clone, PartialEq)]
enum Route {
    #[route("/")]
    DogView, // <---- a DogView component must be in scope
}

fn DogView() -> Element {
    todo!()
}
渲染路由
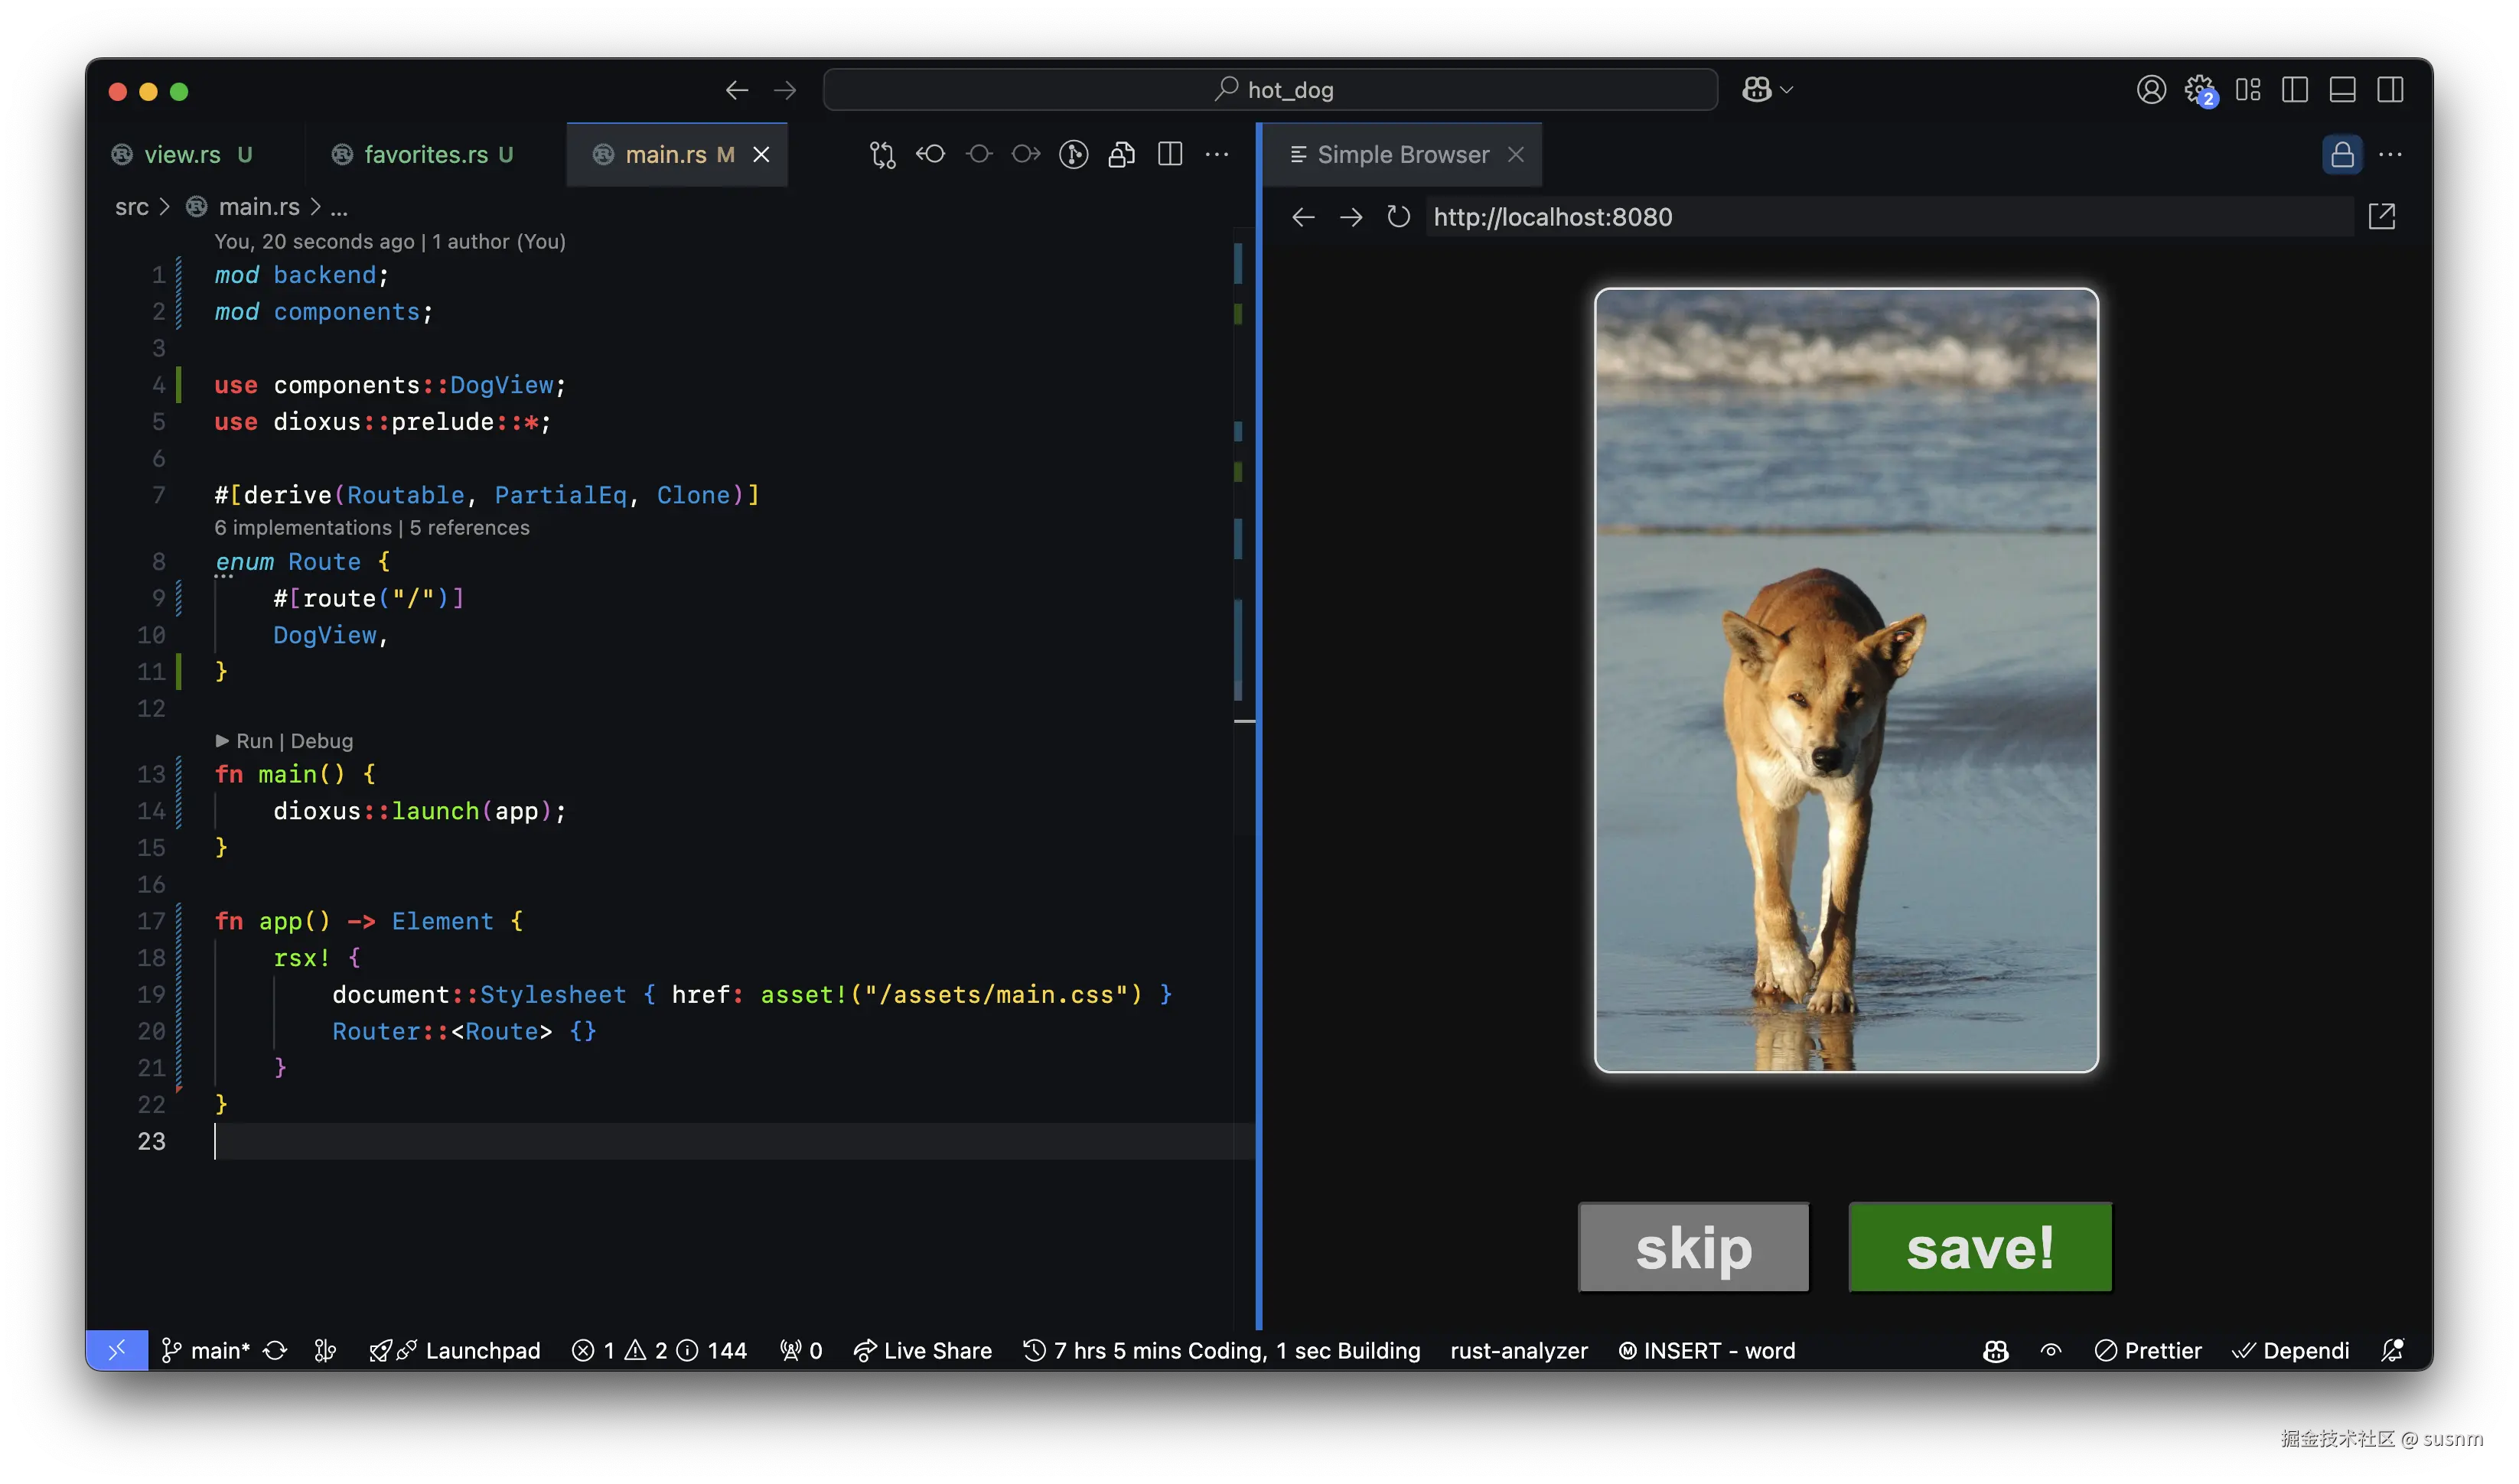
现在我们已经定义了应用程序的路由,接下来需要渲染它。让我们将应用程序组件修改为渲染 Route {} 组件,而不是 DogView。
rust
fn app() -> Element {
    rsx! {
        document::Stylesheet { href: asset!("/assets/main.css") }

        // 📣 delete Title and DogView and replace it with the Router component.
        Router::<Route> {}
    }
}
当 Router {} 组件渲染时,它会将文档的当前 URL 解析为一个路由变体。如果 URL 无法正确解析,路由器将不会渲染任何内容,除非你添加一个通用路由:
rust
#[derive(Routable, Clone, PartialEq)]
enum Route {
    // ...
    // We can collect the segments of the URL into a Vec<String>
    #[route("/:..segments")]
    PageNotFound { segments: Vec<String> },
}
请注意,PageNotFound 路由会接收"segments"参数。Dioxus 路由不仅作为变体具有类型安全,而且在 URL 参数方面也具有类型安全。有关此功能的更多信息,请参阅路由器指南。
此时,我们应该能够看到我们的应用程序,但这次没有标题。
使用布局渲染导航栏
我们正在渲染 DogView 组件,但遗憾的是,我们不再看到标题。让我们将其恢复并将其转换为导航栏!
在 src/components/nav.rs 文件中,我们将恢复标题代码,但将其重命名为 NavBar,并添加两个新组件:Link {} 和 Outlet。
rust
use crate::Route;
use dioxus::prelude::*;

#[component]
pub fn NavBar() -> Element {
    rsx! {
        div { id: "title",
            Link { to: Route::DogView,
                h1 { "🌭 HotDog! " }
            }
        }
        Outlet::<Route> {}
    }
}
Link {} 组件通过类型安全的接口包裹锚点 <a> 元素。这意味着任何实现 Routable 接口的结构体(即任何能够调用 .to_string() 方法的结构体)均可作为有效的导航目标。
rust
// Using the Link with Route
Link { to: Route::DogView }

// Or passing in a "/" route directly
Link { to: "/" }
链接组件支持多种不同的参数,使其能够根据您的具体用例进行扩展和自定义。
在导航栏中,我们还添加了一个 Outlet::<Route> {}组件。当路由组件渲染时,它会首先查找任何子 Outlet 组件。如果存在子 Outlet 组件,则将当前路由渲染在该 Outlet 下。这使我们能够用额外的元素包裹当前页面------在本例中是 NavBar。如果没有 Outlet,则当前路由会直接渲染在 Router {} 声明的位置。
要将 NavBar 组件实际添加到应用中,我们需要为 Route 枚举添加 #[layout] 属性。这会强制路由器首先渲染 NavBar 组件,以便其暴露 Outlet {}。
rust
#[derive(Routable, PartialEq, Clone)]
enum Route {
    #[layout(NavBar)] // <---- add the #[layout] attribute
    #[route("/")]
    DogView,
}
布局属性指示路由器将后续枚举变体包裹在指定组件中。
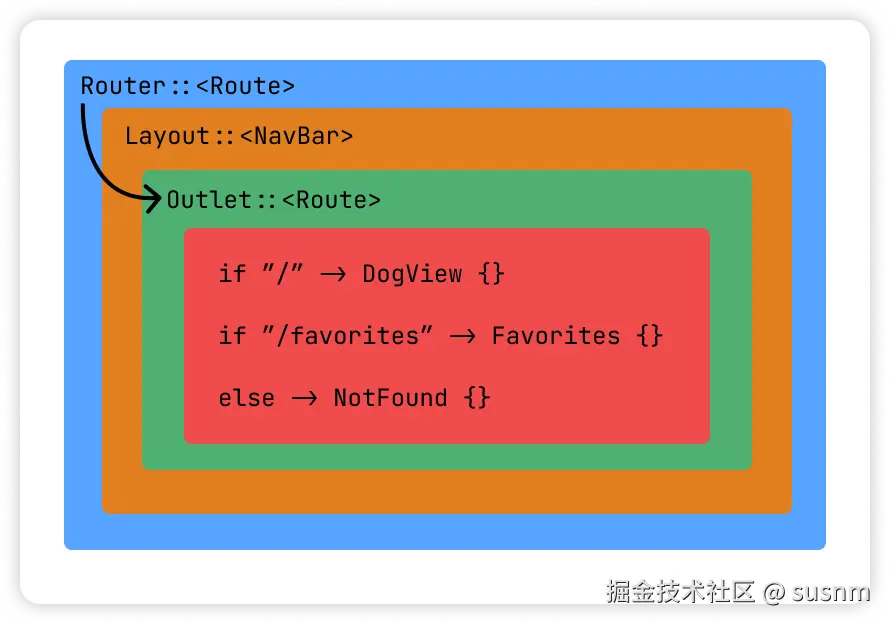
rust
Router  {
    NavBar {
        Outlet {
            if route == "/" {
                DogView {}
            }
        }
    }
}
从视觉上来看,这应该很容易理解。请注意,路由器和插座共享相同的Route泛型类型。
添加收藏夹路由
既然我们已经了解了路由的基本原理,现在终于可以添加我们的收藏夹页面,以便查看我们保存的狗狗照片。
我们将从创建一个空组件 src/components/favorites.rs 开始:
rust
use dioxus::prelude::*;

#[component]
pub fn Favorites() -> Element {
    rsx! { "favorites!" }
}
然后,我们确保在我们的 Route 枚举中添加一个新变体:
rust
#[derive(Routable, PartialEq, Clone)]
enum Route {
    #[layout(NavBar)]
    #[route("/")]
    DogView,

    #[route("/favorites")]
    Favorites, // <------ add this new variant
}
为了确保用户能够访问此页面,我们还应在导航栏中添加一个指向该页面的按钮。
rust
use crate::Route;
use dioxus::prelude::*;

#[component]
pub fn NavBar() -> Element {
    rsx! {
        div { id: "title",
            Link { to: Route::DogView,
                h1 { "🌭 HotDog! " }
            }
            Link { to: Route::Favorites, id: "heart", "♥️" } // <------- add this Link
        }
        Outlet::<Route> {}
    }
}
我们的收藏页面
最后,我们可以创建我们的收藏页面。让我们添加一个新的 list_dogs 服务器函数,用于获取最近保存的 10 张狗狗照片:
rust
// Query the database and return the last 10 dogs and their url
#[server]
pub async fn list_dogs() -> Result<Vec<(usize, String)>, ServerFnError> {
    let dogs = DB.with(|f| {
        f.prepare("SELECT id, url FROM dogs ORDER BY id DESC LIMIT 10")
            .unwrap()
            .query_map([], |row| Ok((row.get(0)?, row.get(1)?)))
            .unwrap()
            .map(|r| r.unwrap())
            .collect()
    });

    Ok(dogs)
}
现在,我们可以填充我们的组件。我们将使用之前提到的 use_resource 钩子。从服务器解析请求可能需要一些时间,因此我们将使用 Resource 的 .suspend()? 方法,在将内容映射到列表之前等待请求完成。
rust
use dioxus::prelude::*;

#[component]
pub fn Favorites() -> Element {
    // Create a pending resource that resolves to the list of dogs from the backend
    // Wait for the favorites list to resolve with `.suspend()`
    let mut favorites = use_resource(super::backend::list_dogs).suspend()?;

    rsx! {
        div { id: "favorites",
            div { id: "favorites-container",
                for (id, url) in favorites().unwrap() {
                    // Render a div for each photo using the dog's ID as the list key
                    div {
                        key: id,
                        class: "favorite-dog",
                        img { src: "{url}" }
                    }
                }
            }
        }
    }
}
作为一个扩展目标,尝试添加一个按钮,让用户也可以从数据库中删除项目。