- 🍨 本文为 🔗365天深度学习训练营中的学习记录博客
- 🍖 原作者: K同学啊
1.导入库及参数
python
import argparse
import os
import numpy as np

import torchvision.transforms as transforms
from torchvision.utils import save_image

from torch.utils.data import DataLoader
from torchvision import datasets
from torch.autograd import Variable

import torch.nn as nn
import torch

# 创建用于存储生成图像的目录
os.makedirs("images", exist_ok=True)

# 解析命令行参数
parser = argparse.ArgumentParser()
parser.add_argument("--n_epochs", type=int, default=10, help="训练的总轮数")
parser.add_argument("--batch_size", type=int, default=64, help="每个批次的大小")
parser.add_argument("--lr", type=float, default=0.0002, help="Adam优化器的学习率")
parser.add_argument("--b1", type=float, default=0.5, help="Adam优化器的一阶动量衰减")
parser.add_argument("--b2", type=float, default=0.999, help="Adam优化器的二阶动量衰减")
parser.add_argument("--n_cpu", type=int, default=8, help="用于批次生成的CPU线程数")
parser.add_argument("--latent_dim", type=int, default=100, help="潜在空间的维度")
parser.add_argument("--n_classes", type=int, default=10, help="数据集的类别数")
parser.add_argument("--img_size", type=int, default=32, help="每个图像的尺寸")
parser.add_argument("--channels", type=int, default=1, help="图像通道数")
parser.add_argument("--sample_interval", type=int, default=400, help="图像采样间隔")
opt = parser.parse_args()
print(opt)

# 检查是否支持GPU加速
cuda = True if torch.cuda.is_available() else False
2.初始化权重
python
# 初始化神经网络权重的函数
def weights_init_normal(m):
    classname = m.__class__.__name__
    if classname.find("Conv") != -1:
        torch.nn.init.normal_(m.weight.data, 0.0, 0.02)
    elif classname.find("BatchNorm2d") != -1:
        torch.nn.init.normal_(m.weight.data, 1.0, 0.02)
        torch.nn.init.constant_(m.bias.data, 0.0)
3.模型
python
# 生成器网络类
class Generator(nn.Module):
    def __init__(self):
        super(Generator, self).__init__()

        # 为类别标签创建嵌入层
        self.label_emb = nn.Embedding(opt.n_classes, opt.latent_dim)

        # 计算上采样前的初始大小
        self.init_size = opt.img_size // 4  # Initial size before upsampling

        # 第一层线性层
        self.l1 = nn.Sequential(nn.Linear(opt.latent_dim, 128 * self.init_size ** 2))

        # 卷积层块
        self.conv_blocks = nn.Sequential(
            nn.BatchNorm2d(128),
            nn.Upsample(scale_factor=2),
            nn.Conv2d(128, 128, 3, stride=1, padding=1),
            nn.BatchNorm2d(128, 0.8),
            nn.LeakyReLU(0.2, inplace=True),
            nn.Upsample(scale_factor=2),
            nn.Conv2d(128, 64, 3, stride=1, padding=1),
            nn.BatchNorm2d(64, 0.8),
            nn.LeakyReLU(0.2, inplace=True),
            nn.Conv2d(64, opt.channels, 3, stride=1, padding=1),
            nn.Tanh(),
        )

    def forward(self, noise, labels):
        # 将标签嵌入到噪声中
        gen_input = torch.mul(self.label_emb(labels), noise)

        # 通过第一层线性层
        out = self.l1(gen_input)

        # 重新整形为合适的形状
        out = out.view(out.shape[0], 128, self.init_size, self.init_size)

        # 通过卷积层块生成图像
        img = self.conv_blocks(out)
        return img

# 判别器网络类
class Discriminator(nn.Module):
    def __init__(self):
        super(Discriminator, self).__init__()

        # 定义判别器块的函数
        def discriminator_block(in_filters, out_filters, bn=True):
            """返回每个判别器块的层"""
            block = [nn.Conv2d(in_filters, out_filters, 3, 2, 1), nn.LeakyReLU(0.2, inplace=True), nn.Dropout2d(0.25)]
            if bn:
                block.append(nn.BatchNorm2d(out_filters, 0.8))
            return block

        # 判别器的卷积层块
        self.conv_blocks = nn.Sequential(
            *discriminator_block(opt.channels, 16, bn=False),
            *discriminator_block(16, 32),
            *discriminator_block(32, 64),
            *discriminator_block(64, 128),
        )

        # 下采样后图像的高度和宽度
        ds_size = opt.img_size // 2 ** 4

        # 输出层
        self.adv_layer = nn.Sequential(nn.Linear(128 * ds_size ** 2, 1), nn.Sigmoid())
        self.aux_layer = nn.Sequential(nn.Linear(128 * ds_size ** 2, opt.n_classes), nn.Softmax())

    def forward(self, img):
        out = self.conv_blocks(img)
        out = out.view(out.shape[0], -1)
        validity = self.adv_layer(out)
        label = self.aux_layer(out)

        return validity, label

# 损失函数
adversarial_loss = torch.nn.BCELoss()
auxiliary_loss = torch.nn.CrossEntropyLoss()

# 初始化生成器和判别器
generator = Generator()
discriminator = Discriminator()

if cuda:
    generator.cuda()
    discriminator.cuda()
    adversarial_loss.cuda()
    auxiliary_loss.cuda()

# 初始化权重
generator.apply(weights_init_normal)
discriminator.apply(weights_init_normal)
4.数据集
python
# 配置数据加载器
os.makedirs("../../data/mnist", exist_ok=True)
dataloader = torch.utils.data.DataLoader(
    datasets.MNIST(
        "../../data/mnist",
        train=True,
        download=True,
        transform=transforms.Compose(
            [transforms.Resize(opt.img_size), transforms.ToTensor(), transforms.Normalize([0.5], [0.5])]
        ),
    ),
    batch_size=opt.batch_size,
    shuffle=True,
)

# 优化器
optimizer_G = torch.optim.Adam(generator.parameters(), lr=opt.lr, betas=(opt.b1, opt.b2))
optimizer_D = torch.optim.Adam(discriminator.parameters(), lr=opt.lr, betas=(opt.b1, opt.b2))

FloatTensor = torch.cuda.FloatTensor if cuda else torch.FloatTensor
LongTensor = torch.cuda.LongTensor if cuda else torch.LongTensor
5.训练
python
# 保存生成图像的函数
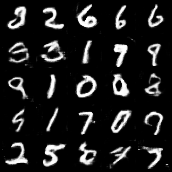
def sample_image(n_row, batches_done):
"""保存从0到n_classes的生成数字的图像网格"""
# 采样噪声
z = Variable(FloatTensor(np.random.normal(0, 1, (n_row ** 2, opt.latent_dim))))
# 为n行生成标签从0到n_classes
labels = np.array([num for _ in range(n_row) for num in range(n_row)])
labels = Variable(LongTensor(labels))
gen_imgs = generator(z, labels)
save_image(gen_imgs.data, "images/%d.png" % batches_done, nrow=n_row, normalize=True)
# ----------
# 训练
# ----------
for epoch in range(opt.n_epochs):
for i, (imgs, labels) in enumerate(dataloader):
batch_size = imgs.shape[0]
# 真实数据的标签
valid = Variable(FloatTensor(batch_size, 1).fill_(1.0), requires_grad=False)
# 生成数据的标签
fake = Variable(FloatTensor(batch_size, 1).fill_(0.0), requires_grad=False)
# 配置输入
real_imgs = Variable(imgs.type(FloatTensor))
labels = Variable(labels.type(LongTensor))
# -----------------
# 训练生成器
# -----------------
optimizer_G.zero_grad()
# 采样噪声和标签作为生成器的输入
z = Variable(FloatTensor(np.random.normal(0, 1, (batch_size, opt.latent_dim))))
gen_labels = Variable(LongTensor(np.random.randint(0, opt.n_classes, batch_size)))
# 生成一批图像
gen_imgs = generator(z, gen_labels)
# 损失度量生成器的欺骗判别器的能力
validity, pred_label = discriminator(gen_imgs)
g_loss = 0.5 * (adversarial_loss(validity, valid) + auxiliary_loss(pred_label, gen_labels))
g_loss.backward()
optimizer_G.step()
# ---------------------
# 训练判别器
# ---------------------
optimizer_D.zero_grad()
# 真实图像的损失
real_pred, real_aux = discriminator(real_imgs)
d_real_loss = (adversarial_loss(real_pred, valid) + auxiliary_loss(real_aux, labels)) / 2
# 生成图像的损失
fake_pred, fake_aux = discriminator(gen_imgs.detach())
d_fake_loss = (adversarial_loss(fake_pred, fake) + auxiliary_loss(fake_aux, gen_labels)) / 2
# 判别器的总损失
d_loss = (d_real_loss + d_fake_loss) / 2
# 计算判别器的准确率
pred = np.concatenate([real_aux.data.cpu().numpy(), fake_aux.data.cpu().numpy()], axis=0)
gt = np.concatenate([labels.data.cpu().numpy(), gen_labels.data.cpu().numpy()], axis=0)
d_acc = np.mean(np.argmax(pred, axis=1) == gt)
d_loss.backward()
optimizer_D.step()
print(
"[Epoch %d/%d] [Batch %d/%d] [D loss: %f, acc: %d%%] [G loss: %f]"
% (epoch, opt.n_epochs, i, len(dataloader), d_loss.item(), 100 * d_acc, g_loss.item())
)
batches_done = epoch * len(dataloader) + i
if batches_done % opt.sample_interval == 0:
sample_image(n_row=10, batches_done=batches_done)
ACGAN(Auxiliary Classifier GAN)总结
ACGAN(辅助分类器生成对抗网络)是一种结合了生成对抗网络(GAN)和分类器的深度学习模型,能够在生成图像的同时控制生成图像的类别。以下是对其核心原理、代码实现及关键点的总结:
1. 核心原理
-
生成器(Generator)
- 输入:潜在噪声(latent noise)和类别标签(class label)。
- 功能:将噪声和标签结合,生成特定类别的图像。
- 结构 :通过线性层和卷积层逐步上采样,最终输出图像。类别标签通过嵌入层(
nn.Embedding)映射到潜在空间,并与噪声相乘,作为生成器的输入。
-
判别器(Discriminator)
- 输入:图像(真实或生成)。
- 功能 :
- 判断图像是否为真实图像(二分类任务)。
- 预测图像的类别(多分类任务)。
- 结构 :通过卷积层逐步降采样,提取特征后分为两个输出分支:
- 真假判别:输出图像为真实的概率(Sigmoid激活)。
- 类别预测:输出类别概率分布(Softmax激活)。
-
损失函数
-
生成器损失 :

目标是让生成的图像欺骗判别器(接近真实标签)并正确匹配类别标签。 -
判别器损失 :

目标是正确区分真假图像,并准确预测类别。
-
2. 代码实现关键点
-
数据预处理
- 使用MNIST数据集,图像尺寸调整为
32x32,归一化到范围[-1, 1]。 - 标签进行独热编码(One-Hot Encoding),通过
nn.Embedding映射到潜在空间。
- 使用MNIST数据集,图像尺寸调整为
-
模型结构
- 生成器 :
- 输入:噪声(
latent_dim=100) + 标签嵌入(opt.n_classes=10)。 - 上采样流程:通过
nn.Upsample逐步放大图像尺寸(从8x8到32x32)。
- 输入:噪声(
- 判别器 :
- 使用卷积层逐步降采样(
Conv2d + LeakyReLU + Dropout),最终输出真假概率和类别概率。
- 使用卷积层逐步降采样(
- 生成器 :
-
训练过程
- 交替训练:生成器和判别器交替更新,避免模式崩溃(Mode Collapse)。
- 生成器训练 :
- 随机生成噪声和标签,生成假图像。
- 计算生成器的对抗损失(使判别器误判为真)和分类损失(使判别器预测正确类别)。
- 判别器训练 :
- 对真实图像和生成图像分别计算损失,优化判别能力。
- 图像保存 :定期生成并保存图像,观察训练效果(
sample_image函数)。
-
超参数与优化
- 使用Adam优化器,学习率
0.0002,动量参数(b1=0.5, b2=0.999)。 - 权重初始化:卷积层和批归一化层使用正态分布初始化(均值0,标准差0.02)。
- 使用Adam优化器,学习率
3. 与传统GAN的差异
- 条件生成 :
- 传统GAN仅生成无条件数据,而ACGAN通过引入类别标签,实现条件生成(Conditional Generation)。
- 辅助分类器 :
- 判别器额外输出类别概率,迫使生成器生成符合类别特征的图像,提升生成质量。
- 损失函数设计 :
- ACGAN结合对抗损失和分类损失,使模型在生成逼真图像的同时保持类别多样性。
4. 应用与优势
- 应用场景 :
- 图像生成(如MNIST、CIFAR-10)。
- 数据增强(生成特定类别的训练样本)。
- 风格迁移(结合文本描述生成特定风格图像)。
- 优势 :
- 可控生成:通过类别标签控制生成图像的类别。
- 多样性:辅助分类器避免生成器陷入单一模式。
- 稳定性:分类任务的引入有助于稳定训练过程。