Task
Create
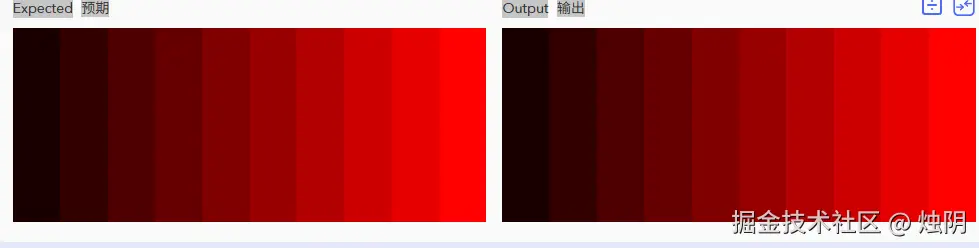
10equally sized vertical sections on the screen and label them with sequential numbers from1to10. Adjust the intensity of the red color in each section based on its assigned number (0.1,0.2...1.0). This will result in a gradient effect where the red color becomes progressively stronger from left to right.
在屏幕上从左到右依次分配10个大小相同的垂直区域。并且依次把数字(0.1、0.2......1.0)分配给这10个区域作为颜色红色分量的值。
Requirements
The shader should avoid using branching or conditional statements in its code, and instead rely on the
ceilfunction to determine the color of each pixel.
着色器应避免在其代码中使用分支或条件语句,而是依赖cell函数来确定每个像素的颜色。
Theory
ceil(x):返回大于或等于 x 的最小整数。
ceil(3.14)结果是4.0ceil(-3.14)结果是-3.0
glsl
float scaled_uv = uv.x * 10.0; // 值域从 [0, 1] 放大到 [0, 10]
float stepped_value = ceil(scaled_uv);
这一步是整个过程的核心。发生了什么?
- 当
uv.x在(0, 0.1]范围时,scaled_uv在(0, 1],ceil()结果为1.0。 - 当
uv.x在(0.1, 0.2]范围时,scaled_uv在(1, 2],ceil()结果为2.0。 - ...
- 当
uv.x在(0.9, 1.0]范围时,scaled_uv在(9, 10],ceil()结果为10.0。
ceil() 将连续的值域 [0, 10] "吸附"到了离散的整数集合 {1, 2, 3, 4, 5, 6, 7, 8, 9, 10} 上。
现在我们得到的 stepped_value 是从1到10的整数。如果直接作为颜色输出,它们都会因为大于1而被裁剪为纯白色。我们需要将其重新映射回 [0, 1] 的颜色范围。怎么做?很简单,除以我们之前放大的倍数即可。
glsl
float final_color = stepped_value / 10.0;现在,final_color 的值将是 {0.1, 0.2, 0.3, ..., 1.0}。这正是我们想要的阶梯状渐变!
Answer
glsl
uniform vec2 iResolution;
uniform float iTime;

void main() {
  // Normalized pixel coordinates (from 0 to 1)
  vec2 uv = gl_FragCoord.xy / iResolution.xy;
  float scaled_uv = uv.x * 10.0; // 值域从 [0, 1] 放大到 [0, 10]
  float stepped_value = ceil(scaled_uv);
  gl_FragColor = vec4(stepped_value / 10.0, 0.0, 0.0, 1.0);
}
效果
练习
最后
如果你觉得这篇文章有用,记得点赞、关注、收藏,学Shader更轻松!!