文章目录
-
- 一、onnx
-
- 1)onnx格式介绍
- 2)onnx模型网络图认识
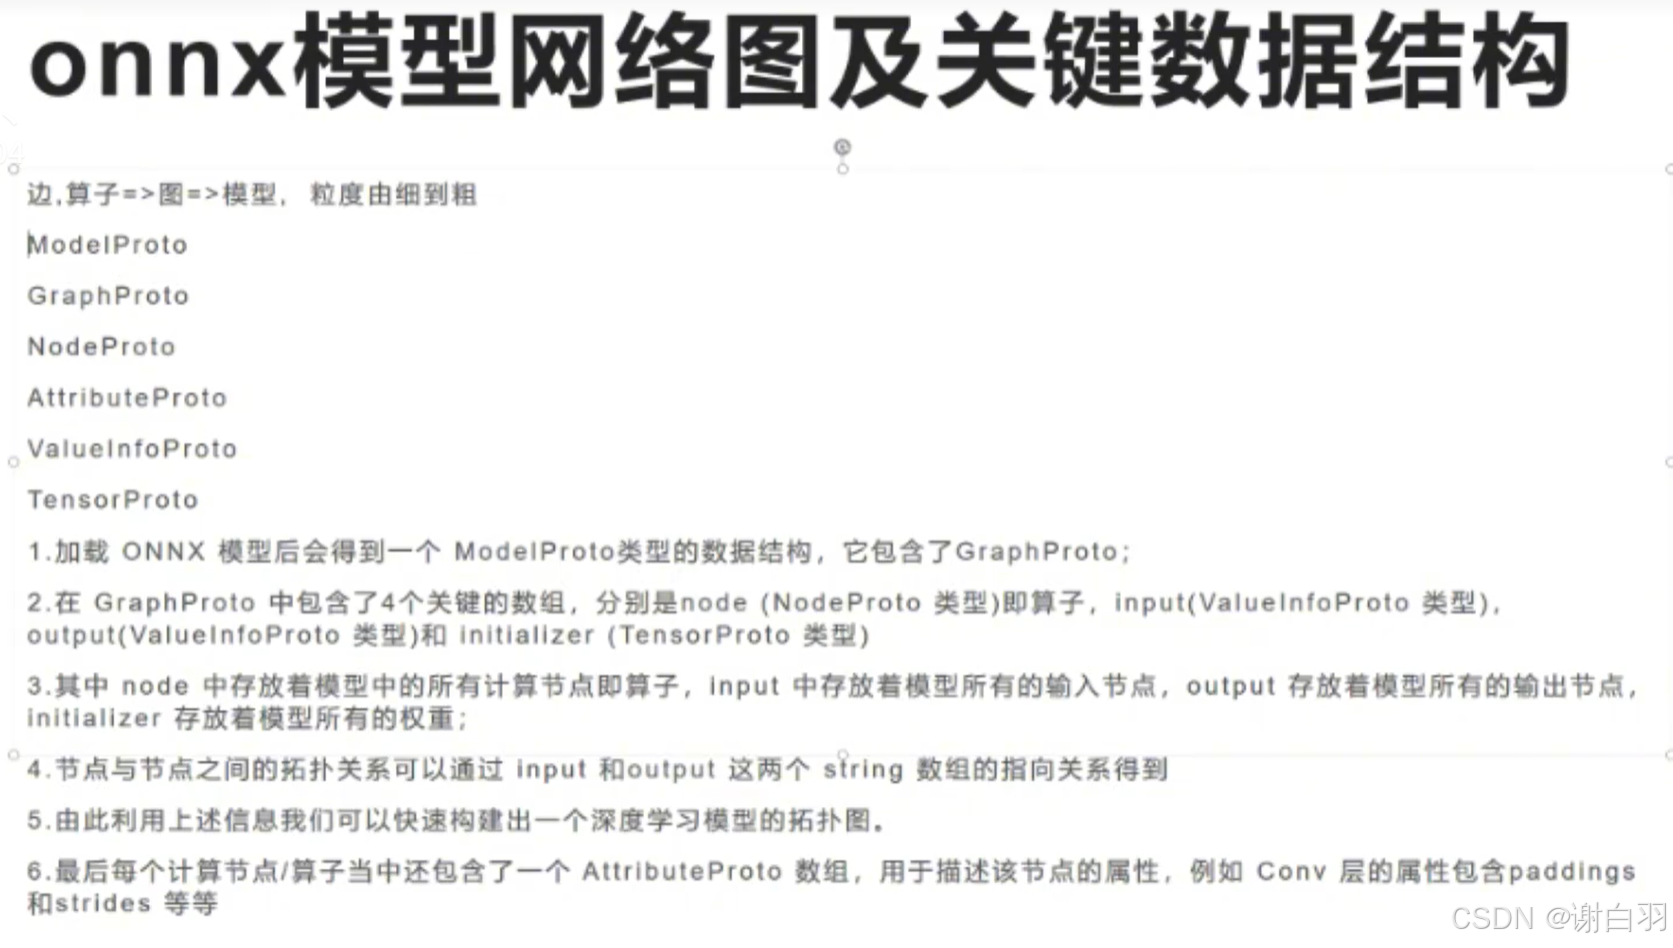
- 3)onnx关键数据结构(边+算子=》组成图=》组成模型)
- 4)onnx原生API搭建onnx模型
- 5)onnx模型推理
- 6)dump模型,输出onnx各算子信息
- [7)onnx模型实用工具: onnx graphsurgeon](#7)onnx模型实用工具: onnx graphsurgeon)
- [8)onnx模型实用工具: onnx simplier](#8)onnx模型实用工具: onnx simplier)
- 9)onnx与TensorRT模型部署的前后纠葛
一、onnx
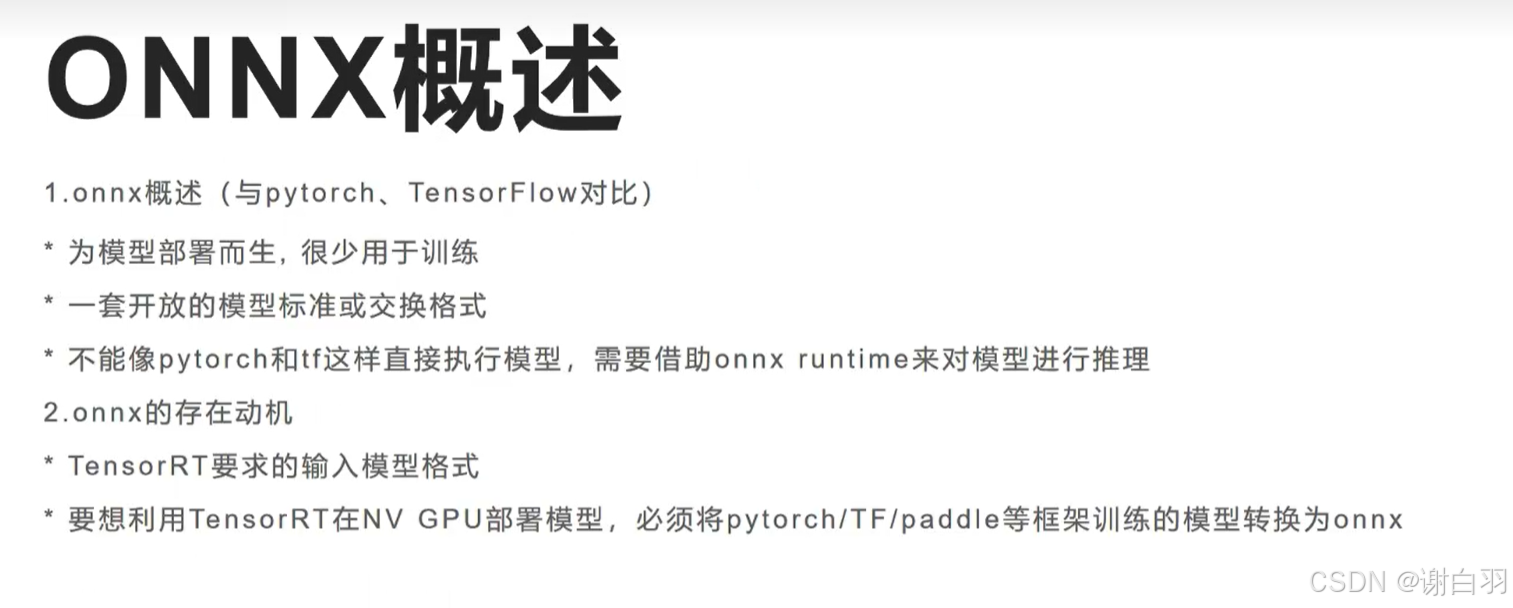
1)onnx格式介绍
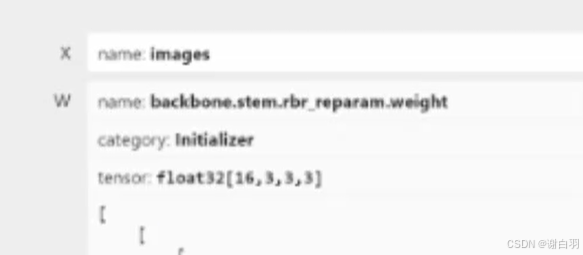
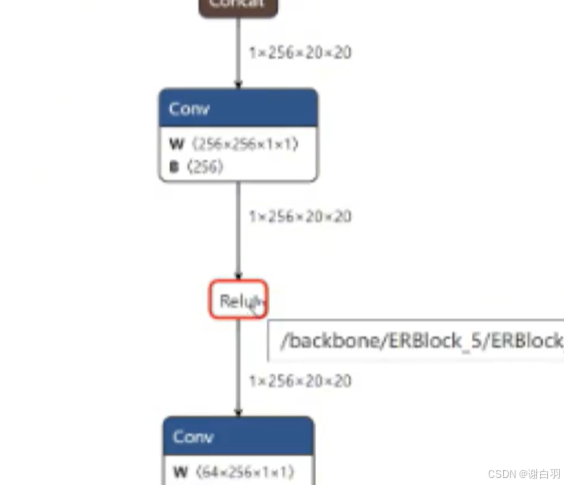
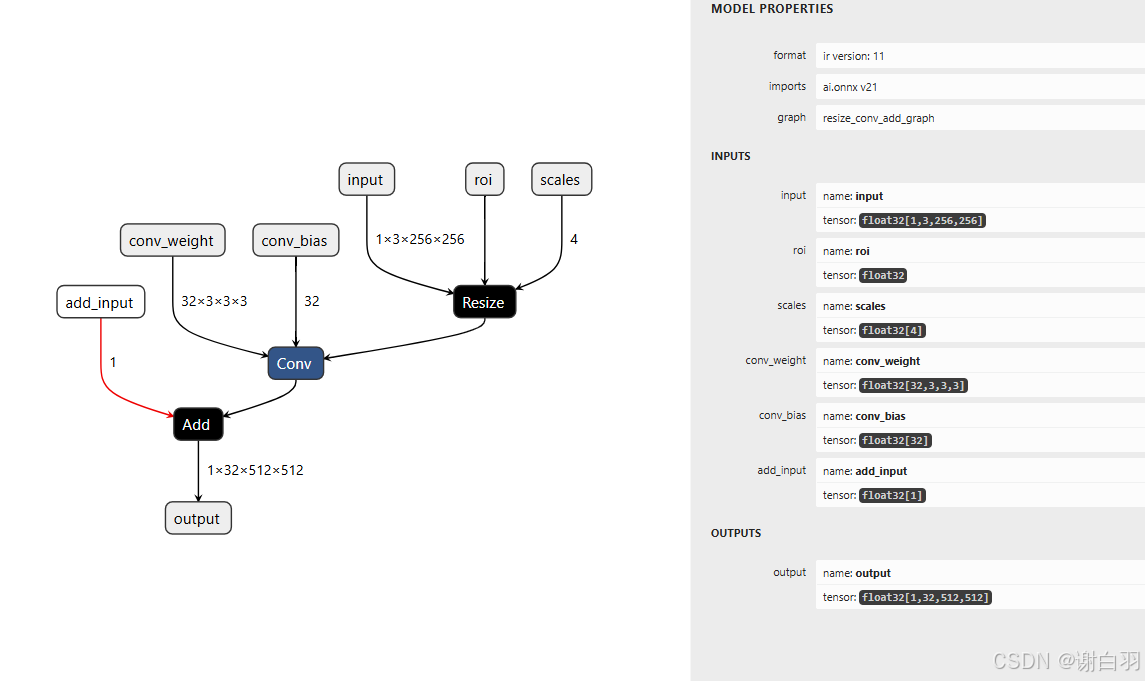
2)onnx模型网络图认识
initializer:
拓扑关系:先conv,后relu
3)onnx关键数据结构(边+算子=》组成图=》组成模型)
3.1 边
3.2 算子
3.3 模型
3.4 图
4)onnx原生API搭建onnx模型
-
指定节点
①resize节点
②conv节点
③Add节点
-
步骤
①定义tensor节点,定义输入、输出
②制作节点
③根据节点制作图和模型
④保存成onnx
-
代码
python
import onnx
from onnx import helper
from onnx import TensorProto
import onnxruntime
import numpy as np
# define tensor
input = helper.make_tensor_value_info('input', TensorProto.FLOAT, [1,3,256, 256])
roi = helper.make_tensor_value_info('roi', TensorProto.FLOAT, [])
scales = helper.make_tensor_value_info('scales', TensorProto.FLOAT, [4])
conv_input = helper.make_tensor_value_info('conv_input', TensorProto.FLOAT, [1,3,512,512])
conv_weight = helper.make_tensor_value_info('conv_weight', TensorProto.FLOAT, [32,3,3,3])
conv_bias = helper.make_tensor_value_info('conv_bias', TensorProto.FLOAT, [32])
conv_output = helper.make_tensor_value_info('conv_output', TensorProto.FLOAT, [1,32,512,512])
add_input = helper.make_tensor_value_info('add_input', TensorProto.FLOAT, [1])
output = helper.make_tensor_value_info('output', TensorProto.FLOAT, [1,32,512,512])

# make node
resize_node = helper.make_node("Resize", ['input','roi','scales'], ['conv_input'], name='resize')
conv_node = helper.make_node("Conv", ['conv_input','conv_weight','conv_bias'], ['conv_output'], name='conv',strides=[1, 1],pads=[1, 1, 1, 1])
add_node = helper.make_node('Add', ['conv_output','add_input'], ['output'], name='add')

# make graph
graph = helper.make_graph([resize_node,conv_node,add_node],'resize_conv_add_graph',inputs=[input,roi,scales,conv_weight,conv_bias,add_input],outputs=[output])

# make model
model = helper.make_model(graph, opset_imports=[helper.make_opsetid('', 21)]) # 构建模型
onnx.checker.check_model(model) # 检测模型的准确性- 输出的模型结构
shell
ir_version: 11
graph {
  node {
    input: "input"
    input: "roi"
    input: "scales"
    output: "conv_input"
    name: "resize"
    op_type: "Resize"
  }
  node {
    input: "conv_input"
    input: "conv_weight"
    input: "conv_bias"
    output: "conv_output"
    name: "conv"
    op_type: "Conv"
    attribute {
      name: "pads"
      ints: 1
      ints: 1
      ints: 1
      ints: 1
      type: INTS
    }
    attribute {
      name: "strides"
      ints: 1
      ints: 1
      type: INTS
    }
  }
  node {
    input: "conv_output"
    input: "add_input"
    output: "output"
    name: "add"
    op_type: "Add"
  }
  name: "resize_conv_add_graph"
  input {
    name: "input"
    type {
      tensor_type {
        elem_type: 1
        shape {
          dim {
            dim_value: 1
          }
          dim {
            dim_value: 3
          }
          dim {
            dim_value: 256
          }
          dim {
            dim_value: 256
          }
        }
      }
    }
  }
  input {
    name: "roi"
    type {
      tensor_type {
        elem_type: 1
        shape {
        }
      }
    }
  }
  input {
    name: "scales"
    type {
      tensor_type {
        elem_type: 1
        shape {
          dim {
            dim_value: 4
          }
        }
      }
    }
  }
  input {
    name: "conv_weight"
    type {
      tensor_type {
        elem_type: 1
        shape {
          dim {
            dim_value: 32
          }
          dim {
            dim_value: 3
          }
          dim {
            dim_value: 3
          }
          dim {
            dim_value: 3
          }
        }
      }
    }
  }
  input {
    name: "conv_bias"
    type {
      tensor_type {
        elem_type: 1
        shape {
          dim {
            dim_value: 32
          }
        }
      }
    }
  }
  input {
    name: "add_input"
    type {
      tensor_type {
        elem_type: 1
        shape {
          dim {
            dim_value: 1
          }
        }
      }
    }
  }
  output {
    name: "output"
    type {
      tensor_type {
        elem_type: 1
        shape {
          dim {
            dim_value: 1
          }
          dim {
            dim_value: 32
          }
          dim {
            dim_value: 512
          }
          dim {
            dim_value: 512
          }
        }
      }
    }
  }
}
opset_import {
  domain: ""
  version: 21
}
5)onnx模型推理
6)dump模型,输出onnx各算子信息
- 代码
python
"""
打印onnx节点信息
"""
import onnx
import onnxruntime as rt
import numpy as np
# 加载ONNX模型
model_path = 'resize_conv_add.onnx'
onnx_model = onnx.load(model_path)
session = rt.InferenceSession(model_path) #类似于tf.Session
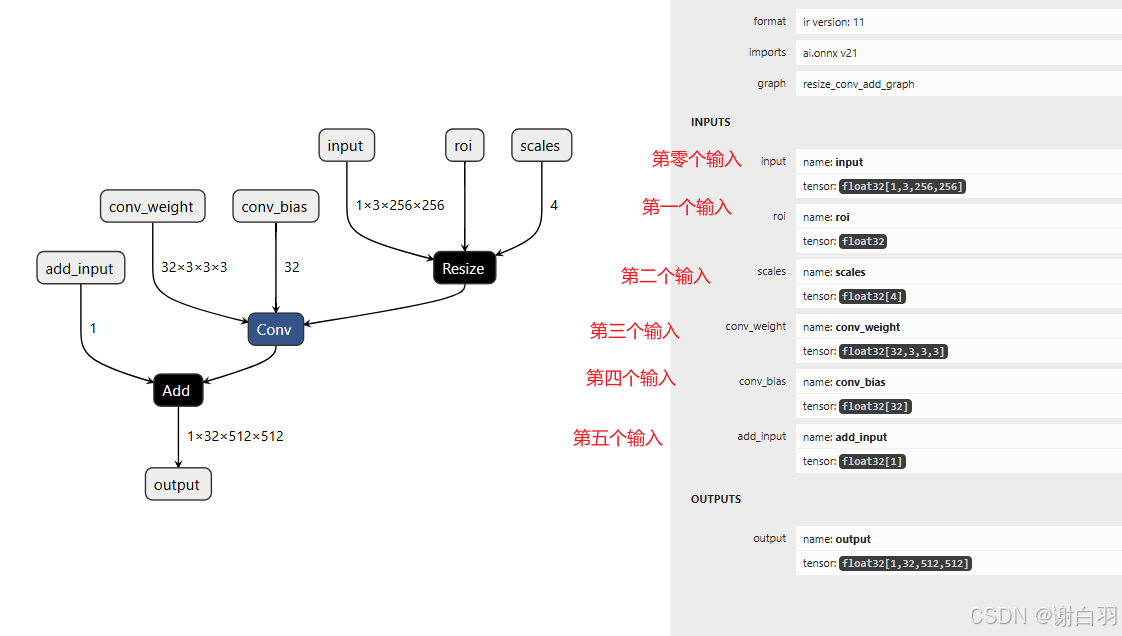
input_name = session.get_inputs()[0].name
roi_name = session.get_inputs()[1].name
scales_name = session.get_inputs()[2].name
conv_weight_name = session.get_inputs()[3].name
conv_bias_name = session.get_inputs()[4].name
add_input_name = session.get_inputs()[5].name
output_name = session.get_outputs()[0].name
intermediate_layer_names = [onnx_model.graph.node[i].name for i in range(len(onnx_model.graph.node))]
print(f"input_name:{input_name}, conv_weight_name: {conv_weight_name}")
print('node=',onnx_model.graph.node)
for node in onnx_model.graph.node:
print('node_name=',node.name)
print('node_input=',node.input)
print('node_output=',node.output)