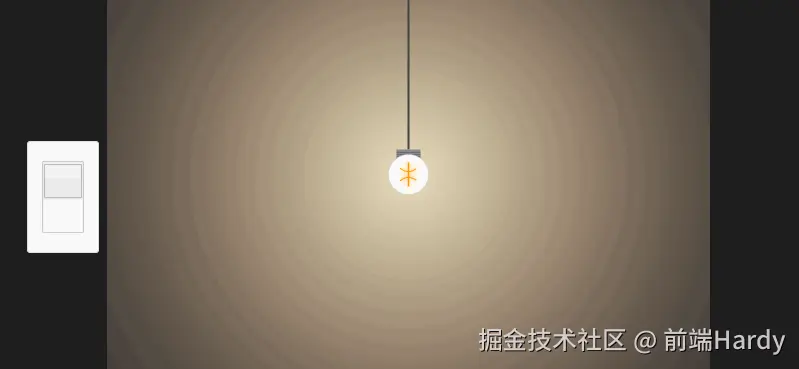
该HTML页面模拟了一个简单的房间,用户可以通过点击开关来控制房间的灯光。灯光效果通过渐变和透明度变化实现,灯泡可以交互拖拽,表现出物理运动效果。
大家复制代码时,可能会因格式转换出现错乱,导致样式失效。建议先少量复制代码进行测试,若未能解决问题,私信回复源码两字,我会发送完整的压缩包给你。
演示效果

HTML&CSS
html
<!DOCTYPE html>
<html lang="en">

<head>
    <meta charset="UTF-8">
    <meta http-equiv="X-UA-Compatible" content="IE=edge">
    <meta name="viewport" content="width=device-width, initial-scale=1.0">
    <title>开灯效果</title>
    <style>
        body {
            margin: 0;
            background: #000;
            overflow: hidden;
            cursor: grab;
        }

        canvas {
            display: block;
        }

        body.dragging {
            cursor: grabbing;
        }

        .switch-plate {
            position: absolute;
            left: 40px;
            top: 50%;
            transform: translateY(-50%);
            width: 70px;
            height: 110px;
            background: #f8f8f8;
            border: 1px solid #ddd;
            border-radius: 3px;
            box-shadow: 0 2px 4px rgba(0, 0, 0, 0.1);
            display: flex;
            align-items: center;
            justify-content: center;
        }

        .switch {
            width: 40px;
            height: 70px;
            background: #fff;
            border: 1px solid #ccc;
            border-radius: 2px;
            position: relative;
            cursor: pointer;
            box-shadow: inset 0 1px 3px rgba(0, 0, 0, 0.1);
        }

        .switch-toggle {
            width: 36px;
            height: 32px;
            background: linear-gradient(to bottom, #f5f5f5, #e8e8e8);
            border: 1px solid #bbb;
            border-radius: 1px;
            position: absolute;
            left: 1px;
            top: 2px;
            transition: all 0.1s ease;
            box-shadow: 0 1px 2px rgba(0, 0, 0, 0.15);
        }

        .switch.off .switch-toggle {
            top: 34px;
            background: linear-gradient(to bottom, #e8e8e8, #ddd);
        }
    </style>
</head>

<body>
    <canvas id="canvas"></canvas>
    <div class="switch-plate">
        <div class="switch on" id="lightSwitch">
            <div class="switch-toggle"></div>
        </div>
    </div>
    <script src="https://cdnjs.cloudflare.com/ajax/libs/matter-js/0.19.0/matter.min.js"></script>
    <script>
        const canvas = document.getElementById('canvas');
        const ctx = canvas.getContext('2d');
        const lightSwitch = document.getElementById('lightSwitch');
        canvas.width = window.innerWidth;
        canvas.height = window.innerHeight;
        let lightOn = true;
        let brightness = 1.0;
        const engine = Matter.Engine.create();
        engine.world.gravity.y = 0.8;
        const ceiling = Matter.Bodies.rectangle(canvas.width / 2, 40, 20, 10, {
            isStatic: true
        });
        const bulb = Matter.Bodies.circle(canvas.width / 2, canvas.height / 2, 22, {
            density: 0.006,
            frictionAir: 0.015,
            restitution: 0.3
        });
        const cord = Matter.Constraint.create({
            bodyA: ceiling,
            bodyB: bulb,
            length: canvas.height / 2 - 62,
            stiffness: 0.95,
            damping: 0.02
        });
        const mouse = Matter.Mouse.create(canvas);
        const mouseConstraint = Matter.MouseConstraint.create(engine, {
            mouse: mouse,
            constraint: {
                stiffness: 0.8,
                render: {
                    visible: false
                }
            }
        });
        Matter.World.add(engine.world, [ceiling, bulb, cord, mouseConstraint]);
        lightSwitch.addEventListener('click', () => {
            lightOn = !lightOn;
            lightSwitch.classList.toggle('off', !lightOn);
        });

        function drawBackground() {
            ctx.fillStyle = lightOn ? '#1a1a1a' : '#050505';
            ctx.fillRect(0, 0, canvas.width, canvas.height);
        }

        function drawRoom() {
            const roomColor = lightOn ? '#2a2a2a' : '#0f0f0f';
            ctx.fillStyle = roomColor;
            ctx.fillRect(120, 80, canvas.width - 240, canvas.height - 160);
            ctx.fillStyle = lightOn ? '#222' : '#080808';
            ctx.fillRect(0, 0, canvas.width, 80);
            ctx.fillStyle = lightOn ? '#1f1f1f' : '#0a0a0a';
            ctx.fillRect(0, 80, 120, canvas.height - 160);
            ctx.fillRect(canvas.width - 120, 80, 120, canvas.height - 160);
            ctx.fillStyle = lightOn ? '#1f1f1f' : '#080808';
            ctx.fillRect(0, canvas.height - 80, canvas.width, 80);
        }

        function drawRealisticLighting(x, y) {
            if (!lightOn) {
                brightness += (0 - brightness) * 0.08;
                return;
            }
            brightness += (1 - brightness) * 0.08;
            const gradient = ctx.createRadialGradient(x, y, 0, x, y, 450);
            gradient.addColorStop(0, `rgba(255, 240, 200, ${0.9 * brightness})`);
            gradient.addColorStop(0.2, `rgba(255, 230, 180, ${0.7 * brightness})`);
            gradient.addColorStop(0.4, `rgba(255, 210, 160, ${0.5 * brightness})`);
            gradient.addColorStop(0.6, `rgba(240, 190, 140, ${0.3 * brightness})`);
            gradient.addColorStop(0.8, `rgba(200, 160, 120, ${0.15 * brightness})`);
            gradient.addColorStop(1, 'rgba(150, 120, 100, 0)');
            ctx.save();
            ctx.beginPath();
            ctx.rect(120, 80, canvas.width - 240, canvas.height - 160);
            ctx.clip();
            ctx.globalCompositeOperation = 'screen';
            ctx.fillStyle = gradient;
            ctx.beginPath();
            ctx.arc(x, y, 450, 0, Math.PI * 2);
            ctx.fill();
            ctx.globalCompositeOperation = 'source-over';
            ctx.restore();
        }

        function drawBulb(x, y) {
            ctx.strokeStyle = '#444';
            ctx.lineWidth = 2;
            ctx.beginPath();
            ctx.moveTo(canvas.width / 2, 45);
            ctx.lineTo(x, y - 25);
            ctx.stroke();
            ctx.fillStyle = '#888';
            ctx.fillRect(x - 12, y - 25, 24, 12);
            ctx.strokeStyle = '#555';
            ctx.lineWidth = 0.5;
            for (let i = 0; i < 5; i++) {
                ctx.beginPath();
                ctx.moveTo(x - 12, y - 22 + i * 2);
                ctx.lineTo(x + 12, y - 22 + i * 2);
                ctx.stroke();
            }
            if (lightOn) {
                ctx.fillStyle = '#ffffff';
            } else {
                ctx.fillStyle = '#e8e8e8';
            }
            ctx.beginPath();
            ctx.arc(x, y, 20, 0, Math.PI * 2);
            ctx.fill();
            ctx.strokeStyle = 'rgba(200, 200, 200, 0.5)';
            ctx.lineWidth = 1;
            ctx.beginPath();
            ctx.arc(x, y, 20, 0, Math.PI * 2);
            ctx.stroke();
            ctx.fillStyle = 'rgba(255, 255, 255, 0.7)';
            ctx.beginPath();
            ctx.ellipse(x - 8, y - 6, 3, 10, -0.2, 0, Math.PI * 2);
            ctx.fill();
            if (lightOn) {
                ctx.strokeStyle = '#ff9900';
                ctx.shadowColor = '#ff9900';
                ctx.shadowBlur = 8;
            } else {
                ctx.strokeStyle = '#666';
                ctx.shadowBlur = 0;
            }
            ctx.lineWidth = 1.5;
            ctx.beginPath();
            ctx.moveTo(x, y - 12);
            ctx.lineTo(x, y + 12);
            ctx.stroke();
            ctx.lineWidth = 1;
            ctx.beginPath();
            ctx.moveTo(x - 8, y - 6);
            ctx.quadraticCurveTo(x, y, x + 8, y - 6);
            ctx.moveTo(x - 8, y + 6);
            ctx.quadraticCurveTo(x, y, x + 8, y + 6);
            ctx.stroke();
            ctx.shadowBlur = 0;
        }

        function animate() {
            Matter.Engine.update(engine);
            const x = bulb.position.x;
            const y = bulb.position.y;
            ctx.clearRect(0, 0, canvas.width, canvas.height);
            drawBackground();
            drawRoom();
            drawRealisticLighting(x, y);
            drawBulb(x, y);
            requestAnimationFrame(animate);
        }
        canvas.addEventListener('mousedown', () => document.body.classList.add('dragging'));
        canvas.addEventListener('mouseup', () => document.body.classList.remove('dragging'));
        window.addEventListener('resize', () => {
            canvas.width = window.innerWidth;
            canvas.height = window.innerHeight;
            Matter.Body.setPosition(ceiling, {
                x: canvas.width / 2,
                y: 40
            });
            cord.length = canvas.height / 2 - 62;
        });
        animate();
    </script>
</body>

</html>
HTML
- canvas:定义一个绘图区域,用于动态绘制图形和动画。
- switch-plate:包含开关的容器,用于布局和样式。
- switch on lightSwitch:开关控件,默认为"开"状态。
- switch-toggle:开关的滑块元素,用于视觉上模拟开关的动作。
CSS
- body:设置页面背景色为黑色,隐藏滚动条,设置光标为可拖动样式。
- canvas:设置画布显示为块级元素。
- .switch-plate:定义开关面板的位置、大小、背景及边框样式。
- .switch:定义开关的大小、样式及交互效果。
- .switch-toggle:定义开关滑块的样式及动画过渡。
- .switch.off .switch-toggle:定义开关关闭时滑块的样式。
JavaScript
1. 画布及引擎初始化
JavaScript
const canvas = document.getElementById('canvas');
const ctx = canvas.getContext('2d');
const lightSwitch = document.getElementById('lightSwitch');
canvas.width = window.innerWidth;
canvas.height = window.innerHeight;
let lightOn = true;
let brightness = 1.0;
const engine = Matter.Engine.create();
engine.world.gravity.y = 0.8;
const ceiling = Matter.Bodies.rectangle(canvas.width / 2, 40, 20, 10, {
    isStatic: true
});
const bulb = Matter.Bodies.circle(canvas.width / 2, canvas.height / 2, 22, {
    density: 0.006,
    frictionAir: 0.015,
    restitution: 0.3
});
const cord = Matter.Constraint.create({
    bodyA: ceiling,
    bodyB: bulb,
    length: canvas.height / 2 - 62,
    stiffness: 0.95,
    damping: 0.02
});
const mouse = Matter.Mouse.create(canvas);
const mouseConstraint = Matter.MouseConstraint.create(engine, {
    mouse: mouse,
    constraint: {
        stiffness: 0.8,
        render: {
            visible: false
        }
    }
});
Matter.World.add(engine.world, [ceiling, bulb, cord, mouseConstraint]);- 获取画布和上下文,用于后续绘制。
- 初始化 lightOn 和 brightness 变量,用于控制灯光状态和亮度。
- 创建 Matter.js 物理引擎。
- 设置物理世界重力,使物体下落。
- 创建天花板(静态物体)和灯泡(动态物体),并用灯线连接。
- 创建鼠标约束,允许用户与灯泡交互。
2. 开关事件处理
JavaScript
lightSwitch.addEventListener('click', () => {
    lightOn = !lightOn;
    lightSwitch.classList.toggle('off', !lightOn);
});- 监听开关的点击事件,切换 lightOn 状态。
- 使用 classList.toggle 方法切换开关的样式,使其在开/关状态间切换。
3. 绘制函数
JavaScript
function drawBackground() {
    ctx.fillStyle = lightOn ? '#1a1a1a' : '#050505';
    ctx.fillRect(0, 0, canvas.width, canvas.height);
}

function drawRoom() {
    const roomColor = lightOn ? '#2a2a2a' : '#0f0f0f';
    ctx.fillStyle = roomColor;
    ctx.fillRect(120, 80, canvas.width - 240, canvas.height - 160);
    ctx.fillStyle = lightOn ? '#222' : '#080808';
    ctx.fillRect(0, 0, canvas.width, 80);
    ctx.fillStyle = lightOn ? '#1f1f1f' : '#0a0a0a';
    ctx.fillRect(0, 80, 120, canvas.height - 160);
    ctx.fillRect(canvas.width - 120, 80, 120, canvas.height - 160);
    ctx.fillStyle = lightOn ? '#1f1f1f' : '#080808';
    ctx.fillRect(0, canvas.height - 80, canvas.width, 80);
}- drawBackground:根据灯光状态绘制背景颜色。
- drawRoom:绘制房间结构,包括墙壁和地板,颜色随灯光状态变化。
4. 灯光效果
JavaScript
function drawRealisticLighting(x, y) {
    if (!lightOn) {
        brightness += (0 - brightness) * 0.08;
        return;
    }
    brightness += (1 - brightness) * 0.08;
    const gradient = ctx.createRadialGradient(x, y, 0, x, y, 450);
    gradient.addColorStop(0, `rgba(255, 240, 200, ${0.9 * brightness})`);
    gradient.addColorStop(0.2, `rgba(255, 230, 180, ${0.7 * brightness})`);
    gradient.addColorStop(0.4, `rgba(255, 210, 160, ${0.5 * brightness})`);
    gradient.addColorStop(0.6, `rgba(240, 190, 140, ${0.3 * brightness})`);
    gradient.addColorStop(0.8, `rgba(200, 160, 120, ${0.15 * brightness})`);
    gradient.addColorStop(1, 'rgba(150, 120, 100, 0)');
    ctx.save();
    ctx.beginPath();
    ctx.rect(120, 80, canvas.width - 240, canvas.height - 160);
    ctx.clip();
    ctx.globalCompositeOperation = 'screen';
    ctx.fillStyle = gradient;
    ctx.beginPath();
    ctx.arc(x, y, 450, 0, Math.PI * 2);
    ctx.fill();
    ctx.globalCompositeOperation = 'source-over';
    ctx.restore();
}- 创建径向渐变,模拟灯光的光晕效果。
- 根据灯光开关状态和亮度调整光晕颜色和透明度。
- 使用 clip 方法限制光晕在房间范围内。
5. 绘制灯泡
JavaScript
function drawBulb(x, y) {
    ctx.strokeStyle = '#444';
    ctx.lineWidth = 2;
    ctx.beginPath();
    ctx.moveTo(canvas.width / 2, 45);
    ctx.lineTo(x, y - 25);
    ctx.stroke();
    ctx.fillStyle = '#888';
    ctx.fillRect(x - 12, y - 25, 24, 12);
    ctx.strokeStyle = '#555';
    ctx.lineWidth = 0.5;
    for (let i = 0; i < 5; i++) {
        ctx.beginPath();
        ctx.moveTo(x - 12, y - 22 + i * 2);
        ctx.lineTo(x + 12, y - 22 + i * 2);
        ctx.stroke();
    }
    if (lightOn) {
        ctx.fillStyle = '#ffffff';
    } else {
        ctx.fillStyle = '#e8e8e8';
    }
    ctx.beginPath();
    ctx.arc(x, y, 20, 0, Math.PI * 2);
    ctx.fill();
    ctx.strokeStyle = 'rgba(200, 200, 200, 0.5)';
    ctx.lineWidth = 1;
    ctx.beginPath();
    ctx.arc(x, y, 20, 0, Math.PI * 2);
    ctx.stroke();
    ctx.fillStyle = 'rgba(255, 255, 255, 0.7)';
    ctx.beginPath();
    ctx.ellipse(x - 8, y - 6, 3, 10, -0.2, 0, Math.PI * 2);
    ctx.fill();
    if (lightOn) {
        ctx.strokeStyle = '#ff9900';
        ctx.shadowColor = '#ff9900';
        ctx.shadowBlur = 8;
    } else {
        ctx.strokeStyle = '#666';
        ctx.shadowBlur = 0;
    }
    ctx.lineWidth = 1.5;
    ctx.beginPath();
    ctx.moveTo(x, y - 12);
    ctx.lineTo(x, y + 12);
    ctx.stroke();
    ctx.lineWidth = 1;
    ctx.beginPath();
    ctx.moveTo(x - 8, y - 6);
    ctx.quadraticCurveTo(x, y, x + 8, y - 6);
    ctx.moveTo(x - 8, y + 6);
    ctx.quadraticCurveTo(x, y, x + 8, y + 6);
    ctx.stroke();
    ctx.shadowBlur = 0;
}- 绘制灯线、灯座和灯泡。
- 根据灯光状态调整灯泡颜色和阴影效果。
- 使用 ellipse 和 quadraticCurveTo 绘制灯丝细节。
6. 动画循环
JavaScript
function animate() {
    Matter.Engine.update(engine);
    const x = bulb.position.x;
    const y = bulb.position.y;
    ctx.clearRect(0, 0, canvas.width, canvas.height);
    drawBackground();
    drawRoom();
    drawRealisticLighting(x, y);
    drawBulb(x, y);
    requestAnimationFrame(animate);
}- 更新物理引擎。
- 获取灯泡当前位置。
- 清除画布并重绘背景、房间、灯光和灯泡。
- 使用 requestAnimationFrame 实现动画循环。
7. 交互事件
JavaScript
canvas.addEventListener('mousedown', () => document.body.classList.add('dragging'));
canvas.addEventListener('mouseup', () => document.body.classList.remove('dragging'));
window.addEventListener('resize', () => {
    canvas.width = window.innerWidth;
    canvas.height = window.innerHeight;
    Matter.Body.setPosition(ceiling, {
        x: canvas.width / 2,
        y: 40
    });
    cord.length = canvas.height / 2 - 62;
});
animate();- 添加拖拽光标样式。
- 监听窗口大小变化,调整画布和物理对象位置。
各位互联网搭子,要是这篇文章成功引起了你的注意,别犹豫,关注、点赞、评论、分享走一波,让我们把这份默契延续下去,一起在知识的海洋里乘风破浪!