Apollo中三种相机外参的可视化分析
-
-
- 一、什么是相机外参?为什么需要可视化?
- 二、不同外参来源对比
- 三、详细操作步骤
-
- [1. 环境准备](#1. 环境准备)
- [2. 获取 `NuScenes`外参数据](#2. 获取
NuScenes外参数据) - [3. 外参到空间位置的转换及可视化](#3. 外参到空间位置的转换及可视化)
- 四、可视化对比
-
- [1. `NuScenes`数据集外参](#1.
NuScenes数据集外参) - [2. Apollo BEV模型外参](#2. Apollo BEV模型外参)
- [3. Apollo园区版外参](#3. Apollo园区版外参)
- [1. `NuScenes`数据集外参](#1.
- 五、关键结论与应用
-
一、什么是相机外参?为什么需要可视化?
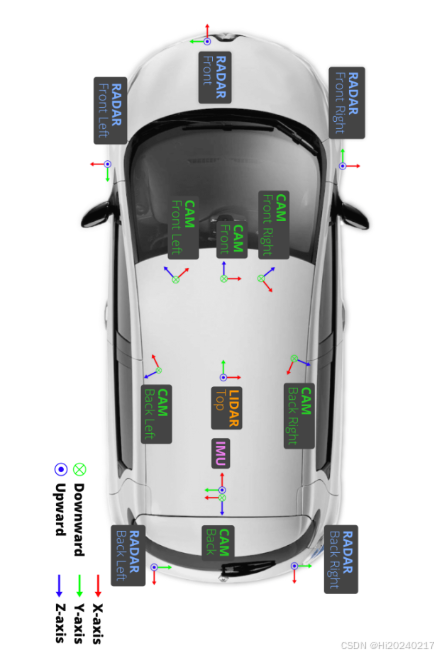
在自动驾驶系统中,相机外参描述了相机在车辆坐标系中的位置和朝向。它包含两个关键信息:
- 位置:相机相对于车辆中心(通常是激光雷达位置)的坐标 (x, y, z)
- 朝向:相机的旋转角度(通常用四元数表示)
可视化相机外参的重要性在于:
- 验证标定质量:直观检查相机位置和朝向是否符合物理布局
- 检测标定错误:发现位置偏移或方向错误等重大问题
- 理解感知系统:帮助理解不同相机视角的覆盖范围
- 多传感器融合:确保相机和激光雷达的空间对齐关系正确
二、不同外参来源对比
本次分析对比了三种不同来源的外参数据:
-
NuScenes数据集外参
- 来源:公开数据集
v1.0-mini - 特点:标准车辆坐标系,相机布局规范
- 来源:公开数据集
-
Apollo BEV模型自带外参
- 来源:
camera_detection_bev模型 - 特点:针对特定感知模型优化
- 来源:
-
Apollo园区版外参
- 来源:
nuscenes_165校准数据 - 特点:Apollo实际部署使用的参数【怀疑是非真实的】
- 来源:
三、详细操作步骤
1. 环境准备
bash
nuscenes-devkit              1.1.11     # NuScenes数据集解析工具
numpy                        1.26.0
opencv-contrib-python        4.12.0.88
opencv-python                4.9.0.80
opencv-python-headless       4.9.0.80
2. 获取 NuScenes外参数据
python
cat > get_nuscenes_extrinsics.py <<-'EOF'
import numpy as np
from nuscenes.nuscenes import NuScenes

def get_nuscenes_extrinsics(nusc, sample_token):
    """获取6个相机的变换矩阵和位置"""
    sample = nusc.get('sample', sample_token)
    camera_channels = ["CAM_FRONT", "CAM_FRONT_RIGHT", "CAM_BACK_RIGHT",
                      "CAM_BACK", "CAM_BACK_LEFT", "CAM_FRONT_LEFT"]
    extrinsics = {}
    positions = {}
    rotations = {}
    directions = {}
    print("相机数据 (名称, 四元数(w,x,y,z), 位置(x,y,z))")
    print("[")
    for channel in camera_channels:
        camera_data = nusc.get('sample_data', sample['data'][channel])
        calib_sensor = nusc.get('calibrated_sensor', camera_data['calibrated_sensor_token'])
        rotation = np.array(calib_sensor['rotation'])
        trans = np.array(calib_sensor['translation'])
        print(f"[\"{channel:16s}\",[{rotation[0]:>7.4e},{rotation[1]:>7.4e},{rotation[2]:>7.4e},{rotation[3]:>7.4e}],[{trans[0]:>7.4f},{trans[1]:>7.4e},{trans[2]:>7.4e}]],")
    print("]")
dataroot = './'  # 替换为你的数据集路径
nusc = NuScenes(version='v1.0-mini', dataroot=dataroot, verbose=False)
sample_token = nusc.sample[0]['token']
get_nuscenes_extrinsics(nusc, sample_token)
EOF

# 执行脚本(需提前下载数据集)
python get_nuscenes_extrinsics.py关键步骤解释:
- 连接NuScenes数据库获取标定数据
- 提取6个相机的四元数旋转参数和平移向量
- 格式化输出外参矩阵(位置+旋转)
输出
bash
相机数据 (名称, 四元数(w,x,y,z), 位置(x,y,z))
[
["CAM_FRONT       ",[4.9980e-01,-5.0303e-01,4.9978e-01,-4.9737e-01],[ 1.7008,1.5946e-02,1.5110e+00]],
["CAM_FRONT_RIGHT ",[2.0603e-01,-2.0269e-01,6.8245e-01,-6.7136e-01],[ 1.5508,-4.9340e-01,1.4957e+00]],
["CAM_BACK_RIGHT  ",[1.2281e-01,-1.3240e-01,-7.0043e-01,6.9050e-01],[ 1.0149,-4.8057e-01,1.5624e+00]],
["CAM_BACK        ",[5.0379e-01,-4.9740e-01,-4.9419e-01,5.0455e-01],[ 0.0283,3.4514e-03,1.5791e+00]],
["CAM_BACK_LEFT   ",[6.9242e-01,-7.0316e-01,-1.1648e-01,1.1203e-01],[ 1.0357,4.8480e-01,1.5910e+00]],
["CAM_FRONT_LEFT  ",[6.7573e-01,-6.7363e-01,2.1214e-01,-2.1123e-01],[ 1.5239,4.9463e-01,1.5093e+00]],
]
3. 外参到空间位置的转换及可视化
python
cat > infer_camera_pos_by_extrinsics.py <<-'EOF'
import numpy as np
import matplotlib.pyplot as plt
from matplotlib.patches import FancyArrowPatch
from mpl_toolkits.mplot3d import proj3d, Axes3D
import json
from scipy.spatial.transform import Rotation as R
from pyquaternion import Quaternion
from collections import OrderedDict
import yaml

# 自定义3D箭头类
class Arrow3D(FancyArrowPatch):
    def __init__(self, xs, ys, zs, *args, **kwargs):
        super().__init__((0,0), (0,0), *args, **kwargs)
        self._verts3d = xs, ys, zs

    def do_3d_projection(self, renderer=None):
        xs3d, ys3d, zs3d = self._verts3d
        xs, ys, zs = proj3d.proj_transform(xs3d, ys3d, zs3d, self.axes.M)
        self.set_positions((xs[0], ys[0]), (xs[1], ys[1]))
        return min(zs)

# 四元数转旋转矩阵函数
def quaternion_to_rotation_matrix(translation, rotation):
    """
        1.输入是从相机坐标系到车辆坐标系
        将四元数转换为3x3旋转矩阵,并调整平移部分
    """
    q = Quaternion(rotation)  # 注意参数顺序:w,x,y,z
    R_w2c = q.rotation_matrix  # 世界坐标系到相机坐标系的旋转

    # 计算相机中心在世界坐标系中的位置: C = -R^T * T
    T = np.array(translation)
    C = -R_w2c.T @ T

    # 构建从相机坐标系到世界坐标系的变换矩阵
    transformation_matrix = np.eye(4)
    transformation_matrix[:3, :3] = R_w2c   # 旋转部分
    transformation_matrix[:3, 3] = C        # 平移部分: 相机中心在世界坐标系中的位置

    return transformation_matrix

# 四元数转旋转矩阵函数
def quaternion_to_rotation_matrix_apollo(translation, rotation):
    """将四元数转换为3x3旋转矩阵,并调整平移部分"""
    q = Quaternion(rotation)  # 注意参数顺序:w,x,y,z
    R_w2c = q.rotation_matrix  # 世界坐标系到相机坐标系的旋转

    # 计算相机中心在世界坐标系中的位置: C = -R^T * T
    T = np.array(translation)
    C = -R_w2c.T @ T

    # 构建从相机坐标系到世界坐标系的变换矩阵
    transformation_matrix = np.eye(4)
    transformation_matrix[:3, :3] = R_w2c   # 旋转部分
    transformation_matrix[:3, 3] = C        # 平移部分: 相机中心在世界坐标系中的位置

    return transformation_matrix

cam_names = [
    "CAM_FRONT",
    "CAM_FRONT_RIGHT",
    "CAM_FRONT_LEFT",
    "CAM_BACK",
    "CAM_BACK_LEFT",
    "CAM_BACK_RIGHT"]

def gen_bev_kdata_from_nuscenes_extrinsics(extrinsics_data):
    '''
    通过nuscenes_extrinsics外参生成bev需要的外参矩阵(6,4,4)
    '''
    cameras = {}
    for val in json.loads(extrinsics_data):
      name,rotation,translation=val
      name=name.strip()
      cameras[name]={"translation":translation,"rotation":rotation}
    with open("nuscenes_extrinsics.txt","w") as f:
        f.write("[\n")
        for name in cam_names:
            cam =cameras[name]
            extrinsic = quaternion_to_rotation_matrix(cam["translation"],cam["rotation"])
            for line in extrinsic:
                print(line)
                f.write(",".join([f"{x:.8e}" for x in line])+",\n")
        f.write("]\n")

def gen_bev_kdata_from_apollo_nuscenes_165():
    '''
    通过apollo的nuscenes_165外参生成bev需要的外参矩阵
    '''
    print("相机数据 (名称, 四元数(w,x,y,z), 位置(x,y,z))")
    with open("apollo_nuscenes_165.txt","w") as f:
        f.write("[\n")
        for name in cam_names:
            path=f"camera_params/{name}_extrinsics.yaml"
            with open(path, 'r',encoding="utf-8") as fi:
                config = yaml.safe_load(fi)
            extrinsic=config['transform']
            translation=extrinsic['translation']
            rotation=extrinsic['rotation']
            rotation=[rotation['w'], rotation['x'], rotation['y'], rotation['z']]
            trans=[translation['x'], translation['y'], translation['z']]
            print(f"[\"{name:16s}\",[{rotation[0]:>7.4e},{rotation[1]:>7.4e},{rotation[2]:>7.4e},{rotation[3]:>7.4e}],[{trans[0]:>7.4f},{trans[1]:>7.4e},{trans[2]:>7.4e}]],")
            extrinsic = quaternion_to_rotation_matrix(trans,rotation)
            for line in extrinsic:
                f.write(",".join([f"{x:.8e}" for x in line])+",\n")
        f.write("]\n")

def main(ext_params,name):
    ext_params = ext_params.reshape(6, 4, 4)
    # 创建3D图形
    fig = plt.figure(figsize=(14, 10))
    ax = fig.add_subplot(111, projection='3d')
    ax.set_title(f'Camera Positions Relative to LiDAR({name})', fontsize=16)

    # 绘制LiDAR原点
    ax.scatter([0], [0], [0], c='red', s=100, label='LiDAR Origin')

    # 相机颜色映射
    colors = {
        "CAM_FRONT": "blue",
        "CAM_FRONT_RIGHT": "green",
        "CAM_FRONT_LEFT": "cyan",
        "CAM_BACK": "red",
        "CAM_BACK_LEFT": "magenta",
        "CAM_BACK_RIGHT": "yellow"
    }

    # 处理每个相机
    for i, matrix in enumerate(ext_params):
        # 提取数据
        name = cam_names[i]

        R = matrix[:3, :3]   # 旋转矩阵
        pos = matrix[:3, 3]  # 平移向量
        cam_pos=pos

        cam_pos= - R @ cam_pos

        # 计算相机朝向向量 (Z轴方向)
        direction = R @ np.array([0, 0, 1])

        # 绘制相机位置
        ax.scatter(cam_pos[0], cam_pos[1], cam_pos[2], c=colors[name], s=80, label=name)

        # 绘制相机朝向箭头
        arrow = Arrow3D(
            [cam_pos[0], cam_pos[0] + direction[0]*0.4],
            [cam_pos[1], cam_pos[1] + direction[1]*0.4],
            [cam_pos[2], cam_pos[2] + direction[2]*0.4],
            mutation_scale=15, arrowstyle="-|>", color=colors[name], linewidth=2
        )
        ax.add_artist(arrow)

        # 添加文本标签
        ax.text(cam_pos[0], cam_pos[1], cam_pos[2] + 0.1, name, fontsize=6)

    # 设置坐标轴
    ax.set_xlabel('X Axis (Front-Back)', fontsize=12)
    ax.set_ylabel('Y Axis (Left-Right)', fontsize=12)
    ax.set_zlabel('Z Axis (Height)', fontsize=12)

    # 设置等比例坐标轴
    max_range = 2 #np.array([max(abs(p) for cam in cameras for p in cam["translation"])]).max() * 1.5
    ax.set_xlim(-max_range, max_range)
    ax.set_ylim(-max_range, max_range)
    ax.set_zlim(-max_range, max_range)

    # 添加图例和网格
    ax.legend(loc='upper right', fontsize=10)
    ax.grid(True)

    # 调整视角以便观察
    ax.view_init(elev=25, azim=-45)

    plt.tight_layout()
    plt.show()


# apollo bev自带的k_data modules/perception/camera_detection_bev/detector/petr/bev_obstacle_detector.h
apollo_bev_kdata = np.array([
      -1.40307297e-03, 9.07780395e-06,  4.84838307e-01,  -5.43047376e-02,
      -1.40780103e-04, 1.25770375e-05,  1.04126692e+00,  7.67668605e-01,
      -1.02884378e-05, -1.41007011e-03, 1.02823459e-01,  -3.07415128e-01,
      0.00000000e+00,  0.00000000e+00,  0.00000000e+00,  1.00000000e+00,
      -9.39000631e-04, -7.65239349e-07, 1.14073277e+00,  4.46270645e-01,
      1.04998052e-03,  1.91798881e-05,  2.06218868e-01,  7.42717385e-01,
      1.48074005e-05,  -1.40855671e-03, 7.45946690e-02,  -3.16081315e-01,
      0.00000000e+00,  0.00000000e+00,  0.00000000e+00,  1.00000000e+00,
      -7.0699735e-04,  4.2389297e-07,   -5.5183989e-01,  -5.3276348e-01,
      -1.2281288e-03,  2.5626015e-05,   1.0212017e+00,   6.1102939e-01,
      -2.2421273e-05,  -1.4170362e-03,  9.3639769e-02,   -3.0863306e-01,
      0.0000000e+00,   0.0000000e+00,   0.0000000e+00,   1.0000000e+00,
      2.2227580e-03,   2.5312484e-06,   -9.7261822e-01,  9.0684637e-02,
      1.9360810e-04,   2.1347081e-05,   -1.0779887e+00,  -7.9227984e-01,
      4.3742721e-06,   -2.2310747e-03,  1.0842450e-01,   -2.9406491e-01,
      0.0000000e+00,   0.0000000e+00,   0.0000000e+00,   1.0000000e+00,
      5.97175560e-04,  -5.88774265e-06, -1.15893924e+00, -4.49921310e-01,
      -1.28312141e-03, 3.58297058e-07,  1.48300052e-01,  1.14334166e-01,
      -2.80917516e-06, -1.41527120e-03, 8.37693438e-02,  -2.36765608e-01,
      0.00000000e+00,  0.00000000e+00,  0.00000000e+00,  1.00000000e+00,
      3.6048229e-04,   3.8333174e-06,   7.9871160e-01,   4.3321830e-01,
      1.3671946e-03,   6.7484652e-06,   -8.4722507e-01,  1.9411178e-01,
      7.5027779e-06,   -1.4139183e-03,  8.2083985e-02,   -2.4505949e-01,
      0.0000000e+00,   0.0000000e+00,   0.0000000e+00,   1.0000000e+00
])

nuscenes_extrinsics_data = """
[
["CAM_FRONT       ",[4.9980e-01,-5.0303e-01,4.9978e-01,-4.9737e-01],[ 1.7008,1.5946e-02,1.5110e+00]],
["CAM_FRONT_RIGHT ",[2.0603e-01,-2.0269e-01,6.8245e-01,-6.7136e-01],[ 1.5508,-4.9340e-01,1.4957e+00]],
["CAM_BACK_RIGHT  ",[1.2281e-01,-1.3240e-01,-7.0043e-01,6.9050e-01],[ 1.0149,-4.8057e-01,1.5624e+00]],
["CAM_BACK        ",[5.0379e-01,-4.9740e-01,-4.9419e-01,5.0455e-01],[ 0.0283,3.4514e-03,1.5791e+00]],
["CAM_BACK_LEFT   ",[6.9242e-01,-7.0316e-01,-1.1648e-01,1.1203e-01],[ 1.0357,4.8480e-01,1.5910e+00]],
["CAM_FRONT_LEFT  ",[6.7573e-01,-6.7363e-01,2.1214e-01,-2.1123e-01],[ 1.5239,4.9463e-01,1.5093e+00]]
]
"""
gen_bev_kdata_from_nuscenes_extrinsics(nuscenes_extrinsics_data)
with open("nuscenes_extrinsics.txt","r") as f:
    nuscenes_bev_kdata=np.array(eval(f.read()))

gen_bev_kdata_from_apollo_nuscenes_165()
with open("apollo_nuscenes_165.txt","r") as f:
    apollo_nuscenes_kdata=np.array(eval(f.read()))

main(apollo_bev_kdata,"apollo_bev_kdata")
main(nuscenes_bev_kdata,"nuscenes_bev_kdata")
main(apollo_nuscenes_kdata,"apollo_nuscenes_kdata")
EOF
\cp /opt/apollo/neo/share/modules/calibration/data/nuscenes_165/camera_params ./ -rf
python infer_camera_pos_by_extrinsics.py数学原理:
四元数 → 旋转矩阵:使用
pyquaternion库转换相机位置计算: C w o r l d = − R T ⋅ T C_{world} = -R^T \cdot T Cworld=−RT⋅T
最终得到4x4变换矩阵(包含旋转和平移)
可视化要素:坐标系:X(前/后), Y(左/右), Z(高/低)
激光雷达:原点红色标记
相机位置:不同颜色表示不同视角
相机朝向:3D箭头指示拍摄方向
四、可视化对比
参考图片
1. NuScenes数据集外参
- 特点 :
- 车辆朝向:标准前向(Y轴正方向)
- 相机布局:六相机均匀分布
- 位置对称性:左右相机位置精确对称

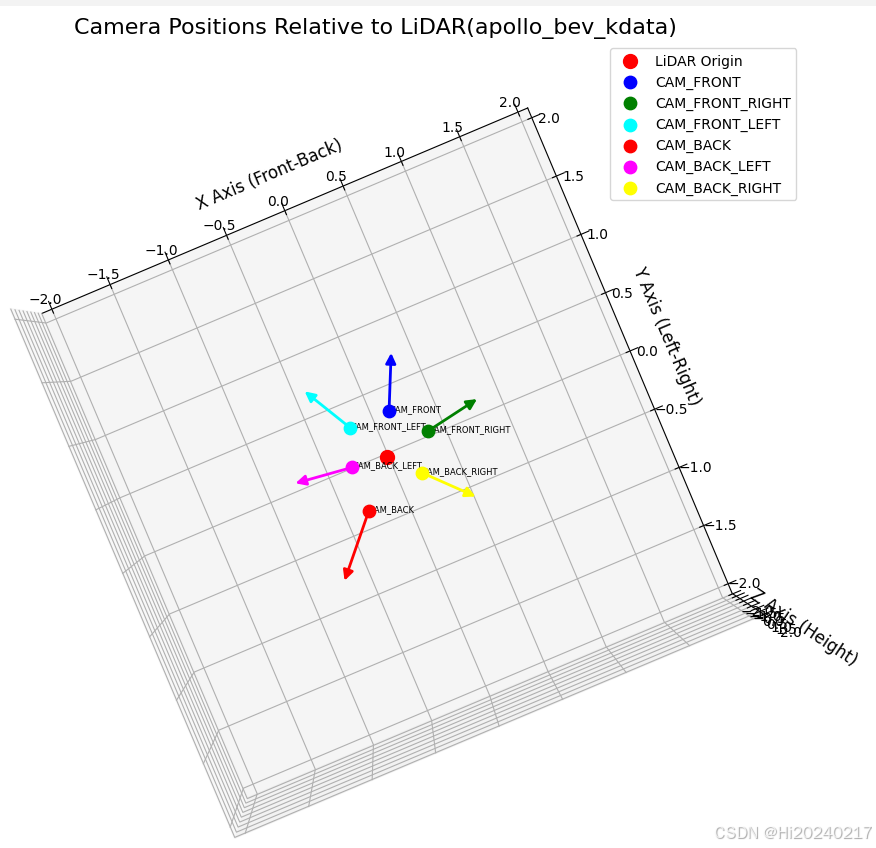
2. Apollo BEV模型外参
- 特点 :
- 车辆朝向:非标准方向(约15度偏转)
- 相机视角:六相机均匀分布
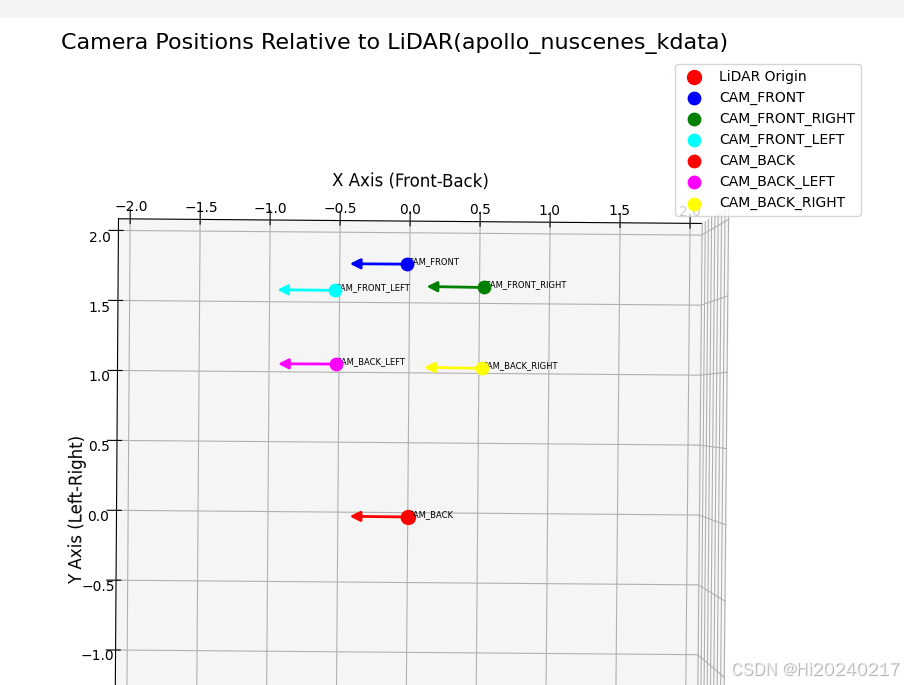
3. Apollo园区版外参
- 特点 :
- 位置正确:相机位置符合车辆布局
- 车辆朝向:朝向X轴,不合理,应该是Y轴
- 朝向错误:所有相机均朝向前方(应为各方向)
- 问题原因:可能是标定时未设置正确方向
- 实际影响:导致侧面和后方视角失效
bash
相机数据 (名称, 四元数(w,x,y,z), 位置(x,y,z))
["CAM_FRONT       ",[7.0511e-01,-1.7317e-03,-7.0910e-01,2.2896e-03],[-0.0159,1.7008e+00,1.5110e+00]],
["CAM_FRONT_RIGHT ",[6.1737e-01,3.3363e-01,-6.2890e-01,-3.3472e-01],[ 0.4934,1.5508e+00,1.4957e+00]],
["CAM_FRONT_LEFT  ",[6.2786e-01,-3.2765e-01,-6.2564e-01,3.2712e-01],[-0.4946,1.5239e+00,1.5093e+00]],
["CAM_BACK        ",[2.2658e-03,-7.0116e-01,5.7708e-04,7.1300e-01],[-0.0035,2.8326e-02,1.5791e+00]],
["CAM_BACK_LEFT   ",[4.0822e-01,-5.7804e-01,-4.1698e-01,5.7040e-01],[-0.4848,1.0357e+00,1.5910e+00]],
["CAM_BACK_RIGHT  ",[3.9507e-01,5.8460e-01,-4.0790e-01,-5.7947e-01],[ 0.4806,1.0149e+00,1.5624e+00]],
五、关键结论与应用
-
标定质量验证:
- 理想情况:相机位置对称分布,高度一致(如NuScenes数据)
- 危险信号:位置不对称、高度不一致、朝向错误
-
错误检测:
- Apollo园区版外参存在严重朝向错误
- 通过可视化可快速发现此类基础错误
通过这种可视化方法,即使非专业人员也能直观理解相机空间关系,快速发现标定中的重大错误,显著提高自动驾驶系统的可靠性。