这不最近我司设计师又给我整了点活,实现一个加载进度的动画,刚开始我还以为放两个圆圈转一下就可以了;但是设计说我们是一个3D项目,得搞点高端大气的,于是就有了这篇文章。
环境准备
首先我们还是将三维场景的四个要素准备好,这里笔者为了简化代码,使用了自己封装的工具来创建:
typescript
export default class Index {
  scene: Scene;
  camera: PerspectiveCamera;
  renderer: WebGLRenderer;
  controls: OrbitControls;
  constructor() {
    this.scene = initScene();
    this.camera = initCamera(new Vector3(60, 50, 70), 55, 0.01, 200);
    this.renderer = initRenderer({
      antialias: true,
      alpha: true
    });
    // 设置透明背景
    this.renderer.setClearColor(0x000000, 0);
    this.controls = initOrbitControls(this.camera, this.renderer, false);
  }
} 这里有一个我们可能会不太常见的函数:renderer.setClearColor,它的主要作用是用于设置渲染器的清除颜色,也就是场景中的背景色;这个函数接收两个参数,第一个是一个十六进制的颜色,默认是0x000000,即黑色;第二个参数是其透明度alpha值;我们后期可以在背景中插入一些预加载图等,因此可以通过设置这个函数的alpha为0来清除背景的颜色。
环境搭建好了,神说要有光;于是我们创建两种光,环境光和平行光:
typescript
export default class Index {
  initLight() {
    {
      // 环境光
      this.ambientLight = new AmbientLight(0xffffff, 1)
      this.ambientLight.castShadow = false
      this.scene.add(this.ambientLight)
    }

    {
      // 平行光
      this.directionalLight = new DirectionalLight(0xffffff, 1.2)
      this.directionalLight.position.set(0, 10, 0)
      this.directionalLight.castShadow = true
      this.scene.add(this.directionalLight)
    }
  }
}
接着,就需要我们最重要的物体,三个方块了,我们定义一个函数来批量地创建方块:
typescript
export default class Index {
  createCube(x: number, y: number, z: number, size: number, color: number):
  Mesh<BufferGeometry, MeshPhongMaterial>
  {
    const material = new MeshPhongMaterial({
      color,
    })
    const mesh = new Mesh(new BoxGeometry(size, size, size), material)
    mesh.castShadow = true
    mesh.receiveShadow = true
    mesh.position.set(x, y, z)
    mesh.name = "cube"

    this.scene.add(mesh)
    return mesh
  }
}
然后按照初始化的位置创建三个方块:
typescript
const SIZE = 4.8
export default class Index {
  cube1: Mesh<BufferGeometry, MeshPhongMaterial>;
  cube2: Mesh<BufferGeometry, MeshPhongMaterial>;
  cube3: Mesh<BufferGeometry, MeshPhongMaterial>;
  constructor() {
    this.cube1 = this.createCube(0, 0, 0, SIZE, 0xf0fafc)
    this.cube2 = this.createCube(0, 0, SIZE, SIZE, 0xf0fafc)
    this.cube3 = this.createCube(0 - SIZE, 0, SIZE, SIZE, 0xf0fafc)
  }
}
这里我们定义了一个全局的
SIZE变量,用于定义方块的尺寸,后续方块的位置更新也都会使用这个尺寸变量。
从代码上可能很难看出来,实际上方块按照这样的位置进行排布了:
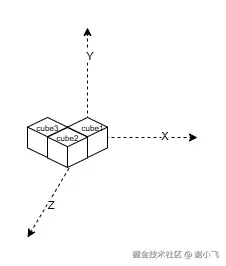
翻滚把!方块
三个方块出场了,首先我们就来看一下如何先让一个方块向前翻滚,向前翻滚其实包含了两个动作,一个是前进,一个是旋转;因此这里还是引入我们常用的GSAP库,我们让cube3先沿着-Z轴的方向运动看一下效果:
typescript
import gsap from "gsap";
export default class Index {
  constructor() {
    const tl = gsap.timeline();
    tl.to(this.cube3.position, {
      z: 0,
      duration: 1,
    })
    .to(
      this.cube3.rotation,
      {
        x: -Math.PI / 2,
        duration: 1,
      },
      "<"
    );
  }
} 上面代码中,我们创建了时间线,然后对Cube的position位置和rotation旋转角度进行了动画设置;由于两个动作是同时进行的,在这里我们使用了gsap的<参数,将rotation插入到position动画执行前,表示两个动作之间的时间间隔为0秒;我们允许代码,就能看到方块翻滚运动起来了:
但是如果每个方块运动我们都写一遍这样的代码,比较费时费力;我们发现方块不是沿着X轴运动就是沿着Z轴运动,因此我们可以将方块的移动代码封装到一个函数中去:
typescript
const DURATION = 0.8;
/**
 * 将方块移动并且旋转到指定地方
 * @param {Mesh} cube 方块
 * @param {'x' | 'z'} direction 方向,在x轴或者z轴
 * @param {number} pos 移动到的最终位置
 * @param {rotation} rotation 旋转的角度
 * @param {rotationAxes} rotationAxes 绕着哪个轴旋转
 * @returns {gsap.core.Timeline}
 */
rollCube(
  cube: Mesh,
  direction: "x" | "z",
  pos: number,
  rotation: number,
  rotationAxes: "x" | "y" | "z"
) {
  const tl = gsap.timeline();
  if (direction === "x") {
    tl.to(cube.position, {
      x: pos,
      duration: DURATION,
    }).to(
      cube.rotation,
      {
        [rotationAxes]: rotation,
        duration: DURATION,
      },
      "<"
    );
  } else if (direction === "z") {
    tl.to(cube.position, {
      z: pos,
      duration: DURATION,
    }).to(
      cube.rotation,
      {
        [rotationAxes]: rotation,
        duration: DURATION,
      },
      "<"
    );
  }
  return tl;
} 我们封装一个rollCube函数,它定义了一个timeline时间线,然后根据传入的方向、位置、旋转角度、旋转轴等参数,将方块的移动和旋转进行设置;对方块的单次运动方式实现完毕之后,那我们下面就要来看下如何让他们一起运动起来呢?我们如何将单次运动的时间线进行串起来?
这里我们使用gsap的一个小技巧:嵌套时间线;嵌套时间线的方式可以改变我们代码的组织逻辑,让我们实现各种复杂的动画逻辑,同时保持代码的简洁和可读性;那么嵌套时间线如何来做呢?
由于rollCube中定义了一个一个小的时间线,因此,我们可以在构造函数中定义一个主时间线,然后通过add方法将rollCube返回的小时间线添加到主时间线中:
typescript
export default class Index {
  mainTimeline: gsap.core.Timeline;
  constructor() {
    this.mainTimeline = gsap.timeline({ repeat: -1 });
  }
} 这里我们设置repeat: -1,表示这个主时间线会无限重复执行,这样我们对方块移动只需要进行四次,就可以实现效果了,而不需要将所有方块移动到原来的位置;下面我们就可以把每个小方块的运动添加到主时间线中:
typescript
const ROTATION_UNIT = Math.PI / 2;
export default class Index {
mainTimeline: gsap.core.Timeline;
constructor() {
this.mainTimeline.add(
this.rollCube(this.cube3, "z", 0, -ROTATION_UNIT, "x")
);
this.mainTimeline.add(
this.rollCube(this.cube2, "x", -SIZE, ROTATION_UNIT, "z")
);
this.mainTimeline.add(
this.rollCube(this.cube1, "z", SIZE, ROTATION_UNIT, "x")
);
this.mainTimeline.add(
this.rollCube(this.cube3, "x", 0, ROTATION_UNIT, "y")
);
}
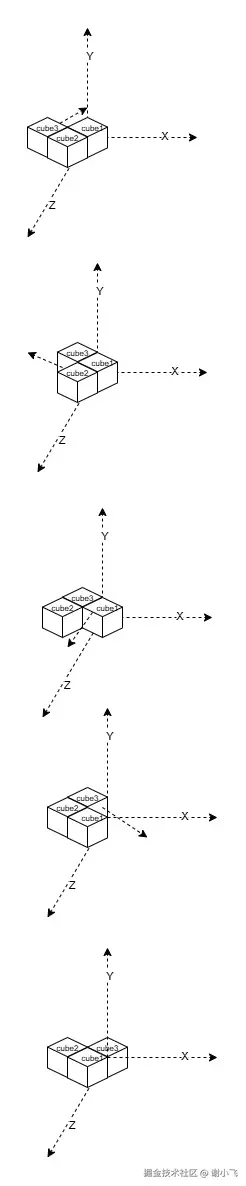
}我们通过一张图来更好的理解这个运动过程:
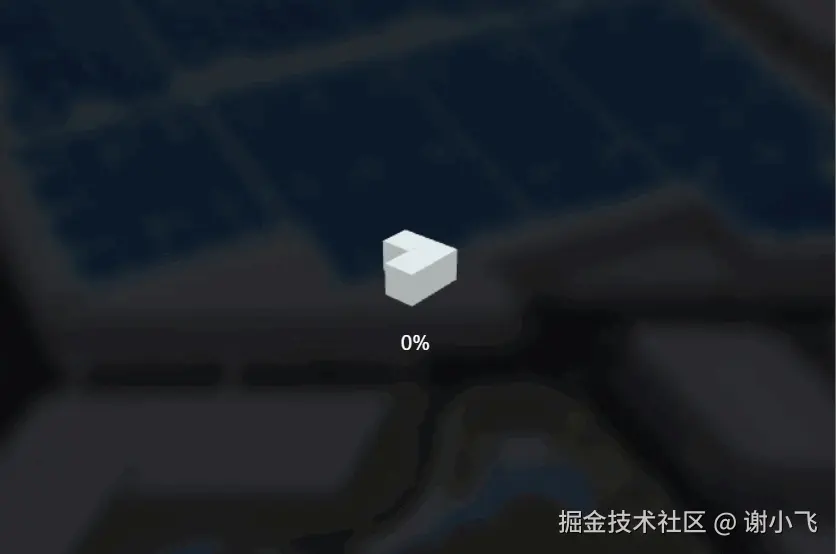
我们看下最后的实现效果:
本文所有源码敬请关注gzh【前端壹读】,后台回复关键词【3D方块加载动画】即可获取。
总结
本文我们实现了一个有趣的3D方块加载动画的效果,相比于2D加载效果,3D效果通过空间运动和旋转带来了更加丰富的视觉体验。我们学习了通过setClearColor方法设置透明背景,以及通过gsap嵌套时间线的方式将多个方块动画串联起来,形成无限循环的加载动画效果,这种3D动画的实现方式不仅代码结构清晰,而且通过空间运动为加载效果增添了更多趣味性。